La pagina si sta caricando...

PCM
MANUALE TECNICO
Condensatori ad aria con motoventilatori centrifughi
BETRIEBSANLEITUNG
Luftverflüssiger mit Radialventilatoren
TECHNICAL MANUAL
Air cooled condensers with centrifugal fan motors
MANUALE TECNICO
Condensadores de aire con ventiladores centrífugos
MANUEL TECHNIQUE
Condenseur à air avec motoventilateurs axiaux
ТЕХНИЧЕСКОЕ РУКОВОДСТВО
Конденсаторы с воздушным охлаждением с центробежными
электровентиляторами


Indice
-
Avvertenze - Sicurezza . . . . . . . . . . . . . . . . . . . . . . . . . . . . . . . . . . . . . . . . . . . . . . . . . . .2
-
Campo di impiego - caratteristiche . . . . . . . . . . . . . . . . . . . . . . . . . . . . . . .2
-
Caratteristiche dimensionali . . . . . . . . . . . . . . . . . . . . . . . . . . . . . . . . . . . . . . . . . . .2
-
Ispezione - Trasporto - Stoccaggio . . . . . . . . . . . . . . . . . . . . . . . . . . . . . . . . . .2
-
Posizione del modello . . . . . . . . . . . . . . . . . . . . . . . . . . . . . . . . . . . . . . . . . . . . . . . . . . . .2
-
Prestazioni . . . . . . . . . . . . . . . . . . . . . . . . . . . . . . . . . . . . . . . . . . . . . . . . . . . . . . . . . . . . . . . . . . . .3
-
Sollevamento . . . . . . . . . . . . . . . . . . . . . . . . . . . . . . . . . . . . . . . . . . . . . . . . . . . . . . . . . . . . . . .4
-
Installazione - Fissaggi kit di sostegno . . . . . . . . . . . . . . . . . . . . . . . . . . . . . .4
-
Installazione - Canalizzazioni . . . . . . . . . . . . . . . . . . . . . . . . . . . . . . . . . . . . . . . . . .4
-
Installazione - Collegamenti elettrici . . . . . . . . . . . . . . . . . . . . . . . . . . . . . . .4
-
Installazione - Collegamenti allo scambiatore . . . . . . . . . . . . . . . . .5
-
Verifiche prima dell’avviamento . . . . . . . . . . . . . . . . . . . . . . . . . . . . . . . . . . . .5
-
Avviamento . . . . . . . . . . . . . . . . . . . . . . . . . . . . . . . . . . . . . . . . . . . . . . . . . . . . . . . . . . . . . . . . . .5
-
Modifiche della posizione della mandata dell’aria . . . . . . . . . .5
-
Schema di collegamento dei motoventilatori . . . . . . . . . . . . . . . . .6
-
Manutenzione . . . . . . . . . . . . . . . . . . . . . . . . . . . . . . . . . . . . . . . . . . . . . . . . . . . . . . . . . . . . . .7
-
Raccomandazioni finali . . . . . . . . . . . . . . . . . . . . . . . . . . . . . . . . . . . . . . . . . . . . . . . . .7
-
Ricerca dei guasti . . . . . . . . . . . . . . . . . . . . . . . . . . . . . . . . . . . . . . . . . . . . . . . . . . . . . . . . .7
Index
-
Anweisungen - Sicherheit . . . . . . . . . . . . . . . . . . . . . . . . . . . . . . . . . . . . . . . . . . . . . .8
-
Anwendung - Eigenschaften . . . . . . . . . . . . . . . . . . . . . . . . . . . . . . . . . . . . . . . . .8
-
Abmessungen . . . . . . . . . . . . . . . . . . . . . . . . . . . . . . . . . . . . . . . . . . . . . . . . . . . . . . . . . . . . . . .8
-
Kontrolle - Transport - Lagerung . . . . . . . . . . . . . . . . . . . . . . . . . . . . . . . . . . . . . .8
-
Modellaufstellung . . . . . . . . . . . . . . . . . . . . . . . . . . . . . . . . . . . . . . . . . . . . . . . . . . . . . . . . .8
-
Leistungen . . . . . . . . . . . . . . . . . . . . . . . . . . . . . . . . . . . . . . . . . . . . . . . . . . . . . . . . . . . . . . . . . . . .9
-
Heben . . . . . . . . . . . . . . . . . . . . . . . . . . . . . . . . . . . . . . . . . . . . . . . . . . . . . . . . . . . . . . . . . . . . . . . .10
-
Installation - Zusammenbausätze Füße . . . . . . . . . . . . . . . . . . . . . . . . . .10
-
Installation - Kanaleinsatz . . . . . . . . . . . . . . . . . . . . . . . . . . . . . . . . . . . . . . . . . . . . .10
-
Installation - elektrische Anschlüsse . . . . . . . . . . . . . . . . . . . . . . . . . . . . . . .10
-
Installation - Anschluss an den Wärmeaustauscher . . . . . . . .11
-
Kontrollen vor der Inbetriebnahme . . . . . . . . . . . . . . . . . . . . . . . . . . . . . . .11
-
Inbetriebnahme . . . . . . . . . . . . . . . . . . . . . . . . . . . . . . . . . . . . . . . . . . . . . . . . . . . . . . . . .11
-
Änderung der Ausblasstellung . . . . . . . . . . . . . . . . . . . . . . . . . . . . . . . . . . . . . .11
-
Elektrische Anschlüsse der Motorventilatoren . . . . . . . . . . . . . . . .12
-
Wartung . . . . . . . . . . . . . . . . . . . . . . . . . . . . . . . . . . . . . . . . . . . . . . . . . . . . . . . . . . . . . . . . . . . . .13
-
Zusätzliche Empfehlungen . . . . . . . . . . . . . . . . . . . . . . . . . . . . . . . . . . . . . . . . . . .13
-
Untersuchung von Defekten . . . . . . . . . . . . . . . . . . . . . . . . . . . . . . . . . . . . . . . . .13
Index
-
Safety Instructions . . . . . . . . . . . . . . . . . . . . . . . . . . . . . . . . . . . . . . . . . . . . . . . . . . . . . . . .14
-
Application field - features . . . . . . . . . . . . . . . . . . . . . . . . . . . . . . . . . . . . . . . . . . .14
-
Dimensional features . . . . . . . . . . . . . . . . . . . . . . . . . . . . . . . . . . . . . . . . . . . . . . . . . . .14
-
Inspection - Transport - Storage . . . . . . . . . . . . . . . . . . . . . . . . . . . . . . . . . . . .14
-
Model Layout . . . . . . . . . . . . . . . . . . . . . . . . . . . . . . . . . . . . . . . . . . . . . . . . . . . . . . . . . . . . .14
-
Performance . . . . . . . . . . . . . . . . . . . . . . . . . . . . . . . . . . . . . . . . . . . . . . . . . . . . . . . . . . . . . .15
-
Unit handling - Lifting . . . . . . . . . . . . . . . . . . . . . . . . . . . . . . . . . . . . . . . . . . . . . . . . . . .16
-
Installation - Fitting of support kits . . . . . . . . . . . . . . . . . . . . . . . . . . . . . . . . .16
-
Installation - Ducting . . . . . . . . . . . . . . . . . . . . . . . . . . . . . . . . . . . . . . . . . . . . . . . . . . . .16
-
Installation - Electric connections . . . . . . . . . . . . . . . . . . . . . . . . . . . . . . . . . .16
-
Installation - Connections to heat exchanger . . . . . . . . . . . . . . . .17
-
Check before start-up . . . . . . . . . . . . . . . . . . . . . . . . . . . . . . . . . . . . . . . . . . . . . . . . .17
-
Start-up . . . . . . . . . . . . . . . . . . . . . . . . . . . . . . . . . . . . . . . . . . . . . . . . . . . . . . . . . . . . . . . . . . . . . .17
-
Modification of the air throw position . . . . . . . . . . . . . . . . . . . . . . . . . . . .17
-
Fan motors connection scheme . . . . . . . . . . . . . . . . . . . . . . . . . . . . . . . . . . .18
-
Maintenance . . . . . . . . . . . . . . . . . . . . . . . . . . . . . . . . . . . . . . . . . . . . . . . . . . . . . . . . . . . . . .19
-
Final Recommendations . . . . . . . . . . . . . . . . . . . . . . . . . . . . . . . . . . . . . . . . . . . . . .19
-
Understanding malfunctions . . . . . . . . . . . . . . . . . . . . . . . . . . . . . . . . . . . . . . . .19
Indice
-
Important - sûreté . . . . . . . . . . . . . . . . . . . . . . . . . . . . . . . . . . . . . . . . . . . . . . . . . . . . . . . .20
-
Champ d'emploi - Caractéristiques . . . . . . . . . . . . . . . . . . . . . . . . . . . . . .20
-
Caractéristiques dimensionelles . . . . . . . . . . . . . . . . . . . . . . . . . . . . . . . . . . . .20
-
Inspection - Transport - Stockage . . . . . . . . . . . . . . . . . . . . . . . . . . . . . . . . . .20
-
Position du modèle . . . . . . . . . . . . . . . . . . . . . . . . . . . . . . . . . . . . . . . . . . . . . . . . . . . . . .20
-
Prestations . . . . . . . . . . . . . . . . . . . . . . . . . . . . . . . . . . . . . . . . . . . . . . . . . . . . . . . . . . . . . . . . . .21
-
Levage . . . . . . . . . . . . . . . . . . . . . . . . . . . . . . . . . . . . . . . . . . . . . . . . . . . . . . . . . . . . . . . . . . . . . . .22
-
Installation - Fixage des Kits de soutien . . . . . . . . . . . . . . . . . . . . . . . . . .22
-
Installation - Canalisations . . . . . . . . . . . . . . . . . . . . . . . . . . . . . . . . . . . . . . . . . . . .22
-
Installation - Branchements électriques . . . . . . . . . . . . . . . . . . . . . . . . .22
-
Installation - Branchements à l'échangeur . . . . . . . . . . . . . . . . . . . .23
-
Vérifications avant la mise en route . . . . . . . . . . . . . . . . . . . . . . . . . . . . . .23
-
Mise en route . . . . . . . . . . . . . . . . . . . . . . . . . . . . . . . . . . . . . . . . . . . . . . . . . . . . . . . . . . . . . .23
-
Modification de la position du refoulement de l'air . . . . . . . .23
-
Schéma de connexion motoventilateurs . . . . . . . . . . . . . . . . . . . . . .24
-
Entretien . . . . . . . . . . . . . . . . . . . . . . . . . . . . . . . . . . . . . . . . . . . . . . . . . . . . . . . . . . . . . . . . . . . . .25
-
Recommandations finales . . . . . . . . . . . . . . . . . . . . . . . . . . . . . . . . . . . . . . . . . . .26
-
Problèmes . . . . . . . . . . . . . . . . . . . . . . . . . . . . . . . . . . . . . . . . . . . . . . . . . . . . . . . . . . . . . . . . . . .27
Indice
-
Advertencias - Seguridad . . . . . . . . . . . . . . . . . . . . . . . . . . . . . . . . . . . . . . . . . . . .26
-
Campo de utilización - Características . . . . . . . . . . . . . . . . . . . . . . . . .26
-
Características dimensiónales . . . . . . . . . . . . . . . . . . . . . . . . . . . . . . . . . . . . . .26
-
Inspección - Transporte - Almacenaje . . . . . . . . . . . . . . . . . . . . . . . . . . .26
-
Posición del modelo . . . . . . . . . . . . . . . . . . . . . . . . . . . . . . . . . . . . . . . . . . . . . . . . . . . .26
-
Prestaciones . . . . . . . . . . . . . . . . . . . . . . . . . . . . . . . . . . . . . . . . . . . . . . . . . . . . . . . . . . . . . . .27
-
Levantamiento . . . . . . . . . . . . . . . . . . . . . . . . . . . . . . . . . . . . . . . . . . . . . . . . . . . . . . . . . . .28
-
Instalación - Fijación Kit de soporte . . . . . . . . . . . . . . . . . . . . . . . . . . . . . . .28
-
Instalación - Canalizaciones . . . . . . . . . . . . . . . . . . . . . . . . . . . . . . . . . . . . . . . .28
-
Instalación - Conexiones eléctricas . . . . . . . . . . . . . . . . . . . . . . . . . . . . . .28
-
Instalación - Conexión a la batería . . . . . . . . . . . . . . . . . . . . . . . . . . . . . . .29
-
Verificaciones antes de la puesta en marcha . . . . . . . . . . . . . . .29
-
Puesta en marcha . . . . . . . . . . . . . . . . . . . . . . . . . . . . . . . . . . . . . . . . . . . . . . . . . . . . . . .29
-
Modificación de la posición del caudal del aire . . . . . . . . . . .29
-
Esquema de conexión de los ventiladores . . . . . . . . . . . . . . . . . . . .30
-
Mantenimiento . . . . . . . . . . . . . . . . . . . . . . . . . . . . . . . . . . . . . . . . . . . . . . . . . . . . . . . . . . .31
-
Recomendaciones finales . . . . . . . . . . . . . . . . . . . . . . . . . . . . . . . . . . . . . . . . . . .31
-
Busca de averías . . . . . . . . . . . . . . . . . . . . . . . . . . . . . . . . . . . . . . . . . . . . . . . . . . . . . . . .31
Указатель
-
Меры предосторожности - Безопасность . . . . . . . . . . . . . . . . . . . . . . .32
-
Область применения - Характеристики . . . . . . . . . . . . . . . . . . . . . . . . .32
-
Габаритные характеристики . . . . . . . . . . . . . . . . . . . . . . . . . . . . . . . . . . . . . . . . .32
-
Осмотр - Транспортировка - Хранение . . . . . . . . . . . . . . . . . . . . . . . . . .32
-
Расположение аппарата . . . . . . . . . . . . . . . . . . . . . . . . . . . . . . . . . . . . . . . . . . . . . .32
-
Рабочие характеристики . . . . . . . . . . . . . . . . . . . . . . . . . . . . . . . . . . . . . . . . . . . . . .33
-
Поднятие . . . . . . . . . . . . . . . . . . . . . . . . . . . . . . . . . . . . . . . . . . . . . . . . . . . . . . . . . . . . . . . . . . . .34
-
Установка - Крепление комплекта опор . . . . . . . . . . . . . . . . . . . . . . . .34
-
Установка в канал . . . . . . . . . . . . . . . . . . . . . . . . . . . . . . . . . . . . . . . . . . . . . . . . . . . . . . .34
-
Установка - Электрические соединения . . . . . . . . . . . . . . . . . . . . . . . .34
-
Установка - Подключение к теплообменнику . . . . . . . . . . . . . . . .35
-
Проверки перед запуском . . . . . . . . . . . . . . . . . . . . . . . . . . . . . . . . . . . . . . . . . . . .35
-
Запуск . . . . . . . . . . . . . . . . . . . . . . . . . . . . . . . . . . . . . . . . . . . . . . . . . . . . . . . . . . . . . . . . . . . . . . . .35
-
Изменение направления нагнетания воздуха . . . . . . . . . . . . . . . . .35
-
Схема подключения электровентиляторов . . . . . . . . . . . . . . . . . . . .36
-
Техобслуживание . . . . . . . . . . . . . . . . . . . . . . . . . . . . . . . . . . . . . . . . . . . . . . . . . . . . . . . .37
-
Заключительные рекомендации . . . . . . . . . . . . . . . . . . . . . . . . . . . . . . . . . . .37
-
Поиск неисправностей . . . . . . . . . . . . . . . . . . . . . . . . . . . . . . . . . . . . . . . . . . . . . . . . .37
PCM
Index

2
www.modine.com
Avvertenze - Sicurezza
1. Conservare questo manuale tecnico per tutto il periodo di vita
del modello, fino allo smaltimento finale.
2. Leggere con estrema attenzione tutto il manuale prima dell’in-
stallazione e prima di qualsiasi operazione sul modello.
3. L’installazione e la manutenzione di apparecchiature per la refri-
gerazione e climatizzazione possono risultare pericolose a
causa delle pressioni in gioco e delle apparecchiature elettriche
che si trovano all’interno. Il modello deve essere installato, avvia-
to e mantenuto esclusivamente da personale addestrato e quali-
ficato alla conduzione dell’impianto, secondo le Norme Vigenti.
4. Ogni dettame delle Normative di Sicurezza deve sempre
essere seguito scrupolosamente. Indossare sempre guanti ed
occhiali di sicurezza. Fare attenzione a non ustionarsi durante
l’esecuzione di eventuali saldature.
5. Per identificare la macchina (modello e numero di serie), in
caso di richiesta di assistenza o di ricambi, leggere la targhet-
ta di identificazione posta esternamente all’unità.
6. Durante il funzionamento, alcune parti dell’unità (es. attacchi
del refrigerante) possono superare la temperatura di 70° C;
solo personale esperto e qualificato può accedere alle suddet-
te parti, che comunque sono parzialmente protette da pannelli
di chiusura.
Attenzione: questo manuale è suscettibile di modifiche; per-
tanto, ai fini di una completa ed aggiornata informazione, l’u-
tente dovrà consultare il manuale a bordo della macchina.
Campo di impiego - caratteristiche
Descrizione del modello:
CONDENSATORE AD ARIA CON MOTOVENTILATORI CEN-
TRIFUGHI ADATTO A CONDENSARE FLUIDI REFRIGERANTI
IN IMPIANTI A COMPRESSIONE DI VAPORE.
1. Il modello va impiegato esclusivamente per lo scopo per cui è
stato progettato: l’uso improprio esonera il costruttore da qual-
siasi responsabilità.
2. Il modello non deve essere impiegato con fluidi refrigeranti
non compatibili con il materiale usato per la costruzione dello
scambiatore (es. ammoniaca).
3. Il modello non può essere impiegato a temperature di condensa-
zione del refrigerante superiori a 60 °C (50 °C per i modelli “A”).
4. La pressione massima di collaudo dello scambiatore è di 30 bar.
5. Il fabbricante dichiara che il modello è conforme alle condizio-
ni della direttiva 73/23 CE modificata.
6. Il modello viene fornito con scambiatore di calore con attacchi
sigillati rispondente alla normativa di pulizia interna DIN 8964,
con carica di aria secca a 2 bar e con due attacchi di pressio-
ne da 1/4” SAE.
7. Il grado di protezione minimo del modello è IP 44.
Ispezione - Trasporto - Stoccaggio
1. Al ricevimento del modello controllare immediatamente il suo
stato; contestare subito alla compagnia di trasporto qualsiasi
eventuale danno o mancanza.
2. Durante il trasporto evitare di esercitare pressioni improprie
sull’imballaggio, che va mantenuto comunque sempre nella
posizione indicata sullo stesso.
3. Disimballare il modello il più vicino possibile al luogo di instal-
lazione. Una volta disimballato, evitare urti ai componenti.
4. Durante la movimentazione e l’installazione del modello utiliz-
zare appositi guanti protettivi e comunque tutte le opportune
misure per evitare di ferirsi con le parti taglienti (es. alette) del
modello.
5. Il modello deve essere immagazzinato nel suo imballo d’origi-
ne in un locale temperato e non esposto alle intemperie.
6. Il modello non deve essere usato come base di appoggio di
altri modelli o altri materiali.
Posizione del modello
1. La base d’appoggio deve essere robusta quanto basta a reg-
gere il peso del modello in ordine di marcia.
2. Tutto attorno al modello sia a disposizione uno spazio suffi-
ciente alla circolazione dell’aria ed alla manutenzione (min.
600 mm).
3. Nella posizione di installazione non devono essere presenti
corpi estranei e/o polvere che possano essere aspirati e di
conseguenza possano ostruire la batteria.
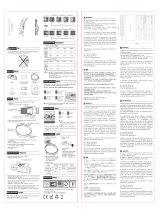
C
A
B
inlet
outlet
F
A
D E
N
P
HG
C
C + L
L
inlet
M
outlet
Q
R
Z
ST
Modello PCM M1A M1B M1C M1D M1G M1E M1F M2A M2B M2C M2D M2G M2E M2F M3C M3D M3G M3E M3F M4E M4F
Dimensioni A 590 590 760 760 760 1110 1110 1020 1020 1360 1360 1360 2060 2060 1960 1960 1960 3010 3010 3960 3960
mm B 1150 1150 1300 1300 1300 1300 1300 1150 1150 1300 1300 1300 1300 1300 1300 1300 1300 1300 1300 1300 1300
C 490 490 815 815 815 815 815 490 490 815 815 815 815 815 815 815 815 815 815 815 815
D 465 465 610 610 610 970 970 465 465 1210 120 120 1920 1920 1810 1810 1810 2870 2870 3820 3820
E 430 430 755 755 755 755 755 430 430 755 755 755 755 755 755 755 755 755 755 755 755
F--------------645 645 645 995 995 1945 1945
G 450 450 450 450 450 450 450 450 450 450 450 450 450 450 450 450 450 450 450 450 450
H 700 700 850 850 850 850 850 700 700 850 850 850 850 850 850 850 850 850 850 850 850
L 30 30 30 30 30 30 30 30 30 30 30 30 30 30 30 30 30 30 30 30 30
M 760 760 910 910 910 910 910 760 760 910 910 910 910 910 910 910 910 910 910 910 910
N 800 800 950 950 950 950 950 800 800 950 950 950 950 950 950 950 950 950 950 950 950
P 268 268 296 296 349 349 349 268 268 296 296 349 349 349 296 296 349 349 349 349 349
Q 305 305 336 336 399 399 399 305 305 336 336 399 399 399 336 336 399 399 399 399 399
R---------730 730 730 1065 1065 730 730 730 1065 1065 1065 1065
S--------------600 600 600 950 950 950 950
T---------590 590 590 945 945 590 590 590 945 945 945 945
Z 550 550 720 720 720 1060 1060 980 980 1320 1320 1320 2010 2010 1920 1920 1920 2960 2960 3910 3910
Caratteristiche dimensionali

3
www.modine.com
Italiano
Prestazioni
Modello Motoventilatori (tensione e Watt a 50 Hz) Portata Pressione Capacità Superficie Superficie Volume Attacchi Peso
aria aggiunta interna esterna interno netto
M1A 1 9/9 - 35 66 2690 0 7030 1,0 9,7 1,5 22 16 48
550W 2640 5 6950
2560 10 6830
2375 15 6550
M1B 1 9/9 - 35 66 2560 0 9970 1,9 19,4 3,0 22 16 52
550W 2370 5 9420
2280 10 9150
2090 15 8570
M1C 1 10/10 - 37 68 4160 0 12230 2,5 21,5 3,8 22 16 80
525W 36 67 3860 5 11670
35 66 3520 10 11000
34 65 3090 15 10090
M1D 1 10/10 - 37 68 3930 0 16340 4,2 42,2 6,4 28 22 87
525W 36 67 3580 5 15190
35 66 3230 10 13980
34 65 2530 15 11410
M1E 1-12/12 46 77 7590 0 30630 4,8 81,0 9,6 35 28 110
1380W 45 76 7040 5 28980
44 75 6560 10 27490
43 74 5960 15 25530
M1F 1-12/12 46 77 7170 0 32950 7,2 121,5 14,4 35 28 123
1380W 45 76 6880 5 31000
44 75 6190 10 29000
43 74 5710 15 26990
M1G 1 - 12/12 46 77 6680 0 24100 5,7 42,2 6,4 28 22 98
1380W 45 76 6315 5 23200
44 75 5830 10 21950
43 74 4060 15 16850
M2A 2 9/9 - 38 69 5380 0 14110 2,6 19,4 3,0 22 16 75
550W 5280 5 13970
5120 10 13740
4750 15 13160
M2B 2 9/9 - 38 69 5120 0 19980 5,2 38,8 6,0 28 22 83
550W 4740 5 18870
4560 10 18340
4180 15 17170
M2C 2 10/10 - 39 71 8320 0 24540 6,8 43,0 7,6 28 22 121
525W 38 70 7720 5 23420
37 69 7040 10 22050
36 68 6180 15 20200
M2D 2 10/10 - 39 71 7860 0 32710 11,3 84,4 12,8 35 28 135
525W 38 70 7160 5 30380
37 69 6460 10 27960
36 68 5060 15 22780
M2E 2-12/12 48 80 15180 0 61370 9,6 162,0 19,2 42 35 188
1380W 47 79 14080 5 57990
46 78 13120 10 54950
45 77 11920 15 51010
M2F 2-12/12 48 80 14340 0 65960 14,3 243,0 28,8 42 35 208
1380W 47 79 13360 5 62040
46 78 12380 10 58030
45 77 11420 15 56120
M2G 2 - 12/12 48 80 13360 0 48200 11,3 84,4 12,8 35 28 157
1380W 47 79 12630 5 46400
46 78 11660 10 43900
45 77 8120 15 33700
M3C 3 10/10 - 41 73 12480 0 36780 10,2 64,5 11,4 35 28 162
525W 40 72 11580 5 35100
39 71 10560 10 33030
38 70 9270 15 30290
M3D 3 10/10 - 41 73 11790 0 49050 17,0 126,6 19,2 35 28 183
525W 40 72 10740 5 45620
39 71 9690 10 42010
38 70 7590 15 34270
M3E 3-12/12 50 82 22770 0 92180 14,3 243,0 28,8 42 35 266
1380W 49 81 21120 5 87160
48 80 19680 10 82580
47 79 17880 15 76640
M3F 3-12/12 50 82 21510 0 98860 21,5 364,5 43,2 54 42 293
1380W 49 81 20040 5 92980
48 80 18570 10 86960
47 79 17130 15 80950
M3G 3 - 12/12 50 82 20040 0 72300 17,0 126,6 19,2 35 28 216
1380W 49 81 18945 5 69600
48 80 17490 10 65850
47 79 12180 15 50550
M4E 4-12/12 51 83 30360 0 122810 19,1 324,0 38,4 54 42 344
1380W 50 82 28160 5 116060
49 81 26240 10 110030
48 80 23840 15 102080
M4F 4-12/12 51 83 28680 0 132000 28,7 486,0 57,6 54 42 378
13800W 50 82 26720 5 124250
49 81 24760 10 116210
48 80 22840 15 108130
N. 230V/1/50Hz 230-400V/3/50Hz LPA 10m LwA m
3
/h mm Wm
2
m
2
l In (mm) Out (mm) kg
dB(A) dB(A)

4
www.modine.com
4. La posizione di installazione non deve essere soggetta ad
allagamenti.
5. La posizione d’installazione deve avere caratteristiche confor-
mi a quanto eventualmente prescritto dalla Normativa Locale.
6. Devono essere previsti degli ammortizzatori per prevenire la
trasmissione del rumore.
7. Il modello deve essere saldamente ancorato alla base d’ap-
poggio (vedi punti di fissaggio su tabelle dimensionali).
8. Questo modello non può essere installato in atmosfera esplo-
siva, acida, o comunque aggressiva e non compatibile con i
materiali usati per la costruzione dell’apparecchio.
9. Collocare sempre l’unità condensante in modo che il gas refri-
gerante entri dall’alto ed il liquido esca dal basso.
10.La massima temperatura dell’aria in aspirazione non deve
superare i 43 °C.
11. La minima temperatura dell’aria attraverso i motoventilatori
non deve essere inferiore a –20 °C.
12.Il modello può essere installato all’esterno a all’interno: nel caso
di installazione all’interno, in locali chiusi, è tassativo prevedere
una opportuna ripresa dell’aria (Tabella “Prestazioni”).
Tutti i modelli sono progettati per installazioni canalizzate. Il
fabbircante non si assume responsabilità alcuna sulle presta-
zioni e la sicurezza di modelli impiegati senza canalizzazioni.
In caso di utilizzo senza canali, comunque l’installatore dovrà
installare sulla bocca di mandata dell’aria una griglia di prote-
zione rispondente alle Normative di Sicurezza Locali.
Sollevamento
1. Per la movimentazione, tutti i modelli vengono forniti completi
di pallet di appoggio e sollevamento dal suolo, in posizione
con flusso d’aria verticale e mandata dell’aria superiore. La
movimentazione deve essere eseguita per mezzo di carrello
elevatore di portata adeguata al peso dell’apparecchio, da
personale esperto ed abilitato secondo la Normativa Locale.
Accertarsi che le staffe del carrello appoggino in maniera sta-
bile e ben bilanciata al modello, sia in profondità che in lun-
ghezza. Occorre evitare anche ogni movimento brusco.
Un grosso urto o una forte spinta laterale possono capo-
volgere il modello.
Per il sollevamento, tutti i modelli sono provvisti di ganci di sol-
levamento. Al fine di evitare danni durante le operazioni di sol-
levamento è necessario l’uso di una trave distributrice collega-
ta a tutti i ganci disponibili come indicato nel disegno.
2. Per prevenire danni da movimentazione occorre non togliere
l’imballaggio prima che il modello abbia raggiunto il luogo in
cui deve essere installato.
3. Durante le fasi di sollevamento non inclinare in ogni direzione
il modello.
Installazione - Fissaggi kit di sostegno
1. Fissare gli eventuali kit di sostegno al modello utilizzando le viti
fornite in dotazione, seguendo le indicazioni fornite sugli stessi.
2. Durante il fissaggio dei kit di sostegno accertarsi che il modello
sia saldamente fissato ad un organo di sollevamento adeguato
al peso dello stesso.
Installazione - Canalizzazioni
Le dimensioni dei canali devono essere determinate in funzione
della portata d’aria che vi deve transitare e della corrispondente
pressione statica messa a disposizione dal ventilatore del model-
lo. Si rammenta che, per un funzionamento ottimale, la lun-
ghezza minima del canale applicato dovrebbe essere almeno
1,5 volte il diametro corrispondente della bocca di mandata
del ventilatore.
Le tabelle delle prestazioni riportano la portata d’aria in funzione
della perdita di carico statica applicata per ciascun modello.
È comunque indispensabile seguire le seguenti raccoman-
dazioni:
1. Indipendentemente dal tipo di canale che viene usato, il mate-
riale di costruzione non deve essere infiammabile, né deve
dare luogo allo sviluppo di gas tossici in caso di incendio. Le
superfici interne dei canali devono essere lisce e non devono
contaminare in alcun modo l’aria in transito. Raccomandiamo
comunque l’uso di canali in lamiera adeguatamente isolati per
evitare condensazioni e dispersioni di calore.
2. È raccomandabile collegare il modello alle condotte dell’aria
interponendo dei giunti flessibili in modo da assorbire le vibra-
zioni, prevenire la generazione di rumori nei canali, e permet-
tere l’accesso all’apparecchio.
3. Le curve in prossimità del modello dovrebbero essere evitate
per quanto è possibile. Se nonostante tutto non si riuscisse ad
evitarne l’installazione, occorre almeno fare in modo che
abbiano il più ampio raggio di curvatura possibile e prevedere
dei deflettori all’interno quando il canale sia di ampie dimen-
sioni.
Installazione - Collegamenti elettrici
1. Gli allacciamenti esterni devono essere eseguiti in osservanza
ai dettami della Normativa Locale. Il costruttore declina ogni
responsabilità per allacciamenti non conformi.
2. Prestare speciale attenzione durante le fasi di connessione
del collegamento a terra del modello. Il perno per il collega-
mento a terra si trova sulla testata del modello dal lato attacchi
refrigerante (Caratteristiche dimensionali).
3. Il funzionamento del modello con tensioni e/o frequenze di ali-
mentazione non adatte costituisce un’inosservanza che provo-
ca il decadimento automatico di ogni forma di garanzia eroga-
ta dal fabbricante
Attenzione
Prima di movimentare il modello occorre accertarsi che tutti i
pannelli siano fissati saldamente. Il modello deve essere solle-
vato ed appoggiato delicatamente.
Attenzione
Il sollevamento deve essere eseguito inserendo dei distanziali
tra le funi ed il modello per prevenire danni alle pannellature
dello stesso.
Attenzione
Aprire il sezionatore generale prima di effettuare ogni opera-
zione di manutenzione sull’apparecchio. Le folgorazioni pos-
sono causare gravi danni fisici.
Attenzione
Il dimensionamento di tutta la rete di canalizzazioni e l’intero
lavoro di progettazione devono essere eseguiti da un profes-
sionista esperto.

5
www.modine.com
Italiano
4. I termocontatti (TK o TP) sono elementi di azionamento dipen-
denti dalla temperatura che vengono inseriti, isolati, negli
avvolgimenti dei motoventilatori; essi aprono un contatto elet-
trico quando viene superata la temperatura permanente mas-
sima ammissibile. Per quanto riguarda i motori trifase i termo-
contatti devono essere collegati ai circuiti di comando dei
contattori della linea di alimentazione generale, mentre per i
motori monofase i termocontatti devono essere collegati in
serie al circuito di alimentazione, in tal modo si avrà una rein-
serzione automatica.
IMPORTANTE: L’adeguatezza della tensione di alimentazione
(posizione dell’ingresso dei cavi, sezione dei conduttori,
dispositivi di protezione, ecc.) deve essere verificata consul-
tando la tabella dei dati elettrici, le avvertenze e schemi elet-
trici forniti dal costruttore di motoventilatori, oltre che tenen-
do presente tutte le Normative Locali o Nazionali che in qual-
che modo possano riguardare l’installazione di
apparecchiature per la refrigerazione e/o la climatizzazione.
Seguire rigorosamente gli schemi elettrici riportati sui moto-
ventilatori per evitarne il danneggiamento. Prima di utilizzare
sistemi di regolazione del numero di giri dei motoventilatori
verificarne la compatibilità con gli stessi; sistemi non com-
patibili possono generare rumorosità e danneggiamenti; il
costruttore. non si assume responsabilità alcuna sulle pre-
stazioni dei modelli equipaggiati con sistemi di regolazione.
Installazione
collegamenti allo scambiatore
1. Dimensionare adeguatamente le tubazioni in modo da ottene-
re una minima caduta di pressione e dei valori di velocità del
refrigerante che garantiscano il trascinamento dell’olio.
2. Installare sulla linea di mandata, tra il compressore ed il con-
densatore, sia il dispositivo antivibrante che il silenziatore,
anche in caso di non eccessiva rumorosità delle valvole di
scarico del compressore.
3. Per eseguire i collegamenti all’impianto frigorifero, utilizzare
sempre tubo di rame speciale per refrigerazione
opportunamente disossidato e disidratato.
4. Per le brasature utilizzare sempre leghe saldanti all’argento in
atmosfera di azoto per prevenire formazioni di scorie.
5. Effettuare il vuoto nel circuito refrigerante e mantenerlo per
almeno 2 ore.
6. Al termine della fase di carica del refrigerante, verificare che
non vi siano fughe.
7. Evitare assolutamente di invertire i collettori di ingresso (dia-
metro maggiore) con quelli di uscita (diametro inferiore) del
refrigerante.
Attenzione
L’installatore deve prevedere un interruttore sezionatore e
dispositivi di protezione imposti dalla legislazione in materia.
Attenzione
Una installazione non corretta può influenzare notevolmente il
livello di rumorosità del condensatore.
Verifiche prima dell’avviamento
1. Serraggio di tutti i collegamenti elettrici.
2. Correttezza del livellamento e solidità dell’appoggio del modello.
3. Fissaggio dei pannelli, dei condotti e serraggio delle relative
viti di fissaggio.
4. Disponibilità e sufficienza degli spazi di manutenzione.
5. Verifica della corrispondenza della tensione d’alimentazione ai
dati di targa.
6. Verificare che la girante dei motoventilatori ruoti liberamente.
7. Verificare che non vi siano perdite di refrigerante.
8. Tutti i modelli sono provvisti di film plastico di protezione in
polietilene (LDPE) delle parti di carrozzeria esterna. Tale film
va rimosso completamente al termine dell’installazione.
9. I modelli vengono forniti privi di griglia di protezione per i
motoventilatori; è quindi opportuno verificare che la coclea sia
libera da corpi estranei che possano essre eventualmente
penetrati durante il trasporto e/o lo stoccaggio.
10.Il fabbricante dichiara che il modello non deve essere
messo in servizio finchè la macchina in cui sarà incorpo-
rato non sia stata dichiarata conforme alle condizioni
della direttiva 98/37 CE ed alle legislazioni nazionali che la
traspongono.
Avviamento
Il primo avviamento del modello deve essere eseguito solo sotto
la supervisione di un frigorista qualificato.
1. Verificare attentamente il corretto senso di rotazione dei moto-
ventilatori: una rotazione inversa può generare danni agli stessi.
2. Verificare che le condizioni di funzionamento (temperature e
pressioni) siano conformi a quelle di progetto.
Modifiche della posizione
della mandata dell’aria
Rispetto alla posizione di fornitura è possibile modificare la posi-
zione dei pannelli completi di motoventilatori e di conseguenza la
posizione della mandata dell’aria:
1. Rimuovere i tappi di plastica a pressione, presenti sui pannelli
interessati alla modifica di posizione, dai fori in cui sono allog-
giati per consentire l’accessibilità alle viti di fissaggio.
2. Rimuovere uno dei pannelli senza motoventilatore svitando le
viti di fissaggio interne.
3. Rimuovere uno dei pannelli con motoventilatore (verificare
preventivamente i pesi dei suddetti particolari sulla tabella
dimensionali) svitando le viti di fissaggio interne; posizionare
questo pannello nella nuova posizione desiderata, serrare le
viti di fissaggio e riposizionare i tappi di plastica a pressione.
4. Posizionare il pannello senza motoventilatore nella nuova
posizione disponibile, serrare le viti di fissaggio e riposizionare
i tappi di plastica a pressione.
5. Procedere seguendo le stesse fasi per tutti gli altri pannelli.
Modello PCM peso pannello convogliatore (kg)
MxA - B 20
MxC - D 27
MxE - F - G 35
Dati dimensionali

6
www.modine.com
Modello PCM MxA - B MxC - D MxE - F - G
Alimentazione
230/1/50Hz 230/1/50Hz 230/400V-3-50 Hz
Potenza (kW) 0,55 0,52 1,38
Assorbimento (A) 4,1 4 6,7/3,9
RPM 1200 875 725
Caratteristiche motoventilatori
Modelli MxE - F - GModelli MxA - B
Modelli MxC - D
Schema di collegamento
dei motoventilatori
giallo / verde
giallo / verde
marrone
marrone
nero
blu
nero
blu
cond.
cond.
marcia
grigio
grigio
giallo
marrone
bianco
blu
nero
rosso
230V/1/50Hz
230V/1/50Hz
aux
marcia
aux
TK
TK
RST
grigio
grigio
giallo
marrone
bianco
blu
nero
rosso
TK
RST
TK
400V/3/50Hz connessione a stella predisposta
230V/3/50Hz connessione a triangolo predisposta

7
www.modine.com
Italiano
Manutenzione
1. COLLEGAMENTI ELETTRICI: La tensione di alimentazione
deve rientrare nei limiti accettabili per i motoventilatori.
Verificare che non vi sia alcun contatto lasco a livello dei mor-
setti di collegamento elettrico, in particolare per il collegamen-
to di messa a terra. Un’attenzione speciale deve essere pre-
stata alle condizioni dei cavi di collegamento tra i motoventila-
tori ed il quadro elettrico di alimentazione generale. Essi non
devono essere torti ed il loro isolamento non deve presentare
alcuna discontinuità. Verificare che gli assorbimenti nominali
siano nei limiti riportati nei dati tecnici.
2. COLLEGAMENTI ALLO SCAMBIATORE: Accertarsi che non
vi siano fughe di gas refrigerante.
3. I motoventilatori sono lubrificati all’origine e dotati di cuscinetti
stagni che non richiedono ulteriori lubrificazioni.
4. Verificare periodicamente i fissaggi delle pannellature e dei
motoventilatori.
5. Provvedere alla pulizia periodica del pacco alettato, per evitare
accumuli di sostanze nocive. Si consiglia l’utilizzo di una solu-
zione al 50 % di acqua ed alcool etilico, evitando solventi, agen-
ti aggressivi, acidi, abrasivi o prodotti a base di ammoniaca.
6. Per le riparazioni utilizzare solamente Parti di Ricambio
Originali. I ricambi devono essere sempre installati nella posi-
zione originale.
Non attendere che il componente sia completamente
logoro: la sostituzione al momento opportuno significa
migliorare il funzionamento e la durata del modello.
Raccomandazioni finali
1. L’Utente deve evitare di manomettere ogni componente inter-
no del modello o far funzionare lo stesso in condizioni di fun-
zionamento non specificate in questo manuale, in quanto si
potrebbero verificare seri danni e la vanificazione di ogni
garanzia.
2. La riparazione e la manutenzione del modello sono di esclusi-
va competenza dell’Installatore.
3. Tutte le raccomandazioni sull’installazione del modello hanno
carattere puramente indicativo. L’installatore deve eseguire
l’installazione in funzione delle specifiche condizioni di proget-
to e conformemente alle normative locali sull’installazione di
apparecchiature per refrigerazione e climatizzazione.
Attenzione
Prima di intraprendere qualunque operazione di manutenzione
sull’apparecchio, occorre assicurarsi che sia stata tolta tensio-
ne. Le scariche elettriche possono provocare gravi danni fisici
alle persone.
Attenzione
Tali operazioni dovranno essere effettuate da personale
esperto e qualificato.
Ricerca dei guasti
a) Il modello non funziona
1. Controllare che l’alimentazione elettrica sia collegata.
Effettuare il collegamento necessario.
2. Controllare se c’è stata un’interruzione di energia elettrica.
Reinserire l’alimentazione elettrica.
3. Controllare che i motoventilatori funzionino correttamente.
Sostituire motoventilatori guasti.
4. Verificare se l’interruttore generale risulta aperto.
Chiudere l’interruttore generale.
b) Il modello vibra
1. Controllare che il modello sia fissato al suolo.
Fissare il modello al suolo.
2. Controllare che i motoventilatori siano bilanciati.
Verificare / sostituire i motoventilatori sbilanciati.

8
www.modine.com
Anweisungen - Sicherheit
1. Diese Betriebsanleitung während der ganzen Lebensdauer
des Gerätes aufbewahren, bis zur endgültigen Entsorgung.
2. Vor Inbetriebnahme und vor jedem Eingriff die
Betriebsanleitung mit äußerster Aufmerksamkeit durchlesen.
3. Die Installation und Wartung der Geräte für die Kühlung und
Klimatisierung kann sich auf Grund der Pressungen und der
sich im Inneren der Geräte befindenden elektrischen
Ausrüstung als gefährlich erweisen. Das Gerät darf aus-
schließlich nur von geschultem und für den Betrieb der Anlage
qualifiziertem Personal gemäß der gültigen Normen installiert,
in Betrieb genommen und gewartet werden.
4. Alle Sicherheitsvorschriften müssen sorgfältigst befolgt wer-
den. Immer Handschuhe und Sicherheitsbrillen tragen. Darauf
achten, sich während eventueller Schweißvorgänge nicht zu
verbrennen.
5. Zur Identifizierung des Gerätes (Modell und Seriennummer)
im Falle von Wartung oder Ersatzteilen, das außen am Gerät
angebrachte Identifizierungsschild lesen.
6. Während des Betriebs können einige Teile (z.B.
Kältemittelanschlüsse) Temperaturen von 70 °C überschreiten;
nur erfahrenes und qualifiziertes Personal darf zu diesen Teilen
Zugang haben, die jedenfalls teilweise durch Platten geschützt
sind.
Achtung: diese Betriebsanleitung kann Änderungen unterlie-
gen, daher muss der Benutzer für eine komplette und auf
den letzten Stand gebrachte Information in der dem Gerät
beiliegenden Anleitung nachschlagen.
Anwendung - Eigenschaften
Beschreibung des Modells:
LUFTVERFLÜSSIGER MIT RADIALVENTILATOREN GEEI-
GNET ZUM VERDICHTEN DER KÜHLFLÜSSIGKEIT IN VERDI-
CHTUNGSANLAGEN.
1. Das Gerät darf nur für den Zweck eingesetzt werden, wofür es
entworfen worden ist: unsachgemäße Anwendung befreit den
Hersteller von jeder Verantwortung.
2. Im Modell dürfen keine Flüssigkeiten angewendet werden, die
nicht mit den für die Herstellung des Wärmeaustauschers
angewandten Materialien verträglich sind (z.B. Ammoniak).
3. Das Modell darf nicht bei höheren Kondensationstemperaturen
des Kühlmittels als 60°C (50°C bei den „A“ Modellen) angewen-
det werden.
4. Der höchstzulässige Prüfdruck des Wärmeaustauschers ist 30
bar.
5. Der Hersteller erklärt, dass das Gerät den EWG Richtlinien
73/23 entspricht.
6. Der Wärmeaustauscher des Gerätes wird mit versiegeltem
Anschluss gemäß innerer Reinheit DIN 8964 mit 2 bar
Trockenluft gefüllt und mit zwei 1/4” SAE Druckventilen gelie-
fert.
7. Der Mindestschutzgrad des Gerätes ist IP44.
Kontrolle - Transport - Lagerung
1. Bei Erhalt des Gerätes sofort den Zustand kontrollieren; sofort
dem Spediteur jeden eventuellen Schaden oder Mangel bean-
standen.
2. Während des Transportes unnötigen Druck auf die
Verpackung vermeiden, die in der darauf aufgedruckten Lage
gehalten werden muss.
3. Das Gerät muss möglichst nahe dem Installationsort ausge-
packt werden. Nach dem Auspacken Stöße an den Teilen ver-
meiden.
4. Während der Handhabung und Installierung des Gerätes
geeignete Schutzhandschuhe tragen und alle
Vorsichtsmassnahmen treffen, um Verletzungen mit schnei-
denden Teilen des Geräts (z.B. Lamellen) zu vermeiden.
5. Das Modell muss in seiner Originalverpackung in einem tem-
perierten Raum, fern von Unwettern gelagert werden.
6. Das Modell darf nicht als Unterlage für andere Modelle oder
anderes Material dienen.
Modellaufstellung
1. Der Boden muss so beständig sein, um das Gewicht des
betriebsfertigen Modells zu tragen.
2. Um das Gerät herum muss ein angepasster Freiraum (minde-
C
A
B
inlet
outlet
F
A
D E
N
P
HG
C
C + L
L
inlet
M
outlet
Q
R
Z
ST
Modell PCM M1A M1B M1C M1D M1G M1E M1F M2A M2B M2C M2D M2G M2E M2F M3C M3D M3G M3E M3F M4E M4F
Abmessungen A 590 590 760 760 760 1110 1110 1020 1020 1360 1360 1360 2060 2060 1960 1960 1960 3010 3010 3960 3960
mm B 1150 1150 1300 1300 1300 1300 1300 1150 1150 1300 1300 1300 1300 1300 1300 1300 1300 1300 1300 1300 1300
C 490 490 815 815 815 815 815 490 490 815 815 815 815 815 815 815 815 815 815 815 815
D 465 465 610 610 610 970 970 465 465 1210 120 120 1920 1920 1810 1810 1810 2870 2870 3820 3820
E 430 430 755 755 755 755 755 430 430 755 755 755 755 755 755 755 755 755 755 755 755
F--------------645 645 645 995 995 1945 1945
G 450 450 450 450 450 450 450 450 450 450 450 450 450 450 450 450 450 450 450 450 450
H 700 700 850 850 850 850 850 700 700 850 850 850 850 850 850 850 850 850 850 850 850
L 30 30 30 30 30 30 30 30 30 30 30 30 30 30 30 30 30 30 30 30 30
M 760 760 910 910 910 910 910 760 760 910 910 910 910 910 910 910 910 910 910 910 910
N 800 800 950 950 950 950 950 800 800 950 950 950 950 950 950 950 950 950 950 950 950
P 268 268 296 296 349 349 349 268 268 296 296 349 349 349 296 296 349 349 349 349 349
Q 305 305 336 336 399 399 399 305 305 336 336 399 399 399 336 336 399 399 399 399 399
R---------730 730 730 1065 1065 730 730 730 1065 1065 1065 1065
S--------------600 600 600 950 950 950 950
T---------590 590 590 945 945 590 590 590 945 945 945 945
Z 550 550 720 720 720 1060 1060 980 980 1320 1320 1320 2010 2010 1920 1920 1920 2960 2960 3910 3910
Abmessungen

9
www.modine.com
Deutsch
Leistungen
Modell Motorventilatoren (Spannung und Watt bei 50 Hz) Luftmenge Zusatz- Leistung Innen- Außen- Innen- Anschlüsse Netto-
druck oberfläche oberfläche volumen gewicht
M1A 1 9/9 - 35 66 2690 0 7030 1,0 9,7 1,5 22 16 48
550W 2640 5 6950
2560 10 6830
2375 15 6550
M1B 1 9/9 - 35 66 2560 0 9970 1,9 19,4 3,0 22 16 52
550W 2370 5 9420
2280 10 9150
2090 15 8570
M1C 1 10/10 - 37 68 4160 0 12230 2,5 21,5 3,8 22 16 80
525W 36 67 3860 5 11670
35 66 3520 10 11000
34 65 3090 15 10090
M1D 1 10/10 - 37 68 3930 0 16340 4,2 42,2 6,4 28 22 87
525W 36 67 3580 5 15190
35 66 3230 10 13980
34 65 2530 15 11410
M1E 1-12/12 46 77 7590 0 30630 4,8 81,0 9,6 35 28 110
1380W 45 76 7040 5 28980
44 75 6560 10 27490
43 74 5960 15 25530
M1F 1-12/12 46 77 7170 0 32950 7,2 121,5 14,4 35 28 123
1380W 45 76 6880 5 31000
44 75 6190 10 29000
43 74 5710 15 26990
M1G 1 - 12/12 46 77 6680 0 24100 5,7 42,2 6,4 28 22 98
1380W 45 76 6315 5 23200
44 75 5830 10 21950
43 74 4060 15 16850
M2A 2 9/9 - 38 69 5380 0 14110 2,6 19,4 3,0 22 16 75
550W 5280 5 13970
5120 10 13740
4750 15 13160
M2B 2 9/9 - 38 69 5120 0 19980 5,2 38,8 6,0 28 22 83
550W 4740 5 18870
4560 10 18340
4180 15 17170
M2C 2 10/10 - 39 71 8320 0 24540 6,8 43,0 7,6 28 22 121
525W 38 70 7720 5 23420
37 69 7040 10 22050
36 68 6180 15 20200
M2D 2 10/10 - 39 71 7860 0 32710 11,3 84,4 12,8 35 28 135
525W 38 70 7160 5 30380
37 69 6460 10 27960
36 68 5060 15 22780
M2E 2-12/12 48 80 15180 0 61370 9,6 162,0 19,2 42 35 188
1380W 47 79 14080 5 57990
46 78 13120 10 54950
45 77 11920 15 51010
M2F 2-12/12 48 80 14340 0 65960 14,3 243,0 28,8 42 35 208
1380W 47 79 13360 5 62040
46 78 12380 10 58030
45 77 11420 15 56120
M2G 2 - 12/12 48 80 13360 0 48200 11,3 84,4 12,8 35 28 157
1380W 47 79 12630 5 46400
46 78 11660 10 43900
45 77 8120 15 33700
M3C 3 10/10 - 41 73 12480 0 36780 10,2 64,5 11,4 35 28 162
525W 40 72 11580 5 35100
39 71 10560 10 33030
38 70 9270 15 30290
M3D 3 10/10 - 41 73 11790 0 49050 17,0 126,6 19,2 35 28 183
525W 40 72 10740 5 45620
39 71 9690 10 42010
38 70 7590 15 34270
M3E 3-12/12 50 82 22770 0 92180 14,3 243,0 28,8 42 35 266
1380W 49 81 21120 5 87160
48 80 19680 10 82580
47 79 17880 15 76640
M3F 3-12/12 50 82 21510 0 98860 21,5 364,5 43,2 54 42 293
1380W 49 81 20040 5 92980
48 80 18570 10 86960
47 79 17130 15 80950
M3G 3 - 12/12 50 82 20040 0 72300 17,0 126,6 19,2 35 28 216
1380W 49 81 18945 5 69600
48 80 17490 10 65850
47 79 12180 15 50550
M4E 4-12/12 51 83 30360 0 122810 19,1 324,0 38,4 54 42 344
1380W 50 82 28160 5 116060
49 81 26240 10 110030
48 80 23840 15 102080
M4F 4-12/12 51 83 28680 0 132000 28,7 486,0 57,6 54 42 378
13800W 50 82 26720 5 124250
49 81 24760 10 116210
48 80 22840 15 108130
N. 230V/1/50Hz 230-400V/3/50Hz LPA 10m LwA m
3
/h mm Wm
2
m
2
l In (mm) Out (mm) kg
dB(A) dB(A)

10
www.modine.com
stens 600 mm) zur Luftzirkulation und Wartung vorhanden sein.
3. In der Installationszone dürfen sich keine Fremdkörper
und/oder Staub befinden, die angesaugt werden können und
somit den Wärmeaustauscher verstopfen können.
4. Der Installationsort muss gegen Überschwemmungen
geschützt sein.
5. Der Installationsort muss den eventuellen örtlichen Gesetzen
entsprechen.
6. Es müssen Stoßdämpfer vorgesehen sein, um die
Lärmübertragung zu verhindern.
7. Das Gerät muss fest am Boden verankert sein (siehe
Befestigungspunkte der Dimensionaltabellen).
8. Dieses Gerät darf nicht in explosiver, säurehaltiger oder mit
den verwendeten Materialien unverträglicher Atmosphäre
installiert werden.
9. Die Kondensatoreinheit immer so anschließen, dass das
Kältemittel oben eintritt und die Flüssigkeit unten austritt.
10.Die höchstzulässige Luftansaugtemperatur darf 43°C nicht
überschreiten.
11.Die Mindestlufttemperatur durch die Motorventilatoren darf
nicht unter –20°C liegen.
12.Das Modell ist für die Außen- oder Innenaufstellung geeignet;
im Falle einer Innenaufstellung ist es unbedingt notwendig, für
eine geeignete Luftzufuhr zu sorgen (Tabelle 1 – Leistungen).
Alle Modelle sind für den Kanaleinbau entworfen. Die Firma der
Hersteller. übernimmt keine Haftung für die Leistungen und die
Sicherheit des Gerätes, die ohne Kanaleinbau angewendet wer-
den. Im Falle von Anwendung ohne Kanale muss der Installateur
bei der Lufteintrittsöffnung ein Schutzgitter gemäß den örtlichen
Sicherheitsnormen montieren.
Heben
1. Zur Handhabung werden alle Geräte auf einer Pallete in ver-
tikaler Luftrichtungsposition mit Luftausblas nach oben gerich-
tet geliefert. Die Handhabung muss mit einem für das Gewicht
des Gerätes geeigneten Gabelstapler und von sachverständi-
gen Personen gemäß örtlichen Normen ausgeführt werden.
Man muss sicherstellen, dass die Stützen des Staplers stabil
und eben auf dem Gerät gestellt sind, sowie in der Tiefe als in
der Länge. Es muss auf sensible Handhabung geachtet wer-
den. Durch einen starken Schlag oder kräftigen seitlichen
Stoß kann das Modell umfallen. Alle Geräte sind mit
Hebebügel versehen. Um Schäden während der Handhabung
zu vermeiden, müssen alle Hebebügel mittels einem Träger
verbunden werden, wie auf der Zeichnung aufgeführt.
2. Um Schäden während der Handhabung zu vermeiden darf die
Verpackung solange nicht entfernt werden, bis das Gerät am
Installationsort ist.
3. Während des Hebevorgangs das Gerät nicht umkippen.
Installation - Zusammenbausätze Füße
1. Die eventuell mitgelieferten Zusammenbausätze mit den gelie-
ferten Schrauben gemäß den beigefügten Hinweisen befestigen.
2. Während der Befestigung der Füße muss sichergestellt wer-
den, dass das Gerät richtig an das für das Gewicht des
Modells geeignete Hebegerät, befestigt ist.
Installation - Kanaleinsatz
Die Abmessungen der Kanäle müssen in Bezug auf die
Luftmenge und den zugelassenen externen Druck festgelegt wer-
den. Für einen optimalen Betrieb soll die Mindestlänge des
verwendeten Kanals 1,5 mal der Durchmesser des
Ventilatorausgangs sein. In der Leistungstabelle sind die
Luftmengen bezogen auf die für jedes Gerät zugelassenen sta-
tischen Druckverluste aufgeführt.
Folgende Hinweise müssen aber unbedingt eingehalten werden:
1. Unabhängig des verwendeten Kanaltyps, darf das Material
nicht entzündbar sein und im Falle eines Feuers dürfen keine
giftigen Gase freikommen. Die inneren Oberflächen des
Kanals müssen flach sein und dürfen die durchströmende Luft
nicht verunreinigen. Wir empfehlen die Verwendung von
Kanälen aus ausreichend isoliertem Blech, um Kondensation
und Wärmeverlust zu vermeiden.
2. Es ist ratsam, die Modelle an die Luftschläuche durch
Verwendung von flexiblen Verbindungen anzuschließen, damit
die Vibrationen absorbiert werden, Geräuschbildung innerhalb
der Kanäle vermieden wird und der Zugang zum Gerät ermög-
licht wird.
3. Kurven in der Nähe des Modells sollen möglichst vermieden
werden. Wenn dies nicht möglich ist, soll der Biegungsgrad so
groß wie möglich gehalten werden und wenn der Kanal dies
abmessungsgemäß zulässt, sollen innen Luftrichter ange-
bracht werden.
Installation - Elektrische Anschlüsse
1. Die externen Verbindungen müssen gemäß den lokalen
Vorschriften ausgeführt werden. Der Hersteller übernimmt
keine Haftung für nicht konforme Anschlüsse.
2. Besondere Aufmerksamkeit dem Anschließen der Erdung des
Modells widmen. Der Zapfen des Erdungsanschlusses befin-
det sich auf der Kopfseite des Modells auf der Seite der
Kältemittelanschlüsse (Abmessungseigenschaften).
3. Bei Betrieb des Geräts mit ungeeigneter Spannung u/o
Frequenz entfällt jede Garantiegewährung seitens der
Hersteller.
4. Die Temperaturwächter (TK oder TP) sind temperaturunabhän-
gige Schaltelemente, die in die Wicklungen der Motoren iso-
Achtung
Vor der Handhabung des Geräts muss geprüft werden, ob alle
Blechteile richtig befestigt sind. Das Gerät muss sorgfältig
gehoben und hingestellt werden.
Achtung
Zum Heben des Modells muss ein Abstandshalter zwischen
Seil und Gerät eingeführt werden, um Schäden an den
Paneelen zu vermeiden.
Achtung
Vor Wartungstätigkeiten den Trennschalter öffnen. Elektrische
Schläge können schwere Verletzungen verursachen.
Achtung
Die Dimensionierung der Kanäle und die Projektierung müs-
sen von einem Spezialisten ausgeführt werden.

11
www.modine.com
Deutsch
liert eingebettet werden; sie öffnen einen elektrischen Kontakt,
sobald die höchstzulässige Dauertemperatur überschritten
wird. Für die Drehstromventilatoren müssen die
Temperaturwächter an die Kontrollkreise der Stromzähler der
allgemeinen Stromleitung angeschlossen werden. Die
Temperaturwächter der Wechselstromventilatoren müssen in
Serie an den Stromkreis angeschlossen werden, so dass eine
automatische Wiedereinschaltung erfolgen kann.
WICHTIG: Die Angemessenheit der Spannung
(Kabeleingangspositionen, Schutzvorrichtungen, Schnitt der
Konduktoren usw.) muss mit der vom Ventilatorhersteller
gelieferten Tabelle der elektrischen Daten, Warnungen und
Anschlussschema, geprüft werden. Auch müssen die lokalen
oder nationalen Vorschriften, die die Installation von Geräten
für die Kälte und/oder Klimatisierung betreffen, befolgt wer-
den. Um Schäden zu vermeiden, müssen die auf den Lüftern
angebrachten Anschlussschema unbedingt eingehalten wer-
den. Vor Anwendung von Drehzahlreglungssystemen die
Eignung für die Motoren überprüfen, nicht verträgliche
Systeme können Lärm und Schäden am Motor hervorrufen.
Der Hersteller lehnt jede Verantwortung für mit
Drehzahlreglern ausgestattete Geräte ab.
Installation
Anschluss an den Wärmeaustauscher
1. Die Rohrleitungen sind so zu bemessen, dass ein minimaler
Druckabfall und Geschwindigkeitswerte des Kühlmittels, die
die Mitnahme des Öls gewährleisten, erreicht werden.
2. Auf die Vorleitung, zwischen Kompressor und Kondensator,
sowohl den Schwingungsdämpfer als auch den Schalldämpfer
einbauen. Dies auch im Falle eines nicht übermäßigen
Geräusches der Entleerungsventile des Kompressors.
3. Die Anschlüsse an die Kältemittelleitung müssen mit unoxy-
diertem und dehydratisiertem Kupferrohr erfolgen.
4. Die Lötung mit Silberlegierung in Stickstoffatmosphäre durch-
führen, um die Bildung von Schlacke zu vermeiden.
5. Im Kältemittelkreislauf eine Leere bilden und diese für zwei
Stunden halten.
6. Nach der Kältemittelfüllung kontrollieren, dass es keine Lecks
gibt.
7. Es ist absolut zu vermeiden, die Eintritts- (größerer
Durchmesser) und Austrittssammler (kleinerer Durchmesser)
des Kältemittels zu vertauschen.
Achtung
Der Installateur muss gesetzlich vorgeschriebene
Reparaturschalter und Sicherheitsapparate anbringen.
Achtung
Eine unkorrekte Installation kann den Lautstärkepegel des
Verflüssigers beträchtlich beeinflussen.
Kontrollen vor der Inbetriebnahme
1. Anziehen aller elektrischen Anschlüsse.
2. Planierung und Haltbarkeit der Trägerfläche.
3. Befestigung der Paneele, Kanäle und Anziehen der
Befestigungsschrauben.
4. Bemessung des Platzes für die Wartung.
5. Übereinstimmung der Stromspannung mit den Schilddaten.
6. Bewegungsfreiheit des Laufrads der Motorventilatoren.
7. Kein Kältemittelaustritt.
8. Alle Modellen sind mit Schutzfolie (LDPE) überzogen. Dieser
Schutzfilm muss nach der Installierung komplett entfernt wer-
den.
9. Die Modelle werden ohne Schutzgitter für die Ventilatoren
geliefert; es muss geprüft werden, dass innerhalb des
Gehäuses keine Fremdkörper sind, die während des
Transports oder der Lagerung eingedrungen sein könnten.
10.Der Hersteller erklärt, dass das Gerät solange nicht in
Betrieb genommen werden darf, bis die Maschine wo es
eingebaut wird, den Bestimmungen der Richtlinie 98/37
sowie dem entsprechenden nationalen Rechterlass zur
Umsetzung der Richtlinie ins nationale Recht entspricht.
Inbetriebnahme
Die erste Inbetriebnahme muss unter Aufsicht eines qualifizierten
Kühltechnikers erfolgen.
1. Die Drehrichtung der Motorventilatoren überprüfen: eine entge-
gengesetzte Drehrichtung kann Schäden verursachen.
2. Überprüfen, ob die Betriebsbedingungen (Temperaturen und
Drucke) denen des Projekts entsprechen.
Änderung der Ausblasstellung
Es ist möglich die Position der Lüfterpaneele gegenüber der
gelieferten Position zu ändern und demzufolge kann die
Ausblasstellung modifiziert werden:
1. Die sich auf den betreffenden Paneelen befindenden
Plastikstopfen mit Druck entfernen, um den Zugang zu den
Befestigungsschrauben zu gestatten.
2. Einen der Paneele ohne Ventilatoren mittels Abschrauben der
inneren Befestigungsschrauben entfernen.
3. Einen der Lüfterpaneele durch Abschrauben der
Befestigungsschrauben entfernen (vorab das Gewicht auf der
Abmessungstabelle prüfen); den Paneel in die gewünschte
Position bringen, die Befestigungsschrauben anziehen und die
Plastikstopfen wieder anbringen.
4. Die Paneele ohne Ventilatoren in die zur Verfügung stehende
neue Position bringen, die Befestigungsschrauben anziehen
und die Plastikstopfen wieder anbringen.
5. Für die restlichen Paneele gilt die gleiche Vorgangsweise.
Modell PCM Gewicht Luftleitpaneel (kg)
MxA - B 20
MxC - D 27
MxE - F - G 35
Abmessungen

12
www.modine.com
Modell PCM MxA - B MxC - D MxE - F - G
Anschluss
230/1/50Hz 230/1/50Hz 230/400V-3-50 Hz
Leistung (kW) 0,55 0,52 1,38
Stromaufnahme (A) 4,1 4 6,7/3,9
RPM 1200 875 725
Eigenschaften der Motorventilatoren
Modell MxE - F - GModell MxA - B
Modell MxC - D
Elektrische Anschlüsse
der Motorventilatoren
Gelb / Grün
gelb / grün
Braun
Braun
Schwarz
Blau
Schwarz
Blau
Kond.
Kond.
Primärwindung
Grau
Grau
Gelb
Braun
Weiß
Blau
Schwarz
Rot
230V/1/50Hz
230V/1/50Hz
aux
Primärwindung
aux
TK
TK
RST
Grau
Grau
Gelb
Braun
Weiß
Blau
Schwarz
Rot
TK
RST
TK
400V/3/50Hz Anschluss Y vorbereitet
230V/3/50Hz Anschluss ∆ vorbereitet

13
www.modine.com
Deutsch
Wartung
1. ELEKTRISCHE ANSCHLÜSSE: Die Stromspannung muss
innerhalb der zugelassenen Werte der Ventilatoren liegen.
Überprüfen, dass keine Klemme des elektrischen Anschlusses
gelockert ist, vor allem die des Erdungskabels. Besondere
Aufmerksamkeit muss den Bedingungen der Verbindungskabel
zwischen Ventilatoren und allgemeinen
Stromspannungskasten gewidmet werden. Sie dürfen nicht
verdreht sein und die Isolierung muss unversehrt sein. Über-
prüfen, dass die nominale Stromaufnahme innerhalb der in den
technischen Daten aufgeführten zugelassenen Werten liegt.
2. ANSCHLUSS AN DEN WÄRMETAUSCHER: sicherstellen,
dass es keine Kühlgaslecke gibt
3. Die Ventilatoren werden geschmiert geliefert und die Lager
benötigen keine zusätzliche Schmierung
4. Die Befestigungen der Paneele und Ventilatoren periodisch
kontrollieren.
5. Das Lamellenpaket periodisch reinigen, um die Ablagerung
von schädlichen Rückständen zu vermeiden. Es wird empfoh-
len, eine Lösung von 50% Wasser und Äthylenalkohol zu
verwenden. Keine Lösungsmittel und aggressive oder ammo-
niakhaltige Reibepulver verwenden.
6. Zur Reparatur ausschließlich original Ersatzteile verwenden.
Die Ersatzteile immer in die ursprüngliche Position ein-
bauen.
Nicht solange warten bis der Teil ganz abgenutzt ist: der
Ersatz im richtigen Moment bedeutet, die
Funktionstüchtigkeit und die Lebensdauer des Modells
zu verbessern.
Zusätzliche Empfehlungen
1. Der Benutzer muss das Aufbrechen jedes Innenteils vermei-
den oder dieses unter Betriebsbedingungen, die nicht in die-
ser Betriebsanleitung spezifiziert sind, in Betrieb zu nehmen,
da dadurch ernsthafte Schäden entstehen können und jede
Garantie zu Nichte gemacht werden könnte.
2. Die Reparatur und Wartung des Modells sind ausschließlich
Aufgabe des Installateurs.
3. Alle Installationsempfehlungen für das Modell sind rein wei-
send. Der Installateur muss den Einbau gemäß spezifischen
Projektbedingungen und gemäß lokalen Vorschriften für den
Einbau der Geräte in Kälte- und Klimatisierungsanlagen vor-
nehmen.
Achtung
Vor jeder Wartungstätigkeit am Gerät sicherstellen, dass der
Strom abgeschaltet ist. Elektrische Schläge können schwere
Verletzungen verursachen.
Achtung
Die Wartungstätigkeiten müssen immer von zuständigen und
qualifizierten Personen ausgeführt werden
Untersuchung von Defekten
a) Das Gerät funktioniert nicht
1. Prüfen, ob die Stromversorgung angeschlossen ist.
Den notwendigen Anschluss vornehmen.
2. Prüfen, ob es eine Stromunterbrechung gegeben hat.
Strom wieder einschalten.
3. Prüfen, ob die Ventilatoren richtig funktionieren.
Defekte Ventilatoren ersetzen.
4. Prüfen, ob der Hauptschalter eingeschalten ist.
Den Hauptschalter ausschalten.
b) Das Gerät vibriert
1. Prüfen, ob das Gerät am Boden befestigt ist.
Das Gerät am Boden befestigen.
2. Prüfen, ob die Ventilatoren gewuchtet sind.
Die nicht gewuchteten Ventilatoren ersetzen.

14
www.modine.com
Safety Instructions
1. Keep this technical manual for the lifespan of the model, i.e.
until it is no longer in use and has been scrapped.
2. Read the technical manual very carefully before installation
and prior to any intervention on model.
3. Installation and maintenance of refrigeration and air conditio-
ning equipment may be dangerous due to the pressures invol-
ved and the electrical apparatus inside the model. Installation,
start-up and maintenance of model must be carried out by trai-
ned and qualified personnel only, in compliance to the regula-
tions in force.
4. All Safety Norms must be rigorously followed. Protective glo-
ves and goggles must be worn at all times. Care must be
exercised during welding to prevent injury.
5. Model identification required for service, technical assistance
or spare parts, can be found on ID plate placed on the outer
casing of unit (model and serial number).
6. During operation, some parts of the unit (e.g. refrigerant con-
nections) may exceed a temperature of +70 °C; only experien-
ced and qualified personnel can gain access to these parts,
which are partially protected by panels.
Note: this manual may be subject to possible revision; for
complete and up-to-date information the user must consult
the manual supplied with unit.
Application field - features
Description of model:
AIR COOLED CONDENSER WITH CENTRIFUGAL FAN
MOTORS SUITABLE FOR CONDENSING REFRIGERANTS IN
STEAM COMPRESSION INSTALLATIONS.
1. The model must be used exclusively for the purpose for which
it has been designed: misuse exempts the manufacturer from
any responsibility.
2. The model must not be used with refrigerants that are non-com-
patible with the material the coil is made from (e.g. ammonia).
3. The model must not be used at condensing temperatures
exceeding 60 °C (50 °C for “A” models).
4. The maximum testing pressure of the coil is 30 bars.
5. The manufacturer declares that the model is in compliance to
the conditions of amended directive 73/23 CE.
6. The model is equipped with coil with sealed connections in
accordance with DIN 8964 norm referred to internal cleansing
requisites, charged with dry air at 2 bars and supplied with two
1/4” SAE pressure connections.
7. The minimum protection grade of this model is IP 44.
Inspection - Transport - Storage
1. Upon receipt the model should be visually inspected; notify
shipping forwarder immediately of any damages or shortages.
2. During transport it is necessary to avoid applying inappropriate
pressures onto the packaging, it must be kept in the position
indicated.
3. Unpack unit as close as possible to the installation site. Once
it has been unpacked, it is important to avoid accidental colli-
sions with the components.
4. During positioning and installation of the unit use proper pro-
tective gloves and take all necessary safety measures to avoid
injury with the sharp parts (e.g. fins) of the unit.
5. The unit must be stored in its original packaging in a sheltered
and temperate place.
6. The packaged unit must not be used as a support base for
other units or other material.
Model Layout
1. The base must be sturdy enough to carry the weight of the
unit during operation.
2. Ensure adequate free space around the unit for air circulation
and maintenance (min. 600 mm).
3. The installation area must be free from foreign objects and/or
dust that can be drawn in and therefore obstruct the coil.
4. The installation site must not be located in a flood-prone area.
5. The installation area must have features that are in complian-
ce with the local regulations.
C
A
B
inlet
outlet
F
A
D E
N
P
HG
C
C + L
L
inlet
M
outlet
Q
R
Z
ST
Model PCM M1A M1B M1C M1D M1G M1E M1F M2A M2B M2C M2D M2G M2E M2F M3C M3D M3G M3E M3F M4E M4F
Dimensions A 590 590 760 760 760 1110 1110 1020 1020 1360 1360 1360 2060 2060 1960 1960 1960 3010 3010 3960 3960
mm B 1150 1150 1300 1300 1300 1300 1300 1150 1150 1300 1300 1300 1300 1300 1300 1300 1300 1300 1300 1300 1300
C 490 490 815 815 815 815 815 490 490 815 815 815 815 815 815 815 815 815 815 815 815
D 465 465 610 610 610 970 970 465 465 1210 120 120 1920 1920 1810 1810 1810 2870 2870 3820 3820
E 430 430 755 755 755 755 755 430 430 755 755 755 755 755 755 755 755 755 755 755 755
F--------------645 645 645 995 995 1945 1945
G 450 450 450 450 450 450 450 450 450 450 450 450 450 450 450 450 450 450 450 450 450
H 700 700 850 850 850 850 850 700 700 850 850 850 850 850 850 850 850 850 850 850 850
L 30 30 30 30 30 30 30 30 30 30 30 30 30 30 30 30 30 30 30 30 30
M 760 760 910 910 910 910 910 760 760 910 910 910 910 910 910 910 910 910 910 910 910
N 800 800 950 950 950 950 950 800 800 950 950 950 950 950 950 950 950 950 950 950 950
P 268 268 296 296 349 349 349 268 268 296 296 349 349 349 296 296 349 349 349 349 349
Q 305 305 336 336 399 399 399 305 305 336 336 399 399 399 336 336 399 399 399 399 399
R---------730 730 730 1065 1065 730 730 730 1065 1065 1065 1065
S--------------600 600 600 950 950 950 950
T---------590 590 590 945 945 590 590 590 945 945 945 945
Z 550 550 720 720 720 1060 1060 980 980 1320 1320 1320 2010 2010 1920 1920 1920 2960 2960 3910 3910
Dimensional features

15
www.modine.com
English
Performance
Model Fan motors (voltage and Watts at 50 Hz) Air flow Added Capacity Internal External Inner Connections Net
pressure surface surface volume weight
M1A 1 9/9 - 35 66 2690 0 7030 1,0 9,7 1,5 22 16 48
550W 2640 5 6950
2560 10 6830
2375 15 6550
M1B 1 9/9 - 35 66 2560 0 9970 1,9 19,4 3,0 22 16 52
550W 2370 5 9420
2280 10 9150
2090 15 8570
M1C 1 10/10 - 37 68 4160 0 12230 2,5 21,5 3,8 22 16 80
525W 36 67 3860 5 11670
35 66 3520 10 11000
34 65 3090 15 10090
M1D 1 10/10 - 37 68 3930 0 16340 4,2 42,2 6,4 28 22 87
525W 36 67 3580 5 15190
35 66 3230 10 13980
34 65 2530 15 11410
M1E 1-12/12 46 77 7590 0 30630 4,8 81,0 9,6 35 28 110
1380W 45 76 7040 5 28980
44 75 6560 10 27490
43 74 5960 15 25530
M1F 1-12/12 46 77 7170 0 32950 7,2 121,5 14,4 35 28 123
1380W 45 76 6880 5 31000
44 75 6190 10 29000
43 74 5710 15 26990
M1G 1 - 12/12 46 77 6680 0 24100 5,7 42,2 6,4 28 22 98
1380W 45 76 6315 5 23200
44 75 5830 10 21950
43 74 4060 15 16850
M2A 2 9/9 - 38 69 5380 0 14110 2,6 19,4 3,0 22 16 75
550W 5280 5 13970
5120 10 13740
4750 15 13160
M2B 2 9/9 - 38 69 5120 0 19980 5,2 38,8 6,0 28 22 83
550W 4740 5 18870
4560 10 18340
4180 15 17170
M2C 2 10/10 - 39 71 8320 0 24540 6,8 43,0 7,6 28 22 121
525W 38 70 7720 5 23420
37 69 7040 10 22050
36 68 6180 15 20200
M2D 2 10/10 - 39 71 7860 0 32710 11,3 84,4 12,8 35 28 135
525W 38 70 7160 5 30380
37 69 6460 10 27960
36 68 5060 15 22780
M2E 2-12/12 48 80 15180 0 61370 9,6 162,0 19,2 42 35 188
1380W 47 79 14080 5 57990
46 78 13120 10 54950
45 77 11920 15 51010
M2F 2-12/12 48 80 14340 0 65960 14,3 243,0 28,8 42 35 208
1380W 47 79 13360 5 62040
46 78 12380 10 58030
45 77 11420 15 56120
M2G 2 - 12/12 48 80 13360 0 48200 11,3 84,4 12,8 35 28 157
1380W 47 79 12630 5 46400
46 78 11660 10 43900
45 77 8120 15 33700
M3C 3 10/10 - 41 73 12480 0 36780 10,2 64,5 11,4 35 28 162
525W 40 72 11580 5 35100
39 71 10560 10 33030
38 70 9270 15 30290
M3D 3 10/10 - 41 73 11790 0 49050 17,0 126,6 19,2 35 28 183
525W 40 72 10740 5 45620
39 71 9690 10 42010
38 70 7590 15 34270
M3E 3-12/12 50 82 22770 0 92180 14,3 243,0 28,8 42 35 266
1380W 49 81 21120 5 87160
48 80 19680 10 82580
47 79 17880 15 76640
M3F 3-12/12 50 82 21510 0 98860 21,5 364,5 43,2 54 42 293
1380W 49 81 20040 5 92980
48 80 18570 10 86960
47 79 17130 15 80950
M3G 3 - 12/12 50 82 20040 0 72300 17,0 126,6 19,2 35 28 216
1380W 49 81 18945 5 69600
48 80 17490 10 65850
47 79 12180 15 50550
M4E 4-12/12 51 83 30360 0 122810 19,1 324,0 38,4 54 42 344
1380W 50 82 28160 5 116060
49 81 26240 10 110030
48 80 23840 15 102080
M4F 4-12/12 51 83 28680 0 132000 28,7 486,0 57,6 54 42 378
13800W 50 82 26720 5 124250
49 81 24760 10 116210
48 80 22840 15 108130
N. 230V/1/50Hz 230-400V/3/50Hz LPA 10m LwA m
3
/h mm Wm
2
m
2
l In (mm) Out (mm) kg
dB(A) dB(A)

16
www.modine.com
6. It is necessary to foresee shock absorbers in order to avoid
noise transmission.
7. The unit must be secured to base (see fixing points indicated
in dimensional tables).
8. This model must not be installed in explosive, acidic or
aggressive ambients or in other conditions that are not compa-
tible with the unit’s materials.
9. Always place the condensing unit so that the refrigerant enters
from the top and the fluid exits the bottom.
10. The maximum air entering temperature must not exceed 43 °C.
11. The minimum air temperature going through the fan motors
must not be below –20 °C.
12. The unit is suitable for in or outdoor installation. In closed
areas it is necessary to foresee adequate air circulation
(Performance).
All models are designed for ducted installations. The manu-
facturer. is not responsible for performances and the safety of
models without fitted ducts. In case of use without ducts the
installer must still fit a safety grill on the air outlet in accor-
dance to the local safety regulations.
Unit handling - Lifting
1. For proper handling, all models are supplied with base pallets
for support and suitable for lifting, in accordance to the type of
unit and placed in relation to vertical air flow and top air flow.
Handling of model must be carried out by means of a forklift
truck of appropriate capacity, by experienced and qualified
personnel in accordance to local regulations. Ensure that the
forks fit securely and are balanced with the unit, both in depth
and in length. It is important to avoid abrupt movements. The
unit may topple over if pushed or as a result of accidental
collision.
All models are equipped with lifting hooks. To avoid damage
during lifting operations it is necessary to use a lifting beam
connected to all available lifting hooks, as illustrated.
2. In order to avoid damage during handling and positioning of
unit do not remove packing before reaching installation site.
3. During lifting phases do not tilt unit.
Installation - Fitting of support kits
1. Mount support kits to unit with the screws supplied, adhere to
the instructions provided.
2. Whilst the support kits are being fitted ensure that the unit is
securely fastened to a lifting element that can adequately carry
its weight.
Installation - Ducting
The dimensions of the duct must be determined in relation to the
air flow that will transit through it and to the static pressure given
by the fan. It is necessary to consider that for best operation
the minimum length of duct must be at least 1,5 times the
diameter of the fan output hole.
The performance tables state the air flow in relation to the static
pressure drop of each model.
It is also very important to follow the following points:
1. Besides the type of duct used, the building material must be
non-flammable, not produce toxic fumes in case of fire. The
inner surface of the ducts must be smooth and must by no
means contaminate the air in transit. We recommend adequa-
tely insulated metal sheet ducts in order to avoid condensation
and heat dispersion.
2. It is advisable to connect the unit’s air duct by interposing flexi-
ble joints to absorb vibrations, to prevent the generation of
noise in the ductwork, and to facilitate access to model.
3. Curves in proximity to model must be avoided as much as
possible. Should this be unavoidable it is will be necessary to
at least consider the widest curve possible and foresee flaps
inside larger ducts.
Installation - Electric connections
1. All external connections must be carried out in compliance to
local regulations. The manufacturer disclaims all responsibility
for non-compliant connections.
2. Pay particular attention during earth connection of unit. An
earthing stud is located on the front panel refrigerant connec-
tion side (see dimensional features).
3. Operation with incompatible voltages and/or input frequencies
constitutes a violation and automatically invalidates all forms
of warranty recognized by the manufacturer.
4. The thermal contacts (TK or TP) are temperature sensing ele-
ments built directly into the windings of the motors; they inter-
rupt an electrical contact when a maximum sustained tempe-
rature has been reached. For three-phase motors the thermal
contacts must be connected to the control circuit of the mains,
whereas for the single-phase motors the thermal contacts
must be connected in sequence to the power supply circuit, in
this way there will be an automatic reinsertion.
Important
Before moving model ensure that all panels are securely
fastened. Lift and position unit with care.
Caution
Lifting must be carried out by placing spacers between the
cables and the unit, so as to prevent damage to unit casing.
Caution
Before maintenance operations are carried out ensure that the
main disconnecting switch must be opened. Electric shock
may cause serious injury.
Important
The dimensioning of the entire duct network and the project
must be carried out by qualified personnel.

17
www.modine.com
English
IMPORTANT: The adequacy of the power supply (position of
wires, sections of conductors, protection devices, etc) must
be assessed by consulting the electrical data table, the
instructions and electrical schemes provided by the fan
motor manufacturer, and by taking into consideration all
local or national regulations governing the installation of
refrigeration and/or air conditioning equipment. It is neces-
sary to strictly adhere to the electrical schemes printed on
the fan motors as to avoid possible damage. Before using
fan motor revolution regulation systems it is necessary to
assess compatibility; non-compatible systems may generate
noise and damage. The manufacturer will not be liable for
performances of models equipped with regulation systems.
Installation
Connections to heat exchanger
1. Adequately dimension connections in order to have a mini-
mum pressure drop and refrigerant velocity values that ensure
oil entrainment.
2. On the delivery line, between the compressor and the consi-
der, install the anti-vibration device and the silencer, even in
case of reduced noise level from the compressor discharge
valves.
3. The connection to the refrigeration installation must always be
made from special copper tube, duly deoxidized and dehydra-
ted.
4. Welding must always be carried out in nitrogen atmosphere
with silver welding alloys in order to avoid formation of slag.
5. Create a void in the refrigerant circuit and maintain it for a
period of at least two hours.
6. After the circuit has been filled with refrigerant ensure that
there are no leaks.
7. Do not invert the refrigerant inlet (greater diameter) headers
with the outlet (smaller diameter) headers.
Note
The installer must predispose a disconnecting switch and all
other protection devices imposed by local legislation regula-
ting the subject.
Note
Incorrect installation can significantly influence the noise level
of the condenser.
Check before start-up
1. Clamping of all electrical connections.
2. Correct leveling and sturdiness of supporting base.
3. Fastening of panels, ducts and tightening of all fastening
screws.
4. Foresee adequate free space for maintenance and service.
5. Ensure the correspondence between input voltage and data
printed on model nameplate.
6. Ensure that the fan motor blades rotate freely.
7. Exclude refrigerant leakage.
8. All models are supplied with polyethylene plastic protective
film (LDPE) on the outer casing. All protective film must be
removed from unit after installation has been completed.
9. Models are supplied without protective fan guard; therefore it
is necessary to ensure that the scroll is free from foreign
objects that may have accidentally fallen inside during tran-
sport or storage.
10.The manufacturer declares that the unit must not be put
into operation until the installation in which it is incorpo-
rated has not been confirmed compliant to the conditions
of EC directive 98/37 and to national/local implementing
legislation.
Start-up
The initial start-up must be carried out under the supervision of a
qualified technician.
1. Attentively check that the rotation of the fan motors is in the
correct direction: counter rotation may cause damage to
motors.
2. Check that the working conditions (temperatures and pressu-
res) are in compliance to those of project.
Modification of the air throw position
It is possible to modify the factory set position of the fan motor
panels and therefore change the air throw position:
1. In order to gain access to fastening screws remove plastic
pressure caps from the panel involved with the position modifi-
cation.
2. Remove one of the panels without fan motor by loosening the
internal fastening screws.
3. Remove one of the panels with fan motor (preventively check
weights of these parts in the dimensional table) by loosening
internal fastening screws; adjust panel in the new position,
tighten fastening screws and reposition plastic pressure caps.
4. Place panel without motors in the new available position, tigh-
ten fastening screws and reposition the plastic pressure caps.
5. Continue following the same procedure for all panels.
Model PCM Fan shroud weight (kg)
MxA - B 20
MxC - D 27
MxE - F - G 35
Dimensional features

18
www.modine.com
Model PCM MxA - B MxC - D MxE - F - G
Connection
230/1/50Hz 230/1/50Hz 230/400V-3-50 Hz
Capacity (kW) 0,55 0,52 1,38
Absorption (A) 4,1 4 6,7/3,9
RPM 1200 875 725
Fan motors features
Models MxE - F - GModels MxA - B
Models MxC - D
Fan motors connection
scheme
yellow / green
yellow / green
brown
brown
black
blue
black
blue
cond.
cond.
run
grey
grey
yellow
brown
white
blue
black
red
230V/1/50Hz
230V/1/50Hz
aux
run
aux
TK
TK
RST
grey
grey
yellow
brown
withe
blue
black
red
TK
RST
TK
400V/3/50Hz star connection preset
230V/3/50Hz delta connection preset
1/44