HP LaserJet 1022 Printer series Guida Rapida
- Tipo
- Guida Rapida

HP LaserJet 1022nw
Wireless Printer
Getting Started Guide
Guide de démarrage
Leitfaden zur Inbetriebnahme
Guida rapida
Guía de puesta en marcha
Opsætningsvejledning
Installatiegids
Guia de primeiros passos
Lea esto primero


HP LaserJet 1022nw Wireless Printer
Getting Started Guide
English

Copyright and License
© 2005 Copyright Hewlett-Packard
Development Company, L.P.
Reproduction, adaptation, or translation
without prior written permission is
prohibited, except as allowed under the
copyright laws.
The information contained herein is subject
to change without notice.
The only warranties for HP products and
services are set forth in the express
warranty statements accompanying such
products and services. Nothing herein
should be construed as constituting an
additional warranty. HP shall not be liable
for technical or editorial errors or omissions
contained herein.
Part number: Q5914-90918
Edition 1, 2/2005
FCC Regulations
This equipment has been tested and found
to comply with the limits for a Class B
digital device, pursuant to Part 15 of the
FCC rules. These limits are designed to
provide reasonable protection against
interference when the equipment is
operated in a residential installation. This
equipment generates, uses, and can
radiate radio frequency energy and, if it is
not installed and used in accordance with
the instructions, it may cause harmful
interference to radio communications.
However, there is no guarantee that
interference will not occur in a particular
installation. If this equipment does cause
harmful interference to radio or television
reception, which can be determined by
turning the equipment off and on, the user
is encouraged to try to correct the
interference by one or more of the following
measures:
Reorient or relocate the receiving antenna.
Increase separation between the
equipment and receiver.
Connect equipment into an outlet on a
circuit different from that to which the
receiver is connected.
Consult your dealer or an experienced
radio/TV technician.
Any changes or modifications to the printer
that are not expressly approved by HP
could void the user's authority to operate
the equipment.
Use of a shielded interface cable is
required to comply with the Class B limits
of Part 15 of FCC rules.
This device complies with Part 15 of FCC
Rules. Operation is subject to the following
two conditions: (1) this device may not
cause harmful interference, and (2) this
device must accept any interference
received, including interference that may
cause undesired operation.
Trademark Credits
Microsoft®, Windows®, and Windows NT®
are U.S. registered trademarks of Microsoft
Corporation.

Table of contents
1 Introduction
Device overview .......................................................................................................................2
Preparing the location ..............................................................................................................3
Package contents ....................................................................................................................4
Locating the device parts .........................................................................................................5
2 Setting up the printer
Remove the tape ......................................................................................................................8
Prepare the print cartridge .......................................................................................................9
Load the 250-sheet main input tray .......................................................................................11
Select a connection method ...................................................................................................12
Connect the printer to a wired network ..................................................................................13
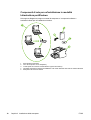
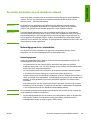
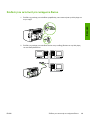
Connect the printer to a wireless only network ......................................................................15
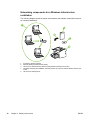
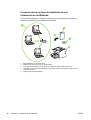
Networking information and components ........................................................................15
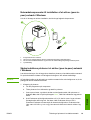
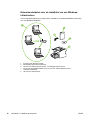
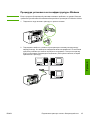
Networking components for a Windows infrastructure installation ..................................16
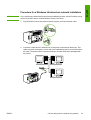
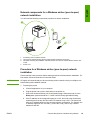
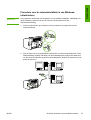
Procedure for a Windows infrastructure network installation ...........................................17
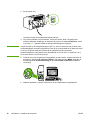
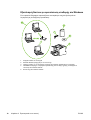
Network components for a Windows ad-hoc (peer-to-peer) network installation ............19
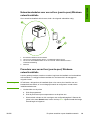
Procedure for a Windows ad-hoc (peer-to-peer) network installation .............................19
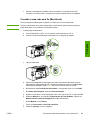
Connecting to a wireless network (Macintosh) ................................................................20
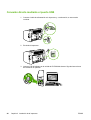
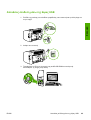
Direct connect using the USB port .........................................................................................24
ENWW Table of contents iii
English

iv ENWW


Device overview
NOTE
The HP LaserJet 1022nw printer is part of the HP LaserJet 1022 series printer family. For
information about using the printers in this series, see the HP LaserJet 1022 User Guide
located on the CD-ROM.
The HP LaserJet 1022nw printer contains all the features of the HP LaserJet 1022 printer. In
addition, the HP LaserJet 1022nw printer includes integrated 802.11b/g wireless connectivity
and an internal network port.
2 Chapter 1 Introduction ENWW

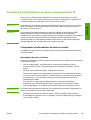
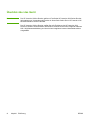
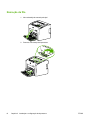
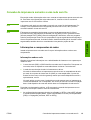
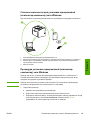
Preparing the location
Place the printer on a sturdy, level surface in a well-ventilated area. Make sure there is
enough space around the printer to allow air to flow through the vents.
Do not place the printer in direct sunlight or in an area that has abrupt temperature and
humidity changes. The recommended temperature range is 10°C to 32.5°C (50°F to 90.5°F).
ENWW Preparing the location 3
English

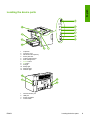
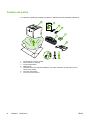
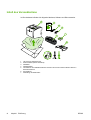
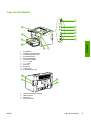
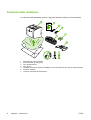
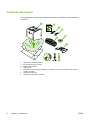
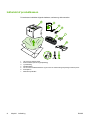
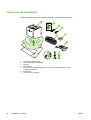
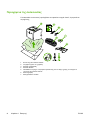
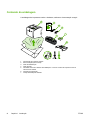
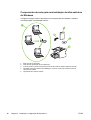
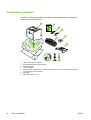
Package contents
The printer package contains the following hardware, software, and documentation.
1 HP LaserJet 1022nw printer
2 Documentation (this manual)
3 Power cord
4 Network cable
5 CD-ROM containing the installation software and the HP LaserJet 1022nw printer Wireless User
Guide
6 Print cartridge
7 Input tray cover
4 Chapter 1 Introduction ENWW

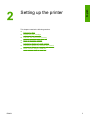
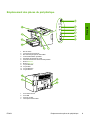
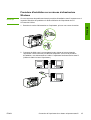
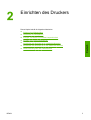
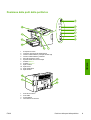
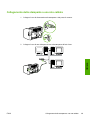
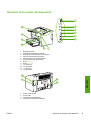
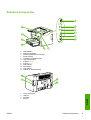
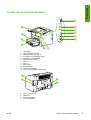
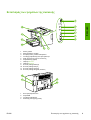
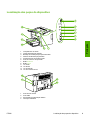
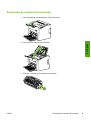
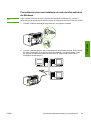
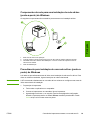
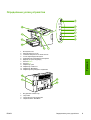
Locating the device parts
1 Output bin
2 Input tray cover
3 250-sheet main input tray
4 Priority feed slot
5 Output media storage
6 Print cartridge door
7 C
ANCEL
button
8 G
O
button
9 Go light
10 Ready light
11 Attention light
12 Wireless light
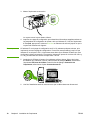
1 Internal network port
2 USB port
3 Power receptacle
4 On/Off switch
ENWW Locating the device parts 5
English

6 Chapter 1 Introduction ENWW

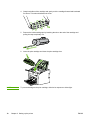
Setting up the printer
This chapter contains the following sections:
●
Remove the tape
●
Prepare the print cartridge
●
Load the 250-sheet main input tray
●
Select a connection method
●
Connect the printer to a wired network
●
Connect the printer to a wireless only network
●
Direct connect using the USB port
ENWW 7
English

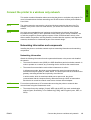
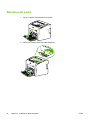
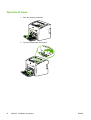
Remove the tape
1. Open the main input tray.
2. Remove the orange tape from the printer.
8 Chapter 2 Setting up the printer ENWW

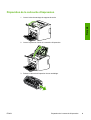
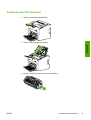
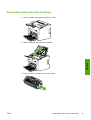
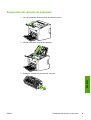
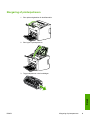
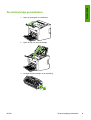
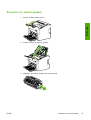
Prepare the print cartridge
1. Open the output media storage tray.
2. Open the print cartridge door.
3. Remove the print cartridge from the wrapping.
ENWW Prepare the print cartridge 9
English

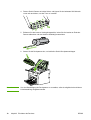
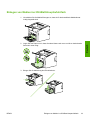
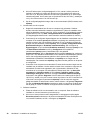
4. Grasp both sides of the cartridge and gently rock the cartridge forward and backward
five times. This action distributes the toner.
5
x
5. Remove the inside sealing tape by breaking the tab on the end of the cartridge and
pulling the tape completely out.
6. Insert the print cartridge and close the print cartridge door.
NOTE
To prevent damage to the print cartridge, minimize its exposure to direct light.
10 Chapter 2 Setting up the printer ENWW

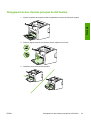
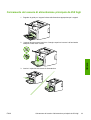
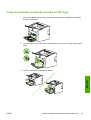
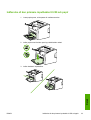
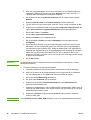
Load the 250-sheet main input tray
1. Adjust the media guides to the correct media size settings.
2. Insert the paper with the top forward and the side to be printed facing down.
3. Insert the input tray cover.
ENWW Load the 250-sheet main input tray 11
English

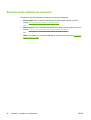
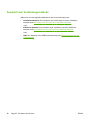
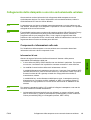
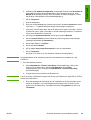
Select a connection method
Select one of the following methods for connecting the printer:
● Wired network: To connect to a wired network, see
Connect the printer to a wired
network
-or-
● Wireless network: To connect to a wireless network, see
Connect the printer to a
wireless only network
-or-
● USB: To perform a USB direct connect, see
Direct connect using the USB port
12 Chapter 2 Setting up the printer ENWW

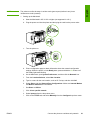
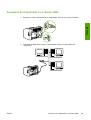
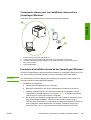
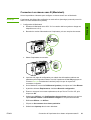
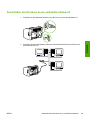
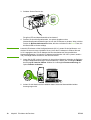
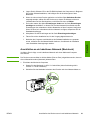
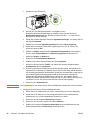
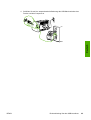
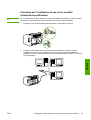
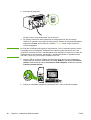
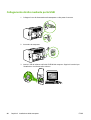
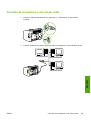
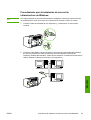
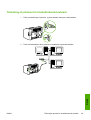
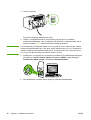
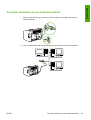
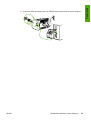
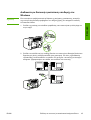
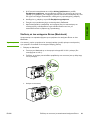
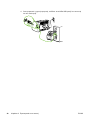
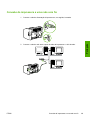
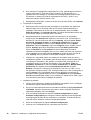
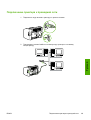
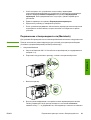
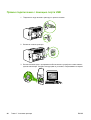
Connect the printer to a wired network
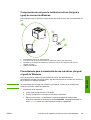
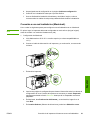
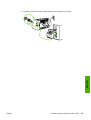
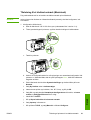
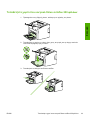
1. Plug the power cord into the printer and then plug the cord into the power outlet.
2. Connect the network cable between the network port on the printer and the network hub.
ENWW Connect the printer to a wired network 13
English

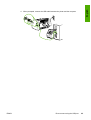
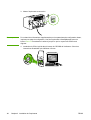
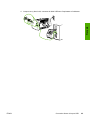
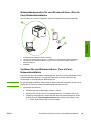
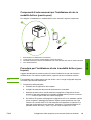
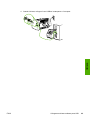
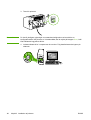
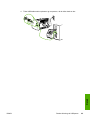
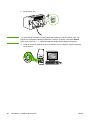
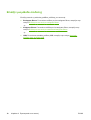
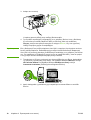
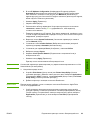
3. Turn the printer on.
NOTE
To obtain additional information about the network configuration settings, print a
configuration page. When the printer is in the Ready state, press and hold the G
O
button
until the Ready light starts blinking.
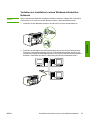
4. Insert the software CD into the computer CD-ROM drive. Follow the on-screen
installation instructions.
14 Chapter 2 Setting up the printer ENWW
La pagina si sta caricando...
La pagina si sta caricando...
La pagina si sta caricando...
La pagina si sta caricando...
La pagina si sta caricando...
La pagina si sta caricando...
La pagina si sta caricando...
La pagina si sta caricando...
La pagina si sta caricando...
La pagina si sta caricando...
La pagina si sta caricando...
La pagina si sta caricando...
La pagina si sta caricando...
La pagina si sta caricando...
La pagina si sta caricando...
La pagina si sta caricando...
La pagina si sta caricando...
La pagina si sta caricando...
La pagina si sta caricando...
La pagina si sta caricando...
La pagina si sta caricando...
La pagina si sta caricando...
La pagina si sta caricando...
La pagina si sta caricando...
La pagina si sta caricando...
La pagina si sta caricando...
La pagina si sta caricando...
La pagina si sta caricando...
La pagina si sta caricando...
La pagina si sta caricando...
La pagina si sta caricando...
La pagina si sta caricando...
La pagina si sta caricando...
La pagina si sta caricando...
La pagina si sta caricando...
La pagina si sta caricando...
La pagina si sta caricando...
La pagina si sta caricando...
La pagina si sta caricando...
La pagina si sta caricando...
La pagina si sta caricando...
La pagina si sta caricando...
La pagina si sta caricando...
La pagina si sta caricando...
La pagina si sta caricando...
La pagina si sta caricando...
La pagina si sta caricando...
La pagina si sta caricando...
La pagina si sta caricando...
La pagina si sta caricando...
La pagina si sta caricando...
La pagina si sta caricando...
La pagina si sta caricando...
La pagina si sta caricando...
La pagina si sta caricando...
La pagina si sta caricando...
La pagina si sta caricando...
La pagina si sta caricando...
La pagina si sta caricando...
La pagina si sta caricando...
La pagina si sta caricando...
La pagina si sta caricando...
La pagina si sta caricando...
La pagina si sta caricando...
La pagina si sta caricando...
La pagina si sta caricando...
La pagina si sta caricando...
La pagina si sta caricando...
La pagina si sta caricando...
La pagina si sta caricando...
La pagina si sta caricando...
La pagina si sta caricando...
La pagina si sta caricando...
La pagina si sta caricando...
La pagina si sta caricando...
La pagina si sta caricando...
La pagina si sta caricando...
La pagina si sta caricando...
La pagina si sta caricando...
La pagina si sta caricando...
La pagina si sta caricando...
La pagina si sta caricando...
La pagina si sta caricando...
La pagina si sta caricando...
La pagina si sta caricando...
La pagina si sta caricando...
La pagina si sta caricando...
La pagina si sta caricando...
La pagina si sta caricando...
La pagina si sta caricando...
La pagina si sta caricando...
La pagina si sta caricando...
La pagina si sta caricando...
La pagina si sta caricando...
La pagina si sta caricando...
La pagina si sta caricando...
La pagina si sta caricando...
La pagina si sta caricando...
La pagina si sta caricando...
La pagina si sta caricando...
La pagina si sta caricando...
La pagina si sta caricando...
La pagina si sta caricando...
La pagina si sta caricando...
La pagina si sta caricando...
La pagina si sta caricando...
La pagina si sta caricando...
La pagina si sta caricando...
La pagina si sta caricando...
La pagina si sta caricando...
La pagina si sta caricando...
La pagina si sta caricando...
La pagina si sta caricando...
La pagina si sta caricando...
La pagina si sta caricando...
La pagina si sta caricando...
La pagina si sta caricando...
La pagina si sta caricando...
La pagina si sta caricando...
La pagina si sta caricando...
La pagina si sta caricando...
La pagina si sta caricando...
La pagina si sta caricando...
La pagina si sta caricando...
La pagina si sta caricando...
La pagina si sta caricando...
La pagina si sta caricando...
La pagina si sta caricando...
La pagina si sta caricando...
La pagina si sta caricando...
La pagina si sta caricando...
La pagina si sta caricando...
La pagina si sta caricando...
La pagina si sta caricando...
La pagina si sta caricando...
La pagina si sta caricando...
La pagina si sta caricando...
La pagina si sta caricando...
La pagina si sta caricando...
La pagina si sta caricando...
La pagina si sta caricando...
La pagina si sta caricando...
La pagina si sta caricando...
La pagina si sta caricando...
La pagina si sta caricando...
La pagina si sta caricando...
La pagina si sta caricando...
La pagina si sta caricando...
La pagina si sta caricando...
La pagina si sta caricando...
La pagina si sta caricando...
La pagina si sta caricando...
La pagina si sta caricando...
La pagina si sta caricando...
La pagina si sta caricando...
La pagina si sta caricando...
La pagina si sta caricando...
La pagina si sta caricando...
La pagina si sta caricando...
La pagina si sta caricando...
La pagina si sta caricando...
La pagina si sta caricando...
La pagina si sta caricando...
La pagina si sta caricando...
La pagina si sta caricando...
La pagina si sta caricando...
La pagina si sta caricando...
La pagina si sta caricando...
La pagina si sta caricando...
La pagina si sta caricando...
La pagina si sta caricando...
La pagina si sta caricando...
La pagina si sta caricando...
La pagina si sta caricando...
La pagina si sta caricando...
La pagina si sta caricando...
La pagina si sta caricando...
La pagina si sta caricando...
La pagina si sta caricando...
La pagina si sta caricando...
La pagina si sta caricando...
La pagina si sta caricando...
La pagina si sta caricando...
La pagina si sta caricando...
La pagina si sta caricando...
La pagina si sta caricando...
La pagina si sta caricando...
La pagina si sta caricando...
La pagina si sta caricando...
La pagina si sta caricando...
La pagina si sta caricando...
La pagina si sta caricando...
La pagina si sta caricando...
La pagina si sta caricando...
La pagina si sta caricando...
La pagina si sta caricando...
La pagina si sta caricando...
La pagina si sta caricando...
La pagina si sta caricando...
La pagina si sta caricando...
La pagina si sta caricando...
La pagina si sta caricando...
La pagina si sta caricando...
La pagina si sta caricando...
La pagina si sta caricando...
La pagina si sta caricando...
La pagina si sta caricando...
La pagina si sta caricando...
La pagina si sta caricando...
La pagina si sta caricando...
La pagina si sta caricando...
La pagina si sta caricando...
La pagina si sta caricando...
La pagina si sta caricando...
La pagina si sta caricando...
La pagina si sta caricando...
La pagina si sta caricando...
La pagina si sta caricando...
La pagina si sta caricando...
La pagina si sta caricando...
La pagina si sta caricando...
La pagina si sta caricando...
La pagina si sta caricando...
La pagina si sta caricando...
La pagina si sta caricando...
La pagina si sta caricando...
La pagina si sta caricando...
La pagina si sta caricando...
La pagina si sta caricando...
La pagina si sta caricando...
La pagina si sta caricando...
La pagina si sta caricando...
La pagina si sta caricando...
La pagina si sta caricando...
La pagina si sta caricando...
La pagina si sta caricando...
La pagina si sta caricando...
La pagina si sta caricando...
La pagina si sta caricando...
La pagina si sta caricando...
La pagina si sta caricando...
La pagina si sta caricando...
La pagina si sta caricando...
La pagina si sta caricando...
La pagina si sta caricando...
La pagina si sta caricando...
La pagina si sta caricando...
La pagina si sta caricando...
La pagina si sta caricando...
La pagina si sta caricando...
La pagina si sta caricando...
La pagina si sta caricando...
La pagina si sta caricando...
La pagina si sta caricando...
La pagina si sta caricando...
La pagina si sta caricando...
La pagina si sta caricando...
La pagina si sta caricando...
La pagina si sta caricando...
La pagina si sta caricando...
La pagina si sta caricando...
La pagina si sta caricando...
La pagina si sta caricando...
La pagina si sta caricando...
La pagina si sta caricando...
La pagina si sta caricando...
La pagina si sta caricando...
La pagina si sta caricando...
La pagina si sta caricando...
La pagina si sta caricando...
La pagina si sta caricando...
La pagina si sta caricando...
La pagina si sta caricando...
La pagina si sta caricando...
La pagina si sta caricando...
La pagina si sta caricando...
La pagina si sta caricando...
La pagina si sta caricando...
La pagina si sta caricando...
La pagina si sta caricando...
La pagina si sta caricando...
La pagina si sta caricando...
La pagina si sta caricando...
La pagina si sta caricando...
-
 1
1
-
 2
2
-
 3
3
-
 4
4
-
 5
5
-
 6
6
-
 7
7
-
 8
8
-
 9
9
-
 10
10
-
 11
11
-
 12
12
-
 13
13
-
 14
14
-
 15
15
-
 16
16
-
 17
17
-
 18
18
-
 19
19
-
 20
20
-
 21
21
-
 22
22
-
 23
23
-
 24
24
-
 25
25
-
 26
26
-
 27
27
-
 28
28
-
 29
29
-
 30
30
-
 31
31
-
 32
32
-
 33
33
-
 34
34
-
 35
35
-
 36
36
-
 37
37
-
 38
38
-
 39
39
-
 40
40
-
 41
41
-
 42
42
-
 43
43
-
 44
44
-
 45
45
-
 46
46
-
 47
47
-
 48
48
-
 49
49
-
 50
50
-
 51
51
-
 52
52
-
 53
53
-
 54
54
-
 55
55
-
 56
56
-
 57
57
-
 58
58
-
 59
59
-
 60
60
-
 61
61
-
 62
62
-
 63
63
-
 64
64
-
 65
65
-
 66
66
-
 67
67
-
 68
68
-
 69
69
-
 70
70
-
 71
71
-
 72
72
-
 73
73
-
 74
74
-
 75
75
-
 76
76
-
 77
77
-
 78
78
-
 79
79
-
 80
80
-
 81
81
-
 82
82
-
 83
83
-
 84
84
-
 85
85
-
 86
86
-
 87
87
-
 88
88
-
 89
89
-
 90
90
-
 91
91
-
 92
92
-
 93
93
-
 94
94
-
 95
95
-
 96
96
-
 97
97
-
 98
98
-
 99
99
-
 100
100
-
 101
101
-
 102
102
-
 103
103
-
 104
104
-
 105
105
-
 106
106
-
 107
107
-
 108
108
-
 109
109
-
 110
110
-
 111
111
-
 112
112
-
 113
113
-
 114
114
-
 115
115
-
 116
116
-
 117
117
-
 118
118
-
 119
119
-
 120
120
-
 121
121
-
 122
122
-
 123
123
-
 124
124
-
 125
125
-
 126
126
-
 127
127
-
 128
128
-
 129
129
-
 130
130
-
 131
131
-
 132
132
-
 133
133
-
 134
134
-
 135
135
-
 136
136
-
 137
137
-
 138
138
-
 139
139
-
 140
140
-
 141
141
-
 142
142
-
 143
143
-
 144
144
-
 145
145
-
 146
146
-
 147
147
-
 148
148
-
 149
149
-
 150
150
-
 151
151
-
 152
152
-
 153
153
-
 154
154
-
 155
155
-
 156
156
-
 157
157
-
 158
158
-
 159
159
-
 160
160
-
 161
161
-
 162
162
-
 163
163
-
 164
164
-
 165
165
-
 166
166
-
 167
167
-
 168
168
-
 169
169
-
 170
170
-
 171
171
-
 172
172
-
 173
173
-
 174
174
-
 175
175
-
 176
176
-
 177
177
-
 178
178
-
 179
179
-
 180
180
-
 181
181
-
 182
182
-
 183
183
-
 184
184
-
 185
185
-
 186
186
-
 187
187
-
 188
188
-
 189
189
-
 190
190
-
 191
191
-
 192
192
-
 193
193
-
 194
194
-
 195
195
-
 196
196
-
 197
197
-
 198
198
-
 199
199
-
 200
200
-
 201
201
-
 202
202
-
 203
203
-
 204
204
-
 205
205
-
 206
206
-
 207
207
-
 208
208
-
 209
209
-
 210
210
-
 211
211
-
 212
212
-
 213
213
-
 214
214
-
 215
215
-
 216
216
-
 217
217
-
 218
218
-
 219
219
-
 220
220
-
 221
221
-
 222
222
-
 223
223
-
 224
224
-
 225
225
-
 226
226
-
 227
227
-
 228
228
-
 229
229
-
 230
230
-
 231
231
-
 232
232
-
 233
233
-
 234
234
-
 235
235
-
 236
236
-
 237
237
-
 238
238
-
 239
239
-
 240
240
-
 241
241
-
 242
242
-
 243
243
-
 244
244
-
 245
245
-
 246
246
-
 247
247
-
 248
248
-
 249
249
-
 250
250
-
 251
251
-
 252
252
-
 253
253
-
 254
254
-
 255
255
-
 256
256
-
 257
257
-
 258
258
-
 259
259
-
 260
260
-
 261
261
-
 262
262
-
 263
263
-
 264
264
-
 265
265
-
 266
266
-
 267
267
-
 268
268
-
 269
269
-
 270
270
-
 271
271
-
 272
272
-
 273
273
-
 274
274
-
 275
275
-
 276
276
-
 277
277
-
 278
278
-
 279
279
-
 280
280
-
 281
281
-
 282
282
-
 283
283
-
 284
284
-
 285
285
-
 286
286
-
 287
287
-
 288
288
-
 289
289
-
 290
290
-
 291
291
-
 292
292
-
 293
293
-
 294
294
-
 295
295
-
 296
296
-
 297
297
-
 298
298
-
 299
299
-
 300
300
-
 301
301
-
 302
302
-
 303
303
-
 304
304


HP LaserJet 1022 Printer series Guida Rapida
- Tipo
- Guida Rapida
in altre lingue
- English: HP LaserJet 1022 Printer series Quick start guide
- français: HP LaserJet 1022 Printer series Guide de démarrage rapide
- español: HP LaserJet 1022 Printer series Guía de inicio rápido
- Deutsch: HP LaserJet 1022 Printer series Schnellstartanleitung
- русский: HP LaserJet 1022 Printer series Инструкция по началу работы
- Nederlands: HP LaserJet 1022 Printer series Snelstartgids
- português: HP LaserJet 1022 Printer series Guia rápido
- dansk: HP LaserJet 1022 Printer series Hurtig start guide
Documenti correlati
-
HP LaserJet 1320 Printer series Guida Rapida
-
-
HP LaserJet 9050 Printer series Guida Rapida
-
-
-
-
HP Photosmart C6340 Manuale utente
-
-
HP LaserJet M5035 Multifunction Printer series Guida Rapida
-