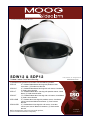
Moog Videolarm SDW16C Istruzioni per l'uso
- Categoria
- Accessori per telecamere di sicurezza
- Tipo
- Istruzioni per l'uso
La pagina si sta caricando...

IMPORTANT SAFEGUARDS SAFETY PRECAUTIONS
UNPACKING
SERVICE
1 Read these instructions.
2 Keep these instructions.
3 Heed all warnings
4 Follow all instructions.
5 Do not use this apparatus near water.
6 Clean only with damp cloth.
7 Do not block any of the ventilation openings. Install in accordance with the
manufacturers instructions.
8 Cable Runs- All cable runs must be within permissible distance.
9 Mounting - This unit must be properly and securely mounted to a supporting
structure capable of sustaining the weight of the unit.
Accordingly:
a. The installation should be made by a qualified installer.
b. The installation should be in compliance with local codes.
c. Care should be exercised to select suitable hardware to install the unit, taking into
account both the composition of the mounting surface and the weight of the
unit.
10 Do not install near any heat sources such as radiators, heat registers, stoves, or other
apparatus ( including amplifiers) that produce heat.
11 Do not defeat the safety purpose of the polarized or grounding-type plug. A
polarized plug has two blades with one wider than the other. A grounding type
plug has two blades and a third grounding prong. The wide blade or the third
prong are provided for your safety. When the provided plug does not fit into your
outlet, consult an electrician for replacement of the obsolete outlet.
12 Protect the power cord from being walked on or pinched particularly at plugs,
convenience receptacles, and the point where they exit from the apparatus.
13 Only use attachment/ accessories specified by the manufacturer.
14 Use only with a cart, stand, tripod, bracket, or table specified by the manufacturer,
or sold with the apparatus. When a cart is used, use caution when moving the cart/
apparatus combination to avoid injury from tip-over.
15 Unplug this apparatus during lighting storms or when unused for long periods of time.
16 Refer all servicing to qualified service personnel. Servicing is required when the
apparatus has been damaged in any way, such as power-supply cord or plug is
damaged, liquid has been spilled of objects have fallen into the apparatus, the
apparatus has been exposed to rain or moisture, does not operate normally, or
has been dropped.
Be sure to periodically examine the unit and the supporting structure to make sure that the
integrity of the installation is intact. Failure to comply with the foregoing could result in the
unit separating from the support structure and falling, with resultant damages or injury to
anyone or anything struck by the falling unit.
Unpack carefully. Electronic components can be
damaged if improperly handled or dropped. If an item
appears to have been damaged in shipment, replace
it properly in its carton and notify the shipper.
Be sure to save:
1 The shipping carton and packaging material.
They are the safest material in which to make
future shipments of the equipment.
2 These Installation and Operating Instructions.
If technical support or service is needed, contact us
at the following number:
The lightning flash with an arrowhead
symbol, within an equilateral triangle, is
intended to alert the user to the presence
of non-insulated “dangerous voltage”
within the product’s enclosure that may be
of sufficient magnitude to constitute a risk
to persons.
Este símbolo se piensa para alertar al usuario a la
presencia del “voltaje peligroso no-aisIado” dentro del
recinto de los productos que puede ser un riesgo de
choque eléctrico.
Ce symbole est prévu pour alerter I’utilisateur à la
presence “de la tension dangereuse” non-isolée dans la
clôture de produits qui peut être un risque de choc
électrique.
Dieses Symbol soll den Benutzer zum Vorhandensein der
nicht-lsolier “Gefährdungsspannung” innerhalb der
Produkteinschließung alarmieren die eine Gefahr des
elektrischen Schlages sein kann.
Este símbolo é pretendido alertar o usuário à presença
“di tensão perigosa non-isolada” dentro do cerco dos
produtos que pode ser um risco de choque elétrico.
Questo simbolo è inteso per avvertire I’utente alla
presenza “di tensione pericolosa” non-isolata all’interno
della recinzione dei prodotti che può essere un rischio di
scossa elettrica
.
The exclamation point within an equilateral
triangle is intended to alert the user to
presence of important operating and
maintenance (servicing) instructions in the
literature accompanying the appliance.
Este símbolo del punto del exclamation se piensa para
alertar al usuario a la presencia de instrucciones
importantes en la literatura que acompaña la
aplicación.
Ce symbole de point d’exclamation est prévu pour
alerter l’utilisateur à la presence des instructions
importantes dans la littérature accompagnant
l’appareil.
Dieses Ausruf Punktsymbol soll den Benutzer zum
Vorhandensein de wichtigen Anweisungen in der
Literatur alarmieren, die das Gerät begleitet.
Este símbolo do ponto do exclamation é pretendido
alertar o usuário à presença de instruções importantes
na literatura que acompanha o dispositivo.
Questo simbolo del punto del exclamaton è inteso per
avvertire l’utente alla presenza delle istruzioni importanti
nella letteratura che accompagna l'apparecchio.
TECHNICAL SUPPORT
AVAILABLE 24 HOURS
1- 800 - 554 -1124
RISK OF ELECTRIC SHOCK
DO NOT OPEN
CAUTION
CAUTION: TO REDUCE THE RISK OF
ELECTRIC SHOCK, DO NOT REMOVE
COVER ( OR BACK). NO USER- SERVICE-
ABLE PARTS INSIDE. REFER SEVICING TO
QUALIFIED SERVICE PERSONNEL.
La pagina si sta caricando...
La pagina si sta caricando...

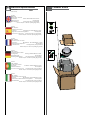
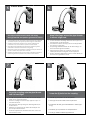
Wall Mount
Securely mount unit to wall or to appropriate
adapter bracket.
• Monte con seguridad la unidad a la pared o al
soporte apropiado del adaptador.
• Montez solidement l'unité au mur ou à la parenthèse
appropriée d'adapteur.
• Bringen Sie sicher Maßeinheit zur Wand oder zum
passenden Adapterhaltewinkel an.
• Monte firmemente a unidade à parede ou ao suporte
apropriado do adaptador.
• Monti saldamente l'unità alla parete o alla staffa
adatta dell'adattatore.
If using conduit connect, connect to
incoming conduit fitting.
• Si usa el conducto conecte, conecte con la guar-
nición entrante del conducto.
• Si à l'aide du conduit reliez, reliez à l'ajustage de
précision entrant de conduit.
• Wenn Sie Rohr verwenden, schließen Sie an, schließen
Sie an ankommende Rohrbefestigung an.
• Se usando a canalização conecte, conecte ao
encaixe entrante da canalização.
• Se per mezzo del condotto colleghi, colleghi al mon-
taggio ricevuto del condotto.
Open access door to access power and
control connectors.
• Abra la puerta de acceso en los conectadores de la
energía y de control del acceso.
• Ouvrez la porte d'accès aux connecteurs de
puissance et de commande d'accès.
• Öffnen Sie Zugang zur Zugang Energie und zu den
Geräteanschlüssen.
• Abra a porta de acesso aos conectores do poder e
de controle do acesso.
• Apra il portello di accesso ai connettori di alimentazi-
one e di controllo di accesso.
Make wire connection as they are required
for your needs.
• Haga la conexión del alambre como se requieren
para sus necesidades.
• Établissez le rapport de fil comme ils sont exigés pour
vos besoins.
• Stellen Sie Leitung Beziehung her, wie sie für Ihre
Notwendigkeiten angefordert werden.
• Faça a conexão do fio como são requeridos para suas
necessidades.
• Faccia il collegamento del legare come sono richiesti
per i vostri bisogni.
1 2
3 4

1
Securely mount bracket to wall. Pull wiring
through bracket and position grommet as shown.
• Con seguridad soporte del montaje a emparedar. Tire del cableado
a través del soporte y del ojal de la posición según lo demostrado.
• Solidement parenthèse de bâti à murer. Tirez le câblage par la
parenthèse et le canon isolant de position comme montré.
• Sicher Einfassung Haltewinkel wall. Ziehen Sie Verdrahtung durch
Haltewinkel und Position Gummimuffe, wie gezeigt.
• Firmemente suporte da montagem a wall. Puxe a fiação através do
suporte e do ilhó da posição como mostrado.
• Saldamente staffa del supporto da wall. Tiri i collegamenti tramite la
staffa ed il gommino di protezione di posizione come indicato.
4
Screw the (2) bolts into the coupling.
• Atornille (2) los pernos en el acoplador.
• Vissez (2) les boulons dans l'accouplement.
• Schrauben Sie die (2) Schraubbolzen in die Koppe-
lung.
• Parafuse (2) os parafusos no acoplamento.
• Avviti (2) i bulloni nell'accoppiamento.
2
Wrap Teflon tape around the pipe threads
to ensure a tight seal.
• La cinta del Teflon del abrigo alrededor de la pipa rosca
para asegurar un sello apretado.
• La bande de teflon d'enveloppe autour de la pipe filète
pour assurer un joint serré.
• Verpackung Teflonklebeband um das Rohr verlegt, um
eine feste Dichtung sicherzustellen.
• A fita adesiva do Teflon do envoltório em torno da
tubulação enfía para assegurar um selo apertado.
• Il nastro del Teflon dell'involucro intorno al tubo filetta per
accertare una guarnizione stretta.
TM
3
Screw the coupling onto the pipe threads
until it is hand tight.
• Atornille el acoplador sobre los hilos de rosca de la pipa
hasta que es mano firmemente.
• Vissez le couplage sur les fils de pipe jusqu'à ce que ce
soit main fortement.
• Schrauben Sie die Koppelung auf die Rohrgewinde, bis
es Hand fest ist.
• Parafuse o acoplamento nas linhas da tubulação até
que esteja mão firmemente.
• Avviti l'accoppiamento sui filetti del tubo fino a che non
sia fortemente mano.
5
6
7
8
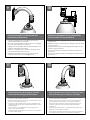
Pendant Mount

5
Loop the lanyard over the set screw to
temporarily hold housing.
• Coloque el acollador sobre el tornillo de presión para
celebrar temporalmente la cubierta.
• Faites une boucle la lanière au-dessus de la vis de réglage
pour tenir temporairement le logement.
• Schlingen Sie die Abzuglinie über der Klemmschraube, um
Gehäuse vorübergehend zu halten.
• Dê laços no colhedor sobre o parafuso de fixação para
prender temporariamente a carcaça.
• Colleghi la cordicella in circuito sopra la vite di arresto
temporaneamente per tenere l'alloggiamento.
6
Make the appropriate wiring connections
from the dome to the gooseneck.
• Haga las conexiones apropiadas del cableado de la bóveda
al gooseneck.
• Établissez les rapports appropriés de câblage à partir du dôme
au col de cygne.
• Stellen Sie die passenden Verdrahtung Beziehungen von der
Haube zum gooseneck her.
• Faça as conexões apropriadas da fiação da abóbada ao
gooseneck.
• Faccia i collegamenti adatti dei collegamenti dalla cupola al
gooseneck.
7
Undo the lanyard, pull housing up and twist
secure with the locking bolt and washers.
• Deshaga el acollador, tire de contener para arriba y tuerza seguro
con el perno y las arandelas de fijación.
• Défaites la lanière, tirez loger vers le haut et tordez bloqué avec le
boulon et les rondelles de fermeture.
• Annulieren Sie die Abzuglinie, ziehen Sie oben unterbringen und
verdrehen Sie sicheres mit dem verriegelnschraubbolzen und den
Unterlegscheiben.
• Undo o colhedor, puxe abrigar acima e torça seguro com o
parafuso e as arruelas travando.
• Undo la cordicella, tiri l'alloggio in su e torca sicuro con il bullone e
le rondelle di bloccaggio.
8
Slide the grommet down over the coupling to prevent
water from entering and complete the assembly.
• Resbale el ojal abajo sobre el acoplador para evitar que el agua
entre y para terminar a la asamblea.
• Glissez le canon isolant vers le bas au-dessus de l'accouplement
pour empêcher l'eau d'entrer et pour accomplir l'assemblée.
• Schieben Sie die Gummimuffe unten über der Koppelung, um zu
verhindern, daß Wasser und die Versammlung durchzuführen
hereinkommt.
• Deslize o ilhó para baixo sobre o acoplamento para impedir que a
água entre e para terminar o conjunto.
• Faccia scorrere il gommino di protezione giù sopra l'accoppiamento
per impedire l'acqua entrare e per completare il complessivo.
9
10
11
12
La pagina si sta caricando...

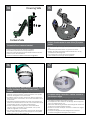
Camera Side
Housing Side
Assemble fixed camera bracket.
• Monte el soporte fijo de la cámara fotográfica.
• Assemblez la parenthèse fixe d'appareil-photo.
• Bauen Sie örtlich festgelegten Kamerahaltewinkel zusammen.
• Monte suporte fixo da câmera.
• Monti la staffa fissa della macchina fotografica.
14
Using security tool, attach dome to housing. Wipe
surface if needed, with damp cotton cloth if
needed.
• Con la herramienta de la seguridad, una la bóveda a la
cubierta. Limpie la superficie si está necesitado, con el paño
húmedo del algodón si está necesitado.
• En utilisant l'outil de sécurité, attachez le dôme au logement.
Essuyez la surface si nécessaire, avec le tissu humide de coton
si nécessaire.
• Mit Sicherheit Werkzeug bringen Sie Haube zum Gehäuse an.
Wischen Sie Oberfläche ab, wenn Sie, mit feuchtem Baumwoll-
tuch benötigt werden, wenn Sie benötigt werden.
• Usando a ferramenta da segurança, una a abóbada à
carcaça. Limpe a superfície se necessitado, com o pano
úmido do algodão se necessitado.
• Per mezzo dell'attrezzo di sicurezza, fissi la cupola ad alloggia-
mento. Pulisca la superficie se avuto bisogno di, con il panno
umido del cotone se avuto bisogno di.
16
Complete wiring connection. Position camera to
desired view angle.
• Termine la conexión del cableado. Coloque la cámara
fotográfica al ángulo deseado de la visión.
• Accomplissez le raccordement de câblage. Placez l'appareil-
photo à l'angle désiré de vue.
• Führen Sie Verdrahtung Anschluß durch. Bringen Sie Kamera zu
gewünschtem Ansichtwinkel in Position.
• Termine a conexão da fiação. Posicione a câmera ao ângulo
desejado da vista.
• Completi il collegamento dei collegamenti. Posizioni la
macchina fotografica sull'angolo voluto di vista.
17
Attach fixed bracket to one of the (2) square
holes.
• Una el soporte fijo a una (2) de las perforaciones rectangula-
res.
• Attachez la parenthèse fixe à un (2) des trous carrés.
• Bringen Sie örtlich festgelegten Haltewinkel bis eine der (2)
quadratischen Bohrungen an.
• Una suporte fixo a um (2) dos furos quadrados.
• Fissi la staffa fissa ad uno (2) dei fori quadrati.
15
La pagina si sta caricando...
La pagina si sta caricando...
-
 1
1
-
 2
2
-
 3
3
-
 4
4
-
 5
5
-
 6
6
-
 7
7
-
 8
8
-
 9
9
-
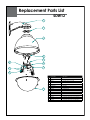 10
10
-
 11
11


Moog Videolarm SDW16C Istruzioni per l'uso
- Categoria
- Accessori per telecamere di sicurezza
- Tipo
- Istruzioni per l'uso
in altre lingue
Documenti correlati
-
Moog Videolarm SDP12C Installation And Operation Instructions Manual
-
-
-
-
-
Moog Videolarm IRHW75CF2N Installation And Operation Instructions Manual
-
-
Moog Videolarm PFD7CN-3 Manuale utente
-
-