
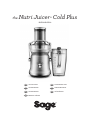
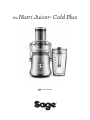
the Nutri Juicer‰ Cold Plus
BJE530/SJE530
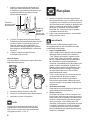
EN QUICK GUIDE DE KURZANLEITUNG
FR GUIDE RAPIDE NL SNELSTARTGIDS
ES GUÍA RÁPIDA
IT GUIDA RAPIDA
PT MANUAL RÁPIDO

2
Contents
2 Sage® Recommends Safety First
5 Components
6 Assembly
7 Functions
9 Care & Cleaning
10 Troubleshooting
12 Guarantee
SAGE®
RECOMMENDS
SAFETY FIRST
At Sage® we are very safety
conscious. We design and
manufacture consumer
products with the safety of you,
our valued customer, foremost
in mind. In addition we ask
that you exercise a degree of
care when using any electrical
appliance and adhere to the
following precautions.
IMPORTANT SAFEGUARDS
READ ALL INSTRUCTIONS
BEFORE USE AND SAVE
FOR FUTURE REFERENCE
• A downloadable version of this
document is also available at
sageappliances.com
• Before using the rst time ensure
your electricity supply is the
same as shown on the label on
the underside of the appliance.
• Remove and safely discard
any packaging materials
before rst use.
• To eliminate a choking hazard
for young children, safely
discard the protective cover
tted to the power plug.
• This appliance is for
household use only. Do not
use the appliance for anything
other than its intended use.
Do not use in moving vehicles
or boats. Do not use outdoors.
Misuse may cause injury.
• Fully unwind the power cord
before operating.
• Position the appliance on a
stable, heat resistant, level,
dry surface away from the
edge and do not operate on
or near a heat source such as
a hot plate, oven or gas hob.
• Vibration during operation may
cause the appliance to move.
• Do not let the power cord
hang over the edge of a bench
or table, touch hot surfaces
or become knotted.
• Always ensure the appliance
is turned OFF, unplugged at
the power outlet and has been

3
EN
allowed to cool before cleaning,
attempting to move or storing.
• Always turn the appliance to
the o position, switch o at
the power outlet and unplug
at the power outlet when the
appliance is not in use.
• Do not use the appliance
if the power cord, plug, or
appliance becomes damaged
in any way. If damaged or
maintenance other than
cleaning is required, please
contact Sage Customer Service
or go to sageappliances.com
• Any maintenance other
than cleaning should be
performed by an authorised
Sage® service centre.
• Children should not play
with the appliance.
• Cleaning of the appliance
should not be carried out
by children unless they are
8 years or older and supervised.
• The appliance and its cord should
be kept out of reach of children
aged 8 years and younger.
• The installation of a residual
current safety switch is
recommended to provide
additional safety when using
all electrical appliances. Safety
switches with a rated operating
current not more than 30mA
are recommended. Consult an
electrician for professional advice.
• Always ensure the appliance is
properly assembled before use.
The appliance will not operate
unless properly assembled.
• Do not use the appliance
on a sink drain board.
• Keep hands, ngers, hair,
clothing as well as spatulas and
other utensils away from moving
or rotating parts during operation.
• Do not use the appliance for
anything other than food and/or
beverage preparation.
• In order to avoid the possible
hazard of the appliance starting
by itself due to inadvertent
resetting of the overload
protection, do not attach an
external switching device (such as
a timer) or connect the appliance
to a circuit that can regularly
switch the appliance on and o.
• Carefully read all instructions
before operation and save for
future reference.
• The appliance can be used by
persons with reduced physical
or mental capabilities or a lack
of experience and knowledge,
only if they have been given
supervision or instruction
concerning use of the appliance
in a safe way and understand
the hazards involved.
• This appliance shall not be
used by children.
• Do not leave the appliance
unattended when in use.

4
• Do not push food into the feed
chute with your ngers or other
utensils. Always use the food
pusher provided. Do not place
hand or ngers into the food
chute when it is attached to
the appliance.
• Do not juice stone fruit unless
seeds and/or stones have
been removed.
• Do not operate the juice
extractor without the pulp
and juice container in place.
• Make sure the stainless steel
lter basket has stopped
rotating and the motor has
completely stopped before
releasing the safety locking arm
and/or attempting to move the
appliance, when the juicer is not
in use, and before disassembling,
cleaning and storing.
• Any signicant spillage onto
the surface under or around the
appliance, or onto the appliance
itself, should be cleaned and
dried before continuing to use
the appliance.
• Be careful when handling the
stainless steel lter basket as
the small cutting blades at the
base of the lter basket are
very sharp. Mishandling may
cause injury.
SAVE THESE INSTRUCTIONS
• Remove rind from all citrus
fruit before juicing.
• Do not use the appliance if
the rotating sieve (lter basket)
or lid is damaged.
• Always make sure juicer cover
is clamped securely in place
before motor is turned on.
Do not unfasten interlock arm
while juicer is in operation.
The symbol shown
indicates that this appliance
should not be disposed of
in normal household waste.
It should be taken to a local
authority waste collection centre
designated for this purpose or to
a dealer providing this service.
For more information, please
contact your local council oce.
To protect against electric
shock, do not immerse the
power plug, cord or appliance in
water or any liquid.

5
EN
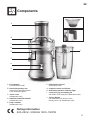
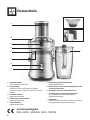
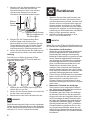
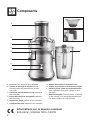
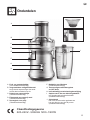
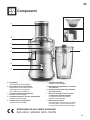
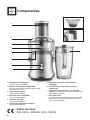
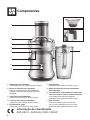
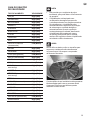
Components
A
E
F
I
H
G
D
B
C
A. Food pusher
(not dishwasher safe)
B. Interlocking safety arm
Stops juicer operating without
cover locked into place.
C. Juicer cover
(dishwasher safe)
D.
(dishwasher safe)
E. Pulp container
(dishwasher safe)
F.
(dishwasher safe)
G.
H. Overload protection indicator light
I. 2 litre juice jug and sealing lid
with built in froth separator (dishwasher safe)
J. Juicing Nozzle
Can be placed over spout to juice
directly into a cup (dishwasher safe)
J
D
Rating Information
220–240V~ 50/60Hz 1200–1300W

6
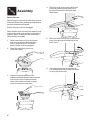
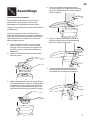
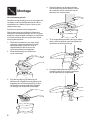
Before using your juicer for the rst time, remove
and safely discard any packaging materials and
promotional stickers and labels.
Ensure the power cord is unplugged.
Wash the lter bowl surround, lter basket, juicer
cover, food pusher, pulp container and juice jug
and lid in warm, soapy water with a soft cloth.
Rinse and dry thoroughly.
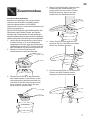
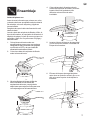
1. Place motor base on a at, dry surface
such as a countertop. Ensure that the
juicer is switched to OFF at the dial,
and the power cord is unplugged.
2. Place lter bowl surround on top
of the motor base.
3. Align the arrows at the base of the
stainless steel lter basket with the arrows
on the motor drive coupling and push
down until it clicks into place to create
a secure t with the motor base.
4. Place the juicer cover over the lter bowl
surround, positioning the lower part of
the feed chute over the stainless steel
lter basket.
5. Raise the safety locking arm up and locate
into the two grooves on either side of the
juicer cover.
6. The safety locking arm should now be
in a vertical position and locked into place
on top of the juicer cover.

7
EN
7. Slide the food pusher down the food chute
by aligning the groove in the food pusher,
with the small protrusion on the inside of the
top of the feed tube.
8. Place the pulp container into position by
tilting and lifting the motor base slightly.
Insert the pulp container under the juicer
cover on the back ensuring it is supported by
the juicer cover and motor base.
9. Fit the lid to the juice jug and position jug
under juice spout.
Juice jug
Juice can be preserved in the juice jug for up to
3 days by following these steps.
1. Lift the lid o the jug and rotate 180°
2. Press down rmly to replace the lid
3. Store juice in the fridge
NOTE
Storage time depends on the ingredients being
juiced and the freshness of the fruit prior to juicing.
Juice must be stored in the refrigerator between
2°C to 4°C.
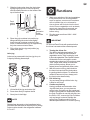
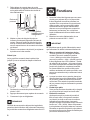
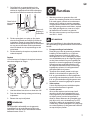
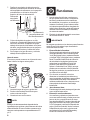
Functions
1. Wash your selection of fruit and vegetables
to be juiced. Most fruit and vegetables
such as apples, carrots and cucumbers
will not need to be cut or trimmed to
size as these will t whole into the feed
chute. Ensure vegetables such as beets,
carrots etc. have all soil removed, are
washed well and trimmed of leaves
before using.
2. Plug the power cord into a 220V – 240V
power outlet.
IMPORTANT
Do not load Feed Chute with produce before
the Juicer has reached the selected speed.
3. Turning the Juicer On
Turn dial to desired speed setting. Turn
Dial to "Low" setting for soft fruits and
vegetables and to "High" setting for hard
fruits and vegetables. See Speed Selector
Guide table on the next page to match
speed and produce type for maximum yield.
"Low" range, while it may not maximise
yield of some produce, allows you to
extract juice at a signicantly lower noise.
4. With the motor running, place food into
the feed chute and use the food pusher
to gently guide food down. To extract the
maximum amount of juice, always push
the food pusher down slowly.
5. Full Juice Jug
You can keep juicing until the Juice Jug
is lled to max. level.
6. Continuous Juicing
Having just lled and removed a Juice
Jug with fresh juice, you can place an
empty Juice Jug back onto the nozzle and
continue juicing without disassembly. When
the Pulp Container is near full with pulp, turn
the Dial to "O", remove the Pulp Container
only and empty contents. Replace the
empty Pulp Container and turn Dial to
desired speed selection to continue juicing.
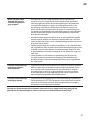
Food
pusher
groove
Small
protrusion
inside
feed tube

8
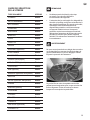
SPEED SELECTOR GUIDE
FOOD TYPE SPEED
APPLES High
BABY SPINACH High
BEETS High
BELL PEPPER High
BLUEBERRIES High
BROCCOLI High
CABBAGE High
CARROT High
CELERY High
CITRUS FRUITS (peeled)
CUCUMBER High
GINGER High
GRAPES (seedless)
HONEYDEW MELON (peeled) High
KALE High
KIWI (peeled)
MANGO (peeled, pit removed) High
MINT High
PEACH (pit removed) High
PEARS High
PINEAPPLE (peeled) High
RHUBARB High
SQUASH High
STRAWBERRIES High
TOMATOES High
WATERMELON (peeled)
ZUCCHINI High
NOTE
• Do not allow the pulp container to overll as
this may aect the operation of the appliance.
• The juicer is tted with a safety device which
safeguards against overheating with excessive
loads. If overheating occurs, the juicer will
automatically activate the overload protection
device and the unit will switch itself o. When
the overload protection is activated, unplug the
juicer from the power outlet for 30 minutes to
allow the unit to cool. Then plug juicer into the
power outlet and use as normal.
WARNING
Never use ngers, hands or utensils to push food
down the feed chute or to clear the feed chute.
Always use the food pusher provided.
The stainless steel lter basket contains small
sharp blades to cut and process fruit and
vegetables. Avoid touching the blades when
handling the lter basket.
Caution:

9
EN
Care & Cleaning
Ensure the juicer is turned o by turning the
juicer dial to the OFF position. Then unplug
the power cord.
Cleaning
1. Remove Juice Jug.
2. Remove Pulp Container.
3. Disengage Locking Bar, pull up entire
Juice Collector Assembly and take to sink.
Rinse all parts after use (except the motor base)
under running water to clear away the majority of
juice and pulp. Wash in warm soapy water with a
soft cloth.
To avoid food drying on to the blades, mesh or
transparent parts, rinse and wash as soon as
possible after use.
Pulp container
To minimize cleaning, you can line the pulp container
with a biodegradable bag to collect the pulp.
To clean the motor base, wipe with a soft, damp
cloth then dry thoroughly. Wipe any excess food
particles from the power cord.
Do not immerse the motor base in liquids.
Cleaning agents
Do not use abrasive scouring pads or cleaners
on either the motor base or the jug, as they may
scratch the surface. Use only warm soapy water
with a soft cloth.
Wash all parts (except the motor base) in warm
soapy water with a soft cloth. All parts except for
the motor base and food pusher are dishwasher
safe. However washing parts on a regular base
in the dishwasher can shorten the life of them
due to prolonged exposure to harsh detergents,
hot water and pressure.
Cleaning the parts in the dishwasher also may
cause parts to deteriorate so inspect the parts
regularly and stop using the product if any signs
of damage is noticed.
To ensure consistent juicing results, always clean
the lter basket thoroughly immediately after use.
If pulp is left to dry, it may clog the ne pores of the
lter mesh, which can aect juicing performance.
The lter basket can be soaked in hot soapy water
for 10 minutes, if necessary.
Hold the lter basket under running water and use
brush (supplied with the juicer) in a circular motion
to clear away pulp from the inside of the basket,
including the blades. Turn over to brush away
pulp from the outside of the basket, and repeat
if necessary.
After cleaning, hold up towards a light source to
check that the ne mesh pores are not blocked.
If blocked, soak the lter basket in hot water with
10% lemon juice to loosen, and brush under
running water again.
Do not soak the lter basket in bleach, harsh
chemicals or abrasive cleansers.
Always treat the lter basket with care,
as it can be easily damaged. Do not use if there
is any damage or deformation to the lter mesh.
Filter basket can be washed in the dishwasher
(top shelf).
The center of the lter basket has an array of small,
sharp blades. Do not touch these blades when
handling the lter basket.
Discoloration of the plastic may occur with strongly
colored fruit and vegetables. To help prevent this,
wash parts immediately after use.
If discoloration does occur, the plastic parts can be
soaked in water with 10% lemon juice or can be
cleaned with a non-abrasive cleaner.

10
• The safety locking arm may not be correctly engaged in the vertical
operating position. Check the top cover is properly aligned and the locking
arm is located rmly into the two grooves on either side of the juicer cover.
• Motor overload protection may have operated (see below).
excessive loads • The juicer is equipped with an internal self-resetting overload to prevent the
motor from damage under heavy or continuous loads. If the motor suddenly
stops working, turn the dial to OFF, and unplug the unit from the power
outlet. Allow the juicer to cool for at least 30 minutes before operating again.
NOTE: The unit MUST be turned o in order for it to cool and be reset.
• Despite this overload protector, we suggest juicing in smaller batches,
without excessive pushing force, to avoid overheating and stalling and to
maintain the life of the motor.
up in the stainless
• Stop juicing, disassemble to scoop excess pulp o the juicer cover.
Reassemble and continue juicing. Alternating soft and hard ingredients
may help avoid this.
and reduced
extracted juice
• The cleaner the lter, the better the juice yield, and dryer the pulp. Be sure
to thoroughly clean the juicer as soon as possible after each use. Remove
the stainless steel lter basket and thoroughly clean mesh walls with a
cleaning brush. Rinse the lter basket under hot water. If the ne mesh
holes are blocked, soak the basket in a solution of hot water with 10%
lemon juice to unblock the holes or wash in the dishwasher (top shelf).
This will remove excess ber build up which could be inhibiting the ow.
the rim of the juicer
and the juicer cover
• Try a slower juicing speed (if possible) and push the food pusher down the
feed chute more slowly.
Juice sprays out
from spout • The juice is being extracted too High; try a slower juicing speed (if possible)
and push the food pusher down the feed chute more slowly.

11
EN
Motor appears
overload protection
• Wet pulp can build up under the juicer cover and stall the juicer if the juicer
is used excessively without cleaning. If this occurs, disassemble and follow
the cleaning instructions to clean the lter bowl surround, the stainless
steel lter basket and the juicer cover. The juicer can also stall if excessive
force is used to push produce down the feed chute. If this occurs, ensure
that a more gentle pressure is used to push produce down the chute.
• The juicer will automatically stop operating if too much food is being
processed at one time. Try processing a smaller amount per batch. To
continue juicing, reset the juicer by turning the juicer OFF and back ON.
• Turn on the juicer before putting ingredients in the chute. Pressing
ingredients down before the juicer reaches full speed can cause the motor
to stall or overload. Use gentle to moderate pressure on the pusher. Lower
pressure produces a better juice yield.
• Hard fruit and vegetables will put excess strain onto the motor if a low
speed is selected. Refer to the juicing guide to determine the correct speed
for the fruit and vegetables selected for juicing.
Overload protection
during the use
• This indicates the motor speed is slowed down to an inecient level.
This may be caused by excessive pushing force on the pusher or too much
pulp building up on the lid or in pulp pin. Use moderate pushing force on
the food pusher and regularly clean the lid and pulp bin to ensure the juicer
is operating at optimal speed.
Overload Protection
LED is on • This indicates motor overload protection is activated. To reset the unit,
turn the dial to OFF, unplug the juicer and let the motor cool down for
25–30 minutes, then plug the juicer back in.
Sage® Customer Service.

12
2 YEAR LIMITED GUARANTEE
AND 5 YEAR LIMITED MOTOR
GUARANTEE
Sage Appliances guarantees this product for
domestic use in specied territories for 2 years for
all parts of the product and 5 years for the product’s
motor from the date of purchase against defects
caused by faulty workmanship and materials.
During this guarantee period Sage Appliances will
repair, replace, or refund any defective product (at
the sole discretion of Sage Appliances).
All legal warranty rights under applicable national
legislation will be respected and will not be
impaired by our guarantee. For full terms and
conditions on the guarantee, as well as instructions
on how to make a claim, please visit
www.sageappliances.com.
Guarantee

DE KURZANLEITUNG
the Nutri Juicer‰ Cold Plus

2
Inhalt
2 Bei Sage® steht Kundendienst an
erster Stelle
6 Komponenten
7 Zusammenbau
8 Funktionen
10 Pege & Reinigung
11 Störungsbehebung
13 Garantie
BEI SAGE® STEHT
SICHERHEIT AN
ERSTER STELLE
Wir bei Sage® sind sehr sicher-
heitsbewusst. Beim Design und
bei der Herstellung denken wir
zuallererst an Ihre Sicherheit. Wir
bitten Sie, bei der Verwendung
aller Elektrogeräte angemesse-
ne Sorgfalt walten zu lassen und
sich an die folgenden Vorsichts-
maßnahmen zu halten.
WICHTIGE SICHERHEITSHIN-
WEISE: BITTE ALLE ANWEI-
SUNGEN VOR GEBRAUCH
LESEN UND ZUM SPÄTEREN
NACHSCHLAGEN AUFBE-
WAHREN
• Dieses Dokuments ist auch
zum Download verfügbar unter
sageappliances.com
• Vergewissern Sie sich vor dem
ersten Gebrauch, dass die
Netzspannung der Angabe
auf der Unterseite des Geräts
entspricht.
• Entfernen und entsor-
gen Sie vor dem ersten
Gebrauch vorsichtig jegliches
Verpackungsmaterial.
• Entsorgen Sie die Schutzhülle
des Netzsteckers, da diese
eine Erstickungsgefahr für
Kleinkinder darstellt.
• Dieses Gerät ist nur für den
Hausgebrauch bestimmt.
Verwenden Sie das Gerät
ausschließlich zu seinem
Bestimmungszweck.
Verwenden Sie das Gerät
nicht in fahrenden Fahrzeugen
oder Booten. Verwenden Sie
das Gerät nicht im Freien.
Fehlgebrauch kann zu
Verletzungen führen.
• Rollen Sie das Kabel vor
Inbetriebnahme ganz aus.
• Stellen Sie das Gerät auf eine
stabilen, hitzebeständige,
ebene, und trockene Fläche
in einem sicheren Abstand
zur Kante und betreiben Sie
es nicht in der Nähe einer
Hitzequelle, wie beispielswei-
se Kochplatten, Backöfen oder
Gaskochfelder.

DE
3
• Erschütterungen während des
Betriebs können dazu führen,
dass sich das Gerät bewegt.
• Achten Sie darauf, dass das
Kabel nicht über die Kante
einer Arbeitsäche oder
eines Tisches hängt, heiße
Oberächen berührt oder sich
verknotet.
• Stellen Sie vor dem Reinigen,
Transportieren oder Verstauen
sicher, dass das Gerät
abgeschaltet („OFF“), vom
Stromnetz getrennt und abge-
kühlt ist.
• Schalten Sie das Gerät immer
aus („OFF“) und schalten
Sie ggf. den Strom an der
Steckdose ab, wenn das Gerät
nicht in Gebrauch ist.
• Benutzen Sie das Gerät nicht,
wenn das Stromkabel, der
Netzstecker oder das Gerät
selbst in irgendeiner Weise
beschädigt sind. Im Falle
von Beschädigungen oder
Wartungsarbeiten, die über die
gewöhnliche Reinigung hinaus-
gehen, kontaktieren Sie bitte
den Sage Kundendienst oder
besuchen Sie
sageappliances.com
• Mit Ausnahme der
Reinigung müssen sämtli-
che Wartungsarbeiten von
einer autorisierten Sage®
Kundendienststelle durchge-
führt werden.
• Das Gerät ist kein Spielzeug für
Kinder.
• Das Gerät darf nur von
Kindern mit einem Mindestalter
von 8 Jahren und unter
Beaufsichtigung gereinigt
werden.
• Das Gerät und das Netzkabel
müssen außerhalb der
Reichweite von Kindern unter
8 Jahren aufbewahrt werden.
• Als zusätzliche
Schutzmaßnahme bei
der Verwendung von
Elektrogeräten wird die
Installation eines Schutz- oder
Sicherheitsschalters empfohlen.
Ideal sind Sicherheitsschalter
mit einer Nennleistung von ma-
ximal 30 mA. Wenden Sie sich
an einen Elektriker für fachge-
rechte Beratung.
• Vergewissern Sie sich vor dem
Gebrauch, dass das Gerät
ordnungsgemäß zusammen-
gesetzt wurde. Nur bei richtiger
Zusammensetzung kann das
Gerät in Betrieb genommen
werden.
• Verwenden Sie das
Gerät nicht auf einem
Spülbeckenabussbrett.
• Halten Sie Hände, Finger,
Haare, Kleidung sowie Spachtel
und andere Hilfsmittel während
des Betriebs von beweglichen
oder rotierenden Teilen fern.

4
• Verwenden Sie das Gerät
zu keinem anderen Zweck
außer der Zubereitung von
Lebensmitteln und/oder
Getränken.
• Um zu vermeiden, dass
das Gerät sich durch verse-
hentliches Rückstellen des
Überlastschutzes selbst akti-
viert, sollten Sie das Gerät nicht
an ein externes Schaltgerät
(z. B. einen Timer) oder einen
Stromkreis anschließen, durch
den es möglicherweise regel-
mäßig ein- und ausgeschaltet
wird.
• Lesen Sie vor dem Gebrauch
alle Anweisungen und bewah-
ren Sie diese zum späteren
Nachschlagen auf.
• Dieses Gerät darf von Personen
mit eingeschränkten körperli-
chen oder geistigen Fähigkeiten
oder Personen, denen es an
Erfahrung und Kenntnis man-
gelt, nur unter Beaufsichtigung
benutzt werden oder wenn sie
in die sichere Handhabung des
Geräts eingewiesen wurden
und die damit verbundenen
Gefahren verstehen.
• Dieses Gerät darf nicht von
Kindern benutzt werden.
• Lassen Sie das Gerät wäh-
rend des Gebrauchs nicht
unbeaufsichtigt.
• Füllen Sie den Einfüllschacht
nicht mit bloßen Fingern oder
anderen Hilfsmitteln. Verwenden
Sie dazu immer den mitgeliefer-
ten Speiseschieber. Greifen Sie
nicht mit Händen oder Fingern
in den Einfüllschacht, wenn
dieser am Gerät befestigt ist.
• Entsaften Sie Kernobst nur,
wenn die Samen und Kerne
zuvor entfernt wurden.
• Zum Betrieb des Entsafters
müssen Trester- und
Saftbehälter am Gerät befestigt
sein.
• Vergewissern Sie sich bei
Nichtgebrauch und vor dem
Auseinanderbauen, Reinigen
und Verstauen des Entsafters,
dass sich der Siebeinsatz aus
Edelstahl nicht mehr dreht und
der Motor nicht mehr läuft,
bevor Sie den Schutzriegel
lösen und/oder das Gerät
bewegen.
• Wenn eine erhebliche Menge
an Flüssigkeit unter das Gerät
läuft oder sich um das Gerät
herum ausbreitet, muss die
Fläche vor dem weiteren
Gebrauch des Geräts gereinigt
und getrocknet werden.
• Lassen Sie beim Umgang mit
dem Siebeinsatz aus Edelstahl
Vorsicht walten, da die kleinen
Schneideklingen am Boden
sehr scharf sind. Ein unsach-
gemäßer Umgang kann zu
Verletzungen führen.

DE
5
ANLEITUNG BITTE AUFBEWAHREN
• Schälen Sie Zitrusfrüchte vor
dem Entsaften.
• Verwenden Sie das Gerät
nicht, wenn das rotierende Sieb
(Siebeinsatz) oder der Deckel
Schäden aufweisen.
• Der Entsafter-Deckel muss
vor Einschalten des Motors
stets fest sitzen. Lösen Sie die
Verriegelungsklinke nicht, wäh-
rend der Entsafter in Betrieb ist.
Dieses Symbol bedeutet,
dass das Gerät nicht mit
dem gewöhnlichen
Haushaltsmüll entsorgt
werden darf. Stattdessen muss
es zu einer für diesen Zweck
eingerichteten behördlichen
Sammelstelle oder zu einem
Händler gebracht werden, der
Entsorgung anbietet. Weitere
Informationen dazu erhalten Sie
bei Ihrem Gemeindeamt.
Um sich vor
Stromschlägen zu
schützen, tauchen Sie den
Netzstecker, das Netzkabel oder
das Gerät nicht in Wasser oder
eine andere Flüssigkeit ein.

6
Bestandteile
A
E
F
I
H
G
D
B
C
A.
(nicht spülmaschinenfest)
B. Schutzriegel
Verhindert, dass der Entsafter in Betrieb
genommen wird, solange der Deckel nicht fest
aufsitzt.
C. Entsafter-Deckel
(spülmaschinenfest)
D.
(spülmaschinenfest)
E.
(spülmaschinenfest)
F.
(spülmaschinenfest)
G.
und Ausschalttaste
H.
I. 2-l-Saftkrug und Versiegelungsdeckel
mit eingebautem Schaumabscheider
(spülmaschinenfest)
J. Ausgießer
Kann zum Entsaften direkt ins Glas am Auslauf
befestigt werden (spülmaschinenfest)
J
D
220–240V~ 50/60Hz 1200–1300W

DE
7
Entfernen und entsorgen Sie vor dem ersten
Gebrauch des Entsafters sorgfältig jegliche
Verpackungsmaterialien und Aufkleber.
Vergewissern Sie sich, dass das Stromkabel vom
Stromnetz getrennt ist.
Spülen Sie die Einfassung des Siebeinsatzes, den
Siebeinsatz, den Entsafter-Deckel, den Speise-
schieber, den Tresterbehälter und den Saftkrug in
warmem Seifenwasser mit einem weichen Lappen ab.
Spülen und trocknen Sie die Komponenten gründlich.
1. Stellen Sie den Motorsockel auf eine ebene,
trockene Fläche, z. B. eine Arbeitsplatte.
Vergewissern Sie sich, dass der Drehschalter
des Entsafters auf der „OFF“-Position steht und
das Stromkabel vom Stromnetz getrennt ist.
2. Platzieren Sie die Einfassung des
Siebeinsatzes auf dem Motorsockel.
3. Richten Sie die Pfeile an der Unterseite
des Siebeinsatzes an den Pfeilen an der
Antriebskupplung des Motorsockels aus
und drücken Sie den Einsatz nach unten,
bis er einrastet, um ihn sicher auf dem
Motorsockel zu positionieren.
4. Setzen Sie den Entsafter-Deckel auf die
Einfassung des Siebeinsatzes und
positionieren Sie den unteren Teil des
Einfüllschachts so, dass er auf dem
Siebeinsatz aus Edelstahl aufsitzt.
5. Heben Sie den Schutzriegel an und
schieben Sie ihn in die Rillen zu beiden
Seiten des Entsafter-Deckels.
6. Der Schutzriegel sollte nun in aufrechter
Position auf dem Entsafter-Deckel
auiegen und fest eingerastet sein.

8
7. Schieben Sie den Speiseschieber in den
Füllschacht, indem Sie die Rille des
Speiseschiebers auf eine Linie mit dem
vorstehenden Dreieck innen an der
Oberkante des Einfüllschachts bringen.
8. Bringen Sie den Tresterbehälter durch
leichtes Kippen und Anheben des
Motorsockels in Position. Schieben Sie den
Tresterbehälter unter den Entsafter-Deckel
auf der Rückseite, sodass er von Deckel
und Motorsockel in Position gehalten wird.
9. Setzen Sie den Deckel auf den Saftkrug und
positionieren Sie diesen unter dem Auslauf.
Saftkrug
Der Saft kann im Saftkrug maximal 3 Tage
lang aufbewahrt werden. Führen Sie dazu die
folgenden Schritte aus.
1. Nehmen Sie den Deckel vom Krug ab und
drehen Sie ihn um 180°
2. Setzen Sie den Deckel wieder auf, indem Sie
ihn fest nach unten drücken
3. Bewahren Sie den Saft im Kühlschrank auf
HINWEIS
Die Aufbewahrungszeit hängt von den entsafteten
Zutaten und dem Alter des Obsts vor dem Entsaften
ab. Der Saft muss im Kühlschrank bei Temperaturen
zwischen 2°C und 4°C aufbewahrt werden.
Funktionen
1. Waschen Sie das Obst und Gemüse, das
Sie entsaften möchten. Die meisten Obst-
und Gemüsesorten wie Äpfel, Karotten und
Gurken müssen nicht geschnitten oder zer-
kleinert werden, da sie ganz in den Einfüll-
schacht passen. Gemüsesorten wie Rüben,
Karotten usw. müssen vor der Verwendung
vollständig von Erdrückständen und Blättern
befreit und gut gewaschen werden.
2. Schließen Sie das Netzkabel an eine
220-V—240-V-Steckdose an.
WICHTIG
Warten Sie vor dem Füllen des Einfüllschachts, bis
der Entsafter die eingestellte Drehzahl erreicht hat.
3. Einschalten des Entsafters
Stellen Sie am Drehschalter die gewünschte
Geschwindigkeitsstufe ein. Stellen Sie am
Drehschalter die niedrigere Geschwindig-
keitsstufe für Weichobst und -gemüse und die
höhere Geschwindigkeitsstufe für Hartobst
und -gemüse ein. Informationen zur richtigen
Geschwindigkeitsstufe für unterschiedliche
Obst- und Gemüsesorten nden Sie in der
Tabelle auf der nächsten Seite. Auf der
niedrigen Stufe verursacht der Entsaftungs-
vorgang deutlich weniger Lärm, doch je nach
Obst- oder Gemüsesorte kann damit nicht die
maximale Saftmenge gewonnen werden.
4. Füllen Sie den Einfüllschacht bei laufendem
Motor und drücken Sie den Inhalt mit dem
Speiseschieber vorsichtig nach unten.
Drücken Sie den Speiseschieber für eine
maximale Saftmenge kontinuierlich langsam
nach unten.
5. Maximaler Füllstand des Saftkrugs
Sie können bis zum maximalen Füllstand
des Saftkrugs mit dem Entsaften fortfahren.
6. Kontinuierliches Entsaften
Unmittelbar nach dem Füllen des Saftkrugs
mit frischem Saft können Sie den geleerten
Krug erneut unter den Ausgießer stellen und
ohne Demontage mit dem Entsaften fortfah-
ren. Wenn der Tresterbehälter vollständig mit
Fruchteischrückständen gefüllt ist, drehen
Sie den Drehschalter auf „OFF“, entnehmen
Sie den Behälter und entleeren Sie ihn. Set-
zen Sie den leeren Behälter wieder ein und
wählen Sie am Drehschalter die gewünschte
Geschwindigkeitsstufe, um mit dem Entsaften
fortzufahren.
Rille am
Speise-
schieber
Vorstehendes Dreieck
an der Innenseite des
Einfüllschachts
La pagina si sta caricando...
La pagina si sta caricando...
La pagina si sta caricando...
La pagina si sta caricando...
La pagina si sta caricando...
La pagina si sta caricando...
La pagina si sta caricando...
La pagina si sta caricando...
La pagina si sta caricando...
La pagina si sta caricando...
La pagina si sta caricando...
La pagina si sta caricando...
La pagina si sta caricando...
La pagina si sta caricando...
La pagina si sta caricando...
La pagina si sta caricando...
La pagina si sta caricando...
La pagina si sta caricando...
La pagina si sta caricando...
La pagina si sta caricando...
La pagina si sta caricando...
La pagina si sta caricando...
La pagina si sta caricando...
La pagina si sta caricando...
La pagina si sta caricando...
La pagina si sta caricando...
La pagina si sta caricando...
La pagina si sta caricando...
La pagina si sta caricando...
La pagina si sta caricando...
La pagina si sta caricando...
La pagina si sta caricando...
La pagina si sta caricando...
La pagina si sta caricando...
La pagina si sta caricando...
La pagina si sta caricando...
La pagina si sta caricando...
La pagina si sta caricando...
La pagina si sta caricando...
La pagina si sta caricando...
La pagina si sta caricando...
La pagina si sta caricando...
La pagina si sta caricando...
La pagina si sta caricando...
La pagina si sta caricando...
La pagina si sta caricando...
La pagina si sta caricando...
La pagina si sta caricando...
La pagina si sta caricando...
La pagina si sta caricando...
La pagina si sta caricando...
La pagina si sta caricando...
La pagina si sta caricando...
La pagina si sta caricando...
La pagina si sta caricando...
La pagina si sta caricando...
La pagina si sta caricando...
La pagina si sta caricando...
La pagina si sta caricando...
La pagina si sta caricando...
La pagina si sta caricando...
La pagina si sta caricando...
La pagina si sta caricando...
La pagina si sta caricando...
La pagina si sta caricando...
La pagina si sta caricando...
La pagina si sta caricando...
La pagina si sta caricando...
La pagina si sta caricando...
La pagina si sta caricando...
La pagina si sta caricando...
La pagina si sta caricando...
-
 1
1
-
 2
2
-
 3
3
-
 4
4
-
 5
5
-
 6
6
-
 7
7
-
 8
8
-
 9
9
-
 10
10
-
 11
11
-
 12
12
-
 13
13
-
 14
14
-
 15
15
-
 16
16
-
 17
17
-
 18
18
-
 19
19
-
 20
20
-
 21
21
-
 22
22
-
 23
23
-
 24
24
-
 25
25
-
 26
26
-
 27
27
-
 28
28
-
 29
29
-
 30
30
-
 31
31
-
 32
32
-
 33
33
-
 34
34
-
 35
35
-
 36
36
-
 37
37
-
 38
38
-
 39
39
-
 40
40
-
 41
41
-
 42
42
-
 43
43
-
 44
44
-
 45
45
-
 46
46
-
 47
47
-
 48
48
-
 49
49
-
 50
50
-
 51
51
-
 52
52
-
 53
53
-
 54
54
-
 55
55
-
 56
56
-
 57
57
-
 58
58
-
 59
59
-
 60
60
-
 61
61
-
 62
62
-
 63
63
-
 64
64
-
 65
65
-
 66
66
-
 67
67
-
 68
68
-
 69
69
-
 70
70
-
 71
71
-
 72
72
-
 73
73
-
 74
74
-
 75
75
-
 76
76
-
 77
77
-
 78
78
-
 79
79
-
 80
80
-
 81
81
-
 82
82
-
 83
83
-
 84
84
-
 85
85
-
 86
86
-
 87
87
-
 88
88
-
 89
89
-
 90
90
-
 91
91
-
 92
92


in altre lingue
- français: Sage BJE530 Mode d'emploi
- español: Sage BJE530 Guía del usuario
- Deutsch: Sage BJE530 Benutzerhandbuch
- Nederlands: Sage BJE530 Gebruikershandleiding
- português: Sage BJE530 Guia de usuario
Documenti correlati
Altri documenti
-
Moulinex ZU150127 Manuale utente
-
King P 1110 S Exotic Manuale utente
-
Philips HR1875/71 Manuale utente
-
Philips HR1869/60 Manuale utente
-
Amazon Basics B07PJ6XLLF Manuale utente
-
Kenwood JMP600WH Manuale del proprietario
-
Kenwood JMP800 PureJuice Pro Manuale del proprietario
-
-
-
Hendi 221044 Manuale utente