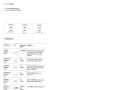
Pfaff tipmatic 1045 Manuale del proprietario
- Categoria
- Macchine da cucire
- Tipo
- Manuale del proprietario
Questo manuale è adatto anche per
La pagina si sta caricando...

Diese
Seite
nach
au1en
kappen
Fdd
out
this
page
Rabattre
ce
voet
vers
rextérieur
Girare
questa
pagina
verso
‘esterno
-a
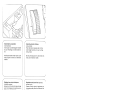
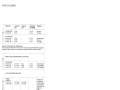
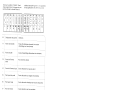
aaheitshinweise
au
H,iushaltnähmaschinen
n;h
DIN
57
700
Tell
28
bzw.
IEC
335
IiI
28
ar
Benutzer
hat
wegen
der
auf-
und
l)gehenden
Nadel
genugend
Vorsicht
walten
zu
lassen
und
die
Nähstelle
bei
Icr
Arbeit
ständig
zu
beobachten.
Deim
Verlassen
der
Maschine,
bei
Wartungsarbeiten
oder
beim
Wech
;eln
von
mechanischen
Teilen
oder
ZubehOr
ist
die
Maschine
durch
Her
ausziehen
des
Netzsteckers
aus
der
Steckdose
vom
Netz
zu
trennen.
c)
Die
maximal
zuldssige
Leistung
der
Lampe
beträgt
15
Watt.
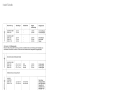
Some
safety
rules
a)
Take
care
to
avoid
injury
to
your
fin
gers
by
the
needle
during
sewing.
b)
Be
sure
to
unplug
the
power
cord
whenever
you
leave
the
machine
or
wish
to
clean
it,
oil
it
or
change
mechanical
and
accessory
parts.
c)
Be
sure
to
use
only
a
15-watt
light
bulb
in
the
sewing
lamp.
dl
The
drive
belt
must
never
be
adjusted
by
anyone
but
an
authorized
Pfaff
agent.
Mesures
de
sécurité
a)
Toujours
faire
preuve
de
prudence
et
continuellement
surveiller
le
travail.
b)
Toujours
débrancher
Ia
machine
du
secteur
avant
de
quitter
Ia
machine,
avant
les
travaux
d’entretien
et
en
cas
de
remplacement
de
pièces
mécani
ques
ou
d’accessoires.
c)
Puissance
maximale
admissible
de
l’ampoule:
15
Watts.
Norme
di
sicurezza
per
macchine
per
cucire
per
uso
famiglia
secondo
DIN
57
700
parte
28
oppure
IEC
335
parte
28
a)
In
virtü
del
movimento
alternativo
dell’ago,
I’utente
deve
prestare
suffi
ciente
atenzione
e
tenere
costante
mente
d’occhio
il
punto
di
lavoro.
b)
Nel
cambiare
ago,
piedino,
spolina
e
placca
d’ago,
nelle
interruzioni
non
custodite
del
lavoro
e
durante
i
lavori
di
manutenzione
si
deve
disinserire
Ia
corrente
della
macchina
togliendo
Ia
spina
dalla
presa
a
muro.
c)
La
potenza
massima
consentita
per
Ia
lampadina
è
di
15
Watt.
For
safety
rules
applicable
to
the
UK
please
see
page
84.
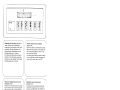
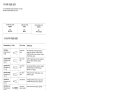
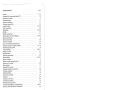
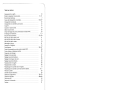
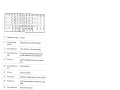
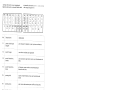
4ble
des
matières,
page
l\ndice
pagina
Inhaltsverzeichnis
Contents
on
page
Seite
6
63,)
65
6?

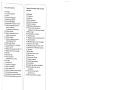
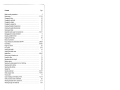
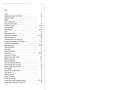
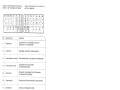
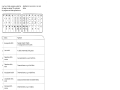
Pièces
de
Ia
machine
100
Poignee
101
Couvercle
superieur
102
Volant
103
Disque
de
debrayage
104
Interrupteur
general
105
Touches
de
reglage
106
Réglage
de
Ia
longueur
de
point
107
Boite
de
rangement
formant
plan
de
travail
avec
compartiments
a
accessoires
108
Plaque
a
aiguille
109
Support
de
semelle
du
pied
presseur
avec
semelle
110
Enfileur
d’aiguille
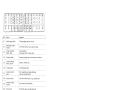
Ill
Disque
de
réglage
des
points
d’ornementation
(1147)
Il
2
Relève-pied
presseur
113
Pince-aiguille
avec
vis
de
fixation
114
Touche
,,arrière”
1
5
Tableau
des
programmes
(1047,
1147)
Ii
6
Tableau
des
points
de
bordage
Ill
Dévidoir
118
Plaque
de
base
119
Capot
couvrant
le
compartiment
du
crochet
120
Bras
libre
121
Passage
du
fil
122
Tension
du
fil
d’aiguille
23
Guide-fil
de
dévidoir
24
Levier
releveur
de
fil
125
Guide-fil
de
dévidoir
(escamotable)
126
Porte-bobine
avec
dérouleur
127
Deuxième
porte-bobine
(relevable)
128
Barre
du
pied
presseur
avec
coupe-fil
Elementi
di
comando
della
macchina
per
cucire
100
Maniglia
101
Coperchio
102
Volantino
103
Disco
disinnesto
104
lnterrutore
principale
105
Tasti
di
comando
106
Regolatore
lunghezza
punto
107
Piano
di
cucito
variabile
con
cassettino
e
scomparto
per
accessori
108
Placca
d’ago
109
Portapiedino
con
piedino
110
Infilatore
d’ago
111
Regolatore
punto
ornamentale
(1147)
112
Leva
alzapiedino
11
3
Morsetto
d’ago
con
vite
di
fissagglo
114
Tasto
per
cucire
indietro
11
5
Tabella
dei
programmi
(1047,
1147)
11
6
Scomparto
con
tabella
per
bordure
11
7
Spolatore
118
Placca
base
119
Sportello,
dietro
crochet
120
Braccio
libero
121
Fessure
per
infilatura
122
Tensione
superiore
123
Guidafilo
per
spolatore
124
Leva
tendifilo
125
Guidafilo
per
spolatore
(estraibile)
126
Portarocchetto
con
disco
di
scorrimento
127
Secondo
portarocchetto
(da
girare
in
sü)
128
Barra
premistoffa
con
rasafilo
)

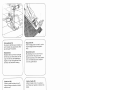
4
N
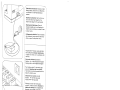
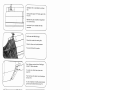
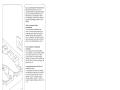
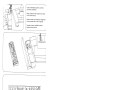
Die
Kofferhaube
abheben.
Den
Iragegriti
umklappen.
Den
Klappdeckel
101
öffnen.
Lift
off
the
cover.
Fold
down
the
carrying
handle.
Tilt
cover
101
backwards.
Enlever
le
couvercie
de
a
valisette.
Basculer
a
poignée.
Ouvrir
le
couvercle
101.
Aizare
Ia
custodia.
Ribaltare
Ia
maniglia.
Aprire
il
coperchio
101.
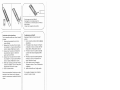
4
Den
Anlasser
und
die
Bedienungs
anleitung
aus
dem
Fach
N
nehmen.
So
wie
die
Abbildung
oben
zeigt,
beides
wieder
einräumen.
Take
foot
control
and
instruction
book
out
of
compartment
N.
Put
back
again
as
shown
in
the
illustration
above.
Retirer
le
rheostat
a
pédale
et
Ia
notice
d’emploi
de
Ia
case
N
et
es
remettre
dans
Ia
case
comme
on
voit
sur
Ia
photo
du
haut.
Togliere
iI
pedale
d’awiamento
e
le
istruzioni
per
Iuso
dallo
scomparto
N.
Come
rappresentato
nella
figura
supe
riore,
riporli
entrambi
nello
scomparto.
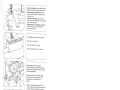
2

4
Elektrischer
Anschluf:
Anlasser
auf
den
Boden
stellen.
Stecker
N
in
die
Maschine,
und
Stecker
0
in
die
Wandsteckdose
stecken.
Electrical
connection:
Set
the
foot
con
trol
on
the
floor.
Insert
plug
N
in
the
machine
and
plug
0
in
the
wall
socket.
Branchement
electrique:
Placer
le
rheostat
a
pédale
sur
le
sol.
Brancher
Ia
fiche
N
dans
Ia
machine
et
Ia
fiche
0
dans
Ia
prise
murale.
Collegamento
elettrico:
Porre
Il
reostato
sul
pavimento.
lnserire
spina
N
nella
mac
china,
e
spina
0
nella
presa
a
muro.
Hauptschalter
P
drücken,
wobei
das
Näh
licht
aufleuchtet.
Anlasser
niedertreten.
Je
tiefer
man
drückt,
um
so
schneller
näht
die
Ptaff.
Electronic-Anlasser
(Schalter
Q)
Stellung
=
halbe
Endgeschwindigkeit
Stellung
=
voIle
Endgeschwindigkeit
Push
master
switch
P;
the
sewing
light
goes
on.
Operating
the
foot
control:
The
farther
you
press
the
pedal
down
the
faster
the
machine
runs.
Electronic
foot
control
(slide
Q)
Position
=
half
the
top
speed
Position
=
full
top
speed
Enfoncer
le
boutori
de
l’interrupteur
general
P;
Ia
lampe
s’allume.
Abaisser
Ia
pédale
du
rheostat.
Plus
Ia
pédale
sera
abaissée,
plus
Ia
Pfaff>
coudra
vite,
Rheostat
electronique
(interrupteur
Q)
Position
=
demi-vitesse
maximale
Position
1
=
vitesse
maximale
integrale
Premendo
l’interruttore
principale
P
si
accende
il
riflettore.
Premere
il
reostato:
Piü
a
fondo
si
preme
il
pedale,
piü
veloce
cucirà
Ia
“Pfaff”.
Reostato
elettronico
(commutatore
Q)
Posizione
=
velocità
finale
dimezzata
Posizione
=
velocità
finale
intera
La pagina si sta caricando...

4
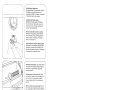
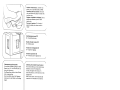
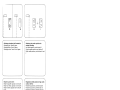
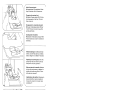
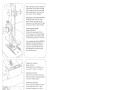
Spule
auf
den
Spuler
117
stecken
Stft
N
mul,
in
Schlitz
0.
Place
a
bobbin
on
spindle
117,
making
sure
pin
N
enters
slot
0.
Mettre
Is
canette
sur
le
dévidoir
117
le
tenon
N
doit
s’engager
dans
Ia
fente
0.
Inserire
Ia
spolina
sullo
spolatore
117
e
girarla
finché
il
perno
N
si
inserisce
nella
fessura
0.
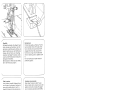
7-
N
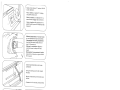
Nähwerk
ausscha[ten:
Handrad
festhal
ten
und
Scheibe
103
nach
vorn
drehen.
Disengaging
the
sewing
mechanism:
Hold
the
hand
wheel
steady
and
turn
knob
103
toward
you.
Débrayer
le
mécanisme:
IRetenir
le
volant
et
tourner
le
disque
103
vers
l’avant.
Disinriestare
H
meccanismo
di
cucito:
tenere
fermo
il
volantino
e
girare
il
disco
103
in
avanti.
Zweiten
Garnrollenhalter
nach
hinten
schwenken.
Swing
the
sewing
spool
holder
toward
the
back,
Basculer
le
deuxième
porte-bobines
vers
l’arrière.
Orientare
in
sü
il
secondo
portarocchetto.
7-
J
Garnrolle
und
kleine
Ablaufscheibe
P
auf
den
Halter
schieben.
Push
a
spool
of
thread
and
small
thrust
collar
P
onto
the
holder.
Passer
Ia
bobine
de
fil
et
le
petit
dérouleur
P
sur
Ia
broche
porte-bobine.
Porre
Ia
spagnoletta
di
fib
con
il
piccolo
disco
di
scorrimento
P
sul
portarocchetto.
\
5
La pagina si sta caricando...

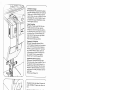
Rempissage
de
Ia
canette
a
partir
d’une
deuxième
bobine
Bascuter
te
guide-fit
125
vers
‘avant.
Pas
ser
le
fit
par
le
guide
fit
123
puis,
seton
le
dessin,
dans
te
guide-fit
125,
entre
ce
guide
et
te
ressort
de
tension
N.
Enrouler
te
fit
de
quetques
tours
sur
Ia
canette
et
a
pousser
vers
a
droite.
Appuyer
sur
Ie
rheostat
et
bobiner.
Pousser
a
canette
garnie
vers
ta
gauche:
ta
retirer,
tirer
te
fit
vers
‘avant
et
te
couper
sur
te
coupe-fit
0.
tmportant:
Veitter
a
ce
que
tes
fentes
de
maintien
du
fit
de
ta
bobine
passée
sur
a
broche
se
trouvent
a
droite.
Auvogere
a
spolina
da
un
secondo
rocchetto:
Spostare
in
avanti
ta
guida
125
per
to
spolatore.
Tenere
it
fito
netta
guida
123
e,
come
indicato
net
disegno,
netta
guida
125
facendo
attenzione
che
it
fib
passi
tra
ta
guida
e
ta
motta
di
tensione
N.
Avvot
gore
ora
it
fito
atcune
votte
attorno
atta
spotina.
Premere
ta
spotina
verso
destra.
Azionare
it
reostato
e
avvotgere
ta
bobina.
Premere
a
spotina
piena
verso
sinistra,
togtierta,
tirare
it
fito
in
avanti
e
reciderto
net
tagtiafito
0.
tmportante:
quando
si
usano
rocchetti
con
intagtio
fermafiti,
occorre
inserire
a
parte
intagtiata
verso
destra.
Nähwerk
einschalten:
Handrad
festhat
ten
und
Scheibe
103
nach
hinten
drehen.
Dann
Handrad
nach
vorne
drehen,
bis
es
einrastet.
Engaging
the
sewing
mechanism:
Hotd
the
hand
wheet
firmly
and
turn
disk
103
toward
the
back,
then
turn
the
hand
wheet
forward
again
until
it
snaps
in.
Embrayage
du
mécanisme
Retenir
to
votant
of
tourner
te
disque
103
vers
‘ar
rière.
Tourner
te
votant
vers
‘avant
jusqu’à
ce
qu’it
s’enctenche.
nserimento
meccanismo
di
cucito:
tenere
fermo
it
votantino
e
girare
it
disco
103
verso
dietro.
Girare
quindi
it
volantino
in
avanti
fincha
s’innesta.
)
7
La pagina si sta caricando...

7-
do
Ia
canette
avec
Ia
til
pwsseur
a
aiguille
en
posi
‘I
l
canette
sur
le
dévi
1y(
lo
rnécanisme,
Passer
le
le
pied
presseur
vers
Ia
h
,i’sjjl
125
avant
de
l’en
U’ftU0S
tours
sur
Ia
canette
et
ci
vers
Ia
droite.
Appuyer
nt
bobiner.
Pousser
a
vors
Ia
gauche,
l’enlever
et
‘i.
I’n.’ant
puis,
le
couper
sur
le
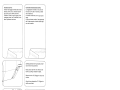
Avvolgere
Ia
spolina
attraverso
I’ago:
Alzare
ii
piedino.
Posizione
ago
superiore.
Inserire
Ia
spolina
sullo
spolatore
117.
Disinserire
ii
meccanismo
di
cucito,
Por
tare
il
fib
superiore
sotto
ii
piedino
verso
destra
attraverso
Ia
guida
125
(vedere
disegno).
Avvolgere
ii
fib
alcune
volte
attorno
alla
spolina
e
premerla
quindi
verso
destra.
Azionare
ii
reostato
e
bobi
nare.
Premere
Ia
spolina
piena
verso
sinistra,
toglierla,
tirarla
in
avanti
e
recidere
II
fib
nel
tagliafibo
“N”.
(
Nähwerk
einschalten:
Handrad
festhal
ten
und
Scheibe
103
nach
hinten
drehen.
Dann
Handrad
nach
vorne
drehen,
bis
es
einrastet.
Engaging
the
sewing
mechanism:
Hold
the
hand
wheel
firmly
and
turn
disc
103
toward
the
back,
then
turn
the
hand
wheel
forward
again
until
it
snaps
in.
Embrayage
du
mécanisme
Retenir
le
volant
et
tourner
le
disque
103
vers
l’ar
rière.
Tourner
le
volant
vers
l’avant
jusqu’à
ce
qu’il
s’enclenche.
Inserimento
meccanismo
di
cucito:
tenere
fermo
il
volantino
e
girare
1
disco
103
verso
dietro.
Girare
quindi
1
volantino
in
avanti
finchè
s’innesta.
)
9
La pagina si sta caricando...

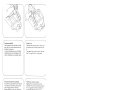
f
11
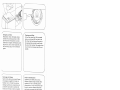
Spulenkapsel
einsetzen:
•
Hauptscha/ter
104
ausschalten.
Klappe
N
anheben
und
die
Kapsel
bis
zum
Anschlag
auf
Stiff
0
schieben.
Ausschnitt
P
muB
dabei
nach
oben
zeigen.
nserting
the
bobbin
case:
•
Switch
off
master
switch
104.
Raise
latch
N
and
push
the
bobbin
case
onto
stud
0
as
far
as
it
will
go,
making
sure
cutout
P
points
upwards.
Mise
en
place
de
a
bolte
a
canette:
•
burner
/‘interrupteur
general
104
sur
‘4rrdt’
Relever
le
loquet
N
et
glisser
Ia
boite
a
canette,
l’ouverture
P
en
haut,
a
fond
sur
le
tourillon
0.
Come
inserire
a
capsula
della
spolina:
•
Disinserire
/7nterruttore
princ,oale
104.
Sollevare
ii
chiusino
N
e
inserire
Ia
cap
sula
fino
all’arresto
sul
perno
0.
L’apertura
P
deve
essere
rivolta
verso
‘alto.
Garnrolle
aufschieben:
Vor
kleine
Rollen
die
kleine
oder
mittlere
Ablaufscheibe
0
schieben,
vor
groBe
Rollen
die
groBe
Ablaufscheibe
R.
Placing
spool
of
thread
on
pin:
Place
the
small
or
medium-size
unwinding
col
lar
0
in
front
of
small
spools,
and
the
large
unreeling
disc
R
in
front
of
large
spools.
Mise
en
place
de
Ia
bobine
de
fil:
Utili
ser
le
dérouleur
C
(petit
diamètre(
devant
es
petites
bobines
et
le
grand
dérouleur
R
devant
les
grosses
bobines.
Inserimento
del
rocahetto
del
fib:
Davanti
a
piccoli
rocchetti
porre
il
disco
di
scorrimento
piccolo
o
medio
C,
davanti
a
grandi
rocchetti
porre
1
disco
di
scorn
mento
grande
R.
La pagina si sta caricando...
La pagina si sta caricando...
La pagina si sta caricando...
La pagina si sta caricando...
La pagina si sta caricando...

4
17
Tensions
des
fils:
Position
de
reglage
normale
dans
Ia
plage
blanche,
entre
3
et
5.
Tension
d’autant
plus
forte
que
le
chiffre
est
élevé.
Contrder
a
‘aide
du
point
zigzag.
Coudre
quelques
points.
Les
fils
doivent
se
nouer
dans
I’épaisseur
des
tissus.
Controllo
della
tensione
del
fib:
La
regolazione
normale
si
trova
nel
set-
tore
da
3-5.
Piü
alto
il
numero
piü
forte
sara
Ia
tensione.
II
controllo
viene
fatto
con
In
zig-zag
piü
argo.
Cucire
una
breve
cucitura.
Lannodamento
dei
fili
deve
avvenire
al
centro
dello
spes
sore
del
materiale.
—I
4
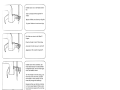
N
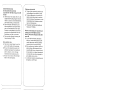
Stoffdrückerhebel
112
hochstellen.
Stoff
nach
hinten
herausnehmen.
Raise
presser
bar
lifter
112.
Remove
the
fabric
by
pulling
it
toward
the
back.
Relever
le
levier
112.
Dégager
le
tissu
vers
l’arrière,
Alzare
Ia
eva
alzapiedino
112.
Togliere
Ia
stoffa
verso
dietro.
4
Fadenabschneider
N.
Fäden
einlegen
und
nach
unten
ziehen.
Thread
cutter
N.
Draw
the
threads
into
the
slot
and
pull
them
downwards.
Coupe-fil
N.
Coucher
es
fils
dans
Ia
fente
et
les
tirer
vers
le
bas.
Tagliafibo
N.
Inserire
i
fili
e
tirarli
verso
ii
basso.

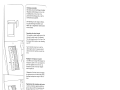
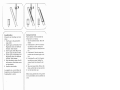
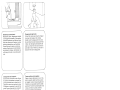
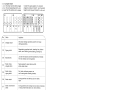
7
Stichlange
einstellen:
Die
Zahien
auf
dem
Stichldngen-Einsteller
106
geben
die
Stichlange
in
mm
an,
Der
Einstellbereich
ist
0
bis
6
mm.
Die
gewünschte
Stichlange
wird
an
die
Em
stelimarkierung
N
gedreht.
Die
Abbildung
0
unten
zeigt
die
Einstei
lung
des
Stichlängen-Einstellers
zum
Nähen
der
rot
abgebildeten
Stretchstiche
auf
den
Tasten,
Regulating
the
stitch
length
The
numbers
on
stitch
length
control
106
ndicate
the
stitch
length
in
millimeters.
The
stitch
length
range
is
0
to
6
mm.
Turn
the
desired
stitch
length
to
the
indicating
mark
“N’.
Fig.
0
(bottom)
shows
how
to
set
the
stitch
length
control
for
sewing
stretch
stitches
(red
stitch
symbols
on
push
but
tons).
Réglage
de
Ia
longueur
du
point:
Les
chiffres
sur
le
disque
106
indiquent
a
longueur
du
point
en
mm.
La
longueur
du
point
est
réglable
entre
0
et
6
mm.
La
Iongueur
de
point
choisie
est
indiquée
face
au
repére
N.
Lillustration
0
(en
bas)
montre
Ie
réglage
du
règle-point
pour
a
couture
des
points
élastiques
marques
en
rouge
sur
los
tou
ches.
Regolazione
della
lunghezza
del
punto:
I
numeri
sul
bottone
regolatore
della
lun
ghezza
del
punto
106
corrispondono
alla
lunghezza
del
punto
in
mm.
La
regola
zione
si
estende
da
0
a
6
mm.
La
lun
ghezza
del
punto
desiderata
si
regola
sulla
marcatura
N.
La
figura
0
sotto
mostra
Ia
regolazione
del
bottone
regolatore
per
cucire
i
punti
flexi
(stretch)
raffigurati
in
rosso
Sui
tasti.
18

RUCkWaIlSflahefl
Die
Taste
114
niederdrücken
Solange
die
Taste
gedruc
wird,
näht
die
Maschjne
rückwâs
Reverse
sewing
Press
button
114
As
long
as
you
hold
this
button
the
machine
sews
backwards
Couture
en
marche
arrlère.
Abajsser
Ia
touche
114.
La
machine
coud
en
arrière
aussi
longtemps
que
Ia
touche
est
mainteflue
en
bas.
La
cucjtura
iridjetra
Premere
il
tasto
114.
Finchè
ii
tasto
rimane
premuto
Ia
macchina
cuce
indietro
/
/
/
La pagina si sta caricando...
La pagina si sta caricando...

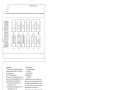
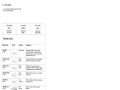
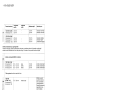
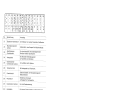
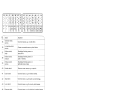
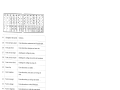
22
I
tasti
automatici:
diversi
modelli
hanno
differente
numero
di
tasti
e
programmi.
A,
B,
C:
tasti
per
ocuhiello
automatico.
II
tasto
B
serve
inoltre
come
tasto
di
annullamento
del
tasti
inseriti
e
per
Ia
posizione
dell’ago
a
sinistra
(vedi
pag.
26>.
D
punto
a
zig-zag
stretch
triplo
2
mm
punto
a
zig-zag
2
mm
E
punto
a
zig-zag
stretch
triplo
3,5
mm
punto
a
zig-zag
3,5
mm
F
punto
a
zig-zag
stretch
triplo
5
mm
punto
a
zig-zag
5
mm
G
punto
dritto
stretch
triplo
punto
dritto
H
punto
pullover
punto
invisible
I
punto
overlock
chiuso
punto
giuntura
K
punto
overlock
orb
a
conchiglia
L
punto
piuma
punto
elastico
ornamentale
M
punto
nido
d’ape
punto
elastico
Per
cucire
i
punti
dei
tasti
automatici
nel
Modelbo
1147
bisogna
disinnestare
prima
il
regolatore
punto
ornamentale
ruotando
il
punto
bianco
sotto
Ia
marca
di
registra
zione
(vedi
pag.
27>.
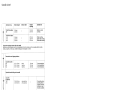
Nel
coperchio
della
macchina
a
raffigurata
una
tabella
del
programmi
con
i
punti
e
le
relative
combinazioni,
Nella
tabella
a
pagine
80-83
troverete
be
relative
istru
zioni
per
l’applicazione.
Le
lettere
dei
tasti
della
sua
macchina
determinano
programmi
e
le
combina
zioni
che
si
possono
cucire.
-3
[I
ii

Alle
Zickzack-
und
Nutzstiche
werden
durch
zusätzliches
Tippen
der
Taste
G
in
der
Breite
halbiert.
J
Regtage
des
points
utilitaires:
(symboles
blancs)
Appuyer
sur
Ia
touche
et
regler
Ia
Ion
gueur
de
point
désirée
entre
1
et
6.
En
appuyant
également
sur
Ia
touche
G,
tous
es
points
zigzag
et
utilitaires
sont
réduits
de
moitié
en
largeur.
punti
utili:
(simboli
bianchi)
Premere
il
tasto
e
regolare
Ia
lunghezza
del
punto
desiderata
tra
1-6.
Tutti
i
punti
a
zig-zag,
elastici
e
stretch
vengono
dimezzati
nella
loro
larghezza,
se
si
preme
in
aggiunta
il
tasto
G.
/
Nutzstiche
einsteflen:
j
f
S&ecting
utNity
stitches
(weilte
Symbole)
Taste
tippen
und
die
gewunschte
Stich
lange
zwischen
1
und
6
einstellen.
(white
symbols>
Push
the
button
required
and
set
the
stitch
length
between
1
and
6.
All
zigzag,
and
utility
stitches
are
halved
in
width
when
button
G
is
pressed.
23

By
also
pressing
button
G,
all
stretch
stit
ches
can
be
halved
in
width.
Regobzone
dei
punti
flexi
(stretch):
(simboli
rossi)
Premere
il
tasto
e
girare
1
regolatore
per
a
lunghezza
del
punto
fino
all’arresto
sul
simbolo
rosso.
Tutti
i
punti
flexi
si
dimezzano
in
ar
ghezza,
premendo
in
aggiunta
1
tasto
G.
Stretchstiche
einsteflen:
(rote
Symbole)
Taste
tippen
und
Stichlängen-Einsteller
bis
zum
Anschlag
auf
rotes
Symbol
stel
len.
4
Alle
Stretchstiche
werden
durch
zusätz
liches
Tippen
der
Taste
G
in
der
Breite
halbiert.
S&ecting
stretch
stitches
(red
symbols)
Push
the
button
required
and turn
the
stitch
length
control
as
far
as
it
will
go
(red
symbol).
Régage
des
points
éastiques:
(symboles
rouges)
Appuyer
sur
Ia
touche
et
regler
le
régle
point
de
Ia
longueur
de points
sur
le
sym
bole
rouge,
jusqu’à
Ia
butée.
Tous
los
points
élastiques
sont
réduits
de
moitié
en
appuyant
sur
Ia
touche
G.
1
24
La pagina si sta caricando...

C2D
III
[+
H
Stichage
einstellen
bei
Geradstich:
Stichlage
links:
Taste
B
tippen
Stichlage
Mitte:
Taste
G
tippen
Stichlage
rechts:
Taste
H
und
I
tippen
Selecting
the
needle
position
for
straight
stitching
Left
needle
position:
push
button
8
Central
needle
position:
push
button
G
Right
needle
position:
push
buttons
H
and
Deport
du
point
droit:
Deport
a
gauche:
appuyer
sur
Ia
touche
B
Deport
au
milieu:
appuyer
sur
Ia
touche
G
Deport
a
droite:
appuyer
sur es
touches
H
et
I
N
Regolazione
della
posizione
d’ago
nella
cucitura
diritta:
Posizione
ago
sinistra:
premere
tasto
B
Posizione
ago
centro:
premere
tasto
G
Posizione
ago
destra:
premere
tasti
H
e
I
26

4
Sicherheitshinweise
für
Haushaltnähmaschinen
nach
DN
57
700
Tell
28
bzw.
IEC
335
Tell
28
a)
Der
Benutzer
hat
wegen
der
auf-
und
abgehenden
Nadel
genugend
Vorsicht
walten
zu
lassen
und
die
Nähstelle
bei
der
Arbeit
ständig
zu
beobachten,
b)
l3eim
Verlassen
der
Maschine,
bei
Wartungsarbeiten
oder
beim
Wech
seln
von
mechanischen
Teilen
oder
Zubehör
ist
die
Maschine
durch
Her
ausziehen
des
Netzsteckers
aus
der
Steckdose
vom
Netz
zu
trennen.
c)
Die
maximal
zulässige
Leistung
der
Lampe
beträgt
15
Watt.
Some
safety
rules
a)
Take
care
to
avoid
injury
to
your
fin
gers
by
the
needle
during
sewing.
b)
Be
sure
to
unplug
the
power
cord
whenever
you
leave
the
machine
or
wish
to
clean
it,
oil
it
or
change
mechanical
and
accessor’
parts.
c)
Be
sure
to
use
only
a
15-watt
light
bulb
in
the
sewing
lamp.
Mesures
de
sécurité
a)
Toujours
faire
preuve
de
prudence
et
continuellement
surveiller
le
travail.
b)
Toujours
débrancher
Ia
machine
du
secteur
avant
de
quitter
Ia
machine,
avant
les
travaux
d’entretien
et
en
Gas
de
remplacement
de
pièces
mécani
ques
ou
d’accessoires.
c)
Puissance
maximale
admissible
de
l’ampoule:
15
Watts,
Norme
di
sicurezza
per
macchine
per
cucire
per
uso
famiglia
secondo
DIN
57
700
parte
28
oppure
IEC
335
parte
28
a)
In
virtü
del
movimento
alternativo
dell’ago,
l’utente
deve
prestare
suffi
ciente
attenzione
e
tenere
costante
mente
d’occhio
il
punto
di
lavoro.
b)
Nel
cambiare
ago,
piedino,
spolina
e
placca
d’ago,
nelle
interruzioni
non
custodite
del
lavoro
e
durante
i
lavori
di
manutenzione
si
deve
disinserire
Ia
corrente
della
macchina
togliendo
Ia
spina
dalla
presa
a
muro.
C)
La
potenza
massirna
consentita
per
Ia
lampadina
è
di
15
Watt.
Some
safety
rules
valid
for
United
Kingdom
only
The
wires
in
this
mains
lead
are
coloured
according
to
following
code:
Blue:
Neutral
Brown:
Lve
As
the
colours
of
the
vvires
in
the
mains
lead
of
this
appliance
may
not
correspond
vvith
the
colour
coding
of
the
terminals
in
your
plug,
proceed
as
follows:
the
wire
(
which
is
coloured
blue
must
be
connected
to
the
terminal
vvhich
is
marked
with
the
letter
N
or
coloured
black.
The
wire
vvhich
is
coloured
brown
must
be
connected
to
the
terminal
which
is
marked
with
the
letter
L
or
coloured
red.
Please
note:
When
a
13-ampere
plug
is
used
a
3-ampere
fuse
has
to
be
fitted.
27

U
—
[i[1[1[ZLtH*1
,1
4
4
Thumb
wheel
for
fancy
stitches
(Model
1147)
Every
fancy
stitch
is
provided
with
a
letter.
Select
the
fancy
stitch
from
the
table.
Set
the
corresponding
letter
at
mark
“0”
by
turning
thumb
wheel
N.
For
sewing
utility
stitches,
thumb
wheel
N
for
fancy
stitches
must
be
disengaged.
To
do
so,
set
the
white
dot
at
mark
“0”.
Regolatore
punti
ornamentali
(Modello
1147):
Ad
ogni
punto
ornamentale
corrisponde
una
lettera.
Scegliere
il
punto
secondo
Ia
riproduzione
nella
tabella.
Col
selettore
di
registrazione
“N”
ruotare
Ia
lettera
deside
rata
sotto
Ia
marca
di
registrazione
“0”.
Per
cucire
con
i
punti
comuni
disinserire
1
regolatore
“N”
dei
punti
ornamentali.
Allo
scopo
ruotare
II
punto
bianco
sotto
Ia
marca
di
registrazione
“0”.
N
Einstellrad
für
Zierstiche
(Modell
1147):
Jedem
Zierstich
ist
em
Buchstabe
zugeordnet.
Den
Zierstich
auf
der
Tabelle
auswählen.
Mit
dem
Einstellrad
,,N”
den
entsprechenden
Buchstaben
unter
die
Einstellmarkierung
,,0”
drehen.
Zum
Nàhen
der
Nutzstiche
muR
das
Em
stellrad
,,N”
der
Zierstiche
ausgeschaltet
werden.
Dazu
den
weiRen
Punkt
unter
die
Emnstellmarkierung
,,0”
drehen.
Disque
de
réglage
des
points
d’orne
mentation
(1147):
Chaque
point
d’ornementation
est
désigné
par
une
Iettre-code.
A
l’aide
du
disque
,,N”
placer
Ia
lettre-code
du
motif
désiré
sous
le
repére
,,0”.
Pour
pouvoir
coudre
les
points
utilitaires,
débrayer
le
disque
de
reglage
,,N”
des
points
d’ornementation
en
placant
le
point
blanc
de
ce
disque
sous
le
repère
,,0”.
28

4
4
th
N
E
)
C
D.QC’
0
o
CC)Q
CU
C
E
o
CCD
25
.
C
.W
.
-
C
-
2
-
C
C
.CO
.C’C)
C.3
—
.
C
.C
.
-
.
-
)
0
2
.2
tCJ)
cC)
-J
-
k-C)
C
a
o2
CU
cc
cC)t
ccv
CcC
0
)hCD
-o
C
C
C
C
-
-
0
C
0
-
cC)
C
-
2
OE
c
2
cv
0
cC)
2
0—
E
(#C
0
U)
V
cC)
U)
-
-
Cd)
0
0
C
CC.
9-
0
0.9
C
-
2
w
O00
0G.)
0
..J
CC.
Cd)
Cd)
-
—7
:
‘Nd’%4
.GU_1
,_\it
/,-%//
I—
iiliiI”IiiiiiII’!IiiiiiI’’’iIiiIIiIl’’Iiiliiii”iIiIIiIi’’’II
>.
-OG)
cC)
QC
C
C
D0
-
V-
‘—
C
CU
D.
0
G)
.
cv—
•
.D
E
o
CC
—
C.)
Q
U).—_cC)
•
CC
C
0—
0
C
CU
0C/c
>-
CC
.C
C.)
Cd)
—
0
C
C
.rC
-
CC)
C)
0
cv
Cd)
.C
C)
CU
LLCC
IiIiiih11iiiiihh1IIIliihh1IiiiiihhhIiiiIihIiIjiJhh1iiiII
iiliilhhliiiihhhiiliiiihhhiiiIiiiIhhhhiiIiJiPhhhJIi
__JHIVI_
__illhlIIL_JIIIII1_illhITL_JIIIIIL
..PillIJIf.IUIIIIFGiIIII1I
‘ii
tiIiiiiNlIiiIIIituliiiiii!I’’iiiiiiiiH!IIililI’Iiiii
Iii
‘hr
ti]
iii
htjJ
‘hi
0
_000
g
-
CO=6C=)°’
cv
E
CU
0
9C00G)
—
CU
_
0
.C
)
E
.2
co
C
CU
—
.o
U)
=
j
0.2
E
o
.9
0=._•
)C)V
j3
.
-
.
2
v
0
2
0
5
)
/
I
La pagina si sta caricando...

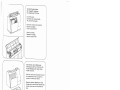
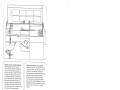
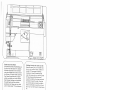
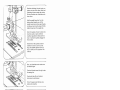
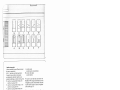
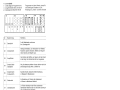
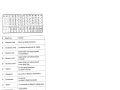
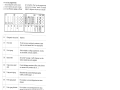
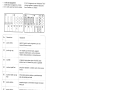
Verwandlungsnähflache
und
Zubehor:
Nähfläche
kann
herausgenommen
werden
N.
Nähfläche
öffnen,
Zubehörkästchen
P
herausnehmen.
Unter
dem
Zubehärkäst
chen
ist
em
Zubehörfach
0.
Abbildung
Q
zeigt,
wie
Nähfü5e,
Nadein
und
Spulen
eingeordnet
werden
müssen.
o
Stopfful
1
NormalnähfuI,
2
Klarsichtful
3
Säumer
4
BIindstichfuE
5
ReiE,verschluBfuE.
6
KnopflochfuR
7
Lineal
Detachable
work
support
and
accessories:
The
work
support
can
be
lifted
out
(N>.
Open
its
lid
and
take
out
accessory
box
P.
Underneath
the
box
is
an
accessory
com
partment
0.
Illustration
0
shows
hw
to
arrange
sewing
feet,
needles
and
bobbins
in
the
accessory
box.
o
Darning
foot
1
Standard
sewing
foot
2
Clear-view
foot
3
Hemmer
foot
4
Blindstitch
foot
5
Zipper
foot
6
Buttonhole
foot
7
Edge
guide
Bolte
de
rangement
et
accessoires:
Enlever
Ia
bolte
de
rangement
N,
l’ouvrir
et
enlever
Ia
bolte
d’accessoires
R
Sous
celle-ci
se
trouve
le
casier
0.
Figure
0
vous
montre
comment
ranger
es
pieds
presseurs,
les
aiguilles
et
les
canettes.
O
Pied
a
repriser
1
Semelle
normale
2
Semelle
transparente
3
Pied
ourleur
4
Semelle
a
point
invisible
5
Semelle
pour
poser
Ia
fermeture
a
glissiere
6
Semelle
pour
boutonniere
7
Guide-bord
II
piano
d
lavoro
variabile
e
gli
accessori:
II
piano
di
lavoro
puô
essere
tolto
(N).
Aprire
il
piano
di
lavoro,
togliere
il
casset
tino
degli
accessori
P.
Sotto
ii
cassettino
degli
accessori
si
trova
uno
scomparto
per
accessori
0.
Figura
0
mostra
come
siste
mare
piedini,
aghi
e
spoline.
o
piedino
da
rammendo
1
piedino
normale
2
piedino
trasparente
3
orlatore
4
piedino
per
punto
invisiblle
5
piedino per
cerniere
6
piedino
per
occhielli
7
lineale
di
guida
31

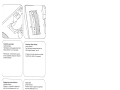
f
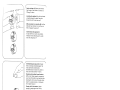
Nahfug
auswechseln:
•
Hauptschalter
104
ausschalten.
Roten
Knopf
N
drücken,
Der
Ful?
rastet
aus,
Changing
the
sewing
foot:
•
Switch
off
master
switch
104.
Pull
the
foot
downwards
at
the
front.
The
foot
then
comes
out.
Changement
de
Ia
semeNe
du
pied:
•
Tourner
I’interrupteur
general
104
sur
‘Arrêt’
Enfoncer
le
bouton
rouge
N;
Ia
semelle
est
libérée.
Sostituzione
del
piedino:
•
Disinserire
l7nterruttore
princIa/e
104.
Premere
bottoncino
rosso
N.
II
piedino
si
disinnesta.
Nähful
anbringen:
Stoffdrückerhebel
senken
und
den
Ful
dabei
so
schieben,
daR
der
Steg
0
in
die
Nuten
P
einrasten.
Replacing
the
sewing
foot:
lower
the
presser
bar
lifter
and
move
the
foot
so
that
pins
N
snap
into
grooves
0,
Mise
en
place
de
Ha
semeNe:
Abaisser
le
levier du
pied
presseur
et
deplacer
Ia
semelle de
manière
quo
l’étrier
0
s’em
bolte
dans
los
rainures
P.
Applicazione
del
piedino:
Abbassare
Ia
leva
premistoffa
a
inserire
il
piedino
in
maniera
che
il
porno
0
si
innesti
nella
scanalatura
P.
Q
und
R
sind
zum
Zubehér
befestigen.
S
ist
die
NähfuRhalterschraube.
Screws
P
and
Q
are
for
securing
accesso
ries.
R
is
the
sewing
foot
retaining
screw.
Q
et
R
servent
a
fixer
los
accessoires.
S
est
Ia
vis
de
fixation
du
support
do
semelle.
0
e
R
servono
per
fissare
gli
accessori.
S
è
Ia
vito
di
fissaggio
del
supporto
per
piedino.
4
32
La pagina si sta caricando...
La pagina si sta caricando...
La pagina si sta caricando...
La pagina si sta caricando...
La pagina si sta caricando...
La pagina si sta caricando...
La pagina si sta caricando...
La pagina si sta caricando...
La pagina si sta caricando...
La pagina si sta caricando...
La pagina si sta caricando...
La pagina si sta caricando...
La pagina si sta caricando...
La pagina si sta caricando...
La pagina si sta caricando...
La pagina si sta caricando...
La pagina si sta caricando...
La pagina si sta caricando...
La pagina si sta caricando...
La pagina si sta caricando...
La pagina si sta caricando...
La pagina si sta caricando...
La pagina si sta caricando...
La pagina si sta caricando...
La pagina si sta caricando...
La pagina si sta caricando...
La pagina si sta caricando...
La pagina si sta caricando...
La pagina si sta caricando...
La pagina si sta caricando...
La pagina si sta caricando...
La pagina si sta caricando...
La pagina si sta caricando...
La pagina si sta caricando...
La pagina si sta caricando...
La pagina si sta caricando...
La pagina si sta caricando...
La pagina si sta caricando...
La pagina si sta caricando...
La pagina si sta caricando...
La pagina si sta caricando...
La pagina si sta caricando...
La pagina si sta caricando...
La pagina si sta caricando...
La pagina si sta caricando...
La pagina si sta caricando...
La pagina si sta caricando...
La pagina si sta caricando...
La pagina si sta caricando...
La pagina si sta caricando...
La pagina si sta caricando...
La pagina si sta caricando...
-
 1
1
-
 2
2
-
 3
3
-
 4
4
-
 5
5
-
 6
6
-
 7
7
-
 8
8
-
 9
9
-
 10
10
-
 11
11
-
 12
12
-
 13
13
-
 14
14
-
 15
15
-
 16
16
-
 17
17
-
 18
18
-
 19
19
-
 20
20
-
 21
21
-
 22
22
-
 23
23
-
 24
24
-
 25
25
-
 26
26
-
 27
27
-
 28
28
-
 29
29
-
 30
30
-
 31
31
-
 32
32
-
 33
33
-
 34
34
-
 35
35
-
 36
36
-
 37
37
-
 38
38
-
 39
39
-
 40
40
-
 41
41
-
 42
42
-
 43
43
-
 44
44
-
 45
45
-
 46
46
-
 47
47
-
 48
48
-
 49
49
-
 50
50
-
 51
51
-
 52
52
-
 53
53
-
 54
54
-
 55
55
-
 56
56
-
 57
57
-
 58
58
-
 59
59
-
 60
60
-
 61
61
-
 62
62
-
 63
63
-
 64
64
-
 65
65
-
 66
66
-
 67
67
-
 68
68
-
 69
69
-
 70
70
-
 71
71
-
 72
72
-
 73
73
-
 74
74
-
 75
75
-
 76
76
-
 77
77
-
 78
78
-
 79
79
-
 80
80
-
 81
81
-
 82
82
-
 83
83
-
 84
84
-
 85
85
-
 86
86


Pfaff tipmatic 1045 Manuale del proprietario
- Categoria
- Macchine da cucire
- Tipo
- Manuale del proprietario
- Questo manuale è adatto anche per
in altre lingue
- English: Pfaff tipmatic 1045 Owner's manual
- français: Pfaff tipmatic 1045 Le manuel du propriétaire
- Deutsch: Pfaff tipmatic 1045 Bedienungsanleitung
Documenti correlati
-
Pfaff tipmatic 1115 Manuale del proprietario
-
-
-
-
-
-
-
-
-
Altri documenti
-
Bernina Bernette 100 Manuale del proprietario
-
Brother Innov-is 4750D Manuale utente
-
SINGER 2662 Excel Manuale del proprietario
-
-
-
-
Bernina 1008 Manuale del proprietario
-
Adler 166 Directions For Use Manual
-