
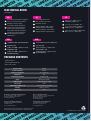
VIRTUAL 7.1 SURROUND SOUND
RICH AND POSITIONAL AUDIO
CLEAR VOICE COMMUNICATION

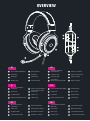
OVERVIEW
Detachable Flexible Mic
USB Cable
RGB Logo
1
2
3
RGB On/Off
4
Mute Volume
Mute Mic
Volume Up
5
6
7
Volume Down
8
EN
Micrófono flexible
desmontable
Cable de USB
Logotipo RGB
1
2
3
Activación y
desactivación de la RGB
4
Silenciar volumen
Silenciar micrófono
Subir volumen
5
6
7
Bajar volumen
8
ES
1
2
3
4
5
6
7
8
Microfono flessibile
rimovibile
Cavo USB
Logótipo RGB
1
2
3
RGB attivato/disattivato
4
Disattivazione Volume
Disattivazione audio
microfono
Volume su
5
6
7
Volume giù
8
IT
Micro flexible détachable
Câble USB
Logo RVB
1
2
3
RVB activé/désactivé
4
Volume muet
Micro muet
Volume haut
5
6
7
Volume bas
8
FR
Microfone flexível
e amovível
Cabo USB
Logótipo RGB
1
2
3
Ligar/Desligar RGB
4
Desativar Volume
Desativar microfone
Aumentar o volume
5
6
7
Diminuir o volume
8
PT
Abnehmbares flexibles
Mikrofon
USB-Kabel
RGB-Logo
1
2
3
RGB ein/aus
4
Lautstärke stumm
Mikrofon stumm
Lautstärke erhöhen
5
6
7
Lautstärke verringern
8
DE
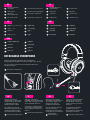
Plug the detachable microphone to the headphone
microphone jack and adjust so that it is parallel to your mouth.
For best results, make sure the microphone diaphragm is
facing your mouth.
Enchufe el micrófono
desmontable al conector del
micrófono de los auriculares
y ajústelo de forma que
quede paralelo a la boca.
Para obtener los mejores
resultados, asegúrese de que
el diafragma del micrófono
esté orientado hacia la boca.

Съемный гибкий
микрофон
USB-кабель
Логотип с
RGB-подсветкой
1
2
3
Вкл./выкл. RGB
4
Отключение громкости
Отключение микрофона
Увеличить громкость
5
6
7
уменьшить громкость
8
RU
着脱式フレキシブルマイク
USB ケ ーブ ル
RGB ロゴ
1
2
3
RGB オン/オフ
4
音量の消音
マイクの消音
音量上
5
6
7
音量下
8
JP
Mik fleksibel yang
dapat dilepas
Kabel USB
Logo RGB
1
2
3
RGB On/Off
4
Volume Bisu
Mik Bisu
Volume naik
5
6
7
Volume turun
8
ID
可拆卸靈活的麥克風
USB 線材
RGB 標誌
1
2
3
RGB 開/關
4
音量靜音
麥克風靜音
調高音量
5
6
7
調低音量
8
CHT
可拆卸式柔性麦克风
USB 线材
RGB 标志
1
2
3
RGB 开关
4
音量静音
麦克风静音
音量增大
5
6
7
音量减小
8
CHS
1
Plug the detachable microphone to the headphone
microphone jack and adjust so that it is parallel to your mouth.
For best results, make sure the microphone diaphragm is
facing your mouth.
ES
Enchufe el micrófono
desmontable al conector del
micrófono de los auriculares
y ajústelo de forma que
quede paralelo a la boca.
Para obtener los mejores
resultados, asegúrese de que
el diafragma del micrófono
esté orientado hacia la boca.
Diafragma del Micrófono
1
IT
Collegare il microfono
rimovibile al jack del microfono
delle cuffie e regolarlo in modo
che sia parallelo alla bocca.
Per ottenere i migliori risultati,
assicurarsi che la membrana
del microfono sia rivolta verso
la bocca.
Membrana del Microfono
1
FR
Branchez le microphone
détachable sur la prise micro
du casque et réglez-le de
manière à ce qu'il soit
parallèle à votre bouche.
Pour de meilleurs résultats,
assurez-vous que le
diaphragme du microphone
est orienté vers votre bouche.
Diaphragme
du Microphone
1
PT
Ligue o microfone amovível à
tomada de microfone dos
auscultadores e ajuste de
modo a que fique paralelo à
sua boca.
Para melhores resultados,
certifique-se de que o
diafragma do microfone está
virado para a sua boca.
Diafragma do Microfone
1
Schließen Sie das
abnehmbare Mikrofon an
den Kopfhörer-Mikrofon-An-
schluss an und richten Sie es
parallel zu Ihrem Mund aus.
Stellen Sie für optimale
Ergebnisse sicher, dass die
Mikrofonmembran zu Ihrem
Mund zeigt.
DETACHABLE MICROPHONE
將可拆卸麥克風對準耳機麥克風插座插緊並調整至與嘴巴平行。
請確定麥克風振膜方向是面朝你。
2
1
Microphone Diaphragm
1

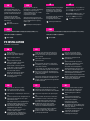
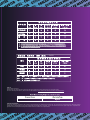
PC INSTALLATION
*Windows 7 Installation
DE
Schließen Sie das
abnehmbare Mikrofon an
den Kopfhörer-Mikrofon-An-
schluss an und richten Sie es
parallel zu Ihrem Mund aus.
Stellen Sie für optimale
Ergebnisse sicher, dass die
Mikrofonmembran zu Ihrem
Mund zeigt.
Dass die
Mikrofonmembran
1
RU
Подключите съемный
микрофон к соответствующему
разъему на гарнитуре и
отрегулируйте его так, чтобы
он был расположен
параллельно губам.
Для наилучшего результата
мембрана микрофона должна
быть направлена в сторону
ваших губ.
Мембрана Микрофона
1
ID
Pasang mikrofon yang dapat
dilepas ke soket mikrofon
headphone, lalu sesuaikan
agar sejajar dengan mulut
Anda.
Untuk hasil terbaik, pastikan
diafragma mikrofon
menghadap mulut Anda.
Diafragma Mikrofon
1
JP
着脱 式マイクをヘッドホンのマイク
ジャックに差し込み、口と平行にな
るよう に 調 整してくだ さ い 。
最良の性能を実現するために、マイ
クの ダイア フラム が 口 の 方 を 向 い
て い るこ とを 確 認 してくだ さ い 。
マイク の ダイ ア フ ラム が
1
CHT
將可拆卸麥克風對準耳機麥克風插座插緊並調整至與嘴巴平行。
請確定麥克風振膜方向是面朝你。
麥克風振膜
1
CHS
将可拆卸麦克风对准耳机麦克风插座插紧然后弯曲麦克风平行于嘴巴。
请确定麦克风振膜方向是面朝你。
麦克风振膜
1
1
2
3
4
EN
Right click the
Speaker/Headset Icon at the
bottom right of the desktop
Select "Playing Device"
or
Open Control Panel and
select "Hardware and Sound"
and then select "Sound"
If the CH331 is not the default
audio device, right click above
the device icon and select
"Set as Default Device"
5
Repeat the same steps above
under the "Recording" tab.
Set CH331 as the default
recording device.
1
2
3
4
ES
Haga clic con el botón derecho en el
icono del altavoz o de los auriculares
que se encuentra en la parte inferior
del escritorio
Seleccione "Dispositivo de
reproducción".
o
Abra el panel de control y seleccione
"Hardware y sonido" y, a continuación,
seleccione "Sonido".
Si su CH331 no es el dispositivo de audio
predeterminado, haga clic con el botón
derecho en la imagen del dispositivo y
seleccione "Establecer como dispositivo
predeterminado"
5
Repita los mismos pasos anteriores bajo
la pestaña "Grabación". Establezca su
CH331 como el dispositivo de grabación
predeterminado.
1
2
3
4
IT
Fare clic con il tasto destro
sull'icona altoparlanti/cuffie
in basso a destra sul desktop
Selezionare "Dispositivo di
riproduzione"
o
Aprire Pannello di controllo e
selezionare "Hardware e suoni",
quindi selezionare "Suono"
Se CH331 non è il dispositivo
audio predefinito, fare clic con il
tasto destro sull'immagine del
dispositivo e selezionare "Imposta
come dispositivo predefinito"
5
Ripetere le stesse procedure nella
scheda "Registrazione". Impostare
CH331 come dispositivo di
registrazione predefinito.
1
2
3
4
FR
Faites un clic droit sur l'icône
Haut-parleur/Casque dans le
coin inférieur droit du bureau
Sélectionnez "Périphérique de lecture"
ou
Ouvrez le panneau de configuration et
sélectionnez "Matériel et son" puis
sélectionnez "Son"
Si le CH331 n'est pas le périphérique
audio par défaut, faites un clic droit
sur l'image du périphérique et
sélectionnez "Définir en tant que
périphérique par défaut"
5
Répétez les mêmes étapes que
ci-dessus dans l'onglet
"Enregistrement". Définissez le
CH331 en tant que périphérique
d'enregistrement par défaut.
1
2
3
4
PT
Clique com o botão direito no ícone de
altifalante/auscultadores no canto
inferior direito do ambiente de trabalho
Selecione "Dispositivo de reprodução"
ou
Abra o Painel de Controlo e selecione
"Hardware e som" e selecione "Som"
Se o dispositivo CH331 não estiver
definido como dispositivo de áudio
predefinido, clique com o botão
direito na imagem do dispositivo e
selecione "Predefinir Dispositivo"
5
Repita os mesmos passos indicados
acima no separador "Gravação".
Defina o CH331 como dispositivo de
gravação predefinido.
1
2
3
4
DE
Lautsprecher/Headset-Symbol
unten rechts am Desktop mit
rechter Maustaste anklicken
„Wiedergabegerät“ wählen
oder
Systemsteuerung öffnen,
„Hardware und Sound“ und
dann „Sound“ wählen
Falls CH331 nicht das
Standardaudiogerät ist:
Gerätebild mit rechter Maustaste
anklicken und „Als Standardgerät
festlegen“ wählen
5
Die obigen Schritte im Register
„Aufnahme“ wiederholen.
CH331 als Standardauf-
nahmegerät festlegen.

Ripetere le stesse procedure nella
scheda "Registrazione". Impostare
CH331 come dispositivo di
registrazione predefinito.
1
2
3
4
RU
Щелкните правой кнопкой мыши
значок динамика (гарнитуры) в
правом нижнем углу Рабочего стола.
Выберите команду «Устройство
воспроизведения»
Или
Откройте Панель управления и
выберите пункт «Оборудование из
звук», а затем — «Звук»
Если устройство CH331 не является
аудиоустройством по умолчанию,
щелкните его значок правой
кнопкой мыши и выберите пункт
«Использовать по умолчанию»
5
Повторите вышеуказанные
действия на вкладке «Запись».
Установите CH331 в качестве
устройства записи по умолчанию.
1
2
3
4
ID
Klik Kanan Ikon Speaker/Headset
pada sisi kanan bawah desktop
pilih "Playback Device"
Atau
Buka "Control Panel" dan pilih "Hardware
and Sound" Lalu pilih "Sound"
Jika CH331 bukan "Default Audio Device",
klik kanan disekitar gambar perangkat
dan pilih "Set As Default Device"
5
Ulangi langkah diatas pada tab
"Recording". Atur CH331 sebagai "Default
Recording Device"
1
2
3
4
JP
デスクトップの右下に表示され
て い る ス ピ ー カ ー / ヘ ッド セ ット
ア イコ ン を 右 クリッ クし ま す
[再生デバイス] を選択します
あるいは
コントロールパネルを開き、[ハード
ウェアとサウンド] を選 択し、[サウン
ド] を選択します
CH331 が 既 定 の オー ディオデ バ イス
になっていない場合、デバイスの畫像
を右クリックし、[既定のデバイスとして
設定] を選択します
5
[録音] タブでも上と同じ手順を行いま
す 。 CH331 を既定の録音デバイスとし
て 設 定 してくだ さ い 。
1
2
3
4
CHT
在桌面右下角右鍵點擊"喇叭/耳機"圖示
左鍵點擊"播放裝置"
或
打開控制台,選擇"聲音"
若CH331不是預設裝置,右鍵點擊"耳麥
式耳機"圖示旁的空白處,並選擇"設定
成預設裝置"
5在"錄製"索引標籤重複以上動作,將
CH331麥克風設定成預設的錄音裝置
1
2
3
4
CHS
在桌面右下角右键点击"喇叭/耳机"图示
左键点击"播放装置"
或
打开控制台,选择"声音"
若CH331不是默认装置,右键点击"耳麦式耳
机"图示旁的空白处,并选择"设定成默认装置"
5在"录制"索引卷标重复以上动作,将CH331麦
克风设定成默认的录音装置
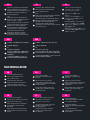
MAC INSTALLATION
1
2
3
4
EN
Open the Apple Menu and
select "System Preferences"
Select "Sound" icon
Under the Input tab, select
“CH331” for default sound input.
Under the Output tab, select
“CH331” for default sound output.
1
2
3
4
ES
Abra el menú Apple y
seleccione "Preferencia del
sistema"
Seleccione el icono "Sonido"
En la pestaña Entrada, seleccione
“CH331” para la entrada de sonido
predeterminada.
En la pestaña Salida, seleccione
“CH331” para la salida de sonido
predeterminada.
1
2
3
4
IT
Aprire il menu Apple e
selezionare "Preferenze di
Sistema"
Selezionare l'icona "Suono"
Nella scheda Ingresso, selezionare
“CH331” come ingresso audio
predefinito.
Nella scheda Uscita, selezionare
“CH331” come uscita audio
predefinita.
1
2
3
4
FR
Ouvrez le menu Apple et
sélectionnez "Préférences système"
Sélectionnez l'icône "Son"
Dans l'onglet Entrée, sélectionnez
"CH331" pour l'entrée sonore
par défaut.
Dans l'onglet Sortie, sélectionnez
"CH331" pour la sortie sonore par
défaut.
1
2
3
4
PT
Abra o Menu Apple e selecione
"Preferências do Sistema"
Selecione o ícone "Som"
No separador Entrada, selecione
“CH331” como entrada de
som predefinida.
No separador Saída, selecione
“CH331” como saída de som
predefinida.
1
2
3
4
DE
Apple-Menü öffnen,
„Systemeinstellungen“ wählen
„Ton“-Symbol wählen
Im Eingabe-Register
„CH331“ als Standardeingabegerät
wählen.
Im Ausgabe-Register
„CH331“ als Standardausgabe-
gerät wählen.

512005000-GP Ver 1.0: 2022/01 CH331
© 2022 Cooler Master Technology Inc. All Rights Reserved.
All trademarks are registered to their respective owners.
North America - Cooler Master NA
1 N Indian Hill Blvd Suite D200
Claremont, CA 91711 U.S.A.
Tel: +1-888-624-5099
Europe - Cooler Master Europe B.V.
Lodewijkstraat 1b, 5652AC Eindhoven,
The Netherlands
Tel: +31-(0)40 -702- 0900
China - Cooler Master China
Room 112, Building 9, No. 327, Songjin Road,
Jinshanwei Town, Jinshan Dist.,
Shanghai City, China
Tel: +86-21-51872177
Asia Pacific - Cooler Master Technology Inc.
7F., No. 398, Xinhu 1st Rd., Neihu Dist.,
Taipei City 114065, Taiwan (R.O.C.)
Tel: +886-2-2225-3517
MAC INSTALLATION
(Continued...)
1
2
3
4
RU
Вызовите меню Apple и выберите
пункт «Системные настройки».
Выберите значок «Звук».
На вкладке «Вход» выберите
CH331 в качестве устройства
записи звука по умолчанию.
На вкладке «Выход» выберите
CH331 в качестве устройства
воспроизведения звука по
умолчанию.
1
2
3
4
ID
Buka "Apple Menu" dan
pilih "System Preferences"
Pilih Ikon "Sound"
Dalam tab Input, Pilih "CH331"
sebagai "Default Sound Input"
Dalam tab Output, Pilih "CH331"
sebagai "Default Sound Output"
1
2
3
4
JP
Apple メ ニ ュ ー を 開 き 、[ シ ス テ
ム環境設定] を選択します
[サウンド] アイコンを選択します
[入力] タブで、[CH331] を音の入力
の既定デバイスとして選択します。
[出力] タブで、[CH331] を音の出力の
既定デバイスとして選択します。
1
2
3
4
CHT
打開蘋果系統選單,選擇"系統偏好設定"
點選"聲音"圖示
在"輸入"索引標籤下,選取CH331作為
預設聲音輸入裝置
在"輸出"索引標籤下,選取CH331作
為預設聲音輸出裝置
1
2
3
4
CHS
打开苹果系统选单,选择"系统偏好设定"
点选"声音"图标
在"输入"索引卷标下,选取CH331作
为预设音频输入设备
在"输出"索引卷标下,选取CH331作为
默认声音输出装置
Product Name CH331
Driver Diameter 50mm
Frequency Response 20 - 20,000 Hz
Impedance 16Ω
Sensitivity (@1kHz) 103dB ± 3 dB
Input Maximum 30mW
Cable Length 2.2m USB Type A cable
Connector USB
Dimensions (W x H x D) 179.4 * 96.3 * 210.1 mm
Weight approx. 371.2g
Warranty 2 years
PACKAGE CONTENTS
• CH331 Headset
• Detachable Flexible Mic
• Quick Start Guide

CH331
CH331
FOR AUSTRALIA ONLY:
Our goods come with guarantees that cannot be excluded under the Australian Consumer Law. You are entitled to a replacement or refund for a major
failure and for compensation for any other reasonably foreseeable loss or damage. You are also entitled to have the goods repaired or replaced if the
goods fail to be of acceptable quality and the failure does not amount to a major failure.
Table A:
Cooler Master Products
Please check your user manual for the exact warranty period terms for products that are not shown below.
For more warranty information, please visit our official website: http://www.coolermaster.com/service/warranty.html

Cooler Master Products : LIMITED WARRANTY
This document describes the warranty terms for all Cooler Master peripheral products
WHO THE WARRANTY PROTECTS:
This Warranty is valid to the original purchaser only.
WHAT THE WARRANTY PROTECTS:
This warranty is valid only for the Cooler Master Products distributed by authorized dealer(s).
Please contact Cooler Master for warranty information, services and questions: http://account.coolermaster.com
WHAT IS AND IS NOT COVERED
It is important to note that our warranty is not an unconditional guarantee for the duration of the Program. Any replaced parts become the property of
Cooler Master. The Program does not apply to the software component of a product or a product which has been damaged due to accident, misuse,
abuse, improper installation, usage not in accordance with product specifications and instructions, natural or personal disaster, or unauthorized
alterations, repairs or modifications.
The Program does also not cover any events such as below:
• Any damages unrelated to manufacturing defects.
• Any unsuitable environment or use of the product in Cooler Master Opinion.
• Any product which has been modified without official permission from Cooler Master, or on which the serial number or warranty sticker has been
defaced, modified, or removed.
Damage, deterioration or malfunction resulting from:
• Accident, abuse, misuse, neglect, fire, water, lightning, or other acts of nature, commercial or industrial use, unauthorized product modification or failure
to follow instructions included with the product.
• Third party products using Cooler Master Components will not be covered by warranty. See your vendor or the manufacturer for information about
servicing.
• Repair or attempted repair by anyone not authorized by Cooler Master, Inc.
• Any shipment damages (claims must be made with the carrier).
• Unauthorized repairs to a Cooler Master product will void the warranty offered by the Program.
Cooler Master reserves the right to refuse to service any product which has been altered, modified or repaired by non-Cooler Master Service personnel.
• Cooler Master does not warrant that this product will meet your requirements. It is your responsibility to determine the suitability of this product for your
purpose.
• Removal or installation charges.
• You are responsible for the cost of shipping the product to Cooler Master. Cooler Master pays the cost
of returning a product to You (applies only if product is directly purchased from Cooler Master).
• Cooler Master reserves the right to replace the product with a service product at their sole discretion at any time.
• Product malfunction or damage resulting from liquids or moisture.
• All accessories that malfunction due to physical damage such as: USB cables, extension cables, adapter cables, adapters, power cords, screws, retention
brackets, ear cups, and all other similar accessories.
LIMITATION OF IMPLIED WARRANTIES:
THERE ARE NO WARRANTIES, EXPRESS OR IMPLIED, WHICH EXTEND BEYOND THE DESCRIPTION CONTAINED HEREIN INCLUDING THE IMPLIED WARRANTY
OF MERCHANTABILITY AND FITNESS FOR A PARTICULAR PURPOSE.
For the most updated information please visit our official website: www.coolermaster.com
Cooler Master Support: https://account.coolermaster.com
EXCLUSION OF DAMAGES
COOLER MASTER’S LIABILITY IS LIMITED TO THE COST OF REPAIR OR REPLACEMENT OF THE PRODUCT. COOLER MASTER SHALL NOT BE LIABLE FOR:
• DAMAGE TO OTHER PROPERTY CAUSED BY ANY DEFECT IN THE PRODUCT, DAMAGES BASED UPON INCONVENIENCE, LOSS OF USE OF THE PRODUCT,
LOSS OF TIME, LOSS OF PROFITS, LOSS OF BUSINESS OPPORTUNITY, LOSS OF GOODWILL, INTERFERENCE WITH BUSINESS RELATIONSHIPS OR OTHER
COMMERCIAL LOSS, EVEN IF ADVISED OF THEIR POSSIBILITY OF SUCH DAMAGES.
• ANY OTHER DAMAGES, WHETHER INCIDENTAL, CONSEQUENTIAL OR OTHERWISE
• ANY CLAIM AGAINST THE CUSTOMER BY ANY OTHER PARTY
WARRANTY INFORMATION:
If the product is found with reasonable defect within the period of (refer to Table A.,) starting on the first day of purchase (with proof of invoice), this is
what you must do, to claim warranty.
PROCEDURES:
1. Consumers should return to the shop where he/she has bought the goods, After confirming with the shop with a valid invoice, they may approach the
distributor for RMA claim.
2. After confirmed by the distributor that the goods was damaged due to natural causes, replacement and repair will be done by distributor (including
brand new or refurbished goods)
3. All faulty goods must return to the distributor, expenses for returning the faulty goods will be covered by the consumer, and distributor will cover the
cost involved in the transporting of parts or repaired goods to the consumer.
Regarding all the expenses incurred in making the claim, and this is how you would claim:
1. Within the valid warranty date, starting from the first day of issuing invoice, Retail shops will assist in confirmation with distributor for the consumer for
the following:
A. If the damage was caused by the consumer, then the consumer should cover all expenses in fixing the product, if the product still can’t be fixed, we
would suggest consumer in buying a brand new product.
B. Product defect caused under natural use, expenses will be covered by the distributor.
2. Faulty products with expired warranty dates, we would suggest consumer to purchase a new products, without undergoing for repairs.
-
 1
1
-
 2
2
-
 3
3
-
 4
4
-
 5
5
-
 6
6
-
 7
7
-
 8
8


in altre lingue
- English: Cooler Master CH331 User guide
- français: Cooler Master CH331 Mode d'emploi