Videotec NTX Manuale utente
- Categoria
- Accessori per telecamere di sicurezza
- Tipo
- Manuale utente
Questo manuale è adatto anche per

EN
English - Instruction manual
IT
Italiano - Manuale di istruzioni
FR
Français - Manuel d’instructions
DE
Deutsch - Bedienungsanleitung
RU
Русский - Руководство по эксплуатации
ITALIANO
NVX
NTX
Stainless steel camera


EN
English - Instruction manual
ITALIANO
NVX
NTX
Stainless steel camera


Instruction manual - English - EN
3MNVCNVX_2013_EN
Contents
ENGLISH 1
1 About this manual ....................................................................................................................7
1.1 Typographical conventions ................................................................................................................................................ 7
2 Notes on copyright and information on trademarks .............................................................7
3 Note on data security ...............................................................................................................7
3.1 Introduction ............................................................................................................................................................................. 7
4 Safety rules................................................................................................................................8
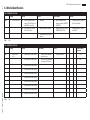
5 Identification ...........................................................................................................................10
5.1 Product description and type designation .................................................................................................................10
5.1.1 NVX .............................................................................................................................................................................................................10
5.1.2 NTX ..............................................................................................................................................................................................................10
5.2 Product Overview.................................................................................................................................................................10
5.3 Product marking ................................................................................................................................................................... 11
5.3.1 Checking the markings ........................................................................................................................................................................11
6 Versions ...................................................................................................................................11
6.1 NVX ............................................................................................................................................................................................ 11
6.1.1 Version with integrated wiper ...........................................................................................................................................................11
6.1.2 Version without wiper ..........................................................................................................................................................................11
6.1.3 Day/Night camera .................................................................................................................................................................................11
6.1.4 VIDEOTEC Analytics ............................................................................................................................................................................... 11
6.2 NTX ............................................................................................................................................................................................11
6.2.1 Germanium window ............................................................................................................................................................................. 11
6.3 Model identification ............................................................................................................................................................12
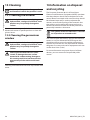
7 Preparing the product for use ...............................................................................................13
7.1 Unpacking ...............................................................................................................................................................................13
7.2 Safely disposing of packaging material .......................................................................................................................13
7.3 Contents ..................................................................................................................................................................................13
7.4 Preparatory work before installation.............................................................................................................................14
7.4.1 Wall, railing or ceiling fastening ........................................................................................................................................................14
7.4.2 Installation options ...............................................................................................................................................................................16
8 Installation ..............................................................................................................................18
8.1 Functional ground ...............................................................................................................................................................18
8.2 Quick connectors cabling ..................................................................................................................................................18
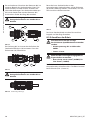
8.2.1 Mobile connectors cabling (power supply, I/O)..........................................................................................................................19
8.2.2 Relays connection..................................................................................................................................................................................20
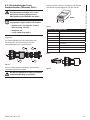
8.2.3 Mobile connectors cabling (Ethernet, PoE+) ...............................................................................................................................21
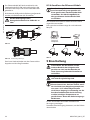
8.2.4 Connection of the Ethernet cable....................................................................................................................................................22
9 Switching on ...........................................................................................................................22
10 Configuration ........................................................................................................................23
10.1 Default IP address ..............................................................................................................................................................23
10.2 Web interface ......................................................................................................................................................................23
10.2.1 First access to the web pages .........................................................................................................................................................23

EN - English - Instruction manual
4 MNVCNVX_2013_EN
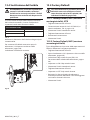
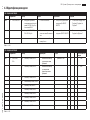
11 Accessories and Supports .................................................................................................... 23
11.1 Washer....................................................................................................................................................................................23
11.2 Mounting bracket for LED illuminator........................................................................................................................24
11.3 LED illuminator ...................................................................................................................................................................24
11.4 Corner mount adaptor ..................................................................................................................................................... 24
11.5 Pole mount adaptor .......................................................................................................................................................... 24
11.6 Counter-plate ......................................................................................................................................................................25
11.7 Dust protection frontal shield .......................................................................................................................................25
12 Maintenance .........................................................................................................................25
12.1 Sunshield removal .............................................................................................................................................................25
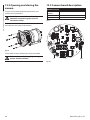
12.2 Opening and closing the camera .................................................................................................................................26
12.3 Camera board description .............................................................................................................................................. 26
12.4 Fuse replacement...............................................................................................................................................................27
12.5 Factory Default ...................................................................................................................................................................27
12.5.1 Factory Default, NVX (version with wiper), NTX .......................................................................................................................27
12.5.2 Factory Default, NVX (version without wiper) ..........................................................................................................................27
13 Cleaning ................................................................................................................................28
13.1 Cleaning the window .......................................................................................................................................................28
13.2 Cleaning the germanium window ...............................................................................................................................28
14 Information on disposal and recycling ............................................................................... 28
15 Technical data .......................................................................................................................29
15.1 NVX..........................................................................................................................................................................................29
15.1.1 General ....................................................................................................................................................................................................29
15.1.2 Mechanical ............................................................................................................................................................................................. 29
15.1.3 Windows for camera ...........................................................................................................................................................................29
15.1.4 Electrical .................................................................................................................................................................................................29
15.1.5 Network ..................................................................................................................................................................................................29
15.1.6 Video ........................................................................................................................................................................................................29
15.1.7 I/O interface ...........................................................................................................................................................................................29
15.1.8 Cameras ..................................................................................................................................................................................................30
15.1.9 Environment..........................................................................................................................................................................................31
15.1.10 Certifications.......................................................................................................................................................................................31
15.1.11 Certifications - Railway applications ..........................................................................................................................................31
15.1.12 Certifications - Marine applications ...........................................................................................................................................31
15.2 NTX ..........................................................................................................................................................................................32
15.2.1 General ....................................................................................................................................................................................................32
15.2.2 Mechanical ............................................................................................................................................................................................. 32
15.2.3 Windows for camera ...........................................................................................................................................................................32
15.2.4 Electrical .................................................................................................................................................................................................32
15.2.5 Network ..................................................................................................................................................................................................32
15.2.6 Video ........................................................................................................................................................................................................32
15.2.7 I/O interface ...........................................................................................................................................................................................32
15.2.8 Cameras ..................................................................................................................................................................................................33
15.2.9 Environment..........................................................................................................................................................................................35
15.2.10 Certifications.......................................................................................................................................................................................35
15.2.11 Certifications - Railway applications ..........................................................................................................................................35

Instruction manual - English - EN
5MNVCNVX_2013_EN
15.2.12 Certifications - Marine applications ...........................................................................................................................................35
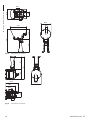
16 Technical drawings ...............................................................................................................36

EN - English - Instruction manual
6 MNVCNVX_2013_EN

Instruction manual - English - EN
7MNVCNVX_2013_EN
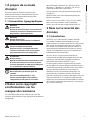
1 About this manual
Read all the documentation supplied carefully before
installing and using this product. Keep the manual in
a convenient place for future reference.
1.1 Typographical conventions
DANGER!
High level hazard.
Risk of electric shock. Disconnect the
power supply before proceeding with any
operation, unless indicated otherwise.
DANGER!
Mechanical hazard.
Risk of crushing or shearing.
DANGER!
Hot surface.
Avoid contact. Surfaces are hot and may
cause personal injury if touched.
CAUTION!
Medium level hazard.
This operation is very important for the
system to function properly. Please read
the procedure described very carefully and
carry it out as instructed.
INFO
Description of system specifications.
We recommend reading this part carefully
in order to understand the subsequent
stages.
2 Notes on copyright and
information on trademarks
The mentioned names of products or companies are
trademarks or registered trademarks.
Microsoft Edge®, Windows XP®, Windows Vista®,
Windows 7®, Windows 8®, Windows 10® are the
property of Microsoft Corporation.
Google Chrome® is a trademark of Google LLC.
Mozilla Firefox® is a trademark of Mozilla Foundation.
INTEL® Core™ 2 Duo, INTEL® Core™ 2 Quad, INTEL®
Xeon® are the property of Intel Corporation.
ONVIF® is a trademark of Onvif, Inc.
3 Note on data security
3.1 Introduction
VIDEOTEC S.p.A. manufactures video surveillance
products exclusively for professional use. VIDEOTEC
S.p.A. products can be used in technical contexts
and for wide-ranging purposes, from controlling the
security of citizens to monitoring product processes
in risk areas to application for environmental
monitoring and protection.
Some of these uses can involve processing of
personal data by those using a video surveillance
system within which VIDEOTEC S.p.A. products are
installed and integrated.
The wide-ranging application scenarios prevent
definition of standard IT safety measures set by
default on products compatible with any use scenario
and technical context. In particular, certain security
measures (including measures composing a sector
standard in devices intended for non-professional
use) may be incompatible or unnecessary in
particular technical contexts or, on the contrary,
insufficient.

EN - English - Instruction manual
8 MNVCNVX_2013_EN
It is therefore indispensable that risk analysis linked
to IT security aspects, also in relation to applicable
local standards on personal data protection, are
performed by specialist staff responsible for end use
of the product.
The user of the product therefore, availing of
specialist staff in IT security, has to decide under his/
her exclusive responsibility whether to:
• Enable certain or all security functionalities offered
by the VIDEOTEC S.p.A. device;
• Implement different security measures at system
level;
• Combine the two options.
The aforementioned choice should be made based
on the specific technical and legislative context, as
well as the type of data processed using the video
surveillance system.
Given the type of technical contexts within which
VIDEOTEC S.p.A. devices are typically used, it is
not possible or would it ever be advisable that the
firmware for these devices automatically upgrades via
the Internet. Over time, VIDEOTEC S.p.A. could release
security upgrades for its devices, which should be
manually installed by the user, always by specialist
staff, if certain or all the security functionalities for
the device provided are enabled. The user is obliged
to be updated viaVIDEOTEC S.p.A. institutional
communication channels on the availability of
firmware security upgrades.
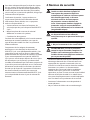
4 Safety rules
CAUTION! The electrical system to which
the unit is connected must be equipped
with a 10A max automatic bipolar circuit
breaker. This circuit breaker must be of
the Listed type. The minimum distance
between the circuit breaker contacts must
be 3mm (0.1in). The circuit breaker must be
provided with protection against the fault
current towards the ground (differential)
and the overcurrent (magnetothermal).
CAUTION! Device installation and
maintaining must be performed by
specialist technical staff only.
CAUTION! TNV-1 installation type. The
installation is type TNV-1, do not connect it
to SELV circuits.
CAUTION! For continued protection against
risk of fire, replace only with same type and
rating of fuse. Fuses must be replaced only
by service personnel.
• The manufacturer declines all responsibility
for any damage caused by an improper use
of the appliances mentioned in this manual.
Furthermore, the manufacturer reserves the right
to modify its contents without any prior notice.
The documentation contained in this manual has
been collected and verified with great care. The
manufacturer, however, cannot take any liability
for its use. The same thing can be said for any
person or company involved in the creation and
production of this manual.
• Before starting any operation, make sure the
power supply is disconnected.
• Be careful not to use cables that seem worn or old.

Instruction manual - English - EN
9MNVCNVX_2013_EN
• Never, under any circumstances, make any
changes or connections that are not shown in
this handbook. Improper use of the appliance
can cause serious hazards, risking the safety of
personnel and of the installation.
• Use only original spare parts. Non-original spare
parts could cause fire, electrical discharge or other
hazards.
• Before proceeding with installation, check the
supplied material to make sure it corresponds
to the order specification by examining the
identification labels (5.3 Product marking, page
11).
• Since the user is responsible for choosing the
surface to which the unit is to be anchored, we
do not supply the fixing devices for attaching the
unit firmly to the particular surface. The installer is
responsible for choosing fixing devices suitable for
the specific purpose on hand. Use methods and
materials capable of supporting at least 4 times the
weight of the device.
• Choose an installation surface that is strong
enough to sustain the weight of the device, also
bearing in mind particular environmental aspects,
such as exposure to strong winds.
• This device was designed to be permanently
secured and connected on a building or on a
suitable structure. The device must be permanently
secured and connected before any operation.
• Make sure the appliance is securely anchored
before supplying power.
• Equipment intended for installation in Restricted
Access Location performed by specialist technical
staff.
• Handle the product with care to avoid accidental
contacts, sharp edges and corners.
• The main insulation must be set up externally to
the product by a safety transformer and/or an
insulated direct current power supply unit.
• To feed the product use a safety transformer
and/or a voltage isolated power supply with the
appropriate characteristics. The characteristics
of output power must not exceed the following
values. Supply voltage: 24Vac (±10%) or 24Vdc
(±5%).
• A power disconnect device must be included
in the electrical installation, and it must be very
quickly recognizable and operated if needed.
• For technical services, consult only and exclusively
authorized technicians.
• Use adequate personal protective equipment
during installation.
• Comply with all the national standards during the
device installation.
• This is a Class A product. In a domestic
environment this product may cause radio
interference. In this case the user may be required
to take adequate measures.
• Connect the device to a power source
corresponding to the indications given on the
marking label. Before proceeding with installation
make sure that the power line is properly isolated.
• To comply with the main supply voltage dips and
short interruption requirements, use a suitable
Uninterruptable Power Supply (UPS) to power the
unit.
• Power the device using a mains power supply
24Vac, 24Vdc or, for models without a board for
video analysis, a PSE (Power Sourcing Equipment)
in compliance with IEEE 802.3at (PoE+).
• In the case of a 24Vac power supply, you must
provide for adequate separation from the AC
power supply line using double or reinforced
insulation between the main power supply line
and the secondary circuit.

EN - English - Instruction manual
10 MNVCNVX_2013_EN
5 Identification
5.1 Product description and type
designation
5.1.1 NVX
NVX is an IP FULL HD super low-light camera with
high corrosion resistance.
The NVX external housing is made entirely from
AISI 316L stainless steel and has a compact and
lightweight design that, along with the quick
connectors, helps installation and maintenance.
The modular support for wall, ceiling or parapet
mounting is a standard feature.
Fig. 1 NVX.
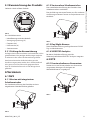
5.1.2 NTX
NTX is a thermal IP camera with high corrosion
resistance.
The thermal camera provides vision in fog, rain,
smoke, across long-range distances or even in
complete darkness.
The germanium window has non-scratch treated,
antireflection, Hard Carbon Coating (DLC) on the
outside and antireflection inside; the spectral range
is from 7.5μm to 14μm.
Fig. 2 NTX.
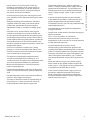
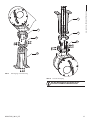
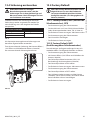
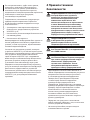
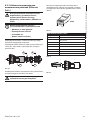
5.2 Product Overview
The main parts of the product are illustrated below.
1. Fastening support.
2. Rotation support.
3. Camera support.
4. Sunshield.
5. Camera.
01
02
03
04
05
Fig. 3

Instruction manual - English - EN
11MNVCNVX_2013_EN
5.3 Product marking
See the label attached to the product.
Fig. 4
The label shows:
• Model identification code.
• Supply voltage (V).
• Frequency (Hz).
• Max current (A).
• Serial number.
5.3.1 Checking the markings
Before proceeding further with installation, make
sure the material supplied corresponds to the order
specification by examining the marking labels.
Never, under any circumstances, make any changes
or connections that are not shown in this handbook.
Improper use of the appliance can cause serious
hazards, risking the safety of personnel and of the
installation.
6 Versions
6.1 NVX
6.1.1 Version with integrated wiper
The standard version of the product is supplied with
an integrated wiper.
Fig. 5
6.1.2 Version without wiper
There is a simplified version of this product not
equipped with a wiper.
Versions are available with a glass window and a
polycarbonate window.
Fig. 6
6.1.3 Day/Night camera
This version of the product is equipped with a Day/
Night Full HD camera.
6.1.4 VIDEOTEC Analytics
This version of the product integrates the VIDEOTEC
Analytics function.
6.2 NTX
6.2.1 Germanium window
The version with germanium window has been
developed for applications with thermal cameras.
Fig. 7

EN - English - Instruction manual
12 MNVCNVX_2013_EN
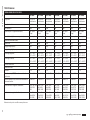
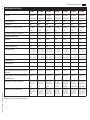
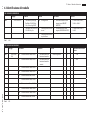
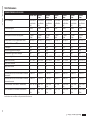
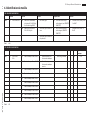
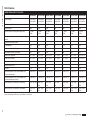
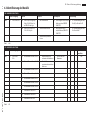
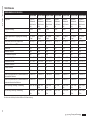
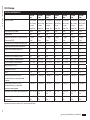
6.3 Model identification
NVX CONFIGURATION OPTIONS
Voltage Camera Versions Video analytics Revision
NVX 2 24Vac/24Vdc/PoE+ 10 Super low-light Day/Night
camera, FULL HD 1080p, 30x,
with DELUX technology
W With wiper 00 Without integrated video
analytics (without VIDEOTEC
ANALYTICS)
A Complies with ONVIF, Profile Q,
Profile S and Profile T
20 SONY FCB-EV7520 camera,
FULL HD 1080p, 30x
S Without wiper/Glass window 01 With integrated video analytics
(VIDEOTEC ANALYTICS)
J Complies with ONVIF, Profile S
and Profile T
P Without wiper/Polycarbonate
window
Tab. 1 NVX.
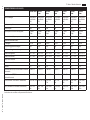
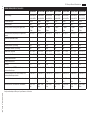
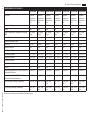
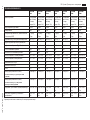
NTX CONFIGURATION OPTIONS
Voltage Camera Radiometry Version
Thermal camera
frequency
NTX 2 24Vac/24Vdc/
PoE+
D Thermal camera 35mm, 640x512 0 Thermal camera with radio-
metric functions
R Germanium window 0 0 A - 7.5Hz
E Thermal camera 25mm, 640x512 R Thermal camera with advan-
ced radiometric functions
H 30Hz
U Thermal camera 19mm, 640x512
G Thermal camera 13mm, 640x512
H Thermal camera 9mm, 640x512
I Thermal camera 35mm, 336x256
L Thermal camera 25mm, 336x256
Z Thermal camera 19mm, 336x256
M Thermal camera 13mm, 336x256
Q Thermal camera 9mm, 336x256
Tab. 2 NTX.

Instruction manual - English - EN
13MNVCNVX_2013_EN
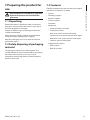
7 Preparing the product for
use
Any change that is not expressly approved
by the manufacturer will invalidate the
guarantee.
7.1 Unpacking
When the product is delivered, make sure that the
package is intact and that there are no signs that it
has been dropped or scratched.
If there are obvious signs of damage, contact the
supplier immediately.
When returning a faulty product we recommend
using the original packaging for shipping.
Keep the packaging in case you need to send the
product for repairs.
7.2 Safely disposing of packaging
material
The packaging material can all be recycled. The
installer technician will be responsible for separating
the material for disposal, and in any case for
compliance with the legislation in force where the
device is to be used.
7.3 Contents
Check the contents to make sure they correspond
with the list of materials as below:
• Camera
• Fastening support
• Rotation support
• Camera support
• Sunshield
• Equipment:
• Quick connectors and caps
• Instruction manual
• Bolts and screws (version with wiper)
• Support for wash system (version with wiper)
• Nozzle for wash system (version with wiper)
• Cable tie (version with wiper)
• Supplied with support:
• Allen wrench
• Bolts and screws

EN - English - Instruction manual
14 MNVCNVX_2013_EN
7.4 Preparatory work before
installation
CAUTION! Device installation and
maintaining must be performed by
specialist technical staff only.
Use appropriate tools for the installation.
The particular nature of the site where the
device is to be installed may mean special
tools are required for installation.
The product must be fastened with suitable
equipment. The fastening means must
guarantee mechanical sealing when a force
equal to at least 4 times the weight of the
device is applied.
Choose an installation surface that is
strong enough to sustain the weight of
the device, also bearing in mind particular
environmental aspects, such as exposure to
strong winds.
It should be installed so that no one can be
hit by moving parts. It should be installed
so that moving parts cannot hit other
objects and create hazardous situations.
Make sure the appliance is securely
anchored before supplying power.
For technical services, consult only and
exclusively authorized technicians.
Since the user is responsible for choosing
the surface to which the unit is to be
anchored, we do not supply the fixing
devices for attaching the unit firmly to
the particular surface. The installer is
responsible for choosing fixing devices
suitable for the specific purpose on hand.
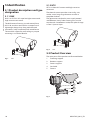
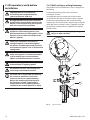
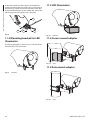
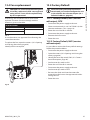
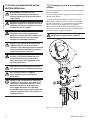
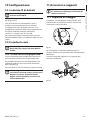
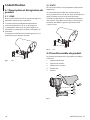
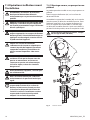
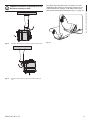
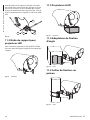
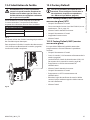
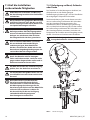
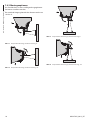
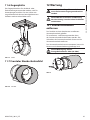
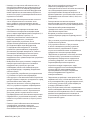
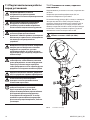
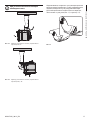
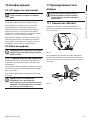
7.4.1 Wall, railing or ceiling fastening
The product can be installed on a wall, a railing or on
the ceiling.
Fasten the fastening support (01) to its final
installation surface.
Assemble the camera support (03) to the camera
using the four M5 screws and the washers supplied.
Fasten the rotation element (02) to the fastening
support (01) and to the camera support (03) using the
seven M5 screws and the washers supplied. Once the
final position of the product is defined, fully tighten
the M5 screws.
Pay attention to the fixing. Tightening
torque: 4.5Nm (±0.5Nm).
01
02
03
Fig. 8 Wall mounting.

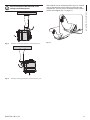
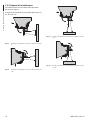
Instruction manual - English - EN
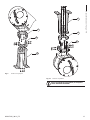
15MNVCNVX_2013_EN
01
02
03
Fig. 9 Parapet mounting.
01
02
03
Fig. 10 Ceiling mounting.
In ceiling installation, the sunshield should
be dismantled.

EN - English - Instruction manual
16 MNVCNVX_2013_EN
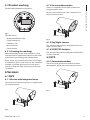
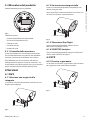
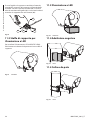
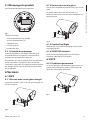
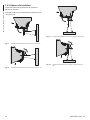
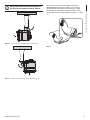
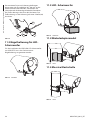
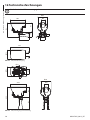
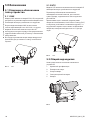
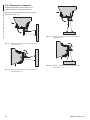
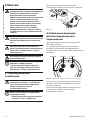
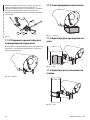
7.4.2 Installation options
The product can be installed in the positions
illustrated below.
The vertical inclination range of the camera is from
-90° to 0°.
Fig. 11 Example of wall installation, vertical rotation, 0°.
Fig. 12 Example of wall installation, vertical rotation, -90°.
Fig. 13 Example of railing installation, vertical rotation, 0°.
Fig. 14 Example of railing installation, vertical rotation, -90°.

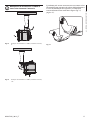
Instruction manual - English - EN
17MNVCNVX_2013_EN
The sunshield must be removed in the
ceiling installation option.
Fig. 15 Example of ceiling installation, vertical rotation, 0°.
Fig. 16 Example of ceiling installation, vertical rotation, -90°.
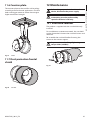
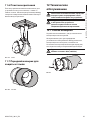
The product can be anchored with a chain or a metal
wire to prevent the camera falling in the event the
support fails. For this reason, the hole can be used as
shown in the figure (Fig. 17, page 17).
Fig. 17

EN - English - Instruction manual
18 MNVCNVX_2013_EN
8 Installation
CAUTION! The electrical system to which the
unit is connected must be equipped with a
10A max automatic bipolar circuit breaker.
The minimum distance between the circuit
breaker contacts must be 3mm (0.1in).
The circuit breaker must be provided
with protection against the fault current
towards the ground (differential) and the
overcurrent (magnetothermal).
Electrical connections must be performed
with the power supply disconnected and
the circuit-breaker open.
A power disconnect device must be
included in the electrical installation, and
it must be very quickly recognizable and
operated if needed.
All disconnected wires must be electrically
isolated.
VIDEOTEC strongly recommend to test the
device configuration and performance
before putting it in the final installation
site.
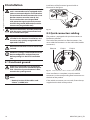
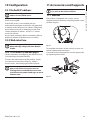
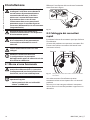
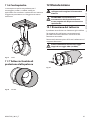
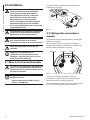
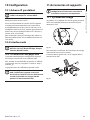
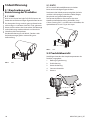
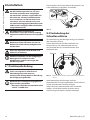
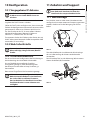
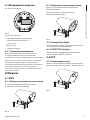
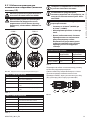
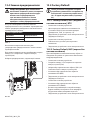
8.1 Functional ground
If the unit is powered using an Ethernet
(PoE+) line, connection should take place
with a functional ground external cable,
towards the system ground.
Use cables with the characteristics outlined
below.
• Nominal section of the cables used:
2.5mm² (14AWG) min.
Installation of the functional ground cable as
illustrated in the figure.
Fig. 18
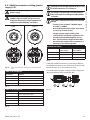
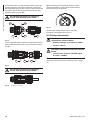
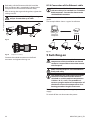
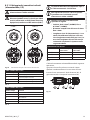
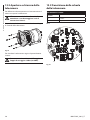
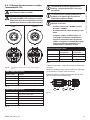
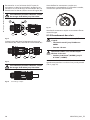
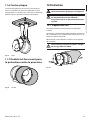
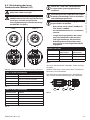
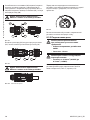
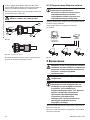
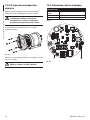
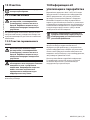
8.2 Quick connectors cabling
The product is equipped with quick connectors to
facilitate installation.
The back of the product has fixed connectors. You
must cable the connectors on the cable side (mobile
connectors).
CONN 2CONN 1Ethernet
Fig. 19 Rear view of the camera. Camera side connectors.
Once installation is complete, insert the mobile
connectors in the corresponding fixed connectors on
the back of the product.
If the mobile connectors are not used, fasten the cap
supplied on the back of the product.
La pagina si sta caricando...
La pagina si sta caricando...
La pagina si sta caricando...
La pagina si sta caricando...
La pagina si sta caricando...
La pagina si sta caricando...
La pagina si sta caricando...
La pagina si sta caricando...
La pagina si sta caricando...
La pagina si sta caricando...
La pagina si sta caricando...
La pagina si sta caricando...
La pagina si sta caricando...
La pagina si sta caricando...
La pagina si sta caricando...
La pagina si sta caricando...
La pagina si sta caricando...
La pagina si sta caricando...
La pagina si sta caricando...
La pagina si sta caricando...
La pagina si sta caricando...
La pagina si sta caricando...
La pagina si sta caricando...
La pagina si sta caricando...
La pagina si sta caricando...
La pagina si sta caricando...
La pagina si sta caricando...
La pagina si sta caricando...
La pagina si sta caricando...
La pagina si sta caricando...
La pagina si sta caricando...
La pagina si sta caricando...
La pagina si sta caricando...
La pagina si sta caricando...
La pagina si sta caricando...
La pagina si sta caricando...
La pagina si sta caricando...
La pagina si sta caricando...
La pagina si sta caricando...
La pagina si sta caricando...
La pagina si sta caricando...
La pagina si sta caricando...
La pagina si sta caricando...
La pagina si sta caricando...
La pagina si sta caricando...
La pagina si sta caricando...
La pagina si sta caricando...
La pagina si sta caricando...
La pagina si sta caricando...
La pagina si sta caricando...
La pagina si sta caricando...
La pagina si sta caricando...
La pagina si sta caricando...
La pagina si sta caricando...
La pagina si sta caricando...
La pagina si sta caricando...
La pagina si sta caricando...
La pagina si sta caricando...
La pagina si sta caricando...
La pagina si sta caricando...
La pagina si sta caricando...
La pagina si sta caricando...
La pagina si sta caricando...
La pagina si sta caricando...
La pagina si sta caricando...
La pagina si sta caricando...
La pagina si sta caricando...
La pagina si sta caricando...
La pagina si sta caricando...
La pagina si sta caricando...
La pagina si sta caricando...
La pagina si sta caricando...
La pagina si sta caricando...
La pagina si sta caricando...
La pagina si sta caricando...
La pagina si sta caricando...
La pagina si sta caricando...
La pagina si sta caricando...
La pagina si sta caricando...
La pagina si sta caricando...
La pagina si sta caricando...
La pagina si sta caricando...
La pagina si sta caricando...
La pagina si sta caricando...
La pagina si sta caricando...
La pagina si sta caricando...
La pagina si sta caricando...
La pagina si sta caricando...
La pagina si sta caricando...
La pagina si sta caricando...
La pagina si sta caricando...
La pagina si sta caricando...
La pagina si sta caricando...
La pagina si sta caricando...
La pagina si sta caricando...
La pagina si sta caricando...
La pagina si sta caricando...
La pagina si sta caricando...
La pagina si sta caricando...
La pagina si sta caricando...
La pagina si sta caricando...
La pagina si sta caricando...
La pagina si sta caricando...
La pagina si sta caricando...
La pagina si sta caricando...
La pagina si sta caricando...
La pagina si sta caricando...
La pagina si sta caricando...
La pagina si sta caricando...
La pagina si sta caricando...
La pagina si sta caricando...
La pagina si sta caricando...
La pagina si sta caricando...
La pagina si sta caricando...
La pagina si sta caricando...
La pagina si sta caricando...
La pagina si sta caricando...
La pagina si sta caricando...
La pagina si sta caricando...
La pagina si sta caricando...
La pagina si sta caricando...
La pagina si sta caricando...
La pagina si sta caricando...
La pagina si sta caricando...
La pagina si sta caricando...
La pagina si sta caricando...
La pagina si sta caricando...
La pagina si sta caricando...
La pagina si sta caricando...
La pagina si sta caricando...
La pagina si sta caricando...
La pagina si sta caricando...
La pagina si sta caricando...
La pagina si sta caricando...
La pagina si sta caricando...
La pagina si sta caricando...
La pagina si sta caricando...
La pagina si sta caricando...
La pagina si sta caricando...
La pagina si sta caricando...
La pagina si sta caricando...
La pagina si sta caricando...
La pagina si sta caricando...
La pagina si sta caricando...
La pagina si sta caricando...
La pagina si sta caricando...
La pagina si sta caricando...
La pagina si sta caricando...
La pagina si sta caricando...
La pagina si sta caricando...
La pagina si sta caricando...
La pagina si sta caricando...
La pagina si sta caricando...
La pagina si sta caricando...
La pagina si sta caricando...
La pagina si sta caricando...
La pagina si sta caricando...
La pagina si sta caricando...
La pagina si sta caricando...
La pagina si sta caricando...
La pagina si sta caricando...
La pagina si sta caricando...
La pagina si sta caricando...
La pagina si sta caricando...
La pagina si sta caricando...
La pagina si sta caricando...
La pagina si sta caricando...
La pagina si sta caricando...
La pagina si sta caricando...
La pagina si sta caricando...
La pagina si sta caricando...
La pagina si sta caricando...
La pagina si sta caricando...
La pagina si sta caricando...
La pagina si sta caricando...
La pagina si sta caricando...
La pagina si sta caricando...
La pagina si sta caricando...
La pagina si sta caricando...
La pagina si sta caricando...
La pagina si sta caricando...
La pagina si sta caricando...
La pagina si sta caricando...
La pagina si sta caricando...
-
 1
1
-
 2
2
-
 3
3
-
 4
4
-
 5
5
-
 6
6
-
 7
7
-
 8
8
-
 9
9
-
 10
10
-
 11
11
-
 12
12
-
 13
13
-
 14
14
-
 15
15
-
 16
16
-
 17
17
-
 18
18
-
 19
19
-
 20
20
-
 21
21
-
 22
22
-
 23
23
-
 24
24
-
 25
25
-
 26
26
-
 27
27
-
 28
28
-
 29
29
-
 30
30
-
 31
31
-
 32
32
-
 33
33
-
 34
34
-
 35
35
-
 36
36
-
 37
37
-
 38
38
-
 39
39
-
 40
40
-
 41
41
-
 42
42
-
 43
43
-
 44
44
-
 45
45
-
 46
46
-
 47
47
-
 48
48
-
 49
49
-
 50
50
-
 51
51
-
 52
52
-
 53
53
-
 54
54
-
 55
55
-
 56
56
-
 57
57
-
 58
58
-
 59
59
-
 60
60
-
 61
61
-
 62
62
-
 63
63
-
 64
64
-
 65
65
-
 66
66
-
 67
67
-
 68
68
-
 69
69
-
 70
70
-
 71
71
-
 72
72
-
 73
73
-
 74
74
-
 75
75
-
 76
76
-
 77
77
-
 78
78
-
 79
79
-
 80
80
-
 81
81
-
 82
82
-
 83
83
-
 84
84
-
 85
85
-
 86
86
-
 87
87
-
 88
88
-
 89
89
-
 90
90
-
 91
91
-
 92
92
-
 93
93
-
 94
94
-
 95
95
-
 96
96
-
 97
97
-
 98
98
-
 99
99
-
 100
100
-
 101
101
-
 102
102
-
 103
103
-
 104
104
-
 105
105
-
 106
106
-
 107
107
-
 108
108
-
 109
109
-
 110
110
-
 111
111
-
 112
112
-
 113
113
-
 114
114
-
 115
115
-
 116
116
-
 117
117
-
 118
118
-
 119
119
-
 120
120
-
 121
121
-
 122
122
-
 123
123
-
 124
124
-
 125
125
-
 126
126
-
 127
127
-
 128
128
-
 129
129
-
 130
130
-
 131
131
-
 132
132
-
 133
133
-
 134
134
-
 135
135
-
 136
136
-
 137
137
-
 138
138
-
 139
139
-
 140
140
-
 141
141
-
 142
142
-
 143
143
-
 144
144
-
 145
145
-
 146
146
-
 147
147
-
 148
148
-
 149
149
-
 150
150
-
 151
151
-
 152
152
-
 153
153
-
 154
154
-
 155
155
-
 156
156
-
 157
157
-
 158
158
-
 159
159
-
 160
160
-
 161
161
-
 162
162
-
 163
163
-
 164
164
-
 165
165
-
 166
166
-
 167
167
-
 168
168
-
 169
169
-
 170
170
-
 171
171
-
 172
172
-
 173
173
-
 174
174
-
 175
175
-
 176
176
-
 177
177
-
 178
178
-
 179
179
-
 180
180
-
 181
181
-
 182
182
-
 183
183
-
 184
184
-
 185
185
-
 186
186
-
 187
187
-
 188
188
-
 189
189
-
 190
190
-
 191
191
-
 192
192
-
 193
193
-
 194
194
-
 195
195
-
 196
196
-
 197
197
-
 198
198
-
 199
199
-
 200
200
-
 201
201
-
 202
202
-
 203
203
-
 204
204


Videotec NTX Manuale utente
- Categoria
- Accessori per telecamere di sicurezza
- Tipo
- Manuale utente
- Questo manuale è adatto anche per
in altre lingue
- français: Videotec NTX Manuel utilisateur
Documenti correlati
-
Videotec MAXIMUS MVXT Manuale del proprietario
-
Videotec NVXTUB Manuale utente
-
-
-
-
-
Videotec NXPTZR SERIES2 Manuale utente
-
Videotec UEAP Manuale utente
-
Videotec ULISSE2 Manuale utente
-
Altri documenti
-
FläktGroup Cassette-Geko II EC Istruzioni per l'uso
-
ONFORU D50 Manuale utente
-
 Zycoo SL30 Network Column Speaker Quick Guida d'installazione
-
Terra PI011 Manuale del proprietario
-
DELTA DORE Tycam 2100 Guida d'installazione
-
-
Lindy Single Display Ceiling to Floor Mount Manuale utente
