Kenwood BM366 Manuale del proprietario
- Categoria
- Macchine per il pane
- Tipo
- Manuale del proprietario

BM366
instructions
istruzioni
instrucciones
Bedienungsanleitungen
gebruiksaanwijzing

English 2 - 28
Nederlands 29 - 56
French 57 - 86
Deutsch 87 - 113
Italiano 114 - 141
Dansk 142 - 168
Svenska 169 - 195
Norsk 196 - 221
Suomi 222 - 247

5
0
1
0
0
1
5
0
2
0
0
2
5
0
3
0
0
3
5
0
4
0
0
4
5
0
m
l
6
bm
bt ck
clcm
bn bo
bp
bq br bs
8
7
4
5
1
2
9 bl
bk
3
bt

1 2 3
7 8 9
13 14 15
19 20

4 5 6
10 11 12
16 17 18
1
10
500g 750g
1kg

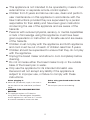
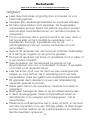
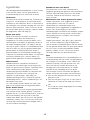
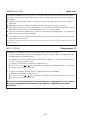
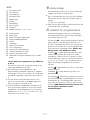
safety
●
Read these instructions carefully and retain for future reference.
●
Remove all packaging and any labels.
●
Do not touch hot surfaces. Accessible surfaces are liable to get
hot during use. Always use oven gloves to remove the hot bread
pan.
●
To prevent spillages inside the oven chamber, always remove the
bread pan from the machine before adding the ingredients.
Ingredients that splash onto the heating element can burn and
cause smoke.
●
Do not use this appliance if there is any visible sign of damage to
the supply cord or if it has been accidentally dropped.
●
Do not immerse this appliance, the supply cord or the plug in
water or any other liquid.
●
Always unplug this appliance after use, before fitting or
removing parts or before cleaning.
●
Do not let the electrical supply cord hang over the edge of a work
surface or allow it to touch hot surfaces such as a gas or electric
hob.
●
This appliance should only be used on a flat heat resistant surface.
●
Do not place your hand inside the oven chamber after the bread
pan has been removed as it will be very hot.
●
Do not touch moving parts within the Bread Maker.
●
Do not exceed the maximum flour and raising agent quantities
specified in the recipes supplied.
●
Do not place the Bread Maker in direct sunlight, near hot
appliances or in a draught. All these things can affect the internal
temperature of the oven, which could spoil the results.
●
Do not use this appliance outdoors.
●
Do not operate the Bread Maker when it is empty as this could
cause it serious damage.
●
Do not use the oven chamber for any type of storage.
●
Do not cover the vents on the sides and top of the machine and
ensure there is adequate ventilation around the bread maker
during operation.
3

●
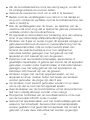
This appliance is not intended to be operated by means of an
external timer or separate remote-control system.
●
Children from 8 years and above can use, clean and perform
user maintenance on this appliance in accordance with the
User Instructions provided they are supervised by a person
responsible for their safety and have been given instruction
concerning the use of the appliance and are aware of the
hazards.
●
Persons with reduced physical, sensory or mental capabilities
or lack of knowledge using this appliance must have been
given supervision or instruction on its safe use and are aware
of the hazards.
●
Children must not play with the appliance and both appliance
and cord must be out of reach of children less than 8 years.
●
Children should be supervised to ensure that they do not play
with the appliance.
●
Unplug the bread maker and allow to cool completely before
cleaning.
●
Do not immerse either the bread maker body or the outside
base of the bread pan in water.
●
Only use the appliance for its intended domestic use.
Kenwood will not accept any liability if the appliance is
subject to improper use, or failure to comply with these
instructions.
4
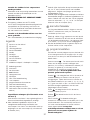
before plugging in
●
Make sure your electricity supply is the same as
the one shown on the underside of your Bread
Maker.
●
WARNING: THIS APPLIANCE MUST BE
EARTHED.
●
This appliance conforms to EC directive
2004/108/EC on Electromagnetic Compatibility
and EC regulation no. 1935/2004 of 27/10/2004
on materials intended for contact with food.
before using your bread maker for the
first time
●
Wash all parts (see care and cleaning).

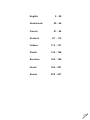
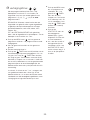
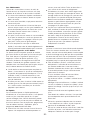
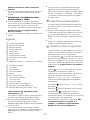
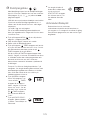
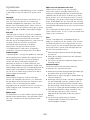
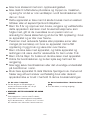
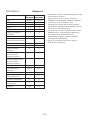
key
1
l
id handle
2
viewing window
3
heating element
4
b
read pan handle
5
kneader
6
drive shaft
7
drive coupling
8
on/off switch
9
measuring cup
bk
dual measuring spoon 1tsp & 1tbsp
bl
control panel
bm
menu button
bn
crust colour button
bo
eco bake button
bp
display screen
bq
viewing light
br
loaf size button
bs
start/stop button
bt
delay timer buttons
ck
loaf size indicators
cl
program status indicator
cm
crust colour indicators (light, medium, dark)
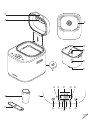
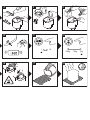
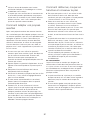
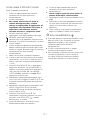
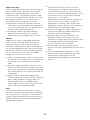
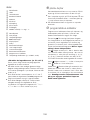
how to measure ingredients (refer to
illustrations 3 to 7)
It is extremely important to use the exact measure
of ingredients for best results.
●
Always measure liquid ingredients in the see-
through measuring cup with graduated markings
provided. Liquid should just reach marking on cup
at eye level, not above or below (see 3).
●
Always use liquids at room temperature,
20ºC/68ºF, unless making bread using the eco
program. Follow the instructions given in the recipe
section.
●
Always use the measuring spoon provided to
measure smaller quantities of dry and liquid
ingredients. Use the slider to select between the
following measure -
1
⁄2 tsp, 1 tsp,
1
⁄2 tbsp or 1 tbsp.
Fill to the top and level off the spoon (see 6).
8
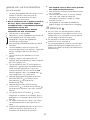
on/off switch
Y
our Kenwood bread maker is fitted with an
ON/OFF switch and will not operate until switched
o
n.
●
P
lug in and press the ON/OFF switch
8
s
ituated
at the back of the bread maker - the unit will beep
and 1 (3:30) will appear in the display window.
●
Always switch off and unplug your bread maker
after use.
cl
program status indicator
The program status indicator is situated in the
display screen and the indicator arrow will point to
the stage of the cycle the bread maker has
reached as follows: -
Pre-heat – The pre-heat feature operates at the
start of the Premium (4-6 minutes), French and
Wholewheat (25 minutes) and Gluten Free (10
minutes) settings to warm the ingredients before
the first kneading stage begins. There is no
kneader action during this period.
Knead – The dough is either in the first or 2nd
kneading stage or being knocked back between
the rising cycles. During the last 20 minutes of the
2nd Kneading cycle on setting (1), (2), (3), (4), (5)
and (7) an alert will sound to tell you to add any
additional ingredients manually.
Rise – the dough is in either the 1st, 2nd or 3rd
rising cycle.
Bake – The loaf is in the final baking cycle.
Keep Warm – The bread maker automatically
goes into the Keep warm mode at the end of the
baking cycle. It will stay on the keep warm mode
for up to 1hour or until the machine is turned off,
which ever is soonest. Please note: the
heating element will switch on and off
and will glow intermittently during the
keep warm cycle.
5

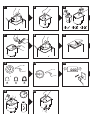
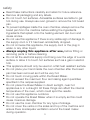
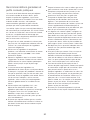
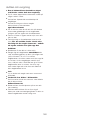
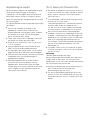
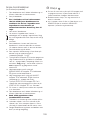
using your Bread Maker
(refer to illustration panel)
1
Remove the bread pan by holding the handle
and turning the pan to the back of the baking
c
hamber.
2
Fit the kneader.
●
To prevent spillages inside the oven
chamber, always remove the bread pan
from the machine before adding the
ingredients. Ingredients that splash onto
the heating element can burn and cause
smoke.
3 Pour the water into the bread pan.
4 Add the rest of the ingredients to the pan in the
order listed in the recipes.
Ensure that all the ingredients are weighed
accurately
7 as incorrect measures will produce poor results.
8 Insert the bread pan into the oven chamber by
positioning the bread pan at an angle towards
the back of the unit. Then lock the pan by turning
it towards the front.
9 Lower the handle and close the lid.
10 Plug in and switch on - the unit will beep and
default to setting 1 (3:30).
11 Press the MENU button
bm
until the required
program is selected. The bread maker will default
to 1Kg & medium crust colour. Note: If using the
“eco BAKE”, just press the eco button
bo
and
the program will start automatically.
12 Select the loaf size by pressing the LOAF SIZE
button
br
until the indicator
ck
moves to the
required loaf size.
13 Select the crust colour by pressing the CRUST
button
bn
until the indicator
cm
moves to the
required crust colour (light, medium or dark).
14 Press the START/STOP button
bs
. To stop or
cancel the program press the START/STOP
button
bs
and hold down for 2 -3 seconds.
15 At the end of the baking cycle unplug the bread
maker.
16 Remove the bread pan by holding the handle
and turning the pan to the back of the baking
chamber.
●
Always use oven gloves as the pan
handle will be hot.
17 Then turn out onto a wire rack to cool.
18 Leave the bread to cool for at least 30 minutes
before slicing, to allow the steam to escape. The
bread will be difficult to slice if hot.
19 Clean the bread pan and kneader immediately
after use (see care and cleaning).
bq
viewing light
●
T
he LIGHT button can be pressed at any time to
view the program status in the display window or
t
o check the progress of the dough inside the
b
aking chamber.
●
The baking chamber viewing light will automatically
s
witch off after 60 seconds..
●
If the light bulb stops working it must be replaced
by KENWOOD or an authorised KENWOOD
repairer (see service and customer care).
6

7
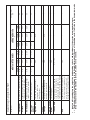
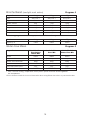
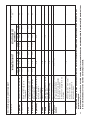
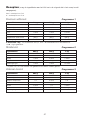
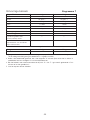
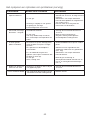
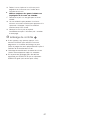
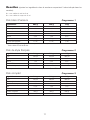
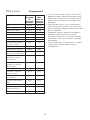
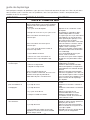
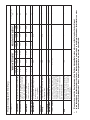
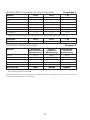
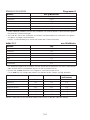
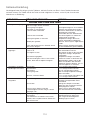
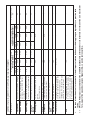
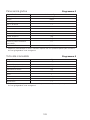
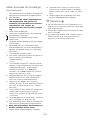
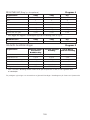
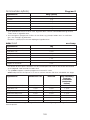
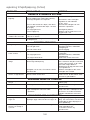
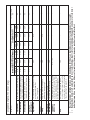
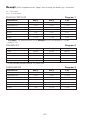
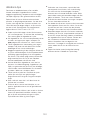
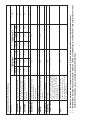
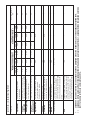
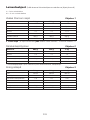
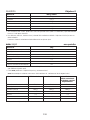
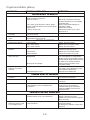
✬ An alert will sound before the end of the 2nd kneading cycle to add ingredients if the recipe recommends doing so.
✬✬ The Bread maker will automatically go in to the keep warm mode at the end of the baking cycle. It will stay in the keep warm mode
for up to 1hour or until the machine is turned off, which ever is soonest.
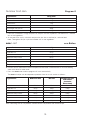
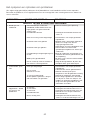
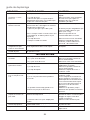
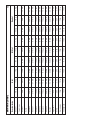
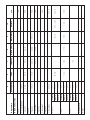
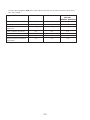
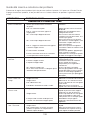
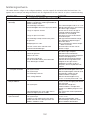
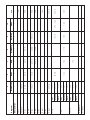
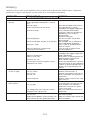
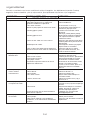
bread/dough program chart
program Total Program Time Manual alert for Keep Warm
Medium Crust Colour adding ingredients ✬✬
✬
500g 750g 1Kg 500g 750g 1Kg
1 premium White or Brown Bread Flour recipes 3:00 3:10 3:30 2:34 2:44 3:02 60
2 french Produces a crisper crust and suited 3:30 3:40 3:50 2:44 2:54 3:04 60
to loaves low in fat and sugar
3 wholewheat Wholewheat or wholemeal flour 3:05 3:15 3:25 2:19 2:29 2:39 60
recipes: 30 minute preheat
4 Brioche High sugar bread recipes 3:15 3:20 3:25 2:55 3:00 2:55 60
(sweet)
5 gluten free For use with gluten free flours 2:35 2:14 -
and gluten free mixes.
Max 500g flour
6 cake Cake mixes - 500g mix 1:32 - -
7 dough Dough for hand shaping and 1:30 1:14 -
baking in your own oven.
8 pizza dough Pizza dough recipes 1:10 - -
9 jam For making jams 1:25 - -
10 bake only Bake only feature. Can also be 0:10 - 1:30 - -
used to rewarm or crisp loaves
already baked and cooled. Use
timer buttons to change time required.
eco Produces loaves of white bread in 1:25 - -
85 minutes. Loaves require warm
water, extra yeast and less salt.
Suitable for use with packet mixes.

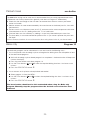
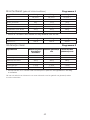
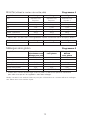
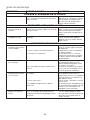
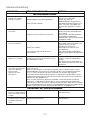
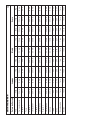
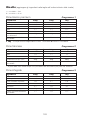
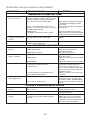
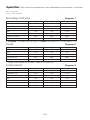
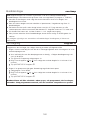
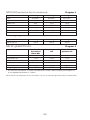
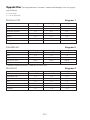
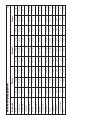
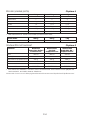
8
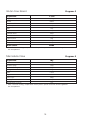
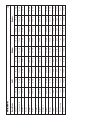
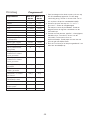
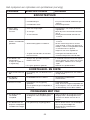
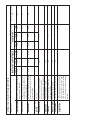
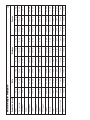
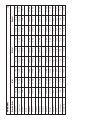
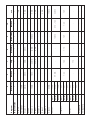
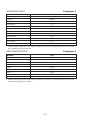
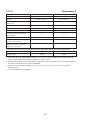
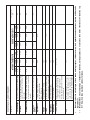
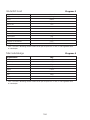
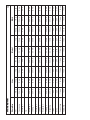
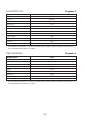
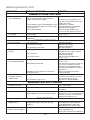
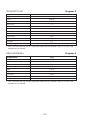
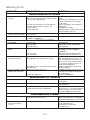
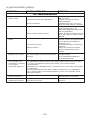
Premium
Crust Colour Light Medium Dark
Weight 500g 750g 1Kg 500g 750g 1Kg 500g 750g 1Kg
Pre-heat 4 min 4 min 6 min 4 min 4 min 6 min 4 min 4 min 6 min
Knead 1 6 min 6 min 6 min 6 min 6 min 6 min 6 min 6 min 6 min
Rest 1 min 1 min 1 min 1 min 1 min 1 min 1 min 1 min 1 min
Knead 2 29 min 29 min 29 min 29 min 29 min 29 min 29 min 29 min 29 min
Rise 1 30 min 30 min 30 min 30 min 30 min 30 min 30 min 30 min 30 min
Knead 3 30 s 30 s 30 s 30 s 30 s 30 s 30 s 30 s 30 s
Rise 2 40 min 40 min 40 min 40 min 40 min 40 min 40 min 40 min 40 min
Knead 4 - - - - - - - - -
Rise 3 30 min 30 min 30 min 30 min 30 min 30 min 30 min 30 min 30 min
Bake 35 min 45 min 63 min 40 min 50 min 68 min 45 min 55 min 73 min
Total 2:55 3:05 3:25 3:00 3:10 3:30 3:05 3:15 3:35
Extras 2:29 2:39 2:57 2:34 2:44 3:02 2:39 2:49 3:07
Keep Warm 1 hour 1 hour 1 hour 1 hour 1 hour 1 hour 1 hour 1 hour 1 hour
Delay 15:00 15:00 15:00 15:00 15:00 15:00 15:00 15:00 15:00

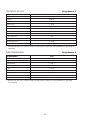
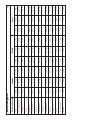
9
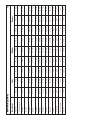
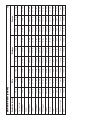
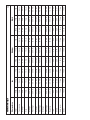
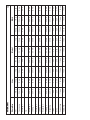
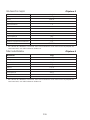
French Style
Crust Colour Light Medium Dark
Weight 500g 750g 1Kg 500g 750g 1Kg 500g 750g 1Kg
Pre-heat 25 min 25 min 25 min 25 min 25 min 25 min 25 min 25 min 25 min
Knead 1 6 min 6 min 6 min 6 min 6 min 6 min 6 min 6 min 6 min
Rest - - - - - - - - -
Knead 2 29 min 29 min 29 min 29 min 29 min 29 min 29 min 29 min 29 min
Rise 1 20 min 20 min 20 min 20 min 20 min 20 min 20 min 20 min 20 min
Knead 3 - - - - - - - - -
Rise 2 25 min 25 min 25 min 25 min 25 min 25 min 25 min 25 min 25 min
Knead 4 - - - - - - - - -
Rise 3 55 min 55 min 55 min 55 min 55 min 55 min 55 min 55 min 55 min
Bake 45 min 55 min 65 min 50 min 60 min 70 min 55 min 65 min 75 min
Total 3:25 3:35 3:45 3:30 3:40 3:50 3:35 3:45 3:55
Extras 2:39 2:49 2:59 2:44 2:54 3:04 2:49 2:59 3:09
Keep Warm 1 hour 1 hour 1 hour 1 hour 1 hour 1 hour 1 hour 1 hour 1 hour
Delay 15:00 15:00 15:00 15:00 15:00 15:00 15:00 15:00 15:00

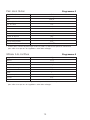
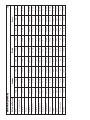
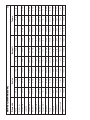
10
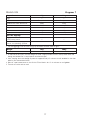
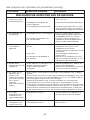
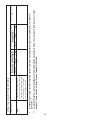
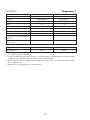
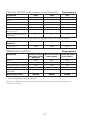
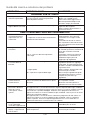
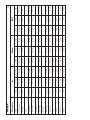
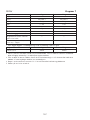
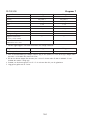
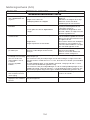
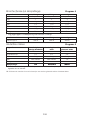
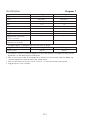
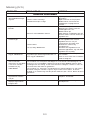
Wholewheat
Crust Colour Light Medium Dark
Weight 500g 750g 1Kg 500g 750g 1Kg 500g 750g 1Kg
Pre-heat 25 min 25 min 25 min 25 min 25 min 25 min 25 min 25 min 25 min
Knead 1 6 min 6 min 6 min 6 min 6 min 6 min 6 min 6 min 6 min
Rest - - - - - - - - -
Knead 2 29 min 29 min 29 min 29 min 29 min 29 min 29 min 29 min 29 min
Rise 1 20 min 20 min 20 min 20 min 20 min 20 min 20 min 20 min 20 min
Knead 3 - - - - - - - - -
Rise 2 35 min 35 min 35 min 35 min 35 min 35 min 35 min 35 min 35 min
Knead 4 - - - - - - - - -
Rise 3 25 min 25 min 25 min 25 min 25 min 25 min 25 min 25 min 25 min
Bake 40 min 50 min 60 min 45 min 55 min 65 min 55 min 65 min 75 min
Total 3:00 3:10 3:20 3:05 3:15 3:25 3:15 3:25 3:35
Extras 2:14 2:24 2:34 2:19 2:29 2:39 2:29 2:39 2:49
Keep Warm 1 hour 1 hour 1 hour 1 hour 1 hour 1 hour 1 hour 1 hour 1 hour
Delay 15:00 15:00 15:00 15:00 15:00 15:00 15:00 15:00 15:00

11
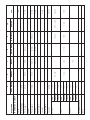
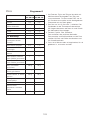
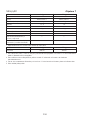
Brioche (Sweet)
Crust Colour Light Medium Dark
Weight 500g 750g 1Kg 500g 750g 1Kg 500g 750g 1Kg
Pre-heat - - - - - - - - -
Knead 1 6 min 6 min 13 min 6 min 6 min 13 min 6 min 6 min 13 min
Rest - - - - - - - - -
Knead 2 28 min 28 min 31 min 28 min 28 min 31 min 28 min 28 min 31 min
Rise 1 31 min 31 min 31 min 31 min 31 min 31 min 31 min 31 min 31 min
Knead 3 15 s 15 s 15 s 15 s 15 s 15 s 15 s 15 s 15 s
Rise 2 30 min 30 min 30 min 30 min 30 min 30 min 30 min 30 min 30 min
Knead 4 15 s 15 s 15 s 15 s 15 s 15 s 15 s 15 s 15 s
Rise 3 48 min 48 min 35 min 48 min 48 min 35 min 50 min 50 min 35 min
Bake 47 min 52 min 60 min 52 min 57 min 65 min 55 min 60 min 68 min
Total 3:10 3:15 3:20 3:15 3:20 3:25 3:20 3:25 3:28
Extras 2:50 2:55 2:50 2:55 3:00 2:55 3:00 3:05 2:58
Keep Warm 1 hour 1 hour 1 hour 1 hour 1 hour 1 hour 1 hour 1 hour 1 hour
Delay 15:00 15:00 15:00 15:00 15:00 15:00 15:00 15:00 15:00

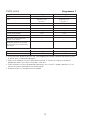
12
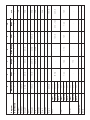
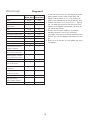
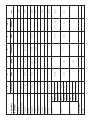
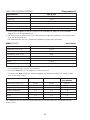
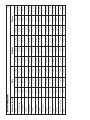
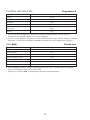
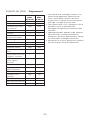
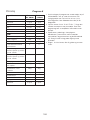
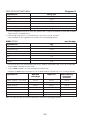
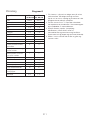
5 6 7 8 9 10
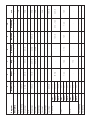
Program Gluten Free Cake Dough Pizza Dough Jam Bake eco
Crust Colour - - - - - - -
Weight - - - - - - 1Kg
Pre-heat 10 min - - - - - -
Knead 1 6 min 6 min 6 min 6 min - - 5 min
Rest - - - - - - -
Knead 2 19 min 1 min 24 min 24 min 85 min - 9 min
Rise 1 - - 60 min 40 min - - 5 min
Knead 3 - - - - - - -
Rise 2 - - - - - - 8 min
Knead 4 - - - - - - -
Rise 3 60 min - - - - - 15 min
Bake Light 50 min
Medium 60 min 85 min - - 70 min 0:10 – 1:30 43 min
Dark 70 min
Total Light 2:25
Medium 2:35 1:32 1:30 1:10 1:25 1:30 1:25
Dark 2:45
Extras Light 2:04
Medium 2:14 - 1:14 - - - -
Dark 2:24
Keep Warm - - - - - - - -
Delay - - - - - - -

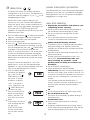
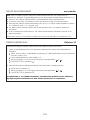
bt
delay timer
T
he Delay timer allows you to delay the bread
making process up to 15 hours. The delayed start
c
annot be used with programs (5), (6), (7)
(
10) or
t
he eco program button.
IMPORTANT: When using this delayed start
function you must not use perishable ingredients –
things that ‘go off’ easily at room temperature or
above, such as milk, egg, cheese and yoghurt etc.
To use the DELAY TIMER simply place the
ingredients in the bread pan and lock the pan into
the bread maker. Then:
●
Press the MENU button to choose the required
program – the program cycle time is displayed.
●
Select the crust colour and size required.
●
Then set the delay timer.
●
Press the TIMER button and keep pressing
until the total time required is displayed. If you go
past the required time press the TIMER button
to go back. The timer button when pressed,
moves in 10 minute increments. You do not need
to work out the difference between the program
time selected and the total hours required as the
bread maker will automatically include the setting
cycle time.
Example: Finished loaf required at 7am. If the
bread maker is set up with the required recipe
ingredients at 10pm the evening before, total time
to be set on the delayed timer is 9 hours.
●
Press the MENU button
to choose your program
e.g. 1 and use the
TIMER button to scroll
the time in 10 minute
increments to display
‘9:00’. If you go past
‘9:00’, simply press the
TIMER button until
you return to ‘9:00’.
●
Press the START/STOP
button and the display
colon (:) will flash. The
timer will start to count
down.
●
If you make a mistake or
wish to change the time
set, press the
START/STOP button
until the screen clears.
You can then reset the
time.
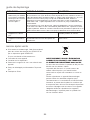
power interruption protection
Y
our Bread Maker has an 8 minute power interruption
protection in case the unit is accidentally unplugged
during operation. The unit will continue the program if
p
lugged back in straight away.
care and cleaning
●
Unplug the bread maker and allow to cool
completely before cleaning.
●
Do not immerse either the bread maker body or
the outside base of the bread pan in water.
●
Do not use abrasive scouring pads or metal
implements.
●
Use a soft damp cloth to clean the outside
surfaces of the bread maker if necessary.
baking chamber/heating element
●
To reduce the risk of smoking and burning odours
during the baking cycle, regularly remove any
spillages from inside the oven chamber and off the
heating element.
●
Wipe the inside of the baking chamber with a soft
damp cloth and dry.
●
Carefully wipe the heating element with a soft
damp cloth. To avoid damage take care
when cleaning the element - avoid
pushing down or lifting the element up.
bread pan
●
Do not dishwash the bread pan.
●
Clean the bread pan and the kneader
immediately after each use by partially filling the
pan with warm soapy water. Leave to soak for 5 to
10 minutes. To remove the kneader, turn clockwise
and lift off. Finish cleaning with a soft cloth, rinse
and dry.
If the kneader cannot be removed after 10
minutes, hold the shaft from underneath the pan
and twist back and forth until the kneader is
released.
lid
●
Lift off the lid and clean with warm soapy water.
●
Do not dishwash the lid.
●
Ensure the lid is completely dry before refitting to
the bread maker.
bread maker feet
●
Always use the bread maker on a clean dry
worksurface.
●
To prevent the bread maker from moving around
on the worksurface during operation, keep the feet
clean by wiping regularly with a damp cloth.
13

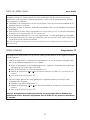
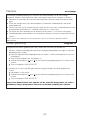
t
sp = 5 ml teaspoon
tbsp = 15ml tablespoon
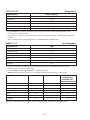
Premium White Bread Program 1
●
1Kg loaf - if the bread over rises either reduce the salt to 1tsp or the yeast to 1tsp.
French Styled Bread Program 2
* Unbleached white bread flour can be used instead of T55 French Flour.
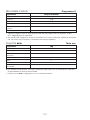
Wholemeal Bread Program 3
Ingredients 500g 750g 1Kg
Water 245ml 310ml 380ml
Salt ½ tsp 1tsp 1tsp
Sugar 1tsp 2tsp 2tsp
T55 French Flour * 350g 450g 600g
Easy blend dried yeast 1 tsp 1 tsp 1½ tsp
Ingredients 500g 750g 1Kg
Water 245ml 330ml 400ml
Vegetable oil 1tbsp 1tbsp 1
1
⁄2tbsp
Skimmed milk powder 1tbsp 5tsp 2tbsp
Salt
1
⁄2tsp 1tsp 1tsp
Sugar 2tsp 1tbsp 4tsp
Wholemeal bread flour 350g 450g 600g
Easy blend dried yeast 1tsp 1
1
⁄2tsp 1
1
⁄2tsp
Ingredients 500g 750g 1Kg
Water 245ml 300ml 380ml
Vegetable oil 1tbsp 1tbsp 1
1
⁄2tbsp
Skimmed milk powder 1tbsp 4tsp 5tsp
Salt 1tsp 1tsp 1
1
⁄2tsp
Sugar 2tsp 1tbsp 4tsp
Unbleached white bread flour 350g 450g 600g
Easy blend dried yeast 1
1
⁄2tsp 1
1
⁄2tsp 1
1
⁄2tsp
14
Recipes (add the ingredients to the pan in the order listed in the recipes)

Brioche Bread (use light crust colour) Program 4
1 Put the egg/eggs into the measuring cup and add sufficient milk to give:-
Gluten Free Mixes Program 5
1 After 5 minutes mixing, scrape down with a plastic spatula to ensure all the ingredients
are incorporated.
Visit the Kenwood website for more information about using Gluten free mixes in your bread maker.
Loaf 500g 750g 1Kg
Liquid up to 190ml 280ml 350ml
Ingredients Glutafin® Gluten Juvela® Gluten Schär Mix B®
Free Select Free Mix Gluten Free Mix
Bread Mix
Water 350ml 400ml 500ml
Vegetable Oil 1 tbsp 2tbsp 2tsp
Gluten Free Bread Mix 500g 500g 500g
Salt N/A N/A 1tsp
Easy blend dried yeast 2tsp 2tsp 2tsp
Crust Colour LIGHT MEDIUM DARK
Ingredients 500g 750g 1Kg
Milk See point 1 See point 1 See point 1
Eggs 122
Butter, melted 80g 110g 135g
Salt 1tsp 1
1
⁄2tsp 1
1
⁄2tsp
Sugar 30g 50g 70g
Unbleached white bread flour 350g 450g 550g
Easy blend dried yeast 1
1
⁄2tsp 1
1
⁄2tsp 1
1
⁄2tsp
15

Gluten Free Bread Program 5
1 After 5 minutes mixing, scrape down with a plastic spatula to ensure all the ingredients
are incorporated.
Marmalade Cake Program 6
1 After 3 minutes mixing, scrape down with a plastic spatula to ensure all the ingredients
are incorporated.
Ingredients 1Kg
Butter 115g
Golden Syrup 150g
Granulated Sugar 75g
Orange Marmalade 75g
Milk 175ml
Egg 1
Plain Flour 280g
Baking Powder 2tsp
Bicarbonate of Soda 1tsp
I
ngredients 1 Loaf
E
gg (medium) 1 (50g)
Water 400ml
Vegetable Oil 2tbsp
Lemon juice 1tsp
Salt 1tsp
Sugar 4tsp
Xanthan Gum 1tbsp
Rice flour 260g
Tapioca flour 70g
Potato flour 70g
Easy blend dried yeast 3tsp
Crust colour DARK
16

Bread rolls Program 7
1 Put the egg/eggs into the measuring cup and add sufficient water to give:-
2 At the end of the cycle, turn the dough out onto a lightly floured surface. Gently knock back the
dough and divide into 12 equal pieces and hand shape.
3 After shaping, leave the dough to prove for approximately 45 minutes or until doubled in size then
bake in your conventional oven.
4 Bake in a pre-heated oven at 200°C/400°F/Gas Mark 6 for 15-20 minutes or until golden.
5 Transfer to a wire rack to cool.
Dough 1Kg 750g
Liquid up to 400ml 260ml
Ingredients 1Kg 750g
Egg 11
Water See point 1 See point 1
Unbleached white bread flour 600g 450g
Salt 1
1
⁄2tsp 1tsp
Sugar 1tbsp 2tsp
Butter 25g 25g
Easy blend dried yeast 2tsp 1
1
⁄2tsp
For the topping:
Egg yolk beaten with
15ml (1tbsp) water 11
Sesame seeds and poppy
seeds, for sprinkling, optional
17
La pagina sta caricando ...
La pagina sta caricando ...
La pagina sta caricando ...
La pagina sta caricando ...
La pagina sta caricando ...
La pagina sta caricando ...
La pagina sta caricando ...
La pagina sta caricando ...
La pagina sta caricando ...
La pagina sta caricando ...
La pagina sta caricando ...
La pagina sta caricando ...
La pagina sta caricando ...
La pagina sta caricando ...
La pagina sta caricando ...
La pagina sta caricando ...
La pagina sta caricando ...
La pagina sta caricando ...
La pagina sta caricando ...
La pagina sta caricando ...
La pagina sta caricando ...
La pagina sta caricando ...
La pagina sta caricando ...
La pagina sta caricando ...
La pagina sta caricando ...
La pagina sta caricando ...
La pagina sta caricando ...
La pagina sta caricando ...
La pagina sta caricando ...
La pagina sta caricando ...
La pagina sta caricando ...
La pagina sta caricando ...
La pagina sta caricando ...
La pagina sta caricando ...
La pagina sta caricando ...
La pagina sta caricando ...
La pagina sta caricando ...
La pagina sta caricando ...
La pagina sta caricando ...
La pagina sta caricando ...
La pagina sta caricando ...
La pagina sta caricando ...
La pagina sta caricando ...
La pagina sta caricando ...
La pagina sta caricando ...
La pagina sta caricando ...
La pagina sta caricando ...
La pagina sta caricando ...
La pagina sta caricando ...
La pagina sta caricando ...
La pagina sta caricando ...
La pagina sta caricando ...
La pagina sta caricando ...
La pagina sta caricando ...
La pagina sta caricando ...
La pagina sta caricando ...
La pagina sta caricando ...
La pagina sta caricando ...
La pagina sta caricando ...
La pagina sta caricando ...
La pagina sta caricando ...
La pagina sta caricando ...
La pagina sta caricando ...
La pagina sta caricando ...
La pagina sta caricando ...
La pagina sta caricando ...
La pagina sta caricando ...
La pagina sta caricando ...
La pagina sta caricando ...
La pagina sta caricando ...
La pagina sta caricando ...
La pagina sta caricando ...
La pagina sta caricando ...
La pagina sta caricando ...
La pagina sta caricando ...
La pagina sta caricando ...
La pagina sta caricando ...
La pagina sta caricando ...
La pagina sta caricando ...
La pagina sta caricando ...
La pagina sta caricando ...
La pagina sta caricando ...
La pagina sta caricando ...
La pagina sta caricando ...
La pagina sta caricando ...
La pagina sta caricando ...
La pagina sta caricando ...
La pagina sta caricando ...
La pagina sta caricando ...
La pagina sta caricando ...
La pagina sta caricando ...
La pagina sta caricando ...
La pagina sta caricando ...
La pagina sta caricando ...
La pagina sta caricando ...
La pagina sta caricando ...
La pagina sta caricando ...
La pagina sta caricando ...
La pagina sta caricando ...
La pagina sta caricando ...
La pagina sta caricando ...
La pagina sta caricando ...
La pagina sta caricando ...
La pagina sta caricando ...
La pagina sta caricando ...
La pagina sta caricando ...
La pagina sta caricando ...
La pagina sta caricando ...
La pagina sta caricando ...
La pagina sta caricando ...
La pagina sta caricando ...
La pagina sta caricando ...
La pagina sta caricando ...
La pagina sta caricando ...
La pagina sta caricando ...
La pagina sta caricando ...
La pagina sta caricando ...
La pagina sta caricando ...
La pagina sta caricando ...
La pagina sta caricando ...
La pagina sta caricando ...
La pagina sta caricando ...
La pagina sta caricando ...
La pagina sta caricando ...
La pagina sta caricando ...
La pagina sta caricando ...
La pagina sta caricando ...
La pagina sta caricando ...
La pagina sta caricando ...
La pagina sta caricando ...
La pagina sta caricando ...
La pagina sta caricando ...
La pagina sta caricando ...
La pagina sta caricando ...
La pagina sta caricando ...
La pagina sta caricando ...
La pagina sta caricando ...
La pagina sta caricando ...
La pagina sta caricando ...
La pagina sta caricando ...
La pagina sta caricando ...
La pagina sta caricando ...
La pagina sta caricando ...
La pagina sta caricando ...
La pagina sta caricando ...
La pagina sta caricando ...
La pagina sta caricando ...
La pagina sta caricando ...
La pagina sta caricando ...
La pagina sta caricando ...
La pagina sta caricando ...
La pagina sta caricando ...
La pagina sta caricando ...
La pagina sta caricando ...
La pagina sta caricando ...
La pagina sta caricando ...
La pagina sta caricando ...
La pagina sta caricando ...
La pagina sta caricando ...
La pagina sta caricando ...
La pagina sta caricando ...
La pagina sta caricando ...
La pagina sta caricando ...
La pagina sta caricando ...
La pagina sta caricando ...
La pagina sta caricando ...
La pagina sta caricando ...
La pagina sta caricando ...
La pagina sta caricando ...
La pagina sta caricando ...
La pagina sta caricando ...
La pagina sta caricando ...
La pagina sta caricando ...
La pagina sta caricando ...
La pagina sta caricando ...
La pagina sta caricando ...
La pagina sta caricando ...
La pagina sta caricando ...
La pagina sta caricando ...
La pagina sta caricando ...
La pagina sta caricando ...
La pagina sta caricando ...
La pagina sta caricando ...
La pagina sta caricando ...
La pagina sta caricando ...
La pagina sta caricando ...
La pagina sta caricando ...
La pagina sta caricando ...
La pagina sta caricando ...
La pagina sta caricando ...
La pagina sta caricando ...
La pagina sta caricando ...
La pagina sta caricando ...
La pagina sta caricando ...
La pagina sta caricando ...
La pagina sta caricando ...
La pagina sta caricando ...
La pagina sta caricando ...
La pagina sta caricando ...
La pagina sta caricando ...
La pagina sta caricando ...
La pagina sta caricando ...
La pagina sta caricando ...
La pagina sta caricando ...
La pagina sta caricando ...
La pagina sta caricando ...
La pagina sta caricando ...
La pagina sta caricando ...
La pagina sta caricando ...
La pagina sta caricando ...
La pagina sta caricando ...
La pagina sta caricando ...
La pagina sta caricando ...
La pagina sta caricando ...
La pagina sta caricando ...
La pagina sta caricando ...
La pagina sta caricando ...
La pagina sta caricando ...
La pagina sta caricando ...
La pagina sta caricando ...
La pagina sta caricando ...
La pagina sta caricando ...
La pagina sta caricando ...
La pagina sta caricando ...
La pagina sta caricando ...
La pagina sta caricando ...
La pagina sta caricando ...
La pagina sta caricando ...
La pagina sta caricando ...
La pagina sta caricando ...
La pagina sta caricando ...
La pagina sta caricando ...
-
 1
1
-
 2
2
-
 3
3
-
 4
4
-
 5
5
-
 6
6
-
 7
7
-
 8
8
-
 9
9
-
 10
10
-
 11
11
-
 12
12
-
 13
13
-
 14
14
-
 15
15
-
 16
16
-
 17
17
-
 18
18
-
 19
19
-
 20
20
-
 21
21
-
 22
22
-
 23
23
-
 24
24
-
 25
25
-
 26
26
-
 27
27
-
 28
28
-
 29
29
-
 30
30
-
 31
31
-
 32
32
-
 33
33
-
 34
34
-
 35
35
-
 36
36
-
 37
37
-
 38
38
-
 39
39
-
 40
40
-
 41
41
-
 42
42
-
 43
43
-
 44
44
-
 45
45
-
 46
46
-
 47
47
-
 48
48
-
 49
49
-
 50
50
-
 51
51
-
 52
52
-
 53
53
-
 54
54
-
 55
55
-
 56
56
-
 57
57
-
 58
58
-
 59
59
-
 60
60
-
 61
61
-
 62
62
-
 63
63
-
 64
64
-
 65
65
-
 66
66
-
 67
67
-
 68
68
-
 69
69
-
 70
70
-
 71
71
-
 72
72
-
 73
73
-
 74
74
-
 75
75
-
 76
76
-
 77
77
-
 78
78
-
 79
79
-
 80
80
-
 81
81
-
 82
82
-
 83
83
-
 84
84
-
 85
85
-
 86
86
-
 87
87
-
 88
88
-
 89
89
-
 90
90
-
 91
91
-
 92
92
-
 93
93
-
 94
94
-
 95
95
-
 96
96
-
 97
97
-
 98
98
-
 99
99
-
 100
100
-
 101
101
-
 102
102
-
 103
103
-
 104
104
-
 105
105
-
 106
106
-
 107
107
-
 108
108
-
 109
109
-
 110
110
-
 111
111
-
 112
112
-
 113
113
-
 114
114
-
 115
115
-
 116
116
-
 117
117
-
 118
118
-
 119
119
-
 120
120
-
 121
121
-
 122
122
-
 123
123
-
 124
124
-
 125
125
-
 126
126
-
 127
127
-
 128
128
-
 129
129
-
 130
130
-
 131
131
-
 132
132
-
 133
133
-
 134
134
-
 135
135
-
 136
136
-
 137
137
-
 138
138
-
 139
139
-
 140
140
-
 141
141
-
 142
142
-
 143
143
-
 144
144
-
 145
145
-
 146
146
-
 147
147
-
 148
148
-
 149
149
-
 150
150
-
 151
151
-
 152
152
-
 153
153
-
 154
154
-
 155
155
-
 156
156
-
 157
157
-
 158
158
-
 159
159
-
 160
160
-
 161
161
-
 162
162
-
 163
163
-
 164
164
-
 165
165
-
 166
166
-
 167
167
-
 168
168
-
 169
169
-
 170
170
-
 171
171
-
 172
172
-
 173
173
-
 174
174
-
 175
175
-
 176
176
-
 177
177
-
 178
178
-
 179
179
-
 180
180
-
 181
181
-
 182
182
-
 183
183
-
 184
184
-
 185
185
-
 186
186
-
 187
187
-
 188
188
-
 189
189
-
 190
190
-
 191
191
-
 192
192
-
 193
193
-
 194
194
-
 195
195
-
 196
196
-
 197
197
-
 198
198
-
 199
199
-
 200
200
-
 201
201
-
 202
202
-
 203
203
-
 204
204
-
 205
205
-
 206
206
-
 207
207
-
 208
208
-
 209
209
-
 210
210
-
 211
211
-
 212
212
-
 213
213
-
 214
214
-
 215
215
-
 216
216
-
 217
217
-
 218
218
-
 219
219
-
 220
220
-
 221
221
-
 222
222
-
 223
223
-
 224
224
-
 225
225
-
 226
226
-
 227
227
-
 228
228
-
 229
229
-
 230
230
-
 231
231
-
 232
232
-
 233
233
-
 234
234
-
 235
235
-
 236
236
-
 237
237
-
 238
238
-
 239
239
-
 240
240
-
 241
241
-
 242
242
-
 243
243
-
 244
244
-
 245
245
-
 246
246
-
 247
247
-
 248
248
-
 249
249
-
 250
250
-
 251
251
-
 252
252


Kenwood BM366 Manuale del proprietario
- Categoria
- Macchine per il pane
- Tipo
- Manuale del proprietario
in altre lingue
- English: Kenwood BM366 Owner's manual
- français: Kenwood BM366 Le manuel du propriétaire
- Deutsch: Kenwood BM366 Bedienungsanleitung
- Nederlands: Kenwood BM366 de handleiding
- dansk: Kenwood BM366 Brugervejledning
- svenska: Kenwood BM366 Bruksanvisning
- suomi: Kenwood BM366 Omistajan opas
Documenti correlati
-
Kenwood BM366 Manuale del proprietario
-
Kenwood BM250 Manuale del proprietario
-
Kenwood BM350 Multilingual Manuale del proprietario
-
-
Kenwood BM256 Manuale del proprietario
-
Kenwood BM450 Manuale del proprietario
-
-
Kenwood BM210J Manuale utente
-
-
Kenwood BM900 series Manuale del proprietario
Altri documenti
-
Philips HD9040/90 Manuale utente
-
Moulinex OW500431 Manuale del proprietario
-
-
-
Proline BM100 Manuale utente
-
G3 Ferrari G10107 Scheda dati
-
Bestron APZ300 Manuale del proprietario
-
-
LAGRANGE Pâtes Créativ' 429002 Manuale del proprietario