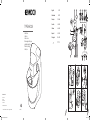
Kenwood PROSPERO KHC291.H0SI Manuale del proprietario
- Categoria
- Robot da cucina
- Tipo
- Manuale del proprietario
Questo manuale è adatto anche per

max
O
2 3 15 16 21
17 18
20
19
10
1
4
9
12 13 14567811
A B
D E
C
F
TYPE KHC29
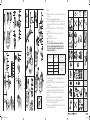
instructions
istruzioni
instrucciones
Bedienungsanleitungen
gebruiksaanwijzing
Instrukcja obsługi
instruções
Kenwood Ltd
New Lane
Havant
Hampshire
PO9 2NH
kenwoodworld.com
© 2019 Kenwood Limited. All rights reserved 140979/1
English 2 - 15
Nederlands 16 - 31
Français 32 - 48
Deutsch 49 - 65
Italiano 66 - 82
Español 83 - 99
Português 100 - 116
´¸∂w
١٣٢ - ١١٧
140979 Iss 1 KHC29 8pp multi A5.indd 1-4 16/05/2019 09:56

Safety
l
Read these instructions carefully and retain for future
reference.
l
Remove all packaging and any labels.
l
If the cord is damaged it must, for safety reasons, be
replaced by KENWOOD or an authorised KENWOOD
repairer.
l
Turn the speed control to ‘O’ (OFF) position and
unplug:
before fitting or removing outlet covers/tools/
attachments;
after and when not in use;
before cleaning.
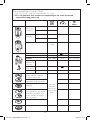
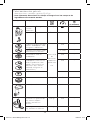
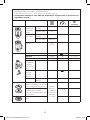
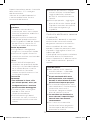
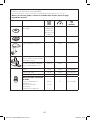
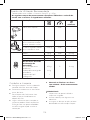
l
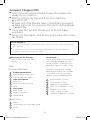
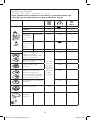
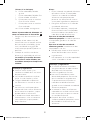
Do not operate your appliance for longer than
the times specified below without a rest period.
Processing continuously for longer periods can
damage your appliance.
Function/
Attachment
Maximum
OperationTime
Rest Period
Between
Operations
Dough Tool 8 mins Unplug the
appliance and allow
to cool down for
15 minutes
Blender 60 secs
Mill 30 secs
Food Mincer 10 mins
l
Keep your fingers away from moving parts and fitted
attachments. Never put your hand/fingers in the
hinge mechanism.
l
Never leave the Kitchen Machine unattended when it
is operating.
l
Never use a damaged appliance. Get it checked or
repaired: see ‘Service and Customer Care’ section.
l
Never let the cord hang down where a child could
grab it.
l
Never let the power unit, cord or plug get wet.
l
Ensure that no bowl tools are fitted or stored in the
bowl when using the drive outlets.
l
Never use an unauthorised attachment or more than
one attachment at a time.
2
19 20
21
c
a
b
d
e
g
f
h
j
i
g
f
e
a
b
c
d
a
b
c
d
17
15
16
18
a
f
a
e
b
d
c
b
a
b
c
d
h
i
j
k
l
m
g
f
e
a
d
c
b
e
140979 Iss 1 KHC29 8pp multi A5.indd 5-8 16/05/2019 09:56

3
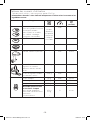
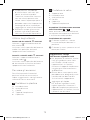
l
Never exceed the quantities stated in the
recommended usage chart.
l
Take care when lifting this appliance. Ensure the
head is correctly latched in the down position and
that the bowl, tools, outlet covers and cord are
secure before lifting.
l
Children should be supervised to ensure that they
do not play with the appliance.
l
Do not move or raise the mixer head with an
attachment fitted as the Kitchen Machine could
become unstable.
l
Do not operate your appliance near the edge of a
work surface.
l
Appliances can be used by persons with reduced
physical, sensory or mental capabilities or lack of
experience and knowledge if they have been given
supervision or instruction concerning use of the
appliance in a safe way and if they understand the
hazards involved.
l
Misuse of your appliance can result in injury.
l
This appliance shall not be used by children. Keep
the appliance and its cord out of reach of children.
l
Only use the appliance for its intended domestic
use. Kenwood will not accept any liability if the
appliance is subject to improper use, or failure to
comply with these instructions.
Attachment General Safety
l
Keep hands and utensils out of the blender and
food processor bowl whilst connected to the power
supply.
l
The appliance will not operate if the attachments
are not correctly fitted.
l
The processing of spices is not recommended as
they may damage the plastic parts.
l
The maximum rating is based on the attachment
that draws the greatest load. Other attachments
may draw less power.
l
Should excessive vibration occur when using an
attachment, either reduce the speed or stop the
machine and remove some of the contents.
140979 Iss 1 KHC29 Multilingual.A5 .indd 3 16/05/2019 09:57

4
5
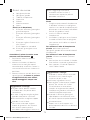
l
Attachments will be damaged and may cause injury
if the interlock mechanism is subjected to excessive
force.
l
DO NOT process hot ingredients.
l
SCALD RISK: Hot ingredients must be allowed to
cool to room temperature before placing in the food
processor bowl, mill or goblet or before blending.
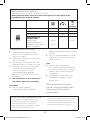
Blender
l
Never fit the blade unit to the power unit without
the blender goblet fitted.
l
AT282 Important - The skirt on the bottom of the
goblet is fitted during manufacture and no attempt
should be made to remove it.
l
Only operate the blender with the lid in place.
l
Only use the goblet with the blade assembly
supplied.
l
Never run the blender empty.
l
Smoothie recipes – never blend frozen ingredients
that have formed a solid mass during freezing;
break it up before adding to the goblet.
l
Do not process spices such as cloves, dill and cumin
seeds as they may damage the plastic parts.
l
Do not use the blender as a storage container. Keep
it empty before and after use.
l
Never blend more than the maximum marked on
the goblet - less for frothy liquids such as milk
shakes.
Food Processor
l
The knife blade and discs are extremely sharp,
handle with care. Always hold by the finger grip at
the top, away from the cutting edge, both when
handling and cleaning.
l
When slicing/grating do not let the bowl fill up as
far as the cutting disc: empty it regularly.
l
Do not exceed the ‘MAX’ capacity level on the
bowl.
l
Always remove the knife blade before pouring
contents from the bowl.
140979 Iss 1 KHC29 Multilingual.A5 .indd 4 16/05/2019 09:57

5
l
Never use your fingers to push food down the feed
tube. Always use the pusher supplied.
l
Before removing the lid from the food processor
bowl switch off and wait until the blade or discs
have completely stopped.
l
Do not use the lid to operate the food processor,
always use the speed control.
Food Mincer
l
Always ensure bones and rind etc. are removed
from the meat before mincing.
l
When mincing nuts, only feed a few down at a time
and allow the scroll to pick them up before adding
any more.
l
Always use the mincer pusher supplied. Never put
your fingers or utensils in the feed tube.
l
Warning – the cutting blade is sharp, handle with
care both in use and when cleaning.
l
Ensure the attachment is secured in position before
switching on.
Juice Extractor
l
Do not use the juicer if the filter is damaged.
l
The cutting blades on the base of the filter are very
sharp, take care when handling and cleaning the
filter.
l
Before removing the lid, switch off and wait for the
filter to stop.
l
Only use the pusher supplied. Never put your
fingers in the feed tube. Unplug before unblocking
the feed tube.
l
Should excessive vibration occur when using this
attachment, either adjust the speed or stop the
machine, unplug and clear any pulp from the drum
(the juicer vibrates if the pulp becomes unevenly
distributed).
140979 Iss 1 KHC29 Multilingual.A5 .indd 5 16/05/2019 09:57

6
7
Compact Chopper/Mill
l
Do not touch sharp blades. Keep the blade unit
away from children.
l
Before removing the mill from the machine:
switch off;
wait until the blades have completely stopped;
take care not to unscrew the jar from the blade
assembly.
l
Only use the jar and blade unit with the base
supplied.
l
Never fit the blade unit to the machine without the
jar fitted.
Before plugging in
l
Make sure your electricity supply is the same as the one shown on the underside of
your appliance.
l
This appliance conforms to EC Regulation 1935/2004 on materials and articles
intended to come into contact with food.
Before using for the first time
l
Wash the parts: see ‘care and
cleaning’.
Key
Kitchen Machine
1
2
3
4
5
6
7
8
9
10
11
12
13
14
15
16
17
18
19
20
21
22
23
24
25
26
27
28
29
30
31
32
33
34
35
36
37
38
39
40
41
42
43
44
45
46
47
48
49
50
51
52
53
54
55
56
57
58
59
60
61
62
63
64
65
66
67
68
69
70
71
72
73
74
75
76
77
78
79
80
81
82
83
84
85
86
87
88
89
90
91
92
93
94
95
96
97
98
99
Medium Speed Outlet
1
2
3
4
5
6
7
8
9
10
11
12
13
14
15
16
17
18
19
20
21
22
23
24
25
26
27
28
29
30
31
32
33
34
35
36
37
38
39
40
41
42
43
44
45
46
47
48
49
50
51
52
53
54
55
56
57
58
59
60
61
62
63
64
65
66
67
68
69
70
71
72
73
74
75
76
77
78
79
80
81
82
83
84
85
86
87
88
89
90
91
92
93
94
95
96
97
98
99
Medium speed outlet cover
1
2
3
4
5
6
7
8
9
10
11
12
13
14
15
16
17
18
19
20
21
22
23
24
25
26
27
28
29
30
31
32
33
34
35
36
37
38
39
40
41
42
43
44
45
46
47
48
49
50
51
52
53
54
55
56
57
58
59
60
61
62
63
64
65
66
67
68
69
70
71
72
73
74
75
76
77
78
79
80
81
82
83
84
85
86
87
88
89
90
91
92
93
94
95
96
97
98
99
High speed outlet cover
1
2
3
4
5
6
7
8
9
10
11
12
13
14
15
16
17
18
19
20
21
22
23
24
25
26
27
28
29
30
31
32
33
34
35
36
37
38
39
40
41
42
43
44
45
46
47
48
49
50
51
52
53
54
55
56
57
58
59
60
61
62
63
64
65
66
67
68
69
70
71
72
73
74
75
76
77
78
79
80
81
82
83
84
85
86
87
88
89
90
91
92
93
94
95
96
97
98
99
High Speed Outlet
1
2
3
4
5
6
7
8
9
10
11
12
13
14
15
16
17
18
19
20
21
22
23
24
25
26
27
28
29
30
31
32
33
34
35
36
37
38
39
40
41
42
43
44
45
46
47
48
49
50
51
52
53
54
55
56
57
58
59
60
61
62
63
64
65
66
67
68
69
70
71
72
73
74
75
76
77
78
79
80
81
82
83
84
85
86
87
88
89
90
91
92
93
94
95
96
97
98
99
Power unit
1
2
3
4
5
6
7
8
9
10
11
12
13
14
15
16
17
18
19
20
21
22
23
24
25
26
27
28
29
30
31
32
33
34
35
36
37
38
39
40
41
42
43
44
45
46
47
48
49
50
51
52
53
54
55
56
57
58
59
60
61
62
63
64
65
66
67
68
69
70
71
72
73
74
75
76
77
78
79
80
81
82
83
84
85
86
87
88
89
90
91
92
93
94
95
96
97
98
99
On/O and speed control
1
2
3
4
5
6
7
8
9
10
11
12
13
14
15
16
17
18
19
20
21
22
23
24
25
26
27
28
29
30
31
32
33
34
35
36
37
38
39
40
41
42
43
44
45
46
47
48
49
50
51
52
53
54
55
56
57
58
59
60
61
62
63
64
65
66
67
68
69
70
71
72
73
74
75
76
77
78
79
80
81
82
83
84
85
86
87
88
89
90
91
92
93
94
95
96
97
98
99
Bowl
1
2
3
4
5
6
7
8
9
10
11
12
13
14
15
16
17
18
19
20
21
22
23
24
25
26
27
28
29
30
31
32
33
34
35
36
37
38
39
40
41
42
43
44
45
46
47
48
49
50
51
52
53
54
55
56
57
58
59
60
61
62
63
64
65
66
67
68
69
70
71
72
73
74
75
76
77
78
79
80
81
82
83
84
85
86
87
88
89
90
91
92
93
94
95
96
97
98
99
Tool Socket
1
2
3
4
5
6
7
8
9
10
11
12
13
14
15
16
17
18
19
20
21
22
23
24
25
26
27
28
29
30
31
32
33
34
35
36
37
38
39
40
41
42
43
44
45
46
47
48
49
50
51
52
53
54
55
56
57
58
59
60
61
62
63
64
65
66
67
68
69
70
71
72
73
74
75
76
77
78
79
80
81
82
83
84
85
86
87
88
89
90
91
92
93
94
95
96
97
98
99
Mixer head
1
2
3
4
5
6
7
8
9
10
11
12
13
14
15
16
17
18
19
20
21
22
23
24
25
26
27
28
29
30
31
32
33
34
35
36
37
38
39
40
41
42
43
44
45
46
47
48
49
50
51
52
53
54
55
56
57
58
59
60
61
62
63
64
65
66
67
68
69
70
71
72
73
74
75
76
77
78
79
80
81
82
83
84
85
86
87
88
89
90
91
92
93
94
95
96
97
98
99
Head release lever
1
2
3
4
5
6
7
8
9
10
11
12
13
14
15
16
17
18
19
20
21
22
23
24
25
26
27
28
29
30
31
32
33
34
35
36
37
38
39
40
41
42
43
44
45
46
47
48
49
50
51
52
53
54
55
56
57
58
59
60
61
62
63
64
65
66
67
68
69
70
71
72
73
74
75
76
77
78
79
80
81
82
83
84
85
86
87
88
89
90
91
92
93
94
95
96
97
98
99
Splashguard
Bowl Tools
1
2
3
4
5
6
7
8
9
10
11
12
13
14
15
16
17
18
19
20
21
22
23
24
25
26
27
28
29
30
31
32
33
34
35
36
37
38
39
40
41
42
43
44
45
46
47
48
49
50
51
52
53
54
55
56
57
58
59
60
61
62
63
64
65
66
67
68
69
70
71
72
73
74
75
76
77
78
79
80
81
82
83
84
85
86
87
88
89
90
91
92
93
94
95
96
97
98
99
Beater
1
2
3
4
5
6
7
8
9
10
11
12
13
14
15
16
17
18
19
20
21
22
23
24
25
26
27
28
29
30
31
32
33
34
35
36
37
38
39
40
41
42
43
44
45
46
47
48
49
50
51
52
53
54
55
56
57
58
59
60
61
62
63
64
65
66
67
68
69
70
71
72
73
74
75
76
77
78
79
80
81
82
83
84
85
86
87
88
89
90
91
92
93
94
95
96
97
98
99
Dough hook with removable guard
1
2
3
4
5
6
7
8
9
10
11
12
13
14
15
16
17
18
19
20
21
22
23
24
25
26
27
28
29
30
31
32
33
34
35
36
37
38
39
40
41
42
43
44
45
46
47
48
49
50
51
52
53
54
55
56
57
58
59
60
61
62
63
64
65
66
67
68
69
70
71
72
73
74
75
76
77
78
79
80
81
82
83
84
85
86
87
88
89
90
91
92
93
94
95
96
97
98
99
Whisk
Attachments
Not all of the attachments listed will
necessarily be included with your
kitchen machine. Attachments are
dependent upon the model variant.
For more information or to order
optional attachments not included
in your pack visit the Kenwood
website www.kenwoodworld.com.
1
2
3
4
5
6
7
8
9
10
11
12
13
14
15
16
17
18
19
20
21
22
23
24
25
26
27
28
29
30
31
32
33
34
35
36
37
38
39
40
41
42
43
44
45
46
47
48
49
50
51
52
53
54
55
56
57
58
59
60
61
62
63
64
65
66
67
68
69
70
71
72
73
74
75
76
77
78
79
80
81
82
83
84
85
86
87
88
89
90
91
92
93
94
95
96
97
98
99
Plastic blender (AT282)
1
2
3
4
5
6
7
8
9
10
11
12
13
14
15
16
17
18
19
20
21
22
23
24
25
26
27
28
29
30
31
32
33
34
35
36
37
38
39
40
41
42
43
44
45
46
47
48
49
50
51
52
53
54
55
56
57
58
59
60
61
62
63
64
65
66
67
68
69
70
71
72
73
74
75
76
77
78
79
80
81
82
83
84
85
86
87
88
89
90
91
92
93
94
95
96
97
98
99
Glass blender (AT283)
1
2
3
4
5
6
7
8
9
10
11
12
13
14
15
16
17
18
19
20
21
22
23
24
25
26
27
28
29
30
31
32
33
34
35
36
37
38
39
40
41
42
43
44
45
46
47
48
49
50
51
52
53
54
55
56
57
58
59
60
61
62
63
64
65
66
67
68
69
70
71
72
73
74
75
76
77
78
79
80
81
82
83
84
85
86
87
88
89
90
91
92
93
94
95
96
97
98
99
Food processor (AT284)
1
2
3
4
5
6
7
8
9
10
11
12
13
14
15
16
17
18
19
20
21
22
23
24
25
26
27
28
29
30
31
32
33
34
35
36
37
38
39
40
41
42
43
44
45
46
47
48
49
50
51
52
53
54
55
56
57
58
59
60
61
62
63
64
65
66
67
68
69
70
71
72
73
74
75
76
77
78
79
80
81
82
83
84
85
86
87
88
89
90
91
92
93
94
95
96
97
98
99
Citrus juicer (Requires AT284)
1
2
3
4
5
6
7
8
9
10
11
12
13
14
15
16
17
18
19
20
21
22
23
24
25
26
27
28
29
30
31
32
33
34
35
36
37
38
39
40
41
42
43
44
45
46
47
48
49
50
51
52
53
54
55
56
57
58
59
60
61
62
63
64
65
66
67
68
69
70
71
72
73
74
75
76
77
78
79
80
81
82
83
84
85
86
87
88
89
90
91
92
93
94
95
96
97
98
99
Food mincer (AT281)
1
2
3
4
5
6
7
8
9
10
11
12
13
14
15
16
17
18
19
20
21
22
23
24
25
26
27
28
29
30
31
32
33
34
35
36
37
38
39
40
41
42
43
44
45
46
47
48
49
50
51
52
53
54
55
56
57
58
59
60
61
62
63
64
65
66
67
68
69
70
71
72
73
74
75
76
77
78
79
80
81
82
83
84
85
86
87
88
89
90
91
92
93
94
95
96
97
98
99
Juice extractor (AT285)
1
2
3
4
5
6
7
8
9
10
11
12
13
14
15
16
17
18
19
20
21
22
23
24
25
26
27
28
29
30
31
32
33
34
35
36
37
38
39
40
41
42
43
44
45
46
47
48
49
50
51
52
53
54
55
56
57
58
59
60
61
62
63
64
65
66
67
68
69
70
71
72
73
74
75
76
77
78
79
80
81
82
83
84
85
86
87
88
89
90
91
92
93
94
95
96
97
98
99
Compact chopper/mill (AT286)
140979 Iss 1 KHC29 Multilingual.A5 .indd 6 16/05/2019 09:57

7
To Use Your Bowl and Tools
Refer to Illustrations
A B C D E F G H I J
K L M N O P Q R S T
U V W X Y Z
–
A B C D E F G H I J
K L M N O P Q R S T
U V W X Y Z
A B C D E F G H I J
K L M N O P Q R S T
U V W X Y Z
Press down on the head release
lever and gently raise the
mixer head.
A B C D E F G H I J
K L M N O P Q R S T
U V W X Y Z
Fit the bowl – turn clockwise to
lock.
A B C D E F G H I J
K L M N O P Q R S T
U V W X Y Z
Push the selected tool into the tool
socket – you will hear a ‘click’ when
fitted securely.
l
To prevent food ingress - always
ensure the guard is fitted onto the
shaft of the dough hook before
inserting into the outlet.
A B C D E F G H I J
K L M N O P Q R S T
U V W X Y Z
Press down on the head release
lever and lower the head gently
down. Plug into the power supply.
A B C D E F G H I J
K L M N O P Q R S T
U V W X Y Z
Slide the splashguard onto the bowl
to fit.
l
During mixing, ingredients can be
added directly to the bowl via the
chute.
A B C D E F G H I J
K L M N O P Q R S T
U V W X Y Z
Turn the speed control to the
desired setting, Use pulse (P) for
short bursts of speed.
After processing turn the speed control
to ‘O’ and unplug from the power supply.
Raise the mixer head and whilst holding
it steady, pull the tool from the outlet.
Hints and Tips
Beater
l
When creaming fat and sugar for
cake mixes, always use the fat at
room temperature or soften it first.
l
Switch o and scrape the bowl
with a spatula when necessary.
l
Use cold ingredients for pastry
unless your recipe states otherwise.
Dough hook
l
The ingredients mix best if you put
the liquid in first.
l
At intervals stop the machine and
scrape the mixture off the dough
hook.
Flour
l
Different batches of flour vary
in the amount of liquid required.
The stickiness of the dough has
a direct effect on the load on the
machine. Keep the machine under
observation whilst the dough is
mixing.
Whisk
Important
l
Do not use the whisk for heavy
mixtures e.g. creaming fat and
sugar as you will damage it.
l
Best results achieved when eggs
are at room temperature.
l
Before whisking egg whites, make
sure there is no grease or egg yolk
on the whisk or the bowl.
l
Mayonnaise - for best results
scrape down the bowl after the
addition of the oil and run for a
further 10 secs at max speed.
l
Batter Mixes - add the flour to the
bowl first, then liquid and mix on
minimum speed to incorporate the
ingredients.
Electronic Speed Sensor
Control
Your mixer is fitted with an electronic
speed sensor control that is designed
to maintain the speed under dierent
load conditions, such as when kneading
bread dough or when eggs are added to
a cake mix.
You may therefore hear some variation
in speed during the operation as the
mixer adjusts to the load and speed
selected - this is normal.
140979 Iss 1 KHC29 Multilingual.A5 .indd 7 16/05/2019 09:57

8
9
Points to note:
l
Never exceed the maximum
capacities stated – you may
overload the machine.
l
Some movement of the mixer
head is normal when mixing heavy
loads such as bread dough.
l
If the mixer head is raised during
operation, the machine will
continue to operate. Always switch
o before raising the head.
l
The machine will not operate
unless all the outlet covers are
correctly fitted.
l
If you hear the machine labouring
either switch o and remove some
of the mixture or increase the
speed.
l
Your mixer has been fitted with
a ‘soft start’ feature to minimise
spillage. However if the machine is
switched on with a heavy mixture
in the bowl such as bread dough,
you may notice that the mixer
takes a few seconds to reach the
selected speed.
l
Always remove attachments fitted
to the outlets before raising the
mixer head.
Using the Drive Outlets
High Speed Outlet
4
attachments
Lift off the high speed outlet cover
3
.
Ensure the medium outlet cover is
in place otherwise the appliance will
not operate.
Medium Speed Outlet
1
attachments
Lift off the medium speed outlet
cover
2
.
Ensure the high speed outlet cover is
in place otherwise the appliance will
not operate.
To Use your Attachments
Refer to the relevant illustrations for
each attachment and see hint and tips
under each attachment section.
1 2 3 4 5 6 7 8 9 10
11 12 13 14
15
16 17 18 19 20
21 22 23 24 25 26 27 28 29 30
31 32 33 34 35 36 37 38 39 40
Plastic Blender
a Blade unit
b Sealing ring
c Goblet
d Filler cap
e Lid
1 2 3 4 5 6 7 8 9 10
11 12 13 14 15
16
17 18 19 20
21 22 23 24 25 26 27 28 29 30
31 32 33 34 35 36 37 38 39 40
Glass Blender
a Blade holder
b Blade unit
c Sealing ring
d Goblet
e Lid
f Filler cap
Assemble the Blender as shown In
illustration
1 2 3 4 5 6 7 8 9 10
11 12 13 14
15 16 17 18 19 20
21 22 23 24 25 26 27 28 29 30
31 32 33 34 35 36 37 38 39 40
and
1 2 3 4 5 6 7 8 9 10
11 12 13 14 15
16 17 18 19 20
21 22 23 24 25 26 27 28 29 30
31 32 33 34 35 36 37 38 39 40
Note: ensure the sealing ring is fitted
correctly or leaking will occur.
Lid Fitting
1
2
3
4
5
6
7
8
9
10
11
12
13
14
15
16
17
18
19
20
21
22
23
24
25
26
27
28
29
30
31
32
33
34
35
36
37
38
39
40
41
42
43
44
45
46
47
48
49
50
51
52
53
54
55
56
57
58
59
60
61
62
63
64
65
66
67
68
69
70
71
72
73
74
75
76
77
78
79
80
81
82
83
84
85
86
87
88
89
90
91
92
93
94
95
96
97
98
99
Plastic blender – turn clockwise to
lock.
1
2
3
4
5
6
7
8
9
10
11
12
13
14
15
16
17
18
19
20
21
22
23
24
25
26
27
28
29
30
31
32
33
34
35
36
37
38
39
40
41
42
43
44
45
46
47
48
49
50
51
52
53
54
55
56
57
58
59
60
61
62
63
64
65
66
67
68
69
70
71
72
73
74
75
76
77
78
79
80
81
82
83
84
85
86
87
88
89
90
91
92
93
94
95
96
97
98
99
Glass blender – push down to secure.
Hints and Tips
Do not process hot ingredients
l
When making mayonnaise, put
all the ingredients, except the oil,
into the blender. Then, with the
machine running, remove the filler
cap and add the oil slowly and
evenly.
l
Thick mixtures, e.g. pates and dips,
may need scraping down. If the
mixture is dicult to process, add
more liquid.
l
To blend dry ingredients - cut into
pieces, remove the filler cap, then
with the appliance running, drop
the pieces down one by one.
140979 Iss 1 KHC29 Multilingual.A5 .indd 8 16/05/2019 09:57

9
1 2 3 4 5 6 7 8 9 10
11 12 13 14 15 16
17 18 19 20
21 22 23 24 25 26 27 28 29 30
31 32 33 34 35 36 37 38 39 40
Food Processor
a Small pusher
b Large pusher
c Feed tube
d Lid
e Bowl
f Drive shaft
g Knife blade
Discs (if supplied)
h Thick slicing/grating disc
i Thin slicing/grating disc
j Extra fine grating disc
k Thin julienne style chipper disc
l Standard chipper disc
m Extra thick grating disc
Assemble the Food Processor as shown
in illustration
1 2 3 4 5 6 7 8 9 10
11 12 13 14 15 16
17 18 19 20
21 22 23 24 25 26 27 28 29 30
31 32 33 34 35 36 37 38 39 40
1 Place the drive shaft onto the outlet.
2 Fit the bowl over the drive shaft with
the handle above the speed control
and turn clockwise until it locks into
position.
3 Fit either the knife blade, one of the
discs or the citrus juicer. The knife
blade and cutting section of the
discs are sharp so always handle
with care.
Hints and Tips
l
Cut meat, bread and vegetables
into 2cm cubes before processing.
l
Herbs are best chopped when
clean and dry.
l
Take care not to over process
when using the knife blade.
l
Do not use knife blade to chop ice
cubes or other hard foods such
as spices, they may damage the
attachment.
l
If adding almond essence or
flavouring avoid contact with
plastic as this may stain.
Discs
1 Choose which feed tube you want to
use. The pusher contains a smaller
feed tube for processing individual
items or thin ingredients.
2 Put the food into the feed tube.
3 Switch on and push down evenly
with the pusher - never put your
fingers in the feed tube.
To use the small feed tube - put the
large pusher inside the feed tube first.
To use the large feed tube - use both
pushers together.
l
Do not let the bowl fill up as far as
the cutting disc: empty it regularly.
l
Do not exceed the ‘MAX’ capacity
level on the bowl.
Hints and Tips
l
When using the reversible discs
ensure that the required cutting
side is uppermost.
l
Use fresh ingredients.
l
Do not cut food up too small. To
stop food slipping over during
processing fill the width of the large
feed tube or use the small feed
tube.
l
When slicing or grating: food
placed upright comes out shorter
than food placed horizontally.
l
After use there will always be a
small amount of waste on the disc
or in with the food.
1 2 3 4 5 6 7 8 9 10
11 12 13 14 15 16 17
18
19 20
21 22 23 24 25 26 27 28 29 30
31 32 33 34 35 36 37 38 39 40
Citrus Juicer
a Cone
b Sieve
Note: This attachment can only be used
in conjunction with the food processor
AT284.
Assemble the Citrus Juicer as shown in
illustration
1 2 3 4 5 6 7 8 9 10
11 12 13 14 15 16 17
18 19 20
21 22 23 24 25 26 27 28 29 30
31 32 33 34 35 36 37 38 39 40
1 Fit the sieve into the bowl ensuring
that the tab on the rim locks into the
bowl handle.
2 Fit the cone over the drive shaft
turning until it drops all the way down.
3 Cut the fruit in half. Switch to
speed 3 and press the fruit onto the
cone.
140979 Iss 1 KHC29 Multilingual.A5 .indd 9 16/05/2019 09:57

10
11
Hints and Tips
l
For best results store and juice the
fruit at room temperature and hand
roll on a worktop before juicing.
l
To help with juice extraction move
the fruit from side to side when
juicing.
l
When juicing large quantities,
empty the sieve regularly to
prevent the build up of pulp and
seeds.
1 2 3 4 5 6 7 8 9 10
11 12 13 14 15 16 17 18
19
20
21 22 23 24 25 26 27 28 29 30
31 32 33 34 35 36 37 38 39 40
Food Mincer
a Ring nut
b Screens: medium or coarse
(depends on model variant)
c Cutter
d Scroll
e Body
f Tray
g Pusher
Assemble the Food Mincer as shown in
illustration
1 2 3 4 5 6 7 8 9 10
11 12 13 14 15 16 17 18
19 20
21 22 23 24 25 26 27 28 29 30
31 32 33 34 35 36 37 38 39 40
1 Fit the scroll inside the body.
2 Fit the cutter – ensure it is located
correctly with the cutting side
outermost.
3 Fit a screen – align the pin with the
notch.
4 Loosely fit the ring nut.
To use the Food Mincer
1 Raise the mixer head. Ensure both
outlet covers are fitted.
2 With the attachment in the position
shown - align the drive tabs on
the end of the scroll with the
corresponding slots in the drive
outlet.
3 Push the attachment into the outlet
and turn clockwise until it locks into
place.
4 Tighten the ring nut manually.
5 Fit the tray
6 Cut meat into 2.5cm (1”) -wide strips.
7 Select Max speed. Using the pusher
gently push the food through, one
piece at a time. Do not push hard -
you could damage your machine.
Hints and Tips
l
Thaw frozen food thoroughly
before mincing.
l
Always ensure bones and rind etc
are removed from the meat before
mincing.
1 2 3 4 5 6 7 8 9 10
11 12 13 14 15 16 17 18 19
20
21 22 23 24 25 26 27 28 29 30
31 32 33 34 35 36 37 38 39 40
Juice Extractor
a Pusher
b Lid
c Lid interlock tab
d Filter
e Pulp container
f Juice outlet (spout)
g Base unit
h Pulp container release lever
i Beaker
j Beaker holder
Assemble the Juicer as shown in
illustration
1 2 3 4 5 6 7 8 9 10
11 12 13 14 15 16 17 18 19
20
21 22 23 24 25 26 27 28 29 30
31 32 33 34 35 36 37 38 39 40
1 Place the pulp container onto the
base unit and turn clockwise until it
locks into position. When correctly
fitted the juice outlet should be
located over the pulp container
release lever.
2 Fit the filter and push firmly into
position.
3 Fit the lid onto the pulp container -
turn clockwise to align the arrow
with the (graphic) on the power unit
(graphic) on the bottom of the bowl
unlock graphic
lock graphic / Fit the lid onto the unit and click into place (x)
lter holder assembly into the juicing bowl and align the (graphic)
(graphic) on the juicing bowl
switch graphic, on, o & reverse
on the lid tab with the mark
with the (graphic) on the power unit
(graphic) on the bottom of the bowl
unlock graphic
lock graphic / Fit the lid onto the unit and click into place (x)
lter holder assembly into the juicing bowl and align the (graphic)
(graphic) on the juicing bowl
switch graphic, on, o & reverse
on the
base unit.
4 Place the beaker holder onto the
underside of the attachment – the
arrow
with the (graphic) on the power unit
(graphic) on the bottom of the bowl
unlock graphic
lock graphic / Fit the lid onto the unit and click into place (x)
lter holder assembly into the juicing bowl and align the (graphic)
(graphic) on the juicing bowl
switch graphic, on, o & reverse
on the beaker holder
should be pointing upwards and
aligned with the juice outlet.
140979 Iss 1 KHC29 Multilingual.A5 .indd 10 16/05/2019 09:57

11
5 Whilst supporting the beaker holder,
fit the attachment to the outlet by
aligning the spout over the corner of
the machine and then turn clockwise
to lock into position.
6 To fit the beaker, rotate the holder
away from the spout and then place
the beaker in the holder. Rotate
the beaker so that it is located
underneath the juice outlet.
7 Cut the food to fit the food tube.
8 Turn to Max speed, then place the
food into the feed tub. Push down
evenly with the pusher – never put
your fingers in the feed tube.
Important
l
If the juicer starts to vibrate, switch
o and empty the pulp from the
filter. (The juicer vibrates if the pulp
becomes unevenly distributed).
l
Some very hard foods may make
your attachment slow down or
stop. If this happens switch o and
unblock the filter.
l
Switch o and empty the pulp and
juice containers regularly during use.
Hints and Tips
l
Citrus Fruit - For best result use
the Citrus juicer which is available
separately.
l
Insert soft food slowly to get the
most juice.
l
Remove stones (plums, peaches,
cherries etc).
l
Remove tough skins (melons,
pineapples, cucumbers, etc).
l
Soft-skinned and other foods
just need washing (apples,
pears, carrots, spinach, grapes,
strawberries, celery etc).
Health recommendations
l
To retain the vitamins drink the juice
as soon as possible.
l
If you need to store the juice for a
few hours put it in the fridge and
add a few drops of lemon juice to
keep it fresh.
l
Do not drink more than three 230ml
(8 fl.oz.) glasses of juice a day
unless you’re used to it.
l
Dilute juice for children with an
equal amount of water.
l
Juice from dark green (broccoli,
spinach etc.) or dark red (beetroot,
red cabbage etc.) vegetables is
extremely strong, so always dilute it.
l
Fruit juice is high in fructose (fruit
sugar), so people with diabetes
or low blood sugar should avoid
drinking too much.
To dismantle the Juicer
Reverse the assembly procedure.
To remove the pulp container from base
unit - press the release lever on the base
unit and rotate the pulp container anti-
clockwise. Then lift off.
1 2 3 4 5 6 7 8 9 10
11 12 13 14 15 16 17 18 19 20
21
22 23 24 25 26 27 28 29 30
31 32 33 34 35 36 37 38 39 40
Compact Chopper/Mill
a Base
b Blade unit
c Sealing ring
d Jar
Assemble the Mill as shown in
illustration
1 2 3 4 5 6 7 8 9 10
11 12 13 14 15 16 17 18 19 20
21 22 23 24 25 26 27 28 29 30
31 32 33 34 35 36 37 38 39 40
1 Put your ingredients into the jar.
2 Ensure the sealing ring is correctly
fitted on the blade unit. Leaking will
occur if the seal is not fitted correctly.
3 Turn the blade unit upside down.
Lower it into the jar, blades down.
4 Screw the base onto the jar until it is
finger-tight.
140979 Iss 1 KHC29 Multilingual.A5 .indd 11 16/05/2019 09:57

12
13
5 Place the mill onto the outlet with
the arrow on the mill base towards
the back of the machine. Turn the
mill clockwise to lock firmly into
place until the two arrows align .
6 Switch on to maximum speed.
Hints and Tips
l
The processing of spices is not
recommended as they may damage
the plastic parts.
l
Do not process hot ingredients
allow to cool before processing.
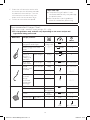
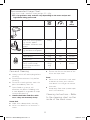
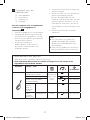
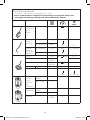
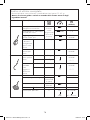
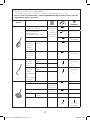
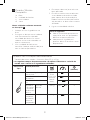
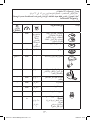
Recommended Usage Chart
Eggs sizes used = medium sized (Weight 53 – 63g).
* This is for guidance only and will vary depending on the exact recipe and
ingredients being processed.
Bowl Tool Recipe/ Process
(Mins)
Creaming butter/
margarine and sugar
Fruit cake
1.8kg total
(6 egg mix)
Min Max 4
Beating eggs into cake
mixes
4
Max 1 – 4
Folding in flour, fruit etc Min
1 30 – 60 secs
Pastry &
Biscuits –
rubbing fat
into flour
Flour weight 450g Min
2 2
All In one
cake mixes
Total weight 1.6kg Min
Max 45 – 60 secs
Bread
Dough (stiff
yeasted)
Flour Weight
500
g Min
3
45 – 60 secs
5 – 7
Total Weight
805g
Soft
yeasted
dough
(enriched
with butter
and eggs
Flour Weight 500g Min
3
45 – 60 secs
5 – 7
Total Weight 960g
Egg whites 8 Min Max 1½ – 3
Fatless sponges 620g
(6 Egg Mix)
4 – 6
Cream 250 -
600ml
Min
Max 2 – 4
Mayonnaise Egg yolks 4 Max 1 – 2
Pancake Batter 1 l Min
Max
10 secs
45 – 50 secs
140979 Iss 1 KHC29 Multilingual.A5 .indd 12 16/05/2019 09:57

13
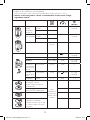
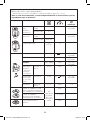
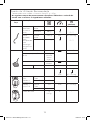
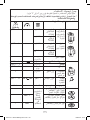
Recommended Usage Chart
Eggs sizes used = medium sized (Weight 53 – 63g).
* This is for guidance only and will vary depending on the exact recipe and
ingredients being processed.
Attachments Recipe/ Process
(Mins)
Cold liquids,
Drinks and
Smoothies
Plastic AT282 1.6l Max 30 – 60 secs
Glass AT283 1.2l
Milkshake/
Cold Milk
Plastic AT282 1.2l Max 15 – 30 secs
Glass AT283 800ml
Ice Cubes 6
(125g)
P –
Raw Meat and Fish 400g 3 Max 15 – 20 secs
Onion
250g
P 5 – 10 secs
Biscuits
250 - 500g
Max 20 – 30 secs
Pastry –
rubbing fat
into flour
Flour weight 450g Max 2
All In one
cake mixes
Total weight 1.6kg Min
Max 45 – 60 secs
Mayonnaise Egg yolks 3 – 4 Max 1 – 2
Slice and grate cheese,
carrot, potato, cabbage,
courgette, beetroot
Do not
exceed
maximum
Mark on the
bowl.
Max
–
Slice softer items such as
cucumbers and tomatoes
4 – Max
–
Parmesan cheese and
potatoes
Max
–
Potatoes for fries and
firm ingredients for salads
casseroles and dips (e.g.
carrot, swede, courgette
and cucumber)
Max
–
Grate carrots and cheeses Max –
All citrus fruit 1kg 3 –
140979 Iss 1 KHC29 Multilingual.A5 .indd 13 16/05/2019 09:57

14
15
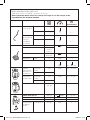
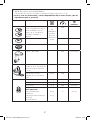
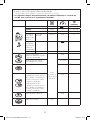
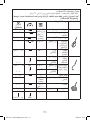
Recommended Usage Chart
Eggs sizes used = medium sized (Weight 53 – 63g).
* This is for guidance only and will vary depending on the exact recipe and
ingredients being processed.
Attachments Recipe/ Process
(Mins)
Meat, poultry and fish. – Max
10 mins
Juice fruit and vegetables
e.g. carrots, apples,
pineapple, tomatoes and
grapes.
500g Max –
Soft fruits and vegetables
e.g. tomatoes and grapes
500g Max –
Nuts 50g Max 30 secs
Coee Beans 50g Max 30 secs
Cold Purees 50g Max 30 secs
Spicy Honey & Nut Marinade
Honey (room temp)
Crunchy peanut butter
Small Chilli
250g
40g
1
P 10 secs
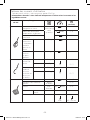
Care and Cleaning
l
Always switch off and unplug before
cleaning.
l
Dismantle attachments fully before
cleaning.
l
For easier cleaning always wash the
parts immediately after use.
l
Some foods, e.g. carrot, will
discolour the plastic. Rubbing with
a cloth dipped in vegetable oil helps
remove discolouring.
l
Handle the blades and discs with
care – they are extremely sharp.
Power Unit
l
Wipe with a damp cloth, then dry.
l
Never use abrasives or immerse in
water.
l
Ensure the feet on the base of the
mixer are kept clean.
Bowl
l
Never use a wire brush, steel wool
or bleach to clean your stainless
steel bowl. Use vinegar to remove
limescale.
l
Keep away from heat (cooker tops,
ovens, microwaves).
Cleaning Instructions - Refer
to the cleaning chart on the
inside of the back cover.
140979 Iss 1 KHC29 Multilingual.A5 .indd 14 16/05/2019 09:57

15
Service and Customer Care
l
If you experience any problems with
the operation of your appliance,
before requesting assistance refer
to the ‘Troubleshooting Guide’
section in the manual or visit
www.kenwoodworld.com.
l
Please note that your product
is covered by a warranty, which
complies with all legal provisions
concerning any existing warranty and
consumer rights in the country where
the product was purchased.
l
If your Kenwood product malfunctions
or you find any defects, please
send it or bring it to an authorised
KENWOOD Service Centre. To find
up to date details of your nearest
authorised KENWOOD Service centre
visit www.kenwoodworld.com or the
website specific to your Country.
l
Designed and engineered by Kenwood
in the UK.
l
Made in China.
IMPORTANT INFORMATION FOR
CORRECT DISPOSAL OF THE PRODUCT
IN ACCORDANCE WITH THE EUROPEAN
DIRECTIVE ON WASTE ELECTRICAL AND
ELECTRONIC EQUIPMENT (WEEE)
At the end of its working life, the product
must not be disposed of as urban waste. It
must be taken to a special local authority
differentiated waste collection centre or to
a dealer providing this service.
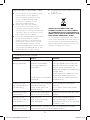
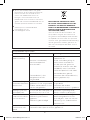
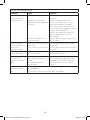
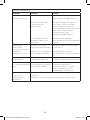
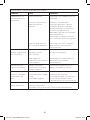
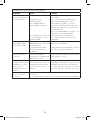
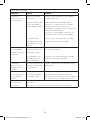
Troubleshooting Guide
Problem Cause Solution
Appliance stopped
during operation.
No Power.
Machine overloaded/
maximum capacities
exceeded.
Outlet covers not fitted or
unlocked.
Check appliance is plugged in.
Turn the speed switch to the o
position, wait a few seconds and
then re-select the speed. The
appliance should resume operating
straight away.
Check maximum capacities in the
‘Recommended Usage Chart’.
Check that the outlet cover/s are
fitted correctly.
Medium or High
speed attachments
not operating.
Attachment not fitted and
locked on correctly.
Other outlet cover not
fitted correctly.
Check attachment locked on
correctly
Check other outlet cover fitted
correctly.
Movement on the
worksurface.
Feet on the underside of
the unit are wet or dirty.
Regularly check the feet are clean
and dry.
Blender or mill
attachment leaking
from blade unit.
Seal missing.
Seal incorrectly fitted.
Seal damaged.
Check seal is fitted correctly
and not damaged. To obtain a
replacement seal see ‘Service and
Customer Care’.
Poor performance of
tools/attachments.
Refer to hints in relevant ‘Using The Attachments’ section.
Check attachments are assembled correctly.
140979 Iss 1 KHC29 Multilingual.A5 .indd 15 16/05/2019 09:57

16
17
Veiligheid
l
Lees deze instructies zorgvuldig door en bewaar ze
voor toekomstig gebruik.
l
Verwijder de verpakking en alle labels.
l
Als het snoer beschadigd is, moet het om
veiligheidsredenen door KENWOOD of een
door KENWOOD geautoriseerd reparatiebedrijf
vervangen worden.
l
Zet de snelheidsregeling op ‘O’ (uit) en haal de
stekker uit het stopcontact:
voordat u contactdeksels/hulpstukken monteert
of verwijdert
na gebruik en indien niet in gebruik
voordat u de machine schoonmaakt.
l
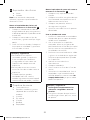
Gebruik uw apparaat nooit langer dan hieronder
staat aangegeven zonder een pauze. Als u het
apparaat langere tijd zonder pauze gebruikt, kan
dat schade veroorzaken.
Functie / hulpstuk Maximale
inschakeltijd
Pauze
tussen twee
inschakelingen
Deeghulpstuk 8 minuten Haal de
stekker uit het
stopcontact en
laat het apparaat
15 minuten
afkoelen
Blender 60 seconden
Hakhulpstuk 30 seconden
Snijmachine 10 minuten
l
Houd uw vingers uit de buurt van bewegende
onderdelen en aangebrachte hulpstukken. Steek
nooit uw hand/vingers in het scharniergedeelte.
l
Laat de keukenmachine nooit onbeheerd aan staan.
l
Gebruik nooit een machine die beschadigd is. Laat
de machine controleren of repareren: raadpleeg het
deel ‘Onderhoud en klantenservice’.
l
Laat het snoer nooit overhangen, zodat een kind
erbij kan.
Nederlands
Vouw voor het lezen a.u.b. de voorpagina met illustraties uit
140979 Iss 1 KHC29 Multilingual.A5 .indd 16 16/05/2019 09:57

17
l
Zorg ervoor dat het motorblok, het snoer en de
stekker nooit nat worden.
l
Zorg dat er geen menghulpstukken bevestigd
zijn of in de kom aanwezig zijn als de
aandrijvingscontacten gebruikt worden.
l
Gebruik nooit een hulpstuk dat niet goedgekeurd
is en gebruik nooit meer dan één hulpstuk
tegelijkertijd.
l
Overschrijd nooit de hoeveelheden die staan
vermeld in de tabel met de maximumcapaciteiten.
l
Wees voorzichtig wanneer u de machine optilt. Zorg
ervoor dat de kop omlaag staat en vergrendeld is,
en dat de kom, de hulpstukken, de contactdeksels
en het snoer vast zitten voordat u de machine optilt.
l
Kinderen mogen de machine alleen onder toezicht
gebruiken, om te voorkomen dat ze ermee spelen.
l
Verplaats de machine niet en breng de kop niet
omhoog als een hulpstuk aangebracht is, omdat de
keukenmachine dan instabiel kan worden.
l
Gebruik de machine niet aan de rand van een
werkoppervlak.
l
Dit apparaat kan worden gebruikt door personen
met verminderde lichamelijke, sensorische of
geestelijke capaciteiten of gebrek aan ervaring en
kennis mits ze onder toezicht staan of instructie
hebben gekregen over het veilige gebruik van het
apparaat, en de betrokken risico’s begrijpen.
l
Misbruik van dit apparaat kan persoonlijk letsel
veroorzaken.
l
Dit apparaat mag niet door kinderen worden
gebruikt. Houd het apparaat en het snoer buiten het
bereik van kinderen.
l
Gebruik het apparaat alleen voor het huishoudelijke
gebruik waarvoor het is bedoeld. Kenwood kan niet
aansprakelijk worden gesteld in als het apparaat is
misbruikt of als deze instructies niet zijn opgevolgd.
Veiligheidsaanwijzingen voor de hulpstukken
l
Steek geen handen of keukengerei in de
blenderbeker of de kom van de keukenmachine
wanneer de stekker in het stopcontact steekt.
140979 Iss 1 KHC29 Multilingual.A5 .indd 17 16/05/2019 09:57

18
19
l
Het apparaat werkt niet als de hulpstukken niet
correct zijn bevestigd.
l
Het verwerken van specerijen wordt niet
aangeraden, omdat dit de kunststofonderdelen kan
beschadigen.
l
Het maximumvermogen is gebaseerd op het
hulpstuk met de grootste belasting. Andere
hulpstukken kunnen minder energie gebruiken.
l
Als een hulpstuk tijdens het gebruik te veel trilt,
dient u de snelheid te verlagen of de machine te
stoppen, de stekker uit het stopcontact te halen en
wat inhoud te verwijderen.
l
Hulpstukken kunnen beschadigd raken en
letsel veroorzaken als er teveel druk op het
vergrendelingsmechanisme wordt uitgeoefend.
l
Verwerk NOOIT hete ingrediënten.
l
KANS OP BRANDWONDEN: Laat hete ingrediënten
altijd tot kamertemperatuur afkoelen voordat u
ze in de kom, snijmachine of beker plaatst of gaat
verwerken.
Blender
l
Plaats de messeneenheid nooit zonder de
blenderbeker op het motorblok.
l
AT282 Belangrijk - De rok onderaan de beker
is door de fabrikant geplaatst en deze mag niet
verwijderd worden.
l
Gebruik de blender altijd met het deksel erop.
l
Gebruik de beker alleen met de meegeleverde
messeneenheid.
l
Laat de blender nooit leeg draaien.
l
Smoothies: meng nooit diepgevroren ingrediënten
die tot een harde klomp zijn vastgevroren; breek de
klomp eerst in stukjes voordat u deze in de beker
doet.
l
Het verwerken van specerijen zoals kruidnagel, dille
of komijnzaad wordt niet aangeraden, omdat dit de
kunststofonderdelen kan beschadigen.
l
Gebruik de blender niet om iets in te bewaren. Zorg
ervoor dat de blender voor en na elk gebruik leeg is.
140979 Iss 1 KHC29 Multilingual.A5 .indd 18 16/05/2019 09:57

19
l
Vermeng nooit meer dan de maximale hoeveelheid
aangegeven op de beker: gebruik minder voor
opschuimende vloeistoffen zoals milkshakes.
Foodprocessor
l
Het meselement en de schijven zijn erg scherp,
wees dus voorzichtig. Houd het meselement altijd
aan de vingergreep aan de bovenkant vast en
houd uw vingers uit de buurt van de snijrand,
zowel tijdens de verplaatsing als tijdens de
reiniging.
l
Laat tijdens het snijden/raspen de kom niet tot
aan de schijf vol raken: leeg de kom regelmatig.
l
Overschrijd de maximumcapaciteit (‘MAX’) van de
kom niet.
l
Verwijder altijd het meselement voordat u de
inhoud van de kom uitschenkt.
l
Gebruik nooit uw vingers om voedsel door
de vultrechter te duwen. Gebruik altijd de
meegeleverde stamper.
l
Voordat u het deksel van de kom af haalt, schakelt
u de machine uit en wacht u totdat het mes of de
schijven volledig tot stilstand zijn gekomen.
l
Gebruik nooit het deksel om de keukenmachine
te bedienen. Gebruik hiervoor altijd de
snelheidsregeling.
Snijmachine
l
Controleer altijd of alle botten, zwoerden, etc.
van het vlees zijn verwijderd voordat u het gaat
vermalen.
l
Wanneer u noten fijnhakt, moet u slechts enkele
noten tegelijk toevoegen en wachten tot de rol ze
volledig heeft meegenomen voordat u meer noten
toevoegt.
l
Gebruik altijd de meegeleverde stamper. Steek
nooit uw vingers of keukengerei in de vultrechter.
l
Waarschuwing: het mes is scherp, wees dus
voorzichtig bij gebruik én bij de reiniging.
l
Controleer of het hulpstuk stevig vastzit voordat u
het apparaat inschakelt.
140979 Iss 1 KHC29 Multilingual.A5 .indd 19 16/05/2019 09:57

20
21
Sapcentrifuge
l
Gebruik de fruitpers niet als het filter beschadigd
is.
l
De snijmessen onder aan het filter zijn erg scherp.
Wees voorzichtig wanneer u het filter verplaatst en
reinigt.
l
Voordat u het deksel verwijdert, moet u de machine
uitschakelen en wachten totdat het filter volledig tot
stilstand gekomen is.
l
Gebruik alleen de meegeleverde stamper. Steek
nooit uw vingers in de vultrechter. Haal de stekker
uit het stopcontact voordat u de vultrechter leeg
gaat maken.
l
Als dit hulpstuk tijdens het gebruik te veel trilt,
dient u de snelheid te verlagen of de machine te
stoppen, de stekker uit het stopcontact te halen
en het vruchtvlees uit de trommel te verwijderen
(de fruitpers gaat trillen als het vruchtvlees
ongelijkmatig verdeeld is).
Compact snij- en hakhulpstuk
l
Raak de scherpe mesjes niet aan. Houd het
meselement uit de buurt van kinderen.
l
Voordat u het compacte snij- en hakhulpstuk van de
machine af haalt:
schakelt u eerst de machine uit
wacht u tot de messen volledig tot stilstand zijn
gekomen
let erop dat u het maatglas niet van het
meselement afschroeft.
l
Gebruik het maatglas en het meselement alleen met
het meegeleverde onderstel.
l
Bevestig het meselement nooit zonder het maatglas
aan de machine.
Voordat u de stekker in het stopcontact steekt
l
Controleer of de elektriciteitsvoorziening dezelfde spanning heeft als op de onderkant
van het apparaat wordt aangegeven.
l
Dit apparaat voldoet aan EG Verordening 1935/2004 inzake materialen en voorwerpen
die bestemd zijn om met levensmiddelen in contact te komen.
140979 Iss 1 KHC29 Multilingual.A5 .indd 20 16/05/2019 09:57
La pagina si sta caricando...
La pagina si sta caricando...
La pagina si sta caricando...
La pagina si sta caricando...
La pagina si sta caricando...
La pagina si sta caricando...
La pagina si sta caricando...
La pagina si sta caricando...
La pagina si sta caricando...
La pagina si sta caricando...
La pagina si sta caricando...
La pagina si sta caricando...
La pagina si sta caricando...
La pagina si sta caricando...
La pagina si sta caricando...
La pagina si sta caricando...
La pagina si sta caricando...
La pagina si sta caricando...
La pagina si sta caricando...
La pagina si sta caricando...
La pagina si sta caricando...
La pagina si sta caricando...
La pagina si sta caricando...
La pagina si sta caricando...
La pagina si sta caricando...
La pagina si sta caricando...
La pagina si sta caricando...
La pagina si sta caricando...
La pagina si sta caricando...
La pagina si sta caricando...
La pagina si sta caricando...
La pagina si sta caricando...
La pagina si sta caricando...
La pagina si sta caricando...
La pagina si sta caricando...
La pagina si sta caricando...
La pagina si sta caricando...
La pagina si sta caricando...
La pagina si sta caricando...
La pagina si sta caricando...
La pagina si sta caricando...
La pagina si sta caricando...
La pagina si sta caricando...
La pagina si sta caricando...
La pagina si sta caricando...
La pagina si sta caricando...
La pagina si sta caricando...
La pagina si sta caricando...
La pagina si sta caricando...
La pagina si sta caricando...
La pagina si sta caricando...
La pagina si sta caricando...
La pagina si sta caricando...
La pagina si sta caricando...
La pagina si sta caricando...
La pagina si sta caricando...
La pagina si sta caricando...
La pagina si sta caricando...
La pagina si sta caricando...
La pagina si sta caricando...
La pagina si sta caricando...
La pagina si sta caricando...
La pagina si sta caricando...
La pagina si sta caricando...
La pagina si sta caricando...
La pagina si sta caricando...
La pagina si sta caricando...
La pagina si sta caricando...
La pagina si sta caricando...
La pagina si sta caricando...
La pagina si sta caricando...
La pagina si sta caricando...
La pagina si sta caricando...
La pagina si sta caricando...
La pagina si sta caricando...
La pagina si sta caricando...
La pagina si sta caricando...
La pagina si sta caricando...
La pagina si sta caricando...
La pagina si sta caricando...
La pagina si sta caricando...
La pagina si sta caricando...
La pagina si sta caricando...
La pagina si sta caricando...
La pagina si sta caricando...
La pagina si sta caricando...
La pagina si sta caricando...
La pagina si sta caricando...
La pagina si sta caricando...
La pagina si sta caricando...
La pagina si sta caricando...
La pagina si sta caricando...
La pagina si sta caricando...
La pagina si sta caricando...
La pagina si sta caricando...
La pagina si sta caricando...
La pagina si sta caricando...
La pagina si sta caricando...
La pagina si sta caricando...
La pagina si sta caricando...
La pagina si sta caricando...
La pagina si sta caricando...
La pagina si sta caricando...
La pagina si sta caricando...
La pagina si sta caricando...
La pagina si sta caricando...
La pagina si sta caricando...
La pagina si sta caricando...
La pagina si sta caricando...
La pagina si sta caricando...
La pagina si sta caricando...
La pagina si sta caricando...
La pagina si sta caricando...
La pagina si sta caricando...
-
 1
1
-
 2
2
-
 3
3
-
 4
4
-
 5
5
-
 6
6
-
 7
7
-
 8
8
-
 9
9
-
 10
10
-
 11
11
-
 12
12
-
 13
13
-
 14
14
-
 15
15
-
 16
16
-
 17
17
-
 18
18
-
 19
19
-
 20
20
-
 21
21
-
 22
22
-
 23
23
-
 24
24
-
 25
25
-
 26
26
-
 27
27
-
 28
28
-
 29
29
-
 30
30
-
 31
31
-
 32
32
-
 33
33
-
 34
34
-
 35
35
-
 36
36
-
 37
37
-
 38
38
-
 39
39
-
 40
40
-
 41
41
-
 42
42
-
 43
43
-
 44
44
-
 45
45
-
 46
46
-
 47
47
-
 48
48
-
 49
49
-
 50
50
-
 51
51
-
 52
52
-
 53
53
-
 54
54
-
 55
55
-
 56
56
-
 57
57
-
 58
58
-
 59
59
-
 60
60
-
 61
61
-
 62
62
-
 63
63
-
 64
64
-
 65
65
-
 66
66
-
 67
67
-
 68
68
-
 69
69
-
 70
70
-
 71
71
-
 72
72
-
 73
73
-
 74
74
-
 75
75
-
 76
76
-
 77
77
-
 78
78
-
 79
79
-
 80
80
-
 81
81
-
 82
82
-
 83
83
-
 84
84
-
 85
85
-
 86
86
-
 87
87
-
 88
88
-
 89
89
-
 90
90
-
 91
91
-
 92
92
-
 93
93
-
 94
94
-
 95
95
-
 96
96
-
 97
97
-
 98
98
-
 99
99
-
 100
100
-
 101
101
-
 102
102
-
 103
103
-
 104
104
-
 105
105
-
 106
106
-
 107
107
-
 108
108
-
 109
109
-
 110
110
-
 111
111
-
 112
112
-
 113
113
-
 114
114
-
 115
115
-
 116
116
-
 117
117
-
 118
118
-
 119
119
-
 120
120
-
 121
121
-
 122
122
-
 123
123
-
 124
124
-
 125
125
-
 126
126
-
 127
127
-
 128
128
-
 129
129
-
 130
130
-
 131
131
-
 132
132
-
 133
133
-
 134
134


Kenwood PROSPERO KHC291.H0SI Manuale del proprietario
- Categoria
- Robot da cucina
- Tipo
- Manuale del proprietario
- Questo manuale è adatto anche per
in altre lingue
- English: Kenwood PROSPERO KHC291.H0SI Owner's manual
- français: Kenwood PROSPERO KHC291.H0SI Le manuel du propriétaire
- español: Kenwood PROSPERO KHC291.H0SI El manual del propietario
- Deutsch: Kenwood PROSPERO KHC291.H0SI Bedienungsanleitung
- Nederlands: Kenwood PROSPERO KHC291.H0SI de handleiding
- português: Kenwood PROSPERO KHC291.H0SI Manual do proprietário
Documenti correlati
-
Kenwood KM280 series Instructions Manual
-
-
Kenwood KM242 Manuale del proprietario
-
Kenwood KHH30 Istruzioni per l'uso
-
Kenwood KHH323WH Manuale del proprietario
-
Kenwood HOME SPEAKER 500 BLACK Manuale del proprietario
-
-
Kenwood Prospero Plus KHC29 Manuale del proprietario
-
Kenwood KHC29.H0WH Istruzioni per l'uso
-