La pagina si sta caricando...

WARNING WARNUNG
AVERTISSEMENT WAARSCHUWING
AVVERTENZA AVISO
AVISO
ВНИМАНИЕ!
The embroidery patterns contained in this product are for personal non-commercial use only. No license is granted for any
commercial use of these patterns and any such use is strictly prohibited.
Die Stickmuster in diesem Produkt sind ausschließlich für die private, nicht kommerzielle Verwendung bestimmt. Jegliche
kommerzielle Verwendung dieser Muster ist nicht lizenziert und ausdrücklich untersagt.
Les motifs de broderie contenus dans ce produit sont exclusivement destinés à une utilisation personnelle non commerciale.
Aucune licence n’est accordée en vue d’une utilisation commerciale de ces motifs de broderie, et toute utilisation commerciale
est strictement interdite.
De borduurpatronen in dit product zijn uitsluitend bedoeld voor niet-commercieel privégebruik. Er wordt geen toestemming
verleend voor commercieel gebruik van deze patronen. Dergelijk gebruik is ten strengste verboden.
I ricami inclusi in questo prodotto sono destinati esclusivamente all’uso personale e non commerciale. Non è concessa alcuna
licenza a fini commerciali per questi ricami e ogni uso in tal senso è severamente proibito.
Los patrones de bordado incluidos en este producto son exclusivamente para uso personal no comercial. No se concede licencia
para uso comercial de estos patrones y dicho uso queda estrictamente prohibido.
Os padrões de bordado contidos neste produto são somente para uso pessoal, e não comercial. Nenhuma licença destes padrões
é concedida para qualquer uso comercial, e tal uso é estritamente proibido.
Дизайны для вышивания, содержащиеся в данном продукте, предназначены только для личного некоммерческого
использования. Не предоставляется никакая лицензия на коммерческое использование данных дизайнов, и любое подобное
использование строго запрещается.
Refer to the operation manual for detailed instruction.
Also, there are differences in the keys and screens depending on the display language. In this guide, English screens are used for
basic explanations.
Einzelheiten hierzu entnehmen Sie bitte der Bedienungsanleitung.
Je nachdem, welche Sprache für die Anzeige gewählt wurde, ergeben sich im Hinblick auf die Tasten und Bildschirme eventuell
Unterschiede. Die grundlegende Bedienung wird in dieser Anleitung am Beispiel von Bildschirmen mit englischem Text erklärt.
Pour les instructions détaillées, reportez-vous au manuel d’instructions.
Par ailleurs, il y a des différences au niveau des touches et des écrans en fonction de la langue d’affichage.
Dans ce guide, les explications de base utilisent les écrans en anglais.
Zie de bedieningshandleiding voor gedetailleerde instructies.
Er zijn verschillen in de toetsen en schermen afhankelijk van de ingestelde taal. In de beschrijvingen in deze handleiding worden
de Engelse schermen gebruikt.
Fare riferimento al manuale d’istruzioni per le istruzioni dettagliate.
Inoltre, i tasti e le schermate variano a seconda della lingua di visualizzazione. La presente guida utilizza le schermate in inglese
per le spiegazioni di base.
Consulte el manual de instrucciones para ver más detalles.
Además, dependiendo del idioma visualizado algunos botones y pantallas podrán ser diferentes.
En esta guía, para las explicaciones básicas se emplean pantallas en inglés.
Consulte o manual de operação para obter as instruções detalhadas.
Além disso, existem diferenças nas teclas e telas, dependendo do idioma de exibição. Neste guia, são utilizadas telas em inglês
para explicações básicas.
Подробная информация: см. в руководстве пользователя.
Внешний вид кнопок и экранов может различаться в зависимости от языка. В данном руководстве в качестве иллюстраций
используются англоязычные экраны.

1
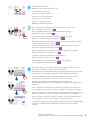
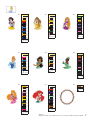
Selecting Disney characters Wahl von Disney-Motiven
Sélection des personnages Disney Disney-personages selecteren
Selezione dei personaggi Disney Selecctionando a Disney
Seleção dos personagens da Disney
Выбор персонажа Disney
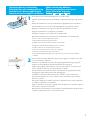
Turn off the power and make preparations for embroidery.
Schalten Sie die Maschine aus und führen Sie die Vorbereitungen zum Sticken
aus.
Mettez la machine hors tension et effectuez les préparatifs pour la broderie.
Zet de machine uit en voer de voorbereidingen uit om te gaan borduren.
Spegnere la macchina ed eseguire le operazioni preliminari al ricamo.
Apague la alimentación y prepárese para bordar.
Desligue a energia e faça os preparativos para bordar.
Выключите питание и подготовьте все необходимое для вышивания.
Please see the machine’s operation manual.
•
Siehe Bedienungsanleitung der Maschine.
•
Reportez-vous au manuel d’instructions de la machine.
•
Raadpleeg de bedieningshandleiding van de machine.
•
Vedere il manuale di istruzioni della macchina.
•
Consulte el manual de instrucciones de la máquina.
•
Consulte o manual de operações da máquina.
•
Подробная информация приведена в руководстве пользователя для вашей
•
машины.
1
2
Turn on the power switch. When the opening screen appears, touch the screen. The
screen at left will be displayed.
Schalten Sie die Maschine ein. Wenn der Begrüßungsbildschirm angezeigt wird,
berühren Sie den Bildschirm. Der Bildschirm links wird angezeigt.
Mettez l'interrupteur d'alimentation en position de marche. Lorsque l'écran
initial s'affiche, touchez-le. L’écran de gauche s’affiche.
Zet de machine aan. Raak het scherm aan wanneer het beginscherm wordt
weergegeven. Het scherm links wordt weergegeven.
Accendere l’interruttore di alimentazione. Quando viene visualizzata la
schermata di apertura, toccare lo schermo. Verrà visualizzata la schermata
illustrata a sinistra.
Encienda la máquina. Cuando se muestre la pantalla inicial, toque la pantalla.
Se exhibirá la pantalla a la izquierda.
Ligue o interruptor de energia. Quando a tela de abertura for exibida, toque na
tela. A tela à esquerda será exibida.
Включите кнопку питания. Когда появится начальный экран, прикоснитесь
к экрану. Открывается окно, показанное слева.

2
Press .
Drücken Sie
.
Appuyez sur
.
Druk op
.
Premere
.
Toque
.
Pressione .
Нажмите
.
4
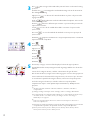
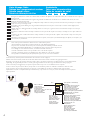
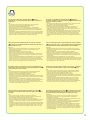
The Disney category screen will be displayed. Select the type of pattern.
Der Bildschirm der Disney-Kategorien wird angezeigt. Wählen Sie die Art des
Musters.
L’écran de la catégorie Disney s’affiche. Sélectionnez le type de motif.
Het scherm met Disney-categorieën wordt weergegeven. Selecteer het type patroon.
Verrà visualizzata la schermata della categoria Disney. Selezionare il tipo di ricamo.
Se visualizará la pantalla de categoría Disney. Seleccione el tipo de patrón.
A tela de categoria da Disney é exibida. Selecione o tipo de padrão.
Открывается экран с категориями персонажей Disney. Выберите тип
рисунка.
1
Modern / Modern / Moderne / Modern / Moderno / Moderno / Moderno /
Современные
2
Vintage / Vintage / Classique / Retro / Vintage / Clásico / Vintage / Винтажные
3
Pooh and friends / Pooh und Freunde / Winnie et ses amis / Winnie de Poeh en zijn
vrienden / Pooh e i suoi amici / Pooh y sus amigos / Pooh e seus amigos /
Винни-Пух и его друзья
4
Princesses / Prinzessinnen / Princesses / Prinsessen / Principesse / Princesas /
Princesas / Принцессы
5
Film property / Filmeigenschaften / Propriété du film / Filmeigendom / Proprietà film
/ Propiedad de la película / Propriedade do filme / Персонажи фильмов
6
Disney
• Pixar / Disney• Pixar / Disney• Pixar / Disney• Pixar / Disney• Pixar /
Disney
• Pixar / Disney• Pixar / Disney• Pixar
5
3
2
1
4
5
6
3
Press . The carriage of the embroidery unit will move to the initial setting
position.
Drücken Sie
. Der Wagen der Stickeinheit bewegt sich in die Position für
die Anfangseinstellung.
Appuyez sur
. Le chariot de l’unité de broderie se place à la position du
réglage initial.
Druk op
. De borduurarm van de borduureenheid verplaatst zich naar de
eerste instellingspositie.
Premere
. Il braccio dell’unità per ricamare si sposterà nella posizione di
impostazione iniziale.
Toque
. El carro de la unidad de bordado se moverá a la posición de
ajuste inicial.
Pressione
. O carro da unidade de bordado se move para a posição de
ajuste inicial.
Нажмите
. Каретка вышивального модуля перемещается в положение
первоначальной настройки.

3
© Disney © Disney•Pixar
© Disney. Based on the "Winnie the Pooh" works by A.A. Milne and E.H. Shepard.
The selected pattern will be displayed in the left part of the screen.
After making the selection, press
.
Das ausgewählte Muster wird links im Bildschirm angezeigt.
Drücken Sie nach der Auswahl
.
Le motif sélectionné s’affiche dans la partie gauche de l’écran.
Après avoir effectué la sélection, appuyez sur
.
Het geselecteerde patroon wordt weergegeven in het linkergedeelte van het
scherm. Bepaal uw keuze en druk op
.
Il ricamo selezionato verrà visualizzato nella parte sinistra dello schermo.
Dopo aver eseguito la selezione, premere
.
El patrón seleccionado se mostrará en la parte izquierda de la pantalla.
Después de realizar la selección, toque
.
O padrão selecionado é exibido à esquerda da tela.
Depois de fazer a seleção, pressione
.
Выбранный рисунок отображается в левой части экрана.
Для подтверждения выбора нажмите
.
7
6
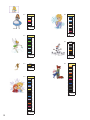
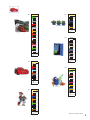
Select the desired pattern.
Wählen Sie das gewünschte Muster aus.
Sélectionnez le motif désiré.
Selecteer het gewenste patroon.
Selezionare il ricamo desiderato.
Seleccione el patrón deseado.
Selecione o padrão desejado.
Выберите требуемый рисунок.
The pattern editing screen appears. Refer to the operation manual for the
instruction to embroider designs with your machine.
Der Bildschirm zur Musterbearbeitung wird angezeigt. Hinweise zum Sticken
von Mustern mit der Maschine finden Sie in der Bedienungsanleitung.
L’écran de modification des motifs apparaît. Reportez-vous au manuel
d’instructions pour broder des motifs à l’aide de votre machine.
Het patroonbewerkscherm wordt weergegeven. Raadpleeg de
bedieningshandleiding voor aanwijzingen om ontwerpen te borduren met uw
machine.
Viene visualizzata la schermata di modifica del ricamo. Per le istruzioni su
come eseguire i ricami con la macchina, consultare il manuale di istruzioni.
Aparece la pantalla de edición de patrones. Consulte el manual de instrucciones
para ver las indicaciones acerca de cómo bordar diseños con la máquina.
A tela de edição de padrões é exibida. Consulte o manual de operações para
obter instruções de como bordar desenhos com a sua máquina.
Открывается экран редактирования рисунков. Инструкции по вышиванию
дизайнов на вашей машине приведены в руководстве пользователя
машины.
8

4
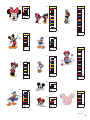
No.1
26 min
1
(001)
2
(079)
3
(307)
4
(900)
83.8 mm
93.0 mm
Refer to the operation manual for details on how to embroider the pattern.
Weitere Hinweise zum Sticken von Mustern finden Sie in der Bedienungsanleitung.
Reportez-vous au manuel d’instructions pour les détails quant à la méthode pour broder le motif.
Raadpleeg de bedieningshandleiding voor gedetailleerde uitleg over het borduren van patronen.
Per i dettagli su come realizzare il ricamo, consultare il manuale di istruzioni.
Consulte el manual de instrucciones por detalles sobre como bordar el patrón.
Consulte o manual de operações da máquina para obter detalhes de como bordar o padrão.
Инструкции по вышиванию рисунка приведены в руководстве пользователя машины.
Note: The Disney character patterns built into this unit cannot be resized or flipped.
Hinweis: Die internen Disney-Motive dieser Maschine können nicht in ihrer Größe verändert oder gespiegelt werden.
Remarque : les motifs des personnages de Disney intégrés dans ce produit ne peuvent être ni redimensionnés ni orientés différemment.
Opmerking: De ingebouwde patronen voor Disney-personages kunnen niet worden vergroot/verkleind of worden gespiegeld.
Nota: I ricami dei personaggi Disney incorporati in questa unità non possono essere ridimensionati né capovolti.
Nota: Los diseños de personajes de Disney incorporados en esta unidad no podrán ser cambiados de tamaño ni darles la vuelta.
Nota: Os padrões de personagens da Disney incorporados a esta unidade não podem ser redimensionados nem invertidos.
Примечание. Рисунки с изображениями персонажей Disney, встроенные в этот модуль, нельзя масштабировать или зеркально
переворачивать.
The figures in shaded areas indicate the estimated time needed for the pattern to be embroidered. They do not include the time required to
change threads.
Die Zahlen in den schattierten Bereichen geben die geschätzte Stickdauer für das Muster an. Sie enthalten nicht die Zeit, die zum
Wechseln der Fäden benötigt wird.
Les chiffres contenus dans les zones grisées indiquent le temps estimé nécessaire pour broder le motif. Ils ne prennent pas en compte le
temps nécessaire pour changer les fils.
De getallen in de getinte vakken geven de geschatte borduurtijd aan voor het patroon. Deze tijd is exclusief de benodigde tijd voor
garenwisseling.
I numeri nelle aree ombreggiate indicano il tempo stimato necessario per eseguire il ricamo. Non includono il tempo necessario per
cambiare i fili.
Los números sombreados indican el tiempo estimado necesario para bordar el patrón. No incluye el tiempo necesario para cambiar los
hilos.
Os números nas áreas sombreadas indicam o tempo estimado necessário para bordar o padrão. Não incluem o tempo necessário para
trocar as linhas.
Значения в затененных полях означают приблизительное время, необходимое для вышивания рисунка. Время, необходимое для
смены нитей, не учитывается.
Color Change Table Farbtabelle
Tableau des changements de couleur
Tabel voor kleurwisseling
Tabella cambi colore Tabla de cambio de color
Tabela de Alteração de Cor
Таблица смены цветов
Time required for embroidering
Stickdauer
Durée estimée requise pour broder
Tijd benodigd voor het borduren
Tempo di ricamo necessario
Tiempo requerido para el bordado
Tempo necessário para bordar
Время, необходимое для вышивания
Embroidery thread color number
Stickgarn-Farbnummer
Numéro de couleur du fil de broderie
Kleurnummer borduurgaren
Numero del colore del filo da ricamo
Número de color del hilo de bordado
Número da cor da linha de bordar
Номер цвета нити для вышивания
Embroidery thread color
Stickgarnfarbe
Couleur du fil de broderie
Kleur borduurgaren
Colore filo ricamo
Color del hilo de bordado
Cor da linha de bordar
Цвет нити для вышивания
Embroidery size
Größe der Stickerei
Taille de la broderie
Afmeting borduurmotief
Dimensioni del ricamo
Tecla de tamaño
Tamanho do bordado
Размер вышивки
Order to embroider
Stickreihenfolge
Séquence de broderie
Borduurvolgorde
Sequenza dei cambi colore del ricamo
Orden para el bordador
Ordem para bordar
Порядок вышивания
La pagina si sta caricando...
La pagina si sta caricando...
La pagina si sta caricando...
La pagina si sta caricando...
La pagina si sta caricando...

10
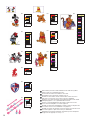
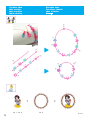
Creative Idea Kreative Idee
Idée créative
Creatieve ideeën
Idea creativa Idea creativa
Ideia criativa
Совет
1
3
5
2
4
6
1
6
2
5
2
1
4
5
6
3
No. 1 - No. 8 No. 9
N
o. 6
+ =
© Disney

11
You can make a 3D motif for a pattern with the mark by
embroidering on a water-soluble embroidery sheet and dissolve it
using water.
Note:
Use the same color of the thread in the bobbin and on top for the designs.•
We recommend using optional water-soluble stabilizer sheets.•
Use three layers of water-soluble stabilizer sheets.•
Place the pattern at the center of the embroidery frame, and embroidery it.•
Remember to check that you have enough upper thread and lower thread for the •
design. If the thread breaks during embroidery, back up at least 10 stitches before
starting again.
When dissolving the water-soluble stabilizer sheets, cut off the unnecessary portions •
and wash the embroidered piece in warm water until it no longer feels slippery. After
the final rinse, dry the motif until slightly damp, shape by hand and place it between
two pieces of cloth, then press with an iron to help maintain the shape.
Sie können ein 3D-Motiv für ein Muster mit der -Markierung
herstellen, indem Sie auf eine wasserlösliche Stickschablone sticken
und diese mit Wasser auflösen.
Hinweis:
Verwenden Sie für die Muster einen Faden derselben Farbe in der Spule und oben.•
Wir empfehlen, optionale wasserlösliche Stickfolien zu verwenden.•
Verwenden Sie drei Lagen wasserlöslicher Stickfolie.•
Positionieren Sie das Muster in die Mitte des Stickrahmens und sticken sie es.•
Achten Sie darauf, dass ausreichend Ober- und Unterfaden für das Muster •
vorhanden ist. Sollte der Faden beim Sticken reißen oder ausgehen, gehen Sie zum
Weitersticken mindestens 10 Stiche zurück.
Zum Auflösen der wasserlöslichen Stickfolie schneiden Sie nicht benötigte Teile der •
Folie ab und waschen Sie die Stickarbeit in warmem Wasser aus, bis sie sich nicht
mehr schlüpfrig anfühlt. Lassen Sie das Motiv nach dem letzten Waschvorgang
trocknen, bis es nur noch leicht feucht ist, formen Sie es von Hand, legen Sie es
zwischen zwei Tuchstücke und pressen Sie es mit einem Bügeleisen, um die Form zu
fixieren.
Vous pouvez réaliser un gabarit 3D pour un motif avec la marque
en brodant sur une feuille de broderie soluble dans l’eau et en la
dissolvant avec de l’eau.
Remarque:
Utilisez la même couleur de fil dans la bobine et sur le dessus pour les motifs.•
Nous recommandons d’utiliser des feuilles de renfort de broderie soluble •
DISPONIBLES EN OPTION.
Superposez trois feuilles de renfort de broderie soluble.•
Placez le motif au centre du cadre de broderie, puis brodez.•
Assurez-vous de bien vérifier que vous avez assez de fil supérieur et de fil inférieur •
pour le motif. Si le fil casse au cours de la broderie, consolidez au moins 10 points
avant de recommencer.
Lorsque vous dissolvez des feuilles de renfort de broderie soluble, coupez les parties •
inutiles et lavez le tissu brodé dans de l’eau chaude jusqu’à ce qu’il ne soit plus
glissant. Une fois bien rincé, faites sécher jusqu’à ce que la pièce soit légèrement
humide avant de lui donner sa forme à la main. Puis, placez-la entre deux morceaux
de tissu, et posez un fer à repasser dessus pour maintenir la forme.
U kunt een 3D-project maken van borduurpatronen met het symbool
door te borduren op een ‘in wateroplosbaar verstevigingsmateriaal’
en het geborduurde patroon naderhand met water uit te spoelen.
Opmerking:
Gebruik dezelfde kleur draad in de spoel en aan de bovenkant voor elk ontwerp.•
We adviseren om gebruik te maken van ‘in water oplosbaar verstevigingsmateriaal’ •
(optioneel verkrijgbaar).
Gebruik drie lagen van het in water oplosbare verstevigingsmateriaal.•
Plaats het patroon in het midden van het borduurraam en borduur het geheel.•
Controleer of u voldoende boven- en onderdraad hebt voor het ontwerp. Indien de •
draad breekt tijdens het borduren, ga dan minstens 10 steken terug voordat u weer
opnieuw begint.
Verwijder onnodige delen bij het oplossen van het in water oplosbare •
verstevigingsmateriaal. Spoel het borduurwerk uit in warm water tot het niet meer glad
aanvoelt. Laat na de laatste spoelbeurt het motief drogen tot het licht vochtig is, breng
het met de hand in vorm, plaats het tussen twee stukken stof en pers het vervolgens
met een strijkijzer om de vorm te behouden.
È possibile creare un motivo 3D per un ricamo contrassegnato da
eseguendo il ricamo su un foglio per ricamo idrosolubile che verrà
successivamente sciolto con acqua.
Nota:
Per la parte superiore dei ricami usare lo stesso colore utilizzato nella spolina.•
Si consiglia di utilizzare i fogli di stabilizzatore idrosolubile opzionali.•
Utilizzare tre strati di fogli di stabilizzatore idrosolubile.•
Posizionare il ricamo al centro del telaio per ricamo ed eseguirlo.•
Ricordarsi di controllare di avere a disposizione filo superiore e inferiore a sufficienza •
per il ricamo. Se il filo si spezza durante il ricamo, tornare indietro di almeno 10 punti
prima di ricominciare.
Quando si sciolgono i fogli di stabilizzatore idrosolubile, rimuovere le parti non •
necessarie e risciacquare il ricamo in acqua calda finché smette di essere scivoloso.
Dopo il risciacquo finale, asciugare il motivo finché risulta leggermente umido,
modellarlo a mano e metterlo tra due pezzi di stoffa; in seguito, schiacciare il motivo
con un ferro da stiro per fargli mantenere la forma.
Puede hacer un motivo 3D para un patrón con la marca bordando
en una hoja de bordado soluble en agua y disolviéndolo en agua.
Nota:
Usar el mismo color del hilo en la bobina y en la parte superior para los diseños.•
Recomendamos utilizar las láminas de estabilizador soluble en agua opcionales.•
Utilice tres capas de láminas de estabilizador soluble en agua.•
Coloque el patrón en el centro del bastidor de bordado, y bórdelo.•
No se olvide de comprobar que tiene hilo superior e inferior suficiente para el diseño. •
Si el hilo se rompe durante el bordado, vuelva atrás 10 puntadas por lo menos antes
de comenzar de nuevo.
Cuando disuelva las láminas de estabilizador soluble en agua, corte las partes •
innecesarias y limpie la pieza bordada en agua caliente hasta que ya no quede
resbaladiza. Después del último enjuague, seque el ornamento hasta que esté
ligeramente húmedo, dele forma manualmente y colóquelo entre dos piezas de tela;
a continuación, presione con una plancha para ayudar a mantener la forma.
Você pode fazer um motivo 3D para um padrão com a marca ,
bordando em uma folha de bordar solúvel em água e dissolvendo-a
com água.
Nota:
Use a mesma cor de linha na bobina e em cima para os desenhos.•
Recomendamos a utilização de folhas de entretela solúveis em água opcionais.•
Use três camadas de folhas de entretela solúveis em água.•
Coloque o padrão no centro do bastidor de bordar e efetue o bordado.•
Lembre-se de verificar se há linha superior e linha inferior suficientes para o desenho. •
Se a linha se romper durante o bordado, recue pelo menos 10 pontos antes de
recomeçar.
Ao dissolver as folhas de entretela solúveis em água, corte as partes desnecessárias •
e lave a peça bordada com água morna até que não esteja mais escorregadia. Após
o enxágue final, seque o motivo até ficar ligeiramente úmido, molde-o com a mão
e coloque-o no meio de dois tecidos. Em seguida, pressione-o com um ferro para
moldá-lo.
Если рядом с рисунком стоит значок , его можно использовать
для создания 3D вышивки. Для этого вышейте рисунок на листе
водорастворимого стабилизатора и растворите его в воде.
Примечание.
Используйте нить одного цвета в шпульке и на лицевой стороне рисунка.•
Рекомендуется использовать листы водорастворимого стабилизатора •
(приобретаются отдельно).
Используйте листы водорастворимого стабилизатора, проложенные в три слоя.•
Расположите рисунок по центру пялец и вышейте его.•
Не забудьте проверить, что верхней и нижней нити достаточно для вышивания •
дизайна. Если нить порвалась во время вышивания, перед продолжением
вышивания вернитесь как минимум на 10 стежков назад.
Перед тем как растворять листы водорастворимого стабилизатора, обрежьте •
ненужные части листа. Промывайте вышивку теплой водой до тех пор, пока
она не перестанет быть скользкой на ощупь. После окончательной промывки
высушите вышивку так, чтобы она оставалась немного влажной. Затем придайте
вышивке форму рукой, положите ее между двумя слоями ткани и проутюжьте
для придания формы.
La pagina si sta caricando...
La pagina si sta caricando...
La pagina si sta caricando...
-
 1
1
-
 2
2
-
 3
3
-
 4
4
-
 5
5
-
 6
6
-
 7
7
-
 8
8
-
 9
9
-
 10
10
-
 11
11
-
 12
12
-
 13
13
-
 14
14
-
 15
15
-
 16
16


Brother Innov-is NS1750D Guida utente
- Tipo
- Guida utente
- Questo manuale è adatto anche per
in altre lingue
- English: Brother Innov-is NS1750D User guide
- français: Brother Innov-is NS1750D Mode d'emploi
- español: Brother Innov-is NS1750D Guía del usuario
- Deutsch: Brother Innov-is NS1750D Benutzerhandbuch
- Nederlands: Brother Innov-is NS1750D Gebruikershandleiding
Documenti correlati
-
Brother Innov-is XJ1 Guida utente
-
Brother Innov-is XP2 Guida utente
-
-
Brother Innov-is 4500D Guida utente
-
-
-
-
-
-