Roland CUBE STREET Manuale del proprietario
- Categoria
- Amplificatore per strumenti musicali
- Tipo
- Manuale del proprietario

Owner’s Manual
Bedienungsanleitung
Guide d’utilisation
Manuale dell'utente
Manual del usuario
Manual do proprietário
Gebruikershandleiding
Thank you, and congratulations on your choice of the Roland CUBE STREET battery-powered stereo amp.
Additionally, in order to feel assured that you have gained a good grasp of every feature provided by your new unit,
Owner’s manual should be read in its entirety.
The manual should be saved and kept on hand as a convenient reference.
Main Features
• Compact and lightweight stereo amp
This is a 5 W (2.5 W + 2.5 W) stereo amp with two newly developed high-efficiency 16 cm (6.5 inch) speakers.
• Dual power operation with batteries or AC
Dual power operation makes it easy to take this amp anywhere.
Six AA alkaline batteries allow approximately 15 hours of operation. (Battery life will depend on the conditions of use.)
• Two channel independent preamplifier
< Mic/line channel >
• The mic/line channel provides a dedicated two-band equalizer as well as delay/reverb.
• A footswitch (sold separately) can be used to turn mute or delay/reverb on and off.
< Guitar/instrument channel>
In addition to accepting input from a guitar or electronic musical instrument, this channel accommodates microphone input as well.
•Eight types of COSM amp
For use when connecting an electric guitar, a variety of famous guitar amp models, including “JC,” are provided. There’s also an “instrument
amp” that’s ideal when connecting an acoustic guitar or an electronic instrument such as a keyboard, as well as a dedicated mic amp.
• Six types of digital effects
In addition to four types of EFX (chorus, flanger, phaser, tremolo), delay and reverb are also provided.
A footswitch (sold separately) can be used as an on/off switch for EFX or delay/reverb.
•Tuner
You can tune your instrument while leaving its guitar connected.
• Stereo AUX input
A convenient mini-stereo jack for connecting your MP3 player or CD player is provided, allowing stereo playback together with the
mic/line input and guitar/instrument input.
• Headphones
A headphones jack is provided for practicing at night.
Before using this unit, carefully read the sections entitled
• IMPORTANT SAFETY INSTRUCTIONS (page 2)
• USING THE UNIT SAFELY (page 2–3)
• IMPORTANT NOTES (page 4)
COSM
(Composite Object Sound Modeling) is proprietary Roland modeling technology, which analyzes the way in which sound is
affected by elements such as electronic circuitry, structure, and materials, and combines these elements to reconstruct the desired sound.
Copyright © 2007 ROLAND CORPORATION
All rights reserved. No part of this publication may be reproduced in any form without the written permission of ROLAND
CORPORATION.
CUBE-Street_egfispd.book 1 ページ 2014年2月6日 木曜日 午前11時36分

2
IMPORTANT SAFETY INSTRUCTIONS
USING THE UNIT SAFELY
001
• Before using this unit, make sure to read the
instructions below, and the Owner’s Manual.
..........................................................................................................
002c
• Do not open (or modify in any way) the unit or its
AC adaptor.
..........................................................................................................
003
• Do not attempt to repair the unit, or replace parts
within it (except when this manual provides
specific instructions directing you to do so). Refer
all servicing to your retailer, the nearest Roland
Service Center, or an authorized Roland
distributor, as listed on the “Information” page.
..........................................................................................................
004
• Never use or store the unit in places that are:
• Subject to temperature extremes (e.g., direct
sunlight in an enclosed vehicle, near a heating
duct, on top of heat-generating equipment); or are
• Damp (e.g., baths, washrooms, on wet floors); or
are
•Humid; or are
• Exposed to rain; or are
• Dusty; or are
• Subject to high levels of vibration.
..........................................................................................................
007
• Make sure you always have the unit placed so it is
level and sure to remain stable. Never place it on
stands that could wobble, or on inclined surfaces.
..........................................................................................................
008c
• Be sure to use only the AC adaptor supplied with
the unit. Also, make sure the line voltage at the
installation matches the input voltage specified on
the AC adaptor’s body. Other AC adaptors may
use a different polarity, or be designed for
a different voltage, so their use could result in
damage, malfunction, or electric shock.
...........................................................................................................
008e
• Use only the attached power-supply cord. Also,
the supplied power cord must not be used with
any other device.
...........................................................................................................
009
• Do not excessively twist or bend the power cord,
nor place heavy objects on it. Doing so can
damage the cord, producing severed elements
and short circuits. Damaged cords are fire and shock
hazards!
...........................................................................................................
010
• This unit, either alone or in combination with an
amplifier and headphones or speakers, may be
capable of producing sound levels that could
cause permanent hearing loss. Do not operate for
a long period of time at a high volume level, or at
a level that is uncomfortable. If you experience
any hearing loss or ringing in the ears, you should
immediately stop using the unit, and consult an
audiologist.
...........................................................................................................
IMPORTANT: THE WIRES IN THIS MAINS LEAD ARE COLOURED IN ACCORDANCE WITH THE FOLLOWING CODE.
BLUE:
BROWN:
As the colours of the wires in the mains lead of this apparatus may not correspond with the coloured markings identifying
the terminals in your plug, proceed as follows:
The wire which is coloured BLUE must be connected to the terminal which is marked with the letter N or coloured BLACK.
The wire which is coloured BROWN must be connected to the terminal which is marked with the letter L or coloured RED.
Under no circumstances must either of the above wires be connected to the earth terminal of a three pin plug.
NEUTRAL
LIVE
For the U.K.
Used for instructions intended to alert
the user to the risk of injury or material
damage should the unit be used
improperly.
* Material damage refers to damage or
other adverse effects caused with
respect to the home and all its
furnishings, as well to domestic
animals or pets.
Used for instructions intended to alert
the user to the risk of death or severe
injury should the unit be used
improperly.
The ● symbol alerts the user to things that must be
carried out. The specific thing that must be done is
indicated by the design contained within the circle. In
the case of the symbol at left, it means that the power-
cord plug must be unplugged from the outlet.
The symbol alerts the user to important instructions
or warnings.The specific meaning of the symbol is
determined by the design contained within the
triangle. In the case of the symbol at left, it is used for
general cautions, warnings, or alerts to danger.
The symbol alerts the user to items that must never
be carried out (are forbidden). The specific thing that
must not be done is indicated by the design contained
within the circle. In the case of the symbol at left, it
means that the unit must never be disassembled.
CUBE-Street_egfispd.book 2 ページ 2014年2月6日 木曜日 午前11時36分

3
011
• Do not allow any objects (e.g., flammable material,
coins, pins); or liquids of any kind (water, soft
drinks, etc.) to penetrate the unit.
..........................................................................................................
012b
• Immediately turn the power off, remove the AC
adaptor from the outlet, and request servicing by
your retailer, the nearest Roland Service Center,
or an authorized Roland distributor, as listed on
the “Information” page when:
• The AC adaptor, the power-supply cord, or the
plug has been damaged; or
• If smoke or unusual odor occurs
• Objects have fallen into, or liquid has been spilled
onto the unit; or
• The unit has been exposed to rain (or otherwise
has become wet); or
• The unit does not appear to operate normally or
exhibits a marked change in performance.
..........................................................................................................
013
• In households with small children, an adult
should provide supervision until the child is
capable of following all the rules essential for the
safe operation of the unit.
..........................................................................................................
014
• Protect the unit from strong impact.
(Do not drop it!)
..........................................................................................................
015
• Do not force the unit’s power-supply cord to
share an outlet with an unreasonable number of
other devices. Be especially careful when using
extension cords—the total power used by all
devices you have connected to the extension
cord’s outlet must never exceed the power rating
(watts/amperes) for the extension cord. Excessive
loads can cause the insulation on the cord to heat
up and eventually melt through.
..........................................................................................................
016
• Before using the unit in a foreign country, consult
with your retailer, the nearest Roland Service
Center, or an authorized Roland distributor, as
listed on the “Information” page.
..........................................................................................................
019
• Batteries must never be recharged, heated, taken
apart, or thrown into fire or water.
..........................................................................................................
101b
• The unit and the AC adaptor should be located so
their location or position does not interfere with
their proper ventilation.
..........................................................................................................
102c
• Always grasp only the plug on the AC adaptor
cord when plugging into, or unplugging from, an
outlet or this unit.
..........................................................................................................
103b
• At regular intervals, you should unplug the AC
adaptor and clean it by using a dry cloth to wipe
all dust and other accumulations away from its
prongs. Also, disconnect the power plug from the
power outlet whenever the unit is to remain
unused for an extended period of time. Any
accumulation of dust between the power plug and
the power outlet can result in poor insulation and
lead to fire.
..........................................................................................................
104
• Try to prevent cords and cables from becoming
entangled. Also, all cords and cables should be
placed so they are out of the reach of children.
...........................................................................................................
106
• Never climb on top of, nor place heavy objects on
the unit.
...........................................................................................................
107c
• Never handle the AC adaptor or its plugs with
wet hands when plugging into, or unplugging
from, an outlet or this unit.
...........................................................................................................
108b
• Before moving the unit, disconnect the AC adaptor
and all cords coming from external devices.
...........................................................................................................
109b
• Before cleaning the unit, turn off the power and
unplug the AC adaptor from the outlet (p. 10).
...........................................................................................................
110b
• Whenever you suspect the possibility of lightning in
your area, disconnect the AC adaptor from the outlet.
...........................................................................................................
111: Selection
• If used improperly, batteries may explode or leak
and cause damage or injury. In the interest of
safety, please read and observe the following
precautions (p. 9).
1
• Carefully follow the installation instructions for
batteries, and make sure you observe the correct
polarity.
2
• Avoid using new batteries together with used
ones. In addition, avoid mixing different types of
batteries.
3
• Remove the batteries whenever the unit is to
remain unused for an extended period of time.
5
• If a battery has leaked, use a soft piece of cloth or
paper towel to wipe all remnants of the discharge
from the battery compartment. Then install new
batteries. To avoid inflammation of the skin,
make sure that none of the battery discharge gets
onto your hands or skin. Exercise the utmost
caution so that none of the discharge gets near
your eyes. Immediately rinse the affected area
with running water if any of the discharge has
entered the eyes.
6
• Never keep batteries together with metallic
objects such as ballpoint pens, necklaces,
hairpins, etc.
...........................................................................................................
112
•
Used batteries must be disposed of in compliance
with whatever regulations for their safe disposal that
may be observed in the region in which you live.
...........................................................................................................
118a
• Should you remove screws, keep them in a safe
place out of children’s reach, so there is no chance
of them being swallowed accidentally.
...........................................................................................................
121
• Do not remove the speaker grille and speaker by
any means. Speaker not user replaceable. Shock
hazardous voltages and currents are present
inside the enclosure.
...........................................................................................................
CUBE-Street_egfispd.book 3 ページ 2014年2月6日 木曜日 午前11時36分

4
IMPORTANT NOTES
291a
In addition to the items listed under “USING THE UNIT SAFELY” on page 2, please read and observe the following:
Power Supply: Use of Batteries
301
• Do not connect this unit to same electrical outlet that is
being used by an electrical appliance that is controlled by
an inverter (such as a refrigerator, washing machine,
microwave oven, or air conditioner), or that contains
a motor. Depending on the way in which the electrical
appliance is used, power supply noise may cause this unit
to malfunction or may produce audible noise. If it is not
practical to use a separate electrical outlet, connect
a power supply noise filter between this unit and the
electrical outlet.
302
• The AC adaptor will begin to generate heat after long
hours of consecutive use. This is normal, and is not
a cause for concern.
303a
• The use of an AC adaptor is recommended as the unit’s
power consumption is relatively high. Should you prefer
to use batteries, please use the alkaline type.
304a
• When installing or replacing batteries, always turn off the
power on this unit and disconnect any other devices you
may have connected. This way, you can prevent
malfunction and/or damage to speakers or other devices.
307
• Before connecting this unit to other devices, turn off the
power to all units. This will help prevent malfunctions
and/or damage to speakers or other devices.
Placement
351
• Using the unit near power amplifiers (or other equipment
containing large power transformers) may induce hum.
To alleviate the problem, change the orientation of this
unit; or move it farther away from the source of inter-
ference.
352a
• This device may interfere with radio and television
reception. Do not use this device in the vicinity of such
receivers.
352b
• Noise may be produced if wireless communications
devices, such as cell phones, are operated in the vicinity of
this unit. Such noise could occur when receiving or initi-
ating a call, or while conversing. Should you experience
such problems, you should relocate such wireless devices
so they are at a greater distance from this unit, or switch
them off.
354b
• Do not expose the unit to direct sunlight, place it near
devices that radiate heat, leave it inside an enclosed
vehicle, or otherwise subject it to temperature extremes.
Also, do not allow lighting devices that normally are used
while their light source is very close to the unit (such as
a piano light), or powerful spotlights to shine upon the
same area of the unit for extended periods of time.
Excessive heat can deform or discolor the unit.
355b
• When moved from one location to another where the
temperature and/or humidity is very different, water
droplets (condensation) may form inside the unit. Damage
or malfunction may result if you attempt to use the unit in
this condition. Therefore, before using the unit, you must
allow it to stand for several hours, until the condensation
has completely evaporated.
356
• Do not allow rubber, vinyl, or similar materials to remain
on the unit for long periods of time. Such objects can
discolor or otherwise harmfully affect the finish.
359
• Do not paste stickers, decals, or the like to this instrument.
Peeling such matter off the instrument may damage the
exterior finish.
360
• Depending on the material and temperature of the surface
on which you place the unit, its rubber feet may discolor
or mar the surface.
You can place a piece of felt or cloth under the rubber feet
to prevent this from happening. If you do so, please make
sure that the unit will not slip or move accidentally.
Maintenance
401a
• For everyday cleaning wipe the unit with a soft, dry cloth
or one that has been slightly dampened with water.
To remove stubborn dirt, use a cloth impregnated with
a mild, non-abrasive detergent. Afterwards, be sure to
wipe the unit thoroughly with a soft, dry cloth.
402
• Never use benzine, thinners, alcohol or solvents of any
kind, to avoid the possibility of discoloration and/or
deformation.
Additional Precautions
553
• Use a reasonable amount of care when using the unit’s
buttons, sliders, or other controls; and when using its jacks
and connectors. Rough handling can lead to malfunctions.
556
• When connecting / disconnecting all cables, grasp the
connector itself—never pull on the cable. This way you
will avoid causing shorts, or damage to the cable’s internal
elements.
558a
• To avoid disturbing your neighbors, try to keep the unit’s
volume at reasonable levels. You may prefer to use
headphones, so you do not need to be concerned about
those around you (especially when it is late at night).
559a
• When you need to transport the unit, package it in the box
(including padding) that it came in, if possible. Otherwise,
you will need to use equivalent packaging materials.
562
• Some connection cables contain resistors. Do not use
cables that incorporate resistors for connecting to this unit.
The use of such cables can cause the sound level to be
extremely low, or impossible to hear. For information on
cable specifications, contact the manufacturer of the cable.
928
* When turning the unit upside-down, get a bunch of newspapers
or magazines, and place them under the four corners or at both
ends to prevent damage to the buttons and controls. Also, you
should try to orient the unit so no buttons or controls get
damaged.
929
* When turning the unit upside-down, handle with care to avoid
dropping it, or allowing it to fall or tip over.
CUBE-Street_egfispd.book 4 ページ 2014年2月6日 木曜日 午前11時36分

5
Contents
IMPORTANT SAFETY INSTRUCTIONS....................2
USING THE UNIT SAFELY........................................2
IMPORTANT NOTES .................................................4
Contents.....................................................................5
English
Panel descriptions..........................................6
Control Panel.................................................6
Connecting the AC adaptor...........................9
A Note About Batteries.................................9
TUNING........................................................9
Connections ..................................................10
Switching the Power On and Off ................10
Deutsch
Beschreibungen zum Bedienfeld ................11
Bedienfeld ...................................................11
Anschließen des Netzadapters.....................14
Hinweise zu Batterien .................................14
TUNING (Stimmgerätfunktion)..................14
Anschlüsse....................................................15
Ein- und Ausschalten ..................................15
Français
Description du panneau...............................16
Panneau de commande................................16
Connexion de l’adaptateur secteur..............19
Remarque concernant les piles....................19
RÉGLAGE ..................................................19
Connexions ...................................................20
Mise sous/hors tension ................................20
Italiano
Descrizioni del pannello...............................21
Pannello di controllo ...................................21
Collegamento dell'adattatore CA ................24
Nota sulle batterie........................................24
ACCORDATURA ......................................24
Collegamenti .................................................25
Accensione e spegnimento..........................25
Español
Descripciones de los paneles..................... 26
Panel de control...........................................26
Conectar el adaptador de CA.......................29
Nota sobre las pilas......................................29
AFINACIÓN...............................................29
Conexiones................................................... 30
Apagar y encender el aparato......................30
Português
Descrições do painel................................... 31
Painel de controle........................................31
Conectando o adaptador CA........................34
Observação sobre as pilhas..........................34
AFINAÇÃO ................................................34
Conexões...................................................... 35
Ligando e desligando a energia...................35
Nederlands
Paneelbeschrijvingen.................................. 36
Voorpaneel ..................................................36
De netstroomadapter aansluiten ..................39
Opmerking over batterijen...........................39
STEMMEN .................................................39
Aansluitingen ............................................... 40
De voeding in- en uitschakelen...................40
BLOCK DIAGRAM .................................................. 41
MAIN SPECIFICATIONS......................................... 41
CUBE-Street_egfispd.book 5 ページ 2014年2月6日 木曜日 午前11時36分

6
Panel descriptions
Control Panel
fig.01-01
1. INPUT Connector
Connect your mic or line instrument (e.g., acoustic guitar
or keyboard) here.
fig.XLR/TRSJack.eps
2. SELECT Switch
Push this to choose the input level that's appropriate for
the device you've connected (mic/line). When this is in
the Line position, you’ll be able to use an acoustic guitar
or keyboard.
3. VOLUME Knob
Adjusts channel volume.
4. BASS Knob
Adjusts the tone quality of the lower range.
5. TREBLE Knob
Adjusts the tone quality of the upper range.
6. DELAY/REVERB Knob
Turn this knob to DELAY or REVERB to switch to that
effect.Turn the knob to adjust the amount of effect applied.
* Graduations for DELAY, REVERB on a panel are for reference.
Be sure to check the sound as you adjust the effects.
DELAY
Turn the knob to change the time and
amount of delay effects.
REVERB
Spacious-sounding stereo reverb is
provided. Turn the knob to adjust the
reverb level.
7. INPUT Jack
Here you can connect your electric guitar, acoustic
guitar, electronic instrument such as a keyboard, or mic.
8. TUNER Switch
The switch lights in red when the tuner function is on;
the switch is unlit when the tuner is off.
For more detailed information, refer to p. 9.
9. Type Switch
You can select from the following eight types.
When the tuner function is on, you can use this to select
the name of the string to be tuned (p. 9).
INSTRUMENT
Select this if you’ve connected an acoustic guitar or an
electronic instrument such as a keyboard.
JC CLEAN
This is a model of Roland’s famous JC-120 Jazz Chorus
guitar amplifier. The ultra-clean, ultra-flat sound offers
a smooth.
This becomes more effective when used in combination
with a external effector.
BLACK PANEL
This is modeled on the classic Fender Twin Reverb
amplifier, used in a wide variety of musical styles, from
country to blues, jazz and rock. Exhibiting rich lows and
a bright high end.
BRIT COMBO
This is modeled on the Vox AC-30TB, the rock amplifier
that created the Liverpool sound of the ’60s. It can
produce a broad range of sounds, from clean to
overdrive, with increased distortion and greater power in
the low-midrange when the amplifier’s gain is boosted.
CLASSIC STACK
This is modeled on the sound and response of a Marshall
JMP1987. The legendary JMP1987 is renowned for its
smooth tone and presence-perfect for classic and hard rock.
MIC/LINE CHANNEL
EQUALIZER
DELAY/REVERB
GUITAR/INSTRUMENT CHANNEL
CUBE-Street_egfispd.book 6 ページ 2014年2月6日 木曜日 午前11時36分

Español Italiano Français Deutsch EnglishPortuguêsNederlands
7
Panel descriptions
R-FIER STACK
This is modeled on the MESA/Boogie Rectifier. This
super high gain amp is capable of producing slash metal,
grunge, and a wide range of other lead sounds.
ACOUSTIC SIM
By combining acoustic guitar simulation with COSM
amplifier modeling technology, this original amplifier
model gives you a dynamic acoustic guitar sound using
a standard electric guitar.
MIC
Select this position when microphone is connected.
* Howling could be produced depending on the location of
microphones relative to speakers. This can be remedied by:
1. Changing the orientation of the microphone(s).
2.
Relocating microphone(s) at a greater distance from speakers.
3. Lowering volume levels.
* All product names mentioned in this document are trademarks
or registered trademarks of their respective owners, and are not
related to Roland Corporation. In this manual, these names are
used as appropriate ways to indicate sounds that are simulated
using COSM technology.
10
.GAIN Knob
Adjusts distortion level.
11
.VOLUME Knob
Adjusts channel volume.
12
.BASS Knob
Adjusts the tone quality of the lower range.
13
.MIDDLE Knob
Adjusts the tone quality of the midrange.
14
.TREBLE Knob
Adjusts the tone quality of the upper range.
* Because COSM faithfully models the special features and
characteristics of a variety of amplifiers; no sound will be
produced when BASS, MIDDLE, and TREBLE knob are all set
to 0 while the Type switch is set to BLACK PANEL.
15
.EFX (Effects) Knob
Turn this knob to chorus, flanger, phaser, or tremolo to select
the corresponding effect. Turn the knob to adjust the amount of
effect applied. You can also turn EFX on and off using optional
footswitches (BOSS FS-5U or FS-6).
* Graduations for CHORUS, FLANGER, PHASER, TREMOLO
on a panel are for reference. Be sure to check the sound as you
adjust the effects.
CHORUS
This is a spacially synthesized
chorus. With spacially synthesized
chorus, a method available only in
stereo, the chorus effect is created
by taking the sound from the right
speaker (from which the effect sound is output), and the
sound from the left speaker (which outputs the direct
sound), and then mixing them in the actual space. This
creates a greater lateral spread than that produced when
the sounds are mixed electronically, providing a more
natural sense of breadth.
FLANGER
This creates a flanging effect that
creates a sort of spinning sensation
with the sound.
PHASER
This effect adds a variable
phaseshifted signal to the direct
sound, giving the sound a swirling
character.
TREMOLO
Tremolo is an effect that creates
a cyclic change in volume.
16
.DELAY/REVERB Knob
Turn this knob to DELAY or REVERB to switch to that
effect.Turn the knob to adjust the amount of effect applied.
DELAY
Turn the knob to change the time and
amount of delay effects.
REVERB
Spacious-sounding stereo reverb is
provided. Turn the knob to adjust the
reverb level.
17.
Power Indicator
This indicator lights when the unit is turned on.
* When operating on battery power only, the unit’s indicator will
become dim during play when battery power gets too low.
* Sounds may distort easily or may cut off when played at high
volume as the battery power begins to fade, but this is normal
and does not indicate a malfunction. In such instances, either
replace the batteries or use the AC adaptor included with the
unit.
EQUALIZER
EFX (Effects)
DELAY/REVERB
CUBE-Street_egfispd.book 7 ページ 2014年2月6日 木曜日 午前11時36分

8
Panel descriptions
18.
POWER Switch
This switches the power on and off.
* This unit is equipped with a protection circuit. A brief interval
(a few seconds) after power up is required before the unit will
operate normally.
* If you need to turn off the power completely, first turn off the
POWER switch, then unplug the power cord from the power
outlet. Refer to “Power Supply: Use of Batteries” (p. 4).
19.
AUX IN Jack
You can connect a CD player, MP3 player or other kind of
device and have it play along with your guitar or other kind
of devices. This accepts a stereo miniature phone plug.
* Determine the volume level by adjusting the volume control of
the connected device.
20.
STEREO PHONES Jack
Connect headphones to this jack.
* No sound is played through the unit’s
speaker while the STEREO PHONES
jack is in use.
If you use a PCS-31 connection cable,
you’ll also be able to use this as a stereo
recording output.
* If you're using a monaural cable, the
effect might be difficult to discern.
fig.01-01
21.
FOOT SW (Footswitch) Jack
A footswitch (BOSS FS-5U or FS-6; sold separately)
connected here can be used to switch on/off MUTE and
DELAY/REVERB for the MIC/LINE CH, and EFX and
DELAY/REVERB for the GUITAR/INST CH.
* If you use a monaural cable to connect just one footswitch, you’ll
only be able to control MUTE for the MIC/LINE CH, and EFX
for the GUITAR/INST CH.
22.
Security Slot ( )
http://www.kensington.com/
23.
AC Adaptor Jack
Connect the included AC adopter to this jack.
* Use only the AC adaptor included with the CUBE STREET.
24.
Grounding terminal
Depending on the circumstances of a particular setup,
you may experience a discomforting sensation, or
perceive that the surface feels gritty to the touch when
you touch this device, microphones connected to it, or
the metal portions of other objects, such as guitars. This
is due to an infinitesimal electrical charge, which is
absolutely harmless. However, if you are concerned
about this, connect the ground terminal with an external
ground. When the unit is grounded, a slight hum may
occur, depending on the particulars of your installation.
If you are unsure of the connection method, contact the
nearest Roland Service Center, or an authorized Roland
distributor, as listed on the “Information” page.
Unsuitable places for connection
• Water pipes (may result in shock or electrocution)
• Gas pipes (may result in fire or explosion)
• Telephone-line ground or lightning rod (may be
dangerous in the event of lightning)
25.
Cord Hook
Hook the AC adaptor cord here (p. 9).
TIP:L
RING:R
white(L)
red(R)
PCS-31
white
EFX
DELAY/REVERB
red
PCS-31
Polarity Switch
white
MUTE
DELAY/REVERB
red
PCS-31
CUBE-Street_egfispd.book 8 ページ 2014年2月6日 木曜日 午前11時36分

Español Italiano Français Deutsch EnglishPortuguêsNederlands
9
Panel descriptions
Connecting the AC adaptor
Use only the AC adaptor included with the CUBE STREET.
Use of other AC adaptors may damage the amp or result in
other problems.
To prevent the inadvertent
disruption of power to your
unit (should the plug be
pulled out accidentally), and
to avoid applying undue
stress to the AC adaptor jack,
anchor the power cord using
the cord hook, as shown in
the illustration.
Place the AC adaptor so the side with the indicator (see
illustration) faces upwards and the side with textual
information faces downwards. The indicator will light when
you plug the AC adaptor into an AC outlet.
A Note About Batteries
In addition to the AC adaptor, the CUBE STREET can also be
powered with six AA batteries (optional). Insert the batteries
as shown in the figure, making sure that the batteries are
oriented correctly.
If there are batteries in the unit while an AC adaptor is being
used, normal operation will continue should the line voltage
be interrupted (power blackout or power cord disconnection).
* When installing or replacing batteries, always turn off the power
on this unit and disconnect any other devices you may have
connected. This way, you can prevent malfunction and/or
damage to speakers or other devices.
* Expected battery life under continuous use:
Alkaline: approx. 15 hours
This figure will vary depending on the actual conditions of use.
TUNING
You can use “manual tuning,” whereby you switch to each
individual string to tune it separately, and “chromatic
tuning,” which automatically determines the closest pitch to
that played by the string.
Tuning in “Manual Mode”
1. Press the TUNER switch.
2. Use the Type switch to select the name of the string you
want to tune, then play a single note on the open string.
* The sound of the guitar/instrument channel will not be heard
from the unit's speakers while you're using the tuner function.
* Reference Pitch: A4=440 Hz
3. Tune the string until the green indicator lights.
<The Pitch is flat>
<The Pitch is flat, but almost in tune>
* When the pitch is even lower, the indicator flashes.
<
The Pitch is correct>
<The Pitch is sharp, but almost in tune>
<The Pitch is sharp>
*
When the pitch is even
higher, the indicator flashes.
Tuning in “Chromatic Mode”
1. Hold down the TUNER switch for at least one second
so that the red indicator flashes.
2. Play a single note on the open string you want to tune.
3. Tune the string until the green indicator lights.
Indicator
AC Outlet
AC adaptor Power Cord
Type Switch
Position
String Name
6E Open sixth string
5A Open fifth string
4D Open fourth string
3G Open third string
2B Open second string
1E Open first string
A
b
Open fifth string (half step (semitone) down)
A
b
b
Open fifth string (whole step (whole tone) down)
CUBE-Street_egfispd.book 9 ページ 2014年2月6日 木曜日 午前11時36分

10
Connections
Refer to the figure shown below to connect the CUBE STREET to other equipment.
fig.01-02
Switching the Power On and Off
Once the connections have been completed, turn on power to
your various devices in the order specified. By turning on
devices in the wrong order, you risk causing malfunction
and/or damage to speakers and other devices.
1. Make sure that all volume controls on the
CUBE STREET and connected devices are set to 0.
2. Turn on all the devices connected to the CUBE STREET ’s
input jacks (INPUT jack and AUX IN jack).
3. Turn on the CUBE STREET.
4. Adjust the volume levels for the devices.
5.
Before switching off the power, lower the volume on each of the
devices in your system and then TURN OFF the devices in the
reverse order to which they were switched on.
* This instrument is equipped with balanced XLR/TRS type jacks
for microphoes. Wiring diagrams for these jacks are shown
below. Make connections after first checking the wiring
diagrams of other equipment you intend to connect.
fig.XLR/TRSJack.eps
* If there are batteries in the unit while an AC adaptor is being
used, normal operation will continue should the line voltage be
interrupted (power blackout or power cord disconnection).
* When operating on battery power only, the unit’s indicator will
become dim when battery power gets too low. Replace the battery
as soon as possible.
* Howling could be produced depending on the location of
microphones relative to speakers. This can be remedied by:
1. Changing the orientation of the microphone(s).
2. Relocating microphone(s) at a greater distance from
speakers.
3. Lowering volume levels.
* This unit is equipped with a protection circuit. A brief interval
(a few seconds) after power up is required before the unit will
operate normally. For protection from sudden big sound,
always make sure to have the volume level turned down before
switching on power. Even with the volume all the way down,
you may still hear some sound when the power is switched on
and off, but this is normal, and does not indicate a malfunction.
* If you need to turn off the power completely, first turn off the
POWER switch, then unplug the power cord from the power
outlet. Refer to “Power Supply: Use of Batteries” (p. 4).
* To prevent malfunction and/or damage to speakers or other
devices, always turn down the volume, and turn off the power on
all devices before making any connections.
* Before making the connections, be sure that the volume setting of
the
VOLUME
knob for both amplifiers is set to “0.”
* When connection cables with resistors are used, the volume level
of equipment connected to the inputs may be low. If this
happens, use connection cables that do not contain resistors,
such as those from the Roland PCS series.
PCS-31
FS-5UFS-6 FS-5U
CD/MP3
player
Electric
Guitar
FS-5U
Footswitches
EFX EFX EFX
DLY/REV DLY/REV
white
red
FS-5UFS-6 FS-5U
PCS-31
FS-5U
Footswitches
MUTE
MUTE MUTE
DLY/REV DLY/REV
white
red
Headphone
Mic
Keyboard
Acoustic Guitar
Mic
Keyboard
Acoustic Guitar
Polarity
Switch
If using a FS-6 switch, set the MODE and
POLARITY switches as shown below.
BA
Stereo 1/4” phone
plugs at both ends
Stereo 1/4”
phone plugs
at both ends
CUBE-Street_egfispd.book 10 ページ 2014年2月6日 木曜日 午前11時36分

11
Español Italiano FrançaisPortuguêsNederlands Deutsch English
Beschreibungen zum Bedienfeld
Bedienfeld
Abb. 01-01
1. Buchse INPUT
Schließen Sie Ihr Mikrofon oder Ihr Instrument
(z. B. akustische Gitarre oder Keyboard) hier an.
fig.XLR/TRSJack.eps
2. Schalter SELECT (Auswahl)
Betätigen Sie diesen Schalter, um den für das
angeschlossene Gerät zu erwartenden Eingangspegel
einzustellen (Mikrofon- oder Leitungspegel). Wenn
dieser in der Stellung Line (Leitung) steht, können Sie
eine akustische Gitarre oder ein Keyboard anschließen.
3. Regler VOLUME (Lautstärke)
Stellt die Lautstärke des Kanals ein.
4. Regler BASS (Bässe)
Regelt den Pegel des unteren Frequenzbereichs.
5. Regler TREBLE (Höhen)
Regelt den Pegel des oberen Frequenzbereichs.
6. Regler DELAY/REVERB (Echo/Hall)
Bewegen Sie diesen Drehregler auf DELAY oder REVERB,
um auf diesen Effekt zu schalten. Drehen Sie am Regler,
um den Effektanteil einzustellen.
* Die Einteilungen auf dem Bedienfeld für DELAY und
REVERB dienen zum Ablesen. Hören Sie beim Einstellen der
Effekte vor Allem auf den Klang.
DELAY (Echo)
Betätigen Sie diesen Regler, um die
Verzögerungszeit und den Anteil des
Delay-Effekts einzustellen.
REVERB (Hall)
Es ist ein räumlich klingender
Stereohall vorgesehen. Drehen Sie den
Regler, um den Hallanteil einzustellen.
7. Buchse INPUT
Hier können Sie Ihre E-Gitarre, akustische Gitarre, Ihr
elektronisches Instrument (z. B. ein Keyboard) oder ein
Mikrofon anschließen.
8. Schalter TUNER (Stimmgerät)
Der Schalter leuchtet rot bei eingeschalteter Stimmgerät-
Funktion; der Schalter erlischt, wenn das Stimmgerät
ausgeschaltet ist. Für nähere Informationen lesen Sie
bitte weiter auf S. 14.
9. Typ-Schalter
Sie können aus folgenden acht Verstärkertypen
auswählen. Wenn die Stimmgerätfunktion eingeschaltet
ist, können Sie hier die Bezeichnung der zu stimmenden
Saite auswählen (S. 14).
INSTRUMENT
Wählen Sie dies, wenn Sie eine akustische Gitarre oder
ein elektronisches Instrument wie ein Keyboard
angeschlossen haben.
JC CLEAN
Dies ist ein Modell des berühmten Gitarrenverstärkers
Jazz Chorus JC-120 von Roland. Der ultra-cleane,
ebenmäßige Sound bietet einen weichen Klang.
Dies wird um so deutlicher, wenn er in Kombination mit
einem externen Effektgerät eingesetzt wird.
BLACK PANEL
Dies ist ein Modell des klassischen Verstärkers Fender
Twin Reverb, der in vielen verschiedenen Musikstilrich-
tungen verwendet wird, von Country und Blues bis Jazz
und Rock. Er bietet voll klingende Bässe und klare Höhen.
BRIT COMBO
Dies ist ein Modell eines Vox AC-30TB, dem Rockmusik-
Amp, der den Liverpool-Sound der 60er mitgestaltet hat.
Er kann viele verschiedene Sounds hervorbringen, von
Clean bis Overdrive, bei stärkerer Verzerrung und
höherer Leistung in den unteren Mitten, wenn der Gain
des Verstärkers höher eingestellt wird.
CLASSIC STACK
Dies ist ein Modell auf Grundlage des Sounds und des
Verhaltens eines Marshall JMP1987. Der legendäre
JMP1987 ist bekannt für seinen weichen Klang und seine
Präsenz – perfekt für klassische Rockmusik und Hardrock.
MIC/LINE CHANNEL
EQUALIZER (Klangregelung)
DELAY/REVERB (Echo/Hall)
SPITZE
RING
MANTEL
HEISS
HEISS
KALT
ERDE
KALT
ERDE
GUITAR/INSTRUMENT CHANNEL
CUBE-Street_egfispd.book 11 ページ 2014年2月6日 木曜日 午前11時36分

12
Beschreibungen zum Bedienfeld
R-FIER STACK
Dies ist ein Modell des MESA/Boogie Rectifier. Dieser
Amp mit äußerst hohem Gain kann Slash-Metal-,
Grunge- und viele andere Lead-Sounds erzeugen.
ACOUSTIC SIM
Durch Kombination einer Simulation einer akustischen
Gitarre mit der COSM-Amp-Modeling-Technologie
erhalten Sie mit diesem Verstärkermodell beim Spiel auf
einer normalen E-Gitarre den dynamischen Sound einer
Akustikgitarre.
MIC
Wählen Sie diese Stellung, wenn ein Mikrofon
angeschlossen wurde.
* Je nach dem Aufstellort von Mikrofonen im Verhältnis zu den
Lautsprechern können Rückkopplungen entstehen. Dies lässt sich
lösen durch:
1. Ändern der Ausrichtung des Mikrofons bzw. der Mikrofone.
2.
Aufstellung des Mikrofons bzw. der Mikrofone weiter weg von
den Lautsprechern.
3. Verringern der Lautstärke(n).
* Alle in diesem Dokument erwähnten Produktbezeichnungen sind
Warenzeichen oder eingetragene Warenzeichen der jeweiligen
Eigentümer und haben nichts mit der Roland Corporation zu tun.
In dieser Anleitung werden diese Bezeichnungen in einer Weise
verwendet, die geeignet ist, die mit der COSM-Technologie
simulierten Sounds zu beschreiben.
10
.Regler GAIN (Verstärkung)
Stellt den Anteil der Verzerrung ein.
11
.Regler VOLUME (Lautstärke)
Stellt die Lautstärke des Kanals ein.
12
.Regler BASS (Bässe)
Regelt den Pegel des unteren Frequenzbereichs.
13
.Regler MIDDLE (Mitten)
Regelt den Pegel des mittleren Frequenzbereichs.
14
.Regler TREBLE (Höhen)
Regelt den Pegel des oberen Frequenzbereichs.
* Da COSM die besonderen Funktionen und Eigenschaften vieler
verschiedener Verstärker simuliert, wird kein Sound
ausgegeben, wenn die Regler BASS, MIDDLE und TREBLE
alle auf 0 eingestellt ist, während der Typ-Schalter auf BLACK
PANEL steht.
15
.Regler EFX (Effekte)
Drehen Sie diesen Regler auf Chorus, Flanger, Phaser oder
Tremolo, um den entsprechenden Effekt auszuwählen. Drehen
Sie den Regler, um den Effektanteil einzustellen. Sie können
EFX auch mit optional erhältlichen Fußschaltern (BOSS FS-5U
oder FS-6) ein- und ausschalten.
* Die Einteilungen auf dem Bedienfeld für CHORUS,
FLANGER, PHASER und TREMOLO dienen zum Ablesen.
Hören Sie beim Einstellen der Effekte vor Allem auf den Klang.
CHORUS
Dies ist ein räumlich synthetisierter
Chorus-Effekt. Beim räumlich
synthetisierten Chorus-Effekt, einer
nur in Stereo verfügbaren
Methode, wird der Chorus-Effekt
erzeugt, indem der Klang vom
rechten Lautsprecher (von dem der Effektklang
ausgegeben wird) und der Klang vom linken
Lautsprecher (der den direkten Klang ausgibt) im
tatsächlichen Raum gemischt werden. Dadurch entsteht
eine größere seitliche Streuung, als wenn die Klänge
elektronisch gemischt werden, was einen natürlicheren
Eindruck von Breite hervorruft.
FLANGER
Dies erzeugt den Flanging-Effekt,
der den Eindruck eines sich
drehenden Klangs bewirkt.
PHASER
Dieser Effekt fügt dem direkten
Klang ein variabel
phasenverschobenes Signal hinzu,
wodurch der Sound einen
wirbelnden Charakter erhält.
TREMOLO
Tremolo ist ein Effekt, der eine
wiederkehrende, zyklische
Lautstärkeänderung erzeugt.
16
.Regler REVERB/DELAY (Hall/Echo)
Bewegen Sie diesen Drehregler auf DELAY oder REVERB,
um auf diesen Effekt zu schalten. Drehen Sie am Regler,
um den Effektanteil einzustellen.
DELAY
Betätigen Sie diesen Regler, um die
Verzögerungszeit und den Anteil des
Delay-Effekts einzustellen.
REVERB
Es ist ein räumlich klingender
Stereohall vorgesehen. Drehen Sie den
Regler, um den Hallanteil einzustellen.
17.
Netzanzeige
Diese Anzeige leuchtet, wenn das Gerät eingeschaltet ist.
* Bei ausschließlichem Batteriebetrieb wird die Anzeige zunehmend
dunkler, sobald die Batteriespannung zu sehr absinkt.
* Die Sounds verzerren früher oder werden abgeschnitten, wenn
Sie bei abnehmender Batteriespannung mit hoher Lautstärke
spielen, dies ist jedoch normal und nicht als Fehlfunktion
zu werten. Ersetzen Sie in diesen Fällen die Batterien, oder
verwenden Sie den mitgelieferten Netzadapter.
EQUALIZER
EFX (Effekte)
DELAY/REVERB
CUBE-Street_egfispd.book 12 ページ 2014年2月6日 木曜日 午前11時36分

Español Italiano Français DeutschPortuguêsNederlands
13
English
Beschreibungen zum Bedienfeld
18.
Netzschalter POWER
Dieser schaltet das Gerät ein und aus.
* Dieses Gerät ist mit einer Schutzschaltung versehen. Es entsteht
eine kurze Pause (einige Sekunden) nach dem Einschalten, bevor
das Gerät in den normalen Betrieb schaltet.
* Wenn Sie die Stromversorgung vollständig unterbrechen
müssen, schalten Sie erst den POWER-Schalter aus und ziehen
Sie dann das Netzkabel aus der Steckdose. Siehe “Power Supply:
Use of Batteries“ (S. 4).
19.
Buchse AUX IN
Sie können einen CD-/MP3-Player oder andere Audiogeräte
anschließen und mit Ihrer Gitarre oder anderen Instrumenten dazu
spielen. Die Buchse nimmt einen Stereo-Miniklinkenstecker auf.
* Stellen Sie die Lautstärke am Lautstärkeregler des
angeschlossenen Audiogerätes ein.
20.
Buchse STEREO PHONES
Schließen Sie an dieser Buchse Kopfhörer an.
* Es erfolgt keine Tonausgabe aus dem
Lautsprecher des Gerätes, so lange die
Buchse STEREO PHONES belegt ist.
Wenn Sie das Anschlusskabel PCS-31
verwenden, können Sie dies auch als
Ausgangsbuchse für Stereoaufnahmen
verwenden.
* Wenn Sie ein monaurales Kabel verwenden, sind u. U. die
Effekte schlechter zu hören.
Abb. 01-01
21.
Buchse FOOT SW (Fußschalter)
Ein hier angeschlossener Fußschalter (BOSS FS-5U oder
FS-6; gesondert erhältlich) kann auch verwendet werden,
um MUTE und DELAY/REVERB für den MIC/LINE-
Kanal sowie EFX und DELAY/REVERB für den
GUITAR/INST-Kanal ein- und auszuschalten.
* Wenn Sie ein monaurales Kabel verwenden und nur einen
Fußschalter anschließen, steuern Sie hiermit MUTE für den
MIC/LINE-Kanal sowie EFX für den GUITAR/INST-Kanal.
22.
Security-Slot ( )
http://www.kensington.com/
23.
Buchse für Netzadapter
Schließen Sie hier den mitgelieferten Netzadapter an.
* Verwenden Sie ausschließlich den mit dem CUBE STREET
gelieferten Adapter.
24.
Erdungsanschluss
Je nach den Umständen von Aufstellung und Anschluss kann
es vorkommen, dass Sie beim Berühren von
Metalloberflächen dieses Gerätes oder angeschlossener
Mikrofone oder Gitarren ein leicht unangenehmes
„Stromgefühl“ wahrnehmen. Dies entsteht durch eine
infinitesimale elektrische Ladung, die absolut harmlos ist.
Wenn Sie das trotzdem beunruhigt, verbinden Sie den
Erdungsanschluss mit einer externen Masse. Wenn das Gerät
geerdet ist, kann je nach den Umständen von Aufstellung und
Anschluss ein geringes Brummen auftreten. Wenn Sie sich
bezüglich der Anschlussmethode nicht sicher sind, wenden
Sie sich an ein Roland Service Center in Ihrer Nähe, oder an
einen der autorisierten Roland-Vertriebspartner, die auf der
Seite „Information“ aufgelistet sind.
Nicht für den Anschluss geeignete Stellen
• Wasserleitungen (kann einen tödlichen elektrischen
Schlag zur Folge haben)
• Gasleitungen (kann zu Bränden oder Explosion führen)
• Masseleiter von Telefonleitungen oder Blitzableiter
(kann bei Blitzschlag eine Gefahr darstellen)
25.
Kabelklemme
Haken Sie hier das Netzkabel ein (S. 14).
SPITZE L
RING:R
weiß(L)
rot(R)
PCS-31
Weiß
EFX
DELAY/REVERB
Rot
PCS-31
Polaritätsschalter
Weiß
MUTE
DELAY/REVERB
Rot
PCS-31
CUBE-Street_egfispd.book 13 ページ 2014年2月6日 木曜日 午前11時36分

14
Beschreibungen zum Bedienfeld
Anschließen des Netzadapters
HINWEIS
Verwenden Sie ausschließlich den mit dem CUBE STREET
gelieferten Netzadapter. Die Verwendung anderer Netzadapter
kann den Verstärker beschädigen oder andere Probleme
verursachen.
Um ein versehentliches
Abtrennen der
Stromversorgung Ihres
Gerätes (durch Herausziehen
des Steckers) sowie
übermäßige Belastungen der
Netzadapter-Buchse zu
vermeiden, sichern Sie das
Netzkabel mithilfe der
Kabelklemme, wie in der
Abbildung gezeigt.
HINWEIS
Platzieren Sie den Netzadapter so, dass die Seite mit der Anzeige
(siehe Abbildung) nach oben und die mit Text bedruckte Seite
nach unten weist. Die Anzeige leuchtet, sobald Sie den
Netzadapter in eine funktionierende Netzsteckdose einstecken.
Hinweise zu Batterien
Neben dem Betrieb über Netzadapter kann der CUBE
STREET auch mit sechs Batterien der Größe AA (gesondert
erhältlich) betrieben werden. Setzen Sie die Batterien ein, wie
in der Abbildung gezeigt, und achten Sie unbedingt auf die
richtige Ausrichtung der Pole.
Wenn im Gerät Batterien eingesetzt sind, während der
Netzadapter angeschlossen ist, wird der normale Betrieb
fortgesetzt in dem Fall, dass die Stromversorgung ausfällt
(durch Stromausfall oder Abziehen des Netzkabels).
* Bevor Sie Batterien einsetzen oder austauschen, sollten Sie dieses
Gerät immer ausschalten und andere evtl. angeschlossene Geräte
abziehen. Auf diese Weise können Sie Fehlfunktion und/oder
Schäden an Lautsprechern oder anderen Geräten vermeiden.
* Die zu erwartende Batterielebensdauer im Dauerbetrieb ist:
Alkali-Batterien: etwa 15 Stunden
Dieser Wert variiert mit den tastsächlichen Einsatzbedingungen.
TUNING
(Stimmgerätfunktion)
Sie können im „manuellen“ Modus stimmen, indem Sie auf die
Note jeder einzelne Saite umschalten und diese stimmen, und im
„chromatischen“ Modus, der automatisch die nächstliegende
Tonhöhe einer angeschlagenen Saite zu erkennen versucht.
Stimmen im „manuellen“ Modus
1. Drücken Sie die TUNER-Taste.
2. Verwenden Sie den Type-Schalter, um die Bezeichnung der
Saite auszuwählen, die Sie stimmen möchten, und schlagen
Sie die entsprechende Saite offen an.
* Der Sound der Gitarren-/Instrumentenkanals wird nicht am
Lautsprecher des Gerätes ausgegeben, während Sie die Tuner-
Funktion benutzen.
* Bezugstonhöhe: A4 = 440 Hz
3. Stimmen Sie die Saite, bis die grüne Anzeige aufleuchtet.
<Die Tonhöhe ist zu niedrig>
<Die Tonhöhe ist zu niedrig, aber
fast richtig gestimmt>
* Wenn die Tonhöhe noch niedriger ist, blinkt die Anzeige.
<
Die Tonhöhe ist genau richtig>
<Die Tonhöhe ist zu hoch, aber <Die Tonhöhe ist zu hoch>
fast richtig gestimmt>
*
Wenn die Tonhöhe noch
höher ist, blinkt die Anzeige.
Stimmen im „chromatischen“ Modus
1. Halten Sie die Taste TUNER mindestens eine Sekunde
lang gedrückt, bis die rote Anzeige blinkt.
2. Spielen Sie eine einzelne Note auf der offenen Saite, die Sie
stimmen möchten.
3.
Stimmen Sie die Saite, bis die grüne Anzeige aufleuchtet.
Anzeige
Netzsteckdose
Netzadapter
Netzkabel
Type-Schal-
terstellung
Saitenbezeichnung
6E Offene sechste Saite
5A Offene fünfte Saite
4D Offene vierte Saite
3G Offene dritte Saite
2B Offene zweite Saite (H)
1E Offene erste Saite
A
b
Offene fünfte Saite (ein Halbton tiefer)
A
b
b
Offene fünfte Saite (ein Ganzton tiefer)
CUBE-Street_egfispd.book 14 ページ 2014年2月6日 木曜日 午前11時36分

15
Español Italiano FrançaisPortuguêsNederlands Deutsch English
Anschlüsse
Beachten Sie die Abbildung unten, wenn Sie den CUBE STREET mit anderen Geräten verbinden möchten.
Abb. 01-02
Ein- und Ausschalten
Sobald Sie alle Anschlüsse vorgenommen haben, schalten Sie
alle beteiligten Geräte in der angegebenen Reihenfolge ein.
Wenn Sie die Geräte in der falschen Reihenfolge einschalten,
kann es zu Fehlfunktionen und/oder Schäden an
Lautsprechern oder anderen Geräten kommen.
1. Achten Sie darauf, dass alle Lautstärkeregler am CUBE
STREET und an angeschlossenen Geräten auf
0 eingestellt sind.
2. Schalten Sie alle Geräte ein, die an den Eingangsbuchsen
des CUBE STREET angeschlossen sind (Buchsen INPUT
und AUX IN).
3. Schalten Sie den CUBE STREET ein.
4. Stellen Sie die Lautstärken der Geräte ein.
5.
Regeln Sie vor dem Ausschalten die Lautstärken aller Geräte in
Ihrem System herunter, und schalten Sie dann die Geräte in
umgekehrter Reihenfolge AUS.
* Dieses Instrument besitzt symmetrische XLR/TRS-Buchsen für
Mikrofone. Anschlussdiagramme für diese Buchsen sind unten
abgebildet. Nehmen Sie die Anschlüsse erst vor, nachdem Sie
auch die Anschlussdiagramme der anderen anzuschließenden
Geräte studiert haben.
fig.XLR/TRSJack.eps
* Wenn im Gerät Batterien eingesetzt sind, während der
Netzadapter angeschlossen ist, wird der normale Betrieb
fortgesetzt in dem Fall, dass die Stromversorgung ausfällt
(durch Stromausfall oder Abziehen des Netzkabels).
* Bei ausschließlichem Batteriebetrieb wird die Anzeige während
des Spielens zunehmend dunkler, sobald die Batteriespannung
zu sehr absinkt. Ersetzen Sie die Batterien sobald wie möglich.
*
Je nach der Aufstellung von Mikrofonen im Verhältnis zu den
Lautsprechern könnten Rückkopplungen entstehen. Dies können
Sie beheben, indem Sie:
1. Die Ausrichtung des Mikrofons/der Mikrofone ändern.
2. Das Mikrofon/die Mikrofone in größerer Entfernung von
den Lautsprechern aufstellen.
3. Die Lautstärkepegel herunterregeln.
* Dieses Gerät ist mit einer Schutzschaltung versehen. Es entsteht
eine kurze Pause (einige Sekunden) nach dem Einschalten, bevor
das Gerät in den normalen Betrieb schaltet. Zum Schutz vor
plötzlichen, lauten Impulsen achten Sie immer darauf, die
Lautstärke herunterzuregeln, bevor Sie das Gerät einschalten.
Auch bei vollständig heruntergeregelter Lautstärke hören Sie
beim Ein- und Ausschalten möglicherweise einen Klang, aber
das ist normal und stellt keine Fehlfunktion dar.
* Wenn Sie die Stromversorgung vollständig unterbrechen
müssen, schalten Sie erst den POWER-Schalter aus und ziehen
Sie dann das Netzkabel aus der Steckdose. Siehe “Power Supply:
Use of Batteries“ (S. 4).
* Um Fehlfunktion und/oder Schäden an Lautsprechern oder
anderen Geräten zu vermeiden, regeln Sie immer die Lautstärke
herunter, und schalten Sie alle beteiligten Geräte aus, bevor Sie
Verbindungen lösen oder herstellen.
* Achten Sie vor dem Anschließen darauf, dass der Regler
VOLUME
beider Verstärkerkanäle auf „0“ steht.
* Wenn Verbindungskabel mit Widerständen verwendet werden, kann
es sein, dass der Lautstärkepegel der an die Eingänge angeschlossenen
Geräte niedrig ist. Sollte dies eintreten, verwenden Sie Verbindung-
skabel, die keine Widerstände enthalten, wie die der Roland-PCS-Serie.
PCS-31
FS-5UFS-6 FS-5U
CD/MP3
-Spieler
E-Gitarre
FS-5U
Fußschalter
EFX EFX EFX
DLY/REV DLY/REV
Weiß
Rot
FS-5UFS-6 FS-5U
PCS-31
FS-5U
Fußschalter
MUTE
MUTE MUTE
DLY/REV DLY/REV
Weiß
Rot
Kopfhörer
Mikro
Keyboard
Akustische Gitarre
Mikro
Keyboard
Akustische Gitarre
Polaritäts
-
schalter
Stellen Sie bei Verwendung des Schalters FS-6 die
Schalter MODE und POLARITY ein wie unten gezeigt.
BA
6,3-mm-
Stereoklinkenstecker
an beiden Enden
6,3-mm-
Stereoklinkenstecker
an beiden Enden
SPITZE
RING
MANTEL
HEISS
HEISS
KALT
ERDE
KALT
ERDE
CUBE-Street_egfispd.book 15 ページ 2014年2月6日 木曜日 午前11時36分

16
Description du panneau
Panneau de commande
fig.01-01
1. Connecteur d’entrée
Permet de connecter votre microphone ou votre instrument
en ligne (par exemple, une guitare acoustique ou un clavier).
fig.XLR/TRSJack.eps
2. Interrupteur SELECT
Appuyez sur cet interrupteur pour sélectionner le niveau
d’entrée en fonction de l’appareil connecté (MIC ou
LINE). En position LINE, cet interrupteur permet
d’utiliser une guitare acoustique ou un clavier.
3. Bouton VOLUME
Permet de régler le volume du canal.
4. Bouton BASS
Permet de régler la qualité sonore de la bande de basses
fréquences.
5. Bouton TREBLE
Permet de régler la qualité sonore de la bande de hautes
fréquences.
6. Bouton DELAY/REVERB
Tournez ce bouton sur la position DELAY ou REVERB
pour activer l’effet correspondant. Tournez le bouton pour
régler la quantité d’effet souhaitée.
* Les repères des effets DELAY et REVERB figurent sur le panneau
pour référence uniquement. Vérifiez vos réglages au niveau sonore.
DELAY
Tournez le bouton pour régler la durée
et la quantité des effets.
REVERB
Permet d’obtenir une réverbération
stéréophonique avec effet d’espace.
Tournez le bouton pour régler le niveau
de réverbération.
7. Prise d’entrée
Permet de connecter une guitare électrique, une guitare
acoustique, un instrument électronique tel qu’un clavier,
ou un microphone.
8. Interrupteur TUNER
Le voyant de cet interrupteur s’allume en rouge lorsque
la fonction tuner est activée. Il est éteint lorsque cette
fonction est désactivée.
Pour plus de détails, voir p. 19.
9. Sélecteur de type
Vous avez le choix entre les huit types suivants.
Lorsque la fonction tuner est activée, vous pouvez utiliser
ce sélecteur pour choisir le nom de la corde à régler (p. 19).
INSTRUMENT
Sélectionnez ce type si vous avez connecté une guitare
acoustique ou un instrument électronique tel qu’un clavier.
JC CLEAN
Il s’agit d’un modèle d’amplificateur pour guitare
Roland JC-120 Jazz Chorus. Offre un son clair et lisse.
Le résultat est amélioré par l’utilisation conjointe d’un
effecteur.
BLACK PANEL
Conçu sur le modèle de l’amplificateur classique Fender
Twin Reverb, utilisé dans de nombreux styles musicaux
(country, blues, jazz, rock). Offre une richesse de graves
et une clarté des aigus.
BRIT COMBO
Conçu sur le modèle de l’amplificateur rock Vox AC-30TB
qui est à l’origine du son de Liverpool des années 60.
Permet de produire une grande variété de sons, du
plus clair au plus chargé, avec plus de distorsion et
de puissance dans les fréquences basses à moyennes
lorsque le gain de l’amplificateur est augmenté.
CLASSIC STACK
Conçu en fonction du son et de la réponse d’un Marshall
JMP1987. Le légendaire JMP1987 est réputé pour le son
lisse qu’il produit et pour sa présence, que ce soit en
environnement classique ou hard rock.
MIC/LINE CHANNEL
EQUALIZER
DELAY/REVERB
MANCHON
EXTRÉMITÉ
ANNEAU
GUITAR/INSTRUMENT CHANNEL
CUBE-Street_egfispd.book 16 ページ 2014年2月6日 木曜日 午前11時36分

Español ItalianoPortuguêsNederlands
17
Français Deutsch English
Description du panneau
R-FIER STACK
Conçu sur le modèle du MESA/Boogie Rectifier. Cet
amplificateur à très haut gain est capable de produire
une multitude de sons (slash metal, grunge, lead, etc.).
ACOUSTIC SIM
En associant une simulation de guitare acoustique à la
technologie de modélisation COSM, cet amplificateur
original permet d’obtenir un son de guitare acoustique
dynamique avec une guitare électrique standard.
MIC
Sélectionnez cette position lorsque le microphone est
connecté.
* Selon l’emplacement des microphones par rapport aux haut-
parleurs, il peut se produire un effet de feedback. Il est possible de
remédier à cela en :
1. Changeant l’orientation du microphone.
2.
Éloignant le microphone des haut-parleurs.
3. Diminuant le volume.
* Tous les noms de produits mentionnés dans ce document sont
des marques ou des marques déposées de leurs propriétaires
respectifs et ne sont pas liés à Roland Corporation. Dans ce
manuel, ces noms sont utilisés de manière appropriée pour
indiquer des sons simulés à l’aide de la technologie COSM.
10
.Bouton GAIN
Permet de régler le niveau de distorsion.
11
.Bouton VOLUME
Permet de régler le volume du canal.
12
.Bouton BASS
Permet de régler la qualité sonore de la bande de basses
fréquences.
13
.Bouton MIDDLE
Permet de régler la qualité sonore de la bande de
moyennes fréquences.
14
.Bouton TREBLE
Permet de régler la qualité sonore de la bande de hautes
fréquences.
* La technologie COSM modélise fidèlement les fonctionnalités et
caractéristiques spéciales d’une variété d’amplificateurs. Par
conséquent, aucun son ne sera produit si les boutons BASS,
MIDDLE et TREBLE sont sur la position 0 et que le sélecteur de
type est sur la position BLACK PANEL.
15
.Bouton EFX (Effets)
Tournez ce bouton sur la position CHORUS, FLANGER,
PHASER ou TREMOLO pour sélectionner l’effet
correspondant. Tournez le bouton pour régler la quantité
d’effet souhaitée. Vous pouvez également activer ou
désactiver les effets EFX à l’aide d’une pédale disponible en
option (BOSS FS-5U ou FS-6).
* Les repères des effets CHORUS, FLANGER, PHASER et
TREMOLO figurent sur le panneau pour référence uniquement.
Vérifiez vos réglages au niveau sonore.
CHORUS
Chorus synthétisé dans l’espace.
Grâce à cette méthode disponible en
stéréo uniquement, l’effet de chorus
est créé en prenant le son provenant
du haut-parleur droit et le son
provenant du haut-parleur gauche, puis en les mélangeant
dans l’espace. On obtient un son plus large et plus naturel
que celui produit en mélangeant les sons électroniquement.
FLANGER
Effet produisant une sensation de
rotation du son.
PHASER
Effet ajoutant au son direct un signal
déphasé variable, produisant une
sensation de tourbillon dans le son.
TREMOLO
Effet qui crée un mouvement
cyclique dans le volume.
16
.Bouton DELAY/REVERB
Tournez ce bouton sur la position DELAY ou REVERB
pour activer l’effet correspondant. Tournez le bouton pour
régler la quantité d’effet souhaitée.
DELAY
Tournez le bouton pour régler la
durée et la quantité des effets.
REVERB
Permet d’obtenir une réverbération
stéréophonique avec effet d’espace.
Tournez le bouton pour régler le
niveau de réverbération.
17.
Voyant d’alimentation
Le voyant d’alimentation s’allume lorsque
l’amplificateur est sous tension.
* Lorsque l’amplificateur fonctionne sur piles uniquement,
l’intensité lumineuse du voyant diminue lorsque le niveau de
charge des piles devient insuffisant.
* Les sons peuvent facilement être déformés ou coupés à volume élevé
lorsque le niveau de charge des piles diminue. Ce phénomène est
normal et n’indique pas de dysfonctionnement particulier. Dans ce
cas, vous pouvez remplacer les piles ou utiliser l’adaptateur secteur
fourni avec l’amplificateur.
EQUALIZER
EFX (Effets)
DELAY/REVERB
CUBE-Street_egfispd.book 17 ページ 2014年2月6日 木曜日 午前11時36分

18
Description du panneau
18.
Interrupteur POWER
Active ou désactive l’alimentation.
* Cet amplificateur est équipé d’un circuit de protection. Un court
délai de quelques secondes est nécessaire après la mise sous
tension pour que l’appareil fonctionne.
* Si vous devez mettre l’appareil hors tension, appuyez d’abord sur
l’interrupteur POWER, puis débranchez le cordon d’alimentation
de la prise de courant. Voir “Power Supply: Use of Batteries” (p. 4).
19.
Prise AUX IN
Vous pouvez connecter un lecteur CD, un lecteur MP3 ou tout
autre type d’appareil et l’utiliser conjointement à votre guitare ou
tout autre dispositif. Une prise téléphonique stéréo miniature peut
être branchée.
* Pour régler le niveau du volume, utilisez le bouton de commande
du volume de l’appareil connecté.
20.
Prise STEREO PHONES
Connectez le casque à cette prise.
* Aucun son n’est émis via le haut-parleur
de l’amplificateur lorsque la prise
STEREO PHONES est utilisée.
ASTUCE
Si vous utilisez un cordon de connexion
PCS-31, vous pourrez également utiliser
cette prise comme sortie d’enregistrement
stéréo.
* Si vous utilisez un cordon monaural, il peut être difficile de
percevoir l’effet produit.
fig.01-01
21.
Prise FOOT SW (pédale)
Vous pouvez connecter ici une pédale (BOSS FS-5U ou
FS-6, vendues séparément) pour activer ou désactiver les
fonctions MUTE et DELAY/REVERB pour le canal
MIC/LINE, et les fonctions EFX et DELAY/REVERB
pour le canal GUITAR/INSTRUMENT.
* Si vous utilisez un cordon monaural pour connecter une seule pédale,
vous ne pourrez contrôler que la fonction MUTE pour le canal MIC/
LINE et la fonction EFX pour le canal GUITAR/INSTRUMENT.
22.
Emplacement Sécurité ( )
http://www.kensington.com/
23.
Prise de l’adaptateur secteur
Connectez l’adaptateur secteur fourni à cette prise.
* Utilisez exclusivement l’adaptateur fourni avec l’amplificateur
CUBE STREET.
24.
Prise de terre
En fonction de votre installation, il est possible que vous
éprouviez un certain inconfort ou que vous perceviez une
rugosité en touchant la surface de l'amplificateur, des
microphones connectés ou des parties métalliques d'autres
objets, tels que les guitares, par exemple. Ce phénomène
est dû à une très petite décharge électrique, absolument
sans danger. Toutefois, si cela vous préoccupe, vous
pouvez relier la prise de terre à une prise de terre
extérieure. Lorsque l'appareil est ainsi connecté, un
léger bourdonnement peut se faire entendre, en fonction
de l'installation. Si vous n'êtes pas certain du mode de
connexion à établir, prenez contact avec le centre de
maintenance Roland le plus proche, ou avec un distributeur
Roland agréé (voir la page Information).
Endroits non adaptés pour une connexion
• Canalisations d'eau (risque de choc ou d'électrocution)
• Conduites de gaz (risque d'incendie ou d'explosion)
• Masse de ligne téléphonique ou paratonnerre
(risque en cas de foudre)
25.
Crochet pour cordon
Accrochez le cordon de l'adaptateur secteur ici (p. 19).
EXTRÉMITÉ:G
ANNEAU D
blanc(G)
rouge(D)
PCS-31
blanc
EFX
DELAY/REVERB
rouge
PCS-31
Interrupteur POLARITY
blanc
MUTE
DELAY/REVERB
rouge
PCS-31
CUBE-Street_egfispd.book 18 ページ 2014年2月6日 木曜日 午前11時36分

Español ItalianoPortuguêsNederlands
19
Français Deutsch English
Description du panneau
Connexion de l’adaptateur
secteur
REMARQUE
Utilisez exclusivement l’adaptateur fourni avec l’amplificateur
CUBE STREET. L'utilisation d'un autre adaptateur secteur risque
d'endommager l'amplificateur ou de générer d'autres problèmes.
Afin d'éviter toute coupure
d'alimentation de l'appareil
(par exemple, si la prise est
débranchée de manière
accidentelle) et de protéger la
prise de l'adaptateur secteur
contre toute tension excessive,
fixez le cordon d'alimentation
à l'aide du crochet, comme
illustré ci-contre.
REMARQUE
Placez l'adaptateur secteur de
sorte que le côté pourvu du voyant (voir illustration) soit dirigé
vers le haut et celui portant du texte soit dirigé vers le bas. Le
voyant s'allume lorsque vous branchez l'adaptateur secteur à
une prise de courant.
Remarque concernant les piles
Outre l'adaptateur secteur, l'amplificateur CUBE STREET
peut également fonctionner à l'aide de six piles AA (fournies
en option). Insérez les piles comme illustré sur la figure,
en veillant à les orienter correctement.
Si des piles se trouvent dans l'appareil alors que l'adaptateur
secteur est utilisé, l'appareil continuera de fonctionner
normalement en cas de coupure de la tension de secteur
(panne électrique ou déconnexion du cordon d'alimentation).
* Lors de l'installation ou du retrait des piles, mettez toujours
l'amplificateur hors tension et déconnectez tout autre appareil
éventuellement relié à ce dernier. Vous empêcherez ainsi tout
dysfonctionnement et/ou dommages au niveau des haut-parleurs
ou des autres dispositifs.
* Durée de vie attendue des piles en cas d'utilisation continue :
Alcaline : environ 15 heures
Cette durée peut varier en fonction des conditions réelles d'utilisation.
RÉGLAGE
Vous avez la possibilité d'effectuer un réglage manuel, c'est-à-dire
que vous passez d'une corde à l'autre pour les régler séparément,
et un réglage chromatique, qui détermine automatiquement le ton
le plus proche de celui produit par la corde.
Réglage manuel
1. Appuyez sur l'interrupteur TUNER.
2. À l'aide du sélecteur de type, choisissez le nom de la corde à
régler, puis jouez une note sur la corde à vide.
* Le son du canal GUITAR/INSTRUMENT n'est pas audible via
les haut-parleurs de l'amplificateur pendant que vous utilisez la
fonction de réglage.
* Ton de référence : A4=440 Hz
3. Réglez la corde jusqu'à ce que le voyant vert s'allume.
<Le ton est trop bas>
<Le ton est trop bas mais presque juste>
* Lorsque le ton est inférieur, le voyant clignote.
<
Le ton est correct>
<Le ton est trop haut mais presque juste>
<Le ton est trop haut>
*
Lorsque le ton est supérieur,
le voyant clignote.
Réglage chromatique
1.
Maintenez l'interrupteur TUNER enfoncé pendant au
moins une seconde jusqu'à ce que le voyant rouge clignote.
2.
Jouez une note sur la corde à vide que vous souhaitez régler.
3. Réglez la corde jusqu'à ce que le voyant vert s'allume.
Voyant
Prise secteur
Adaptateur secteur Cordon d’alimentation
Position du
sélecteur de type
Nom de la corde
6E Sixième corde à vide
5A Cinquième corde à vide
4D Quatrième corde à vide
3G Troisième corde à vide
2B Deuxième corde à vide
1E Première corde à vide
A
b
Cinquième corde à vide (un demi-
ton plus bas)
A
b
b
Cinquième corde à vide (un ton plus bas)
CUBE-Street_egfispd.book 19 ページ 2014年2月6日 木曜日 午前11時36分

20
Connexions
Reportez-vous à la figure ci-dessous pour connecter l'amplificateur CUBE STREET à d'autres appareils.
fig.01-02
Mise sous/hors tension
Une fois les connexions établies, mettez les divers appareils
sous tension en suivant l'ordre indiqué. Si vous ne respectez
pas l'ordre de mise sous tension des appareils, vous risquez
de provoquer un dysfonctionnement et/ou d'endommager
les haut-parleurs ou d'autres dispositifs.
1. Assurez-vous que les boutons de commande du
volume du CUBE STREET et des appareils qui y sont
reliés sont sur la position 0.
2.
Mettez sous tension tous les appareils connectés aux prises
d'entrée du CUBE STREET (prises INPUT et AUX IN).
3. Mettez sous tension le CUBE STREET.
4. Réglez le volume des appareils.
5. Avant de couper l'alimentation, baissez le volume de
chaque appareil sur le système, puis METTEZ HORS
TENSION les appareils en procédant dans l'ordre inverse
de la mise sous tension.
* Cet instrument est équipé de prises XLR/TRS symétriques pour
microphones. Les schémas de câblage de ces prises sont illustrés ci-
dessous. Effectuez les connexions après avoir vérifié les schémas de
câblage des autres appareils que vous envisagez de connecter.
fig.XLR/TRSJack.eps
* Si des piles se trouvent dans l'appareil alors que l'adaptateur
secteur est utilisé, l'appareil continuera de fonctionner
normalement en cas de coupure de la tension de secteur
(panne électrique ou déconnexion du cordon d'alimentation).
* Lorsque l’amplificateur fonctionne sur piles uniquement, l’intensité
lumineuse du voyant diminue lorsque le niveau de charge des piles
devient insuffisant. Remplacez les piles dès que possible.
*
Selon l’emplacement des microphones par rapport aux haut-
parleurs, il peut se produire un effet de feedback. Pour y remédier :
1. Changez l’orientation des microphones.
2. Éloignez les microphones des haut-parleurs.
3. Baissez le volume.
* Cet amplificateur est équipé d’un circuit de protection. Un court
délai de quelques secondes est nécessaire après la mise sous tension
pour que l’appareil fonctionne. Pour éviter l'émission soudaine
d'un bruit fort, assurez-vous toujours que le volume est réglé au
minimum avant de mettre l’amplificateur sous tension. Même si
le volume est réglé au minimum, il est possible que vous entendiez
un son lors de la mise sous/hors tension de l’appareil. C’est normal
et cela n’indique pas de dysfonctionnement.
* Si vous devez mettre l’appareil hors tension, appuyez d’abord sur
l’interrupteur POWER, puis débranchez le cordon d’alimentation
de la prise de courant. Voir “Power Supply: Use of Batteries” (p. 4).
* Pour prévenir tout dysfonctionnement et/ou dommages au
niveau des haut-parleurs ou d'autres appareils, commencez
toujours par diminuer le volume, puis mettez hors tension tous
les autres appareils avant d'établir les connexions.
* Avant de procéder aux connexions, assurez-vous que le bouton
VOLUME
des amplificateurs est sur la position 0.
* L’utilisation de câbles de connexion avec résistances peut diminuer
le volume des appareils connectés. Dans ce cas, utilisez des câbles
de connexion sans résistance, tels que ceux de la série Roland PCS.
PCS-31
FS-5UFS-6 FS-5U
Lecteur
CD/MP3
Guitare
électrique
FS-5U
Pédales
EFX EFX EFX
DLY/REV DLY/REV
blanc
rouge
FS-5UFS-6 FS-5U
PCS-31
FS-5U
Pédales
MUTE
MUTE MUTE
DLY/REV DLY/REV
blanc
rouge
Casque
Micro
Clavier
Guitare acoustique
Micro
Clavier
Guitare acoustique
Interrupteu
r
POLARIT
Y
Si vous utilisez une pédale FS-6, positionnez les interrupteurs
MODE et POLARITY comme indiqué ci-dessous
BA
Prises téléphoniques
stéréo 1/4" à chaque
extrémité
Prises
téléphoniques
stéréo 1/4" à chaque
extrémité
MANCHON
EXTRÉMITÉ
ANNEAU
CUBE-Street_egfispd.book 20 ページ 2014年2月6日 木曜日 午前11時36分
La pagina si sta caricando...
La pagina si sta caricando...
La pagina si sta caricando...
La pagina si sta caricando...
La pagina si sta caricando...
La pagina si sta caricando...
La pagina si sta caricando...
La pagina si sta caricando...
La pagina si sta caricando...
La pagina si sta caricando...
La pagina si sta caricando...
La pagina si sta caricando...
La pagina si sta caricando...
La pagina si sta caricando...
La pagina si sta caricando...
La pagina si sta caricando...
La pagina si sta caricando...
La pagina si sta caricando...
La pagina si sta caricando...
La pagina si sta caricando...
La pagina si sta caricando...
La pagina si sta caricando...
La pagina si sta caricando...
La pagina si sta caricando...
-
 1
1
-
 2
2
-
 3
3
-
 4
4
-
 5
5
-
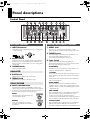 6
6
-
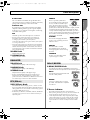 7
7
-
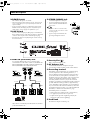 8
8
-
 9
9
-
 10
10
-
 11
11
-
 12
12
-
 13
13
-
 14
14
-
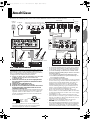 15
15
-
 16
16
-
 17
17
-
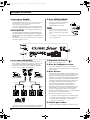 18
18
-
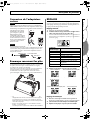 19
19
-
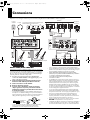 20
20
-
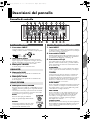 21
21
-
 22
22
-
 23
23
-
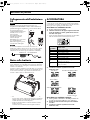 24
24
-
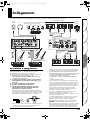 25
25
-
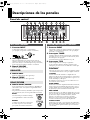 26
26
-
 27
27
-
 28
28
-
 29
29
-
 30
30
-
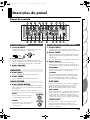 31
31
-
 32
32
-
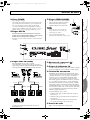 33
33
-
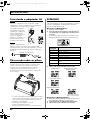 34
34
-
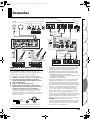 35
35
-
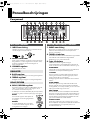 36
36
-
 37
37
-
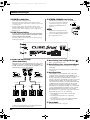 38
38
-
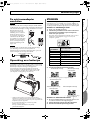 39
39
-
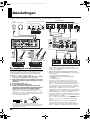 40
40
-
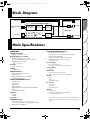 41
41
-
 42
42
-
 43
43
-
 44
44


Roland CUBE STREET Manuale del proprietario
- Categoria
- Amplificatore per strumenti musicali
- Tipo
- Manuale del proprietario
in altre lingue
- English: Roland CUBE STREET Owner's manual
- français: Roland CUBE STREET Le manuel du propriétaire
- español: Roland CUBE STREET El manual del propietario
- Deutsch: Roland CUBE STREET Bedienungsanleitung
- Nederlands: Roland CUBE STREET de handleiding
- português: Roland CUBE STREET Manual do proprietário
Documenti correlati
-
Roland MICRO CUBE GX Manuale del proprietario
-
Roland AC-40 Manuale del proprietario
-
Roland CUBE STREET Manuale utente
-
-
-
Roland MICRO CUBE BASS RX Manuale del proprietario
-
-
-
-
