Foster 7133 043 Manuale utente
- Categoria
- Forni
- Tipo
- Manuale utente
Questo manuale è adatto anche per

Foster spa
via M.S. Ottone, 18/20
42041 Brescello (RE) - Italy
tel. +39.0522.687425 - tel. Servizio Assistenza +39.0522.684450
fax +39.0522.686019 - fax Servizio Ricambi +39.0522.962166
e-mail: [email protected]
www.fosterspa.com
USER'S MANUAL FOR BUILT-IN OVEN
Multifunction S4000, cod. 7133 043
cod. 9606801

EN The symbol on the product or on its packaging indicates that this product may not be treated as household waste. Instead it shall be handed
over to the applicable collection point for the recycling of electrical and electronic equipment. By ensuring this product is disposed of correctly, you will
help prevent potential negative consequences for the environment and human health, which could otherwise be caused by inappropriate waste
handling of this product. For more detailed information about recycling of this product, please contact your local city office, your household waste
disposal service or the shop where you purchased the product.
DE Dieses Produkt darf am Ende seiner Lebensdauer nich über den normalen Haushaltsabfall entsorgt werden, sondern muss an einem
Sammelpunkt für das Recycling von elektrischen und elektronischen Geräten abgegeben werden. Das Symbol auf dem Produkt, der ebrauchsanleitung
oder der Verpackung weist darauf hin. Die Werkstoffe sind gemäß ihrer Kennzeichnung wiederverwertbar. Mit der Wiederverwendung, der stofflichen
Verwertung oder anderen Formen der Verwertung von Altgeräten leisten Sie einen wichtigen Beitrag zum Schutze unserer Umwelt. Bitte erfragen Sie
bei der Gemeindeverwaltung die zuständige Entsorgungsstelle.
IT Il simbolo sul prodotto o sulla confezione indica che il prodotto non deve essere considerato come un normale rifiuto domestico, ma deve
essere portato nel punto di raccolta appropriato per il riciclaggio di apparecchiature elettriche ed elettroniche. Provvedendo a smaltire questo prodotto
in modo appropriato, si contribuisce a evitare potenziali conseguenze negative per l’ambiente e per la salute, che potrebbero derivare da uno
smaltimento inadeguato del prodotto. Per informazioni più dettagliate sul riciclaggio di questo prodotto, contattare l’ufficio comunale, il servizio locale di
smaltimento rifiuti o il negozio in cui è stato acquistato il prodotto.
FR Ce symbole figure sur le produit ou sur son emballage en application de la directive européenne 2002/96/CE sur les Déchets d’Équipement
Électrique et Électronique (DEEE). Cette directive sert de règlement cadre à la reprise, au recyclage et à la valorisation des appareils usagés dans
toute l’Europe. Ce produit doit donc faire l’objet d’une collecte sélective. Lorsque vous ne l’utiliserez plus, remettez-le à un service de ramassage
spécialisé ou à une déchèterie qui traite les DEEE ; vous contribuerez ainsi à éviter des conséquences néfastes pour la santé et l'environnement. Pour
tout renseignement sur la mise au rebut et le recyclage de ce produit, veuillez contacter la mairie ou le service de la propreté de votre commune, ou
encore le magasin dans lequel vous l'avez acheté.
ES Este aparato lleva el marcado CE en conformidad con la Directiva 2002/96/EC del Parlamento Europeo y del Consejo sobre residuos de
aparatos eléctricos y electrónicos (RAEE). La correcta eliminación de este producto evita consecuencias negativas para el medioambiente y la salud.
El símbolo en el producto o en los documentos que se incluyen con el producto, indica que no se puede tratar como residuo doméstico. Es necesario
entregarlo en un puntode recogida para reciclar aparatos eléctricos y electrónicos. Deséchelo con arreglo a las normas medioambientales para
eliminación de residuos. Para obtener información más detallada sobre el tratamiento, recuperación y reciclaje de este producto, póngase en contacto
con el ayuntamiento, con el servicio de eliminación de residuos urbanos o la tienda donde adquirió el producto.
PT O símbolo no produto ou na embalagem indica que este produto não pode ser tratado como lixo doméstico. Em vez disso, deve ser entregue
ao centro de recolha selectiva para a reciclagem de equipamento eléctrico e electrónico. Ao garantir uma eliminação adequada deste produto, irá
ajudar a evitar eventuais consequências negativas para o meio ambiente e para a saúde pública, que, de outra forma, poderiam ser provocadas por
um tratamento incorrecto do produto. Para obter informações mais pormenorizadas sobre a reciclagem deste produto, contacte os serviços
municipalizados locais, o centro de recolha selectiva da sua área de residência ou o estabelecimento onde adquiriu o produto.
UA ɐɟɣ ɫɢɦɜɨɥ ɧɚ ɜɢɪɨɛɿ ɚɛɨ ɧɚ ɣɨɝɨ ɭɩɚɤɨɜɰɿ ɩɨɡɧɚɱɚɽ, ɳɨ ɡ ɧɢɦ ɧɟ ɦɨɠɧɚ ɩɨɜɨɞɢɬɢɫɹ, ɹɤ ɿɡ ɩɨɛɭɬɨɜɢɦ ɫɦɿɬɬɹɦ. Ɂɚɦɿɫɬɶ ɰɶɨɝɨ ɣɨɝɨ
ɧɟɨɛɯɿɞɧɨ ɩɨɜɟɪɧɭɬɢ ɞɨ ɜɿɞɩɨɜɿɞɧɨɝɨ ɩɭɧɤɬɭ ɡɛɨɪɭ ɞɥɹ ɩɟɪɟɪɨɛɤɢ ɟɥɟɤɬɪɢɱɧɨɝɨ ɬɚ ɟɥɟɤɬɪɨɧɧɨɝɨ ɨɛɥɚɞɧɚɧɧɹ. Ɂɚɛɟɡɩɟɱɭɸɱɢ ɧɚɥɟɠɧɭ
ɩɟɪɟɪɨɛɤɭ ɰɶɨɝɨ ɜɢɪɨɛɭ, ȼɢɞɨɩɨɦɚɝɚɽɬɟ ɩɨɩɟɪɟɞɢɬɢ ɩɨɬɟɧɰɿɣɧɿ ɧɟɝɚɬɢɜɧɿ ɧɚɫɥɿɞɤɢ ɞɥɹ ɧɚɜɤɨɥɢɲɧɶɨɝɨ ɫɟɪɟɞɨɜɢɳɚ ɬɚ ɡɞɨɪɨɜ’ɹ ɥɸɞɢɧɢ, ɹɤɿ
ɦɨɝɥɢ ɛɢ ɜɢɧɢɤɧɭɬɢ ɡɚ ɭɦɨɜ ɧɟɧɚɥɟɠɧɨɝɨ ɩɨɡɛɚɜɥɟɧɧɹ ɜɿɞ ɰɶɨɝɨ ɜɢɪɨɛɭ. ɓɨɛ ɨɬɪɢɦɚɬɢ ɞɟɬɚɥɶɧɿɲɭ ɿɧɮɨɪɦɚɰɿɸ ɫɬɨɫɨɜɧɨ ɩɟɪɟɪɨɛɤɢ ɰɶɨɝɨ
ɜɢɪɨɛɭ, ɡɜɟɪɧɿɬɶɫɹ ɞɨ ɫɜɨɝɨ ɦɿɫɰɟɜɨɝɨ ɨɮɿɫɭ, ȼɚɲɨʀ ɫɥɭɠɛɢ ɭɬɢɥɿɡɚɰɿʀ ɚɛɨ ɞɨ ɦɚɝɚɡɢɧɚ, ɞɟ ȼɢ ɩɪɢɞɛɚɥɢ ɰɟɣ ɜɢɪɿɛ.
NL Het symbool op het product of op de verpakking wijst erop dat dit product niet als huishoudafval mag worden behandeld. Het moet echter
naar een plaats worden gebracht waar elektrische en elektronische apparatuur wordt gerecycled. Als u ervoor zorgt dat dit product op de correcte
manier wordt verwijderd, voorkomt u mogelijk voor mens en milieu negatieve gevolgen die zich zouden kunnen voordoen in geval van verkeerde
afvalbehandeling. Voor meer details in verband met het recyclen van dit product, neemt u het best contact op met de gemeentelijke instanties, het
bedrijf of de dienst belast met de verwijdering van huishoudafval of de winkel waar u het product hebt gekocht.
RO Simbolul de pe produs sau de pe ambalaj indică faptul că produsul nu trebuie aruncat împreună cu gunoiul menajer. Trebuie predat la
punctul de colectare corespunzător pentru reciclarea echipamentelor electrice úi electronice. Asigurându-vă că aĠi eliminat în mod corect produsul,
ajutaĠi la evitarea potenĠialelor consecinĠe negative pentru mediul înconjurător úi pentru sănătatea persoanelor, consecinĠe care ar putea deriva din
aruncarea necorespunzătoare a acestui produs. Pentru mai multe informaĠii detaliate despre reciclarea acestui produs, vă rugăm să contactaĠi biroul
local, serviciul pentru eliminarea deúeurilor sau magazinul de la care l-aĠi achiziĠionat.
SLO Simbol na izdelku ali njegovi embalaži oznaþuje, da z izdelkom ni dovoljeno ravnati kot z obiþajnimi gospodinjskimi odpadki. Izdelek odpeljite
na ustrezno zbirno mesto za predelavo elektriþne in elektronske opreme. S pravilnim naþinom odstranjevanja izdelka boste pomagali prepreþiti
morebitne negativne posledice in vplive na okolje in zdravje ljudi, ki bi se lahko pojavile v primeru nepravilnega odstranjevanja izdelka. Za podrobnejše
informacije o odstranjevanju in predelavi izdelka se obrnite na pristojen mestni organ za odstranjevanje odpadkov, komunalno službo ali na trgovino, v
kateri ste izdelek kupili.
PL Symbol na produkcie lub na opakowaniu oznacza, Īe tego produktu nie wolno traktowaü tak, jak innych odpadów domowych. NaleĪy oddaü
go do wáaĞciwego punktu skupu surowców wtórnych zajmującego siĊ záomowanym sprzĊtem elektrycznym i elektronicznym. WáaĞciwa utylizacja i
záomowanie pomaga w eliminacji niekorzystnego wpáywu záomowanych produktów na Ğrodowisko naturalne oraz zdrowie. Aby uzyskaü szczegóáowe
dane dotyczące moĪliwoĞci recyklingu niniejszego urządzenia, naleĪy skontaktowaü siĊ z lokalnym urzĊdem miasta, sáuĪbami oczyszczania miasta lub
sklepem, w którym produkt zostaá zakupiony.
SK Symbol na výrobku alebo na jeho obale znamená, že s výrobkom sa nesmie zaobchádzaĢ ako s domovým odpadom. Namiesto toho ho treba
odovzdaĢ v zbernom stredisku na recykláciu elektrických alebo elektronických zariadení. Zabezpeþte, že tento výrobok bude zlikvidovaný správnym
postupom, aby ste predišli negatívnym vplyvom na životné prostredie a Đudské zdravie, þo by bolo spôsobené nesprávnym postupom pri jeho likvidácii.
Podrobnejšie informácie o recyklácii tohto výrobku získate, ak zavoláte miestny úrad vo Vašom bydlisku, zberné suroviny alebo obchod, v ktorom ste
výrobok kúpili.
CZ Symbol na výrobku nebo jeho balení udává, že tento výrobek nepatĜí do domácího odpadu. Je nutné odvézt ho do sbČrného místa pro
recyklaci elektrického a elektronického zaĜízení. ZajištČním správné likvidace tohoto výrobku pomĤžete zabránit negativním dĤsledkĤm pro životní
prostĜedí a lidské zdraví, které by jinak byly zpĤsobeny nevhodnou likvidací tohoto výrobku. PodrobnČjší informace o recyklaci tohoto výrobku zjistíte u
pĜíslušného místního úĜadu, služby pro likvidaci domovního odpadu nebo v obchodČ, kde jste výrobek zakoupili.
SV Symbolen på produkten eller emballaget anger att produkten inte får hanteras som hushållsavfall. Den skall i stället lämnas in på
uppsamlingsplats för återvinning av el- och elektronikkomponenter. Genom att säkerställa att produkten hanteras på rätt sätt bidrar du till att förebygga
eventuellt negativa miljö- och hälsoeffekter som kan uppstå om produkten kasseras som vanligt avfall. För ytterligare upplysningar om återvinning bör
du kontakta lokala myndigheter eller sophämtningstjänst eller affären där du köpte varan
3

1.
5

2.
a)
b)
!
"###$%#$ &# '(%##
*+,-.*/0$%$12$% (3%$
$% #!
6

User instructions
Thank you for choosing one of our products. We hope you will get the very best
performance from this appliance.
Therefore we would ask you
to carefully comply with the the suggestions and
instructions in this manual for proper use of our products.
The manufacturer shall not be held liable for damage to persons and property
which is due to poor or incorrect installation of the appliance.
The
manufacturer reserves the right to modify its products as deemed fit without
prior
notice.
Technical characteristics
Dimensions:
Volume:
Height: 460 mm
Gross: 43 dm
3
Width: 597 mm
Net: 37 dm
3
Depth: 570 mm
Power supply voltage:
220-240 V 50 Hz
25

DECLARATION OF CE COMPLIANCE
This appliance is in compliance with the following European Directives:
93/68 : General regulations
2006/95/CE : Concerning low tensions
89/336/CEE : Electromagnetic compatibility
CE Regulation n° 1935/2004
:
this appliance is suitable to come in contact with food products.
INSTRUCTIONS FOR THE USER
This manual is an integral part of the appliance.
It is necessary to keep it for the life cycle of the oven and to read it carefully for th
e
installation, use, maintenance, cleaning and handling of the appliance.
Unplug the appliance before undertaking any sort of intervention on it.
Attention: earth connection is required by law.
During oven operation, keep children away.
During operation
the oven becomes very hot.
Do not touch heating elements on the inside.
Do not use steam cleaners to clean the oven.
Do not use the appliance to heat the room.
The manufacturer will not be held liable if accident prevention measures are not observed.
The manufacturer will not be held liable for damage to persons or property due to poor or
lacking maintenance of the appliance.
The manufacturer reserves the right to make any changes to the product which are felt to
be useful or necessary without any adv
ance notice.
Packaging materials (sheets, polystyrene) may be hazardous to children (danger of
suffocation). Keep packaging materials out of the reach of children.
The appliance is designed for adult users who are familiar with these instructions.
Child
ren are often not able to recognize the risks involved with the use of the appliance.
Please supervise properly and do not let children play with the appliance.
Heat is generated during cooking; the door of the appliance may get very hot, specially if
it
is made of glass. There is the risk of burns; do not touch and keep children away.
The physically impaired must be assisted by capable adults.
Do not carry out any modifications, tampering or repair attempts, especially with tools
such as screwdrivers on
the inside or outside of the appliance.
Repair work, especially on the electrical parts, must be performed only by specialized
personnel.
26
26

Improper repair work can cause serious accidents, damage the appliance and equipment as
well as impair proper operat
ion.
Appliances repaired in technical service centres must undergo routine tests, especially a
continuity test of the earth circuit.
THIS PRODUCT WAS DESIGNED FOR HOME USE.
THE MANUFACTURER WILL NOT BE HELD LIABLE FOR DAMAGE TO
PERSONS OR PROPERTY CAUSED BY IMPROPER INSTALLATION, OR BY
IMPROPER, WRONG OR SENSELESS USE.
WARNING: IN CASE OF DISASSEMBLY, MAINTENANCE AND CLEANING OF
THE APPLIANCE, BE CAREFUL SOME PARTS COULD BE SHARP.
PLEASE USE SUITABLE PREVENTION AND PROTECTION EQUIPMENT
(GLOVES, ECT.).
In case of a failure in operation or an indispensable repair job, ask for the intervention of
the customer technical service centre.
If the oven shows visible signs of damage, do not use it.
Unplug it and contact the customer technical service centre.
T
he oven must be unplugged as soon as an operating problem is discovered.
Make sure the power cord of the appliance is not crushed by the oven door as this may
damage the electrical insulation.
If the power cord has been damaged, it must be replaced by the technical service centre in
order to avoid the creation of hazardous situations.
Before closing the oven door, make sure there are no foreign bodies or pets inside the
oven.
Do not place heat-sensitive or flammable materials in the oven such as detergents, oven
sprays, and so on.
The oven gets extremely hot during operation.
The oven remains hot for a long time, even after it has been turned off, and cools off only
very slowly until reaching room temperature. Wait for a suitable period of time before
carr
ying out work such as cleaning.
When opening the oven door, steam and water droplets may come out.
If the oven contains steam, it is not advisable to insert the hands.
Superheated grease and oil may easily catch fire.
Never use water in an attempt to extinguish burning grease or oil (there is the danger of
explosion). Suffocate the fire with wet cloths.
The rack, the plates and the cooking containers become extremely hot.
Use insulated glove or pot holders.
When using and maintaining the oven, be careful not to get fingers caught in the door
hinges to avoid crushing or other injuries.
This is specially important when children are around.
Leave the door open only in an ajar position.
If the door is open there is the hazard of tripping or crushing the fi
ngers.
Do not sit or lean on the door and do not use it as a work surface.
27
27

28
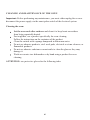
All work on the appliances must be carried out by qualified personnel.
For maintenance, moving, installation and cleaning of the appliance use suitable
prevention and protection equipment (gloves, etc.).
Lifting and moving of appliances weighing more than 25 kg must be carried out
using proper equipment, or by two persons, in order to avoid risks or injuries.
The oven is equipped with a cooling fan that comes on when the cooking cycle is
selected. It creates a slight air flow that exits from the slot under the control panel.
It shuts down 10-30 minutes after the oven is switched off (depending on oven
temperature).
INSTRUCTIONS FOR INSTALLATION OF THE UNIT
All tasks involved in installing the appliance must be carried out by skilled
personnel. Any work is to be performed with the appliance unplugged.
Electrical connection:
make sure that the voltage corresponds to that indicated on the tag on the side.
The oven must be connected using a cable with a minimum cross-section of 1,5
mm on the rear, and with an omni-polar switch compliant with current standards
with a distance of aperture between contacts of at least 3 mm.
Caution:
if you need to replace the power cord, make sure you comply with the following
colour-code when connecting the single wires:
BLUE - NEUTRAL ( N )
BROWN - PHASE ( L )
YELLOW-GREEN - EARTH ( )
Attention: earth connection is required by law.
The manufacturer will in no way be held liable if accident prevention standards
area not observed.
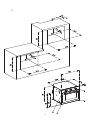
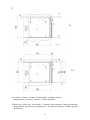
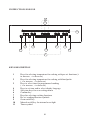
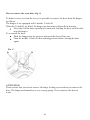
Insertion into the furniture unit:
The appliance can be inserted either under a worktop or into a column. In either
case comply with the dimensions shown in figures 1 and 2.
For column installation, in order to ensure proper ventilation, it is indispensable to
provide an opening of at least 85-90mm as shown in figure 1.
The oven is secured to the furniture unit by four screws “A” located in the holes of
the perimeter frame (see fig. 1).
Do not use the door a lever when installing the oven.
Do not place excessive pressure on the oven door when it is open.
28

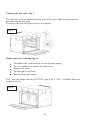
Before using the oven for the first time
After unpacking the oven, installing it in the furniture unit and removing the
accessories (drip pan and racks), it is advisable to run it at the highest temperature for
about 20 minutes to remove any oily residues left from the manufacturing process
which may cause unpleasant odours during cooking. Aerate the room while doing
this. Wash the drip pan and racks with washing up liquid.
For the first few minutes that the oven is in operation, condensation may form on the
front. This does not in any way compromise operation of the unit.
31
29

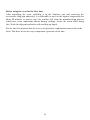
INSTRUCTIONS FOR USE
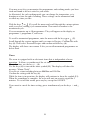
KEYS DESCRIPTION
1
Keys for selecting temperature for cooking with pre
-
set functions(
+
to increase,
-
to decrease)
2
Keys for selecting temperature for cooking with food probe
(
+
to increase,
-
to decrease)
3
Keys t
o select time for programmed cooking
(
+
to increase,
-
to decrease)
4
Keys to set time and to select display language
5
Selection keys for oven setting menus
6
Confirm key
7
Keys for selecting cooking functions
8 P
re
-
set cooking function symbols
9
Oven on/off key
10
Manual on/off key for internal oven light
11
Timer symbol
_ _ _ _ _
_ _ _ _ _
_ _ _ _ _ _ _ _ _ _ _ _ _
_ _ _ _ _ _ _ _ _ _ _ _ _
_ _ _ _ _ _ _ _ _ _ _ _ _ _ _ _ _ _ _
_ _ _ _ _ _ _ _
_ _ _ _ _ _ _ _
_ _ _ _ _ _ _
5
10
1
2
6
8
7
3
4
9
11
32
30

Switching on for the first time
selection of language and time setting
To turn the oven on, press the ON/OFF key (
9)
and release it after 1 second.
The display will light up and it will show the message
WAIT
. Do not touch any
key until the language selection menu appears.
Choose the desired language using the keys +
-
(
4)
, and confirm with the Enter
key (
6
) or wait a
few seconds and confirmation will take place automatically.
Then set the time using the keys +
-
(
4
). The time scrolls more rapidly if you hold
down the keys + or
-.
Confirm your selection with the key (
6
).
Once you have set the time, again press ON/OFF
and release it after 1 second. The
display will show these messages:
COOKING SELECTION
MENU
Cooking selection" lets you access the choice of preset cooking functions of the
oven, while "menu" lets you choose from the various accessory settings of the
oven.
Select a cooking function from among those available using the keys +
-
(
7
).
C
onfirm your selection with the key (
6
). Each cooking function includes a preset
temperature, which may not be varied with the keys +
-
(
1
).
The display will now show a message requesting pre
-
heating of the oven. You can
accept or refuse with the keys +
-
(
4
), then confirm (
6
).
If the request is confirmed, the oven will start heating. When this is complete, the
display will show a message for the end of the operation and an acoustic signal is
emitted.
Then press the key (
6
) to activate the previously chosen
cooking.
If you do not press the key (
6
) within 5 minutes, the oven will shut off.
To cancel the selections you have made, simultaneously press the keys
and
(5
).
If you want to interrupt pre
-
heating, simultaneously press the keys
and
(5
).
Prehe
ating will be interrupted and the selected cooking functions will start directly.
If you want to change the cooking function, use the selection keys
(7
).
33
31

Time
-
controlled cooking
First of all, select a cooking function using the selection keys (
7
). The t
emperature
can be modified using the keys (
1
).
You can set a cooking duration time
using the keys +
-
(
3
) to increase or decrease
the desired time. Confirm your selection with the key (
6
).
The message will then show a request for preheating the oven. Selec
t YES/NO
with the keys (
4
). If confirmed, the time used for preheating will be detracted from
the set cooking time.
The message waits for a response for 5 seconds. If no selection is made, the oven
automatically goes into cooking mode with no preheating.
D
uring time
-
controlled cooking, the display shows a countdown in minutes and
seconds, and the timer symbol stays on (11
).
When the programme is complete, the oven emits an acoustic signal.
To cut off this sound, press any key except for ON/OFF.
Delayed c
ooking (setting of end of cooking time)
Select a cooking mode and set the duration as described in the previous paragraph.
After selecting the cooking time, press the keys
or
(5
), until you come the
item "end of cooking". Confirm the selection with t
he key (
6
), then set the end of
cooking time.
After you have made this setting, a message will appear on the display every 15
seconds which shows the time remaining until the oven switches on.
If you want to modify the times, use the keys
-
(
3
).
If you wan
t to delete the programme, simultaneously press the keys (
5
).
When the programme is complete, the oven emits an acoustic signal.
To cut off this sound, press any key except for ON/OFF.
Note: during operation of the oven in defrost mode, you may not set a
ny end of
cooking time.
34
32

Your new oven lets you memorize the programmes and cooking modes you have
tried and found to be best suited to your needs.
As illustrated, for each cooking mode you can change the temperature, set a
duration or a time for
end of cooking. These settings can be memorized and
recalled any time you like.
With the keys
or
(5
), recall the menu and scroll through the various options
until you select cooking cycle memorization. Then match a number to the
memorized cycle.
You can memorize up to 10 programmes. They will appear on the display as
programme 1, programme 2,
and so on.
To recall a memorized programme, enter the menu with the keys
or
(5
).
Scroll through the various options until you come to Recipes. Confirm this with
key (
6
). Then select Personal Recipes and confirm with the key (
6
).
The display will sho
w a new menu. It lets you recall memorized programmes or
delete them.
Timer
The oven is equipped with an electronic timer
that is independent of oven
operation.
It allows a countdown of the set time.
To set the time, use the keys +
-
(
4
).
Use the keys
(4
) to turn on the timer symbol(11
). The display will show the
message "Alarm Clock".
You can set a time including between 00h00m and 23h59m.
Confirm the setting with the key (
6
).
While the time is in operation, the display will continue to show the symbo
l (11
).
When the countdown is complete, the oven will emit an acoustic signal for 5
minutes. To cut off this sound, press any key except for ON/OFF.
If you want to cancel the timer setting, press simultaneously on the keys + and
(4
).
35
33

Cooking wi
th the food probe
You can cook your favourite dishes using the probe. The probe is inserted in the
appropriate hole inside the oven, on the wall at upper left.
The temperature sensor is instead inserted in the food you are going to cook..
It must be com
pletely inserted, if possible in the middle of the food
.
The sensor detects the internal temperature of the food during cooking.
Once the probe is connected to the oven, the display shows the symbol of a bar
/
and the probe temperature (preset to 70°C) t
o confirm that the probe has indeed
been connected.
Choose from among the available cooking functions with the keys (
7
).
You can modify the oven temperature using the keys (
1
).
The probe temperature can be modified using the keys +
-
(
2
).
The programmes f
or cooking with the probe can also be memorized. The
procedure is the same as described in the previous paragraphs.
When a probe cooking programme is recalled, the display shows the probe
insertion notification.
Note: when the oven is operating in defrost
mode, if the probe is left inserted, there
will be a notice on the display to disconnect it.
Menu options
To select the menu, use the keys
or
(5
). The display will show the following
options:
Recipes, Settings, Guide and Exit.
You can scroll them using the keys (
5
).
To go back a step, press both keys (
5
).
After you select the option
Recipes
with the key (
6
), a list of various types of f
oods
will appear (meat, bread/pizza, fish, desserts, timbales, personal recipes, and exit
menu). Each food type in turn has a sub
-
group of suggested recipes (for example, if
you select "desserts" with key (
6
) a selection will appear: biscuits, etc.).
Each
of these recipes, when selected, will activate the oven according to a cooking
programmes with predefined time and temperature.
It is possible to modify the cooking times and temperatures using respectively the
keys(
1
) and (
3
).
36
34

Use the keys (
5
) to selec
t the menu followed by
Settings
. The display will show a
further selection menu, which includes the following:
language: lets you modify the set language
clock setting: includes 3 options.
-
possibility to show clock on display (YES/NO selection)
-
adjus
tment of time
-
night mode: the display is lit at low intensity from 10:00 pm until 7:00 am.
lock keypad: can be automatic or manual.
With automatic lock, it is activated after the keypad is inactive for 1 minute. To
release it, press simultaneously the
key at far left
and the key at far right
+.
Manual lock is also activated and de
-
activated by simultaneously pressing the key
at far left
and the key at far right
+
.
acoustic signal: choose the volume from among low, medium and high
illumination: c
hoose whether to shut off the light in the oven automatically or
manually. If automatic, after turning it on with key (
10
), the light will switch off
after 5 minutes. With manual shut
-
off, the light must be turned off using key (10
).
restore settings: res
ets all settings (language, time, programme) to their defaults
settings.
If you use the keys (
5
) to select the menu followed by
Guide
, the menu shows a
series of suggestions for cooking and for using the oven.
If you use the keys(
5
) to select the menu fo
llowed by
Exit
, you will leave the menu
options.
37
35

Cooking functions
Traditional cooking
It is recommended that the oven is pre
-heated before introducing the food.
Traditional cooking with fan
Cooking mode suited to bake bread, pizzas and lasagne.
It is recommended that the oven be pre
-
heated.
Keep
the oven door closed during this function.
Bottom element only
Suitable for very slow cooking and warming up of food.
Bottom element with fan
This type of cooking is specially slow and delicate.
Centre grill
This kind of cooking is s
pecially suited to small amounts of food.
Keep the oven door closed during this function.
Double grill
This kind of cooking is specially suited for larger quantities of food that require
full width grilling.
Keep the oven door closed during this function.
Double grill with fan
The action of the fan, combined with the action of the grill, allows for quick,
thorough cooking of food.
It is advisable to heat the oven for a few minutes before putting food in it.
38
36

Fan cooking
This type of cooking allo
ws even heat distribution to all parts of the oven.
It is possible to cook two different types of food (e.g. meat and fish) while using
their different respective cooking times.
Pizza function
This kind of cooking is ideal for pizza and vegetable dishe
s.
With this function, all the heating elements and the fan work together.
Defrosting
Only the fan works, so there is no transmission of heat.
The oven door must be closed. This function makes it possible to defrost foods
using only about one
-
third of
the time that would normally be required.
39
37

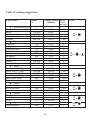
Table of cooking suggestions
Type of dish
Temp.
°C
Cooking time in
minutes
Level
(from
bottom)
Cycle
Bread and biscuits
Pizza
220
20/30
1
Bread 1
90/200 4
5/60 1
Bread with filling
150/16
0
20/25
1 or 2
White bread
175/210
25/40
1 or 2
Biscuits
140/150
20/30
1 or 2
or
Pie and pastry
Focaccia
175
40/45
2
Sponge cake
190
25/35
2
Chocolate cake
175
30/40
2
Fruit pie
140
50/70
2
Vol
-
au
-
vent
175
20
2
Doughnut
18
0
35/45
2
Angel cake
150
20/25
2
Souffle
180/200
20/30
2
Meringue
120/125
25/35
2
or or
Meats
Veal stew (1/1,5Kg)
150/160 180/210
1 or 2
Roast veal (1/1,5Kg)
150/160 120/150
1 or 2
Meat loaf(1/1,5Kg)
180/190
90/120
1 or 2
Lamb (leg
or chop)
180/190
60/90
1 or 2
Beef (leg or chop)
1
80
4
5/60 1
or 2
Pork (loin or leg)
180
60/90
2
or
Game
Roast pheasant
180
60/90
1 or 2
Venison 1
75 9
0/120 1
or 2
or
Poultry
Chicken
170
90/120
1
or 2
Duck
175
180/200
1
or
Fish
Fish in general
200
15/20
2
or
40
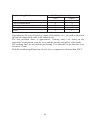
38

Cooking time in minutes
Foods to be grilled
Over
Under
Cuts of thin meat 6 4
Cuts of normal meat 8 5
Fish (e.g. trout, salmon)
15 12
Sausages
12 10
Toast
52
Depending on the type of food (e.g. meats, fish, poultry, etc.), you will need to turn
the food to expose both sides to the infrared rays.
The data provided above is approximate. Cooking times vary based on the
experience of the person using th
e oven and the amount and quality of the foods.
The cooking times do not include pre-heating. It is advisable to pre-heat the oven
for about 15 min.
With the ventilated grill function, do not select a temperature of more than 190°C.
41
39

CLEANING AND MAINTENANCE OF
THE OVEN
Important:
Before performing any maintenance, you must either unplug the oven or
disconnect the power supply via the omni
-
polar switch of the electrical system.
Cleaning the oven:
Let the oven cool after each use
and clean it to keep burnt on
residues
from being repeatedly heated.
For tough dirt, use a product specifically for oven cleaning.
Follow the
instructions on the container of the product.
Clean the outside with a sponge dampened in lukewarm water.
Do not use abrasive produ
cts, steel wool pads, electrical or steam cleaners, or
flammable products.
Do not use abrasive substances or materials to clean the glass as they may
damage it.
Wash accessories in a dishwasher or by hand using a product for oven
cleaning.
ATTENTION:
use
protective gloves for the following tasks.
42
40
La pagina sta caricando ...
La pagina sta caricando ...
-
 1
1
-
 2
2
-
 3
3
-
 4
4
-
 5
5
-
 6
6
-
 7
7
-
 8
8
-
 9
9
-
 10
10
-
 11
11
-
 12
12
-
 13
13
-
 14
14
-
 15
15
-
 16
16
-
 17
17
-
 18
18
-
 19
19
-
 20
20
-
 21
21
-
 22
22


Foster 7133 043 Manuale utente
- Categoria
- Forni
- Tipo
- Manuale utente
- Questo manuale è adatto anche per
in altre lingue
- English: Foster 7133 043 User manual
- română: Foster 7133 043 Manual de utilizare
Documenti correlati
Altri documenti
-
Hoover HOFZ7170IN Manuale utente
-
Univex Double Rack Rotating Manuale del proprietario
-
ROSIERES RDVI342 Manuale del proprietario
-
Caple SO209SS Manuale utente
-
-
-
-
Hoover HOT7174WI WIFI Manuale utente
-
Polar Refrigerator/Freezer Manuale del proprietario
-
Firex betterpan DBRG...-C series Owner's Instruction Manual