
USER INSTRUCTIONS
OVENS
NOTICE D'EMPLOI ET D'INSTALLATION
DES FOURS ENCASTRABLES
CANDY HOOVER GROUP S.R.L. • Via Privata Eden Fumagalli • 20047 Brugherio Milano Italy
MANUALE D’ISTRUZIONI
FORNO
INSTRUCCIONES DE USO
HORNOS EMPOTRABLES
BEDIENUNGSANLEITUNG
BACKOFEN
KULLANIM KILAVUZU
FIRINLAR
POKYNY PRO UŽIVATELE
TROUBY
EN
FR
02
17
IT
ES
33
48
DE
64
TR
CZ
79
95
• HOZ7173 WIFI

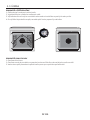
Safety Indications
• WARNING: the appliance and accessible parts become hot during use.
Be careful nottotouch any hot parts.
•WARNING: the accessible parts can become hot when the oven is in
use. Children must be kept ata safe distance.
•WARNING: ensure that the appliance is switched off before replacing
the bulb, to avoidthe possibility of electric shocks.
•WARNING: beforeinitiatingthe automatic cleaning cycle:
- Clean the ovendoor;
- Remove large or coarse foodresidues from the inside of the oven using
a damp sponge. Do not use detergents;
- Removeall accessories and the sliding rackkit (where present);
- Do not place tea towels
• In ovens with meat probe it is necessary, before making the cleaning
cycle, close the hole with the nut provided. Always close the hole with
the nut when the meat probe is not used.
•Children under 8 must be kept at a safe distance from the appliance if
not continuously supervised.
•Children must not play with the appliance. The appliance can be used
by those aged 8 or over and by those with limited physical, sensorial or
mental capacities, without experience or knowledge of the product,
only if supervised or provided with instruction as to the operationof the
appliance, in a safe waywith awareness of the possible risks.
•Cleaning and maintenance should not be carried out by unsupervised
children.
•Do not use rough or abrasive materials or sharp metal scrapers to
clean the oven door glasses, as they can scratch the surface and cause
the glass to shatter.
•The oven must be switched off before removing the removable parts
and, after cleaning, reassemble them according the instructions.
•Only use the meat proberecommended for this oven.
•Do not use a steam cleaner for cleaning operations.
• Connect a plug to the supply cable that is able to bear the voltage,
current and load indicated on the tag and having the earth contact. The
EN 02

socket must be suitable for the load indicated on the tag and must be
having the earth contact connected and in operation. The earth
conductor is yellow-green in colour. This operation should be carried
out by a suitably qualified professional. In case of incompatibility
between the socket and the appliance plug, ask a qualified electrician to
substitute the socket with another suitable type. The plug and the
socket must be conformed to the current norms of the installation
country. Connection to the power source can also be made by placing
an omnipolar breaker between the appliance and the power source
that can bear the maximum connected load and that is in line with
current legislation. The yellow-green earth cable should not be
interrupted by the breaker. The socket or omnipolar breaker used for
the connection should be easily accessible when the appliance is
installed.
•The disconnection may be achieved by having the plug accessible or by
incorporating a switch in the fixed wiring in accordance with the wiring
rules.
•If the power cable is damaged, it must be substituted with a cable or
special bundle available from the manufacturer or by contacting the
customer service department.
•The type of powercable must be H05V2V2-F.
•Failure to comply with the above can compromise the safety of the
appliance and invalidatethe guarantee.
•Any excess of spilled materialshould be removed beforecleaning.
•During the pyrolytic cleaning process, surfaces can heat up more than
usual, children must thereforebe kept at a safe distance.
•The appliance must not be installed behind a decorative door in order
toavoid overheating.
•When you place the shelf inside, make sure that the stop is directed
upwards and in the back of the cavity.
The shelf must be inserted completelyinto the cavity
• WARNING: Do not line the oven walls with aluminum foil or single-use
protection available from stores. Aluminum foil or any other protection,
in direct contact with the hot enamel, risk melting and deteriorating the
enamel of the insides.
• WARNING: Neverremove the oven door seal.
EN 03

Summary
EN 04
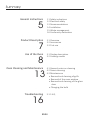
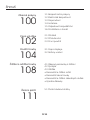
General Instructions
5
1.1 Safety indications
1.2 Electrical safety
1.3 Recommendations
1.4 Installation
1.5 Waste management
1.6 Conformity declaration
2.1 Overview
2.2 Accessories
2.3 First use
Product Description
7
3.1 Display description
3.2 Cooking modes
Use of the Oven
8
4.1 General notes on cleaning
4.2 Steam cleaning
4.3 Maintenance
• Removal and cleaning of grills
• Removal of the oven window
• Removal and cleaning of the glass
door
• Changing the bulb
Oven Cleaning and Maintenance
13
5.1 F.A.Q.
Troubleshooting
16

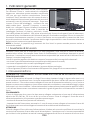
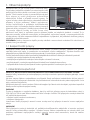
1. General Instructions
We thank you for choosing one of our products. For the
best results with your oven, you should read this
manual carefully and retain it for future reference.
Before installing the oven, take note of the serial
number so that you can give it to customer service staff
if any repairs are required. Having removed the oven
from its packaging, check that it has not been damaged
during transportation. If you have doubts, do not use
the oven and refer to a qualified technician for advice.
Keep all of the packaging material (plastic bags,
polystyrene, nails) out of the reach of children. When
the oven is switched on for the first time, strong
smelling smoke can develop, which is caused by the glue on the insulation panels surrounding the oven
heating for the first time. This is absolutely normal and, if it occurs, you should wait for the smoke to
dissipate before putting food in the oven. The manufacturer accepts no responsibility in cases where
the instructionscontainedin this document are not observed.
NOTE: the oven functions, properties and accessories cited in this manual will vary, depending on the
model youhavepurchased.
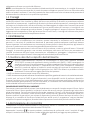
1.1 Safety Indications
Only use the oven for its intended purpose, that is only for the cooking of foods; any other use, for
example as a heat source, is considered improper and therefore dangerous. The manufacturer cannot
be held responsibleforany damageresulting fromimproper, incorrector unreasonable usage.
The use ofany electricalappliance implies the observance of some fundamental rules:
- do notpull on the power cableto disconnectthe plug from the socket;
- do nottouch the appliance with wetor damp hands or feet;
- in general the use of adaptors, multiple sockets andextension cablesis not recommended;
- in caseof malfunction and/orpoor operation,switch offthe appliance and do not tamper with it.
1.2 Electrical Safety
ENSURE THAT AN ELECTRICIAN OR QUALIFIED TECHNICIAN MAKES THE ELECTRICAL CONNECTIONS.
The power supply to which the oven is connected must conform with the laws in force in the country of
installation. The manufacturer accepts no responsibilityfor any damage causedby the failure to observe
these instructions. The oven must be connected to an electrical supply with an earthed wall outlet or a
disconnector with multiple poles, depending on the laws in force in the country of installation. The
electrical supply should be protected with suitable fuses and the cables used must have a transverse
section thatcan ensurecorrect supply tothe oven.
CONNECTION
The oven is supplied with a power cable that should only be connected to an electrical supply with 220-
240 Vac 50 Hz power between the phases or between the phase and neutral. Before the oven is
connectedto the electricalsupply, it is importantto check:
- powervoltageindicatedon the gauge;
- the settingof the disconnector.
The grounding wire connected to the oven's earth terminal must be connected to the earth terminal of
the powersupply.
WARNING
Before connecting the oven to the power supply, ask a qualified electrician to check the continuity of the
power supply's earth terminal. The manufacturer accepts no responsibility for any accidents or other
problems caused by failure to connect the oven to the earth terminal or by an earth connection that has
defective continuity.
EN 05

1.3 Recommendations
Aftereach use of the oven,a minimum of cleaning will help keep the ovenperfectlyclean.
Do not line the oven walls with aluminium foilor single-use protection available from stores. Aluminium
foil or any other protection, in direct contact with the hot enamel, risks melting and deteriorating the
enamel of the insides. In order to prevent excessive dirtying of your oven and the resulting strong
smokey smells, we recommend not using the oven at very high temperature. It is better to extend the
cooking time and lower the temperature a little. In addition to the accessories supplied with the oven,
we advise you only use dishesand baking moulds resistant tovery high temperatures.
1.4 Installation
The manufacturers have no obligation to carry this out. If the assistance of the manufacturer is required
to rectify faults arising from incorrect installation, this assistance is not covered by the guarantee. The
installation instructions for professionally qualified personnel must be followed. Incorrect installation
may cause harm or injury to people, animals or belongings. The manufacturer cannot be held
responsiblefor suchharm or injury.
The oven can be located high in a column or under a worktop. Before fixing, you must ensure good
ventilation in the oven space to allow proper circulation of the fresh air required for cooling and
protecting the internalparts. Makethe openings specified on lastpage accordingto the typeof fitting.
NOTE: as the oven could require maintenance work, it is advisable to keep another wall socket available
so that the oven can be connected to this if it is removed from the space in which it is installed. The
power cable must only be substituted by technical service staff or by technicians with equivalent
qualifications.
1.5 Waste management and environmental protection
This appliance is labelled in accordance with European Directive 2012/19/EU regarding
electric and electronic appliances (WEEE). The WEEE contain both polluting substances
(that can have a negative effect on the environment) and base elements (that can be
reused). It is importantthat the WEEE undergo specific treatmentsto correctly remove and
dispose of the pollutants and recover all the materials. Individuals can play an important
role in ensuring that the WEEE do not become an environmental problem; it is essential to
follow a fewbasic rules:
- the WEEEshould not be treated as domestic waste;
- the WEEE should be taken to dedicated collection areas managed by the town council or a registered
company.
In many countries, domestic collections may be available for large WEEEs. When you buy a new
appliance, the old one can be returned to the vendor who must accept it free of charge as a one-off, as
long as theappliance is of an equivalenttype and has the samefunctions as the purchasedappliance.
SAVING AND RESPECTINGTHE ENVIRONMENT
Where possible, avoid pre-heating the oven and always try to fill it. Open the oven door as infrequently
as possible, because heat from the cavity disperses every time it is opened. For a significant energy
saving, switch off the oven between 5 and 10 minutes before the planned end of the cooking time, and
use the residualheat thatthe oven continuesto generate. Keepthe seals clean and in order, to avoidany
heat dispersal outside of the cavity. If you have an electric contract with an hourly tariff, the "delayed
cooking" programme makes energy saving more simple, moving the cooking process to start at the
reducedtarifftime slot.
1.6 Declaration of compliance
The parts of this appliance thatmay come into contact with foodstuffs complywith the provisionsof EEC
Directive89/109.
By placing the mark on this product,we are confirmingcompliance to all relevant Europeansafety,
health and environmental requirements which are applicablein legislation for this product.
EN 06

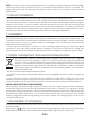
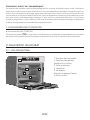
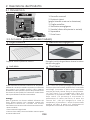
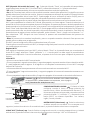
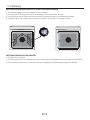
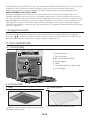
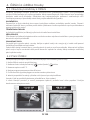
2. Product Description
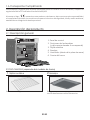
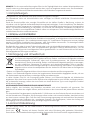
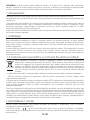
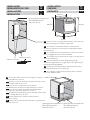
2.1 Overview
1
2
3
5
4
6
1. Control panel
2. Shelf positions
(lateral wire grid if included)
3. Metal grill
4. Drip pan
5. Fan (behind the steel plate)
6. Oven door
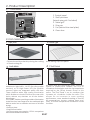
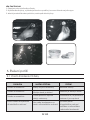
2.2 Accessories
Drip pan
1
Collects the residuesthat drip during the cooking
of foods on the grills.
EN 07
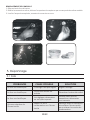
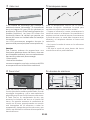
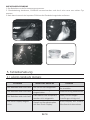
3
Led vision
Is an illumination system which replaces the
traditional « light bulb ». 14 LED (for non-pyrolitic
versions) or 10 High Power LED (for pyrolitic
versions) lights are integrated within the door.
These produce white high quality illumination
which enables to view the inside of the oven with
clarity without any shadows on all the shelves.
Advantages :
This system, besides providing excellent illumination
inside the oven, lasts longer than the traditional light
bulb its easier and to maintain and most of all saves
energy.
-Optimum view
-Long life illumination
-Very low energy consumption,-95% in comparison
with the traditional illumination.
Metal grill
2
Holds baking trays and plates.
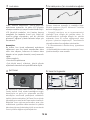
All ovens with this technology boast a function
typical of professional models, the fruit of
innovative technologies and the vast experience
acquired by the Candy Hoover Group in this
sector. The Chef Panel is an air conveyor that
increases air circulation inside the oven. This
allows for an increase in oven cooking
performance, more standard cooking of food at
all temperatures, shorter cooking times and,
lastly, a uniform temperature distribution inside
the oven.
4
Chef Panel

2.3 First Use
PRELIMINARYCLEANING
Clean the oven before using for the first time. Wipe over external surfaces with a damp soft cloth. Wash
all accessories and wipe inside the oven with a solution of hot water and washing up liquid. Set the
empty oven to the maximum temperature and leave on for about 1 hour, this will remove any lingering
smells of newness.
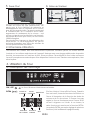
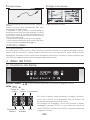
3. Use of the Oven
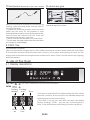
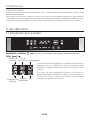
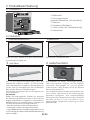
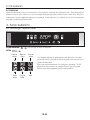
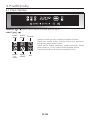
3.1 Display description
EN 08
Cooking
duration
Cooking
end
Timer
Clock
set
Child
lock
WiFi
ON / OFF
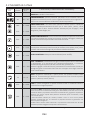
EXTRA
The oven is switched on and off with this button.
If the oven is switched off, the display shows the clock. When
the oven is inactive, all the functions are available except the
cookingduration andend of cooking.
If the clock is not set, the oven does not work: the display
flashes, showing "12:00" and the only functioning key is
Extra.From the Extra key, the followingfunctions can be set:
Measuresthe internal temperature of food during
cooking. Insert the meat-probe into the hole on
the topof the cavity.
– Prepare the food and properly insert the meat
probe into the food. Do not preheat or start
cooking before properly inserting the meat probe.
Probe should be inserted into the food and
receptacle while the ovenis still cool.
– Do notinsert the meat probein the frozenfood.
– Do not leave the meat probe inside the oven when
it's not used: it could damage.
5
Meat-probe (depends on the oven model)
Lateral wiregrid if included.
6
Lateral wire grids

NB: can only be set with an
activecookingprogramme.
Press EXTRA twice and set
the time using the “+” and
“-” keys, confirming by
pressing"SELECT".
The display shows “00:00”
if no cooking duration has
been inserted, otherwise
the display shows the time
remaining.
When a cooking programme
terminates, the oven
switches off while the
display shows "END" (the
cooking programme icon
remains on) until the On/Off
button, the only functioning
key, is pressed. When a
cooking programme
terminates, an alarm will
sound.
When the cooking time has
finished, the oven
automatically switches off and
the alarm sounds for a few
seconds.
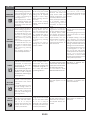
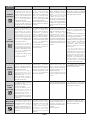
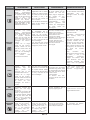
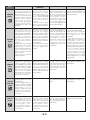
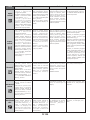
FUNCTION HOW TO DEACTIVATE WHAT IT DOES WHY IT IS NEEDED
END OF
COOKING
COOKING
DURATION
SETTING
THE CLOCK
TIMER
HOW TO USE
NB: can only be set with an
activecookingprogramme.
Press EXTRA enough times
to illuminate the icon, set
the end of cooking time
using the “<” and “>” keys
and confirm by pressing
"SELECT".
Press EXTRA enough times
to illuminate the icon, set
the end of cooking time
using the “<” and “>” keys
and confirm by pressing
"SELECT".
The cooking duration is
automaticallycalculated.
•This function is also used for
cooking that can be scheduled
in advance.
•If a cooking programme is set,
it will be lost if the "F" key is
pressed.
•If delayed cooking is set, the
oven switches off and the
display shows the current time
while the cooking programme,
cooking duration and end of
cookingiconsareilluminated.
•If a cooking programme is set,
by pressing the “<” and “>”
keys you can see and modify
the temperature set: atthefirst
touch, the operating
temperature is shown while
another touch will allow you to
modify said temperature.
To modify the end of
cooking before the set
time, press EXTRA enough
times to illuminate the
icon, regulate the end of
cooking time as required
using the “<” and “>” keys
and confirm by pressing
"SELECT".
To cancel the end of
cooking time, reset the
displayto“00:00”.
When a cooking
programme terminates,
the oven switches off while
the display shows "END"
(the cooking programme
icon remains on) until the
On/Off button, the only
functioning key, is pressed.
When a cooking
programme terminates, an
alarm will sound.
•This function is useful
when there are children in
the house.
•Press the EXTRA key
enough times to illuminate
the icon and then either
the“<”or“>”keyto
activate this function: the
display will show ON; to
confirmpressSELECT.
•Press the EXTRA key
enough times to illuminate
the icon and then either
the“<”or“>”keyto
deactivate this function:
the display will show OFF;
toconfirmpressSELECT.
•If the function is active
only the "Extra" button, to
deactivate the function,
and "On/Off" button can
be used.
•The alarm functions
regardless of whether the
ovenis switchedon.
•Switched on for the first
time, the display
illuminates and shows
"12:00".
•To modify the time, press
EXTRA enough times to
illuminate the icon and use
the “<” and “>” keys to set
the time, confirming it by
pressingSELECT.
•It allows you to set the
time that appears on the
display.
•The display shows
“00:00” if no time has been
inserted or the time
remaining if this has
alreadybeen set.
Press EXTRA enough times
to illuminate the icon and
use the “<” and “>” keys to
set the time, confirming by
pressingSELECT.
•To modify the timer, press
EXTRA enough times to
illuminate the icon,
regulate the cooking time
as required using the “<”
and “>” keys and confirm
by pressing"SELECT".
•This function activates an
alarm that sounds for a few
seconds when the set time
expires (this function does
not switchthe ovenoff).
You can select a time
between00:00 and 23:59.
• The timer functions
regardless of whether the
ovenis switchedon.
•To modify cooking before
the set time, press EXTRA
twice and regulate the
cooking time as required
using the “<” and “>” keys,
before pressing "SELECT"
once more.
•To cancel the cooking
duration, reset the display
to“00:00”.
CHILD
SAFETY
EN 09

Pressing"Extra" on the timer display allows you to select the Wi-
Fi menu.In the Wi-Fimenu if youpress the "< >" buttons youcan select:
- : Wi-Fiis off;the ovenis not controllable via the app.Off
- : Wi-fi is on and the oven is only controllable via the app. It means that it is not possible to select cookingOn
functions, recipes and temperature from the display. Only the Wi-Fi menu is available by pressing "Extra". You
can switch the oven off using the On/Off button, but you cannot switch it back on again via the display, it can
only be switched on via the app.
-:Reset This setting should be used to enrol the oven the first time it connects to your Wi-Fi network and to
reset the current Wi-Fi connection to allow a new enrolment. Once selected, the appliance gives you 5
minutes to complete the enrolment process. During this process the cooking functions, recipes and
temperature setting are not accessible from the display. Only the Wi-Fi menu is available by pressing "Extra".
You can switch the oven off using the On/Off button, but you cannot switch it back on again via the display, it
can only be switched on via the app. To exit the enrolment/reset procedure via the display, press "Extra" and
then use "< >" buttons to select "Off". After five minutes, the appliance will exit the enrolment/reset
procedure automatically.
- : the oven sends its status to the app but it cannot be controlled remotely. The oven must be enrolledRead
before thisis possible.
If Wi-Fiis not configured it is only possible to choose betweenoffand reset.
When the oven is connected to Wi-Fi, the default cooking time duration is 5 hours, but this can be modified by
the user.
Wi-Fi Enrolment:
To enroll the appliance for Wi-Fi, press "Extra" on the display until the Wi-Fi icon lights, then select "Reset" by
pressing "< >". The procedure on the app should then be followed. Once selected, the appliance gives you 5
minutesto complete the enrolment process.
Wi-Fi icon
- iconnot lit: Wi-Fi is off.
- Iconblinks 1 second on an 1 second off:the oven is accessible to yourWi-Fi networkand ready to be enrolled.
If theenrolmenthas not beensuccessful, the Wi-Fi icon will switch off after5 minutes.
- Iconis permanentlylit: the oven is connected toyour Wi-Firouter.
- Theicon blinks3 secondson and 1second off:the ovenis trying to connect to yourWi-Fi router.
- Theicon blinks1 secondon and 3seconds off: theoven isin read only mode.
WiFi (depends on the oven model)
HOOVER :
For detailed information on HOW TO CONNECT your OneFi appliance and HOW
TO USE IT effectively, go to http://wizardservice.candy-hoover.com/
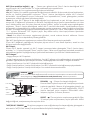
Grill
Oven box
Turnspit
Circular
heating element
Bottom heating element
Fan
Defost
Pyro
LANGUAGE SETTING The language can be set when
the oven is switched off by pressing the Extra and Select
buttonssimultaneously and for 3". The currentlanguage is
shown on the display and can be changed by pressing the
“<” or “>” keys, confirming it by pressing SELECT. Available
languages are: Italian,English, French and German.
SELECT Any selection must be confirmed. If not
confirmed within 15 seconds, the selection is cancelled.
By changing menu, any unconfirmedselection is lost.
“HOT” ICON When a cooking programme finishes or when the oven switches off, if the oven is still
hot, the display shows thecurrent time alternating with the message“HOT” at 3" intervals.
EN 10

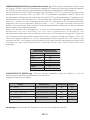
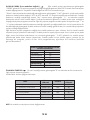
PRE-SETTED RECIPES When a recipe is selected the display shows “R” followed by the number of
the recipeand shows thecorrespondentway of cooking.
The available recipesare the following:
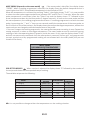
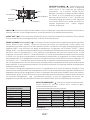
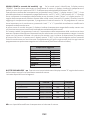
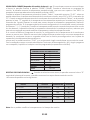
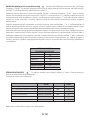
MEAT PROBE
RECOMMENDED TEMPERATURES
Meat
Rare
Medium rare
Medium
Well done
Salmon
Chicken
56
58
60
62
35
min 68
RECIPE
COOKING
METHOD
TEMPERATURE
COOKING
DURATION
R1- Lasagne
R2- Roast/Oven cooked chicken
R3- Crusted bream
R4- Baked potatoes
R5- Omelette
Static + fan
Static
150°
180°
10°6
45’
4’0
25’
Static + fan
Static + fan
Static + fan
180°
180°
4’0
45’
R6- Apple pie
Static + fan
180°
45’
EN 11
NB: It is not possible to change neither the temperature nor the cooking duration.
MEAT PROBE (depends on the oven model) If the meat probe is identified, the display shows
"PROBE". When a cooking programme is selected, the display shows the default temperature but is
neverhigher than 200°C: the selectabletemperature is also limitedto 200°C.
When the temperature is confirmed, by pressing "Select", the display shows “ 40°”: it is now possible
to select the meat probe target temperature, between 30°C and 90°C at 1°C intervals. When the meat
probe temperature is confirmed, press the "Select" key and the display shows “” followed by the
actual temperature taken by the meat probe (1 degree intervals). As soon as the meat probe reaches
the set temperature, the cooking programme terminates. If a cooking programme is set with the meat
probe, by pressing the “-” and “+” keys you can see and modify the temperature of the meat probe: at
the first touch of one of the two keys, the display showsthe meat probe target temperature, while at the
nexttouch you can change the selectedtemperature of the probe.
If the user changes the cooking programme, the meat probe temperature setting is reset. Repeat the
setting sequence to select a new target temperature. The meat probe cannot be used with pre-set
cooking or with the separating plate (if present) inside the oven: in this case the display shows“ NO”
and will not execute any command until the meat probe is removed. Defrost, grill, any program with
turnspit, pyrolysis and any programmed cooking are not allowed with the meat probe (they are not
shown onthe menu).

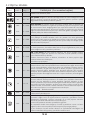
T °C
default
180
210
200
210
40
L3
T °C
range
40 ÷ 40
50 ÷ 240
50 ÷ 230
150 ÷ 220
50 ÷ 240
L1 ÷ L5
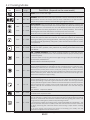
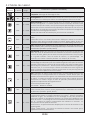
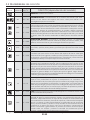
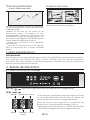
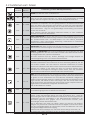
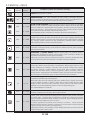
Function
Dial
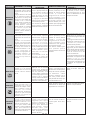
Function (Depends on the oven model)
LAMP: Turns on the oven light.
GRILL: use the grill with the door closed.
The top heating element is used alone and you can adjust the temperature. Five
minutes preheating is required to get the elements red-hot. Success is guaranteed
forgrills, kebabs and gratin dishes. White meatsshould be put ata distance from the
grill; the cooking time is longer, but the meat will be tastier. You can put red meats
and fish fillets on the shelf with the drip tray underneath. The oven has two grill
positions:
Grill: 2140 W Barbecue: 3340 W
FAN ASSISTED GRILL :use the turbo-grillwith the door closed.
The top heating element is used with the fan circulating the air inside the oven.
Preheating is necessary for red meats but not for white meats. Ideal for cooking
thick food items, whole pieces such as roast pork, poultry, etc. Place the food to be
grilled directly on the shelf centrally, at the middle level. Slide the drip trayunder the
shelf to collect the juices. Make sure that the food is not too close to the grill. Turn
the foodover halfwaythroughcooking.
FAN COOKING: We recommend you use this method for poultry, pastries, fish
and vegetables. Heat penetrates into the food better and both the cooking and
preheating times are reduced. You can cook different foods at the same time
with or without the same preparation in one or more positions. This cooking
method gives evenheat distribution and the smells arenot mixed.
Allow about tenminutes extrawhen cookingfoodsatthe sametime.
DEFROST: When the dial is set to this position. The fan circulates air at room
temperature around the frozen food so that it defrosts in a few minutes
without the protein content ofthe food beingchanged or altered.
*Tested in accordance with the CENELEC EN 60350-1 used for definition of energy class.
3.2 Cooking Modes
FAN + LOWER ELEMENT: The bottom heating element is used with the fan
circulatingthe air inside the oven. This method is ideal for juicy fruit flans, tarts,
quiches and pâté.
It prevents food from drying and encourages rising in cakes, bread dough and
other bottom-cooked food.
Place the shelf in the bottom position.
EN 12
*
220 50 ÷ 280
CONVENTIONAL COOKING: Both top and bottom heating elements are used.
Preheat the oven for about ten minutes. This method is ideal for all traditional
roasting and baking. Forseizing redmeats, roastbeef, leg of lamb, game, bread,
foilwrapped food (papillotes), flaky pastry. Place the food and its dish on a shelf
in mid position.
BOTTOM: Using the lower element. Ideal for cooking all pastry based dishes.
Use this for flans, quiches, tarts, pate and any cooking that needs more heat
frombelow.
PIZZA - With this function hot air circulatedin the oven to ensure perfect result
fordishes such as pizza or cake.
The " " function allows you to cook in a healthier way, by reducing the amount ofECO
fat or oil required. Thanks to the use of the grill and fan combined with a pulsating
cycle of air, it will retain the moisture content of the food, grilling the surface and
using a shorter cookingtime, without compromisingon taste.
It is particularly suitable for cooking meat, roasted vegetables and omelettes. The
cycle of pulsed air keeps the humidity inside the oven and the moisture content of
the food, preserving the nutritional values and ensuring a rapid uniform cooking
process.
Try all your recipes and reduce the amount of dressing you usually use and
experiencethe lightness of thisnew function!
210 50 ÷ 230
220 50 ÷ 230
190 50 ÷ 230
*

EN 13
4. Oven cleaning and maintenance
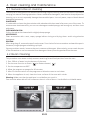
4.1 General notes on cleaning
The lifecycle of the appliancecan be extendedthrough regular cleaning. Waitforthe oven tocool before
carrying out manual cleaning operations. Never use abrasive detergents, steel wool or sharp objects for
cleaning, so as to not irreparably damage the enamelled parts. Use only water, soap or bleach-based
detergents (ammonia).
GLASS PARTS
It is advisable to clean the glass window with absorbent kitchen towel after every use of the oven. To
remove more obstinate stains, you can use a detergent-soaked sponge, well wrung out, and then rinse
with water.
OVENWINDOW SEAL
If dirty, the seal can be cleanedwith a slightly damp sponge.
ACCESSORIES
Clean accessories with a wet, soapy sponge before rinsing and drying them: avoid using abrasive
detergents.
DRIP PAN
After using the grill, removethe pan fromthe oven. Pour the hot fat intoa container and wash the pan in
hot water, using a sponge and washing-up liquid.
If greasy residues remain, immerse the pan in water and detergent. Alternatively, you can wash the pan
in the dishwasher or use a commercial oven detergent. Neverput a dirty pan backinto the oven.
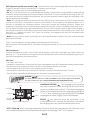
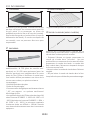
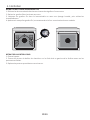
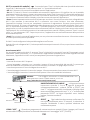
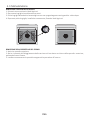
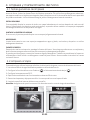
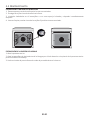
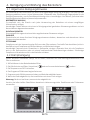
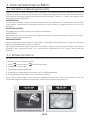
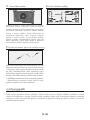
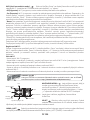
4.2 Steam Cleaning
This procedure uses steam to help remove remaining fat and food particles from the oven.
1. Pour 300 ml of water into the bottom of the oven.
2. Set the oven function to Static ( )or Bottom heater ( ).
3. Set the temperature at 90°C.
4. Allow the program to operate for 30 minutes.
5. After 30 minutes switch off the program and allow the oven to cool down.
6. When the appliance is cool, clean the inner surfaces of the oven with a cloth.
Warning: Make sure that the appliance is cool before you touch it.
Care must be taken with all hot surfaces as there is a risk of burns. Use distilled or drinkable water.
300 ml

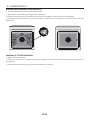
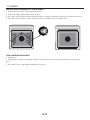
REMOVAL AND CLEANINGOF THE SIDE RACKS
1. Unscrewthe bolt in an anti-clockwisedirection.
2. Remove the side racks by pulling them towardsyou.
3. Clean theside racks in a dishwasher or with a wet sponge andthen dry them immediately.
4. Having cleaned the side racks, put them back in and reinsert the bolts, ensuring that they are fully
tightened.
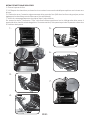
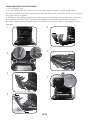
4.3 Maintenance
A
REMOVAL OF THE OVENWINDOW
1. Open thefront window.
2. Open the clamps of the hinge housing on the right and left side of the front window by pushing them
downwards.
3. Replacethe window bycarrying out the procedure in reverse.
EN 14

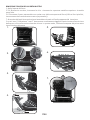
LOW-E
1
2
3
1.
2.
3.
4.
5.
6.
7.
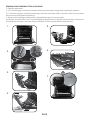
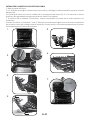
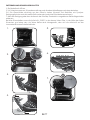
REMOVAL AND CLEANINGOF THE GLASS DOOR
1. Open theoven door.
2.3.4. Lock thehinges, removethe screwsand remove the upper metal cover by pulling it upwards.
5.6. Remove the glass, carefully extracting it from the oven door (NB: in pyrolytic ovens, also remove
the secondand third glass (if present)).
7. At the end of cleaning or substitution, reassemblethe parts in reverse order.
On all glass, the indication "Pyro" must be legible and positioned on the left side of the door, close to the
left-hand lateral hinge.In this way, the printedlabel of the first glass will be insidethe door.
EN 15

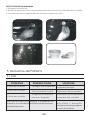
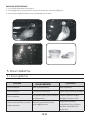
CHANGING THE BULB
1. Disconnectthe oven fromthe mains supply.
2. Undo theglass cover, unscrewthe bulb and replace itwith a new bulb of the same type.
3. Once thedefectivebulb is replaced,replace the glass cover.
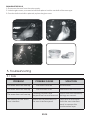
5. Troubleshooting
5.1 FAQ
PROBLEM POSSIBLE CAUSE SOLUTION
The oven does not heat up
The clock is not set Set the clock
The child lock is on
A cooking function and
temperature has not been set
Deactivate the child lock
Ensure that the necessary
settings are correct
The oven does not heat up
The oven does not heat up
EN 16
Steam and condensation on
the user interface panel
Clean with a microfiber
cloth the user interface
panel to remove the
condensation layer
No reaction of the touch
user interface

• AVERTISSEMENT: L'appareil et les parties accessibles deviennent
chauds pendant l'utilisation. Des précautions doivent être prises pour
éviterde toucherles élémentschauffants.
• ATTENTION : les parties accessibles peuvent devenir très chaudes
quand le four est en marche. Les enfants doivent être tenus à une
distance de sécurité.
• Cet appareil n'est pas destiné à être utilisé par des personnes (y
compris les enfants) dont les capacités physiques, sensorielles ou
mentales sont réduites, ou ayant un manque d'expérience et de
connaissances, à moins qu'elles n'aient été formées à l'utilisation de
l'appareil,par une personneresponsablede leur sécurité.
• Les enfants ne doivent jouer avec l'appareil.
• Le nettoyage et l'entretien par l'utilisateur ne doit pas être fait par des
enfants sans surveillance.
• En cours d'utilisation l'appareil devient chaud. Des précautions
doivent être prises pour éviter de toucher les éléments chauds à
l'intérieur du four.
AVERTISSEMENT: Les parties accessibles peuvent devenir chaudes
pendantl'utilisation. Les jeunes enfants doiventêtre tenus à l'écart.
• Ne pas utiliser de nettoyants abrasifs ou de racloirs métalliques
tranchants pour nettoyer la vitre de la porte du four car ils peuvent rayer
la surface, entrainant des risques d'explosion.
•Le four doit être éteint avant d'enlever la protection et après le
nettoyage, la protectiondoit être replacé en respectant les instructions.
• Utiliser seulement la sonde de température recommandée pour ce
four.
• Ne pas utiliser de nettoyantsvapeurpour le nettoyage.
• Brancher le câble d’alimentation sur une prise de courant qui
supporte le voltage ; le courant et la charge sont indiqués sur l’étiquette
; vérifier la présence d’une mise à la terre. La prise d’alimentation doit
supporter la charge indiquée sur l’étiquette et être dotée d’une mise à
la terre en état de fonctionnement. Le conducteur de mise à la terre est
jaune et vert. Cette opération doit être exécutée par du personnel
FR 17
Conseils De Securite

qualifié. En cas d’incompatibilité entre la prise d’alimentation et la fiche
du câble de l’appareil, demander à un électricien professionnel de
remplacer la prise d’alimentation par un dispositif compatible. La fiche
du câble d’alimentation et la prise d’alimentation doivent être
conformes aux normes en vigueur dans le pays d’installation. Il est
possible de brancher l’appareil à la prise d’alimentation en installant un
disjoncteur multipolaire qui supporte la charge électrique maximale,
conformément aux lois en vigueur, entre l’appareil et la prise
d’alimentation.Le conducteur jaune et vert de mise à la terre ne doit pas
être bloqué par le disjoncteur. La prise d’alimentation ou le disjoncteur
multipolaire utilisé pour le branchement doit rester à tout moment
accessible lors de l’installation de l’appareil.
•Le débranchement doit se faire en accédant à la prise d’alimentation
ou en prévoyant un interrupteur sur le circuit électrique fixe, conforme
aux normes électriques.
•Si le câble d’alimentation est endommagé, il doit être remplacé par un
câble ou un faisceau de câbles spécial disponible auprès du fabriquant
ou en contactant le service après-vente.
•Le câble d’alimentationrequisestle H05V2V2-F.
•Le non-respect des consignes ci-dessus peut compromettre la sécurité
de l’appareil et annuler la garantie.
•Tout produit déversé en quantité doit êtreéliminé avant le nettoyage.
•Pendant le nettoyage à pyrolyse, les surfaces peuvent devenir
beaucoup plus chaude que d’habitude, les enfants doivent donc être
tenusà une distancede sécurité.
•Ne pas installer l’appareil derrière une porte décorative, pour éviter la
surchauffe.
•En introduisant le plateau dans le four, s’assurer que le stop est dirigé
vers le haut et au fond de la cavité.
Le plateau doit complètement être inséré dans la cavité
• AVERTISSEMENT : Ne tapissez pas les parois du four avec du papier
aluminium ou un autre matériau de protection jetable en vente dans le
commerce. Tout papier aluminium ou autre matériau de protection qui
entrerait au contact direct de l'émail chaud risquerait de fondre et de
détériorer l'émail intérieurdu four.
• AVERTISSEMENT : Ne retirez jamais le jointde la porte dufour.
FR 18

SOMMAIRE
FR 19
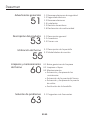
Instructions Générales
20
1.1 Indications de sécurité
1.2 Sécurité électrique
1.3 Recommandations
1.4 Installation
1.5 La gestion des déchets et la
protection de l'environnement
1.6 Déclaration de conformité
2.1 Vue d'ensemble
2.2 Accessoires
2.3 Première utilisation
Description du produit
22
3.1 Description de l'affichage
3.2 Mode de cuisson
Utilisation du Four
24
4.1 Remarques générales concernant
le nettoyage
4.2 Nettoyage à la vapeur
4.3 Entretien
• Retrait et nettoyage des grilles
• Retrait de la porte du four
• Retrait et nettoyage des vitres
• Remplacement de l'ampoule
Nettoyage du four et
maintenance
29
5.1 F.A.Q.
Dépannage
32

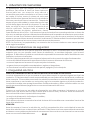
1. Instructions générales
Nous vous remercions d'avoir choisi un de nos produits.
Pourobtenir les meilleurs résultats avec votre four, vous
devezlire attentivement ce manuel et le conserver pour
toute consultation ultérieure. Avant d'installer le four,
notez le numéro de série, il vous sera demandé par le
support technique si des réparations sont nécessaires.
Après avoir enlevé le four de son emballage, vérifiez
qu'il n'a pas été endommagé pendant le transport. Si
vous avez des doutes, ne pas utiliser le four et se référer
à un technicien qualifié pour obtenir des conseils.
Conservez tous les matériaux d'emballage (sacs en
plastique, polystyrène, clous) hors de la portée des
enfants.Lors de la première utilisation du four, il peut se produire un dégagement de fumée âcre
provoqué par le premier échauffement de la colle des panneaux d’isolation enveloppant le four. Ce
phénomène est normal. Attendez que la fumée cesse avant de cuire des aliments. Le fabricant décline
toute responsabilité dans les cas où les instructions contenues dans le présent document ne sont pas
respectées.
REMARQUE: les fonctions du four, les propriétés et les accessoires cités dans ce manuel peuvent varier
selon les modèles.
1.1 Indications de sécurité
Utilisez uniquement le fourà sa destination, qui est seulement pour la cuisson des aliments; toute autre
utilisation, par exemple comme une source de chaleur, est considérée comme impropre et donc
dangereuse. Le fabricant ne peut être tenu responsable de tout dommage lié à une mauvaise utilisation
ou a desmodifications techniquesdu produit.
L'utilisationde tout appareilélectrique implique le respectde certaines règlesfondamentales:
- Ne pastirer sur le fil électriquepour débrancher la prise.
- Ne pastoucher l'appareil avec les mains ou les pieds mouillés ou humides;
- En général l'utilisation d'adaptateurs, de prises multiples etde rallonges est déconseillé;
- En cas de dysfonctionnement et / ou de mauvais fonctionnement, éteindre l'appareil et ne pas y
toucher.
1.2 Sécurité électrique
LE BRANCHEMENT ELECTRIQUE DOIT ÊTRE REALISE PAR UN INSTALLATEUR AGREE OU UN
TECHNICIENDE E.QUALIFICATION SIMILAIR
L'alimentation électrique à laquelle le four est connecté doit être conforme aux lois en vigueur dans le
pays d'installation. Le fabricant décline toute responsabilité pour tout dommage causé par le non
respect de ces instructions. Le four doit être raccordé à l'alimentation électrique avec une prise murale
reliée à la terre ou par l'intermédiaire d'un dispositif à coupure omnipolaire, selon les lois en vigueur
dans le pays d'installation.L'alimentationélectrique doit être protégée par des fusibles appropriés et les
câblesutilisés doivent avoir une section transversalequi peut assurerune alimentationnormale du four.
CONNEXION
Le four est livré avec un câble d’alimentation permettant le raccordement sous une tension électrique
de 230 V entre les phases ou entre phase et neutre. Le raccordement devra être effectué après avoir
vérifié:
- La tensiond'alimentationindiquée sur le compteur;
- Le réglage du disjoncteur.
Le fil de protection du cordon (vert/jaune) relié à la Borne Terre de l’appareil doit être relié à la Borne
Terre de l’installation.
FR 20
La pagina si sta caricando...
La pagina si sta caricando...
La pagina si sta caricando...
La pagina si sta caricando...
La pagina si sta caricando...
La pagina si sta caricando...
La pagina si sta caricando...
La pagina si sta caricando...
La pagina si sta caricando...
La pagina si sta caricando...
La pagina si sta caricando...
La pagina si sta caricando...
La pagina si sta caricando...
La pagina si sta caricando...
La pagina si sta caricando...
La pagina si sta caricando...
La pagina si sta caricando...
La pagina si sta caricando...
La pagina si sta caricando...
La pagina si sta caricando...
La pagina si sta caricando...
La pagina si sta caricando...
La pagina si sta caricando...
La pagina si sta caricando...
La pagina si sta caricando...
La pagina si sta caricando...
La pagina si sta caricando...
La pagina si sta caricando...
La pagina si sta caricando...
La pagina si sta caricando...
La pagina si sta caricando...
La pagina si sta caricando...
La pagina si sta caricando...
La pagina si sta caricando...
La pagina si sta caricando...
La pagina si sta caricando...
La pagina si sta caricando...
La pagina si sta caricando...
La pagina si sta caricando...
La pagina si sta caricando...
La pagina si sta caricando...
La pagina si sta caricando...
La pagina si sta caricando...
La pagina si sta caricando...
La pagina si sta caricando...
La pagina si sta caricando...
La pagina si sta caricando...
La pagina si sta caricando...
La pagina si sta caricando...
La pagina si sta caricando...
La pagina si sta caricando...
La pagina si sta caricando...
La pagina si sta caricando...
La pagina si sta caricando...
La pagina si sta caricando...
La pagina si sta caricando...
La pagina si sta caricando...
La pagina si sta caricando...
La pagina si sta caricando...
La pagina si sta caricando...
La pagina si sta caricando...
La pagina si sta caricando...
La pagina si sta caricando...
La pagina si sta caricando...
La pagina si sta caricando...
La pagina si sta caricando...
La pagina si sta caricando...
La pagina si sta caricando...
La pagina si sta caricando...
La pagina si sta caricando...
La pagina si sta caricando...
La pagina si sta caricando...
La pagina si sta caricando...
La pagina si sta caricando...
La pagina si sta caricando...
La pagina si sta caricando...
La pagina si sta caricando...
La pagina si sta caricando...
La pagina si sta caricando...
La pagina si sta caricando...
La pagina si sta caricando...
La pagina si sta caricando...
La pagina si sta caricando...
La pagina si sta caricando...
La pagina si sta caricando...
La pagina si sta caricando...
La pagina si sta caricando...
La pagina si sta caricando...
La pagina si sta caricando...
La pagina si sta caricando...
La pagina si sta caricando...
La pagina si sta caricando...
La pagina si sta caricando...
La pagina si sta caricando...
-
 1
1
-
 2
2
-
 3
3
-
 4
4
-
 5
5
-
 6
6
-
 7
7
-
 8
8
-
 9
9
-
 10
10
-
 11
11
-
 12
12
-
 13
13
-
 14
14
-
 15
15
-
 16
16
-
 17
17
-
 18
18
-
 19
19
-
 20
20
-
 21
21
-
 22
22
-
 23
23
-
 24
24
-
 25
25
-
 26
26
-
 27
27
-
 28
28
-
 29
29
-
 30
30
-
 31
31
-
 32
32
-
 33
33
-
 34
34
-
 35
35
-
 36
36
-
 37
37
-
 38
38
-
 39
39
-
 40
40
-
 41
41
-
 42
42
-
 43
43
-
 44
44
-
 45
45
-
 46
46
-
 47
47
-
 48
48
-
 49
49
-
 50
50
-
 51
51
-
 52
52
-
 53
53
-
 54
54
-
 55
55
-
 56
56
-
 57
57
-
 58
58
-
 59
59
-
 60
60
-
 61
61
-
 62
62
-
 63
63
-
 64
64
-
 65
65
-
 66
66
-
 67
67
-
 68
68
-
 69
69
-
 70
70
-
 71
71
-
 72
72
-
 73
73
-
 74
74
-
 75
75
-
 76
76
-
 77
77
-
 78
78
-
 79
79
-
 80
80
-
 81
81
-
 82
82
-
 83
83
-
 84
84
-
 85
85
-
 86
86
-
 87
87
-
 88
88
-
 89
89
-
 90
90
-
 91
91
-
 92
92
-
 93
93
-
 94
94
-
 95
95
-
 96
96
-
 97
97
-
 98
98
-
 99
99
-
 100
100
-
 101
101
-
 102
102
-
 103
103
-
 104
104
-
 105
105
-
 106
106
-
 107
107
-
 108
108
-
 109
109
-
 110
110
-
 111
111
-
 112
112
-
 113
113
-
 114
114


Hoover HOT7174WI WIFI Manuale utente
- Tipo
- Manuale utente
- Questo manuale è adatto anche per
Documenti correlati
-
Hoover HOZ7173IN WIFI Manuale utente
-
Hoover HOAZ7173IN WIFI Manuale utente
-
-
-
-
-
-
Hoover HOE7173IN WIFI Manuale utente
-
-