
User's manual
-T receiver with 3.5 TFT (QVGA)
``

12
BASIC OPERATIONS........................
TURNING ON/OFF THE MAIN UNIT..................
DVB-T SETUP...................................
HOW TO DEFINE FAVORITE PROGRAM................
ELECTRONIC PROGRAM GUIDE......................
DTV SETTING ..................................
AUTO SCAN.....................................
MANUAL SCAN...................................
DISPLAY.......................................
SYSTEM........................................
SD-MMC MODE...................................
PLAYING THE FILE STORING IN A MEMORY CARD.....
PLAYING Mp3 FILE..............................
PLAYING JPEG FILE.............................
PLAYING Mp4 FILE..............................
GAME MODE.....................................
HOW TO SELECT TV PROGRAM......................
HOW TO SELECT FAVORITE PROGRAM................
HOW TO CONTROL THE VOLUME.....................
12
13
13
14
14
14
14
14
14
14
1
01
08
PRECAUTIONS......................................
Table of contents
ACCESSORIES.....................................
PARTS AND FUNCTIONS.......................
SPECIFICATION.....................................
2
3
4
02
03
05
02
TROUBLE SHOOTING
.............................
15
03
PARTS IN THE FRONT OF THE UNIT............
PARTS IN THE LEFT OF THE UNIT.............
PARTS IN THE BOTTOM OF THE UNIT...........
PARTS IN THE TOP OF THE UNIT..............
KEYPAD IN THE MAIN UNIT...................
03
03
04
03
USING THE BATTERY..........................
5
CONNECTING THE MAIN UNIT TO OTHER
COMPONENTS............................
CONNECTING TO ANTENNA.....................
CONNECTING TO AC-DC ADAPTER...............
CONNECTING EARPHONE.......................
CONNECTING TO PC..........................
CONNECTING TO MEMORY CARD (SD/MMC)........
CONNECTING TO A TV SET....................
10
10
10
10
11
11
11
5
66
06
06
07
06
08
08
09

1
WARNING:
Precautions
01
Thank you for purchasing this smart product.
Please read this manual carefully before operating this product.
Please keep this manual for future use. It will be helpful to you if you are encounter any
operational problem.
TO REDUCE THE RISK OF FIRE OR ELECTRIC SHOCK, DO NOT USE THE UNIT
IN THE RAIN OR MOISTURE ENVIRONMENT.
ONLY USE ACCESSORIES SPECIFIED BY THE MANUFACTURE.
PLEASE KEEP THE UNIT IN THE TEMPERATURE 10~50.
PLEASE TURN THE POWER SWITCH OFF WHEN DON'T USE THE UNIT.
CLEAN ONLY WITH A DAMP CLOTH.
Pr ecaut ions
Ca utions on using th is smar t produ ct
Ensure a minim um dist ance of 5 cm arou nd the ap parat us for su ffici ent ven tilat ion.
Ensure that th e venti latio n is not im peded b y cover ing the v entil ation o penin gs
with items suc h as news paper s,tab le-cl oths, curta ins,e tc.
Do not place nak ed flam e sourc es,su ch as lig hted ca ndles o n the app aratu s.
Use the appara tus onl y in mode rate cl imate s(not i n tropi cal cli mates ).
Do not expose th e appar atus to d rippi ng or spl ashin g.
Do not place obj ects fi lled wi th liqu ids,s uch as va ses ,on t he appa ratus .
Do not dispose o f the bat tery in t he usua l house hold ga rbage a t the end o f its
lifecycle; h and it ov er at a col lecti on poin t for the r ecycl ing of el ectri cal
and electron ic appl iance s.

1
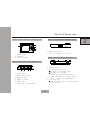
Please check the accessories according to the following:
Ac cesso ries
Earphone
AV cable
AC/DC switching adapter
User's manual
Main unit(built in battery )
Mini cupula antenna
1pcs
1pcs
1pcs
1pcs
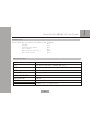
Accessories&Specifications
02
VIDEO
TFT
POWER
SIZE
NET WEIGHT
WORKING TEMPERATURE
DVB-T RECEIVER
SPEAKER
RECHARGEABLE BATTERY
Video output, 1.0Vpp/75Ω(PAL/NTSC)
3.5 digital TFT panel, 320x240 RGB strip
AC/DC switching adapter,AC input 100~240V,DC output 5V/1.0A
128x80x18.5 mm
170g (include battery)
5 ~ 40
VHF,UHF
0.8W/8ohm
2200mAh/3.6V Li-polymerization
Sp ecifi cations
C
C
1p cs
1p cs
``

PORTABLE MULTIMEDIA PLAYER
MENU
CH+
CH-
Fav- Fav+
OK
Parts in the top of the main unit
Antenna socket
1.
1
Parts & Functions
Pa rts in th e front of the main unit
2
1.
2.
3.
2.
LCD display
Speakers
Control keypad
3.
Parts in the bottom of the main unit
1
1
2
3
3
3
03
2
3
5V DC input
Connecting to AC-DC adapter
Earphone jack
1.
2.
3.
4.
USB(1.1) socket
Video output
Output video signal
Parts in the left of the main unit
1
2
3
4
USB DC INVIDEO OUT
SD CARD
Memory card socket
1.
Suit fo r SD/MM C car d re ade r
Po wer LED i ndica to r
Po wer but ton
When power on, the LED is light
When power off, the LED:
Flash: when charging the battery
Dim: when battery is fully charged
Off : when no use AC/DC adapter
Press the button for 1.5 second to power
on/off the unit

Keypad in the main unit
1.
2.
3.
4.
5.
Menu
Press the button to set the system
information.
/
OK
Press the button to confirm the select
6.
1
2
2
Parts & Functions
Fav-
/
Fav+
Cursor left/Favorite program
subtract
Cursor right/Favorite program
addition
04
/CH-
Cursor down/channel subtract
/CH+
Cursor up/channel addition
7.
8.
Volume +/-
Press these buttons to increase/
decrease the volume when the main
unit is in play mode.
Press the button to display program
information when the main unit is in
play mode.
Press the button to select Teletext,
Language,Subtitle when the main
unit is in play mode.
Press the button to Return
3
4
5
6
7
8
MENU
CH+
CH-
Fav- Fav+
OK

Please fully charge the bat ter y whe n the first using the unit.
The unit will be warmer when th e uni t is in u sing. It's normal.
Please switch power off whe n the u nit i s not used for long time
The unit will be auto switch po wer o ff wh en the battery is low.
05
3
Using battery
Warning
Don't use the battery which is not match the unit.Danger of explosion if battery is incorrectly
replaced.Replace only with the same or equivalent type.
The battery could play 2 hour s whe n the b attery is fully charged.
When charging the battery , the p owe r switch should be off.
Charging the battery using AC/DC adapter
Please follow the followi ng st ep:
Switch off the unit, you will s ee th e LED i ndicator is off . Plug AC/DC ad apt er & pl ug DC in, you will see
LED indicator
Flashing: when battery is c har ged ;
Dim: when battery is fully ch arg ed.
The charging time will be aro und 4 h our s.
The AC/DC adapter is switching adapter. The input voltage is 100V~240V, Output voltage is 5V/1.0A
Precautions
Danger of burning out the unit if the AC/DC adapter is not match the unit. .
.
Warning

06
4
Connecting to DVB-T antenna
Plug the antenna to the anten na so cke t.
Please select correct ant enn a mod el in system setup menu.
The following is must be know n:
Type of antenna
The antenna is divided into 2 m ode l: Ac tive and Passive. When you ch ang e
the antenna, please choic e the c orr ect antenna model.
If you don't know the model, pl eas e cho ice passive. (In the setup me nu)
When the unit is moved to a new country
Please search the program f irs t. Th e signal is different from co unt ry,
you must select the correct c oun try .
Connecting the main unit to other components
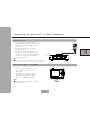
Connecting to AC-DC adapter
1 Please plug the AC-DC adapter to AC
power socket;
2 Connecting the DC output of adapter
to DC in of the main unit.
AC-DC adapter specification: 5V/1.0A
Please using the adapter that is the
standard accessory of the main unit.
Note:
USB DC INVIDEO OUT
Ma i n uni t
le f t sid e

07
4
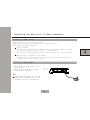
Connecting earphone
Connect the earphone plug securely to the earphone jack on the main unit.
To listen to the audio, using +/- to adjust the volume to a comfortable level.
Main unit
left side
To earphone jack
Insert the earphones plug securely.
No sound will be heard unless the earphones are securely connected.
No te:
Earphone
Note:
When using the earphone, pl eas e adj ust the volume smaller firs t, th en in sert
the earphone.
USB DC INVIDEO OUT
Connecting the main unit to other components

PC
USB c able ( co nn ec t t o PC )
08
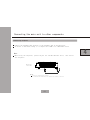
Connecting to PC
1 Please connect the PC USB cable to
the USB terminal of the main unit,
then the main unit could show PC
connected
2 The PC could explore the USB
automatically
3
The PC can read the contents of
card when there is memory card in
the main unit.At the same time,the
contents of card can be removed,
copied and deleted.
Main unit
left side
Connecting to memory card (SD/MMC)
1 Please insert the memory card
to the memory socket of the
main unit
2 The main unit can be read the
contents in the memory card
automatically when the main
unit is in SD/MMC card mode.
Please insert the memory card in
right direction.
Note:
Memory card
4
Note:
If connect to PC USB cable,the keypad
of the main unit can not be operated.
USB DC INVIDEO OUT
PORTABLE MULTIMEDIA PLAYER
MENU
CH+
CH-
Fav- Fav+
OK
Connecting the main unit to other components

09
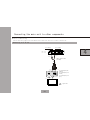
R L
视频输入
音频输入
:
(included)
TV
T o video input jack
(yellow)
T o audio input jack
(white)
T o audio input jack
(red)
Signal flow
Before connecting
Turn off the power of the main unit and the devi ces to be c onnec ted.
Connecting to a TV set
Video / audio cable
Blac k
Yell ow
Audio output
Video output
Main unit
left side
Yell ow
Red
Whit e
4
USB DC INVIDEO OUT
Connecting the main unit to other components

27
Basic operations
10
5
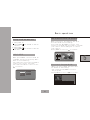
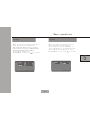
DVB-T SETUP
When press MENU ,the unit wil l be
in DVB-T setup status.Set up ma in
menu is as following:
You could use cursor key and O K t o
select the correct settin gs.
You could use Menu to exit or us e
to re tur n.
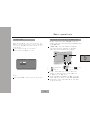
When you select TV channel,the un it
will be shown as following:
Using MENU to ex it or to return.
You could use UP/DOWN to sele ct yo ur
favorite program and pres s OK to c onf irm
your choice, Press OK again t o can cel
your choice.
When you select EPG ,the un it will
be shown as followi ng:
You could use UP/DO WN to sel ect
the program.
Using MENU to ex it or t o retur n.
El ec t ro ni c Pr og ra m G ui de
GD 1
GD 2
GD 3
01 / 01 / 20 06
01 : 00
02 : 00 03 : 00
Electronic Program Guid e
Turning on/off the main unit
1
2
Turn power on
Press POWER 1.5 seconds to turn on
the unit.
Turn power off
Press POWER 1.5 second to turn off
the unit.
TV C h an n el : F a vo r it e c ha n ne l
Pl ea se ' EN TE R' t o ad d to f av or it e
GD 1GD 1
GD 2GD 2
GD 3GD 3
GD 4GD 4
00 100 1
00 200 2
00 300 3
00 400 4
DT V c ha n ne l
DT V ch an ne l >
SD -M MC >
Us e 'R ig ht /L ef t' t o se le ct
Ra d io c h an . >
EP G >
TV c h an . >
Ga me >
Se tt in g >
DT V c ha n ne l
DT V ch an ne l >
SD -M MC >
Pr es s 'R ig ht /L ef t' t o se le ct
Ra d io c h an . >
EP G >
TV c h an . >
Ga me >
Se tt in g >
Ho w to defi ne favorite program

27
Basic operations
11
5
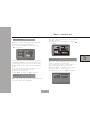
DT V Setting
When you s ele ct DT V Set tin g , the u nit
will be sh own a s fol low ing :
You could use MENU to exit and u s e
to re tur n.
SD -M MC
DT V S et t in g -> L ang ua g e
Pr es s 'R ig ht /L ef t' t o se le ct
Pr es s 'E nt er ' to p op l is t
La ng ua geLa ng ua ge
TV R a ti o
< En g li s h >
< 4: 3 PS >< 4: 3 PS >
Sc a n Area Sc a n Area
Au t o Sc a n
Lo c al T i me
An t en n a
< Ac t iv e >
< UK >
Ma n lu a l Sc anMa n lu a l Sc an
< St a rt S c a n >< St a rt S c a n >
< St a rt S c a n >< St a rt S c a n >
< GM T +0 0 :0 0 >< GM T +0 0 :0 0 >
You could use cursor Up/Dow n to se lec t
Language,TV Ra tio ,set a cti ve an tenna
or passive antenna, set S c an A r ea an d
Loc al Ti me,sel ect A uto S c an or M anu al
Sca n.
Use cursor left/right to se lec t the
correct setup which you wan t.
Press OK to pop list.
Using MENU to e xit o r to return .
When you select Area Scan,t he ma in un it
will be shown as following:
Sc a nn i ng . .. .
Pr es s ME NU t o st op a nd e xi t
DVB
RA DI O: 00 00
TV : 0 00 4
Ch a nn e l Ch a nn e l
Fr e qu e nc y
Pr o gr e ss
St r en g th
57
Qu al it y
76 2 00 0 KH Z
45 / 57
0
0
NO r a di o p ro gra m NO r a di o p ro gra m
00 0 1. G D 10 00 1. G D 1
00 0 2. G D 20 00 2. G D 2
00 0 3. G D 30 00 3. G D 3
00 0 4. G D 40 00 4. G D 4
Sc a nn i ng
Pr es s 'M en u' o r 'R et ur n' t o st op /r e t u r n
Ra di o: 00 00
TV : 0 00 4
Ch a nn e l Ch a nn e l
Fr e q.
Pr o gr e ss
St r en g th
55
Qu al it y
74 6 00 0 KH Z
35 / 48
0
0
NO r a di o p ro gra m NO r a di o p ro gra m
00 0 1. G D 10 00 1. G D 1
00 0 2. G D 20 00 2. G D 2
00 0 3. G D 30 00 3. G D 3
00 0 4. G D 40 00 4. G D 4
When you select Manual Scan ,th e uni t
will be shown as following:
You could use cursor le ft/ ri ght t o
sel ect c hanne l which you want.
Usi ng Up /Do wn to s ele ct St art S can
and press OK to start scan.
Using Me nu to e xit o r to re tur n .
DT V S et t in g -> Cha nn e l
Pr e ss ' U p/ Do w n' t o m ov e
pr e ss ' R ig ht / Le f t' t o s el ect
Ch a nnel Ch a nnel
Fr e qu e nc y
St a rt S c an
< 21 >
47 40 00 K HZ
OK OK
Au to Scan
Manual Scan
The main unit will search the p rog ram
automatically.
Using Me nu to stop and exit or u s e
to re tur n.
< Un de fi ne d >

Basic operations
2712
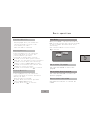
When you select displ ay,the unit
will be shown as following:
Press O K to POP li st.
Using MENU to ex it an d to retu rn.
When you select Syste m,the unit
will be shown as following:
You cou ld use cu rsor UP /Down t o
selec t Defau lt or sys tem Inf o and
press O K to conf irm you r selec t.
Using MENU to ex it and to retu rn.
You could use Cursor key to select
your favorate setting of Brightness,
Contrast,Hue and TV Standard.
Di s pl a y- > B ri gh t ne s s
Pr es s 'R ig ht /L ef t' t o se le ct
Pr es s 'E nt er ' to p op l is t
Br i gh t ne ssBr i gh t ne ss
Co n tr a s t
< 5 >
< 5 >< 5 >
TV S ta nd ar d TV S ta nd ar d
Hu e
< 5 >
< NT SC >
Sy s te m -> D e fa ul t
Pr es s 'U p/ Do wn ' to m ov e
Pr es s 'E nt er ' to c on fi rm a ct io n
De f au l tDe f au l t
Sy s te m I n f o
Lo a d
Sh o w In f o Sh o w In f o
Sy stem
Di splay
5

27
Basic operations
13
5
SD-MMC MODE
When press MENU ,the unit will be in
DVB-T setup status.Use cursor up/down
to select SD-MMC.The main menu is as
following:
You could use OK to con firm.
You could use ME NU to e xit .
“READ CARD” will be shown in LCD and
the files will be display in the LCD
when the unit finished the reading.
Playing the file storing in a memory card
Please insert the card (SD,MMC) into the
socket. The file will be played automatically
in SD-MMC mode.
The SD and MMC can be read in this unit.
Note:
[MP3_1] 1001.MP3
0 1 . M P 3 _ 1
0 1 . 1 0 0 1
0 2 . 1 0 0 2
0 3 . 1 0 0 3
0 4 . 1 0 0 4
1 2
3 4
1. 2. File 3. Mp3 icon
4. JPEG icon 5. Mp4 icon
0 1 . 1 0 0 1
0 2 . 1 0 0 2
0 3 . 1 0 0 3
0 4 . 1 0 0 4
Directory
Using left/right /up /down to move the
cursor to the directory, file, MP3 icon
or JPEG icon or Mp4 icon.
Selecting MP3 icon/JPEG icon/MP4 icon and
press OK if you want to play MP3/JPEG/MP4.
Selecting a file and press OK if you want
to play the file.
5
DT V c ha n ne l
DT V ch an ne l >
SD -M MC >
Us e 'R ig ht /L ef t' t o se le ct
Ra d io c h an . >
EP G >
TV c h an . >
Ga me >
Se tt in g >
SD - MM C
DT V ch an ne l >DT V ch an ne l >
SD -M MC >SD -M MC >
Pr es s 'E nt er ' to c on fi rm s el ec ti on
Ga me >
Se tt in g >

How to select TV program
How to control the volume
You could use vol+/vol- to control the
volume.
You could use CH+/CH- to select the
program.
Basic operations
5
14
Playing Mp3 file
Playing Mp3 file,you could use
cursor up/down to select the
file which you like.
Then use OK to confirm.
Playing JPG file
Playing JPG file, you cou ld use
cursor up/down to s elect t he
picture which you l ike.
Press O K to wa tch ful l-scr een.
In full -scre en mo de ,pr ess cur sor
down for 1.5 second s to play s equen ce.
In full-screen mo de,us e curso r up
/down to select PRE V/NEX T pictu re.
In full-screen mo de,us e curso r le ft
/righ t to rotate pi cture .
In full-screen mo de,us e to retu rn.
Playing Mp4 file
Playing Mp4 file, you cou ld use
cursor up/down to s elect t he movi e
which you like.
Then use OK to confir m.
In play mode,use cu rsor up /down
select PREV/NEX T movie .
In play mode,use to r eturn .
How to select favorite program
You could use FAV+/FAV- to select the
favorite program.
Ga me Mode
You could use Menu to exit or us e
to re tur n.
DT V c ha n ne l
DT V ch an ne l >
SD -M MC >
Us e 'R ig ht /L ef t' t o se le ct
Ra d io c h an . >
EP G >
TV c h an . >
Ga me >
Se tt in g >
DT V c ha n ne l
DT V ch an ne l >DT V ch an ne l >
SD -M MC >
Pr es s 'R ig ht /L ef t' t o se le ct
Pr es s 'E nt er ' to c on fi rm s el ec ti on
Te tr is >
Bo x Ma n >Bo x Ma n >
Ga me >Ga m e >
Se tt in g >
When press MENU ,the unit will be in
DVB-T setup status.Use cursor up/down
to select Game .The main menu is as
following:

-D TV14 0 EN-V 0.1-
6
15
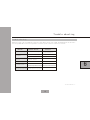
Trouble shooting
Please refer the followin g ins tru ction when there are some pro ble m wit h this unit.
If the problem still exit,p lea se co nsult your nearest servic e cen ter .
PROBLEM
POSSIBLE REASON
SOLUTION
Te mper atur e high
Pl ay tim e too lo ng
It’ s n or ma l, Pl ease po we r
off s ev er al m in utes.
No s igna l
An tenn a loos en
Ins er t th e an te nna aga in
An tenn a mode l erro r
Set ant e nna mod e l corre c tly
Ba tter y can’t b e
ch arge d
Ad apte r loos en
Ins er t th e ad ap ter aga in
Sp eake r no sou nd
Ea rpho ne in us e
Rem ov in g ea rp hone
Imag e qua l ity i s b ad
when h igh s p eed m o vin g
The u ni t on ly i s us ed for
med iu m sp ee d or l ow spee d
It’ s n or ma l.
No s ound i n TV
Ca ble lo osen
In sert t he cab le aga in
Co nnec ting c able e rror Conn ect i ng ca b le co rrec tly
Trouble shooting

Guarantee
This device has been tested a cco rdi ng to all
relevant current CE guide lin es, s uch as
electromagnetic compa tib ili ty and low voltage
directives, and has been co nst ruc ted in accord
-ance with the latest safet y reg ula tions.
Subject to technical chan ges w ith out prior notice!
Guarantee
The device supplied by our Co mpa ny is c overed
by a 24 month guarantee start ing o n the d ate of
purchase(receipt).
During the life of the guaran tee a ny fa ult of
the device or its accessori es as cri bable to
material or manufacturi ng de fec ts will be
eliminated free of charge b y rep air ing or,at
our discretion,by repla cin g it. T he guarantee
services do not entail an ext ens ion o f the life
of the guarantee nor do they gi ve ri se to a ny
right to a new guarantee!
Proof of the guarantee is pro vid ed by t he proof
of purchase.
Without proof of purchase n o fre e rep lacement
or repair will be carried out .
If you wish to make a claim under t he gu ara ntee
please return the entire ma chi ne in t he original
packaging to your dealer to get her w ith the receipt.
Defects to consumables or p art s sub ject to wearing
as well as cleaning, mainte nan ce or t he replacement
of said parts are not covered b y the g uar antee and
hence are to be paid!
The guarantee lapses in cas e of un aut horized
tampering.
After the expiry of th e guara ntee
After the expiry of the guara nte e rep airs
can be carried by the compete nt de ale r or
repair service against th e pay men t of the
ensuing costs.
Meaning of the “Dustb in”Symb ol
Protect our environment : Do no t dis pose of
electrical equipment in t he do mes tic waste.
Please return any electri cal e qui pment that
you will no longer use to the col lec tio n
points provided for their d isp osa l.
This helps avoid the potent ial e ffe cts of
incorrect disposal on the e nvi ron ment and
human health.
This will contribute to the r ecy cli ng and
other forms of reutilisat ion o f ele ctrical
and electronic equipmen t.
Information concernin g whe re th e equipment
can be disposed of can be obtai ned f rom y our
local authority.
-
 1
1
-
 2
2
-
 3
3
-
 4
4
-
 5
5
-
 6
6
-
 7
7
-
 8
8
-
 9
9
-
 10
10
-
 11
11
-
 12
12
-
 13
13
-
 14
14
-
 15
15
-
 16
16
-
 17
17
-
 18
18


in altre lingue
- English: Lenco TFT-360 User manual
Altri documenti
-
Matsui MAT7DB2656E Manuale utente
-
 Axess TVD1801-32 Manuale utente
-
Haier LE22G610CF Manuale utente
-
Haier LE32G610CF Manuale utente
-
Conceptronic 3.5" Media PVR 500GB Manuale utente
-
Teleco TEK32DE Televisore Manuale utente
-
aqprox! APPMPR1TDT Manuale utente
-
Haier LE40M600SF Manuale utente
-
-
Haier LE40B650CF Manuale del proprietario
