Gaggia VIVA CHIC Manuale del proprietario
- Categoria
- Macchine da caffè
- Tipo
- Manuale del proprietario
Questo manuale è adatto anche per

RI8433, RI8435, RI8437
SVENSKA
NEDERLANDS
NORSK
РУССКИЙ
DANSK
ΕΛΛΗΝΙΚΆ
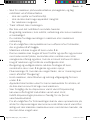
VIVA
STYLE / DELUXE / PRESTIGE
ENGLISH
ITALIANO
DEUTSCH
FRANÇAIS
ESPAÑOL
PORTUGUÊS
Operating instructions
Brugsanvisning
Bedienungsanleitung
Instrucciones de uso
Mode d'emploi
Istruzioni per l’uso
Gebruiksaanwijzing
Bruksanvisning
Instruções de uso
Bruksanvisning
Οδηγιες χρησης
Инструкция по эксплуатации
Gaggia Viva WEU_export_30029_72.indd 1 21/12/2018 10:55:46

Gaggia Viva WEU_export_30029_72.indd 2 21/12/2018 10:55:46

14
13
15
16
17
19
21 2220
18
12
1110
5
8 9
6
7
2
1
4
3
Gaggia Viva WEU_export_30029_72.indd 3 21/12/2018 10:55:47

Gaggia Viva WEU_export_30029_72.indd 4 21/12/2018 10:55:47

English 6
Dansk 17
Deutsch 28
Español 41
Français 53
Italiano 65
Nederlands 77
Norsk 89
Português 100
Svenska 112
Ελληνικα
123
Русский 135
Gaggia Viva WEU_export_30029_72.indd 5 21/12/2018 10:55:47

Introduction
This coee machine is suitable for preparing 1 or 2 cups of espresso coee and is equipped with a
swivel steam and hot water wand. The controls on the front of the machine are labeled with easy-to-
read symbols. The machine has been designed for domestic use and is not suitable for professional,
continuous use.
Clean cold water
Use clean cold water every day. If you have not used the coee machine for one day, you have to
ush it with clean cold water before you use it again. To ush the machine, ll the water tank with
clean cold water, place a bowl or 2 cups under the coee spout and brew hot water until the water
tank is empty.
Energy saving
The RI8437, RI8435, RI8433 machines are equipped with an auto power-o function for energy saving.
The auto power-o function automatically activates 30 minutes after setting the main switch to 'I'. To
switch the machine back on, set the main switch back to 'I'.
Important safety information
This machine is equipped with safety features. Nevertheless, read and follow the safety instructions
carefully and only use the machine as described in these instructions, to avoid accidental injury or
damage due to improper use of the machine. Keep this safety booklet for future reference.
Warning
- Check if the voltage indicated on the machine corresponds to the
local mains voltage before you connect the appliance.
- Connect the machine to an earthed wall socket.
- Do not let the power cord hang over the edge of a table or
worktop and do not let it touch hot surfaces.
- To avoid the danger of electric shock, never immerse the machine,
mains plug or power cord in water.
- If the mains cord is damaged, you must have it replaced by
Gaggia, a service center authorized by Gaggia or similarly qualied
person in order to avoid a hazard.
- Do not pour liquids on the power cord connector.
- To avoid the danger of burns, keep body parts away from hot
water jets produced by the machine.
- Do not touch hot surfaces. Use handles and knobs.
- Switch o the machine with the main switch located on the back
6
English
Gaggia Viva WEU_export_30029_72.indd 6 21/12/2018 10:55:47

and remove the mains plug from the wall socket:
- If a malfunction occurs.
- If you are not going to use the appliance for a long time.
- Before you clean the machine.
- Pull at the plug, not at the power cord.
- Do not touch the mains plug with wet hands.
- Do not use the machine if the mains plug, the power cord or the
machine itself is damaged.
- Do not make any modications to the machine or its power cord.
- Only have repairs carried out by a service center authorized by
Gaggia to avoid a hazard.
- The machine should not be used by children younger than 8 years
old.
- This machine can be used by children aged from 8 years and
above and by persons with reduced physical, sensory or mental
capabilities or lack of experience and knowledge if they have
been given supervision or instruction concerning use of the
machine in a safe way and if they understand the hazards
involved.
- Cleaning and user maintenance shall not be made by children
unless they are older than 8 and supervised.
- For instructions on how to clean surfaces that come into contact
with food, see chapter 'Cleaning'.
- Keep the machine, its accessories and its cord out of the reach of
children aged less than 8 years.
- Children should be supervised to ensure that they do not play
with the machine.
- Be carefull when you dispense hot water. Dispensing may be
preceded by small jets of hot water. Wait until the end of the
dispensing cycle before you remove the hot water dispensing
spout.
- To avoid the danger of burns, be aware that dispensing may be
preceded by small jets of hot water. Never touch the classic milk
frother with bare hands, as it may become very hot.
7
English
Gaggia Viva WEU_export_30029_72.indd 7 21/12/2018 10:55:47

- Only use this espresso maker for its intended use to avoid
potential injury.
Caution
- Always return the machine to a service center authorized by
Gaggia for examination or repair. Do not attempt to repair the
machine yourself, otherwise your warranty becomes invalid
- The machine is intended for normal household use only. It is not
intended for use in environments such as sta kitchens of shops,
oces, farms or other work environments, nor is it intended to
be used by clients in hotels, motels, bed and breakfast and other
residential environments.
- Always put the machine on a at and stable surface. Keep it in
upright position, also during transport.
- Do not place the machine on a hotplate or directly next to a hot
oven, heater or similar source of heat.
- When you clean the machine, let it cool down before you insert
or remove any parts. The heating surface may retain residual heat
after use.
- Never ll the water tank with warm, hot or sparkling water, as this
may cause damage to the water tank and the machine.
- Never use scouring pads, abrasive cleaning agents or aggressive
liquids such as petrol or acetone to clean the machine. Simply use
a soft cloth dampened with water.
- Descale your machine every 3 months. Not doing this will make
your machine stop working properly. In this case repair is not
covered by your warranty.
- Do not keep the machine at temperatures below 0°C/32°F. Water
left in the heating system may freeze and cause damage.
- Do not leave water in the water tank when you are not going to
use the machine for a long period of time. The water can become
contaminated. Use fresh water every time you use the machine.
- Never use any accessories or parts from other manufacturers or
that Gaggia does not specically recommend. If you use such
8
English
Gaggia Viva WEU_export_30029_72.indd 8 21/12/2018 10:55:47

accessories or parts, your warranty becomes invalid.
- Regular cleaning and maintenance prolongs the lifetime of your
machine and ensures optimum quality and taste of your coee.
- The machine is exposed continuously to moisture, coee and
scale. Therefore it is very important to regularly clean and
maintain the machine as described in the user manual and
shown on the website. If you do not perform these cleaning and
maintenance procedures, your machine eventually may stop
working. In this case repair is not covered by warranty.
- Never drink the solution dispensed during the descaling process.
- The machine shall not be placed in a cabinet when in use.
- After frothing milk, quickly clean the classic milk frother by
dispensing a small quantity of hot water into a container. Then
remove the external part of the classic milk frother and wash it
with lukewarm water.
- Never pour any other liquid than clean cold water into the water
tank.
- Do not clean the pressurized lter holder in the dishwasher. This
will damage the pressurized lter holder.
Electromagnetic elds (EMF)
This machine complies with all applicable standards and regulations regarding exposure to
electromagnetic elds.
9
English
Gaggia Viva WEU_export_30029_72.indd 9 21/12/2018 10:55:47

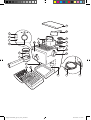
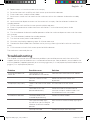
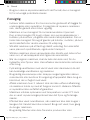
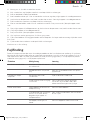
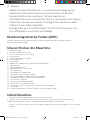
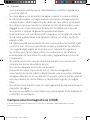
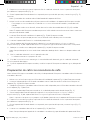
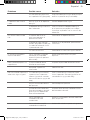
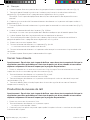
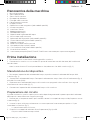
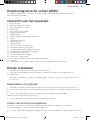
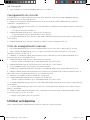
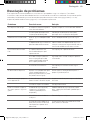
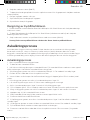
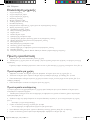
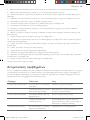
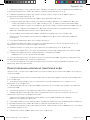
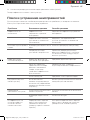
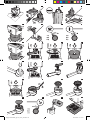
Machine overview
1 Power-on light
2 Steam ready light
3 Machine ready light
4 Selection knob
5 Ground coee lter
6 Pressurized lter holder
7 Brew unit
8 Drip tray cover (specic types only)
9 Drip tray
10 User interface
11 Cup holder rest
12 Water tank
13 Lid of the water tank
14 Ground coee measuring scoop
15 Pod lter adapter (specic types only)
16 Coee pod lter (specic types only)
17 Seat for accessories
18 Seat for coee measuring scoop
19 Hot water/steam knob
20 Classic milk frother (specic types only)
21 Power cord
22 Main switch (RI8437, RI8435, RI8433) with energy saving switch)
First installation
1 Remove all packaging material from the machine.
2 Place the machine on a table or worktop away from the tap, the sink and heat sources.
Note: Leave at least 15 cm of free space above, behind and on both sides of the machine (Fig. 2).
Preparing for use
1 Remove the lid of the water tank and remove the water tank from the machine (Fig. 3).
2 Rinse the water tank. Fill the water tank with fresh water up to the MAX indication (Fig. 4).
3 Place the water tank back into the machine and push it downwards until the reference marks are
visible (Fig. 5).
4 Place the lid of the water tank back onto the machine.
Circuit priming
When you use the machine for the rst time, after dispensing steam or when the water tank is empty,
perform the following steps:
1 Place a container under the milk frother and turn the hot water/steam knob anticlockwise (Fig. 6).
2 Insert the mains plug into a wall socket.Set the main switch to 'I' to switch on the machine (Fig. 7).
- The power-on light lights up.
3 Turn the selection knob to the coee position (Fig. 8).
- Hot water comes out of the milk frother.
4 When the water tank is empty, turn the selection knob back to the standby position (Fig. 9).
5 Turn the hot water/steam knob clockwise. Remove the container (Fig. 10).
10
English
Gaggia Viva WEU_export_30029_72.indd 10 21/12/2018 10:55:48

Manual rinsing cycle
1 Rinse the water tank. Fill the water tank with fresh water up to the MAX indication (Fig. 4).
2 Place the water tank back into the machine and push it downwards until the reference marks are
visible (Fig. 5).
3 Place a container under the classic milk frother and turn the hot water/steam knob anticlockwise
(Fig. 6).
4 Turn the selection knob to the coee position (Fig. 8).
- Let the machine dispense water until the water tank is empty.
5 Turn the selection knob back to standby position (Fig. 9).
6 Fill the water tank with fresh water up to the MAX indication.
7 Insert the pressurized lter holder into the brew unit from below (Fig. 11).
8 Turn the lter holder from left to right as far as possible and release the lter holder grip. The
handle will automatically jump back to the left again (Fig. 12).
9 Place a container under the lter holder (Fig. 13).
10 Turn the selection knob to the coee position (Fig. 8).
- Let the machine dispense water until the water tank is empty.
11 When the water tank is empty, turn the selection knob back to the standby position (Fig. 9).
12 Fill the water tank with fresh water up to the MAX indication and wait until the 'machine ready'
light lights up.
13 Turn the lter holder from right to left to remove it from the brew unit and rinse it with fresh water
(Fig. 14).
The machine is ready for use.
Using the machine
Note: Clean the coee pod lter and coee pod adapter every time you have used it.
Brewing coee with ground coee
Warning: To prevent the risk of burns, do not turn the pressurized lter holder to remove
it during brewing.
1 Preheat the pressurized lter holder before the rst coee brewing.
2 Insert the lter holder into the brew unit from below (Fig. 11).
3 Turn the lter holder from left to right until it locks into place and release the lter holder grip (Fig.
12). The handle will jump back to the left slightly.
4 Turn the selection knob to the coee position until some water ows out of the coee dispensing
openings (Fig. 8).
5 Brew one cup of water. Turn the selection knob to the standby position to stop brewing (Fig. 9).
6 Turn the lter holder from right to left to remove it from the machine and pour out the remaining
water (Fig. 15).
Note: Remove any coee residues from the rim of the lter holder.
7 Use the measuring scoop to put the ground coee into the pressurized lter holder.
- To brew one cup of coee, add 1-1.5 measuring scoops of ground coee.
- To brew two cups of coee, add 2 measuring scoops of ground coee (Fig. 16).
11
English
Gaggia Viva WEU_export_30029_72.indd 11 21/12/2018 10:55:48

Note: The pressurized lter holder automatically tamps the ground coee. There is no need to
tamp the ground coee yourself.
8 Insert the ground coee lter into the pressurized lter holder (Fig. 17).
Note: When you use the machine for the rst time, the ground coee lter is already inserted.
9 Insert the lter holder into the brew unit.
10 Turn the lter holder from left to right until it locks into place and release the lter holder grip (Fig.
12). The handle will jump back to the left slightly.
11 Place one or two cups under the pressurized lter holder (Fig. 18).
Note: Make sure the cups are placed correctly under the coee dispensing openings.
12 Turn the selection knob to the coee position.
- The machine starts brewing coee.
13 Turn the selection knob to the standby position when the cup(s) contain(s) the desired amount of
coee.
14 Remove the pressurized lter holder and empty it. Clean the pressurized lter under a running tap.
Brewing coee with coee pods
Note: Only use the coee pod lter and coee pod lter adapter with coee pods
1 Use a teaspoon to remove the ground coee lter from the pressurized lter holder (Fig. 19).
2 Insert the pod lter adapter with the convex side facing down into the pressurized lter holder (Fig.
20).
3 Place the coee pod lter on top of the pod lter adapter in the lter holder (Fig. 21).
4 Insert the pressurized lter holder into the brew unit from below (Fig. 11).
5 Turn the lter holder from left to right until it locks into place and release the lter holder grip (Fig.
12). The handle will turn to the left slightly.
Note: For the rst coee brewing session, you need to preheat the pressurized lter holder.
6 Brew one cup of water. Turn the selection knob to the standby position to stop brewing (Fig. 9).
7 Turn the lter holder from right to left to remove it from the machine and pour out the remaining
water (Fig. 15).
8 Insert a coee pod into the lter holder (Fig. 22).
Note: Make sure the paper of the pod does not stick out beyond the edge of the lter holder.
9 Insert the lter holder into the brew unit from the below.
10 Turn the lter holder from left to right until it locks into place and release the lter holder grip. The
handle will turn to the left slightly.
11 Place a cup under the lter holder.
12 Turn the selection knob to the coee position (Fig. 8).
- The machine starts brewing coee.
13 Turn the selection knob to the standby position when the cup contains the desired amount of
coee.
14 Remove the lter holder and throw away the used coee pod.
12
English
Gaggia Viva WEU_export_30029_72.indd 12 21/12/2018 10:55:48

Dispensing hot water
Warning: To avoid the danger of burns, be aware that dispensing may be preceded
by small jets of hot water and only move the steam wand by means of the protective
handle.
1 Place a container or a glass under the classic milk frother.Turn the hot/water steam knob
anticlockwise (Fig. 6).
2 Turn the selection knob to the coee position. (Fig. 8)
- The machine starts dispensing hot water.
3 Turn the selection knob to the standby position when the machine has dispensed the desired
amount of water (Fig. 9).
4 Turn the hot/water steam knob clockwise. Remove the container or the glass (Fig. 10).
Frothing milk
Warning: To avoid the danger of burns, be aware that dispensing may be preceded
by small jets of hot water and only move the steam wand by means of the protective
handle.
1 Place a cup under the milk frother.
2 Turn the selection knob to the steam position
- The 'machine ready' light goes out.
3 Wait until the 'steam ready' light lights up. Then the machine is ready to dispense steam.
4 Turn the selection knob to the steam position to let out any water in the milk frother (Fig. 23).
5 Turn the selection knob back to standby position. Remove and empty the cup
6 Fill 1/3 of a jug with cold milk (Fig. 24).
7 Place the jug under the milk frother.
8 Turn the hot water/steam knob anticlockwise. Gently stir the jug to create foam and turn the hot
water/steam knob clockwise.
9 Remove the jug.
10 Place a cup under the milk frother, let the rest water and milk ow out of the milk frother. Remove
the cup.
Cleaning
Regular cleaning and descaling prolongs the lifetime of your machine and ensures optimum quality
and taste of your coee.
Warning: Do not immerse the machine in water or any other liquid.
Warning: Never use scouring pads, abrasive cleaning agents or aggressive liquids to
clean the machine.
Warning: Always unplug the machine and let it cool down before you clean it.
Warning: Only use a soft, damp cloth to clean the machine.
13
English
Gaggia Viva WEU_export_30029_72.indd 13 21/12/2018 10:55:48

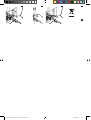
Cleaning the drip tray
1 Pull the drip tray out of the machine (Fig. 25).
2 Empty and rinse the drip tray under the tap.
3 Slide the drip tray back into the machine.
Cleaning the classic milk frother (specic types only)
Note: After brewing milk-based beverages clean the classic milk frother.
1 Remove the tube of the classic milk frother (Fig. 26).
2 Rinse it with fresh water (Fig. 27).
3 Remove the plastic handle of the classic milk frother from the steam wand and rinse it with fresh
water (Fig. 28).
4 Clean the steam wand with a wet cloth.
5 Slide the plastic handle back onto the steam wand.
6 Slide the tube back onto the steam wand.
Cleaning the pressurized lter holder
1 Remove the ground coee lter or coee pod lter from the lter holder and rinse it thoroughly
with hot water.
2 If present, remove the pod lter adapter from the lter holder and rinse it thoroughly with hot
water.
3 Rinse the inside and outside of the pressurized lter holder with hot water (Fig. 14).
Caution: Do not clean the pressurized lter holder in the dishwasher. This will damage the
pressurized lter holder.
Descaling
Please use Gaggia descaler only. Under no circumstances should you use a descaler based on
sulfuric acid, hydrochloric acid, sulfamic or acetic acid (vinegar) as this may damage the water circuit
in your machine and not dissolve the limescale properly. Not using the Gaggia descaler will void your
warranty. Failure to descale the appliance will also void your warranty.
Descaling procedure
1 Insert the pressurized lter holder in the brew unit.
2 Remove and empty the water tank.
3 Pour half of the descaling solution into the water tank. Fill the water tank with fresh water up to the
MAX indication. Place the water tank back into the machine.
4 Set the main switch to 'I' to switch on the machine. Turn the selection knob to the standby position.
5 Place a container under the classic milk frother.
6 Wait until the coee ready light lights up and brew two cups (of approx. 150ml each) of water.
7 Set the main switch to 'O' to switch o the machine.
8 Let the descaling solution work for 15-20 minutes with the machine switched o.
9 Set the main switch to 'I' to switch the machine back on.
10 Fill two cups (of approx. 150ml each) with hot water from the classic milk frother.
11 Set the main switch to 'O' to switch o the machine and wait 3 minutes.
14
English
Gaggia Viva WEU_export_30029_72.indd 14 21/12/2018 10:55:48

12 Repeat steps 9-11 until the water tank is empty.
13 Rinse the water tank and ll it with fresh water up to the MAX indication.
14 Place a container under the lter holder.
15 Set the main switch to 'I' to switch on the machine and turn the selection knob to the standby
position.
16 Let the machine dispense water until the water tank is empty. Set the selection knob to the
standby position.
17 Fill the water tank with fresh water up to the MAX indication.
18 Place a large container under the classic milk frother. Turn the hot water/steam knob
anticlockwise.
19 Turn the selection knob to the coee position and let the machine dispense water until the water
tank is empty.
20 Turn the selection knob to the standby position.
21 Turn the hot water/steam knob clockwise.
22 Rinse the machine by repeating steps 13-20 one more time.
23 Remove the lter holder from the brew unit by turning it from right to left and rinse it with fresh
water.
24 Fill the water tank with fresh water up to the MAX indication.
The machine is now ready for use.
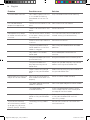
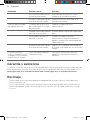
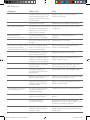
Troubleshooting
This chapter summarizes the most common problems you could encounter with the machine. For
support, contact your local dealer or an authorized service center. Contact details are included in the
warranty booklet supplied separately or visit www.gaggia.com/n-m-co/espresso/world-wide or www.
gaggia.it/n-m-co/espresso/contact.
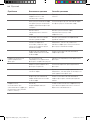
Problem Possible cause Solution
The machine does not
switch on.
The machine is not
connected to a wall socket.
Connect the machine to a wall socket.
The main switch is in o
position.
Make sure the main switch is in
onposition.
The pump is very noisy. There is no water in the water
tank.
Fill the water tank with water.
The water tank is not
positioned correctly.
Place the water tank back into the
machine and push it downwards until
the reference marks are visible.
The coee is too cold. The lter holder is not
inserted for preheating.
Preheat the lter holder.
The 'machine ready' light
was o when you turned the
selection knob to the coee
position.
Wait until the 'machine ready' light lights
up.
The cups are cold. Preheat the cups with hot water.
15
English
Gaggia Viva WEU_export_30029_72.indd 15 21/12/2018 10:55:48

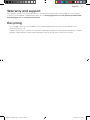
Problem Possible cause Solution
The milk does not froth. You used a type of milk that
is unsuitable for frothing
(powdered milk or low-fat
milk).
Only use cold whole milk for frothing.
It is not possible to
prepare a cappuccino.
The classic milk frother is not
clean.
Clean the classic milk frother.
There is no steam left in the
boiler.
Prime the circuit.
No coee or only drops
of coee come out of the
machine.
The hot water/steam knob is
in the 'open' setting (turned
anticlockwise).
Turn the hot water/steam knob to the
'closed' setting (turned clockwise).
Scale has built up inside the
machine.
Descale the machine
The ground coee lter or
coee pod lter in the lter
holder is clogged.
Clean the ground coee lter or coee
pod lter.
You used an unsuitable
coee pod.
Use a coee pod suitable for this
machine.
The ground coee you use is
ground too nely.
Use ground coee with a coarser grind.
The ground coee was
pressed into the ground
coee lter
Make sure you do not press the ground
coee into the ground coee lter.
There is too much ground
coee in the ground coee
lter.
Reduce the quantity of ground coee in
the ground coee lter.
Coee ows out along the
edges of the lter holder.
You have not attached the
lter holder to the brew unit
properly.
Attach the lter holder correctly.
The upper edge of the lter
holder is not clean.
Clean the upper edge of the lter holder.
The coee pod is not
inserted correctly.
Insert the coee pod correctly. Make
sure its edges do not stick out beyond
the edge of the lter holder.
There is too much ground
coee in the ground coee
lter.
Reduce the amount of ground coee
in the ground coee lter with the
measuring scoop.
The machine switches
o while brewing coee
or dispensing hot water
(RI8437, RI8435, RI8433).
The energy saving modus
is on
Set the main switch to 'I' to switch the
machine back on.
16
English
Gaggia Viva WEU_export_30029_72.indd 16 21/12/2018 10:55:48

Warranty and support
For support, contact your local dealer or an authorized service center. Contact details are included
in the warranty booklet supplied separately or visit www.gaggia.com/n-m-co/espresso/world-wide
orwww.gaggia.it/n-m-co/espresso/contact.
Recycling
- This symbol means that this product shall not be disposed of with normal household waste
(2012/19/EU) (Fig. 29).
- Follow your country's rules for the separate collection of electrical and electronic products. Correct
disposal helps prevent negative consequences for the environment and human health.
17
English
Gaggia Viva WEU_export_30029_72.indd 17 21/12/2018 10:55:48

Introduktion
Denne kaemaskinen er velegnet til tilberedning af 1 eller 2 kopper espresso, og den er udstyret med
en drejelig dyse til damp og varmt vand. Kontrolelementerne foran på maskinen er markeret med
letlæselige symboler. Maskinen er blevet designet til brug i hjemmet og er ikke egnet til professionel,
kontinuerlig brug.
Rent koldt vand
Brug rent, koldt vand hver dag. Hvis du ikke har brugt kaemaskinen i en dag, skal du skylle den
igennem med rent, koldt vand, før du bruger den igen. Du skyller maskinen igennem ved at fylde
vandtanken med rent, koldt vand, sætte en skål eller 2 kopper under kaeudløbet og brygge varmt
vand, indtil vandtanken er tom.
Energibesparelse
Maskinerne RI8437, RI8435 og RI8433 er udstyret med en funktionen til automatisk slukning for
at spare energi. Funktionen til automatisk slukning aktiveres, 30 minutter efter at hovedkontakten
indstilles til "I". Du kan tænde maskinen igen ved at sætte hovedkontakten tilbage til "I".
Vigtige sikkerhedsoplysninger
Denne maskine er udstyret med sikkerhedsfunktioner. Læs og følg dog sikkerhedsinstruktionerne
omhyggeligt, og brug kun maskinen som beskrevet i denne brugervejledning for at undgå utilsigtede
skader på personer eller ting som følge af ukorrekt brug af maskinen. Gem dette sikkerhedshæfte til
senere brug.
Advarsel
- Kontrollér, om den angivne netspænding på maskinen svarer til
den lokale netspænding, før du slutter strøm til apparatet.
- Maskinen skal sluttes til en stikkontakt med jordforbindelse.
- Lad aldrig ledningen hænge ud over kanten af et bord eller
komme i kontakt med varme overader.
- For at undgå faren for elektrisk stød må du aldrig nedsænke
netledningen i vand.
- Hvis netledningen er beskadiget, må den kun udskiftes af Gaggia,
et autoriseret Gaggia-serviceværksted eller en tilsvarende
kvaliceret fagmand for at undgå enhver risiko.
- Stikket på netledningen må ikke komme i kontakt med væske.
- For at undgå fare for forbrændinger skal kropsdele holdes væk fra
de stråler med varmt vand, som maskinen producerer.
- Rør ikke ved de varme overader. Brug maskinens håndtag og
knapper.
18
Dansk
Gaggia Viva WEU_export_30029_72.indd 18 21/12/2018 10:55:49

- Sluk for maskinen på hovedkontakten på bagsiden, og tag
netstikket ud af stikkontakten:
- Hvis der opstår en funktionsfejl.
- Hvis du ikke skal bruge apparatet i lang tid.
- Før maskinen rengøres.
- Træk i stikket, ikke i ledningen.
- Rør ikke ved det netstikket med våde hænder.
- Brug aldrig maskinen, hvis netstik, netledning eller selve maskinen
er beskadiget..
- Du må ikke foretage ændringer i maskinen eller maskinens
netledning.
- For at undgå fare må reparationer kun udføres af en forhandler,
der er godkendt af Gaggia.
- Maskinen må ikke bruges af børn under 8 år.
- Denne maskine kan bruges af børn fra 8 år og opefter og personer
med reducerede fysiske, sensoriske eller mentale evner eller
manglende erfaring og viden, hvis de er blevet instrueret i sikker
brug af maskinen og forstår de medfølgende risici.
- Rengøring og vedligeholdelse må ikke foretages af børn,
medmindre de er over 8 år gamle og under opsyn.
- Få anvisninger til, hvordan du rengør ader, der er i berøring med
mad, i afsnittet "Rengøring".
- Hold maskinen, dens tilbehør og ledning utilgængelig for børn
under 8 år.
- Apparatet skal holdes uden for børns rækkevidde for at sikre, at
de ikke kan komme til at lege med maskinen.
- Vær forsigtig, når du dispenserer varmt vand. Dispensering
kan være efterfulgt af små stråler varmt vand. Vent,
indstil dispenseringscyklussen er færdig, før du fjerner
varmtvandsudløbet.
- For at undgå fare for forbrændinger skal du være opmærksom på,
at der før dispenseringen kan komme små stråler varmt vand. Rør
aldrig ved den klassiske mælkeskummer med de bare hænder, da
den kan blive meget varm.
19
Dansk
Gaggia Viva WEU_export_30029_72.indd 19 21/12/2018 10:55:49

- Brug kun denne espressomaskine til det formål, den er beregnet
til, for at undgå potentielle skader.
Forsigtig
- Indlever altid maskinen til et servicecenter godkendt af Gaggia for
undersøgelse eller reparation. Forsøg ikke at reparere maskinen
selv, da din garanti ellers bliver ugyldig.
- Maskinen er kun beregnet til normal anvendelse i hjemmet.
Den er ikke beregnet til brug i miljøer som personalekøkkener i
butikker, på kontorer, på gårde eller andre arbejdspladser. Den er
heller ikke beregnet til brug af gæster på hoteller, moteller, på bed
and breakfast eller i andre værelser til udlejning.
- Stil altid maskinen på et adt og stabilt underlag. Den skal altid
være placeret opretstående, også under transport..
- Stil ikke maskinen på en varmeplade eller direkte ved siden af en
varm ovn, et varmeapparat eller lignende varmekilder.
- Når du rengører maskinen, skal du lade den køle ned, før du
indsætter eller fjerner dele. Varmeaden kan indeholde restvarme
efter brug.
- Fyld aldrig vandtanken med varmt vand eller danskvand, da det
kan beskadige vandtanken og maskinen.
- Brug aldrig skuresvampe eller skrappe rengøringsmidler såsom
rensebenzin eller acetone til rengøring af apparatet. Bare brug en
blød klud, der er fugtet med vand.
- Afkalk maskinen hver 3. måned. Hvis der ikke udføres afkalkning,
vil maskinen holde op med at fungere korrekt. I sådanne tilfælde
er reparation ikke omfattet af garantien.
- Maskinen må ikke opbevares ved temperaturer under 0°C. Hvis
der er vand i opvarmningssystemet kan det fryse og forårsage
skader.
- Efterlad ikke vand i vandtanken, når maskinen ikke skal bruges i
længere tid. Vandet kan blive snavset. Brug rent vand, hver gang
du bruger maskinen.
- Brug aldrig tilbehør eller dele fra andre producenter eller
20
Dansk
Gaggia Viva WEU_export_30029_72.indd 20 21/12/2018 10:55:49
La pagina sta caricando ...
La pagina sta caricando ...
La pagina sta caricando ...
La pagina sta caricando ...
La pagina sta caricando ...
La pagina sta caricando ...
La pagina sta caricando ...
La pagina sta caricando ...
La pagina sta caricando ...
La pagina sta caricando ...
La pagina sta caricando ...
La pagina sta caricando ...
La pagina sta caricando ...
La pagina sta caricando ...
La pagina sta caricando ...
La pagina sta caricando ...
La pagina sta caricando ...
La pagina sta caricando ...
La pagina sta caricando ...
La pagina sta caricando ...
La pagina sta caricando ...
La pagina sta caricando ...
La pagina sta caricando ...
La pagina sta caricando ...
La pagina sta caricando ...
La pagina sta caricando ...
La pagina sta caricando ...
La pagina sta caricando ...
La pagina sta caricando ...
La pagina sta caricando ...
La pagina sta caricando ...
La pagina sta caricando ...
La pagina sta caricando ...
La pagina sta caricando ...
La pagina sta caricando ...
La pagina sta caricando ...
La pagina sta caricando ...
La pagina sta caricando ...
La pagina sta caricando ...
La pagina sta caricando ...
La pagina sta caricando ...
La pagina sta caricando ...
La pagina sta caricando ...
La pagina sta caricando ...
La pagina sta caricando ...
La pagina sta caricando ...
La pagina sta caricando ...
La pagina sta caricando ...
La pagina sta caricando ...
La pagina sta caricando ...
La pagina sta caricando ...
La pagina sta caricando ...
La pagina sta caricando ...
La pagina sta caricando ...
La pagina sta caricando ...
La pagina sta caricando ...
La pagina sta caricando ...
La pagina sta caricando ...
La pagina sta caricando ...
La pagina sta caricando ...
La pagina sta caricando ...
La pagina sta caricando ...
La pagina sta caricando ...
La pagina sta caricando ...
La pagina sta caricando ...
La pagina sta caricando ...
La pagina sta caricando ...
La pagina sta caricando ...
La pagina sta caricando ...
La pagina sta caricando ...
La pagina sta caricando ...
La pagina sta caricando ...
La pagina sta caricando ...
La pagina sta caricando ...
La pagina sta caricando ...
La pagina sta caricando ...
La pagina sta caricando ...
La pagina sta caricando ...
La pagina sta caricando ...
La pagina sta caricando ...
La pagina sta caricando ...
La pagina sta caricando ...
La pagina sta caricando ...
La pagina sta caricando ...
La pagina sta caricando ...
La pagina sta caricando ...
La pagina sta caricando ...
La pagina sta caricando ...
La pagina sta caricando ...
La pagina sta caricando ...
La pagina sta caricando ...
La pagina sta caricando ...
La pagina sta caricando ...
La pagina sta caricando ...
La pagina sta caricando ...
La pagina sta caricando ...
La pagina sta caricando ...
La pagina sta caricando ...
La pagina sta caricando ...
La pagina sta caricando ...
La pagina sta caricando ...
La pagina sta caricando ...
La pagina sta caricando ...
La pagina sta caricando ...
La pagina sta caricando ...
La pagina sta caricando ...
La pagina sta caricando ...
La pagina sta caricando ...
La pagina sta caricando ...
La pagina sta caricando ...
La pagina sta caricando ...
La pagina sta caricando ...
La pagina sta caricando ...
La pagina sta caricando ...
La pagina sta caricando ...
La pagina sta caricando ...
La pagina sta caricando ...
La pagina sta caricando ...
La pagina sta caricando ...
La pagina sta caricando ...
La pagina sta caricando ...
La pagina sta caricando ...
La pagina sta caricando ...
La pagina sta caricando ...
La pagina sta caricando ...
La pagina sta caricando ...
La pagina sta caricando ...
La pagina sta caricando ...
La pagina sta caricando ...
La pagina sta caricando ...
La pagina sta caricando ...
La pagina sta caricando ...
La pagina sta caricando ...
La pagina sta caricando ...
La pagina sta caricando ...
La pagina sta caricando ...
-
 1
1
-
 2
2
-
 3
3
-
 4
4
-
 5
5
-
 6
6
-
 7
7
-
 8
8
-
 9
9
-
 10
10
-
 11
11
-
 12
12
-
 13
13
-
 14
14
-
 15
15
-
 16
16
-
 17
17
-
 18
18
-
 19
19
-
 20
20
-
 21
21
-
 22
22
-
 23
23
-
 24
24
-
 25
25
-
 26
26
-
 27
27
-
 28
28
-
 29
29
-
 30
30
-
 31
31
-
 32
32
-
 33
33
-
 34
34
-
 35
35
-
 36
36
-
 37
37
-
 38
38
-
 39
39
-
 40
40
-
 41
41
-
 42
42
-
 43
43
-
 44
44
-
 45
45
-
 46
46
-
 47
47
-
 48
48
-
 49
49
-
 50
50
-
 51
51
-
 52
52
-
 53
53
-
 54
54
-
 55
55
-
 56
56
-
 57
57
-
 58
58
-
 59
59
-
 60
60
-
 61
61
-
 62
62
-
 63
63
-
 64
64
-
 65
65
-
 66
66
-
 67
67
-
 68
68
-
 69
69
-
 70
70
-
 71
71
-
 72
72
-
 73
73
-
 74
74
-
 75
75
-
 76
76
-
 77
77
-
 78
78
-
 79
79
-
 80
80
-
 81
81
-
 82
82
-
 83
83
-
 84
84
-
 85
85
-
 86
86
-
 87
87
-
 88
88
-
 89
89
-
 90
90
-
 91
91
-
 92
92
-
 93
93
-
 94
94
-
 95
95
-
 96
96
-
 97
97
-
 98
98
-
 99
99
-
 100
100
-
 101
101
-
 102
102
-
 103
103
-
 104
104
-
 105
105
-
 106
106
-
 107
107
-
 108
108
-
 109
109
-
 110
110
-
 111
111
-
 112
112
-
 113
113
-
 114
114
-
 115
115
-
 116
116
-
 117
117
-
 118
118
-
 119
119
-
 120
120
-
 121
121
-
 122
122
-
 123
123
-
 124
124
-
 125
125
-
 126
126
-
 127
127
-
 128
128
-
 129
129
-
 130
130
-
 131
131
-
 132
132
-
 133
133
-
 134
134
-
 135
135
-
 136
136
-
 137
137
-
 138
138
-
 139
139
-
 140
140
-
 141
141
-
 142
142
-
 143
143
-
 144
144
-
 145
145
-
 146
146
-
 147
147
-
 148
148
-
 149
149
-
 150
150
-
 151
151
-
 152
152
-
 153
153
-
 154
154
-
 155
155
-
 156
156


Gaggia VIVA CHIC Manuale del proprietario
- Categoria
- Macchine da caffè
- Tipo
- Manuale del proprietario
- Questo manuale è adatto anche per
in altre lingue
- français: Gaggia VIVA CHIC Le manuel du propriétaire
- español: Gaggia VIVA CHIC El manual del propietario
- Nederlands: Gaggia VIVA CHIC de handleiding
- português: Gaggia VIVA CHIC Manual do proprietário
- dansk: Gaggia VIVA CHIC Brugervejledning
Documenti correlati
-
Gaggia Carezza SIN 042 GM Manuale utente
-
Gaggia RI8260 SUP047G - Velasca Manuale del proprietario
-
-
-
-
Gaggia Babila Manuale utente
-
-
-
-
 Gaggia Milano RI8435 Manuale del proprietario
