
© 2013 snom technology AG
v1.05
Your specialist retailer - Ihr Fachhändler -
Votre distributeur - Su distribuidor - Il tuo rivenditore:
Quick Start Guide
IP Phone
ENGLISH
DEUTSCH
FRANÇAIS
ITALIANO
ESPAÑOL
snom technology AG
Wittestr. 30 G
13509 Berlin, Deutschland
Tel. +49 30 39 83 3-0
Fax +49 30 39 83 31 11
snom technology, Inc.
18 Commerce Way, Suite 6000
Woburn, MA 01801, USA
Tel. 781-569-2044
Fax 978-998-7883
snom UK Ltd
Amethyst House, Meadowcroft Way
Leigh Business Park, Leigh
Manchester WN7 3XZ, UK
Tel. +44 169 348 7500
Fax +44 169 348 7509
snom France SARL
6 Parc des fontenelles
78870 Bailly, France
Tel. +33 1 80 87 62 87
Fax +33 1 80 87 62 88
snom technology SRL
Via A. Lusardi 10
20122 Milano, Italia
Tel +39 02 00611212
Fax +39 02 93661864
snom technology Ltd.
Rm. A2, 3F, No. 37, Ln. 258
Ruiguang Rd., Neihu Dist.
Taipei City 114, Taiwan
Tel +886-2-8751-1120
Fax +886-2-8751-1130

2 3
Connecting - Anschließen - Connecter - Collegare - Conectar
C
B
Attaching the Footstand - Fuß befestigen
Attacher le pied - Fissare il supporto - Montar el soporte
Delivery content - Lieferumfang - Contenu de la boîte -
Contenuto della confezione - En la caja
A
1
Optional
Optionnel
Opzionale
Opcional
2
3
Optional
Optionnel
Opzionale
Opcional
If no PoE available
Wenn PoE nicht verfügbar
S'il n'y a pas de PoE
Si no se dispone de PoE
Se non disponibile PoE
Not included in delivery
Nicht im Lieferumfang enthalten
Non inclus
Non incluido
Non incluso
USB 2.0
Type/Typ A
Optional
Optionnel
Opzionale
Opcional

4 5
D
Wall Mounting - Wandmontage - Fixation murale -
Montaje en pared - Montaggio a parete - Montagem na parede
2
1
Distance to wall
Abstand zur Wand
Distance au mur
Distanza dalla parete
Distancia a la pared
Distância à parede
∼ 4 mm (0.157")
ø max: 9 mm
(0.354")
ø min: 6 mm
(0.236")
ø max
4,5 mm
(0.177")
50 mm
(1.969")
3
Not included in delivery Nicht im Lieferumfang enthalten:
Non inclus No incluidos Non inclusos:
2 x
Symbols used in this guide - In dieser Anleitung benutzte Symbole
Symboles utilisés dans ce manuel - Symboli utilizzati in questa
manuale Símbolos usados en este manual
Press the key:
Drücken Sie auf die Taste:
Appuyez sur la touche:
Premere il tasto:
Pulse la tecla:
p
>
• Proceeding to next step, next selection, etc. Example: Setting the phone language
• Nächster Schritt, nächste Auswahl etc. Beispiel: Ändern der Telefonsprache
• Passez à l'étape suivante, à la sélection suivante etc. Exemple: Modifier la langue du
téléphone
• Avanzare allo prossimo passo, alla prossima selezione etc. Esempio: Cambiare la
lingua del telefono
• Avanzar al siguiente paso, al siguiente selección. Ejemplo: Cambiar el idioma del
teléfono
> 1 Preferences > 4 Language > > Deutsch > >
4
ENGLISH .........................................................................................
7
DEUTSCH .......................................................................................
17
FRANÇAIS ......................................................................................
29
ITALIANO .........................................................................................
39
ESPAÑOL ........................................................................................
49
APPENDIX ANHANG ANNEXE APENDICE ANEXO
GNU General Public License ..........................................................
59
Table of Contents - Inhaltsverzeichnis
Table des matières - Indice - Índice

6 7
snom 760 Quick Start Guide
snom 760 Quick Start Guide
E
N
G
L
I
S
H
This quick start guide describes the installation, setup, and operation of the
snom 760. For further information please refer to the manual on our web
page, http://wiki.snom.com.
Copyright, Trademarks, GPL, Legal Disclaimers
© 2013 snom technology Aktiengesellschaft
All Rights Reserved.
snom, the names of snom products, and snom logos are trademarks owned by snom
technology AG. All other product names and names of enterprises are the property of
their respective owners.
snom technology AG reserves the right to revise and change this document at any time,
without being obliged to announce such revisions or changes beforehand or after the
fact.
Texts, images, and illustrations and their arrangement in this document are subject to
the protection of copyrights and other legal rights worldwide. Their use, reproduction,
and transmittal to third parties without express written permission may result in legal
proceedings in the criminal courts as well as civil courts.
Although due care has been taken in the compilation and presentation of the
information in this document, the data upon which it is based may have changed in the
meantime. snom therefore disclaims all warranties and liability for the accurateness,
completeness, and currentness of the information published, except in the case of
intention or gross negligence on the part of snom or where liability arises due to binding
legal provisions.
Our firmware includes some source code that may be used and modified by anyone
and everyone under the GNU Public License (GPL) (see Appendix on page 59), provided
they, in turn, make it available to everyone else with the same licensing agreement.
Please go to http://www.snom.com/en/support/download/gpl-quellcode/ for the
original GPL license and the source code of components licensed under GPL and
used in snom products.
Important Information
Please read the instructions on safety and disposal and on how to set up and use the
device before using it and also give them to other users to read or inform those users of
their contents. Save this manual and do not give the device to third parties without it.
Safety Instructions
Follow the instructions in this manual and other applicable documentation of the device.
• If the phone is not supplied with power via an Ethernet cable, use only a power
adapter expressly recommended by snom technology. Other power supplies may
damage or destroy the phone, affect its behavior, or induce noise.
• Avoid placing the cables where people may trip over them or where they may be
exposed to mechanical pressure as this may damage them.

8 9
snom 760 Quick Start Guide
snom 760 Quick Start Guide
E
N
G
L
I
S
H
E
N
G
L
I
S
H
• Do not install the device in rooms with high humidity (for example, in bathrooms,
laundry rooms, damp basements). Do not immerse the device in water and do not
spill or pour liquids of any kind onto or into the device.
• Do not install the device in surroundings at risk for explosions (paint shops, for
example). Do not use the device if you smell gas or other potentially explosive fumes.
• Do not use the device during thunderstorms. Lightning striking the power grid may
cause electric shocks.
• Warning: The handset contains a magnet, and its earpiece may attract small
dangerous objects such as needles or pins. Please ensure before each use that no
such objects are present.
SELV (Safety Extra Low Voltage) Compliance
Safety status of Input/Output connections comply with SELV requirements.
Warning: To avoid electric shock, do not connect safety extra-low voltage (SELV)
circuits to telephone-network voltage (TNV) circuits. LAN ports contain SELV
circuits, and PSTN ports contain TNV circuits. Some LAN and PSTN ports both use
RJ-45 (8P8C) connectors. Use caution when connecting cables.
Standards conformance
This device complies with the essential health, safety, and environmental
requirements of all relevant European directives. The declaration of
conformity can be requested from snom (address see reverse cover).
This phone is FCC-certified and meets US health, safety, and environmental
standards.
Unauthorized opening, changing, or modifying the device will cause the
warranty to lapse and may also result in the loss of CE conformity and
the FCC certification. In case of malfunction contact authorized service
personnel, your seller, or snom.
•
Safety: IEC 60950-1:2007
•
Power: PoE or power supply PSAC10R-050 (available separately, snom PN
00002730)
•
1 x LAN, 1 x PC: RJ45
•
Ethernet: 2 x IEEE 802.3/1 Gigabit switch
•
Power over Ethernet: IEEE 802.3af, Class 2
Disposal of the device
This device is subject to European Directive 2002/96/EC and may not be
disposed of with general household garbage.
Cleaning
To clean the device, use an anti-static cloth. Please avoid cleaning liquids as they might
damage the surface or internal electronics of the device.
Setting up and connecting the phone
See pages 2 - 3
Initializing and registering the phone
Please note: You will need the registration information received from your
Internet service provider or your network administrator - normally the phone or
extension number, the password, and the registrar.
After you have set up the phone and connected it to the network as shown on pages
2 - 3, the phone begins to initialize.
Normally the initialization is completely automatic, using DHCP. If your network does not
support DHCP, you must obtain the IP address, netmask, IP gateway, and DNS server
from your Internet service provider or your network administrator and enter them manually
when you are asked to do so on the display.
Watch the display and, when asked to, make selections with / and save with
.
1. Language. The default is English.
2. Time zone
3. Dial tone
4. The display shows the "Welcome" screen. Press any key to log on.
5. Enter the account number. Save with
.
6. Enter the registrar. Press .
7. Enter the password received from your Internet service provider or administrator.
Press . After successful registration you will see the green symbol with the
handset:
Infobar with date & time
Identity line
Identity for outgoing
calls: Green symbol
Unregistered
identity:
Active identity:
Yellow symbol
Entering numerals, letters, and special characters
Press any key or pick up handset.
Directories, call lists,
contact list, favorites
Input modes:
123: Numerals
abc: Small letters
ABC: Capital letters
Delete character to
the left of the cursor
Current input mode:
Next input mode:
Redial
Move cursor to the left
Move cursor to the right
:
:
Changing input mode:

10 11
snom 760 Quick Start Guide
snom 760 Quick Start Guide
E
N
G
L
I
S
H
E
N
G
L
I
S
H
Pound (hash) key
#
: Rescue
mode for TFTP update
Star key
a A
• In editing mode:
- Press for one second to change input
mode (numerals > lower case > upper
case)
- Press briefl y to type *
• On idle screen: Press for 3 seconds to
lock/unlock the keypad
Adjust volume
Mute microphone
Speakerphone on/off
Headset on/off
Audio control keys
Context-sensitive, programmable
function symbols and function keys
Select outgoing identity, incl. inactive
identities
Call lists (missed, received, dialled calls)
Forwarding all calls (on/off)
Status information (call forwarding active,
passwords not set, missed calls, etc.)
Dedicated,
customizable
function keys:
MWI (LED key) - if supported by PBX
• Lit when message is waiting on mailbox
• Press to listen to message(s)
Turn DND (do not disturb) on/off
Directory
Settings menu
Transfer call
Hold/unhold call
• Confi rming, saving
actions & input
• From idle screen:
Redial
•
Canceling actions
& input
• Turning off call LED
after missed call
Missed
calls
Received
calls
Selecting identity for
outgoing calls
Press the function key to activate the function, open
the list etc. depicted by the symbol above the key
AT A GLANCE
CALL LED
• BLINKING FAST: INCOMING CALL
• STEADY LIGHT: IN CALL OR
• MISSED CALL. PRESS TO
TURN OFF.
FREELY PROGRAMMABLE LED
KEYS P1 - P16
DEFAULT SETTING: LINE
• FAST-BLINKING LED: INCOMING
CALL. PRESS KEY OR TO
ACCEPT
• STEADILY LIT LED: IN CALL
• SLOW-BLINKING LED: CALL ON
HOLD
Outgoing
identity:
Alphanumeric
keypad
Display -
idle screen
P5 - P10
P11-P16
P1
P2
P3
P4
i
i
Pound (hash) key
#
: Rescue
mode for TFTP update
Star key
a A
• In editing mode:
- Press for one second to change input
mode (numerals > lower case > upper
case)
- Press briefl y to type *
• On idle screen: Press for 3 seconds to
lock/unlock the keypad
Adjust volume
Mute microphone
Speakerphone on/off
Headset on/off
Audio control keys
Context-sensitive, programmable
function symbols and function keys
Select outgoing identity, incl. inactive
identities
Call lists (missed, received, dialled calls)
Forwarding all calls (on/off)
Status information (call forwarding active,
passwords not set, missed calls, etc.)
Dedicated,
customizable
function keys:
MWI (LED key) - if supported by PBX
• Lit when message is waiting on mailbox
• Press to listen to message(s)
Turn DND (do not disturb) on/off
Directory
Settings menu
Transfer call
Hold/unhold call
• Confi rming, saving
actions & input
• From idle screen:
Redial
•
Canceling actions
& input
• Turning off call LED
after missed call
Missed
calls
Received
calls
Selecting identity for
outgoing calls
Press the function key to activate the function, open
the list etc. depicted by the symbol above the key
AT A GLANCE
CALL
LED
•
BLINKING FAST: INCOMING CALL
•
STEADY LIGHT: IN CALL OR
•
MISSED CALL. PRESS TO
TURN OFF.
FREELY PROGRAMMABLE
LED
KEYS P1 - P16
DEFAULT SETTING: LINE
•
FAST-BLINKING LED: INCOMING
CALL. PRESS KEY OR TO
ACCEPT
•
STEADILY LIT LED: IN CALL
•
SLOW-BLINKING LED: CALL ON
HOLD
Outgoing
identity:
Alphanumeric
keypad
Display -
idle screen
P5 - P10
P11-P16
P1
P2
P3
P4
i
i
Entering letters, special characters and symbols
In input modes small and capital letters, press the alphanumeric key one or more times
quickly, with a pause after each character.
Special characters and symbols
"0" key": 1x = space ("˽"), 2x = underscore ("_"), 3x = 0
"1" key: . + @ 1 : , ? ! - _ / \ ( ) ; & % * # <=> $ [ ]. Example: 3x = "@".
Letters with accents and umlauts
Keys "2" to "9": Available letters with accents and umlauts depend on the phone's
language setting. Example: If the phone language is German, press key "2" four times
to type "ä".

12 13
snom 760 Quick Start Guide
snom 760 Quick Start Guide
E
N
G
L
I
S
H
E
N
G
L
I
S
H
* The submenus and the settings shaded black and gray are not available when the
phone is running in user mode. The factory setting is administrator mode. The
default administrator password is 0000 (4 x zero).
** System Info: Firmware version, IP address, MAC address, available + total memory
1
Preferences
1
Time Zone
2
Tone Scheme
3
Ringer
4
Language
5
Display
2
Call Features
1
Call Forwarding
1
Forward all
2 Forward
when busy
3
Fwd after timeout
2
Outgoing Calls
1
Auto Dial
2 Number
Guessing
3
Call Completion
4 Hide own
outgoing ID
3
Incoming Calls
1
Reject anonymous
2
Call Waiting
3 Auto Answer
Indication
4
Auto Answer Type
3 *
Identity
1 Outgoing
Identity
2
Reregister
3
Edit
4
Logoff
5
Logoff all
4 *
Network
1
IP Setting
2
Webserver
1
Webserver Type
2
HTTP Admin
3
HTTP Password
3
Reset VLAN
3
VLAN
1
VLAN ID (0-4095)
2 VLAN Priority
(0-7)
3
Switch off WLAN
4
WLAN
1
802.11b/g/n
2
802.11b/g
5
Maintenance
1
System Info**
2
User Mode
3
Reboot
4 *
Reset Values
6 (4)
Information
1
Status Info**
2
System Info**
3
Help
3
Maintenance
1
System Info**
2 Administrator
Mode
3
Reboot
In user mode. Admin
password required to
switch to admin mode:
• Press to open
• Press number key
1
,
2
ABC
, etc. to
open submenus and settings
• Press
/
to select setting
• Press to save selected setting
• Settings with (On)/(Off) or (Yes)/(No): Press
to change and save
• Press briefly to return to the previous screen
• Press for 2 seconds to return to idle screen
Settings menu
Time zone:
Move to
beginning
of next time
zone
Show all
Show only
countries
where phone
language is
spoken
Select time zone
with / and
In administrator mode.
Pressing key "2" will
switch phone to user
mode!
The phone's web interface
1. Look up the phone's IP address: > 6 Information > 2 System Info. Example:
http://192.168.10.115.
2. Open a web browser on your PC. Enter the IP address in the address bar and
press ENTER. The "welcome" screen opens.
3. Click on an item in the menu on the left side of the screen to open that window.
4. If a window contains several pages, click on the tab at the top to open the page.
The font weight of the characters on the tab of the visible page is bold.
5. Any changes you make will not take effect until you click on "Apply". Changes
will be lost if you open another page of the web interface or if you close the web
interface without first clicking on "Apply".
6. Whenever you click on "Apply", the "Save" button will appear at the top of the page.
Click on "Save" to save the changes permanently. Changes that have not been
saved will be lost if and when the phone loses power or is disconnected from its
power source.
Clock/time format
Web interface > Preferences > General Information > 24 Hour Clock:
On: 24-hour format, 00:00 to 23:59
Off: 12-hour AM/PM format, 0:00 AM to 11:59 PM
Date format
Web interface > Preferences > General Information > US Date Format (mm/dd).
Example: March 8, 2010
On: 3/8/2010
Off: 8.3.2010
Function keys
Function key mapping: Web interface of phone > Function Keys.
Change settings > Press "Save". Example: Mapping function keys P5 and P6 with
the extension function for extensions 154 and 152, respectively

14 15
snom 760 Quick Start Guide
snom 760 Quick Start Guide
E
N
G
L
I
S
H
E
N
G
L
I
S
H
Configuring & modifying identities
Web interface > Identity 1-12 > Login. See "Initializing and registering the phone"
on page 9 for required and optional information.
Using the phone
Making calls
• Enter the number on the alphanumeric keypad and pick up the handset or
• pick up the handset, enter the number,
or
•
, enter the number,
Speed Dial
Type the speed dial number or character on the alphanumeric keypad and press P.
Setting the speed dial numbers: Web interface > Speed Dial. Type each phone
number with any necessary area code and/or country code etc. without spaces,
hyphens, etc. into one of the textboxes of the table. Do not add any names or other
data. Example: To enter (911) 555-1234, type 9115551234.
Emergency Numbers
These numbers can be called even when the keyboard is locked. The numbers "911",
"112", "110", and "999" are preset.
Change/add numbers: Web interface > Preferences > Lock Keyboard > Emergency
Numbers (space separated). Type each number without spaces, hyphens, etc. between
the digits, separate the individual numbers with one empty space between them.
Example: 911 112 110 999.
Accepting calls
• With handset: Pick up the handset
• With a headset: Press
or blinking line key
• With the speakerphone: Press
Putting calls on hold
Press . The LED starts to blink slowly. Press
again to resume the call. With more than one call on hold:
Select a caller with
/ and resume the call by
pressing
.
Conference (3 parties)
1. Your phone number: 172. Put first party (157) on hold.
2. Call second party (153). Put on hold. Call
third party (154). Press
to start
conference.
3. Press to stop conference and put parties on hold. Talking
to one of the parties alone: Select with
/ , press .
4. Resume conference: Press
.
Call transfer
Attended transfer
Put the call on hold
> Dial the number that you wish to transfer the call to > If
the third party wishes to accept the call, press
and .
Blind transfer
With call ringing or on the line: Press
> dial the phone number the call is to be
transferred to > press
.
Call forwarding
1. All incoming calls.
• Turning on:
> Target when forwarding > enter number > .
• Turning off:
2. When busy.
• Turning on:
> 2 Call Features > 1 Call Forwarding > 2 Forward when
busy > 2 Target when Forwarding: Enter number > > 1 Enable
Forwarding: Press
1
[Yes] > Press for 2 seconds to return
to idle screen
• Turning off:
> 2 Call Features > 1 Call Forwarding > 2 Forward when
busy > 1 Enable Forwarding: Press
1
[No] > Press for 2
seconds to return to idle screen
• When call is not picked up.
• Turning on:
> 2 Call Features > 1 Call Forwarding > 3 Forward after
Timeout > 2 Target when Forwarding > enter number >
> 3
Call Forwarding time > enter number of seconds > > 1 Enable
Forwarding: Press
1
[Yes] > Press for 2 seconds to return
to idle screen
• Turning off:
> 2 Call Features > 1 Call Forwarding > 3 Forward after
Timeout > 1 Enable Forwarding: Press
1
[No] > Press for 2
seconds to return to idle screen

16 17
snom 760 Quick Start Guide
snom 760 Quick Start Guide
D
E
U
T
S
C
H
E
N
G
L
I
S
H
Diese Kurzanleitung beschreibt die Installation, Einrichtung und den Betrieb
des snom 760. Weitere Informationen finden Sie auf unserer Webseite,
http://wiki.snom.com.
Copyright, Markenrechte, GNU Lizenz, Haftung
© 2013 snom technology Aktiengesellschaft
Alle Rechte reserviert.
snom sowie die Namen der snom-Produkte und die snom logos sind gesetzlich
geschützte Marken der snom technology AG. Alle anderen Produkt- und Firmennamen
sind Marken der jeweiligen Inhaber.
snom technology AG behält sich jederzeit das Recht auf Überarbeitung und Änderung
dieses Dokumentes vor, ohne verpflichtet zu sein, die vorgenommenen Änderungen
anzukündigen oder mitzuteilen.
Texte, Bilder, Grafiken und deren Anordnung in diesem Dokument unterliegen weltweit
dem Schutz des Urheberrechts und anderen Schutzgesetzen. Ihre Verwendung,
Reproduktion oder Weitergabe ohne ausdrückliche schriftliche Zustimmung der snom
technology AG können sowohl straf- als auch zivilrechtlich verfolgt werden.
Trotz der angewandten Sorgfalt bei der Zusammenstellung und Präsentation der
Informationen in diesem Dokument können sich Daten zwischenzeitlich geändert
haben. Daher übernimmt snom keine Gewähr für die Richtigkeit, Vollständigkeit oder
Aktualität der zur Verfügung gestellten Informationen. Jegliche Haftung für Schäden
ist ausgeschlossen, sofern diese nicht auf Vorsatz oder grober Fahrlässigkeit auf
seiten von snom beruhen oder sofern keine Haftung aufgrund zwingender gesetzlicher
Bestimmungen eintritt.
Unsere Firmware enthält teilweise Quellcodes, die unter der GNU Public License
(GPL) (s. Seite 59) von jedermann genutzt und modifiziert werden dürfen, solange
sie wiederum mit denselben Lizenzbedingen zur allgemeinen Nutzung veröffentlicht
werden. Die Quellcodes der von snom genutzten und der GPL unterliegenden
Komponenten können Sie auf der Supportseite unserer Webseite auf www.snom.com,
den Wortlaut der GPL auf http://www.snom.com/de/support/download/gpl-quellcode/
herunterladen.
Wichtige Hinweise
Lesen Sie bitte vor Inbetriebnahme die Sicherheitshinweise und die Bedienungsanlei-
tung. Lassen Sie sie auch von den Mitbenutzern des Gerätes lesen oder informieren
Sie sie über deren Inhalt. Bewahren Sie diese Bedienungsanleitung auf und geben Sie
das Telefon nur mit der Bedienungsanleitung an Dritte weiter.
Sicherheit
Befolgen Sie die Anweisungen in dieser Bedienungsanleitung und in der sonstigen
Dokumentation des Geräts.
• Falls die Stromversorgung nicht über ein Ethernetkabel erfolgt, verwenden Sie nur
Forwarding
when busy
or after
timeout:
Forwarding
all calls:
i
Call lists
• Press .
• Select list of missed, received, dialed calls with pq >
.
• Scroll through list with pq. Press
to dial, press to show call details,
press
to delete entry. Press to delete entire list.
Directory
• Opening list of names: Press
• Shortcut to <New Item> at the end of the list: p. Scroll with pq .
• Dial:
. Details: , edit detail: . Delete entry: .
Trouble shooting
Reboot
> 5 Maintenance:
5
JKL
> 3 Reboot:
3
DEF
> "Reboot?" >
Hard reboot
Disconnect power, wait for a few seconds, reconnect.
Never disconnect the power during a firmware update!
Reset to factory values
> 5 Maintenance:
5
JKL
> 4 Reset values:
4
GHI
> enter administrator
password >
All customized settings will be lost!
TFTP Update
When there is no other way to get the phone to work (administrator password lost,
etc.). How it is done: See http://wiki.snom.com/Firmware/Update/TFTP_Update/en.
All customized settings will be lost!

18 19
snom 760 Quick Start Guide
snom 760 Quick Start Guide
D
E
U
T
S
C
H
D
E
U
T
S
C
H
ein von snom ausdrücklich empfohlenes Netzteil. Die Verwendung anderer Netzteile
könnte das Telefon beschädigen oder gar zerstören.
• Verlegen Sie die Netz- und Stromkabel so, dass sie durch mechanischen Druck nicht
beschädigt werden und Personen nicht darüber stolpern könnten.
• Dieses Gerät ist nur für den Gebrauch in Innenräumen bestimmt - NICHT FÜR DEN
AUSSENBEREICH!
• Stellen Sie das Telefon nicht in Räumen mit hoher Luftfeuchtigkeit wie z.B.
Badezimmern, Waschküchen, feuchten Kellerräumen auf. Tauchen Sie das Telefon
nicht in Wasser und gießen Sie keine Flüssigkeiten auf oder in das Gerät.
• Stellen Sie das Telefon nicht in explosionsgefährdeten Umgebungen (z.B.
Lackiereien) auf. Benutzen Sie das Telefon nicht, wenn Sie Gas oder andere
möglicherweise explosionsgefährliche Dämpfe riechen.
• Telefonieren Sie nicht während eines Gewitters (Stromschlaggefahr bei Blitz-
einschlag ins Netz).
• Warnung: Der Hörer enthält einen Magneten und kann kleine gefährliche Objekte
wie Nadeln anziehen. Bevor Sie ihn ans Ohr halten, vergewissern Sie sich, dass
keine Objekte daran haften.
SELV (Safety Extra Low Voltage) Einhaltung
Die Eingangs-/Ausgangsverbindungen halten die SELV-Richtlinien für Kleinspannungs-
geräte ein.
Warnung: Um elektrische Schläge zu vermeiden, verbinden Sie keine SELV-Geräte
mit Geräten, die Fernsprech-Netzspannung (TNV) führen. Nur an LAN-Ports
anschließen! LAN-Ports enthalten SELV-Stromkreise, Festnetz-Anschlüsse dagegen
TNV-Stromkreise. Vorsicht beim Anschließen, da beide Steckverbindungen RJ-45
(8P8C) verwenden könnten.
Normkonformität
Dieses Gerät entspricht den grundlegenden Gesundheits-, Sicherheits- und
Umweltanforderungen aller relevanten europäischen Richtlinien. Die Konfor-
mitätserklärung kann bei snom (Anschrift siehe hintere Umschlagseite)
angefordert werden.
Die eigenmächtige Öffnung des Geräts sowie Änderungen und Modifizierun-
gen am Gerät führen zum Erlöschen der Garantie und können darüberhinaus
zum Verlust der CE-Konformität und der FCC-Zertifizierung führen. Wenden
Sie sich bei Betriebsstörungen oder Defekten an authorisiertes Serviceperso-
nal, an Ihren Verkäufer oder an snom.
•
Sicherheit: IEC 60950-1:2007
• Power over Ethernet (PoE): IEEE 802.3af, Klasse 2
• Stromversorgung: PoE oder Netzteil 5V DC (separat erhältlich, snom Art.-Nr. 00002730)
• 1 x LAN, 1 x PC: RJ45
• Ethernet: 2 x IEEE 802.3/1 Gigabit switch
Reinigung
Benutzen Sie ein antistatisches Tuch. Benutzen Sie kein Wasser und keine
Reinigungsflüssigkeiten, da sie die Oberfläche und die Elektronik des Gerätes
beschädigen könnten.
Entsorgung des Produkts
Dieses Gerät unterliegt der europäischen Richtlinie 2002/96/EG und darf
nicht im Hausmüll entsorgt werden.
Wenn Sie nicht wissen, wo Sie Ihr Altgerät entsorgen können, wenden
Sie sich bitte an Ihre Kommune, Ihren örtlichen Müllentsorger oder Ihren
Fachhändler.
Aufstellen und Anschließen des Telefons
Siehe S. 2 und 3
Initialisierung und Registrierung des Telefons
Beachten Sie bitte: Sie benötigen die von Ihrem Netzwerkadministrator oder
Ihrem VoIP-Provider erhaltenen Zugangsdaten für die Registrierung und Nutzung
Ihres Accounts (Kontos), normalerweise Telefonnummer, Passwort und Registrar.
Sobald Sie das Telefon - wie auf den Seiten 2 - 3 gezeigt - an das Netzwerk
angeschlossen haben, beginnt es mit der Initialisierung und Registrierung.
Die Initialisierung erfolgt normalerweise automatisch über DHCP. Falls Ihr Netzwork
DHCP nicht unterstützt, benötigen Sie außerdem die IP-Addresse, den IP-Gateway und
den DNS Server, die Sie ebenfalls von Ihrem Netzwerkadministrator oder VoIP-Provider
erhalten, um sie manuell einzugeben, wenn Sie auf dem Display dazu aufgefordert werden.
Treffen Sie bei Aufforderung auf dem Display Ihre Auswahl mit / und speichern
Sie mit .
1. Sprache. Die Einstellung ab Werk ist Englisch.
2. Zeitzone
3. Rufton
4. Auf dem Bildschirm erscheint "Welcome". Drücken Sie eine beliebige Taste.
5. Geben Sie die Account/Telefon-Nummer ein >
. Eingabe von Zahlen,
Buchstaben und Sonderzeichen: Siehe Seite 23.
6. Geben Sie den Registrar ein >
.
7. Geben Sie das Passwort ein, dass Sie von Ihrem VoIP-Provider oder Ihrem
Netzwerkadministrator erhalten haben. Bei erfolgreicher Registrierung sehen Sie das
grüne Symbol mit dem Hörer:

20 21
snom 760 Quick Start Guide
snom 760 Quick Start Guide
D
E
U
T
S
C
H
D
E
U
T
S
C
H
Auf einen Blick
Anruf-LED
• Schnell blinkend: Eingehender
Anruf
• Leuchtend: Im Gespräch
ODER
• Verpasster Anruf. LED aus-
schalten: Drücken Sie auf .
Rautetaste
#
: Rescuemodus
für TFTP-Update
Sternchentaste
a A
• Im Eingabemodus:
- Drücken Sie
a A
eine Sekunde lang, um zwischen Ziffern, Klein- und Groß-
buchstaben zu wechseln
- Kurz drücken, um das Sternchen (*) einzugeben
• Vom Ruhebildschirm aus: Taste drei Sekunden lang drücken, um die Tastatur zu
verriegeln/entriegeln
Frei programmierbare
LED-Tasten
Standardeinstellung: Leitung
• Schnell blinkend: Eingehender
Anruf
• Leuchtend: Im Gespräch
• Langsam blinkend:
Gehaltener Anruf
Display -
Ruhezustand
Alphanumeri-
sche Tastatur
P5 - P10
P11-P16
P1
P2
P3
P4
Lautstärkeregelung
Mikrofon stummschalten
Freisprecheinrichtung ein/aus
Headset ein/aus
Audiotasten
Ausgehende
Identität:
Kontextsensitive, programmierbare
Funktionssymbole und -tasten
Ausgehende Identität wählen, inkl. inaktiver
Identitäten
Anrufl isten (verpasste, erhaltene, gewählte
Anrufe)
Alle Anrufe umleiten (an/aus)
Status-Informationen (bestehende Umlei-
tungen, verpasste Anrufe, Passwörter nicht
gesetzt, etc.)
Voreingestellte,
programmierbare
Funktionstasten:
LED-Taste "Neue Nachricht"
• Leuchtet bei neuer Nachricht
• Zum Abhören Taste drücken
"Bitte nicht stören" ein/aus
Telefonbuch
Menü Einstellungen
Anruf weiterleiten
Anruf auf Halten setzen/wieder aufnehmen
• Aktionen + Eingaben
bestätigen/speichern
• Am Ruhebildschirm:
Erneut wählen
• Aktionen + Eingaben
beenden/abbrechen
• Nach verpasstem Anruf
LED-Anzeige ausschalten
Empfangene
Anrufe
Verpasste
Anrufe
Identität für ausgehende
Anrufe auswählen
Taste drücken, um im darüberliegenden Symbol
angezeigte Funktion aufzurufen, Aktion
durchzuführen etc.
i
i
Infozeile mit Datum & Zeit
Konfi gurierte Identität
Identität für ausgehende
Anrufe: Grünes Symbol
Aktive Identität:
Gelbes Symbol
Nicht registrierte
Identität:

22 23
snom 760 Quick Start Guide
snom 760 Quick Start Guide
D
E
U
T
S
C
H
D
E
U
T
S
C
H
* Die schwarz + grau unterlegten Untermenüs und Einstellungen stehen im Benutzer-
modus nicht zur Verfügung.aDie werkseitige Einstellung ist Administratormodus. Das
werkseitig eingestellte Administrator-Kennwort lautet 0000 (4x Null).
** Systeminfo: Firmware-Version, IP-Adresse, MAC-Adresse, freier + Gesamt-Speicher
1
Präferenzen
1
Zeitzone
2
Tonschema
3
Klingel
4
Sprache
5
Display
2 Anrufein-
stellungen
1
Umleitung
1
Alles umleiten
2 Umleiten bei
Besetzt
3 Umleiten
nach Zeit
2 Ausgehende
Anrufe
1 Automatisch
wählen
2 Nummer
vorschlagen
3 Automatischer
Rückruf
4 Nummer
verstecken
3 Eintreffende
Anrufe
1 Keine
anonymen Anrufe
2
Anklopfen
3 Automat.
Annahmeton
4 Automat.
Annahmeart
3 *
Identität
1
Identität wählen
2
Reregistrieren
3
Editieren
4
Abmelden
5
Alle abmelden
4 *
Netzwerk
1
IP Einstellungen
2
Webservertyp
1
Verbindungsart
2
HTTP Admin
3
HTTP Passwort
3 VLAN
zurücksetzen
3
VLAN
1
VLAN ID (0-4095)
2 VLAN
Priorität (0-7)
3
Switch off WLAN
4
WLAN
1
802.11b/g/n
2
802.11b/g
5
Wartung
1
Systeminfo**
2
Benutzermodus
3
Neustart
4 * Werte
zurücksetzen
6 (4)
Information
1
Statusinfo
2
Systeminfo
3
Hilfe
3
Wartung
1
Systeminfo
2 Administrator-
modus
3
Neustart
Im Administratormodus.
Durch Drücken der Taste
2 schalten Sie in den
Benutzermodus um!
Im Benutzermodus.
Umschalten zum
Administratormodus
nur mit Administrator-
Kennwort!
Menü Einstellungen
Zeitzone:
Zum Anfang
der nächsten
Zeitzone
Alle Zeit-
zonen zeigen
Nur die
Zeitzonen der
Länder zeigen,
in denen die
Telefonsprache
gesprochen wird
Zeitzone mit /
und auswählen.
• drücken
• Zur Auswahl + Anzeige der Untermenüs
und Einstellungen Nummerntasten
1
,
2
ABC
usw. drücken
• Auswahl der Einstellung mit
/
• Ausgewählte Einstellung mit speichern
• Einstellungen mit (Ein)/(Aus) oder (Ja)/
(Nein): Mit ändern und gleichzeitig
speichern
• Mit zum vorherigen Bildschirm zurück
• Mit
zum Ruhebildschirm zurück
Der Webbrowser des Telefons
1. IP-Adresse anzeigen: Drücken Sie > 6 Information > Systeminfo. Beispiel:
http://10.10.10.110.
2. Öffnen Sie den Webbrowser Ihres PCs, tippen Sie die IP-Adresse in die Adresszeile
und drücken Sie auf die Bestätigen-Taste, um auf die Startseite des Telefon-
Webbrowsers zu gelangen.
3. Klicken Sie auf einen Menüpunkt auf der linken Seite, um das dazugehörige Fenster
zu öffnen, z.B. Präferenzen.
4. Enthält das Fenster mehrere Seiten, klicken Sie auf einen Tab (“Karteireiter”) am
oberen Rand, um die Seite sichtbar zu machen. Der Schriftschnitt der Textzeichen
auf der sichtbaren Seite ist fett.
5. Klicken Sie vor dem Schließen des Telefonbrowsers oder dem Anklicken eines
anderen Menüpunktes immer auf "Übernehmen", wenn die vorgenommenen
Änderungen wirksam werden sollen.
6. Nachdem Sie auf "Übernehmen" geklickt haben, erscheint oben auf der Seite die
Schaltfläche "Speichern". Klicken Sie darauf, um die Änderungen auf Dauer zu
speichern. Nicht gespeicherte Änderungen gehen bei Stromausfall und bei Trennung
des Telefons von der Stromversorgung verloren.
Zeitformat
Webbrowser > Präferenzen > Allgemeine Informationen > 24-Stundenuhr:
An: 24-Stundenformat, 00:00 - 23:59
Aus: 12-Stundenformat AM/PM, 0:00 A to 11:59 P
Datumsformat
Webbrowser > Präferenzen > Allgemeine Informationen > US Datumsformat (mm/tt).
Beispiel: 08.03.2010
An: 3/8/2010
Aus: 8.3.2010

24 25
snom 760 Quick Start Guide
snom 760 Quick Start Guide
D
E
U
T
S
C
H
D
E
U
T
S
C
H
Funktionstasten
Funktionstasten einrichten: Webinterface des Telefons > Funktionstasten.
Änderungen vornehmen > Speichern. Beispiel: Belegung der Funktionstasten P5
und P6 mit den Nebenstellen 154 und 152.
Identitäts-/Kontoeinstellungen
Webbrowser > Identität 1-12 > Login. Erforderliche und optionale Eingaben: Siehe
"Initialisierung und Registrierung des Telefons" auf Seite 19.
Die Bedienung des Telefons
Zahlen, Buchstaben und Sonderzeichen eingeben
Eine beliebige Taste drücken oder Hörer abheben.
Telefonbücher, Anruf-,
Kontakt- und Favoriten-
listen
Eingabemodi:
123: Ziffern
abc: Kleinbuchstaben
ABC: Großbuchstaben
Zeichen links vom
Cursor löschen
Derzeitiger Eingabemodus:
Nächster Eingabemodus:
Erneut wählen
Cursor nach links
Cursor nach rechts
:
:
Eingabemodus ändern:
Eingabe von Umlauten oder Buchstaben mit Akzenten
in den Eingabemodi Klein- u. Großbuchstaben.
Umlaute und Buchstaben mit Aklzenten werden auf den Tasten "2" bis "9" eingegeben.
Die verfügbaren Zeichen hängen von der eingestellten Telefonsprache ab. Drücken
Sie die Taste, auf der jeweilige Buchstaben aufgedruckt ist, so oft, bis der gewünschte
Umlaut oder der Buchstabe mit Akzent erscheint.
Beispiel: Bei Telefonsprache Deutsch drücken Sie viermal die Taste "2", um das "ä"
einzugeben.
Eingabe von Sonderzeichen
in den Eingabemodi Klein- u. Großbuchstaben: Taste schnell drücken, mit einer Pause
nach jedem Zeichen.
Taste "0": 1 x = Leerzeichen ("˽"), 2x = Unterstrich ("_")
Taste "1": . + @ 1 : , ? ! - _ / \ ( ) ; & % * # <=> $ [ ].
Beispiele: 1x = "." ; 2x = "+", etc.
Anrufen
• Nummer auf der alphanumerischen Tastatur eingeben und Hörer abheben oder
• Hörer abheben, Nummer eingeben,
oder
•
, Nummer eingeben, .
Kurzwahl
Einstellung: Webbrowser > Kurzwahl. Geben Sie pro Textfeld eine Telefonnummer
einschließlich der notwendigen Vorwahl/en ohne Leerstellen, Bindestriche usw. ein.
Fügen Sie keine Namen oder sonstigen Angaben hinzu. Beispiel: Die Telefonnummer
(030) 555-1234 geben Sie so ein: 0305551234.
Anwendung der Kurzwahl: Geben Sie die Kurzwahlnummer oder das Kurzwahlzeichen
auf der alfanumerischen Tastatur ein und drücken Sie
.
Notfallnummern
können auch dann angerufen werden, wenn die Tastatur verriegelt. Die Nummern
"911", "112", "110" und "999" sind voreingestellt.
Änderung/Ergänzung: Webbrowser > Präferenzen> Tastatursperre > Notrufnummern
(Leerzeichen-getrennt). Geben Sie jede Telefonnummer ohne Leerstellen, Bindestriche
usw. innerhalb der Nummer ein, mit einer Leerstelle zwischen den einzelnen
Telefonnummern. Eingabebeispiel: 911 112 110 999.
Anrufe annehmen
• Mit dem Hörer: Hörer abheben
• Mit einem Headset:
oder blinkende Leitungstaste drücken
• Mit dem Gehäuselautsprecher/-mikrofon:
drücken.
Anruf auf Halten setzen
drücken. Die LED beginnt, langsam zu blinken. Anruf
wieder aufnehmen: Erneut drücken. Wird mehr als ein
Anruf gehalten: Mit
/ einen Anrufer auswählen
und drücken, um mit ihm zu sprechen.
Konferenz (3 Teilnehmer)
1. Ihre Telefonnummer: 172. Ersten Anrufer (157) auf Halten setzen.
2. Zweiten Teilnehmer (153) anrufen. Auf
Halten setzen. Dritten Teilnehmer (154)
anrufen. Konferenz starten:
drücken.

26 27
snom 760 Quick Start Guide
snom 760 Quick Start Guide
D
E
U
T
S
C
H
D
E
U
T
S
C
H
3. Mit die Konferenz stoppen und alle Teilnehmer auf Halten
setzen. Einzelgespräch mit einem der Teilnehmer: Wählen Sie
mit
/ einen Teilnehmer aus und drücken Sie auf .
4. Konferenz erneut starten: drücken.
Anruf-Weiterleitung
Mit Ankündigung
Anruf auf Halten setzen mit
> Telefonnummer wählen, an die weitergeleitet
werden soll. Will der Teilnehmer den Anruf entgegennehmen: und drücken.
Ohne Ankündigung
Bei läutendem Anruf oder im Gespräch:
> Telefonnummer wählen > .
Rufumleitung
1. Alle eingehenden Anrufe.
• Einschalten:
> Umleitungsziel: Telefonnummer eingeben >
• Ausschalten:
2. Bei Besetzt.
• Einschalten: > 2 Anrufeinstellungen > 1 Umleitung >
2 Umleiten bei Besetzt > 2 Umleitungsziel: > Telefonnummer
eingeben >
> 1 Umleitung einschalten [Nein:
1
drücken
Ja] > 2 Sekunden lang
drücken
• Ausschalten:
> 2 Anrufeinstellungen > 1 Umleitung > 2 Umleiten bei
Besetzt: > 1 Umleitung einschalten [Ja Nein] > 2 Sekunden
lang
drücken
3. Wenn niemand abnimmt.
• Einschalten:
>2 Anrufeinstellungen: > 1 Umleitung >
3 Umleiten nach Zeit > 2 Umleitungsziel > Telefonnummer
eingeben > > 3 Zeit bis Umleitung > Anzahl der Wartezeit
in Sekunden eingeben > 1 Umleitung einschalten [Nein:
1
drücken Ja] > 2 Sekunden lang
drücken
• Ausschalten:
> 2 Anrufeinstellungen > 1 Umleitung > 3 Umleiten nach
Zeit > 1 Umleitung einschalten [Ja:
1
drücken Nein] > 2
Sekunden lang drücken
Umleiten bei
Besetzt oder
nach Zeitüber-
schreitung:
Alle Anrufe
werden
umgeleitet:
Anruflisten
• Aufrufen vom Ruhebildschirm: .
• Liste der verpassten, angenommenen oder gewählten Anrufe auswählen: pq
• Listeneintrag suchen: pq. Markierten Eintrag wählen: . Details (Nummer, Name,
Zeit) anzeigen:
. Eintrag löschen: .
• Liste löschen:
.
Telefonbuch
• Öffnen:
• Direkt zu <Neuer Eintrag> am Ende der Liste: p. Eintrag suchen: pq.
• Markierten Eintrag wählen:
. Details anzeigen: , Detail bearbeiten: .
Eintrag löschen:
.
Fehlerbehebung
Neustart (Reboot)
> 5 Wartung:
5
JKL
> 3 Neustart:
3
DEF
> "Neustart?" >
Harter Neustart
Netzstecker ziehen. Telefon nach ein paar Sekunden wieder anschließen.
Nie während eines Firmware-Updates die Stromzufuhr unterbrechen!
Werte zurücksetzen
> 5 Wartung:
5
JKL
> 4 Werte zurücksetzen:
4
GHI
> Admin. Modus
Passwort: Administratorkennwort eingeben >
Alle persönlichen Einstellungen werden gelöscht!
TFTP-Update
Wenn es keine andere Möglichkeit mehr gibt, das Telefon zum Laufen zu bringen
(Administratorpasswort verloren usw.). Wie es gemacht wird:
http://wiki.snom.com/Firmware/Update/TFTP_Update/de.
Alle persönlichen Einstellungen werden gelöscht!

28 29
snom 760 Quick Start Guide
snom 760 Quick Start Guide
F
R
A
N
Ç
A
I
S
D
E
U
T
S
C
H
Ce manuel abrégé décrit l'installation, l'initialisation et la mise en
service du snom 760. Consultez notre site web pour des informations
complémentaires:
http://wiki.snom.com.
Copyright, Marques Déposées, GPL, Non Responsabilitée
© 2013 snom technology Aktiengesellschaft
Tous droits réservés.
snom, les noms des produits snom et les logos snom sont des marques déposées par snom
technology AG. Tous les autres noms de produits et noms d'entreprises sont les propriétés de
leurs détenteurs respectifs.
snom technology AG se réserve le droit de modifier et de changer ce document à n'importe quel
moment, sans devoir annoncer de telles modifications ou changements avant ou après leur mise
en place.
Les textes, images et illustrations ainsi que leur mise en page dans ce document sont protégés
par les copyrights et autres dispositions légales internationales. Leur utilisation, leur reproduction
et leur transmission à des parties tierces sans accord express écrit peut induire des poursuites
devant les cours criminelles et civiles.
Bien que le plus grand soin ait été apporté à la compilation et à la présentation des informations
contenues dans ce document, les données sur lesquelles elles sont basées peuvent entre-
temps avoir été modifiées. snom doit donc décliner toute garantie et toute responsabilité quand à
l'exactitude et à l'exhaustivité des informations publiées excepté en cas de négligence flagrante de
la part de snom ainsi que des les cas ou la responsabilité de snom est engagée de par la loi.
Notre firmware inclus des éléments de code source qui peuvent être utilisés et modifié par
quiconque selon les termes des licences GPL (cf. page 59), à condition qu'à leurs tours ils les
rendent disponibles selon les mêmes termes. Veuillez vous rendre sur http://www.snom.com/de/
support/download/gpl-quellcode/ pour consulter la licence GPL originelle et le code source des
composants couverts par la licence GPL qui sont utilisé dans les produits snom.
Informations importantes
Veuillez lire les informations concernant la sécurité et la mise au rebut de l'appareil
ainsi que celles concernant son installation et son utilisation avant d'utiliser l'appareil.
Communiquez également ces informations aux autres utilisateurs ou faites-les leur lire.
Conservez ce manuel et ne cédez pas l'appareil à une tierce partie sans y joindre le
manuel.
Sécurité
Suivez les instructions présentes dans ce manuel et dans les autres documents
concernant l'appareil.
• Evitez de placer les câbles de l'appareil dans un endroit ou il est possible de
trébucher dessus. Evitez également de les placer là ou ils pourraient être exposé à
un écrasement car ils pourraient en être endommagé. Si les câbles ou la fiche sont
endommagés, débranchez l'appareil et contactez du personnel d'entretien qualifié.
• Cet appareil est destiné à une utilisation en intérieur uniquement! Ne l'installez
pas au dehors!

30 31
snom 760 Quick Start Guide
snom 760 Quick Start Guide
F
R
A
N
Ç
A
I
S
F
R
A
N
Ç
A
I
S
de bain, une buanderie ou un sous-sol humide). N'immergez pas l'appareil dans l'eau
et ne versez pas de liquides d'aucune sorte sur ou dans l'appareil.
• N'installez pas l'appareil dans un lieu présentant un risque d'explosion (un magasin
de peinture par exemple). N'utilisez pas l'appareil si vous sentez une odeur de gaz ou
d'autres émanations potentiellement explosives.
• N'utilisez pas l'appareil durant les orages, le choc d'un éclair sur les circuits
électriques peut provoquer une électrocution.
• Avertissement: Le combiné contient un aimant, et son écouteur pourrait attirer de
petits objets dangereux tels que des aiguilles ou des épingles. Assurez-vous avant
chaque utilisation que de tels objets ne sont présents.
Conforme à SELV (Safety Extra Low Voltage) - TBTS (Très Basse Tension de
Sécurité)
Le niveau de sécurité des connexions d'entré/sortie est conforme aux recommandations
SELV /TBTS.
Avertissement: Pour éviter des électrocutions, ne connectez pas les circuits de
SELV / TBTS à des circuits de tension de réseau téléphonique (Telephone Network
Voltage ou TNV). Ne connectez le câble NET/Ethernet qu'à des ports du réseau
local (LAN) qui contiennent des circuits SELV. Les ports du Réseau Téléphonique
Commuté Public (RTCP ou PSTN) sont munis de circuits TNV.
Conformité au standards
Cet appareil est marqué CE et conforme aux standards de sécurité, de
santé et environnementaux de tous les directives européennes applicables.
La déclaration de conformité peut être demandée de snom (adresse sur la
jaquette arrière).
L'appareil est certifié FCC Class B et répond aux standards de santé, de
sécurité et environnementaux des États Unis.
L'ouverture et la modification de l'appareil sans autorisation annule la garantie et peut
également annuler la conformité CE et la certification FCC. En cas de mauvais fonction-
nement, veuillez contacter le personnel d'entretien agrée, votre revendeur ou bien snom.
• Sécurité
: IEC 60950-1:2007
• 1 x LAN, 1 x PC: RJ45
• Power over Ethernet (PoE):
IEEE 802.3af, Classe 2
• Ethernet:
2 x IEEE 802.3/1 Gigabit switch
• Alimentation: PoE ou bloc d'alimentation PSAC10R-050 (pas inclu dans la boîte - N
o
art. snom 00002730)
Mise au Rébut du Produit
Cet appareil est soumis à la Directive 2002/96/CE et ne peut être mis au
rebut avec les déchets ménagers normaux.
Si vous ne savez pas ou mettre au rebut oú faire recycler l'appareil lorsqu'il
arrive au terme de son existence, contactez votre municipalité, la société
locale en charge de la gestion des déchets ou votre vendeur.
Nettoyage
Utilisez un tissu antistatique. N'utilisez pas de l'eau ou un produit de nettoyage liquide
ou solide. Ils peuvent endommager l'éléctronique ou les sufaces de l'appareil.
Installer et connecter le telephone: Voir pages 2 - 3.
Initialisation et enrégistration
Renseignement: Vous devez également disposer des données pour la
registration et l'utilisation de votre compte que vous avez reçu de votre
administrateur réseau ou de votre fournisseur de VoIP, normalement la numéro de
téléphone, le mot de passe et le régistraire.
Une fois que l'appareil est connecté avec le réseau comme indiqué sur les pages 2 - 3,
il commence à s'initialiser et se registrer.
L'initialisation est normalement fait automatiquement via DHCP. Si votre réseau ne
supporte pas le protocole DHCP, vous devez également saisir l'adresse IP, la passerelle
IP et le serveur DNS manuellement. Demandez-les de votre administrateur réseau ou de
votre fournisseur de VoIP et suivez les instruction qui s'affichent à l'ecran.
Après l'initialisation, le téléphone va vous conduire à travers les paramètres de base.
Sélectionnez une option avec /
et sauvegardez chaque sélection avec .
1. Langue. Le paramètre par défaut est Anglais.
2. Fuseau horaire
3. Tonalité
4. Ecran de bienvenue: "Welcome". Appuyez sur une touche alphanumérique
quelconque pour vous loguer.
5. Saisissez votre numéro de téléphone/compte + appuyez sur
6. Saisissez votre registraire et appuyez sur .
7. Saisissez le mot de passe que vous avez recu de votre fournisseur de VoIP, ou votre
administrateur et appuyez su . Si l'enregistrement a réussi l'écran d'attente avec le
symbole vert s'affiche:
Barre d‘information avec date & heure:
Barre d‘identité:
Identité sortante:
Symbole vert
Identité active:
Symbole jaune
Identité non
enregistrée:
Saisie de lettres, chiffres et caractères spéciaux
Appuyez sur une touche alphanumérique quelconque ou décrochez le combiné.
Annuaires; listes des
appels, des contactes
et des favoris
Modes de saisie:
123: Chiffres
abc:
Lettres minuscules
ABC:
Lettres majuscules
Supprimer le caractère
à la gauche du curseur
Mode de saisie actuel:
Mode de saisie prochain:
Recomposer
Déplacer le curseur vers
la gauche | vers la droite
:
:
Changer le mode de saisie:

32 33
snom 760 Quick Start Guide
snom 760 Quick Start Guide
F
R
A
N
Ç
A
I
S
F
R
A
N
Ç
A
I
S
Saisie de lettres, caractères spéciaux et symboles
En modes de saisie lettres minuscules et majuscules: Appuyez rapidement plusieurs
fois sur la touche respective, avec une petite pause après chaque caractère.
Caractères spéciaux et symboles
La touche "0": 1x = espace ("˽"); 2x = tiret inférieur ("_"); 3x = 0
La touche "1": . + @ 1 : , ? ! - _ / \ ( ) ; & % * # <=> $ [ ]
Exemples: 1x = ".", 2x = "+" etc.
Saisie de voyelles infléchies et caractères accentués
Touches "2"-"9". Les caractères disponibles dépendent de la langue sélectionnée. Par
exemple: Si la langue sélectionnée est le français, appuyez sur la touche
2
ABC
quatre
fois pour saisir le "à", sept fois pour saisir le "ç".
Touches de fonction programmables avec diodes
Défaut: Ligne
• Clignotement rapide: Appel entrant
• Allumé: Appel en cours
• Clignotement lent: Appel en attente
Touche dièse
#
: Mode "Re-
scue" (réinitial. avec TFTP)
Touche astérisque
a A
• En mode de saisie:
- Appuyé pour 3 secondes: Passer entre modes chiffres, lettres minuscules et
lettres majuscules.
- Appuyé brièvement: Saisir l'asterisque (*)
• En mode inactif: Appuyé pour 3 secondes: Verrouiller/déverrouiller le clavier
Réglage du volume
Microphone (arrêt/marche)
Haut-parleur (marche/arrêt)
Casque (marche/arrêt)
Touches audio
Symboles contextuelles
des fonctions personnalisables
Selectionner l'identité sortante (identités
inactives inclus)
Listes des appels (manqués, recus,
composés)
Renvoyer tous les appels (marche/arrêt)
Informations d'état (renvois d'appels actifs, ap-
pels manqués, mots de passe pas défi nis, etc.)
Touches de fonction
programmés:
Touche "Nouvel message" avec diode
• Allumé: Nouvel message
• Appuyez sur la touche pour ecouter le nouvel message
Mode
"Ne pas déranger" en marche/arrêt
Annuaire
Menu Paramètres
Transférir un appel
Mettre un appel en attente
• Confi rmer/sauvegarder
des actions/entrées
• De l'écran inactif: Re-
composer
• Annuler des actions/
saisies
• Éteindre la diode ap-
rès un appel manqué
Appels
reçus
Appels
manqués
Selectionner l'identité
pour des appels sortants
Appuyer sur la touche de fonction au-dessous du
symbole contextuel pour activer la fonction indiquée
là, initier une action etc.
D'un seul coup d'oeil
Diode d'indication d'appel
• Clignotement rapide: Appel entrant
• Allumé: Appel en cours OU
• Appel manqué. L'éteindre:
Appuyez sur .
Clavier
alphanumérique
Écran inactif
Identité
sortante:
P5 - P10
P11-P16
P1
P2
P3
P4
i
i
Touches de fonction programmables avec diodes
Défaut: Ligne
• Clignotement rapide: Appel entrant
• Allumé: Appel en cours
• Clignotement lent: Appel en attente
Touche dièse
#
: Mode "Re-
scue" (réinitial. avec TFTP)
Touche astérisque
a A
• En mode de saisie:
- Appuyé pour 3 secondes: Passer entre modes chiffres, lettres minuscules et
lettres majuscules.
- Appuyé brièvement: Saisir l'asterisque (*)
• En mode inactif: Appuyé pour 3 secondes: Verrouiller/déverrouiller le clavier
Réglage du volume
Microphone (arrêt/marche)
Haut-parleur (marche/arrêt)
Casque (marche/arrêt)
Touches audio
Symboles contextuelles
des fonctions personnalisables
Selectionner l'identité sortante (identités
inactives inclus)
Listes des appels (manqués, recus,
composés)
Renvoyer tous les appels (marche/arrêt)
Informations d'état (renvois d'appels actifs, ap-
pels manqués, mots de passe pas défi nis, etc.)
Touches de fonction
programmés:
Touche "Nouvel message" avec diode
• Allumé: Nouvel message
• Appuyez sur la touche pour ecouter le nouvel message
Mode "Ne pas déranger" en marche/arrêt
Annuaire
Menu Paramètres
Transférir un appel
Mettre un appel en attente
• Confi rmer/sauvegarder
des actions/entrées
• De l'écran inactif: Re-
composer
• Annuler des actions/
saisies
• Éteindre la diode ap-
rès un appel manqué
Appels
reçus
Appels
manqués
Selectionner l'identité
pour des appels sortants
Appuyer sur la touche de fonction au-dessous du
symbole contextuel pour activer la fonction indiquée
là, initier une action etc.
D'un seul coup d'oeil
Diode d'indication d'appel
• Clignotement rapide: Appel entrant
• Allumé: Appel en cours OU
• Appel manqué. L'éteindre:
Appuyez sur .
Clavier
alphanumérique
Écran inactif
Identité
sortante:
P5 - P10
P11-P16
P1
P2
P3
P4
i
i

34 35
snom 760 Quick Start Guide
snom 760 Quick Start Guide
F
R
A
N
Ç
A
I
S
F
R
A
N
Ç
A
I
S
L'interface Web du téléphone
1. Obtenir l'adresse IP: > 6 Information > 2 Infos Système, p.ex.
192.168.10.115.
2. Ouvrez le navigateur web de votre PC et saisissez l'adresse IP dans la barre
d'adresse, p.ex. http://192.168.10.115. Appuyez sur la touche d'entrée pour ouvrir la
page d'accueil de l'interface Web du téléphone.
3. Cliquez sur un élément au menu à gauche pour ouvrir la page correspondante.
4. Certaines pages contiennent plusieurs documents. Pour rendre visible un document,
cliquez sur 'onglet correspondant. Les lettres de l'onglet actif sont affichées en
caractères gras.
5. Appuyez toujours sur la touche "Apply" avant de cliquer sur un menu différent ou de
refermer l'interface web si vous désirez appliquer les modifications que vous avez
effectuées.
6. Chaque fois que vous cliquez sur "Appliquer", le "sauvegarder" bouton apparaîtra
en haut de la page. Cliquez sur "Sauvegarder" pour enregistrer les modifications de
façon permanente. Les modifications qui n'ont pas été enregistrées seront perdues
si et lorsque le téléphone n'est plus alimenté ou est déconnecté de sa source
d'alimentation.
Format de l'heure
Interface Web > Préférences > Informations générals > Horloge 24 Heures
On: Format 24 heures, 00:00 - 23:59
Off: Format 12 heures AM/PM, 0:00 AM - 11:59 PM
Format de la date
Interface Web > Préférences > Informations générals > Format date U.S. (mm/dd).
Example: Le 8 mars 2010.
On: 3/8/2010
Off: 8.3.2010
Touches de fonction
Confi gurer les touches de fonction: Interface web du téléphone > Touches de fonc-
tion. Modifi er les parametrès > Sauvegarder. P. ex.: Dédier les touches de fonction
P4 et P5 à la fonction "extension" pour les postes intérieurs 154 et 156.
* Les sous-menus et parametres en panneaux gris et noir ne sont pas disponibles en
mode utilisateur.aLa réglage par défaut est le mode administrateur. Le mot de passe
administrateur par défaut est 0000 (4 x zéro).
** Infos Système: Version de logiciel, adresse IP, adresse MAC, mémoire totale + libre
1
Préférences
1
Fuseau
2 Tonalité de
numérotation
3
Sonnerie
4
Langue
5
Affi chage
2 Gestion
des appels
1
Renvoi d'appels
1 Renvoi
systématique
2 Renvoi sur
occupation
3 Renvoi
temporisé
2 Appels
sortants
1
Comp. auto
2 Détermination
numéro
3 Rappel
automatique
4 Masquer
l'identité
3 Appels
entrants
1 Refuser no.
masqué
2
Appel en attente
3 Indic. réponse
automatique
4 Réponse
automatique
3 *
Identité
1 Sélection
utilisateur
2 Réenregistrer
Utilisateur
3
Édit. utilisateur
4 Déconnexion
utilisateur
5 Tout
déconnecter
4 *
Réseau
1
Paramètres IP
2
Serveur Web
1
Type serveur web
2
Admin HTTP
3 Mot de
passe HTTP
3
Reset VLAN
3
VLAN
1 VLAN ID (0-
4095)
2 VLAN
Priority (0-7)
3
Switch off WLAN
4
WLAN
1
802.11b/g/n
2
802.11b/g
5
Maintenance
1
Infos Système**
2 Mode
utilisateur
3
Redémarrage
4 *
Réinit. Param.
En mode administrateur.
Appuyez sur la touche 2
pour passez le telepho-
ne en mode utilisateur!
En mode utilisateur.
Retour en mode
administrateur seu-
lement avec mot de
passe administrateur.
6 (4)
Information
1
Status Info
2
Infos Système
3
Aide
3
Maintenance
1
Infos Système
2 Mode
Administrateur
3
Redémarrage
Menu Paramètres
Fuseau:
Aller au
debut du fu-
seau horaire
suivant
Affi cher tous
les fuseaux
N'affi cher que
les fuseaux
correspondant à la
langue que vous
avez choisie
Selectionner un
fuseau avec /
et
1 Sélectionner
une identité
enregistrée sur
le registraire
2 Réenregistrer
une identité
3 Éditer une
identité
4 Désinscrire
une identité du
régistraire
5 Désinscrire
toutes les
identités
• Appuyez sur
• Selectionner un sous-menu ou un pa-
ramètre: Appuyez sur la touche nume-
rique correspondante
1
,
2
ABC
etc.
• Selectionner un paramètre:
/
• Sauvegarder votre modifi cation:
• Paramètres avec (Marche)/(Arrêt) ou
(Oui)/(Non): Modifi er et sauvegarder
simultanément avec
• Retourner à l'écran précédent:
• Retourner à l'écran inactif:

36 37
snom 760 Quick Start Guide
snom 760 Quick Start Guide
F
R
A
N
Ç
A
I
S
F
R
A
N
Ç
A
I
S
Paramètres d'identité/compte
Interface Web > Identité 1-12 > > Login. Voir "Initialisation et enrégistration" á la
page 31 pour les données requises et optionelles.
Utilizer le téléphone
Passer des appels
• Saisissez le numéro sur le clavier alphanumérique et décrochez le combiné ou
• Saisissez le combiné, saisissez le numéro et appuyez sur
ou
•
, saisissez le numéro, .
Composition Rapide
Configuration: Interface Web > Numérotation Rapide. Saisissez un seul numéro avec
tous les préfixes requis dans chaque zone de texte, sans espaces libres, sans traits
d'union ou d'autres signes de ponctuation. N'ajoutez pas de nom avant où apres le
numéro ! P. ex: Saisissez le "(01) 23.45.67.89" comme "0123456789".
Utilisation: Saisissez un numéro (0 - 30) ou les caractères spécials # ou * et appuyez
sur
.
Numéros d'urgence
Ils peuvent être composés même lorsque le clavier est verrouillé! Paramètres par
défaut: "911", "112", "110", "999".
Configuration sur l'interface web du téléphone: Interface Web > Préférences >
Verrouillage clavier > Emergency Numbers (space separated). Saisissez chaque
numéro sans espace entre les chiffres, séparez les numéros par un espace vide. P. ex:
911 112 110 999.
Accepter des appels
• Avec le combiné: Décrochez le combiné
• Avec un casque: Appuyez sur
ou la touche clignotante de la ligne
• Avec le haut-parleur/microphone du boîtier: Appuyez sur
Placer un appel en attente
Appuyez sur . La diode commence à clignoter
lentement. Reprendre l'appel: Appuyez sur . S'il y a
plus qu'un seul appel en attente: Sélectionnez un d'eux
avec
/ et appuyez sur .
Conférence (3 participants)
1. Votre numéro de téléphone: 172. Mettez le premier appel (157) en attente.
2. Appelez la deuxième partie (153). Mettez-
la en attente. Appelez la troisième partie
(154). Appuyez sur
pour démarrer la
conference.
3. Appuyez sur pour arrêter la conférénce et mettre
les participants en attente. Parler à un seul participant:
Sélectionnez un d'eux avec
/ et appuyez sur .
4. Recommencer la conférénce: Appuyez sur .
Transfert d'un appel
Attendu
Mettre l'appel en attente > Composez le numéro du nouveau poste destinataire.
Annoncez l'appel > Si la tierce partie veux l'accepter: Appuyez sur et .
Sans l'annoncer au poste destinataire
Quand un appel sonne ou avec un appel en ligne: Appuyez sur
> composez le
numéro du nouveau poste destinataire > appuyez sur .
Renvoi d'appel
1. Tous les appels entrants.
• Activer:
> Numéro où renvoyer > composez le numéro du poste
destinataire >
• Désactiver:
2. Sur occupation.
• Activer: > 2 Gestions des appels > 1 Renvoi d'appels > 2 Renvoi sur
occupation > 2 Numéro où renvoyer > composez le numéro du
poste destinataire > > 1 Activation du renvoi [Non: Appuyez
sur
1
OUI] > pour 2 secondes
• Désactiver: > 2 Gestions des appels > 1 Renvoi d'appels > 2 Renvoi
sur occupation > 1 Activation du renvoi [Oui: Appuyez sur
1
Non] > pour 2 secondes
3. Après un délai de réponse.
• Activer:
> 2 Gestions des appels > 1 Renvoi d'appels > 3 Renvoi
temporisé > 2 Numéro où renvoyer > composez le numéro du poste
destinataire > > 3 Attente en secondes > saisissez le numero
de secondes > > 1 Activation du renvoi [Non: Appuyez sur
1
OUI] > pour 2 secondes.
• Désactiver: > 2 Gestions des appels > 1 Renvoi d'appels > 3 Renvoi
temporisé > 1 Activation du renvoi [Oui: Appuyez sur
1
Non]
> pour 2 secondes.

38 39
snom 760 Quick Start Guide
snom 760 Quick Start Guide
I
T
A
L
I
A
N
O
F
R
A
N
Ç
A
I
S
Questa è la guida rapida per l'installazione, l'impostazione e il
funzionamento dello snom 760. Per ulteriori informazioni consultare la
nostra pagina web: http://wiki.snom.com.
Copyright, Marchi registrati, GPL, Declinazione di responsa-
bilita
© 2013 snom technology Aktiengesellschaft
Tutti i diritti riservati.
snom, i nomi dei prodotti snom, ed i loghi snom sono marchi registrati di proprietà di
snom technology AG. Tutti gli altri nomi di prodotti e di imprese sono proprietà dei
rispettivi proprietari.
snom technology AG si riserva il diritto di rivedere e modificare il presente documento
in qualsiasi momento senza alcun obbligo di notifica precedente o posteriore a tali
cambiamenti.
Testi, immagini ed illustrazioni ed il loro ordine in questo documento sono soggetti
a protezione del diritto d’autore ed altri diritti legali a livello mondiale. Il loro utilizzo,
riproduzione e trasmissione a terzi senza il permesso scritto di snom potrebbe dar
luogo ad azioni legali, in sede penale e civile.
Sebbene sia stata prestata la massima attenzione nella stesura e presentazione delle
informazioni in questo documento, i dati su cui si basa potrebbero già aver subito
variazioni. snom pertanto declina ogni responsabilità riguardo a tutte le garanzie di
affidabilità, accuratezza, completezza ed attualità delle informazioni pubblicate, tranne
nel caso di grossolana negligenza da parte di snom o laddove per legge possa essere
ritenuta responsabile.
Il nostro firmware include codice sorgente utilizzabile e modificabile da chiunque. La
licenza pubblica GNU (GPL) (cfr. pag. 59), consente di rendere disponibile il software
con lo stesso accordo di licenza. Visitate http://www.snom.com/de/support/download/
gpl-quellcode/ per la licenza GPL originale e per i codici di sorgente di componenti
sotto licenza GPL ed utilizzati in prodotti snom.
Informazioni importanti
Pregasi leggere con attenzione le istruzioni inerenti la sicurezza, lo smaltimento e
l'installazione del dispositivo prima del suo impiego. Tali informazioni vanno condivise
con gli altri utenti. È altresì necessario conservare questo manuale, consegnandolo
insieme al dispositivo qualora esso venga dato a terzi.
Sicurezza
Seguite le istruzioni in questo manuale e tutta la documentazione relativa al dispositivo.
• Non posizionare i cavi del telefono dove può essere calpestato. Non posizionare i
cavi del telefono dove può essere soggetto a pressione meccanica perchè potrebbe
danneggiare i cavi. Se i cavi o la spina si danneggiano, scollegare il telefono e
contattare il personale di assistenza qualificato.
Renvoi si
votre poste
est occupé
et renvoi
temporisé:
Renvoi de
tous les appels
entrants sur un
autre poste:
i
Listes des appels manqués, recus et appelés
• Appuyez sur .
• Sélectionner la liste des appels manqués (perdu), recus, appelés: pq >
• Chercher un appel dans la liste: pq. Composer lè numéro: . Afficher les détails
de l'appel à l'écran:
. Supprimer l'entrée: . Supprimer la liste:
Annuaire du telephone
• Ouvrir l'annuaire: Appuyez sur
• Faire défiler les entrées: pq. Aller directement à <Nouvelle Entrée>: p.
• Composer le numéro:
; Détails: ; Éditer un détail: ; Supprimer l'entrée:
.
Dépannage
Redémarrage (Reboot)
> 5 Maintenance:
5
JKL
> 3 Redémarrage
3
DEF
> "Redémarrer?" >
Redémarrage à froid
Retirez la prise de courant. Rebranchez l'alimentation après quelques secondes.
Ne coupez pas l'alimentation pendant une mise à jour du firmware !
Réinitialiser aux valeurs d'usine (remettre à zero)
> 5 Maintenance:
5
JKL
> 4 Réinit. Para.:
4
GHI
> saisissez le mot de passe
administrateur >
Tous les paramètres personnalisés seront écrasés !
TFTP Update (réinitialisation aux valeurs d'usine avec TFTP)
Quand il n'y a pas d'autre moyen pour faire fonctionner le téléphone ou d'accéder à
l'interface web (mot de passe administrateur perdu ou oublié, etc.). Comment le faire:
Voir http://wiki.snom.com/Firmware/Update/TFTP_Update/en.
Tous les paramètres personnalisés seront écrasés !
La pagina si sta caricando...
La pagina si sta caricando...
La pagina si sta caricando...
La pagina si sta caricando...
La pagina si sta caricando...
La pagina si sta caricando...
La pagina si sta caricando...
La pagina si sta caricando...
La pagina si sta caricando...
La pagina si sta caricando...
La pagina si sta caricando...
La pagina si sta caricando...
La pagina si sta caricando...
-
 1
1
-
 2
2
-
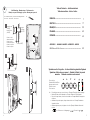 3
3
-
 4
4
-
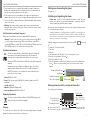 5
5
-
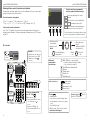 6
6
-
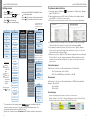 7
7
-
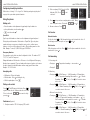 8
8
-
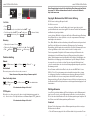 9
9
-
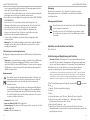 10
10
-
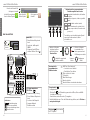 11
11
-
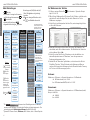 12
12
-
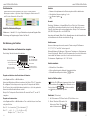 13
13
-
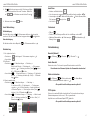 14
14
-
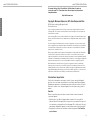 15
15
-
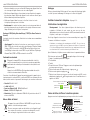 16
16
-
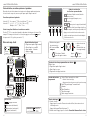 17
17
-
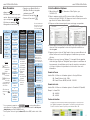 18
18
-
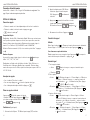 19
19
-
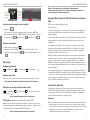 20
20
-
 21
21
-
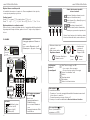 22
22
-
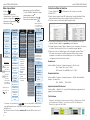 23
23
-
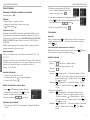 24
24
-
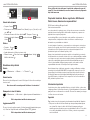 25
25
-
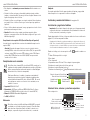 26
26
-
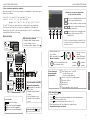 27
27
-
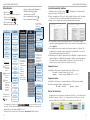 28
28
-
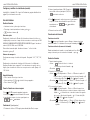 29
29
-
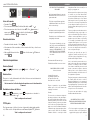 30
30
-
 31
31
-
 32
32
-
 33
33


