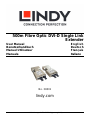
Lindy 500m Fibre Optic DVI-D Single Link Extender Manuale utente
- Tipo
- Manuale utente

© LINDY Group – FIFTH EDITION (January 2021)
500m Fibre Optic DVI-D Single Link
Extender
User Manual English
Benutzerhandbuch Deutsch
Manuel Utilisateur Français
Manuale Italiano
No. 38301
lindy.com

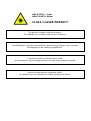
This product contains visible laser beams.
The radiation is not harmful under normal conditions.
Innerhalb dieses Produktes wird sichtbare Laserstrahlung erzeugt. Unter normalen
Bedingungen ist die Strahlung ungefährlich.
Ce produit contient un faisceau laser visible
Le rayonnement n'est pas dangereux dans le cadre d'une utilisation normale.
Questo prodotto produce raggi laser visibili.
Le radiazioni non sono dannose in normali condizioni di utilizzo.
MAX OUTPUT: < 1 mW
WAVE LENGTH: 850nm
CLASS 1 LASER PRODUCT

User Manual English
Safety Instructions
! WARNING !
Please read the following safety information carefully and always keep this document with
the product.
Failure to follow these precautions can result in serious injuries or death from electric
shock, fire or damage to the product.
Touching the internal components or a damaged cable may cause electric shock, which
may result in death.
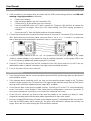
This device is a switching type power supply and can work with supply voltages in the range 100 - 240
VAC For worldwide usability four different AC adapters are enclosed: Euro type, UK type, US/Japan type
and Australia/New Zealand type. Use the appropriate AC adapter as shown in the picture and ensure it
is firmly secured in place and does not detach by pulling before installing into a power socket.
To reduce risk of fire, electric shocks or damage:
▪ Do not open the product nor its power supply. There are no user serviceable parts inside.
▪ Only qualified servicing personnel may carry out any repairs or maintenance.
▪ Never use damaged cables.
▪ Do not expose the product to water or places of moisture.
▪ Do not use this product outdoors it is intended for indoor use only.
▪ Do not place the product near direct heat sources. Always place it in a well-ventilated place.
▪ Do not place heavy items on the product or the cables.
▪ Please ensure any adapters are firmly secured and locked in place before inserting into a wall socket

User Manual English
Introduction
Thank you for purchasing the LINDY Fibre Optic DVI-D Extender!
This Fibre Optic Extender allows you to transmit DVI-D Single Link signals up to maximum resolutions of
1920x1200 up to a distance of 500m/1600 feet using two standard multimode 50/125µm LC Duplex fibre
cables.
Features
• Extends DVI-D signals up to 500m/ 1600 feet
• Supports DVI-D Single Link, resolutions up to 1920x1200@60Hz, HDCP not supported
• Suitable for use with Computer, Video Wall and presentation equipment
• May be used with two standard LC Duplex or a 4x LC fibre cables (not included)
• Preset EDID data set and Self-EDID learning feature
Package Contents
▪ LINDY Fibre Optic DVI-D Extender x 2 (1x Transmitter, 1x Receiver)
▪ Multi-Country Power Adapter (5VDC) x 1
▪ This User Manual
Pre-Installation Remarks
The EDID preset timings stored in the extender are the following:
1360x768@60Hz; 1920x1080@60Hz; 1920x1200@60Hz; 1600x1200 @60Hz; 1280x1024 @60Hz;
1280x960 @60Hz; 1152x864 @75Hz; 1280x720 @60Hz; 1440x900 @60Hz; 720x400 @70Hz;
640x480 @60Hz; 640x480 @72Hz; 640x480 @75Hz; 800x600 @60Hz; 800x600 @72Hz; 800x600
@75Hz; 1024x768 @60Hz; 1024x768 @70Hz; 1024x768 @75Hz; 1280x1024 @75Hz; 1152x870
@60HZ
Interlaced resolutions and HDCP protected content are not supported.
If the resolution or the timing requirement of your monitor is not included above, the EDID data of the
monitor can be stored into the transmitter by self-learning EDID function, using the steps on the next page.
Do NOT introduce strain or stress to the fibre optic LC cable and connectors!
Do NOT bend the fibre cable below the minimum allowed radius, approximately 5cm -
see supplier’s specification!
CAUTION!
The Extender may get hot during operation!
Avoid touching it directly and install it with adequate ventilation!

User Manual English
Installation
1. If the resolution of your display does not match with the EDID preset timings perform the EDID self-
learning / copying procedure as following
a. Power on the display.
b. Plug the power adapter into the Transmitter (TX).
c. Connect the TX to the display (not to the source!).
d. Push the self-EDID button on TX with a narrow pin. The green LED will blink to indicate the
copy process has begun. When this LED stops blinking, the EDID copying procedure is
complete.
e. Disconnect the TX from the display and from its power adapter.
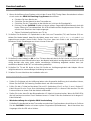
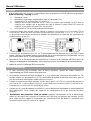
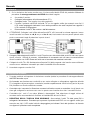
2. Connect each optical fibre connector as shown below on the ports on Transmitter (TX) and Receiver
(RX). Notice that you connect the cables cross over from a -> d, b -> c, c -> b and d -> a, make sure
that no dust gets inside and keep the protective caps in a secure place!
3. Connect the power adapter to the RX. The TX is powered via the DVI port provided it can output
~200mA, a power adapter is only required in case of unreliable operation, or if the power LED on the
TX is not lit properly (additionally power supply NOT included).
4. Plug the TX and RX directly into the DVI receptacle of the DVI source and sink. Do NOT use any
intermediate cable or adapter in between, this might cause unreliable operation.
5. Turn on the power of DVI source and sink.
Troubleshooting Tips
• If you have problems with the correct resolution repeat the EDID self-learning steps as described in
the Installation section.
• If the extender works erratically and if you have not connected the power supply to the TX please
install the power supply to the TX because the TX might not get sufficient power from the DVI source
causing erratic behaviour (additional power supply NOT included).
• Check that the fibre connectors are seated correctly. Check if port 1 on the TX is connected directly
to port 1 on the RX – some Duplex LC fibre cables may be configured as a cross over connection. In
such case exchange the connectors on one end of the cable with each other.
• Check if the LC cable has any kinks to make sure the problem is not caused by a faulty LC cable.
Regard the handling and minimum bend radius requirements for fibre optic cables!
• Recovery of default EDID setting: Plug the power adapter into the TX and disable all DVI connections.
Push the self-EDID button with a narrow pin. The green LED will blink to indicate the recovery has
begun. When the LED stops blinking the EDID has been restored.

Benutzerhandbuch Deutsch
Sicherheitshinweise
! GEFAHR !
Bitte lesen Sie die folgenden Sicherheitshinweise sorgfältig durch und bewahren Sie
dieses Dokument immer zusammen mit dem Produkt auf.
Die Nichtbeachtung dieser Vorsichtsmaßnahmen kann zu schweren Verletzungen oder
zum Tod durch Stromschlag, Feuer oder Schäden am Produkt führen.
Das Berühren der internen Komponenten oder eines beschädigten Kabels kann einen
elektrischen Schlag verursachen, der zum Tod führen kann.
Dieses Schaltnetzteil arbeitet mit Anschlussspannungen im Bereich von 100…240 VAC. Für weltweiten
Einsatz sind vier verschiedene AC-Adapter für Europa, Großbritannien, USA/Japan und
Australien/Neuseeland enthalten. Verwenden Sie den geeigneten Adapter wie es die Abbildung zeigt.
Stellen Sie bitte sicher, dass der Adapter fest eingerastet ist und sich nicht abziehen lässt, bevor Sie ihn
in die Steckdose stecken.
Um die Gefahr von Bränden, Stromschlägen oder Schäden zu verringern:
▪ Öffnen Sie weder das Produkt noch sein Netzteil. Es befinden sich keine vom Benutzer zu
wartenden Teile im Inneren.
▪ Ausschließlich qualifiziertes Personal darf Reparaturen oder Wartungen durchführen.
▪ Verwenden Sie niemals beschädigte Kabel.
▪ Setzen Sie das Produkt nicht Wasser oder Feuchtigkeit aus.
▪ Dieses Produkt ist nur für den Gebrauch in geschlossenen Räumen bestimmt.
▪ Stellen Sie das Produkt nicht in der Nähe von direkten Wärmequellen auf. Stellen Sie es immer an
einem gut belüfteten Ort auf.
▪ Stellen Sie keine schweren Gegenstände auf das Produkt oder die Kabel.
▪ Bitte stellen Sie vor der Verwendung sicher, dass alle Adapter sicher und fest eingerastet sind

Benutzerhandbuch Deutsch
Einführung
Wir freuen uns, dass Ihre Wahl auf ein LINDY-Produkt gefallen ist und danken Ihnen für Ihr Vertrauen.
Sie können sich jederzeit auf unsere Produkte und einen guten Service verlassen. Dieser Extender kann
DVI-D Signale unkomprimiert und in voller Auflösung sowie Qualität über zwei optische Multimode LC
Duplexkabel (50/125µm) bis zu 500m weit übertragen. Er unterstützt DVI-D Single Link bis 1920 x 1200.
Eigenschaften
▪ Überträgt DVI-D Signale über zwei LWL LC Duplex Kabel bis 500m Kabellänge
▪ Unterstützt DVI-D Single Link bis 1920x1200 @60Hz
▪ Einsetzbar für Computer Equipment, Video Walls und Präsentations-Installationen
▪ Kann Standard Netzwerk LC Duplex Fibre Optic LWL Kabel verwenden
▪ EDID Standarddatensatz sowie Monitor-EDID Selbstlern- & Kopierfunktion
Lieferumfang
▪ LINDY Fibre Optic DVI-D Extender (1 x Transmitter, 1 x Receiver)
▪ 1x Steckernetzteil mit auswechselbaren Steckern / Multi-Country Power Adapter (5V DC)
▪ Dieses Handbuch
Installation – Vorbemerkungen
WICHTIG! Vor Beginn der Arbeiten schalten Sie die beteiligten Geräte bitte aus!
Die vorgespeicherten EDID Timings Im Transmitter sind folgende:
1360x768@60Hz; 1920x1080@60Hz; 1920x1200@60Hz; 1600x1200 @60Hz; 1280x1024 @60Hz;
1280x960 @60Hz; 1152x864 @75Hz; 1280x720 @60Hz; 1440x900 @60Hz; 720x400 @70Hz;
640x480 @60Hz; 640x480 @72Hz; 640x480 @75Hz; 800x600 @60Hz; 800x600 @72Hz; 800x600
@75Hz; 1024x768 @60Hz; 1024x768 @70Hz; 1024x768 @75Hz; 1280x1024 @75Hz; 1152x870
@60HZ
Interlaced Signale sowie HDCP geschützte Inhalte werden nicht unterstützt.
Falls die Auflösungen oder „Timing Requirements“ Ihres Monitors abweichen, müssen Sie das EDID
Selbstlern-Feature des Transmitters verwenden um die Monitoreigenschaften in den Transmitter zu
kopieren:
Vermeiden Sie unbedingt Zug- oder andere Krafteinwirkungen auf das LC Kabel!
Biegen Sie das LC Kabel niemals kleiner als mit seinem zulässigen
Mindestbiegeradius, etwa 5cm – Details siehe Herstellerangabe!
ACHTUNG!
Der Extender wird im Betrieb sehr heiss! Vermeiden Sie direkten Kontakt und
verwenden Sie ihn ausschließlich an einm gut durchlüfteten Ort!

Benutzerhandbuch Deutsch
Installation
1. Wenn die Auflösung Ihres Displays nicht mit den Preset EDID Timing Daten übereinstimmt müssen
sie als erstes den EDID Self Learning Copy Prozess durchführen:
a. Schalten Sie Ihren Monitor ein.
b. Schließen Sie das Netzteil an den Transmitter an.
c. Schließen Sie den Transmitter an den Monitor an (nicht an die Signalquelle!).
d. Drücken Sie den Self-EDID Schalter mit einem spitzen Gegenstand (Büroklammer) durch die
kleine Öffnung im Transmitteretikett. Die LED wird während des Kopierprozesses blinken. Sie
erlischt nach Abschluss des Kopiervorganges.
e. Ziehen Sie Netzteil und Monitor vom TX ab
2. Schließen Sie die beiden LC Duplexkabel an die Ports von Transmitter (TX) und Receiver (RX) an.
Achten Sie hierbei darauf, dass Sie die Kabel „cross over“ von a -> d, b -> c, c -> b und d -> a
angeschlossen werden (siehe Grafik). Stellen Sie sicher, dass kein Staub in die Anschlüsse gerät!
Bewahren Sie die Staubkappen an einem sicheren Platz auf!
3. Schließen Sie das Netzteil an RX an. Der TX kann alternativ durch die DVI Quelle mit Strom versorgt
werden sofern sie etwa 200mA liefern kann; das Netzteil wird jedoch benötigt wenn die PWR LED nicht
richtig leuchtet oder wenn keine stabile zuverlässige Verbindung aufgebaut werden kann (ein
zusätzliches Netzteil ist NICHT im Lieferumfang enthalten).
4. Schließen Sie TX und RX direkt an Ihre DVI Geräte an. Verlängerungskabel oder Adapter können
möglicherweise eine unzuverlässige Verbindung hervorrufen.
5. Schalten Sie zum Abschluss der Installation alles ein.
Fehlersuche und -behebung
• Sollten Sie Probleme mit der Auflösung haben oder die gewollte Auflösung nicht einstellen können,
führen Sie die EDID Self Learning Prozedur durch wie oben beschrieben.
• Prüfen Sie die LC Kabel auf korrekten Sitz und 1:1 Verbindung (Port 1 an Port 1, usw.). Duplex LC
Kabel können für eine Cross Over Verbindung konfiguriert sein, in diesem Falle tauschen Sie die
Portanschlüsse an einem Ende des Kabels miteinander.
• Stellen Sie sicher, dass Sie den Biegeradius der LC Kabel nicht unterschreiten. Wenn die PWR LEDs
alle hell leuchten versuchen Sie ein anderes kurzes LC Kabel. Falls dies funktioniert ist ihr langes LC
Kabel fehlerhaft.
• Wiederherstellung der originalen EDID Voreinstellung
Schließen Sie das Netzteil an den Transmitter an und ziehen Sie alle anderen Anschlüsse ab. Drücken
Sie den Self-EDID Schalter mit einem spitzen Gegenstand (Büroklammer). Nach Abschluss des
Vorganges hört die LED auf zu blinken.

Manuel Utilisateur Français
Consignes de sécurité
! ATTENTION !
Merci de lire attentivement ces instructions de sécurité et de les conserver avec le
produit.
Le non-respect de ces précautions peut causer un choc électrique entrainant des
blessures graves, voire mortelles, un incendie ou des dommages au produit.
Toucher les composants internes ou un câble endommagé peut provoquer un choc
électrique pouvant entraîner la mort.
Cet appareil est une alimentation à découpage et peut fonctionner avec des tensions d'alimentation de
100...240 VAC Pour une utilisation dans le monde entier, quatre adaptateurs secteur différents sont
inclus : Type Euro, type UK, type US/Japon et type Australie/Nouvelle-Zélande. Utilisez l'adaptateur
secteur approprié comme indiqué sur la photo et assurez-vous qu'il est solidement fixé en place et qu'il
ne se détache pas en tirant avant de l'installer dans une prise électrique.
Pour éviter les risques d'incendie, de choc électrique ou de dommages:
▪ N'ouvrez pas l'appareil ni son alimentation électrique. Il n'y a pas de pièces réparables par
l'utilisateur à l'intérieur.
▪ Seul un personnel d'entretien qualifié est autorisé à effectuer toute réparation ou entretien.
▪ Ne jamais utiliser de câble endommagé.
▪ Ne pas mouiller le produit et ne pas l'exposer à l'humidité.
▪ N'utilisez pas ce produit à l'extérieur, il est destiné à un usage intérieur uniquement.
▪ Ne pas placer le produit à proximité de sources de chaleur. Toujours le placer dans un endroit
suffisamment ventilé.
▪ Ne pas déposer de charge lourde sur le produit ou sur les câbles.
▪ Veuillez vous assurer que l'adaptateur utilisé est fermement fixé et verrouillé en place avant de
l'insérer dans une prise murale.

Manuel Utilisateur Français
Introduction
Merci d’avoir choisi l’extender DVI-D sur fibre optique LINDY (Fibre Optic DVI-D Extender) !
Cet extender sur fibre optique vous permet de transmettre des signaux DVI-D Single Link jusqu’à une
résolution maximale de 1920x1200, jusqu’à 500m en utilisant deux fibres optiques multimode 50/125µm
LC Duplex standard.
Caractéristiques
• Transmet les signaux DVI-D jusqu’à 500m
• Prend en charge les résolutions DVI-D Single Link, jusqu’à 1920x1200@60Hz, HDCP non pris en
charge
• Convient à un usage avec ordinateur, murs d’écrans et équipements de présentation
• Peut être utilisé avec deux fibres optiques standard LC Duplex ou 4x LC (non fournis)
• Présélection de données EDID et fonction d’apprentissage Self-EDID
Contenu de l’emballage
▪ Extender DVI-D sur fibre optique LINDY x 2 (1x émetteur (Transmitter), 1x récepteur( Receiver))
▪ Alimentation multi-pays (5VDC) X 1
▪ Ce manuel
Remarques relatives à l’installation
Les présélections EDID suivantes sont stockées dans l’extender:
1360x768@60Hz; 1920x1080@60Hz; 1920x1200@60Hz; 1600x1200 @60Hz; 1280x1024 @60Hz;
1280x960 @60Hz; 1152x864 @75Hz; 1280x720 @60Hz; 1440x900 @60Hz; 720x400 @70Hz;
640x480 @60Hz; 640x480 @72Hz; 640x480 @75Hz; 800x600 @60Hz; 800x600 @72Hz; 800x600
@75Hz; 1024x768 @60Hz; 1024x768 @70Hz; 1024x768 @75Hz; 1280x1024 @75Hz; 1152x870
@60HZ
Les résolutions entrelacées et les contenus protégés en HDCP ne sont pas pris en charge.
Si la résolution ou la fréquence exigée par votre écran ne sont pas inclus ci-dessus, les données EDID de
l'écran peuvent être stockées dans l'émetteur par la fonction d'auto-apprentissage EDID, en utilisant les
étapes de la page suivante.
NE PAS appliquer de contrainte ou de traction sur la fibre optique LC ou ses
connecteurs !
NE PAS appliquer un rayon de courbure en dessous du minimum accepté, environ
5cm – voir spécifications fabricant !
ATTENTION !
L’extender peut devenir très chaud pendant son utilisation !
Évitez de le toucher directement et installez-le dans un endroit suffisamment ventilé !

Manuel Utilisateur Français
Installation
1. Si la résolution de votre écran ne correspond pas avec les présélections EDID, effectuez la procédure
EDID self learning / copying suivante
a. Démarrez l’écran.
b. Branchez le connecteur d’alimentation dans le Transmitter (TX).
c. Connectez le TX à l’écran (PAS à la source !).
d. Appuyez sur le bouton self-EDID sur le TX avec un trombone par exemple. La LED verte va
clignoter pour indiquer que la procédure de copie à débuter. Lorsque cette LED cesse de
clignoter, la procédure de copie EDID est terminée.
e. Déconnectez le TX de l’écran et de son alimentation.
2. Connectez chaque fibre optique comme indiqué ci-dessous sur les ports sur le Transmitter (TX) et
Receiver (RX). Notez que vous connectez les fibres de façon croisée de a -> d, b -> c, c -> b et d ->
a, assurez-vous qu’aucune poussière ne pénètre les connexions et conservez les capuchons de
protection dans un lieu sûr !
3. Connectez les alimentations aux RX. Le TX peut également être alimenté via le port DVI s’il peut
fournir ~200mA, l’alimentation secteur n’est requise que si le fonctionnement n’est pas fiable, ou si la
LED d’alimentation sur le TX n’est pas allumée correctement.
4. Branchez le TX et RX directement aux ports DVI de la source et de l’affichage. NE PAS utiliser de
câbles ou d’adaptateurs intermédiaires, cela pourrait provoquer des problèmes de fonctionnement.
5. Mettez la source et l’affichage DVI sous tension.
Conseils de dépannage
• Si vous rencontrez des problèmes avec la bonne résolution, répétez les étapes relatives à
l’apprentissage de l’EDID comme décrit plus haut.
• Si l’extender fonctionne de façon erratique et si vous n’avez pas connecté d’alimentation au TX,
veuillez installer une alimentation sur le TX, l’alimentation provenant du port DVI de la source peut ne
pas être suffisante (alimentation additionnelle non fournie).
• Vérifiez la connexion des fibres optiques. Vérifiez que le port 1 sur le TX est connecté directement au
port 1 sur le RX – certaines fibres Duplex LC peuvent avoir une connexion croisée. Si cela est le cas,
échangez les connecteurs à une extrémité de la fibre.
• Vérifiez qu’il n’y a pas de cassure sur la fibre LC, pour s’assurer que le problème ne vienne pas d’une
fibre défectueuse. Tenez compte des exigences de manipulations en ce qui concerne les fibres
optiques !
• Restauration des paramètres EDID par défaut: branchez l’alimentation du TX et déconnectez
toutes les connexions DVI. Appuyez sur le bouton self-EDID avec un trombone par exemple. La LED
verte clignotera pour indiquer la restauration des informations EDID par défaut. La procédure sera
terminée lorsque cette LED cessera de clignote.

Manuale Italiano
Istruzioni di sicurezza
! ATTENZIONE !
Per favore leggete la seguente informativa e conservate sempre questo documento con
il prodotto.
La mancata osservanza di queste precauzione può causare seri infortuni o la morte per
folgorazione, incendi o danneggiare il prodotto.
Toccare i componenti interni o un cavo danneggiato può causare uno shock elettrico che
può condurre alla morte.
Questo dispositivo ha un alimentatore a commutazione che può funzionare con tensioni di alimentazione
all’interno del range 100…240 VAC. La fornitura comprende quattro adattatori AC per prese di tutto il
mondo: Euro, UK, US/Giappone e Australia/Nuova Zelanda. Utilizzate l’adattatore AC appropriato e
montatelo come mostrato nell’immagine, assicurandovi che sia fissato correttamente e che non si
stacchi estraendolo dalla presa.
Per ridurre il rischio di incendi, folgorazione o danni:
▪ Non aprite il prodotto o l’alimentatore. Non esistono componenti utilizzabili all'interno.
▪ La riparazione o manutenzione del prodotto può essere effettuata solo da personale qualificato.
▪ Non utilizzare mai cavi danneggiati.
▪ Non fate entrare il prodotto in contatto con acqua e non utilizzatelo in luoghi umidi.
▪ Questo prodotto è pensato esclusivamente per l’uso in ambienti interni.
▪ Non posizionate il prodotto nelle vicinanze di sorgenti di calore. Installatelo sempre in luoghi ben
ventilati.
▪ Non appoggiate oggetti pesanti sul prodotto o sui cavi.
▪ Vi preghiamo di assicurarvi che ogni adattatore sia fermamente inserito e bloccato in sede prima di
collegarlo a una presa di corrente.

Manuale Italiano
Introduzione
Vi ringraziamo per aver acquistato l’Extender su Fibra Ottica DVI-D LINDY! Questo dispositivo vi
permetterà di trasmettere un segnale DVI-D Single Link fino ad una distanza di 500m/1600 piedi alla
risoluzione massina di 1920x1200 utilizzando due cavi standard duplex multimode 50/125um LC-LC.
Caratteristiche
• Estende segnali DVI-D fino a 500m/ 1600 piedi
• Supporta segnali DVI-D Single Link con risoluzioni fino a 1920x1200@60Hz. HDCP NON
SUPPORTATO
• Utilizzabile con Computer, Video Wall e sistemi di presentazione
• Può essere utilizzato con due cavi standard LC Duplex o un cavo a 4 fibre terminate con connettori
LC (non inclusi)
• Contiene un Set di EDID standard e include una funzione di autoapprendimento dei dati EDID
Contenuto della confezione
▪ Extender DVI-D su fibra ottica LINDY x 2 (1x Trasmettitore, 1x Ricevitore)
▪ Alimentatore Multi-Country (5VDC) x 1
▪ Questo manuale utente
Raccomandazioni Pre-Installazione
Le informazioni EDID memorizzate nel prodotto sono le seguenti:
1360x768@60Hz; 1920x1080@60Hz; 1920x1200@60Hz; 1600x1200 @60Hz; 1280x1024 @60Hz;
1280x960 @60Hz; 1152x864 @75Hz; 1280x720 @60Hz; 1440x900 @60Hz; 720x400 @70Hz;
640x480 @60Hz; 640x480 @72Hz; 640x480 @75Hz; 800x600 @60Hz; 800x600 @72Hz; 800x600
@75Hz; 1024x768 @60Hz; 1024x768 @70Hz; 1024x768 @75Hz; 1280x1024 @75Hz; 1152x870
@60HZ
Tutte le risoluzioni interlacciate e i segnali con protezione HDCP NON sono supportate.
Se la risoluzione o la frequenza del vostro video non è fra quelli indicati sopra, le informazioni EDID del
monitor possono essere salvate nel trasmettitore grazie alla funzione di autoapprendimento EDID
seguendo i passaggi descritti nella pagina seguente.
NON sottoponete il cavo a fibra ottica ed i connettori a trazioni o stress meccanici di
qualsiasi tipo!
NON piengate il cavo in fibra al di sotto del raggio minimo consentito! (di solito circa
5cm – fate riferimento alla documentazione del produttore)
ATTENZIONE!
L’Extender può diventare molto caldo durante l’utilizzo!
Evitate di toccarlo e posizionatelo in una zona adeguatamente ventilata!

Manuale Italiano
Installazione
1. Se la risoluzione del vostro monitor non è inclusa nella tabella EDID del prodotto effettuate la
procedura di auto apprendimento dell’EDID descritta di seguito:
a. Accendete il monitor.
b. Collegate l’alimentatore all’unità trasmittente (TX).
c. Collegate l’unita TX al monitor (non alla sorgente!).
d. Premete il pulsante self-EDID sull’unità TX con un oggetto sottile (per esempio una clip). Il
LED verde lampeggerà indicando l’avvio della procedura che sarà completa non appena il
LED smetterà di lampeggiare.
e. Disconnettete l’unità TX dal monitor e dall’alimentatore.
2. ATTENZIONE: Collegate i cavi in fibra ottica alle unità TX e RX secondo lo schema seguente: (vanno
inseriti secondo lo schema a -> d, b -> c, c -> b e d -> a). Assicuratevi che non penetri polvere nelle
porte e conservate i tappi di protezione in posto sicuro!
3. Collegate l’alimentatore all’unità RX. L’unità TX può essere alimentata dalla porta DVI nel caso questa
riesca a fornire ~200mA di corrente. L’alimentatore è necessario solo nel caso la comunicazione
diventi instabile o se il LED Power sull’unità non si accende alla massima luminosità.
4. Collegate le unità TX e RX direttamente nella porta DVI della sorgente e del monitor senza utilizzare
nessun cavo o adattatore intermedio per evitare instabilità di funzionamento.
5. Accendete sorgente e monitor DVI
Risoluzione dei Problemi
• Se avete problemi ad impostare la risoluzione corretta ripetete la procedura di auto apprendimento
dell’EDID descritta sopra.
• Se l’extender non funziona con continuità e non avete collegato un alimentatore aggiuntivo all’unità
TX vi preghiamo di procurarvelo e connetterlo (venduto separatamente: NON incluso) perché la porta
DVI potrebbe non fornire sufficiente corrente.
• Controllate che i connettori in fibra siano connessi nell’ordine corretto e controllate che gli stessi non
siano già configurati in versione cross over. In questo cavo invertite da un lato i connettori fra loro
• Controllate che i cavi LC non siano difettosi o danneggiati. Fate attenzione al raggio minimo di
curvatura e alle raccomandazioni di utilizzo ed installazione dei cavi in fibra!!
• RIPRISTINO DELLA TABELLA EDID ORIGINALE: disconnettete l’unità TX dalla porta DVI e
collegando l’alimentatore. Procedete poi a premere il pulsante self-EDID con un oggetto sottile (per
esempio una clip). Il LED verde inizierà a lampeggiare per indicare l’inizio del ripristino e si fermerà
non appena l’operazione sarà completata.

CE/FCC Statement
CE Certification
LINDY declares that this equipment complies with relevant European CE requirements.
CE Konformitätserklärung
LINDY erklärt, dass dieses Equipment den europäischen CE-Anforderungen entspricht
UKCA Certification
LINDY declares that this equipment complies with relevant UKCA requirements.
FCC Certification
This equipment has been tested and found to comply with the limits for a Class B digital device, pursuant
to part 15 of the FCC Rules. These limits are designed to provide reasonable protection against harmful
interference in a residential installation.
You are cautioned that changes or modification not expressly approved by the party responsible for
compliance could void your authority to operate the equipment.
This device complies with part 15 of the FCC Rules.
Operation is subject to the following two conditions:
1. This device may not cause harmful interference, and
2. This device must accept any interference received, including interference that may cause undesired
operation.
The enclosed power supply has passed Safety test requirements, conforming to the US American versions
of the international Standard IEC 60950-1 or 60065 or 62368-1.
LINDY Herstellergarantie – Hinweis für Kunden in Deutschland
LINDY gewährt für dieses Produkt über die gesetzliche Regelung in Deutschland hinaus eine zweijährige
Herstellergarantie ab Kaufdatum. Die detaillierten Bedingungen dieser Garantie finden Sie auf der LINDY
Website aufgelistet bei den AGBs.
Hersteller / Manufacturer (EU): Manufacturer (UK):
LINDY-Elektronik GmbH LINDY Electronics Ltd
Markircher Str. 20 Sadler Forster Way
68229 Mannheim Stockton-on-Tees, TS17 9JY
Germany England
Email: info@lindy.com , T: +49 (0)621 470050 [email protected].uk, T: +44 (0)1642 754000

Recycling Information
WEEE (Waste of Electrical and Electronic Equipment),
Recycling of Electronic Products
Europe, United Kingdom
In 2006 the European Union introduced regulations (WEEE) for the collection and recycling of all waste electrical
and electronic equipment. It is no longer allowable to simply throw away electrical and electronic equipment. Instead,
these products must enter the recycling process.
Each individual EU member state, as well as the UK, has implemented the WEEE regulations into national law in
slightly different ways. Please follow your national law when you want to dispose of any electrical or electronic
products. More details can be obtained from your national WEEE recycling agency.
Germany / Deutschland Rücknahme Elektroschrott und Batterie-Entsorgung
Die Europäische Union hat mit der WEEE Direktive Regelungen für die Verschrottung und das Recycling von Elektro-
und Elektronikprodukten geschaffen. Diese wurden im Elektro- und Elektronikgerätegesetz – ElektroG in deutsches
Recht umgesetzt. Das Entsorgen von Elektro- und Elektronikgeräten über die Hausmülltonne ist verboten! Diese
Geräte müssen den Sammel- und Rückgabesystemen zugeführt werden! Dort werden sie kostenlos entgegen
genommen. Die Kosten für den weiteren Recyclingprozess übernehmen die Gerätehersteller.
LINDY bietet deutschen Endverbrauchern ein kostenloses Rücknahmesystem an, beachten Sie bitte, dass Batterien
und Akkus den Produkten vor der Rückgabe an das Rücknahmesystem entnommen werden müssen und über die
Sammel- und Rückgabesysteme für Batterien separat entsorgt werden müssen. Ausführliche Informationen zu
diesen Themen finden Sie stets aktuell auf der LINDY Webseite im Fußbereich.
France
En 2006, l'union Européenne a introduit la nouvelle réglementation (DEEE) pour le recyclage de tout équipement
électrique et électronique.
Chaque Etat membre de l’ Union Européenne a mis en application la nouvelle réglementation DEEE de manières
légèrement différentes. Veuillez suivre le décret d’application correspondant à l’élimination des déchets électriques
ou électroniques de votre pays.
Italy
Nel 2006 l’unione europea ha introdotto regolamentazioni (WEEE) per la raccolta e il riciclo di apparecchi elettrici ed
elettronici. Non è più consentito semplicemente gettare queste apparecchiature, devono essere riciclate. Ogni stato
membro dell’ EU ha tramutato le direttive WEEE in leggi statali in varie misure. Fare riferimento alle leggi del proprio
Stato quando si dispone di un apparecchio elettrico o elettronico.
Per ulteriori dettagli fare riferimento alla direttiva WEEE sul riciclaggio del proprio Stato.
No. 38301
5
th
Edition, January 2021
lindy.com
Tested to Comply with
FCC Standards
For Home and Office Use!
Tested to comply with
FCC standards.
For home and office use.
-
 1
1
-
 2
2
-
 3
3
-
 4
4
-
 5
5
-
 6
6
-
 7
7
-
 8
8
-
 9
9
-
 10
10
-
 11
11
-
 12
12
-
 13
13
-
 14
14
-
 15
15
-
 16
16


Lindy 500m Fibre Optic DVI-D Single Link Extender Manuale utente
- Tipo
- Manuale utente
in altre lingue
Documenti correlati
-
Lindy 38113 Kit extendeur DVI-D optique 1500 m Manuale utente
-
Lindy 38113 Manuale utente
-
-
Lindy 8 Port DVI-D Single Link Splitter Manuale utente
-
-
Lindy 70m Cat.6 DVI-D Single Link Extender Manuale utente
-
-
-
-