
FS 305, FS 309
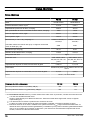
EN Operator's manual 2-21
FR Manuel d'utilisation 22-41
DE Bedienungsanweisung 42-62
IT Manuale dell'operatore 63-82
ES Manual de usuario 83-102
NL Gebruiksaanwijzing 103-122
SV Bruksanvisning 123-141
PT Manual do utilizador 142-161

Contents
Introduction..................................................................... 2
Safety..............................................................................5
Operation........................................................................ 9
Maintenance................................................................. 14
Transportation, storage and disposal........................... 17
Technical data.............................................................. 18
Declaration of Conformity............................................. 20
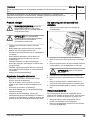
Introduction
Product description
The product is a walk behind floor saw with a 4-stroke
gasoline engine.
Intended use
This product is used with diamond blades for wet cutting
to cut hard floor surface materials such as concrete,
asphalt and stone. All other use is incorrect.
The product is used in industrial operations by operators
with experience.
Do not use indoors, this product is for outdoor use only.
21919 - 002 - 23.01.2023

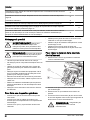
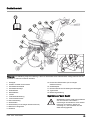
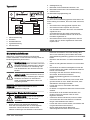
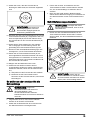
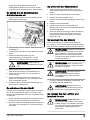
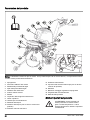
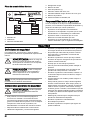
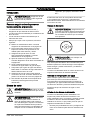
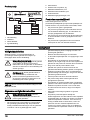
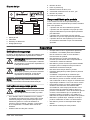
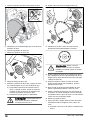
Product overview
19
18
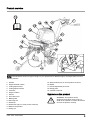
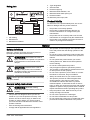
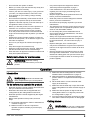
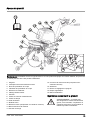
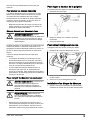
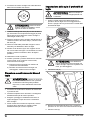
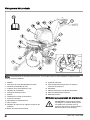
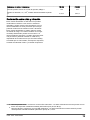
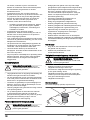
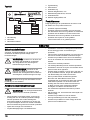
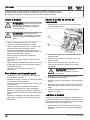
Note: The illustration shows one type of engine. If your product has a different engine, the engine parts can be in
different positions.
1. Handle
2. Engine ON/OFF switch
3. Cutting depth wheel
4. Cutting depth indicator
5. Fuel tank
6. Engine oil drain
7. Pointer
8. Drive belt cover
9. Blade guard
10. Servicing tool
11. Water tap
12. Water tank (only on some product versions)
13. Machine stop button
14. Lifting eye
15. Water tank lid (only on some product versions)
16. Muffler
17. Handle adjustment pinch bolt
18. Rating plate
19. Operator's manual
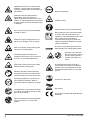
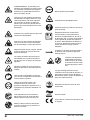
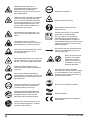
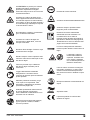
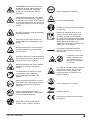
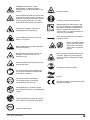
Symbols on the product
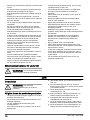
WARNING: This product can be
dangerous and cause serious injury or
death to the operator or others. Be careful
and use the product correctly.
1919 - 002 - 23.01.2023 3

WARNING: The dust can cause health
problems. Use an approved respiratory
protection. Always make sure that there is
good airflow.
Make sure that the cutting blade is
applicable to the same speed or a
higher speed than the value given on the
product. A cutting blade that is operated at
too high speed can break and cause injury
or damage.
Do not use the product near flammable
material or gases.
Make sure that the cutting blade is not
blunt or has damages, such as cracks.
Risk of cut injuries. Keep all body parts
away from the cutting blade.
The blade guards must always be
installed on the product. Do not let more
than 180° of the cutting blade show.
Keep body parts away from the cutting
blade and other moving parts.
Read the operator's manual carefully
and make sure that you understand the
instructions before you use this product.
Use hearing protection, eye protection
and respiratory protection. Refer to
Personal protective equipment on page
7
.
All displacement of the machine outside
the cutting area shall be carried out with
the tool not in rotation.
Remove the blade before transportation,
when you lift, put on or remove the
product.
Machine stop button.
Lift/lower control.
Always lift the product at the lifting point.
Noise emission to the environment label
as refer to EU and UK directives and
regulations. The guaranteed sound power
level of the product is specified in
Technical data on page 18
,
Noise and
vibration declaration statement on page
19
and on the label.
The arrow on the blade guard shows in
which direction the cutting blade rotates.
Gasoline is very flamma-
ble and explosive. Always
stop the engine and let it
become cool before you
refuel.
The exhaust fumes from the engine
contain carbon monoxide, an odourless,
poisonous and very dangerous gas. Do
not start the engine indoors or in closed
spaces.
Fill tank only with water.
Hot surface.
This product complies with applicable EC
Directives.
41919 - 002 - 23.01.2023

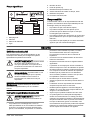
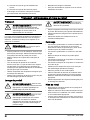
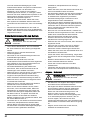
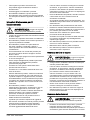
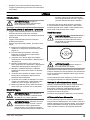
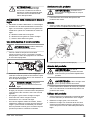
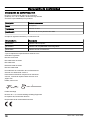
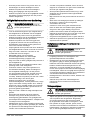
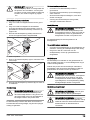
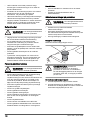
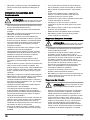
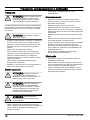
Rating plate
2
1
9
4
5
6
7
8
10
3
1. CE marking
2. Manufacturer
3. Manufacturer address
4. Type designation
5. Serial number
6. Product weight, kg
7. Maximum blade diameter, mm
8. Maximum blade shaft speed, rpm
9. Product number
10. Maximum power input, kW
Product liability
As referred to in the product liability laws, we are not
liable for damages that our product causes if:
• the product is incorrectly repaired.
• the product is repaired with parts that are not
from the manufacturer or not approved by the
manufacturer.
• the product has an accessory that is not from the
manufacturer or not approved by the manufacturer.
• the product is not repaired at an approved service
center or by an approved authority.
Safety
Safety definitions
Warnings, cautions and notes are used to point out
specially important parts of the manual.
WARNING: Used if there is a risk of
injury or death for the operator or bystanders
if the instructions in the manual are not
obeyed.
CAUTION: Used if there is a risk of
damage to the product, other materials or
the adjacent area if the instructions in the
manual are not obeyed.
Note: Used to give more information that is necessary
in a given situation.
General safety instructions
WARNING: Read the warning
instructions that follow before you use the
product.
• This product is a dangerous tool if you are not
careful or if you use the product incorrectly. This
product can cause serious injury or death to the
operator or others. Before you use the product,
you must read and understand the contents of this
operator’s manual.
• Save all warnings and instructions.
• Comply with all applicable laws and regulations.
• The operator and the employer of the operator must
know and prevent the risks during operation of the
product.
• Do not let a person operate the product unless they
read and understand the contents of the operator's
manual.
• Do not operate the product unless you receive
training before use. Make sure that all operators
receive training.
• Do not let a child operate the product.
• Only let approved persons operate the product.
• The operator is responsible for accidents that occur
to other persons or their property.
• Do not use the product if you are tired, ill, or under
the influence of alcohol, drugs or medicine.
• Always be careful and use your common sense.
• This product produces an electromagnetic field
during operation. This field can under some
circumstances interfere with active or passive
medical implants. To decrease the risk of serious
injury or death, we recommend persons with medical
implants to speak to their physician and the medical
implant manufacturer before operating this product.
• Keep the product clean. Make sure that you can
clearly read signs and decals.
• Do not use the product if it is damaged.
• Do not make modifications to this product.
• Do not operate the product if it is possible that other
persons have made modifications to the product.
1919 - 002 - 23.01.2023 5

Safety instructions for operation
WARNING: Read the warning
instructions that follow before you use the
product.
• Read the warning instructions that are supplied with
the cutting blade by the cutting blade manufacturer.
• Make sure that the product is assembled correctly.
• Do not operate the product without the blade guard
and the protective covers installed.
• Do not operate the product with the front of the blade
guard lifted or opened. The blade guard must be
lowered and correctly attached.
• Incorrect operation of the product can cause the
cutting blade to break and cause injury or damage.
• Make sure that you know how to stop the engine
quickly in an emergency.
• Use personal protective equipment. Refer to
Personal protective equipment on page 7
.
• Make sure that only approved persons are in the
work area.
• Make sure that electrical cables in the work area are
not live.
• Before you operate the product, find out if there are
hidden wires, cables and pipes in the work area.
If the product hits a hidden object, stop the engine
immediately and examine the product and the object.
Do not start to operate the product again until you
know that it is safe to continue.
• Do not use the product in bad weather conditions,
such as thick fog, heavy rain, strong wind or intense
cold. To do work in bad weather makes you tired
and can cause dangerous conditions, for example
slippery surfaces.
• Make sure that you are in a safe and stable position
during operation.
• The product can cause objects to eject at high
speed. Make sure that all persons in the work
area use approved personal protective equipment.
Remove loose objects from the work area.
• The exhaust fumes from the engine contain carbon
monoxide which is an odourless, poisonous and
very dangerous gas. Do not use a combustion
engine product indoors or in areas that do not have
sufficient airflow.
• Before you go away from the product, stop the
engine and make sure that there is no risk of
accidental start.
• If the product has parking brakes, do not go
away from the product without the parking brakes
engaged.
• Do not go away from the product when the engine is
started.
• Be very careful during operation on slopes. The
product is heavy and can cause serious injury if it
falls.
• Make sure that no material can become loose and
cause injury to the operator.
• Make sure that clothes, long hair and jewelry do not
get caught in moving parts.
• Do not operate the product unless you can get aid if
an accident occurs.
• Keep the work area clean and bright.
• Do not use the product in areas where fire or
explosions can occur.
Exhaust fumes safety
WARNING: Read the warning
instructions that follow before you use the
product.
• Long-term inhalation of exhaust fumes can cause
health problems.
• The exhaust fumes from the engine contain carbon
monoxide which is an odourless, poisonous and very
dangerous gas. To breathe carbon monoxide can
cause death. Because carbon monoxide is odourless
and cannot be seen, it is not possible to sense it. A
symptom of carbon monoxide poisoning is dizziness,
but it is possible that a person becomes unconscious
without warning if the quantity or concentration of
carbon monoxide is sufficient.
• Exhaust fumes that you can see or smell also
contain carbon monoxide.
• Do not use a combustion engine product indoors
and/or in areas that do not have sufficient airflow.
Vibration safety
WARNING: Read the warning
instructions that follow before you use the
product.
• During operation of the product, vibrations go from
the product to the operator. Regular and frequent
operation of the product can cause or increase the
degree of injuries to the operator. Injuries can occur
in fingers, hands, wrists, arms, shoulders, and/or
nerves and blood supply or other body parts. The
injuries can be debilitating and/or permanent, and
can increase gradually during weeks, months or
years. Possible injuries include damage to the blood
circulation system, the nervous system, joints, and
other body structures.
• Symptoms can occur during operation of the product
or at other times. If you have symptoms and
continue to operate the product, the symptoms can
increase or become permanent. If these or other
symptoms occur, get medical aid:
• Numbness, loss of feeling, tingling, pricking,
pain, burning, throbbing, stiffness, clumsiness,
loss of strength, changes in skin color or
condition.
61919 - 002 - 23.01.2023

• Symptoms can increase in cold temperatures. Use
warm clothing and keep your hands warm and dry
when you operate the product in cold environments.
• Do maintenance on and operate the product as
given in the operator's manual, to keep a correct
vibration level.
• The product has a vibration damping system that
decreases the vibrations from the handles to the
operator. Let the product do the work.
• Keep your hands on the handle or handles only.
Keep all other body parts away from the product.
• Stop the product immediately if strong vibrations
suddenly occurs. Do not continue the operation
before the cause of the increased vibrations is
removed.
Noise safety
WARNING: Read the warning
instructions that follow before you use the
product.
• High noise levels and long-term exposure to noise
can cause noise-induced hearing loss.
• To keep the noise level to a minimum, do
maintenance on and operate the product as given
in the operator's manual.
• Examine the muffler for damages and defects. Make
sure that the muffler is correctly attached to the
product.
• Use approved hearing protection while you operate
the product.
• Listen for warning signals and voices when you use
hearing protection. Remove the hearing protection
when the product is stopped, unless hearing
protection is necessary for the noise level in the work
area.
Personal protective equipment
WARNING: Read the warning
instructions that follow before you use the
product.
• Always use approved personal protective equipment
when you operate the product. Personal protective
equipment cannot fully prevent injury but it
decreases the degree of injury if an accident does
occur. Let your dealer help you select the correct
personal protective equipment.
• Regularly do a check of the condition of the personal
protective equipment.
• Use an approved protective helmet.
• Use approved hearing protection.
• Use approved respiratory protection.
• Use approved eye protection with side protection.
There is a high risk of eye injury from thrown objects.
• Use protective gloves.
• Use boots with steel toe-cap and non-slip sole.
• Use approved work clothing or equivalent close-
fitting clothing that has long sleeves and long legs.
Fire extinguisher
• Keep a fire extinguisher near during operation.
• Use a powder fire extinguisher or a carbon dioxide
fire extinguisher.
Safety devices on the product
WARNING: Read the warning
instructions that follow before you use the
product.
• Do not use a product with defective safety devices.
• Do a check of the safety devices regularly. If
the safety devices are defective, speak to your
Husqvarna service agent.
• Do not make modifications to safety devices.
Machine stop button
The machine stop button (STOP) stops the engine.
CAUTION: Do not use the machine
stop button to stop the product unless there
is an emergency. For correct procedure how
to stop the product during operation, refer to
To stop the product on page 14
.
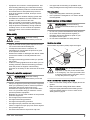
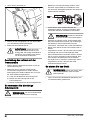
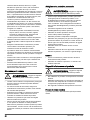
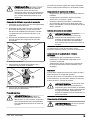
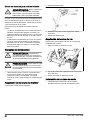
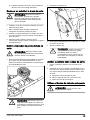
To do a check of the machine stop button
1. Make sure that the cutting blade is slightly above the
ground.
2. Make sure that the cutting blade and the blade
flange are tightly attached and the blade guard is
correctly installed. Refer to
To do a check of the
blade guard on page 8
.
1919 - 002 - 23.01.2023 7

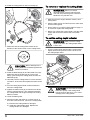
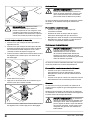
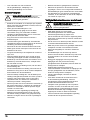
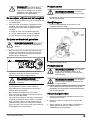
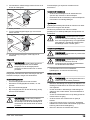
3. Turn the machine stop button (STOP) clockwise to
make sure that it is disengaged.
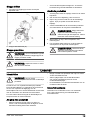
4. Start the product.
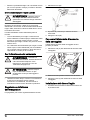
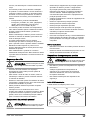
5. Push the machine stop button (A) and make sure
that the engine stops.
A
B
6. Turn the machine stop button clockwise (B) to
disengage.
Blade guard
WARNING: Do not use the product
without a blade guard or with a defective
blade guard. Make sure that the blade guard
is installed and attached correctly before you
start the product.
The blade guard prevent parts, of the blade or the
material that is cut, to be thrown at the operator.
To do a check of the blade guard
• Make sure that the blade guard is correctly installed.
• Examine the blade guard for damages, such as
cracks.
• Replace a damaged blade guard.
• Replace the blade guard if it is hit, bent or has other
defects.
Drive belt cover
WARNING: Do not use the product
without a drive belt cover or with a defective
drive belt cover. Make sure that the drive
belt cover is installed and attached correctly
before you start the product.
The drive belt cover gives protection from the pulleys
and the drive belt.
To do a check of the drive belt cover
• Make sure that the drive belt cover is not damaged
or has cracks. Replace the drive belt cover if it is
necessary.
• Make sure that the 2 nuts of the drive belt cover are
installed and correctly tightened.
Muffler
The muffler keeps the noise levels to a minimum and
sends the exhaust fumes away from the operator.
Do not use the product if the muffler is missing or
defective. A defective muffler increases the noise level
and the risk of fire.
WARNING: The muffler gets very hot
during and after use. This also applies
during idling. Be aware of the fire hazard,
especially when working near flammable
substances and/or vapours.
To do a check of the muffler
WARNING: Do not use a product with
a defective muffler.
WARNING: The muffler becomes very
hot during and after operation, also at idle
speed. Use protective gloves to prevent burn
injuries.
• For information on how to do a check of the muffler,
refer to the operator's manual for the engine.
Fuel safety
WARNING: Read the warning
instructions that follow before you use the
product.
• Fuel is flammable and the fumes are explosive. Be
careful with fuel to prevent injury, fire and explosion.
• Do not breathe in the fuel fumes. The fuel fumes are
poisonous and can cause injury. Make sure that the
airflow is sufficient.
• Do not remove the fuel tank cap or fill the fuel tank
when the engine is on.
• Make sure that the engine is cool before you refuel.
• Do not fill fuel in an indoor area. Insufficient airflow
can cause injury or death because of asphyxiation or
carbon monoxide poisoning.
• Do not smoke near the fuel or the engine.
• Do not put hot objects near the fuel or the engine.
81919 - 002 - 23.01.2023

• Do not fill fuel near sparks or flames.
• Before you refuel, open the fuel tank cap slowly and
release the pressure carefully.
• Fuel on your skin can cause injury. If you get fuel on
your skin, use soap and water to remove the fuel.
• If you spill fuel on your clothing, change clothing
immediately.
• Do not fill the fuel tank fully. Heat causes the fuel to
expand. Keep a space at the top of the fuel tank.
• Tighten the fuel tank cap fully. If the fuel tank cap is
not tightened, there is a risk of fire.
• Before you start the product, move the product to a
minimum of 3 m/10 ft from where you refueled.
• Do not start the product if there is fuel or engine
oil on the product. Remove the unwanted fuel and
engine oil and let the product dry before you start the
engine.
• Examine the engine for leaks regularly. If there are
leaks in the fuel system, do not start the engine until
the leaks are repaired.
• Do not use your fingers to examine the engine for
leaks.
• Keep fuel in approved containers only.
• When the product and fuel is in storage, make sure
that fuel and fuel fumes cannot cause damage.
• Drain the fuel in an approved container outdoors and
away from sparks and flames.
Safety instructions for maintenance
WARNING: Read the warning
instructions that follow before you use the
product.
• Use personal protective equipment. Refer to
Personal protective equipment on page 7
.
• If the maintenance is not done correctly and
regularly, the risk of injury and damage to the
product increases.
• Stop the engine and let the product become cool
before you do the maintenance.
• Clean the product to remove dangerous material
before you do the maintenance.
• Disconnect the spark plug cap before you do the
maintenance.
• The exhaust fumes from the engine are hot and can
contain sparks. Do not operate the product in indoor
areas or near flammable material.
• Do not change the product. Modifications that
are not approved by the manufacturer, can cause
serious injury or death.
• Always use original accessories and spare parts.
Accessories and spare parts that are not approved
by the manufacturer, can cause serious injury or
death.
• Replace damaged, worn or broken parts.
• Only do the maintenance as given in this operator's
manual. Let an approved service center do all other
servicing.
• Remove all tools from the product before you start
the engine after maintenance. Loose tools or tools
attached to rotating parts can eject and cause injury.
• Let an approved service center do servicing on the
product regularly.
Operation
Introduction
WARNING: Read and understand the
safety chapter before you use the product.
To do before you operate the product
• Read the operator's manual carefully and make sure
that you understand the instructions.
• Read the instructions that are supplied with the
cutting blade by the cutting blade manufacturer.
• Read the operator's manual supplied by the engine
manufacturer.
• Before each operation of the product, do these
steps:
a) Do the daily maintenance. Refer to
Maintenance
schedule on page 14
.
b) Make line marks for all cuts. Prepare the
operation sequence carefully to prevent injury
and damage.
c) Make sure that the cutting blade is correctly
installed. Refer to
Maintenance on page 14
.
d) Adjust the handle to an applicable operation
position. Refer to
To adjust the handle height on
page 10
.
e) Fill the water tank or connect external water
supply to the water tap.
f) Make sure that the water tap is open. Each side
of the cutting blade must have sufficient supply of
water.
g) Make sure that the pointer is aligned with the
cutting blade. Refer to
To align the pointer with
the cutting blade on page 13
.
h) Turn the machine stop button clockwise to make
sure that the machine stop button is disengaged.
Cutting blades
WARNING: Do not use a cutting blade
for other materials than which it is made for.
1919 - 002 - 23.01.2023 9

WARNING: Only use diamond blades
for wet cutting. The diamond blade must be
applicable to the same speed or a higher
speed than the value given on the product
type plate. Only use diamond blades that
are in compliance with national or regional
standards, for example EN13236 or ANSI
B7.1.
The cutting blade manufacturer gives warnings and
recommendations for the operation and correct
maintenance of the cutting blade. Those warnings are
supplied with the cutting blade.
Diamond blades
WARNING: Make sure that the
direction of rotation for the diamond blade
shown on the diamond blade aligns with the
direction of rotation shown on the product.
CAUTION: Always use a sharp
diamond blade.
There is a wide range of diamond blades that is used
for different operations. From new made concrete to
concrete and asphalt that has become hard and for
different hardness classes.
Diamond blades has a steel core with segments that are
made of industrial diamonds.
Water cooling system
Always use water during operation to keep the
temperature of the diamond blades down. The water
cooling system also increases the lifetime of the
diamond blades and prevents dust buildup.
Make sure that the water supply is not clogged.
To sharpen the diamond blades
Diamond blades can become blunt if you use an
incorrect feeding pressure or when you cut materials
such as hard reinforced concrete. If you use a blunt
diamond blade it becomes too hot, which can cause the
diamond segments to come loose.
• Decrease the cutting depth and the engine speed
for a short time to sharpen the diamonds on the
diamond blade.
Diamond blades for wet cutting
WARNING: Always use a blade flange
dimension that is specified for the current
blade dimension. Do not use blade flanges
that are damaged.
During the operation, the friction causes the diamond
blade to become very hot. If the diamond blade
becomes too hot, it will decrease the blade tension or
make the core crack.
Let the diamond blade become cool before you touch it.
• Diamond blades for wet cutting must be used with
water to keep the diamond blade core and segments
cool during cutting. Diamond blades for wet cutting
can not be used dry.
• If you use diamond blades for wet cutting without
water, the diamond blade can become too hot. This
gives bad performance, blade damage and is a
safety risk.
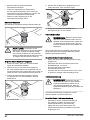
To fill fuel
WARNING: Gasoline is very
flammable. Be careful and refuel outdoors.
Refer to
Fuel safety on page 8
.
CAUTION: Always use correct fuel
type. Incorrect fuel type causes damage to
the product.
• Use gasoline of the correct type. Refer to
Technical
data on page 18
. For more information about the
fuel, refer to the engine manual supplied by the
engine manufacturer.
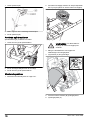
To adjust the handle height
The height of the handle can be adjusted to the correct
height.
1. Loosen the levers (M).
2. Set the position for the necessary work height.
3. Tighten the levers (M).
10 1919 - 002 - 23.01.2023

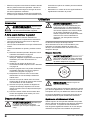
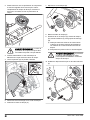
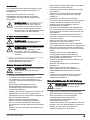
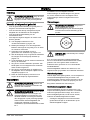
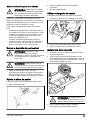
To use the track widener
The track widener makes the product more stable.
1. Loosen the screw (A) for the track widener.
A
2. Pull the right rear wheel out until it stops.
3. Tighten the screw (A) for the track widener.
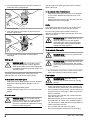
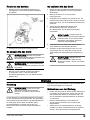
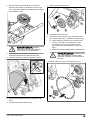
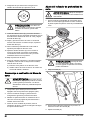
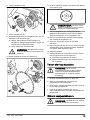
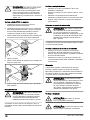
To install a cutting blade
1. Make sure that the engine ON/OFF switch is in its
OFF position.
2. Turn the cutting depth wheel clockwise to fully lift the
cutting blade. Push the lever to lock the cutting depth
wheel.
WARNING: Always lock the cutting
depth wheel when the cutting depth
wheel is not in use.
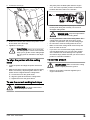
3. Stop the water supply and disconnect the water hose
from the blade guard.
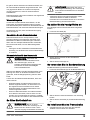
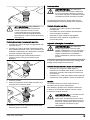
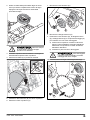
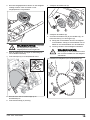
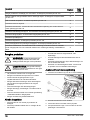
4. Lift the pointer (A) to an upright position.
A
C
B
5. Loosen the front nut (B) on the blade guard.
6. Lift the blade guard (C).
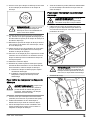
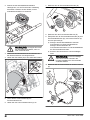
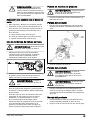
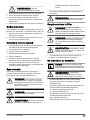
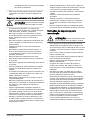
7. Remove the blade screw (D).
DE
F
8. Remove the blade flange (E).
9. Examine the blade screw (D), the blade flange (E),
the inner flange (F) and the locking pin (G).
a) Clean all contact surfaces between the blade
and the blade flange. Clean the blade shaft bolt
threads and the contact surfaces of the blade
shaft bolt.
b) Replace worn or damaged parts.
WARNING: Damaged or dirty parts
can prevent correct installation of the
cutting blade.
1919 - 002 - 23.01.2023 11

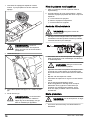
10. Install the cutting blade on the inner flange (F).
E
D
F
G
11. Make sure that the cutting blade rotates in the
direction of the arrows shown on the cutting blade.
CAUTION: Risk of damage to the
cutting blade if it is installed opposite the
direction of rotation.
12. Install the blade flange (E) and the blade screw (D).
Make sure that the locking pin (G) on the inner
flange, goes through the cutting blade and into the
blade flange (E).
13. Hold and push the cutting blade in reverse direction
of rotation. At the same time tighten the blade screw
(D).
14. Turn the cutting depth wheel counterclockwise to
lower the cutting blade.
15. Tighten the blade screw (D) to minimum 40-45 Nm
with the supplied wrench. The resistance between
the cutting blade and the ground keeps the cutting
blade in position.
16. Lower the blade guard.
17. Start the product and listen for unusual sounds. If
there are unusual sounds, remove the cutting blade.
a) Examine the cutting blade for damages.
b) Install the cutting blade again. Replace the
cutting blade if it is damaged.
To remove or replace the cutting blade
WARNING: When you remove
diamond blades, let the product become
cool and use protective gloves. Diamond
blades are very hot after use.
1. Make sure that the engine ON/OFF switch is in its
OFF position.
2. Stop the water supply and disconnect the water hose
from the blade guard.
3. Do the steps in
To install a cutting blade on page 11
to remove or replace the cutting blade.
4. Before you operate the product again, start the water
supply and connect the water hose to the blade
guard.
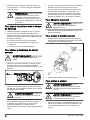
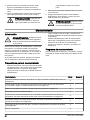
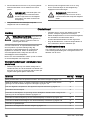
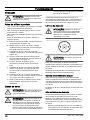
To set the cutting depth indicator
WARNING: Always lock the cutting
depth wheel when the cutting depth wheel
is not in use.
1. Turn the cutting depth wheel until the cutting blade
slightly touches the ground. Push the lever to lock
the cutting depth wheel.
CAUTION: Do not lower the cutting
blade too quickly. If the cutting blade
hits the surface with force, it can cause
damage to the cutting blade.
12 1919 - 002 - 23.01.2023

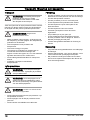
2. Loosen the screw (A).
B
A
3. Rotate the indicator plate until the the position "0" is
at the center of the arrow (B).
4. Tighten the screw (A).
CAUTION: Always do a check that
the cutting depth is correct. The indicator
helps you to get the correct cutting depth
but only gives an indication of the depth
value.
To align the pointer with the cutting
blade
1. Lower the pointer and align the pointer with a line
mark.
2. Make sure that the pointer is aligned with the cutting
blade. If necessary, adjust the guide wheel on the
pointer until it is aligned with the cutting blade.
a) Loosen the nut for the guide wheel.
b) Align the guide wheel with the cutting blade.
c) Tighten the nut for the guide wheel.
To use the correct working technique
WARNING: The blade shaft rotates
when the engine is started.
• Stay away from the blade path while the engine
is on. The correct operator position is behind the
handles with both hands on the handles.
• Examine the cutting blade frequently for cracks and
broken parts during the work day. Do not use a
damaged cutting blade.
WARNING: Stop the engine before
you examine the cutting blade.
• Do not grind with the side of the cutting blade. The
cutting blade can break and cause injury to the
operator or bystanders. Only use the cutting edge.
• Do not bend or twist the cutting blade in the cut.
• Make sure that the cutting blade moves freely and
does not catch in the cut.
• If you are to cut concrete bricks, tightly attach the
concrete bricks before you cut. The heavy weight
of the material can cause damage to the product
and serious injury. Make sure that you can move the
product in controlled conditions.
To start the product
WARNING: Make sure that the cutting
blade is slightly above the ground.
• Refer to the operator's manual supplied by the
engine manufacturer.
1919 - 002 - 23.01.2023 13

To stop the operation
1. Turn the cutting depth wheel (K) clockwise to fully lift
the cutting blade.
2. Stop the water supply (G).
To stop the product
WARNING: If there is an emergency,
push the machine stop button to stop the
product quickly.
WARNING: The cutting blade rotates
for a while after the engine stops.
• Turn the engine ON/OFF switch to the OFF position.
Refer to the operator's manual supplied by the
engine manufacturer.
To operate the product
1. Slowly turn the cutting depth wheel counterclockwise
to lower the cutting blade.
2. Make a cut as a guide, approximately 20-30 mm.
3. Do cut increments of 50 mm until you get the
necessary depth. Push the lever up to lock the
cutting depth wheel.
4. Adjust the water supply when you operate the
product. Turn the water tap to adjust the water
supply.
CAUTION: Each side of the cutting
blade must have sufficient supply of
water to cool down the cutting blade.
The water also prevents dust buildup.
5. Cut only in a line, align the cutting blade with the
marks.
6. Slowly push the product forward and make sure that
the pointer and the cutting blade are aligned with the
marks.
CAUTION: Do not turn, rotate or
move the product from side to side while
the cutting blade rotates.
Maintenance
Introduction
WARNING: Read and understand the
safety chapter before you do maintenance
on the product.
For all servicing and repair work on the product, special
training is necessary. We guarantee that professional
repairs and servicing is available. If your dealer is not a
service agent, speak to them for information about the
nearest service agent.
For spare parts, speak to your Husqvarna dealer or
service agent.
To do before the maintenance
• Park the product on a level surface and stop the
engine. Turn the engine ON/OFF switch to the
OFF position to prevent accidental start during
maintenance.
• Clean the area around the product from oil and dirt.
Remove unwanted objects.
• Put clear signs around the maintenance area to give
a warning to bystanders that maintenance work is in
progress.
• Keep fire extinguishers, medical supplies and an
emergency phone near.
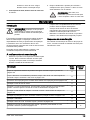
Maintenance schedule
For maintenace of the engine and engine parts, refer
to the operator's manual supplied by the engine
manufacturer.
14 1919 - 002 - 23.01.2023

Maintenance Daily Weekly
Clean the external surfaces of the product with water. Refer to
To clean the product on
page 15
.X
Clean the air filter. In dusty environments, clean the air filter more frequently. Refer to
To
clean and replace the air filter on page 16
.X
Do a general inspection. Refer to
To do a general inspection on page 15
. X
Do a check of the engine oil level. X
Do a check of the drive belt. If it is necessary, adjust the tension of the drive belt. Refer to
To adjust the tension of the drive belt on page 15
.X
Do a check of the machine stop button. Refer to
To do a check of the machine stop button
on page 7
.X
Do a check of the blade guards. Refer to
To do a check of the blade guard on page 8
. X
Do a check of the muffler. X
Do a check of the cutting blade. Refer to
To clean the product on page 15
. X
Lubricate the grease nipples for the cutting depth adjustment. Refer to
To lubricate the
product on page 16
.X
Do a check of the water flow. If the water flow is not sufficient, do a check of the water
supply holes in the blade guard. Remove unwanted material that causes a blockage to
the water supply holes.
X
To clean the product
WARNING: Use protective glasses.
When you clean the product, dirt and
harmful material can eject from the product.
CAUTION: A blocked air intake
decreases the performance of the product
and can cause the engine to become too
hot.
• Let the product become cool before you clean it.
• Do not clean electrical components with water.
• Use a weak cleaning agent. Put on protective gloves
to prevent skin irritation.
• Always clean all the equipment at the end of the
work day. Do not use a high-pressure washer to
clean the product.
• Remove blockage from all air openings.
• Clean all outlets, connections and cables with a dry
cloth.
• Remove unwanted material that causes a blockage
to the water supply holes in the blade guard.
• Clean around the fuel tank cap.
To do a general inspection
• Make sure that the nuts and screws on the product
are tightened.
• Make sure that the cables on the product are not in a
position where they can become damaged.
• Make sure that there are no fuel or oil leaks.
• Make sure that the seals for the fuel tank cap are not
damaged.
• Examine the fuel hose. Replace the fuel hose if it is
damaged or worn.
• Examine the water hoses for leakage. Do not
operate a product that has damaged water hoses.
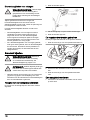
To adjust the tension of the drive belt
1. Loosen the 2 nuts (S) and remove the drive belt
cover.
2. Make sure that the drive belt is not damaged.
1919 - 002 - 23.01.2023 15

3. Loosen the screws that keep the engine in position.
4. Turn the tension nuts ¼ (N) turn clockwise to
increase the tension of the drive belt.
CAUTION: Do not increase the
tension of the drive belt too much.
5. Make sure that the drive belt pulleys are aligned.
6. Tighten the screws that keep the engine in position.
7. Turn the tension nuts 2 turns counterclockwise to
prevent that the tension screw touches the engine
block.
8. Install the drive belt cover and tighten the 2 nuts.
To lubricate the product
Lubricate the components that follow. Lubricate until the
grease can be seen at the edges. For correct grease,
refer to
Technical data on page 18
.
1. Apply some grease to the grease nipples of the lever
for cutting depth adjustment.
2. Turn the cutting depth wheel clockwise and
counterclockwise again and again and lubricate
equally.
To do a check of the engine oil level
1. Make sure that the cutting blade is removed and that
the product is level when you examine the engine oil
level.
2. Remove the dipstick from the oil tank.
3. Clean the oil from the dipstick.
4. Put the dipstick back fully into the oil tank.
5. Remove the dipstick.
6. Examine the oil level on the dipstick. Make sure that
the level of engine oil is between the marks on the
dipstick.
7. If the oil level is low, fill with engine oil and do a
check of the oil level again. Refer to
Technical data
on page 18
for correct engine oil type.
To replace the engine oil
If the engine is cold, start the engine for 1–2 minutes
before you drain the engine oil. This makes the engine
oil warm and faster to drain.
WARNING: Do not operate the engine
for more than 1–2 minutes before you drain
the engine oil. The engine oil becomes very
hot and can cause burn injuries. Let the
engine become cool before you drain the
engine oil.
WARNING: If you spill engine oil on
your body, clean with soap and water.
CAUTION: Do not use engine oil for
2-stroke engines. Engine oil for 2-stroke
engines can cause damage to the engine.
• Refer to the operator's manual supplied by the
engine manufacturer.
CAUTION: Obey local regulations for
safe disposal of used engine oil.
To clean and replace the air filter
WARNING: Use approved respiratory
protection when you clean or replace the air
filter. Discard used air filters correctly. The
dust in the air filter is dangerous to your
health.
WARNING: Do not clean the air filter
with compressed air. This causes damage to
the air filter and the risk increases that you
breathe the dangerous dust.
CAUTION: Always replace a damaged
air filter, or the dust will go into the engine
and cause engine damage.
• For information on how to clean and replace the air
filter, refer to the operator's manual for the engine.
To examine the spark plug
Note: Do not use a spark plug with a
damaged spark plug cap or ignition lead.
A damaged spark plug can cause electrical
shock.
CAUTION: Always use the
recommended spark plug type. Incorrect
spark plug type can cause damage to the
product.
• Examine the spark plug if the engine is low on
power, is not easy to start or does not operate
correctly at idle speed.
• To decrease the risk of unwanted material on the
spark plug electrodes, obey these instructions:
a) Make sure that the fuel type is correct.
b) Make sure that the air filter is clean.
• If the spark plug is dirty, clean it and make sure that
the electrode gap is correct.
• Replace the spark plug if it is necessary.
• For more information, refer to the operator's manual
for the engine.
16 1919 - 002 - 23.01.2023

Transportation, storage and disposal
Transportation
WARNING: Be careful during
transportation. The product is heavy and can
cause injury or damage if it falls or moves
during transportation.
The wheels let you move the product manually for
shorter distances. For longer distances, lift the product
to move it or put the product on a vehicle.
CAUTION: Do not tow the product
behind a vehicle.
• Safety the product during transportation. Make sure
that it cannot move. Use the lifting eye or the base
plate of the product to attach it.
• Remove the cutting blade before transportation of
the product.
• Remove all tools and wrenches.
• For transportation of the product and fuel, make
sure that there are no leaks or fumes. Sparks or
open flames, for example from electrical devices or
boilers, can start a fire.
• Always use approved containers for transportation of
fuel.
• Examine new cutting blades for transport damage.
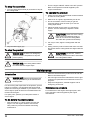
To lift the product
WARNING: Make sure that the lifting
equipment has the correct dimension. The
rating plate on the product shows the
product weight.
WARNING: Make sure that the lifting
eye is not damaged. Do not use metal
hooks, chains or other lifting equipment with
rough edges that can cause damage to the
lifting point.
WARNING: Do not walk or stay below
or near a lifted product.
• Use correct lifting equipment to lift the product. Do
not lift the product manually.
• Use the lifting eye that is attached to the product
when you lift it.
• Use boots with steel toe-caps and non-slip soles.
Storage
• Keep the product in a locked area to prevent access
for children or persons that are not approved.
• Always keep the product indoors.
• Keep the product in a dry and frost free area.
• Remove the cutting blade from the product after the
operation.
• Keep the cutting blades in a safe area to prevent
damage.
• Keep the cutting blades in a dry and frost-free area.
• Examine new cutting blades for storage damage.
• Keep the product on a flat, level surface.
• Remove all fuel from the fuel tank before you put the
product in storage for a long period of time. Discard
the fuel at an applicable disposal location.
• Always use approved containers for storage of fuel.
Disposal
• Obey the local recycling requirements and applicable
regulations.
• Discard all chemicals, such as engine oil or fuel, at a
service center or at an applicable disposal location.
• When the product is no longer in use, send it to
a Husqvarna dealer or discard it at a recycling
location.
1919 - 002 - 23.01.2023 17

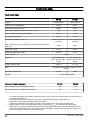
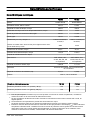
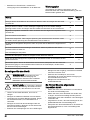
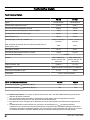
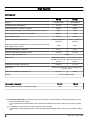
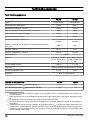
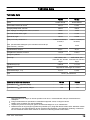
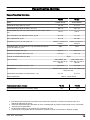
Technical data
Technical data
FS 305 FS 309
Engine 1Honda GX160 Honda GX270
Engine power, kW/hp@rpm23.6/4.8 6.3/8.4
Blade guard capacity, mm/in. 350/14 350/14
Max. cutting depth with blade size 350/14, mm/in. 125/5 125/5
Product weight with empty tanks, kg/lb 58/127 71/157
Operating weight, kg/lb 78/172 93/205
Dimensions (LxWxH), mm/in.3 41195/47 x 530/20.8 x
1010/39.7
1195/47 x 530/20.8 x
1010/39.7
Max. rotation speed of the spindle (at nominal engine speed 3800
rpm), rpm 2800 3400
Arbor size, mm/in. 25.4/1 25.4/1
Blade flange diameter, mm/in. 114/4.5 114/4.5
Blade coolant Water
Engine oil SAE 10W30, API
Class, MS, SD, SE or
higher
SAE 10W30, API
Class, MS, SD, SE or
higher
Oil tank capacity, l/qts 0.6/0.63 1.1/ 1.16
Fuel Unleaded gasoline with a maximum of 10%
ethanol.
Fuel tank capacity, l/qts 3.1/ 3.3 5.3/5.6
Grease NLGI 2, lithium based
Noise and vibration emissions FS 305 FS 309
Sound power level LWA (measured), dB (A) 106 110
Sound power level LWA (guaranteed), dB (A)5108 112
1For further information and questions about the specific engine, refer to the engine manual or the web site of
the engine manufacturer.
2As specified by engine manufacturer. Net power rating as per SAE J1349, at specified rpm.
3Dimensions refer to product without cutting accessories.
4Height can be adjusted at transport by lowering of the handle and by removing of the water tank.
5Noise emissions in the environment measured as sound power (LWA) in conformity with EC directive
2000/14/EC. The difference between guaranteed and measured sound power is that the guaranteed sound
power also includes dispersion in the measurement result and the variations between different machines of
the same model according to Directive 2000/14/EC.
18 1919 - 002 - 23.01.2023

Noise and vibration emissions FS 305 FS 309
Sound pressure level at the operators ear, dB (A) 6102 102
Vibration levels ahv, m/s2, right handle/left handle 74.4/4.7 4.9/3.7
Noise and vibration declaration
statement
These declared values were obtained by laboratory
type testing in accordance with the stated directive or
standards and are suitable for comparison with the
declared values of other products tested in accordance
with the same directive or standards. These declared
values are not suitable for use in risk assessments
and values measured in individual work places may
be higher. The actual exposure values and risk of
harm experienced by an individual user are unique and
depend upon the way the user works, in what material
the product is used, as well as upon the exposure time
and the physical condition of the user, and the condition
of the product.
6Noise pressure level according to EN 13862:2021. Reported data for noise pressure level has a typical
statistical dispersion (standard deviation) of 2.5 dB(A).
7Vibration level according to EN 13862:2021. Reported data for vibration level has a typical statistical disper-
sion (standard deviation) of 1.5 m/s2.
1919 - 002 - 23.01.2023 19

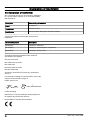
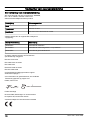
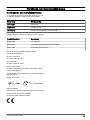
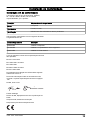
Declaration of Conformity
EU Declaration of Conformity
We, Husqvarna AB, SE-561 82 Huskvarna, SWEDEN,
tel: +46 36 146500, declare on our sole responsibility
that the product:
Description Floor cutting-off machine
Brand Husqvarna
Type/Model FS 305, FS 309
Identification Serial numbers dating from 2022 and onwards
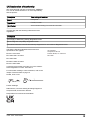
complies fully with the following EU directives and
regulations:
Directive/Regulation Description
2006/42/EC "relating to machinery"
2014/30/EU "relating to electromagnetic compatibility"
2000/14/EC "relating to outdoor noise"
and that the following standards and/or technical
specifications are applied;
EN ISO 12100:2010
EN 13862:2001+A1:2009
EN 13862:2021
EN 55012:2008+A1:2009
EN ISO 14982:2009
Conformity assessment procedure acc 2000/14/EC:
Annex V.
For information relating to noise emissions, refer to the
chapter
Technical data on page 18
.
Partille, 2022-12-07
Fredrik Sandinge
R&D Director, Concrete Sawing & Drilling Equipment
Husqvarna AB, Construction Division
Responsible for technical documentation
20 1919 - 002 - 23.01.2023
La pagina si sta caricando...
La pagina si sta caricando...
La pagina si sta caricando...
La pagina si sta caricando...
La pagina si sta caricando...
La pagina si sta caricando...
La pagina si sta caricando...
La pagina si sta caricando...
La pagina si sta caricando...
La pagina si sta caricando...
La pagina si sta caricando...
La pagina si sta caricando...
La pagina si sta caricando...
La pagina si sta caricando...
La pagina si sta caricando...
La pagina si sta caricando...
La pagina si sta caricando...
La pagina si sta caricando...
La pagina si sta caricando...
La pagina si sta caricando...
La pagina si sta caricando...
La pagina si sta caricando...
La pagina si sta caricando...
La pagina si sta caricando...
La pagina si sta caricando...
La pagina si sta caricando...
La pagina si sta caricando...
La pagina si sta caricando...
La pagina si sta caricando...
La pagina si sta caricando...
La pagina si sta caricando...
La pagina si sta caricando...
La pagina si sta caricando...
La pagina si sta caricando...
La pagina si sta caricando...
La pagina si sta caricando...
La pagina si sta caricando...
La pagina si sta caricando...
La pagina si sta caricando...
La pagina si sta caricando...
La pagina si sta caricando...
La pagina si sta caricando...
La pagina si sta caricando...
La pagina si sta caricando...
La pagina si sta caricando...
La pagina si sta caricando...
La pagina si sta caricando...
La pagina si sta caricando...
La pagina si sta caricando...
La pagina si sta caricando...
La pagina si sta caricando...
La pagina si sta caricando...
La pagina si sta caricando...
La pagina si sta caricando...
La pagina si sta caricando...
La pagina si sta caricando...
La pagina si sta caricando...
La pagina si sta caricando...
La pagina si sta caricando...
La pagina si sta caricando...
La pagina si sta caricando...
La pagina si sta caricando...
La pagina si sta caricando...
La pagina si sta caricando...
La pagina si sta caricando...
La pagina si sta caricando...
La pagina si sta caricando...
La pagina si sta caricando...
La pagina si sta caricando...
La pagina si sta caricando...
La pagina si sta caricando...
La pagina si sta caricando...
La pagina si sta caricando...
La pagina si sta caricando...
La pagina si sta caricando...
La pagina si sta caricando...
La pagina si sta caricando...
La pagina si sta caricando...
La pagina si sta caricando...
La pagina si sta caricando...
La pagina si sta caricando...
La pagina si sta caricando...
La pagina si sta caricando...
La pagina si sta caricando...
La pagina si sta caricando...
La pagina si sta caricando...
La pagina si sta caricando...
La pagina si sta caricando...
La pagina si sta caricando...
La pagina si sta caricando...
La pagina si sta caricando...
La pagina si sta caricando...
La pagina si sta caricando...
La pagina si sta caricando...
La pagina si sta caricando...
La pagina si sta caricando...
La pagina si sta caricando...
La pagina si sta caricando...
La pagina si sta caricando...
La pagina si sta caricando...
La pagina si sta caricando...
La pagina si sta caricando...
La pagina si sta caricando...
La pagina si sta caricando...
La pagina si sta caricando...
La pagina si sta caricando...
La pagina si sta caricando...
La pagina si sta caricando...
La pagina si sta caricando...
La pagina si sta caricando...
La pagina si sta caricando...
La pagina si sta caricando...
La pagina si sta caricando...
La pagina si sta caricando...
La pagina si sta caricando...
La pagina si sta caricando...
La pagina si sta caricando...
La pagina si sta caricando...
La pagina si sta caricando...
La pagina si sta caricando...
La pagina si sta caricando...
La pagina si sta caricando...
La pagina si sta caricando...
La pagina si sta caricando...
La pagina si sta caricando...
La pagina si sta caricando...
La pagina si sta caricando...
La pagina si sta caricando...
La pagina si sta caricando...
La pagina si sta caricando...
La pagina si sta caricando...
La pagina si sta caricando...
La pagina si sta caricando...
La pagina si sta caricando...
La pagina si sta caricando...
La pagina si sta caricando...
La pagina si sta caricando...
La pagina si sta caricando...
La pagina si sta caricando...
La pagina si sta caricando...
La pagina si sta caricando...
La pagina si sta caricando...
La pagina si sta caricando...
La pagina si sta caricando...
-
 1
1
-
 2
2
-
 3
3
-
 4
4
-
 5
5
-
 6
6
-
 7
7
-
 8
8
-
 9
9
-
 10
10
-
 11
11
-
 12
12
-
 13
13
-
 14
14
-
 15
15
-
 16
16
-
 17
17
-
 18
18
-
 19
19
-
 20
20
-
 21
21
-
 22
22
-
 23
23
-
 24
24
-
 25
25
-
 26
26
-
 27
27
-
 28
28
-
 29
29
-
 30
30
-
 31
31
-
 32
32
-
 33
33
-
 34
34
-
 35
35
-
 36
36
-
 37
37
-
 38
38
-
 39
39
-
 40
40
-
 41
41
-
 42
42
-
 43
43
-
 44
44
-
 45
45
-
 46
46
-
 47
47
-
 48
48
-
 49
49
-
 50
50
-
 51
51
-
 52
52
-
 53
53
-
 54
54
-
 55
55
-
 56
56
-
 57
57
-
 58
58
-
 59
59
-
 60
60
-
 61
61
-
 62
62
-
 63
63
-
 64
64
-
 65
65
-
 66
66
-
 67
67
-
 68
68
-
 69
69
-
 70
70
-
 71
71
-
 72
72
-
 73
73
-
 74
74
-
 75
75
-
 76
76
-
 77
77
-
 78
78
-
 79
79
-
 80
80
-
 81
81
-
 82
82
-
 83
83
-
 84
84
-
 85
85
-
 86
86
-
 87
87
-
 88
88
-
 89
89
-
 90
90
-
 91
91
-
 92
92
-
 93
93
-
 94
94
-
 95
95
-
 96
96
-
 97
97
-
 98
98
-
 99
99
-
 100
100
-
 101
101
-
 102
102
-
 103
103
-
 104
104
-
 105
105
-
 106
106
-
 107
107
-
 108
108
-
 109
109
-
 110
110
-
 111
111
-
 112
112
-
 113
113
-
 114
114
-
 115
115
-
 116
116
-
 117
117
-
 118
118
-
 119
119
-
 120
120
-
 121
121
-
 122
122
-
 123
123
-
 124
124
-
 125
125
-
 126
126
-
 127
127
-
 128
128
-
 129
129
-
 130
130
-
 131
131
-
 132
132
-
 133
133
-
 134
134
-
 135
135
-
 136
136
-
 137
137
-
 138
138
-
 139
139
-
 140
140
-
 141
141
-
 142
142
-
 143
143
-
 144
144
-
 145
145
-
 146
146
-
 147
147
-
 148
148
-
 149
149
-
 150
150
-
 151
151
-
 152
152
-
 153
153
-
 154
154
-
 155
155
-
 156
156
-
 157
157
-
 158
158
-
 159
159
-
 160
160
-
 161
161
-
 162
162
-
 163
163
-
 164
164


in altre lingue
- français: Husqvarna FS 305 Manuel utilisateur
- español: Husqvarna FS 305 Manual de usuario
- Deutsch: Husqvarna FS 305 Benutzerhandbuch
- Nederlands: Husqvarna FS 305 Handleiding
- português: Husqvarna FS 305 Manual do usuário
- svenska: Husqvarna FS 305 Användarmanual
Documenti correlati
Altri documenti
-
Toro 12-38XL Lawn Tractor Manuale utente
-
Agria 4500 Manuale del proprietario
-
-
-
-
-
Shindaiwa SBA-LE24 Manuale utente
-
-