ATEN VC1280 Guida Rapida
- Categoria
- Convertitori video
- Tipo
- Guida Rapida
Questo manuale è adatto anche per

A
Hardware Review
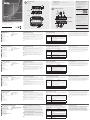
Front and Rear View
1
HDMI In Port
2
VGA In Port
3
Audio In Port
4
Source Switch Pushbutton
5
Auto LED
6
HDMI LED
7
VGA LED
8
HDMI Out Port
9
RS-232 Serial Port
10
Power Jack
B
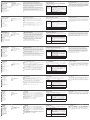
Hardware Installation
1
Connect the HDMI In Port on the VC1280 to the HDMI Out Port on your
video source device using an HDMI cable.
2
Connect the VGA In Port on the VC1280 to the VGA Out Port on your
video source device using a VGA cable. To transmit audio, connect the
Audio In Port on your VC1280 to the Audio Jack from your video source.
3
Connect the HDMI Out Port on the VC1280 to the HDMI In Port on your
HDMI display/projector using an HDMI cable.
4
(Optional) For RS-232 serial transmission and source switch control via RS-
232 commands, connect your computer or control system to the terminal
block on the VC1280.
5
Plug the power adapter cable into the Power Jack on the VC1280.
Source Input Operation
Press the Source Switch Pushbutton on the VC1280 to switch between
different input modes – Auto, HDMI, and VGA mode. Refer to the table below
for details.
Input Mode Description
Auto (Default)
The VC1280
1. Automatically transmits the fi rst detected input to the
connected receiver.
2. Prioritizes HDMI transmission if both the HDMI In and
VGA In ports are plugged in at the same time.
3. Automatically switches to a newly detected input to
the connected receiver.
HDMI
The VC1280 only transmits the HDMI source to the
connected receiver.
VGA
The VC1280 only transmits the VGA source and its audio
input to the connected receiver.
© Copyright 2019 ATEN
®
International Co., Ltd.
ATEN and the ATEN logo are trademarks of ATEN International Co., Ltd. All rights reserved. All
other trademarks are the property of their respective owners.
Part No. PAPE-1223-Q90G Printing Date: 05/2019
VC1280 2-Port 4K HDMI/VGA to HDMI Converter Switch
www.aten.com
RS-232 Channel Transmission
You can connect an RS-232 serial device to the VC1280 RS-232 Serial Port,
such as a touchscreen and barcode scanner. The RS-232 signal transmission
fl ow is shown in the following example: From a source device, the RS-232
signal is transmitted (Tx) to the receiving (Rx) unit; the VC1280 transmits (Tx)
signals to the display device (Rx). In addition, the source input can be remotely
selected by RS-232 command. Please refer to the user manual for further
details.
Top View
1
VGA Input Status LED
2
HDMI Input Status LED
3
Power LED
Commutateur-convertisseur 4K HDMI/VGA vers HDMI à 2 ports VC1280
www.aten.com
VC1280 2-Port 4K HDMI/VGA auf HDMI Konverter Switch
www.aten.com
Conmutador de conversión de HDMI/VGA 4K a HDMI de 2 puertos del VC1280
www.aten.com
VC1280 - 2-портовый конвертер-переключатель 4K HDMI/VGA в HDMI
www.aten.com
Switch convertitore da 4K HDMI/VGA a HDMI a 2 porte VC1280
www.aten.com
2-Port 4K HDMI/VGA to HDMI
Converter Switch
Quick Start Guide
VC1280
ATEN VanCryst
™
B
Package Contents
1 VC1280 2-Port 4K HDMI/VGA to HDMI Converter Switch
1 Power Adapter
1 RS-232 Terminal Block
1 User Instructions
Front View
Rear View
Top View
Hardware Installation
A
Hardware Review
1 2 3 4
6
5
7
9 10
1
2 3
8
VC1280 (Front)
VC1280 (Rear)
VC1280 (Front)
VC1280 (Rear)
1 2
3 4 5
Support and Documentation Notice
All information, documentation, fi rmware,
software utilities, and specifi cations contained in
this package are subject to change without prior
notifi cation by the manufacturer.
To reduce the environmental impact of our
products, ATEN documentation and software can
be found online at
http://www.aten.com/download/
Technical Support
www.aten.com/support
이 기기는 업무용(A급) 전자파적합기기로서 판매자 또는 사용자는 이 점을
주의하시기 바라며, 가정외의 지역에서 사용하는 것을 목적으로 합니다.
Scan for
more information
EMC Information
FEDERAL COMMUNICATIONS COMMISSION INTERFERENCE
STATEMENT:
This equipment has been tested and found to comply with the limits
for a Class A digital device, pursuant to Part 15 of the FCC Rules.
These limits are designed to provide reasonable protection against
harmful interference when the equipment is operated in a commercial
environment. This equipment generates, uses, and can radiate radio
frequency energy and, if not installed and used in accordance with
the instruction manual, may cause harmful interference to radio
communications. Operation of this equipment in a residential area
is likely to cause harmful interference in which case the user will be
required to correct the interference at his own expense.
FCC Caution: Any changes or modifi cations not expressly approved by
the party responsible for compliance could void the user's authority to
operate this equipment.
Warning: Operation of this equipment in a residential environment
could cause radio interference.
This device complies with Part 15 of the FCC Rules. Operation is subject
to the following two conditions:(1) this device mat not cause harmful
interference, and(2) this device must accept any interference received,
including interference that may cause undesired operation.
Important. Before proceeding, download the Installation and
Operation Manual by visiting the website, www.aten.com and
navigating to the product page. The manual includes important
warnings, loading specifi cations and grounding instructions.
A
Description de l’appareil
Vue avant et arrière
1
Port d'entrée HDMI
2
Port d'entrée VGA
3
Port d’entrée audio
4
Bouton-poussoir de commutation
de source
5
LED automatique
6
LED HDMI
7
LED VGA
8
Port de sortie HDMI
9
Port série RS-232
10
Prise d'alimentation
B
Installation matérielle
1
Connectez le port d'entrée HDMI du VC1280 au port de sortie HDMI de
votre périphérique source vidéo à l'aide d'un câble HDMI.
2
Connectez le port d'entrée VGA du VC1280 au port de sortie VGA de votre
périphérique source vidéo à l'aide d'un câble VGA. Pour transmettre de
l’audio, connectez le port d’entrée audio de votre VC1280 à la prise audio
de votre source vidéo.
3
Connectez le port de sortie HDMI du VC1280 au port d’entrée HDMI de
votre écran/projecteur HDMI à l'aide d'un câble HDMI.
4
(Facultatif) Pour la transmission en série RS-232 et le contrôle du
commutateur de source via les commandes RS-232, connectez votre
ordinateur ou votre système de contrôle au bornier du VC1280.
5
Branchez le câble de l’adaptateur secteur dans la prise d'alimentation du
VC1280.
Fonctionnement de l’entrée source
Appuyez sur le bouton poussoir du commutateur de source du VC1280 afi n
de basculer entre les différents modes d’entrée – Mode automatique, HDMI et
VGA. Consultez le tableau ci-dessous pour des détails.
Mode d’entrée Description
Automatique (par
défaut)
Le VC1280
1. Transmet automatiquement la première entrée
détectée au récepteur connecté.
2. Donne la priorité à la transmission HDMI si les ports
d’entrée HDMI et VGA sont branchés en même temps.
3. Bascule automatiquement vers une nouvelle entrée
détectée au récepteur connecté.
HDMI
Le VC1280 transmet uniquement la source HDMI au
récepteur connecté.
VGA
Le VC1280 transmet uniquement la source VGA et son
entrée audio au récepteur connecté.
Transmission de canal RS-232
Vous pouvez connecter un périphérique série RS-232 au port série RS-232
du VC1280, tel qu’un écran tactile et un lecteur de codes-barres. Le fl ux de
transmission du signal RS-232 est présenté sur l’exemple suivant : Depuis un
appareil source, le signal RS-232 est transmis (Tx) vers le l'unité de réception
(Rx); le VC1280 transmet (Tx) les signaux vers le dispositif d’affi chage (Rx). De
plus, l'entrée source peut être sélectionnée à distance par commande RS-232.
Veuillez consulter le manuel de l'utilisateur pour plus de détails.
Vue de dessus
1
LED d'état de l'entrée VGA
2
LED d'état de l'entrée HDMI
3
LED d'alimentation
A
Hardware Übersicht
Ansicht von vorne und hinten
1
HDMI-Eingang
2
VGA-Eingang
3
Audio-Eingang
4
Quellenschalter Drucktaste
5
Auto-LED
6
HDMI-LED
7
VGA-LED
8
HDMI-Ausgang
9
RS-232 serieller Anschluss
10
Netzbuchse
B
Hardwareinstallation
1
Verbinden Sie den HDMI-Eingang des VC1280 mit dem HDMI-Ausgang
Ihres Videoquellgeräts über ein HDMI-Kabel.
2
Verbinden Sie den VGA-Eingang des VC1280 mit dem VGA-Ausgang Ihres
Videoquellgeräts über ein VGA-Kabel. Verbinden Sie den Audio-Eingang
Ihres VC1280 mit dem Audioanschluss Ihrer Videoquelle, um Audio zu
übertragen.
3
Verbinden Sie den HDMI-Ausgang des VC1280 mit dem HDMI-Eingang
Ihres HDMI Monitors/Projektors über ein HDMI-Kabel.
4
(Optional) Für die serielle RS-232 Übertragung und die Steuerung des
Quellenschalters über RS-232 Befehle schließen Sie Ihren Computer oder Ihr
Steuersystem an den Anschlussblock des VC1280 an.
5
Stecken Sie das Netzteilkabel in die Buchse am VC1280.
Quelleneingang bedienen
Drücken Sie die Taste für den Quellenwechsel am VC1280, um zwischen
den verschiedenen Eingangsmodi - Auto, HDMI und VGA - zu wechseln.
Einzelheiten entnehmen Sie bitte der folgenden Tabelle.
Eingangsmodus Beschreibung
Auto (Standard)
Der VC1280
1. Sendet automatisch den ersten erkannten Eingang an
den angeschlossenen Empfänger.
2. Bevorzugt die HDMI-Übertragung, wenn sowohl der
HDMI-Eingang als auch der VGA-Eingang gleichzeitig
angeschlossen sind.
3. Wechselt automatisch zu einem neu erkannten
Eingang des angeschlossenen Empfängers.
HDMI
Der VC1280 sendet nur die HDMI-Quelle an den
angeschlossenen Empfänger.
VGA
Der VC1280 sendet nur die VGA-Quelle und ihren
Audioeingang an den angeschlossenen Empfänger.
RS-232 Kanalübertragung
Sie können ein serielles RS-232 Gerät an den seriellen VC1280 RS-232
Port anschließen, z.B. einen Touchscreen und Barcodescanner. Der RS-232
Signalübertragungsfl uss wird in folgendem Beispiel angezeigt: Von einem
Eingangsgerät wird das RS-232 Signal an das Empfangsgerät (Rx) übertragen
(Tx); der VC1280 überträgt (Tx) Signale an das Anzeigegerät (Rx). Zusätzlich
kann der Quelleingang per RS-232 Befehl ferngesteuert werden. Weitere
Einzelheiten entnehmen Sie bitte dem Benutzerhandbuch.
Ansicht von oben
1
VGA Eingang Status-LED
2
HDMI Eingang Status-LED
3
Netz-LED
A
Presentación del hardware
Vista frontal y posterior
1
Puerto de entrada HDMI
2
Puerto de entrada VGA
3
Puerto de entrada de audio
4
Pulsador de cambio de fuente
5
LED automático
6
LED HDMI
7
LED VGA
8
Puerto de salida HDMI
9
Puerto serie RS-232
10
Toma de alimentación
B
Instalación del hardware
1
Conecte el puerto de entrada HDMI del VC1280 al puerto de salida HDMI
del dispositivo de fuente de vídeo con un cable HDMI.
2
Conecte el puerto de entrada VGA del VC1280 al puerto de salida VGA del
dispositivo de fuente de vídeo con un cable VGA. Para transmitir el audio,
conecte el puerto de entrada de audio de su VC1280 al conector de audio
de su fuente de vídeo.
3
Conecte el puerto de salida HDMI del VC1280 al puerto de entrada HDMI
de la pantalla/proyector HDMI con un cable HDMI.
4
(Opcional) Para la transmisión serie RS-232 y el control de cambio de fuente
a través de comandos RS-232, conecte su ordenador o sistema de control al
bloque de terminales del VC1280.
5
Conecte el cable del adaptador de alimentación al conector de alimentación
del VC1280.
Operación de entrada de fuente
Presione el Pulsador de cambio de fuente del VC1280 para cambiar entre los
distintos modos de entrada: Automático, HDMI y VGA. Consulte la siguiente
tabla para más información.
Modo de entrada Descripción
Automático
(predeterminado)
El VC1280
1. Transmite automáticamente la primera entrada
detectada al receptor conectado.
2. Da prioridad a la transmisión HDMI si tanto el puerto
de entrada HDMI como el puerto de entrada VGA están
conectados al mismo tiempo.
3. Cambia automáticamente a una nueva entrada
detectada al receptor conectado.
HDMI
El VC1280 solo transmite la fuente HDMI al receptor
conectado.
VGA
El VC1280 solo transmite la fuente VGA y su entrada de
audio al receptor conectado.
Transmisión a través del canal RS-232
Puede conectar un dispositivo serie RS-232 al puerto serie VC1280 RS-232,
como, por ejemplo, una pantalla táctil y un lector de códigos de barras. El fl ujo
de transmisión de la señal RS-232 se muestra en el siguiente ejemplo: Desde
un dispositivo fuente, la señal RS-232 se transmite (Tx) a la unidad receptora
(Rx); el VC1280 transmite (Tx) señales al dispositivo de visualización (Rx).
Además, el comando RS-232 puede seleccionar la entrada de fuente de forma
remota. Consulte el manual de usuario para obtener más información.
Vista superior
1
LED de estado de entrada VGA
2
LED de estado de entrada HDMI
3
LED de alimentación
A
Descrizione hardware
Vista anteriore e posteriore
1
Porta ingresso HDMI
2
Porta ingresso VGA
3
Porta ingresso audio
4
Pulsante push scambio sorgente
5
LED auto
6
LED HDMI
7
LED VGA
8
Porta uscita HDMI
9
Porta seriale RS-232
10
Jack di alimentazione
B
Installazione hardware
1
Collegare la porta di ingresso HDMI sul VC1280 alla porta di uscita HDMI
sul dispositivo sorgente video usando un cavo HDMI.
2
Collegare la porta di ingresso VGA sul VC1280 alla porta di uscita VGA sul
dispositivo sorgente video usando un cavo VGA. Per trasmettere l'audio,
collegare la porta ingresso audio sul VC1280 al jack audio dalla sorgente
video.
3
Collegare la porta di uscita HDMI sul VC1280 alla porta di ingresso HDMI
sullo schermo/proiettore usando un cavo HDMI.
4
(Opzionale) Per la trasmissione seriale RS-232 e il controllo dello scambio
di sergente tramite i comandi RS-232, collegare il computer o il sistema di
controllo al blocco terminali sul VC1280.
5
Collegare il cavo dell'adattatore di alimentazione al jack di alimentazione sul
VC1280.
Uso dell'ingresso sorgente
Premere il pulsante push scambio sorgente sul VC1280 per passare alle diverse
modalità di ingresso: Auto, HDMI e VGA. Consultare la tabella di seguito per i
dettagli.
Modalità ingresso Descrizione
Auto (Predefi nito)
VC1280
1. Trasmette automaticamente il primo ingresso rilevato
sul ricevitore collegato.
2. Assegna la priorità alla trasmissione HDMI quando
sono collegate contemporaneamente le porte ingresso
HDMI e VGA.
3. Passa automaticamente al nuovo ingresso rilevato sul
ricevitore collegato.
HDMI
Il VC1280 trasmette al ricevitore collegato solo la
sorgente HDMI.
VGA
Il VC1280 trasmette al ricevitore collegato solo la
sorgente VGA e il relativo ingresso audio.
Trasmissione canale RS-232
È possibile collegare un dispositivo seriale RS-232 alla porta seriale RS-232 del
VC1280, ad esempio uno schermo touch e uno scanner di codici a barre. Il
fl usso di trasmissione del segnale RS-232 è mostrato nel seguente esempio:
Da un dispositivo sorgente, il segnale RS-232 viene trasmesso (Tx) all'unità di
ricezione (Rx); il VC1280 trasmette i segnali (Tx) al dispositivo di visualizzazione
(Rx). Inoltre, l'ingresso della sorgente può essere selezionato da remoto
mediante il comando RS-232. Consultare il manuale utente per ulteriori
informazioni.
Vista lato superiore
1
LED stato ingresso VGA
2
LED stato ingresso HDMI
3
LED alimentazione
A
Обзор аппаратного обеспечения
Вид спереди и сзади
1
Входной разъем HDMI
2
Входной разъем VGA
3
Разъем звукового входа
4
Кнопка переключения источника
5
Индикатор Авто
6
Индикатор HDMI
7
Индикатор VGA
8
Выходной разъем HDMI
9
Последовательный порт RS-232
10
Гнездо питания
B
Установка аппаратного обеспечения
1
С помощью кабеля HDMI подключите к входному HDMI-разъему
на VC1280 выходной HDMI-разъем Вашего устройства-источника
видеосигнала.
2
С помощью кабеля VGA подключите к входному VGA-разъему
на VC1280 выходной VGA-разъем Вашего устройства-источника
видеосигнала. Для передачи звука подключите к разъему звукового
входа на VC1280 кабель от гнезда звукового выхода на Вашем
устройстве-источнике видеосигнала.
3
С помощью кабеля HDMI подключите выходной HDMI-разъем на
VC1280 к входному HDMI-разъему на Вашем дисплее/проекторе.
4
(Необязательно) Для передачи через последовательный интерфейс
RS-232 и управления переключением источника с помощью команд
RS-232 подключите Ваш компьютер или систему управления к
клеммной колодке на VC1280.
5
Вставьте кабель от адаптера питания в гнездо питания на VC1280.
Функция "Источники входного сигнала"
Для переключения между разными режимами входа (Авто, HDMI и VGA)
нажмите на VC1280 кнопку переключения источника. Подробности см.
в следующей таблице.
Режим входа Описание
Авто (по
умолчанию)
VC1280
1. Автоматическая передача сигнала с первого
обнаруженного входа на подключенный приемник.
2. Приоритетная передача сигнала HDMI, если
одновременно подключены оба входных разъема -
HDMI и VGA.
3. Автоматическое переключение сигнала с нового
обнаруженного входа на подключенный приемник.
HDMI
VC1280 передает на подключенный приемник
только сигнал с источника сигнала HDMI.
VGA
VC1280 передает на подключенный приемник
только сигнал с источника сигнала VGA и своего
звукового входа.
Передача по каналу RS-232
К последовательному порту RS-232 на VC1280 можно подключить
устройство с последовательным портом RS-232, например, сенсорный
экран или сканер штрих-кодов. На следующем примере показан
процесс передачи сигнала RS-232: Сигнал RS-232 передается
(Tx) от источника на приемник (Rx); VC1280 передает (Tx) сигналы
на устройство отображения (Rx). Кроме того, с помощью команд
интерфейса RS-232 можно дистанционно выбрать источник входного
сигнала. Дополнительные сведения см. в руководстве пользователя.
Вид сверху
1
Индикатор состояния входа VGA
2
Индикатор состояния входа HDMI
3
Индикатор питания
La pagina si sta caricando...
-
 1
1
-
 2
2


ATEN VC1280 Guida Rapida
- Categoria
- Convertitori video
- Tipo
- Guida Rapida
- Questo manuale è adatto anche per
in altre lingue
- English: ATEN VC1280 Quick start guide
- français: ATEN VC1280 Guide de démarrage rapide
- español: ATEN VC1280 Guía de inicio rápido
- Deutsch: ATEN VC1280 Schnellstartanleitung
- русский: ATEN VC1280 Инструкция по началу работы
- português: ATEN VC1280 Guia rápido
- polski: ATEN VC1280 Skrócona instrukcja obsługi
- 日本語: ATEN VC1280 クイックスタートガイド
- Türkçe: ATEN VC1280 Hızlı başlangıç Kılavuzu