

2
This product has been adjusted specically for use in the region to which it was originally shipped. If operated
outside this region, the product may not perform as stated in the specications.
No part of this manual may be reproduced, stored in a retrieval system, or transmitted, in any form or by any means,
electronic, mechanical, or otherwise, without the prior written permission of EIZO Corporation.
EIZO Corporation is under no obligation to hold any submitted material or information condential unless prior
arrangements are made pursuant to EIZO Corporation’s receipt of said information.
Although every effort has been made to ensure that this manual provides up-to-date information, please note that
EIZO monitor specications are subject to change without notice.
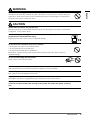
SAFETY SYMBOLS
This manual and this product use the safety symbols below. They denote critical information. Please read them
caref ully.
WARNING
Failure to abide by the information in a WARNING may result in serious injury and
can be life threatening.
CAUTION
Failure to abide by the information in a CAUTION may result in moderate injury and/
or property or product damage.
Indicates an attention to be required. For example, the symbol illustrates the
hazard type such as “the risk of electric shock”.
Indicates a prohibited action. For example, the symbol illustrates a particular
prohibited action such as “Do not disassemble”.
Indicates a mandatory action that must be followed. For example, the symbol
illustrates the notication of general prohibition such as “Grounding the unit”.

3
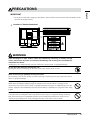
PRECAUTIONS
PRECAUTIONS
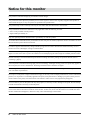
IMPORTANT
• To ensure personal safety and proper maintenance, please read this section and the caution statements on the
unit (refer to the gure below).
●
Location of Caution Statement
WARNING
If the unit begins to emit smoke, smells like something is burning, or makes strange
noises, disconnect all power connections immediately and contact your local EIZO rep-
resentative for advice.
Attempting to use a malfunctioning unit may result in re, electric shock, or equipment damage.
Do not open the cabinet or modify the unit.
Opening the cabinet or modifying the unit may result in re, electric shock, or burn.
Refer all servicing to qualied service personnel.
Do not attempt to service this product yourself as opening or removing covers may result in re, electric
shock, or equipment damage.
Keep small objects or liquids away from the unit.
Small objects accidentally falling through the ventilation slots into the cabinet or spillage into the
cabinet may result in re, electric shock, or equipment damage. If an object or liquid falls/spills into the
cabinet, unplug the unit immediately. Have the unit checked by a qualied service engineer before using
it again.
Place the unit at the strong and stable place.
A unit placed on an inadequate surface may fall and result in injury or equipment damage. If the unit
falls, disconnect the power immediately and ask your local EIZO representative for advice. Do not
continue using a damaged unit. Using a damaged unit may result in re or electric shock.
English

4
PRECAUTIONS
WARNING
Use the unit in an appropriate location.
Not doing so may result in re, electric shock, or equipment damage.
• Do not place outdoors.
• Do not place in a transportation system (ship, aircraft, train, automobile, etc.) where it may be affected
by strong vibration or shock.
• Do not place in a dusty or humid environment.
• Do not place in a location where water is splashed on the screen (bathroom, kitchen, etc.).
• Do not place in a location where the steam comes directly on the screen.
• Do not place near heat generating devices or a humidier.
• Do not place in a location where the product is subject to direct sunlight.
• Do not place in an inammable gas environment.
To avoid danger of suffocation, keep the plastic packing bags away from babies and
children.
Use the enclosed power cord and connect to the standard power outlet of your country.
Be sure to remain within the rated voltage of the power cord.
Not doing so may result in re or electric shock.
Power supply: 100-120/200-240Vac 50/60Hz
To disconnect the power cord, grasp the plug rmly and pull.
Tugging on the cord may damage and result in re or electric shock.
The equipment must be connected to a grounded main outlet.
Failure to do so may result in re or electric shock.
Use the correct voltage.
• The unit is designed for use with a specic voltage only. Connection to another voltage than specied
in this User’s Manual may cause re, electric shock, or equipment damage.
• Do not overload your power circuit, as this may result in re or electric shock.
Handle the power cord with care.
• Do not place the cord underneath the unit or other heavy objects.
• Do not pull on or tie the cord.
If the power cord becomes damaged, stop using it. Use of a damaged cord may result in re or electric
shock.
Never touch the plug and power cord if it begins to thunder.
Touching them may result in electric shock.
When attaching an arm stand, please refer to the user’s manual of the arm stand and
install the unit securely.
Not doing so may cause the unit to become unattached, which may result in injury or equipment
damage. When the unit is dropped, please ask your local EIZO representative for advice. Do not
continue using a damaged unit. Using a damaged unit may result in re or electric shock. When
reattaching the tilt stand, please use the same screws and tighten them securely.

5
PRECAUTIONS
WARNING
Do not touch a damaged LCD panel directly with bare hands.
The liquid crystal that may leak from the panel is poisonous if it enters the eyes or mouth. If any part
of the skin or body comes in direct contact with the panel, please wash thoroughly. If some physical
symptoms result, please consult your doctor.
CAUTION
Handle with care when carrying the unit.
Disconnect the power cord and cables when moving the unit. Moving the unit with the cord attached
is dangerous. It may result in injury.
When handling the unit, grip the bottom of the unit rmly with both hands ensuring
the panel faces outward before lifting.
Dropping the unit may result in injury or equipment damage.
Do not block the ventilation slots on the cabinet.
• Do not place any objects on the ventilation slots.
• Do not install the unit in a closed space.
• Do not use the unit laid down or upside down.
Blocking the ventilation slots prevents proper airow and may result in re, electric shock, or
equipment damage.
Do not touch the plug with wet hands.
Doing so may result in electrical shock.
Use an easily accessible power outlet.
This will ensure that you can disconnect the power quickly in case of a problem.
Periodically clean the area around the plug.
Dust, water, or oil on the plug may result in re.
Unplug the unit before cleaning it.
Cleaning the unit while it is plugged into a power outlet may result in electric shock.
If you plan to leave the unit unused for an extended period, disconnect the power
cord from the wall socket after turning off the power for safety and power conserva-
tion.
English

6
Notice for this monitor
Notice for this monitor
This product is suited for displaying surveillance camera images.
This product has been adjusted specically for use in the region to which it was originally shipped. If the product is
used outside the region, it may not operate as specied in the specications.
This product may not be covered by warranty for uses other than those described in this manual.
The specications noted in this manual are only applicable when the following are used:
• Power cords provided with the product
• Signal cables specied by us
Only use optional products manufactured or specied by us with this product.
As it takes about 30 minutes for the performance of electrical parts to stabilize, adjust the monitor 30 minutes or more
after the monitor power has been turned on.
In order to suppress the luminosity change caused by long-term use and to maintain the stable luminosity, use of a
monitor at a lower “Backlight” setting is recommended.
When the screen image is changed after displaying the same image for extended periods of time, an afterimage may
appear. Use the screen saver or power save function to avoid displaying the same image for extended periods of time.
Periodic cleaning is recommended to keep the monitor looking new and to prolong its operation lifetime (refer to
“Cleaning” (page7)).
The LCD panel is manufactured using high-precision technology. Although, missing pixels or lit pixels may appear on
the LCD panel, this is not a malfunction. Percentage of effective dots: 99.9994% or higher.
The backlight of the LCD panel has a xed lifetime. When the screen becomes dark or begins to icker, please contact
your local EIZO representative.
Do not press on the panel or edge of the frame strongly, as this may result in display malfunctions, such as interference
patterns, etc. If pressure is continually applied to the panel, it may deteriorate or damage your panel. (If the pressure
marks remain on the panel, leave the monitor with a black or white screen. The symptom may disappear.)
Do not scratch or press on the panel with any sharp objects, as this may result in damage to the panel. Do not attempt
to brush with tissues as this may scratch the panel.
When the monitor is cold and brought into a room or the room temperature goes up quickly, dew condensation may
occur on the interior and exterior surfaces of the monitor. In that case, do not turn the monitor on. Instead wait until
the dew condensation disappears, otherwise it may cause some damage to the monitor.

7
Notice for this monitor
Cleaning
Attention
• Chemicals such as alcohol and antiseptic solution may cause gloss variation, tarnishing, and fading of the cabinet or panel,
and also quality deterioration of the image.
• Never use any thinner, benzene, wax, and abrasive cleaner, which may damage the cabinet or panel.
Note
• The optional ScreenCleaner is recommended for cleaning the cabinet and panel surface.
If necessary, the stains on the cabinet and panel surface can be removed by moistening part of a soft cloth with
water.
To use the monitor comfortably
• An excessively dark or bright screen may affect your eyes. Adjust the brightness of the monitor according to
the environmental conditions.
• Staring at the monitor for a long time tires your eyes. Take a 10-minute rest every hour.
English

8
CONTENTS
CONTENTS
PRECAUTIONS ...................................................... 3
Notice for this monitor ......................................... 6
Cleaning .................................................................... 7
To use the monitor comfortably ............................. 7
CONTENTS ............................................................. 8
Chapter 1 Introduction ....................................... 9
1-1. Features ......................................................... 9
1-2. Package Contents ......................................... 9
1-3. Controls and Functions ..............................10
Chapter 2 Connecting Cables ......................... 11
2-1. Connection Procedures ..............................11
2-2. Adjusting the Screen Height and Angle .... 13
Chapter 3 Settings and Adjustments ............. 14
3-1. Using Quick-OSD menu ..............................14
●
Basic operation of Quick-OSD menu .............14
●
Functions ........................................................14
●
Other Functions ..............................................14
3-2. Using OSD menu ..........................................15
●
Basic operation of OSD menu .......................15
●
Functions ........................................................15
Chapter 4 Troubleshooting .............................. 17
4-1. Common ........................................................17
4-2. When displaying on a PC screen ...............17
Chapter 5 Reference ........................................ 18
5-1. Attaching an Arm .........................................18
5-2. Specications ..............................................19
5-3. Preset Timing ...............................................21
Appendix .............................................................. 22
Trademark ............................................................... 22
License / Copyright ................................................ 22
FCC .......................................................................... i
CE ............................................................................. i
CCC .......................................................................... i
LIMITED WARRANTY/
BEGRENZTE GARANTIE/
GARANTIE LIMITÉE/
有限责任保证书
....................................................... ii
Recycling Information/
Informationen zum Thema Recycling/
Informations sur le recyclage ............................. xi

9
Chapter 1 Introduction
Chapter 1 Introduction
Thank you very much for choosing an EIZO color LCD monitor.
1-1. Features
• 17-inch screen
• SXGA (1280 × 1024) display compliant
• Analog signal support
- PC signal: D-Sub mini 15-pin connector × 1
Horizontal scanning frequency 24.8 kHz - 74.8 kHz
Vertical scanning frequency 56.2 Hz - 75.1 Hz
- Video signal: BNC connector × 1
Applicable Format NTSC, PAL, SECAM
• Video aspect function
Alters the display range of the input image (overscan)
• A 2-year long-term warranty for 24-hour continuous use
1-2. Package Contents
Check that all the following items are included in the packaging box. If any items are missing or damaged, contact
your local EIZO representative.
Note
• Please retain the packing materials for future transport of the monitor.
• LCD Monitor
• Power cord
• User’s Manual (Limited Warranty included)
English

10
Chapter 1 Introduction
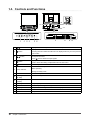
1-3. Controls and Functions
POWER
INPUT
D-SUB MAINTENANCE VIDEO R L
12
13
62 51 3
7
8 109
4
14
11
1 button Displays the volume adjustment menu to volume up or down.
2
button
Displays/Exits the OSD menu.
Pressing the button while the OSD menu is displayed returns you to the previous
menu status.
3
button
Used to: select the OSD menu tab; select the set value; or to increase/decrease
the adjustment value.
Press
twice to switch the input signals.
4
button
Displays the Quick-OSD menu.
Used to select the setting or adjustment items in each menu.
5
button Turns the power on or off.
6 Power indicator
Indicates monitor’s operation status.
Blue: Operating
Orange: Standby mode
7 Power connector Connects the power cord.
8
Input signal connector
(D-SUB)
D-Sub mini 15-pin connector
9
Input signal connector
(VIDEO)
BNC connector
10 Input signal connector Pin jack (L, R)
11 Stand Used to adjust the hight and angle of the monitor screen.
12 Security lock slot Complies with Kensington’s MicroSaver security system.
13 Cable holder Covers the monitor cables.
14 Speaker Outputs audio source.

11
Chapter 2 Connecting Cables
Chapter 2 Connecting Cables
2-1. Connection Procedures
1.
Connects to external equipment compatible with the monitor.
• When used as a PC monitor: page 11
• When using video equipment: page 12
●
When used as a PC monitor
Attention
• When replacing the current monitor with this monitor, be sure to change the PC settings for the resolution and vertical
scan frequency to those appropriate to the this monitor.
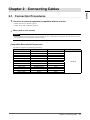
Compatible Resolutions/Frequencies
The monitor supports the following resolutions.
Resolution Display Mode Frequency Dot Clock
640 × 400 NEC PC-9801 56 Hz
~
126 MHz
640 × 400 NEC PC-9821 AP2 70 Hz
640 × 480 Apple Macintosh 67 Hz
640 × 480 VGA, VESA
~
75 Hz
720 × 400 VGA TEXT 70 Hz
800 × 600 VESA
~
75 Hz
832 × 624 Apple Macintosh 75 Hz
1024 × 768 VESA
~
75 Hz
1152 × 864 VESA 75 Hz
1152 × 870 Apple Macintosh 75 Hz
1280 × 960 VESA 60 Hz
1280 × 960 Apple Macintosh 75 Hz
1280 × 1024
*1
VESA 60 Hz
*1 Recommended resolution (Set this resolution.)
English

12
Chapter 2 Connecting Cables
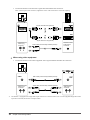
1. Connect the monitor to the PC with a signal cable that matches the connectors.
After connecting the cable connectors, tighten the screws of the connectors to secure the coupling.
DVI
●
When using video equipment
1. Connect the monitor to the video equipment with a signal cable that matches the connectors.
VIDEO
*1 The monitor is equipped with a single audio input connector to connect for either a PC or visual equipment. Regardless of the
input device selected, the monitor will output sound.
Signal cable FD-C16 (optional)
Signal cable MD-C87 (optional)
or
Audio cable (Commercially available product)
Audio output
connector
Audio input
connector
*1
BNC cable (Commercially available product)
Audio output
connector
Audio input
connector
*1
Audio cable (Commercially available product)

13
Chapter 2 Connecting Cables
2.
Plug the power cord of the monitor into a power outlet.
Plug the power cord into a power outlet and the Power connector on the monitor.
Attention
• For the maximum power saving, it is recommended that the Power button be turned off. Unplugging the power cord
completely shuts off power supply to the monitor.
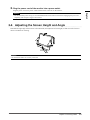
2-2. Adjusting the Screen Height and Angle
Hold left and right edge of the monitor with both hands, and adjust the screen height, tilt and swivel the screen to
the best condition for working.
Attention
• Be sure that the cables are correctly connected.
English

14
Chapter 3 Settings and Adjustments
Chapter 3 Settings and Adjustments
Setting and adjustment of the monitor can be performed using the OSD (On Screen Display) menu.
The Quick-OSD menu is also available to directly operate frequently used functions without starting the OSD menu.
3-1. Using Quick-OSD menu
●
Basic operation of Quick-OSD menu
1.
Displaying Quick-OSD Menu
Press .
Setting/adjustment items are switched each time is pressed.
2.
Setting/Adjusting
Use or for setting/adjustment.
3.
Exiting
The Quick-OSD menu automatically closes when a button is not used for 5 seconds.
●
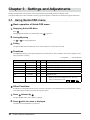
Functions
The adjustable settings in the Quick-OSD menu are shown below. The availability of functions depends on the
input signal (PC or Video).
√ : Configurable ― : Not configurable
Functions PC Video Description
Brightness 0 to 100 √ √ Adjusts the brightness.
Contrast 0 to 100 √ √ Adjusts the contrast.
H Position 0 to 100
√
― Adjusts the display position (horizontal).
V Position 0 to 100
√
― Adjusts the display position (vertical).
Saturation 0 to 100 ―
√
Adjusts the saturation.
Hue 0 to 100 ―
√
Adjusts the hue.
Screen Size Fill All/16:9/4:3 ―
√
Changes the screen display size.
* There are three sizes available for “16:9”. The sizes
change in the following order:
.
●
Other Functions
In addition to setting/adjustment by basic operation, automatic screen adjustment can be performed according
to the following procedure (only when PC signal is input).
1.
Press followed by .
The Quick-OSD menu (“Auto Adjust”) appears.
2.
Press while the menu is displayed.
Automatic screen adjustment is performed.

15
Chapter 3 Settings and Adjustments
3-2. Using OSD menu
●
Basic operation of OSD menu
1.
Displaying OSD menu
Press .
Use
or to select the menu.
2.
Setting/Adjusting
Use to select the set/adjust items.
Use
or for setting/adjustment.
3.
Storing/Exiting
After completing the setting/adjustment, selecting allows you to store the setting.
Selecting repeatedly closes the OSD menu.
●
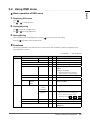
Functions
The settings adjustable in the OSD menu are as shown below. The availability of functions depends on the
input signal (PC or Video).
√ : Configurable ― : Not configurable
Menu Functions PC
Video
Description
Picture Brightness 0 to 100 √ √ Adjusts the brightness.
Contrast 0 to 100 √ √ Adjusts the contrast.
Phase
√
― Adjusts the ickering or blurring.
Frequency
√
― Adjusts the frequency (clock).
Sharpness 0 to 15 √ √ Adjusts the sharpness of the image
outline.
0 (blur) to 15 (sharp)
* This adjustment has no effect for
images of 1280 × 1024 resolution.
Saturation 0 to 100 ―
√
Adjusts the saturation.
Hue 0 to 100 ―
√
Adjusts the hue.
Color Temp Red/
Green/
Blue
0 to 100 √ √ Adjusts the intensity of each color: Red,
Green, and Blue.
Img. Adj Screen Size Fill All/
1 TO 1/
Fill Aspect
√
― Changes the screen display size.
Fill All/
16:9/4:3
―
√
Changes the screen display size.
* There are three sizes available for
“16:9”. The sizes change in the
following order:
.
H Position 0 to 100
√
― Adjusts the display position (horizontal).
V Position 0 to 100
√
― Adjusts the display position (vertical).
Auto Adjust
√
― Performs the automatic screen
adjustment.
English

16
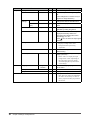
Chapter 3 Settings and Adjustments
Menu Functions PC
Video
Description
Setup Backlight 0 to 100
√ √
Adjusts the brightness of the backlight.
DPMS Off/On
√ √
Switches the power saving setting on or
off.
(The backlight turns off when the sync
signal is no longer detected.)
OSD
Settings
Transparency
0 to 100
√ √
Adjusts the transparency of the
background color for the OSD menu.
OSD Timeout
(sec)
15 to 60
√ √
Adjusts the display time of the OSD
menu.
Mode Light/Dark
√ √
Sets the appearance of the monitor to
light/dark by setting the gamma.
Source scan Off/On
√ √
Switches the auto-selection of input
signal (automatically detects the
input signal and displays the screen
accordingly) on or off.
Press
twice to switch the input signal
manually.
Analog RGB Calibration
√
― Adjusts the color gradation.
* Display an image with a white
background when performing
adjustment.
Reset Calibration
√
― Returns the color gradation to the
default setting.
Video Aspect Normal/100 % √
√
Switches the display range of the input
image (overscan).
* Select “100 %” to display the input
image almost in full. (Depending on
the input signal, noise may appear
around the peripheral portions of the
screen image.)
Utilities Language English/
Deutsch
√ √
Selects the language (English/Deutsch)
for the menu.
Factory Reset
√ √
Returns the menu to the default setting.
Testpattern
√ √
Displays the Testpattern.
Info
√
√ Displays the monitor information.
* The “Power On Time” and “Backlight
On Time” are not always “0” due to
factory inspection when you purchase
the monitor.

17
Chapter 4 Troubleshooting
Chapter 4 Troubleshooting
If a problem still remains after applying the suggested remedies, contact your local EIZO representative.
4-1. Common
Problems Possible cause and remedy
1. No picture
• Power indicator does not light.
• Check whether the power cord is connected correctly.
• Press
for one second or more.
• If the problem persists, turn off the power, and then turn it on
again a few minutes later.
• Power indicator lights orange. • Operate the mouse or keyboard.
• Check whether the power of the connected device is turned on.
• Check whether the signal cable is connected properly.
• Switch the input signal.
• Power indicator lights blue. • Check whether the power of the connected device is turned on.
• Switch the input signal.
• Set each adjusting value in “Brightness”, “Contrast” and “Backlight”
to higher level (see page 15, page 16).
2. The screen is too bright or too dark. • Adjust using “Brightness”, “Contrast” or “Backlight” (see page
15, page 16). (The LCD monitor backlight has a xed life
span. When the screen becomes dark or begins to icker, contact
your local EIZO representative.)
• Adjust using “Analog RGB Calibration” (see page 16).
3. No sound • Check whether the audio cable is connected properly.
• Check that the volume is not set to “0”.
4. Green/red/blue/white dots or
defective dots remain on the
screen.
• This is due to LCD panel characteristics and is not a failure.
5. Interference patterns or pressure
marks remain on the screen.
• Leave the monitor with a white or black screen. The symptom may
disappear.
6. Afterimages appear. • Afterimages are particular to LCD monitors. Avoid displaying the
same image for a long time.
• Use the screen saver or power save function to avoid displaying
the same image for extended periods of time.
4-2. When displaying on a PC screen
Problems Possible cause and remedy
1. Display position is incorrect. • Adjust image position using “H Position” or “V Position” (see page
15).
2. Whole screen is ickering or
blurring.
• Adjust using “Phase” (see page 15).
English

18
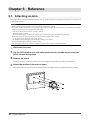
Chapter 5 Reference
Chapter 5 Reference
5-1. Attaching an Arm
The stand can be removed and replaced with an arm (or another stand) to be attached to the monitor. Use an arm or
stand of EIZO option.
Attention
• When attaching an arm or stand, follow the instructions of their user’s manual.
• When using another manufacturer’s arm or stand, conrm the following in advance and select one conforming to the VESA
standard. Use the screws securing the unit and the stand.
- Clearance between the screw holes : 100mm × 100mm
- Thickness of plate : 2.6mm
- Strong enough to support weight of the monitor unit (except the stand) and attachments such as cables.
• When using an arm or stand, attach it
to meet the following tilt angles of the monitor.
- Up 60 degrees, down 45 degrees (horizontal display)
- Up 45 degrees, down 45 degrees (vertical display, 90 degrees clockwise)
• Connect the cables after attaching an arm or a stand.
• Since the monitor and arm are so heavy, dropping them may result in injury or equipment damage.
●
Attachment Procedure
1.
Lay the LCD monitor on a soft cloth spread over on a stable surface with the
panel surface facing down.
2.
Remove the stand.
Prepare a screwdriver. Unscrew the four screws securing the unit and the stand with the screwdriver.
3.
Attach the monitor to the arm or stand.
Secure the monitor to the arm or stand using the screws specied in the user’s manual of the arm or stand.

19
Chapter 5 Reference
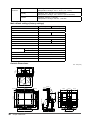
5-2. Specications
LCD Panel Size 17-inch (430 mm)
Type TFT color LCD, LED backlight
Surface treatment Anti-glare, hard coating
Surface hardness 3H
Viewing angle Horizontal 160°, Vertical 140° (CR : 10 or more)
Dot Pitch 0.264 mm
Response time Black-white-black: Approx. 30 ms
Resolution 1280 dots × 1024 lines
Display Area (H × V) 337.9 mm × 270.3 mm
Max. Display Color Approx. 16.77 million colors
PC input Horizontal Scan
Frequency
24.8-74.8 kHz
Vertical Scan Frequency 56.2-75.1 Hz
Max. Dot Clock 126 MHz
Input Signal Connector D-Sub mini 15-pin ×1
Input Signal (Sync) Separate, TTL, positive
/ negative
Input Signal (Video) Analog, Positive (0.7Vp-p/75Ω)
Plug and Play VESA DDC 2B / EDID structure 1.3
Video input Applicable Format NTSC, PAL, SECAM
Input Signal Connector BNC ×1
Input Signal Level 1.0Vp-p/75Ω
Audio Speaker output 0.5 W + 0.5 W
Input Signal Connector Pin Jack (L, R) ×1
Power Supply 100-120 VAC ±10%, 50/60 Hz 0.7 A
200-240 VAC ±10%, 50/60 Hz 0.4 A
Power
Consumption
Screen Display On 36 W or less
Power saving mode 8 W or less (for single signal input, when audio cable is not connected)
Power off 1 W or less
Dimensions
(Width) ×
(Height) ×
(Depth)
Main unit 380 mm
(15 inch) × 400 mm - 500 mm(15.7 inch - 19.7 inch) × 205 mm
(8.1 inch)
Main unit (without stand) 380 mm (15 inch) × 353 mm (13.9 inch) × 58 mm (2.28 inch)
Mass Main unit Approx. 5.9 kg (13.0 lbs.)
Main unit (without stand) Approx. 4.1 kg (9.0 lbs.)
Movable
range
Tilt 30°Up, 0°Down
Swivel 35°Right, 35°Left
Adjustable height 100 mm (3.9 inch)
Rotation 90˚ (Clockwise)
English

20
Chapter 5 Reference
Environmental
Conditions
Temperature Operating : 0 °C - 35 °C (32 °F - 95 °F)
Transportation / Storage : -20 °C - 60 °C (-4 °F - 140 °F)
Humidity Operating : 20% - 80% R.H. (no condensation)
Transportation / Storage : 10% - 80% R.H. (no condensation)
Pressure Operating : 700 hPa - 1,060 hPa
Transportation / Storage : 200 hPa - 1,060 hPa
Main default settings (factory settings)
Functions PC input Video input
Volume 25
Brightness 50
Contrast 50 40
Sharpness 7
Screen Size Fill All
Saturation ― 60
Hue ― 50
Backlight 100
DPMS On
OSD Settings Transparency 50
OSD Timeout 45
Mode Light
Source scan On
Video Aspect Normal
Language English
Outside Dimensions
unit : mm (inch)
353 (13.9)
380 (15.0)
338.4 (13.3)20.8 (0.82) 20.8 (0.82)
160 (6.3)193 (7.6)
56.9 (2.24)
272.2 (10.7)
400~500 (15.7~19.7)
430~530 (16.9~20.9)
205 (8.1)
1 (0.04)
46.5~146.5 (1.8~35.8)
33.5 (1.32)
35.5 (1.40)
67.5 (2.66)
140 (5.5)
58 (2.28)
237.5 (9.4)
30 °
100 (3.9) 110 (4.3)143 (5.6)
100 (3.9)140 (5.5) 140 (5.5)
172 (6.8)
325.5 (12.8)
240.5 (9.5)
35 °
35
°
322.2 (12.7)
346.2 (13.6)
320 (12.6)
D-SUB MAINTENANCE VIDEO R L
SWIVEL
La pagina sta caricando ...
La pagina sta caricando ...
La pagina sta caricando ...
La pagina sta caricando ...
La pagina sta caricando ...
La pagina sta caricando ...
La pagina sta caricando ...
La pagina sta caricando ...
La pagina sta caricando ...
La pagina sta caricando ...
La pagina sta caricando ...
La pagina sta caricando ...
La pagina sta caricando ...
La pagina sta caricando ...
La pagina sta caricando ...
La pagina sta caricando ...
La pagina sta caricando ...
-
 1
1
-
 2
2
-
 3
3
-
 4
4
-
 5
5
-
 6
6
-
 7
7
-
 8
8
-
 9
9
-
 10
10
-
 11
11
-
 12
12
-
 13
13
-
 14
14
-
 15
15
-
 16
16
-
 17
17
-
 18
18
-
 19
19
-
 20
20
-
 21
21
-
 22
22
-
 23
23
-
 24
24
-
 25
25
-
 26
26
-
 27
27
-
 28
28
-
 29
29
-
 30
30
-
 31
31
-
 32
32
-
 33
33
-
 34
34
-
 35
35
-
 36
36
-
 37
37


in altre lingue
- English: Eizo FDS1703 User manual
- français: Eizo FDS1703 Manuel utilisateur
Documenti correlati
-
Eizo EV3237 Manuale utente
-
Eizo CG319X Manuale utente
-
Eizo CG318-4K Manuale utente
-
Eizo FDF2121WT-A Manuale utente
-
-
-
Eizo FDF2304W-IP Manuale del proprietario
-
-
Eizo FDSV1201T Manuale utente
-
Eizo MX215 Manuale del proprietario