Hughes & Kettner Black Spirit 200 Manuale utente
- Categoria
- Amplificatore per strumenti musicali
- Tipo
- Manuale utente

Manual 1.1
• English • Deutsch • Français • Italiano • Español
•
•

Version 2.5 07/2018
Important Safety Instructions!
Read before connecting!
This product has been built by the manufacturer in
accordance with IEC 62368-1 and left the factory in
safe working order. To maintain this condition and
ensure non-risk operation, the user must follow the
advice and warning comments found in the operating
instructions. The unit conforms to Protection Class
1 (protectively earthed). If this product shall be used
in vehicles, ships or aircraft or at altitudes exceeding
2000 m above sea level, take care of the relevant
safety regulations which may exceed the IEC 62368-1
requirements.
WARNING: To prevent the risk of fire and shock
hazard, do not expose this appliance to moisture or
rain. Do not open case – no user serviceable parts
inside. Refer service to qualified service personnel.
This symbol, wherever it appears, alerts you to
the presence of uninsulated dangerous voltage inside
the enclosure – voltage that may be sufficient to
constitute a risk of shock.
This symbol, wherever it appears, alerts you to
the presence of externally accessible hazardous
voltage. External wiring connected to any terminal
marked with this symbol must be a "ready made cable”
complying with the manufacturers recommendations,
or must be a wiring installed by instructed persons only.
This symbol, wherever it appears, alerts you to
important operating and maintenance instructions in
the accompanying literature. Read the manual.
This symbol, wherever it appears, tells you: Take
care! Hot surface! To prevent burns you must not
touch.
All electrical and electronic products including
batteries should be disposed of separately from the
municipal waste stream via designated collection
facilities appointed by the government or the local
authorities.
Read these instructions. Keep these instructions.
Follow all warnings and instructions marked on the
product and in this manual.
• Do not use this product near water. Do not place the
product near water, baths, wash basins, kitchen sinks,
wet areas, swimming pools or damp rooms.
• Do not place objects containing liquid on the product
– vases, glasses, bottles etc.
• Clean only with dry cloth.
• Do not remove any covers or sections of the housing.
• The set operating voltage of the product must match
the local mains supply voltage. If you are not sure of
the type of power available consult your dealer or
local power company.
• To reduce the risk of electrical shock, the grounding
of this product must be maintained. Use only the
power supply cord provided with this product, and
maintain the function of the center (grounding) pin
of the mains connection at any time. Do not defeat
the safety purpose of the polarized or grounding-type
plug.
• Do not defeat the safety purpose of the polarized or
grounding-type plug. A polarized plug has two blades
with one wider than the other. A grounding type
plug has two blades and a third grounding prong.
The wide blade or the third prong are provided for
your safety. If the provided plug does not fit into your
outlet, consult an electrician for replacement of the
obsolete outlet.
• Protect the power cord from being walked on
or pinched particularly at plugs, convenience
receptacles, and the point where they exit from
the device! Power supply cords should always be
handled carefully. Periodically check cords for cuts
or sign of stress, especially at the plug and the point
where the cord exits the device.
• Never use a damaged power cord.
• Unplug this product during lightning storms or when
unused for long periods of time.
• This product can be fully disconnected from mains
only by pulling the mains plug at the unit or the wall
socket. The product must be placed in such a way
at any time, that disconnecting from mains is easily
possible.
• Fuses: Replace with IEC127 (5x20mm) type and rated
fuse only! It is prohibited to use "patched fuses”
or to short the fuse-holder. Replacing any kind of
fuses must only be carried out by qualified service
personal.
• Refer all servicing to qualified service personnel.
Servicing is required when the unit has been
damaged in any way, such as:
- When the power cord or plug is damaged or frayed.
- If liquid has been spilled or objects have fallen into
the product.
- If the product has been exposed to rain or moisture.
- If the product does not operate normally when the
operating instructions are followed.
- If the product has been dropped or the cabinet has
been damaged.
• Do not connect external speakers to this product with
an impedance lower than the rated impedance given
on the product or in this manual. Use only cables
with sufficient cross section according to the local
safety regulations.
• Keep away from direct sunlight.
• Do not install near heat sources such as radiators,
heat registers, stoves or other devices that produce
heat.
• This apparatus is for moderate climates areas use, not
suitable for use in tropical climates countries.
• Do not block any ventilation openings. Install in
accordance with manufacturer’s instructions. This
product must not be placed in a built-in installation
such as a rack unless proper ventilation is provided.
• Always allow a cold device to warm up to ambient
temperature, when being moved into a room.
Condensation can form inside it and damage the
product, when being used without warming up.
• Do not place naked flame sources, such as lighted
candles on the product.
• The device must be positioned at least 20 cm/8"
away from walls with free air space inbetween, and
there must be free air space of at least 50 cm / 20"
immediately above the unit within which no object(s)
may be placed or positioned.
• Make sure that the device is always placed on a solid,
flat surface.
• Use only with the cart, stand, tripod, bracket or
table specified by the manufacturer or sold with the
product. When a cart is used, use caution when
moving the cart/product combination to avoid injury
from tip-over.
• Use only accessories recommended by the
manufacturer, this applies for all kind of accessories,
for example protective covers, transport bags,
stands, wall or ceiling mounting equipment. In case
of attaching any kind of accessories to the product,
always follow the instructions for use, provided by
the manufacturer. Never use fixing points on the
product other than specified by the manufacturer.
• This appliance is NOT suitable to be used by any
person or persons (including children) with limited
physical, sensorial or mental ability, or by persons
with insufficient experience and/or knowledge to
operate such an appliance. Children under 4 years
of age must be kept away from this appliance at all
times.
• Never push objects of any kind into this product
through cabinet slots as they may touch dangerous
voltage points or short out parts that could result in
risk of fire or electric shock.
• This product is capable of delivering sound
pressure levels in excess of 90 dB, which may cause
permanent hearing damage! Exposure to extremely
high noise levels may cause a permanent hearing
loss. Wear hearing protection if continuously exposed
to such high levels.
• The manufacturer only guarantees the safety,
reliability and efficiency of this product if:
- Assembly, extension, re-adjustment, modifications
or repairs are carried out by the manufacturer or by
persons authorized to do so.
-
The electrical installation of the relevant area
complies with the requirements of IEC (ANSI)
specifications.
- The unit is used in accordance with the operating
instructions.
- The grounding of the center pin of the mains plug is
maintained to reduce the risk of shock.
Things to do before operating the amp
• Please read these instructions carefully,
particularly the notes on safety, before
operating the amp.
• The manufacturer disclaims any liability on
responsibility whatsoever for any damage or
defect to this and other devices resulting from
misuse.
• Before you plug this amp into a mains power
outlet, make sure its Power switche is off and
that the voltage rating indicated on its rear
panel matches your local mains current.
• A word of warning before you fire up your
Black Spirit 200: It’s loud, and high volume
levels can cause hearing damage. To avoid
very loud and unwelcome surprises, make a
habit of backing the Volume knob of the guitar
connected to the Black Spirit 200 all the way
down before switching on the amp!

3
Black Spirit 200 – Manual 1.1
1 Quick Start ................................................................................... 3
2 The fundamentals of handling Black Spirit 200 ............................. 3
3 The channel section ..................................................................... 6
4 The effects section ....................................................................... 6
5 The Master Section ......................................................................7
6 Rear panel .................................................................................... 8
7 Bluetooth
®
................................................................................... 9
8 MIDI .......................................................................................... 10
9 Technical Data ........................................................................... 11
1 Quick Start
You will find examples how to connect the amp for live and recording
setups on page 72 to 75 in this manual.
Mains In: Connect the factory-included power cord (Mains Lead) to this
socket. Before you plug this amp into a mains power outlet, make sure the
power outlet is grounded! Non-grounded outlets do not guarantee a safe
operation of your amp and may cause audible noise and hum.
MIDI In: Connect the MIDI Out of your favourite MIDI controller to the
MIDI In. Though this is a 7-pin interface, you can connect a standard 5-pin
MIDI cable and use any standard MIDI controller. The two additional
terminals (1 and 7) serve to supply phantom power to the Hughes &
Kettner FSM-432 MIDI board.
The MIDI In is as important as the Input for your guitar! Only via MIDI will
you have access to all 128 presets of the Black Spirit 200.
Input: Connect your guitar to this input using a shielded cord equipped
with 6.3 mm (1/4") jack plugs.
Speaker Out: Black Spirit 200 offers one speaker output for 8 Ω to 16 Ω
cabinets. You can connect a speaker cabinet designed for guitar amps to
this jack (we recommend the matching Hughes & Kettner TM 112 or TM
212 cabs) or any kind of PA cabinet. In this case, set the cabinet selector
to Fullrange Cab.
Power button: Press and hold this button for two seconds to power up the
amp. Press and hold it for three seconds to switch off.
Note: In case of a power failure the amp will power up automatically again.
Phones/Line: Connect headphones to this 6.3 mm (1/4") jack output or
feed a line signal to any stereo multimedia input, such as a hi-fi system, if
you don't use the speaker out.
2 The fundamentals of handling
Black Spirit 200
Black Spirit 200 is an analog amp, and it works much like other analog
amps. But its handling concept is more advanced, so time spent getting to
know how it operates is time well spent. The following basic facts will help
you under stand the amp's operating concept:
• Although Black Spirit 200 is an analog amplifier, all its switching and
controlling functions (except the Master knob) are programmable.
• Depending on the amp's operation mode, some knobs and switches
have different functions.
• All settings can be saved and recalled via MIDI. For this purpose, you can
store your sound settings into 128 memory slots, the so-called presets.
2.1 How the knobs work
Black Spirit 200 is a four-channel amp. All four channels are controlled
by the same set of knobs. Your choice of channel determines the knob's
assignment. For example, when you have chosen the Clean channel via
the chicken-head selector switch (see chapter 3), the Gain knob will
determine the Clean channel's amount of gain. This means the channels
are independently adjustable and no knobs need to be shared. The best
thing about this is that it gives you total remote control capability so you
can adjust knobs via MIDI in real time. To learn more about this, see
section 2.3 in this chapter and chapter 8 "MIDI".
Note: The knobs look and feel like standard-issue pots with a 300-degree
control range and left and right stops. But there's a difference that may
take some time getting used to: the knob setting programmed in a preset
is independent of the knob's physical position. In other words, when
• English • Deutsch • Français • Italiano • Español
•
•

4
Black Spirit 200 – Manual 1.1
you switch from one preset to another, the knob's actual position may
not reflect the setting programmed in the preset, and you may well hear
something other than what you're seeing would suggest. The knob will
respond like any other conventional pot as soon as you move it. The Store
LED in the Master section tells you the knob's setting stored in the preset. It
lights up when the physical position of the knob corresponds to the preset
setting. You can learn more on this in section 2.4.
Heads Up: You may hear a soft background noise when twisting knobs.
This sound is made by the Programmable Resistor Network (PRN™), as
it switches its 256 resistors: each of these smart rotary controls consists of
256 individual resistors in serial array, 256 switches, and a memory with the
ability to save and recall every switch's position.
2.2 Selecting presets
Presets can only be changed via MIDI or via the free App for iPad. You can
use any MIDI footswitch, MIDI controller, or MIDI equipped pedal board
to switch presets. Both MIDI devices, amp (receiver) and the controller
(sender), should use the same channel. Otherwise, MIDI commands will
be ignored or get lost. The factory default is MIDI channel 1 and "Omni
On" (which means the amp receives on all 16 MIDI channels) to guarantee
instant operation. If Black Spirit 200 does not react to program changes
properly, see chapter 8.1, which explains how you can change the MIDI
channel, or refer to the manual of your favourite MIDI controller.
2.3 Remote Control via the Hughes & Kettner
FSM-432 MK III MIDI Board
Let's have a look at the Hughes & Kettner FSM-432 first. It serves to select
the 128 memory slots arranged in 32 banks of four presets each. You can
easily configure setups any way you wish, say by assigning the four presets
of a bank to a song. Black Spirit 200 works with all versions of the FSM-
432.
1 Preset A, B, C, D: Presets within a bank activate directly, that is, you can
switch straight from A to B within the same bank. The LEDs above the A,
B, C, and D buttons indicate the selected preset.
2 Bank Up/Down: To access a preset in another bank, select the target
bank using the Up and Down buttons. You can continue playing with the
current preset while you're navigating. The display of the FSM-432 shows
the bank's number; it flashes until you select a preset in the target bank by
pressing A, B, C, or D. The FSM-432 will not switch over to the new preset
until you do this.
3 Tap: Tap offers you a quick, convenient way of adjusting delay time. It's
particularly handy on stage: simply tap your foot on the Tap button in time
with the beat to match the delay time to the tempo. See section 4.12 for
more info.
4 Mode switch – Preset/Stompbox: The sliding switch above the MIDI
connections on the rear side of the footswitch determines if the FSM-432
MK III is operating in Preset Mode or Stompbox Mode.
If you move the sliding switch to "Stompbox Mode", the display shows
"Sb". In this mode, the FSM-432's buttons do not serve to select presets,
but to switch channels directly. In addition, modulation FX, delay and
boost can be independently activated and deactivated at the push of a
button.
Heads up: Stompbox mode is designed specifically for situations where
you just don't have the right preset available or when you want to create
presets and wish to compare sounds with or without effects at the touch
of a button. The Tap function is unavailable in Stompbox mode, and
effects settings apply to all four channels. This is why Preset mode is
highly recommended for live situations.
5 Control 1 and Control 2: You can connect either expression pedals
(recommended: Yamaha FC 7) or single footswitches (recommended:
Hughes & Kettner FS-1) to these two 6.3 mm (1/4") jack inputs, both of
which you can assign additional control functions for the Black Spirit 200
to, so all of the amp's programmable functions can be remote controlled
(chapter 8.3).
For instance, you can control the reverb of the amp's FX module using an
expression pedal. You can also switch the noise gate on and off with an
external footswitch or change the amount of gain while playing without
having to take your hands off your guitar. The most useful functions are
the remote control of the Boost (without changing presets) using a foot
switch as well as controlling volume with an expression pedal. As you
can see in the chart (chapter 8.3), assigning controller number 07 to one
of the Control inputs and connecting an expression pedal to it will let you
remote control the volume. The switching function of the Boost can be
remote controlled by assigning controller number 64 to the other Control
input and connecting a footswitch to it.
As a rule, a MIDI value of 0 corresponds to a knob's far left
(counterclockwise) position and a button's "off" position. A MIDI value of
127 corresponds to a knob's far right (clockwise) position and a button's
"on" position. These values have the same effect as if you were to adjust
the knob or press a button on the amp. There is one exception to this rule:
The Volume knob's upper limit is always determined by the value stored
in the preset. Let's say you saved a sound with the Volume knob set to
the 12 0'clock position. Then the maximum value of 127 achieved when
you floor an expression pedal only goes up to the level determined by
the knob's midway position. This ensures that you can adjust the volume
of a preset in a live situation exactly as you would with a conventional
volume pedal.
A word to the wise: The expression pedal's position is ignored when you
change presets! Say you give the expression pedal a little heel to bring
the volume down. Then when you switch presets, the volume will change
to reflect the Volume knob setting that you previously stored with this
preset. If you wish to control Black Spirit 200's overall volume remotely
– that is, adjust the Master knob from afar – we recommend inserting an
analog, low-impedance volume pedal into the FX loop.
To learn more about this, see the FSM-432 MK III's manual.

5
Black Spirit 200 – Manual 1.1
2.4 Programming a preset
Programming a preset is as simple as it can get. Once you have found
your favorite settings, those exact settings for every single knob and switch
(except the Master Volume) can be stored into a preset with the Store
button. This is pretty much like playing an amp with 128 channels, each
with its own Gain, Volume, EQ and even effects settings.
Storing settings by overwriting the currently selected preset
An easy way to store edited settings is to simply overwrite the most recently
selected preset. To do this, press and hold the Store button for about two
seconds until its light flashes briefly and then extinguishes. The Channel
LED (see chapter 3 "Channel Section") also flashes to confirm the write
operation. Release the Store button, and your settings will be stored.
Storing settings by selecting a new memory slot
If you do not wish to overwrite the current preset, you can easily select a
new memory slot instead. In this case, rather than holding the Store button
down for two seconds, press it briefly and then release it. Its light stays
on to signify that Black Spirit 200 is primed and ready to receive a MIDI
program change to define a memory slot.
• From the FSM-432: Select a MIDI bank from 1 to 32 on the FSM-432. The
bank number in the display flashes to signify that the FSM-432 is waiting
for input via one of the four preset buttons A to D. Then engage preset
button A, B, C, or D. The display stops flashing, the light on the Store
button extinguishes, and the preset is stored.
• From any other MIDI device: as soon a program change is sent, the
preset will be stored and can be recalled just by sending that program
change again.
Reading out stored knob settings
When you select a preset, the individual knobs' actual positions may not
represent their stored values. But it is easy enough to read the information
out: select a preset, grab the knob of your choice and twist it to the left or
right until the Store button lights up. Now the knob's position matches the
setting stored in the preset.
2.5 The Black Spirit Remote App for iPad
All controls and buttons on the Black Spirit 200 are MIDI-enabled, so we
programmed an App for iPad that makes the most of MIDI to extend the
amp's capabilities.
This App lets you:
• Give every preset a unique name
• Visually monitor all parameters in real time
• Remotely control all parameters in real time
• Save presets in the App
• Download and upload presets to and from the amp
• Share presets via e-mail or message
• Create and organise preset lists
The free App is available from the Apple App Store and connects to Black
Spirit 200 via Bluetooth (see chapter 7 "Bluetooth").
• English • Deutsch • Français • Italiano • Español
•
•

6
Black Spirit 200 – Manual 1.1
3 The channel section
Black Spirit 200 sports four channels, each voiced very differently
and accessible via a chicken-head selector switch. The power amp
feedback circuit, which has a formative hand in shaping your tone, is also
reconfigured during channel switching. The programmable knobs (see 2.1)
afford you full access to all sound parameters on every channel. We even
painstakingly fine-tuned the knobs' control ranges and characteristics to
match the selected channel's voicing.
●
1
Input: Connect your guitar to this input using a shielded cord equipped
with 6.3 mm (1/4") jack plugs.
●
2
Gain: The Gain knob determines input sensitivity and therefore the
preamp's saturation level. Along with the Boost and Sagging controls, it is
your most important sound-sculpting tool.
●
3
Clean Channel: Black Spirit 200's Clean channel certainly merits its
name. It delivers sparkling fresh sounds and offers tons of headroom. It's
worth your while to experiment with different Gain and Sagging settings
in combination with the switchable Boost.
●
4
Crunch Channel: Your first stop for classic overdrive at its finest. This
channel sweeps the sonic spectrum from clean to mean, and countless
tones in between. Engage Boost to conjure a rude rock roar.
●
5
Lead Channel: This channel's masterfully musical compression
sends those riffs and licks flying off your fingertips. Hit Boost for an extra
helping of in-your-face solo sound.
●
6
Ultra Channel: Get your high-gain tone right here. The Ultra
channel's top end slices, dices, but never sacrifices its thunderous low
end for raging metal riffs and larger-than-life lead tone. Dropped tuning
conjures a quasi-religious experience.
●
7
Boost: Boost targets specific frequency ranges in your tone and kicks
them up a notch. This yields even more assertive, creamier, or punchier
tone, depending on the channel.
●
8
Bass, Mid, Treble: The three-band voicing section's sound-shaping
action is fine-tuned for each channel, and it specifically addresses the
frequency ranges that define each channel's characteristic tone.
Heads Up: These are classic passive tone controls that influence one
another. For example, if you crank the Mid knob, the Bass knob will be
less effective than when you back the Mid knob down. Presence and
Resonance are independent of the three-band voicing controls; that is,
their action remains unaffected by the other knobs' settings.
●
9
Volume: Use the Volume knob to adjust preset levels and adjust their
relative balance to other presets.
Heads Up: Unlike a conventional Volume control, this knob does not
bring the level all the way down; it merely boosts or cuts the given level.
The 12 o'clock position is the best starting point for adjusting volume.
Caution: Please don't use this knob to control the amp's overall output
level – that's the Master knob's job (see 5.17)!
●
10
Noise Gate: This knob controls the noise gate's sensitivity. The noise
gate's IDB™ technology automatically adapts the standard attack and
threshold parameters. Turning the knob all the way down (i.e. counter
clockwise) bypasses the noise gate. The further you turn up the noise gate,
the more aggressively it responds. Set it to 9 o'clock if you want it to open
up at very soft signal levels. The further you twist the knob to the right,
the harder the noise gate kicks in and cuts off signals. The noise gate's
sensitivity setting can be stored within each preset.
4 The effects section
Black Spirit 200 offers three independent effects modules, with reverb,
delay and modulation effects as well as the noise gate. All of them can be
used simultaneously.
Heads Up: The far left knob positions of the "Reverb", "Dly Level", and
"Intensity" knobs bypass the given effect. Twisting those knobs counter
clockwise to the far left takes the given effect module out of the signal
path.
●
11
FX Access: In order to access Reverb, the Delay and Modulation
effects, just press the FX Access button – it will start flashing. Now you
are in the FX mode, and the channel control knobs now serve as effects
controls. To exit the FX mode, press FX Access again. It stops flashing and
you are back to the tone control mode.
●
12
Reverb: Black Spirit 200's digital reverb matches the warmth and
musicality of classic spring reverbs. A genuine improvement over its analog
ancestors, it automatically adjusts the reverb tail – the higher the Reverb
volume setting, the longer the reverb time.
31216
1017 1921 18 20
29
1
6
41115 5 7
13 14
8

7
Black Spirit 200 – Manual 1.1
●
13
Delay: The Delay module's "Dly Level", "Feedback" and "Dly Time"
knobs afford you total control over all parameters.
• Dly Level: Adjusts the volume of repetitions, sweeping from all the way
off to just as loud as the original signal.
• Feedback: Adjusts the number of repetitions from one to infinite.
• Dly Time: Adjusts the time to the next repetition from 50 milliseconds to
1.4 seconds. When you're tapping in delay time on the FSM-432's Tap
button (see 2.3), the effect adopts the new time after your second tap.
The Tap LED flashes for about five seconds in sync with the beat to give
you a visual indication of delay time. The Tap function only works when
the Delay is active. If the Delay is off – or more accurately, bypassed –
the effect will not adopt your Tap tempo.
Heads up: The FSM-432 offers a nifty Tap function that lets you control the
Black Spirit 200's delay time via MIDI. Most third-party MIDI controllers
don't let you do this, and the control range is limited with the few that
do. Not many vendors offer the option of setting minimum and maximum
delay times (e.g. the Behringer FCB1010), which you need to use this Tap
function at least to some extent. The problem is that there is no standard
MIDI message for tap, only for time. The correct value for time has to first
be determined by measuring the interval between two taps. Unlike all
other knobs where 0 is the minimum value and 127 the maximum value,
there is no standard value for delay time because practically every effects
processor works with whatever minimum and maximum delay times the
designer happened to prefer.
●
14
Modulation FX: This module serves up four modulation effects –
Chorus, Flanger, Phaser, and Tremolo.
• Mod Type: Each effect is assigned to one quarter of this knob's control
range. The first quarter addresses Chorus, the second addresses Flanger,
the third addresses Phaser, and the final quarter addresses Tremolo. You
can adjust the modulation effect's rate within its assigned quarter. The
more you turn "Mod Type" up, the faster the rate gets.
• Intensity: This knob adjusts the volume of the modulation effects.
●
15
FX Loop: This serial loop lets you patch in external effects devices:
connect the Send jack in the FX Loop section on the amp's rear panel to
your effects processor's input and the Return jack to the processor's output
(see 6.3). The FX Loop button activates and deactivates the loop.
●
16
Cab Type: This knob serves to select one of eight carefully designed
cabinet emulations for the Red Box AE+ out on the back of the amp (see
6.2 "Red Box AE+"). On the back panel, you can switch the output level
fromMic to Line, so whatever you want to connect your amp to, the level
will match. This makes the Red Box AE+ the perfect choice to send your
tone to the PA, monitoring system, or a recording device. No need to rely
on microphones or sound engineers, because the Red Box AE+ does the
job for you.
No. Cabinet Types:
1 1x12" Modern Thiele-Port
2 1x12" Modern Front-Port
3 2x12" Vintage Open Back
4 4x10" Alnico Open Back
5 4x12" Vintage Cab
6 4x12" British Cab
7 4x12" Modern Cab
8 4x12" American Cab
Heads up: Cab Type affects the Red Box out and the Phones out. However,
it does not affect the speaker out when connected to a guitar speaker,
because you won´t need any cabinet emulation for your own speaker
cabinets! If you use fullrange cabinets as your speaker (see 6.1), your
choice of cabinet emulation also works for the speaker out.
5 The Master Section
The Master section lets you adjust the amp's overall volume, Resonance
and Presence, and lets you control the power amp´s saturation behavior.
●
17
Master: As the name suggests, this knob puts the power amp and its
volume level at your thumb and forefinger's command. Handle it carefully
and you will enjoy a gratifying rather than an agonizing aural experience.
Master also contols the volume of the phones output (see 5.21).
Note: Unlike with Hughes & Kettner tube amplifiers, the level of Black
Spirit 200´s Red Box out is not affected by the setting of the Master control
(see 6.2)
Heads Up: Unlike channel and effect controls, the Master knob is not
programmable! It works like any conventional knob, and its physical
position indicates the actual setting. It's always a good idea to back the
Master knob off by twisting it to the far left position before powering the
amp up.
●
18
Resonance: Set the Resonance knob to 12 o'clock, and you will hear
the normal resonance created by the amp-and-cabinet combination.
Twisting it counter clockwise dampens the speakers' and the cabinet's
resonance for a looser, softer sound that sweetens up clean tone. Turning
the knob clockwise intensifies resonance for a tighter, punchier low end
that works well with distorted sounds.
●
19
Presence: This knob controls the amount of harmonic overtones
generated by the amp – the higher the setting, the more intense the effect.
Heads Up: Resonance and Presence can be programmed into every
preset, or these controls can be used as a master control that is not
changed by switching presets, like the Master Volume control. If you want
to use Resonance and Presence as a global control, see section 8.2.
●
20
Sagging: Along with the Gain and Boost controls, Sagging is your
key knob for making new and exciting sounds! This knob gives you
full control over the power amp's saturation level and behavior at any
volume. It lets you delicately control the creaminess of your tone and lets
you dial through decades of guitar sounds with a twist of the wrist. The
Sagging knob offers eight positions: the higher the number, the more sag,
and the more saturation the power amp gets!
• English • Deutsch • Français • Italiano • Español
•
•

8
Black Spirit 200 – Manual 1.1
●
21
Phones/Line: This output is designed to connect standard headphones
with 6.3 mm (1/4") jack output. Note: you can also use this output to feed
a line signal to any stereo multimedia input, such as a hi-fi system. Please
ask your dealer for matching adapters or cables. To connect this output to
a typical Aux In of a hi-fi System, you will need a cable with a TRS jack
(stereo) at one end to connect it to the phones output of your Black Spirit
200, and two RCA (cinch) connectors on the other end to connect it to the
left and right input of your hi-fi system. You can also connect this output
to any mixing desk using a cable with TRS to 2 x TS (mono) 6.3 mm (1/4")
jack or 2 x XLR. Just make sure the inputs of your desk are panned hard
left/right to benefit from the stereo effect.
Heads up: if the phones output on the front panel is connected, the
speaker out will be switched off.
Heads Up: the phones output delivers a stereo effect designed for
headphones to guarantee a natural hearing experience. For most
applications on stage or in the studio, the mono Red Box out is the better
choice to feed your signal to a mixing desk (see 6.2)
6 Rear panel
●
1
Speaker Out: Black Spirit 200 offers one speaker output for 8 Ω to
16 Ω cabinets. You can connect a speaker cabinet designed for guitar amps
to this jack, or any kind of PA cabinet. In this case, set the cabinet selector
to Fullrange Cab.
Using a single speaker cord, you can connect any cabinet or combination
of cabinets whose total impedance ranges between 8 Ω and 16 Ω. The
formulas below serve to calculate the overall impedance (R) of two
cabinets with different impedances (R1 and R2):
• For cabinets wired in series: R = R1 + R2
Example: If you connect two 8 Ω cabinets, the overall impedance is 16 Ω.
However, very few modern cabinets are wired in series. Parallel circuits
are far more common.
• For cabinets wired in parallel: R = (R1 x R2) / (R1 + R2)
Here is an example with two 16 Ω cabs:
R = (16 x 16) / (16 + 16)
R = 256 / 32 = 8 Ω
• Output Power: Using the power selector, you can switch from 200
watts down to 20 watts or 2 watts. This makes Black Spirit 200 ideal
for anything from practicing with a small cab setup in your bedroom to
driving a 4x12 cab at full power!
• Cabinet: This is a unique and versatile feature. In the Guitar Cab
position, you can connect standard guitar cabinets. In the Fullrange
Cab position, you can connect and drive any kind of non-powered (i.e.
passive) fullrange speaker. In this mode, you can get that great sound
from the Red Box AE+, including your choice of cabinet type emulation
(see sections 6.2 and 4.16) but with up to a whopping 200 watts of sheer
power! And if you don't want to carry your cab from the rehearsal room
back home, no problem - you can simply hook Black Spirit 200 up to
your hi-fi, studio monitors, or PA speakers. Best of all, it'll still sound and
feel like a real guitar cabinet!
Caution: Connect to speakers and cabinets only! Connection with
grounded devices (e.g. power soak or DI Box) will cause serious damage!
●
2
Red Box AE+ DI Out: Since Hughes & Kettner invented the Red
Box in 1988, the original Red Box has been the industry standard tool
for capturing the sound of guitar amps without using microphones. Red
Box delivers unvarying sound quality at every gig or recording session,
putting an end to crosstalk with other instruments and the hassles of
experimenting with microphone placement. The Red Box AE+ is the latest
version of the award-winning speaker simulator.
The DSP-powered Ambience Emulation delivers a perfect mix of authentic
cabinet ambience effects and an ultra-direct attack of pure analog tone.
For Black Spirit 200, we've added in some great new Red Box features
that will make your life onstage and in the studio as easy as it can get!
• Red Box Mic/Line: Make sure the Red Box is set to the right level: line
is always the best choice due to the higher output level. If the mixing
console's XLR input can only handle microphone levels, set the Red
Box to mic. If the mixing console or soundcard/audio interface lacks
XLR inputs, you will need an XLR to 6.3 mm (1/4") jack adapter, which
should be readily available in music stores. Please make sure the Red
Box is set to line when it is connected to 6.3 mm (1/4") jack inputs.
• On/Off: you can switch off the cabinet emulation. Then, the Red Box
out sends an unfiltered signal for the use with your favourite cabinet and
microphone simulation software or processor. Make sure this switch is
set to "On" unless you want to use external cabinet emulators!
Note: Red Box AE+ offers eight carefully designed cabinet emulations,
selectable from the front panel and storable with each preset (see 4.16).
12
4
5
6
3

9
Black Spirit 200 – Manual 1.1
●
3
FX Loop
• FX Send: Connect the FX Send to your external effects processor's input.
• FX Return: Connect the FX Return to your external effects processor's
output.
Tip: If you're a stomp-box user, you may want to try the four-cord method:
For devices that work best plugged into the front end of the amp, simply
connect the guitar to the input of the first pedal in the chain, and the last
pedal's output to the amp's Input. Now do the same for devices that work
best in the FX loop: connect the pedal's output to the amp's FX Return
and the amp's FX Send to the pedal's input. This lets you route chorused,
phased and other modulated signals into Black Spirit 200's preamp and
time-based effects such as reverb and delay after the preamp.
●
4
MIDI
• MIDI In: MIDI In is a 7-pin interface, but you can also connect a standard
5-pin MIDI cable. The two additional terminals serve to supply phantom
power to the Hughes & Kettner FSM-432 MIDI board.
Heads Up: The FSM-432 comes with a 7-pin MIDI cable. You do not need
a power source for the FSM-432 because phantom power is provided.
If you wish to use a 5-pin MIDI cable however, you will need a power
supply. For such cases, the FSM-432 provides an innovative mains port
that accepts any AC or DC adapter rated for 9 to 15 volts.
• MIDI Out/Thru: MIDI Out/Thru forwards signals patched into the MIDI
In to other devices. You can connect any external MIDI-enabled signal
processor that you wish to switch synchronously with Black Spirit 200.
●
5
Aux In: The Aux In allows you to connect any kind of music player to
jam to play alongs and your favorite music. It is mixed to your guitar tone.
It can also be used to connect drum machines or additional instruments.
The Aux In signal is fed in full stereo quality to the headphones out (that
also serves as a stereo line out, see 5.21), and in mono to the speaker out
when the speaker out is set to fullrange (see 6.1). This lets you connect
your home hi-fi system to the headphones out or a non-powered PA
cabinet to enjoy your playing and your jam tracks without any additional
mixers.
●
6
AES: Referring to Commission Regulation (EC) No. 1275/2008,
electrical and electronic devices need to be equipped with an energy
saving mechanism which automatically switches the device off after not
being used for a certain period of time. On your Black Spirit 200, this
mechanism is called AES. It can be activated and deactivated with the
mini switch right next to the speaker jack.
Factory default is AES on; the mini switch is in the left position. In
this mode, the amp will automatically be switched off after a phase
of silence of about 90 minutes. The phase of silence is reset, and starts
again, as soon as the amp receives an input signal (e.g. by playing a note).
A quite gentle signal is enough to trigger the re-start of the 90-minute
phase of silence until the amp will switch off automatically. After
automatically being shut down by AES, the amp can be switched back on
with the Power button. Moving the mini switch to the right will deactivate
AES, so it will not shut down the amp after 90 minutes of inactivity.
7 Bluetooth
®
Black Spirit 200 offers built-in Bluetooth for audio streaming and to
connect to the remote App for iPad (see 2.5). Please note that Black Spirit
200 can only connect to a single device simultaneously. This means that
if you are using the App for iPad, you cannot connect a second device
for audio streaming. However, you can stream audio and remote control
Black Spirit 200 simultaneously from the same iPad.
Attention: To connect to a new device, you will need to reset the
Bluetooth connection, see section 7.4. If Bluetooth is connected but the
connection to the App fails, please close the App, then re-open it again.
To indicate the status of the Bluetooth connection, there is an LED next
to the Bluetooth symbol.
1 Bluetooth LED Status:
• LED is off: Bluetooth is deactivated
• LED is flashing slowly: Black Spirit is scanning for available devices
• LED is lit constantly: Black Spirit 200 is connected to a mobile device
• LED is flashing rapidly: connection failed/interrupted
2 Activating/Connecting: To activate Bluetooth, press and hold Boost
for three seconds. The Bluetooth LED will start flashing slowly, and
Black Spirit 200 starts scanning for available mobile devices. Make sure
Bluetooth is activated on the device you want to connect to. Black Spirit
200 will appear in the list of Bluetooth devices; select "Hughes & Kettner
Black Spirit XXXX" (your amp will have its own four-digit ID here). As
soon you are connected, the amp's Bluetooth LED stops flashing and
stays lit constantly.
3 Disconnecting/Deactivating Bluetooth: To deactivate Bluetooth, press
and hold Boost until the Bluetooth LED turns off.
4 Connecting to a new device: Black Spirit 200 will remember the
last connected mobile device and will start scanning and connecting
automatically when the amp is powered up or Bluetooth is re-activated.
This protects you from unwanted connection to foreign devices and
makes sure that streaming or remote control is only possible with your
dedicated mobile device.
To connect to a new device:
• deactivate Bluetooth on your last connected device (or switch it off)
• activate Bluetooth on the amp. The LED will start flashing slowly
• press and hold Boost for 7 seconds until the Bluetooth LED flashes
rapidly (5 times) and then turns off. Then press and hold Boost again for
3 seconds.Now the LED starts flashing slowly again and the amp starts
scanning and is ready to connect to a new device.
• Activate Bluetooth on your new device, select the amp, and you are
connected
Note: a factory reset will reset Bluetooth settings as well, so you will have
to re-connect the amp.
• English • Deutsch • Français • Italiano • Español
•
•

10
Black Spirit 200 – Manual 1.1
5 Bluetooth Audio Streaming: You can stream audio to your Black Spirit
200 to play along to your favorite songs. The audio signal is fed in full
stereo quality to the headphones out (that also serves as a stereo line out,
see 5.21), and in mono to the speaker out when the speaker out is set to
fullrange (see 6.1). This lets you connect your home hi-fi system to the
headphones out or a non-powered PA cabinet to enjoy your playing and
your jam tracks without any additional mixers.
8 MIDI
As you've learned in chapter 2.2, presets can only be changed via MIDI.
Sender (controller) and receiver (amp) must use the same channel. The
factory default is MIDI channel 1 and "Omni On". If the amp does not react
to program changes properly, the MIDI channel has to be changed.
8.1 Setting MIDI channels and switching
Omni On/Off
Press and hold FX Access and FX Loop simultaneously for three seconds.
The Store button will light up. This assigns special programming functions
to the following LEDs and buttons:
• Boost: lights up to indicate Black Spirit 200 is configured to receive
incoming program changes via all MIDI channels (Omni On, default). If
the LED is not illuminated, the amp receives messages via the selected
channel only (Omni Off). To change the Omni mode, just press the Boost
button.
• FX Loop now serves as a +1/up button, while FX Access now serves as a
-1/down button. Use these buttons to change the MIDI channel.
• When configuring MIDI channels, the four Channel LEDs serve to
indicate the MIDI channels. Consult the table below for the MIDI channel
assignments. They show what in tech-speak is called binary code:
MIDI Channel Clean Crunch Lead Ultra
1 =
¢¢¢¢
2 =
¢¢¢{
3 =
¢¢£¢
4 =
¢¢££
5 =
¢£¢¢
6 =
¢£¢£
7 =
¢££¢
8 =
¢£££
9 =
£¢¢¢
10 =
£¢¢£
11 =
£¢£¢
12 =
£¢££
13 =
££¢¢
14 =
££¢£
15 =
£££¢
16 =
££££
Press and hold the Store button for three seconds to save the settings and
quit MIDI setup mode. The amp is now back in normal
operating mode.
8.2 Global Settings
If you press the Store and FX Loop buttons simultaneously for three
seconds, the Store button will start flashing. The following LEDs and
buttons on the amp will then serve special programming purposes:
• FX Access: This indicates the status of Global EQ mode. The button
lights up when Global EQ mode is active. To deactivate it, press the FX
Access button again.
• FX Loop: This indicates the status of Global Cabinet type Mode. The
button lights up when Global cabinet type mode is active. To deactivate
it, press FX Loop again.
Press and hold the Store button for three seconds to save the settings and
quit Global settings mode. The amp is now back in normal operating
mode.
8.3 MIDI implementation chart / controller list
In addition to controlling all switching functions via MIDI program changes,
you can also change the parameters of every single editable function of the
amp in real time via MIDI control changes. The following chart shows the
editable functions and the corresponding controller numbers:
Controller
number
Function
1 Modulation Intensity
4 Delay Time, 128 steps, 51 ms to 1360 ms
7Volume (soft)
9 Mute On-Off. On status remains active until the amp channel is changed,
the volume parameter is changed or the amp is re-started.
12 Mod-FX Type
20 Gain (soft)
21 Bass
22 Mid
23 Treble
24 Resonance
25 Presence
26 Modulation Speed (always for the active modulation effect)
27 Delay Feedback
28 Delay Volume
29 Reverb Volume
31 Channel Switching (4 sectors)
52 Mod-FX On-Off
53 Delay On-Off
54 Reverb On-Off
55 FX Loop On-Off
56 Gain (hard)
57 Volume (hard)
58 Cabinet Type (8 sectors)
59 Sagging (8 sectors)
62 Noise Gate Sensitivity
63 Noise Gate On-Off
64 Boost On-Off
Heads up: You can adjust Black Spirit 200's volume levels via a controller
pedal (MIDI controller #7), but only up the maximum value stored in the
amp. This means that a controller pedal connected to the FSM-432 does
not work like a global remote control for the amp's overall volume level

11
Black Spirit 200 – Manual 1.1
because its control range is always determined by the maximum value
stored in each preset.
8.4 Factory Reset
A factory reset is a seldom-needed feature. Nonetheless, please read these
instructions carefully to ensure you don't accidentally delete your presets.
You can perform a factory reset by doing the following: Press "Store"
and "FX Access" simultaneously while powering the amp up by using the
Power/On switch. Press and hold Store and FX Access for three seconds.
Both buttons will flash to indicate the successful factory reset. Please wait
until the flashing of the channel LEDs stops, then the amp is in normal
operating mode. Please note that you will have to re-connect Bluetooth
after a factory reset (see Chapter 7).
Caution: Please note that this procedure is a last-resort option. It will
reset all settings, including the 128 MIDI-switchable presets (chapter 2)
and the basic MIDI configuration (chapter 8.1).
9 Technical Data
Black Spirit 200 Head
Max. power consumption 300 W
Mains input voltage 100 – 240 V, 50 – 60 Hz
Mains voltage tolerance range +/–10%
Ambient operating temperature range 0° to +35° C
Mains fuse (internal) T 4 A (not removable by user)
Input jack 6.3 mm (1/4"), unbalanced, 1 MOhms
Sensitivity (Clean, without Boost, all Pots in
center position, Master in max. position)
–16 dBV
Max. Input (without Boost) 0 dBV
FX Send jack 6.3 mm (1/4"), unbalanced, 220 Ohms
Nominal Level (Clean, without Boost, all
Pots in center position)
-10 dBV
Max. Level +5 dBV
FX Return jack 6.3 mm (1/4"), unbalanced, 20 kOhms
Sensitivity (Clean, without Boost, all Pots in
center position)
+1 dBV
Sensitivity (Clean, without Boost, all Pots in
center position, Master in max. position)
-13 dBV
Max. Input +7 dBV
Aux Input mini jack 3.5 mm stereo, 20 kOhms
Sensitivity (Master Center) 0 dBV
Sensitivity (Master in max. position) -16 dBV
Max. Input +6 dBV
Phones/Line jack 6.3 mm (1/4") stereo, 50 Ohms
Nominal Level (Clean, without Boost, all
Pots in center position)
–9 dBV
Nominal Level (Clean, without Boost, all
Pots in center position, Master in max.
Position)
+6 dBV
Max. Level +13 dBV
Red Box AE+ Out XLR, balanced, 1240 Ohms
Max. Level +10 dBV
Speaker Out jack 6.3 mm (1/4"), bridged mode, mono,
8-16 Ohms
Power output 200 Watts
MIDI In 7-pin, 20 V DC phantom power (150mA),
5-pin compatible
MIDI Out/Thru 5-pin
Dimensions (W x H x D) 410 x 155 x 150 mm
Weight 3.6 kg / 7.8 lbs.
Apple, the Apple logo and iPad are trademarks of Apple Inc., registered in the U.S.
and other countries. App Store is a service mark of Apple Inc.
The Bluetooth® word mark and logos are registered trademarks owned by
Bluetooth SIG, Inc. and any use of such marks by Stamer Musikanlagen GmbH is
under license.
All mentioned trademarks and copyrights belong to their respective owners.
For USA:
This device complies with part 15 of the FCC Rules. Operation is subject to the
following two conditions: (1) This device may not cause harmful interference, and
(2) This device must accept any interference received, including interference that
may cause undesired operation.
This equipment complies with FCC radiation exposure limits set forth for an
uncontrolled environment. End users must follow the specific operating instructions
for satisfying RF exposure compliance. This transmitter meets both portable and
mobile limits as demonstrated in the RF Exposure Analysis. This transmitter must
not be co-located or operating in conjunction with any other antenna or transmitter
except in accordance with FCC multi-transmitter product procedures.
For Canada:
This device complies with Industry Canada licence-exempt RSS standard(s).
Operation is subject to the following two conditions: (1) this device may not
cause interference, and (2) this device must accept any interference, including
interference that may cause undesired operation of the device.
Under Industry Canada regulations, this radio transmitter may only operate using
an antenna of a type and maximum (or lesser) gain approved for the transmitter by
Industry Canada. To reduce potential radio interference to other users, the antenna
type and its gain should be so chosen that the equivalent isotropically radiated
power (e.i.r.p.) is not more than that necessary for successful communication.
• English • Deutsch • Français • Italiano • Español
•
•

Wichtige Sicherheitshinweise!
Bitte vor Anschluss lesen!
Dieses Produkt wurde gemäß IEC 62368-1 hergestellt
und hat das Werk in einem sicheren, betriebsfähigen
Zustand verlassen. Um diesen Zustand zu erhalten und
um einen gefahrlosen Betrieb zu gewährleisten, ist es
notwendig, dass der Benutzer die Empfehlungen und
Warnhinweise befolgt, die in der Betriebsanleitung zu
finden sind. Dieses Gerät entspricht der Schutzklasse
1 (Erdungsschutz). Bei Einsatz dieses Produktes in
Fahrzeugen, Schiffen oder Flugzeugen, oder in Höhen
oberhalb 2000 m Meereshöhe müssen die entsprechen-
den Sicherheitsstandards zusätzlich zur IEC 62368-1
beachtet werden.
WARNUNG: Um das Risiko von Feuer oder Strom-
schlag zu verhüten, darf dieses Gerät nicht Feuchtigkeit
oder Regen ausgesetzt werden. Öffnen Sie das Gehäu-
se nicht – im Inneren gibt es keine Bauteile, die vom
Benutzer wartbar sind. Die Wartung darf nur von einem
qualifiziertem Kundendienst durchgeführt werden.
Dieses Symbol, wo immer es erscheint, warnt
Sie vor gefährlicher, nicht isolierter Spannung im
Gehäuse – Spannung, die möglicherweise genügt, eine
Stromschlaggefahr darzustellen.
Dieses Symbol, wo immer es erscheint, warnt
Sie vor außen zugänglicher, gefährlicher Spannung.
Eine Verbindung zu jeder Anschlussklemme, die mit
diesem Symbol versehen ist, darf nur mit konfektionier-
tem Kabel hergestellt werden, dass den Empfehlungen
des Herstellers genügt, oder mit Kabel, das von
qualifiziertem Personal installiert wurde.
Dieses Symbol, wo immer es erscheint, macht
Sie auf wichtige Bedienungs- und Wartungsanweisun-
gen aufmerksam, die in beiliegenden Unterlagen zu
finden sind. Bitte lesen Sie das Handbuch.
Dieses Symbol, wo immer es erscheint, sagt
Ihnen: Vorsicht! Heiße Oberfläche! Um Verbrennungen
zu vermeiden, nicht anfassen.
Elektro- und Elektronikgeräte einschließlich
Batterien sind getrennt vom Hausmüll über offizielle
Sammelstellen fachgerecht zu entsorgen.
Bitte lesen Sie diese Anweisungen. Bewahren Sie
diese Anweisungen auf. Befolgen Sie alle Warnhinweise
und Anweisungen auf dem Gerät und in dieser
Anleitung.
• Benutzen Sie dieses Gerät nicht in der Nähe von
Wasser. Stellen Sie das Gerät nicht in der Nähe von
Wasser, Badewannen, Waschbecken, Küchenspülen,
nassen Stellen, Schwimmbecken oder in feuchten
Räumen auf.
• Stellen Sie keine Gefäße, wie Vasen, Gläser, Flaschen
usw., die Flüssigkeiten enthalten, auf das Gerät.
• Reinigen Sie das Gerät nur mit einem trockenen Tuch.
• Entfernen Sie keine Abdeckungen oder Teile des
Gehäuses.
• Die auf dem Gerät eingestellte Betriebsspannung
muss mit der örtlichen Spannung der Netzstromver-
sorgung übereinstimmen. Wenn Sie sich nicht sicher
sind, welche Spannung in Ihrem Netz zur Verfügung
steht, konsultieren Sie bitte Ihren Händler oder den
örtlichen Stromversorger.
• Um das Risiko eines Stromschlags zu verringern,
muss die Erdung des Gerätes beibehalten werden.
Verwenden Sie nur das mitgelieferte Stromführungs-
kabel und behalten Sie die Funktion der seitlichen,
geerdeten Schutzkontakte des Netzanschlusses
immer aufrecht. Versuchen Sie nicht, die Sicherheits-
aufgabe des geerdeten Steckers zu umgehen.
• Schützen Sie das Stromführungskabel vor Betreten
und Quetschen, besonders in der Nähe der Stecker,
Gerätesteckdosen – und dort, wo sie am Gerät austre-
ten! Stromführungskabel sollten immer vorsichtig be-
handelt werden. Kontrollieren Sie die Stromführungs-
kabel in regelmäßigen Abständen auf Einschnitte und
Anzeichen von Abnutzung, besonders in der Nähe
des Steckers und an der Verbindung zum Gerät.
• Benutzen Sie niemals ein beschädigtes Stromfüh-
rungskabel.
• Ziehen Sie bei Gewittern den Stecker des Gerätes
und wenn das Gerät über einen längeren Zeitraum
nicht benutzt wird.
• Dieses Gerät wird nur vollständig von Stromnetz
getrennt, wenn der Stecker vom Gerät oder aus der
Steckdose gezogen wird. Das Gerät sollte so aufge-
stellt werden, dass das Trennen vom Stromnetz leicht
möglich ist.
• Sicherungen: Ersetzen Sie Sicherungen nur mit dem
Typ IEC127 (5x20mm) und dem korrekten Nennwert!
Es ist untersagt, kurzgeschlossene Sicherungen zu
verwenden oder den Sicherungshalter zu überbrü-
cken. Sicherungen dürfen nur von qualifiziertem
Personal gewechselt werden.
• Alle Wartungsarbeiten sollten nur von qualifiziertem
Personal ausgeführt werden. Wartung ist notwendig,
wenn das Gerät auf irgendeine Weise beschädigt
wurde, wie zum Beispiel:
- Wenn das Stromführungskabel oder der Stecker
beschädigt oder abgenutzt ist.
- Wenn Flüssigkeit oder Gegenstände in das Gerät
gelangt sind.
- Wenn das Gerät Regen oder Feuchtigkeit ausgesetzt
war.
- Wenn das Gerät nicht ordnungsgemäß funktioniert,
obwohl die Bedienungsanleitung beachtet wurde.
- Wenn das Gerät hingefallen ist oder das Gehäuse
beschädigt wurde.
• Beim Anschluss von Lautsprechern an dieses Gerät
darf die auf dem Gerät oder in dieser Anleitung ange-
gebene Mindestimpedanz nicht unterschritten wer-
den. Die verwendeten Kabel müssen entsprechend
den lokalen Regelungen über einen ausreichenden
Querschnitt verfügen.
• Halten Sie das Gerät vom Sonnenlicht fern.
• Installieren Sie das Gerät nicht in der Nähe von Wär-
mequellen, wie zum Beispiel Heizkörper, Heizregis-
ter, Öfen oder anderen Geräten, die Hitze erzeugen.
• Dieses Gerät wurde für die Verwendung in gemä-
ßigten Klimazonen entwickelt. Nicht geeignet zur
Verwendung in tropischen Klimazonen.
• Verstopfen Sie nicht die Lüftungsöffnungen. Instal-
lieren Sie das Gerät entsprechend der Anleitung des
Herstellers. Das Gerät darf nicht eingebaut werden
– wie zum Beispiel in einen Gestellrahmen, es sei
denn, dass für angemessene Belüftung gesorgt wird.
• Ein kaltes Gerät sollte immer auf die Umgebungs-
temperatur erwärmt werden, wenn es in einen Raum
transportiert wird. Es könnte sich Kondensation im
Inneren bilden, die das Gerät beschädigt, wenn es
ohne vorherige Erwärmung benutzt wird.
• Stellen Sie keine offenen Flammen, wie brennende
Kerzen, auf das Gerät.
• Das Gerät sollte mindestens 20 cm von Wänden auf-
gestellt werden, das Gerät darf nicht bedeckt werden,
es muss ein Freiraum von mindestens 50 cm über
dem Gerät gewährleistet sein.
• Achten Sie stets auf sicheren Stand auf einer stabilen,
ebenen Fläche.
• Das Gerät darf nur mit Rollwagen, Ständern, Stativen,
Tischen oder Halterungen benutzt werden, die vom
Hersteller spezifiziert sind oder zusammen mit dem
Gerät verkauft wurden. Wenn ein Rollwagen benutzt
wird, seien Sie vorsichtig, wenn Sie die Rollwagen/
Geräte-Kombination transportieren, um Verletzungen
durch Umkippen zu vermeiden.
• Verwenden Sie nur Zubehör, das vom Hersteller
empfohlen ist. Das gilt für alle Arten von Zubehör,
wie zum Beispiel Schutzabdeckungen, Transportta-
schen, Ständer sowie Wand- und Deckenhalterungen.
Wenn Sie irgendein Zubehör am Gerät anbringen,
befolgen Sie immer die Anleitungen des Herstellers.
Benutzen Sie nur die Befestigungspunkte des Geräts,
die vom Hersteller vorgesehen sind.
• Dieses Gerät ist NICHT geeignet für eine Person
oder Personen (einschließlich Kindern) mit einge-
schränkten physischen, sensorischen und geistigen
Fähigkeiten, oder für Personen mit unzulänglicher
Erfahrung und/oder Fachkenntnis, um solch ein Gerät
zu bedienen. Kinder unter 4 Jahren sollten stets von
diesem Gerät fern gehalten werden.
• Es sollten keinerlei Gegenstände durch die Gehäuse-
schlitze eingeführt werden, da dadurch gefährliche,
spannungsführende Bauteile berührt oder kurzge-
schlossen werden können. Dies könnte zu einer
Feuer- oder Stromschlaggefahr führen.
• Dieses Gerät ist imstande, Schalldruckpegel von
mehr als 90 dB zu produzieren. Dies könnte zu ei-
nem dauerhaften Hörschaden führen! Eine Belastung
durch extrem hohe Geräuschpegel kann zu einem
dauerhaften Gehörverlust führen. Bei einer anhal-
tenden Belastung durch solch hohe Pegel sollte ein
Gehörschutz getragen werden.
• Der Hersteller gewährleistet die Sicherheit, Zuverläs-
sigkeit und Leistung des Gerätes nur unter folgenden
Voraussetzungen:
- Einbau, Erweiterung, Neueinstellung, Modifikationen
oder Reparaturen werden vom Hersteller oder autori-
siertem Personal ausgeführt.
- Die elektrische Installation des betreffenden Berei-
ches entspricht den Anforderungen der IEC (ANSI)
Maßgaben.
- Das Gerät wird entsprechend der Bedienungsanlei-
tung benutzt.
Vor Inbetriebnahme
• Vor der Inbetriebnahme diese Anleitung in-
klusive der Sicherheitshinweise bitte sorgfaltig
durchlesen.
• Für Schäden am Gerät oder an anderen
Geräten, die durch unsachgemäßen Betrieb
entstehen, kann seitens des Herstellers keine
Haftung übernommen werden.
• Vor dem Anschluss an das Stromnetz muss
sichergestellt sein, dass der Power-Schalter
ausgeschaltet ist und der angegebene Span-
nungswert auf der Rückseite des Geräts mit der
ortsüblichen Netzspannung übereinstimmt.
• Ein Wort der Mahnung bevor der Black Spirit
200 in Betrieb genommen wird: Er ist laut!
Hohe Lautstärkepegel können Gehörschäden
verursachen.
• Um laute und nicht willkommene Überra-
schungen zu vermeiden, solltest du es dir zur
Angewohnheit machen, das Lautstärke-Poti
deiner mit dem Black Spirit 200 verbundenen
Gitarre ganz zurückzudrehen, bevor du den
Amp anschaltest!
Version 2.5 07/2018

13
Black Spirit 200 – Manual 1.1
1 Quick Start .............................................................................. 13
2 Bedienungsgrundlagen des Black Spirit 200 ............................. 13
3 Die Kanal-Sektion .................................................................... 16
4 Die Effekt-Sektion .................................................................... 16
5 Die Master-Sektion .................................................................. 17
6 Anschlüsse und Bedienungselemente auf der Rückseite ........... 18
7 Bluetooth
®
............................................................................... 19
8 MIDI ........................................................................................ 20
9 Technische Daten .................................................................... 21
1 Quick Start
Anschlussbeispiele für Live und Recording findest du im Anhang der
Bedienungsanleitung auf den Seiten 72 bis 75!
Mains In: Verbinde das mitgelieferte Netzkabel mit dieser Buchse. Bevor
der Verstärker mit der Netzsteckdose verbunden wird, ist darauf zu achten,
dass die Steckdose geerdet ist. Bei einer nicht geerdeten Steckdose ist ein
sicherer Betrieb deines Amps nicht gewährleistet, und es können hörbare
Brumm- und Störgeräusche entstehen.
MIDI In: Verbinde diese Buchse mit dem MIDI Out des MIDI-Controllers
deiner Wahl. Obwohl es sich hierbei um eine 7-polige Buchse handelt,
kannst du jedes Standard-5-Pin-Kabel und jeden handelsüblichen MIDI-
Controller verwenden. Die beiden zusätzlichen Pins liefern eine Phan-
tomspeisung von 20 Volt Gleichstrom und dienen als Stromversorgung
für das Hughes & Kettner FSM-432 MIDI-Board. Benutzt man ein 5-Pin-
Kabel, bleibt die Phantomspeisung ungenutzt. Der MIDI In ist genauso
wichtig wie der Input für deine Gitarre. Nur über MIDI hast du Zugriff auf
alle 128 Presets des Black Spirit 200.
Input: Instrumenten-Eingang zum Anschluss deiner Gitarre mittels eines
abgeschirmten Klinkenkabels.
Speaker Out: Der Black Spirit 200 verfügt über einen Lautsprecherausgang
für Boxen mit einer Impedanz zwischen 8 und 16 Ohm. An diese Buchse
kann ein für Gitarrenverstärker ausgelegter Lautsprecher (wir empfehlen
dafür passend die Hughes & Kettner TM 112 oder TM 212) oder sogar jede
geeignete PA-Box angeschossen werden. In diesem Fall ist der Cabinet-
Wahlschalter auf "Fullrange Cab" zu stellen.
Power: Zum Einschalten des Amps den Netzschalter drücken und 2 sec.
halten. Zum Ausschalten erneut drücken und 3 sec. halten.
Hinweis: Nach einem Stromausfall schaltet sich der Amp automatisch
wieder ein.
Phones/Line: Klinkenbuchse zum Anschluss eines Kopfhörers oder zur
Übertragung eines Line-Signals an einen beliebigen Stereo-Multimedia-
Eingang wie z.B. HiFi-Systeme, wenn der Speaker Out nicht genutzt wird.
2 Bedienungsgrundlagen des Black
Spirit 200
Der Black Spirit 200 ist ein analoger Verstärker und funktioniert im
Prinzip wie alle anderen analogen Verstärker. Sein Bedienungskonzept
ist allerdings ein wenig fortschrittlicher, weswegen du dir ein wenig Zeit
nehmen und die folgenden Ausführungen aufmerksam studieren solltest.
Um das Bedienkonzept des Black Spirit 200 zu verstehen, musst du dir
folgende grundlegenden Dinge vor Augen halten:
• Obwohl der Black Spirit 200 ein analoger Verstärker ist, sind alle seine
Schalt- und Reglerfunktionen mit Ausnahme des Master-Reglers pro-
grammierbar.
• Je nach Bedienungs-Mode des Verstärkers haben einige Regler unter-
schiedliche Funktionen.
• Alle Einstellungen können über MIDI gespeichert und wieder aufgeru-
fen werden. Zu diesem Zweck stehen dir 128 Speicherplätze für Sound-
Einstellungen, sogenannte Presets, zur Verfügung. Du kannst also 128
verschiedene Sounds in 128 verschiedenen Presets abspeichern und
per MIDI auf Knopfdruck aufrufen.
2.1 Funktionsweise der Regler
Der Black Spirit 200 ist ein vierkanaliger Verstärker. Obwohl es nur ei-
nen Satz Regler für alle vier Kanäle gibt, sind alle Parameterwerte für
jeden Kanal separat einstellbar. Durch die Anwahl des Kanals mittels des
• English • Deutsch • Français • Italiano • Español
•
•

14
Black Spirit 200 – Manual 1.1
Chickenhead-Schalters (vgl. Kapitel 3) wird bestimmt, für welchen Kanal
gerade Einstellungen vorgenommen werden. Dadurch sind die Kanäle
völlig unabhängig einstellbar und brauchen sich keine Regler zu teilen.
Der größte Vorteil liegt aber in der kompletten Fernsteuerbarkeit der Reg-
ler über MIDI in Echtzeit. Mehr Informationen findest du dazu in Ab-
schnitt 2.3 in diesem Kapitel und in Kapitel 8 "MIDI".
Anmerkung: Die Bedienung der Regler ist auf den ersten Blick wie üblich:
Regelbereich 300 Grad, es gibt einen Links- und einen Rechts-Anschlag.
Es gibt aber eine Besonderheit, die evtl. gewöhnungsbedürftig ist: Die
in einem Preset programmierte Einstellung eines Reglers ist unabhängig
von der Reglerposition, bzw. die Position eines Reglers entspricht nach
Umschalten eines Presets nicht zwingend seiner im Preset gespeicherten
Einstellung. Man hört eventuell etwas anderes als man sieht. Sobald dann
aber der Regler bewegt wird, verhält er sich wie gewohnt. Die hinterleg-
te Preset-Einstellung kann mit Hilfe der Store-LED in der Master-Sektion
ausgelesen werden. Sie leuchtet auf, sobald die Position des Reglers der
Einstellung eines Presets entspricht, siehe Kapitel 2.4.
Hinweis: Beim Drehen der Regler entstehen leichte Nebengeräusche.
Hierbei handelt es sich um das Umschaltklicken des programmierbaren
Widerstands-Netzwerkes (PRN™-Technologie), mit dem alle Regler – mit
Ausnahme des Master-Reglers – ausgestattet sind: Jeder Drehknopf ver-
fügt über 256 seriell angeordnete Widerstände, 256 Schalter und einen
Datenspeicher, der in der Lage ist, die Position jedes einzelnen Schalters
zu speichern und jede Regler-Einstellung auf Knopfdruck wieder aufzu-
rufen.
2.2 Anwahl von Presets
Die Presets des Black Spirit 200 können mittels MIDI oder mit der App an-
gewählt werden. Hierzu kann jeder MIDI-Fußschalter, jeder MIDI-Con-
troller oder jedes mit MIDI ausgestattete Fußboard verwendet werden.
Beide MIDI-Geräte, also der Verstärker (Empfänger) und der Controller
(Sender) sollten dabei denselben MIDI-Kanal verwenden. Andernfalls
gehen MIDI-Befehle verloren oder werden ignoriert. Im Auslieferungszu-
stand ist MIDI-Kanal 1 und "Omni On" eingestellt, d.h. der Amp empfängt
auf allen 16 MIDI-Kanälen. Reagiert der Black Spirit 200 nicht korrekt auf
Program-Change-Befehle, dann ändere bitte entweder den MIDI-Kanal
(siehe hierzu Kapitel 8.1) oder schaue in der Bedienungsanleitung deines
MIDI-Controllers nach.
2.3 Fernsteuerung über das Hughes & Kettner
FSM-432 MK III MIDI-Board
Das Hughes & Kettner FSM-432 dient zur Anwahl der insgesamt 128 Pre-
sets, gegliedert in 32 Bänke mit je vier Presets, ideal um z.B. jedem Song
eine Bank mit vier frei definierbaren Sound-Einstellungen zuzuordnen.
Der Black Spirit 200 funktioniert mit allen Versionen des FSM-432.
1 Die Preset-Taster A, B, C, D: Innerhalb einer Bank reagieren die vier
Taster A, B, C und D sofort auf eine Betätigung und schalten direkt um.
Die LEDs über den Tastern zeigen durch Leuchten an, welches Preset
gerade aktiviert ist.
2 Bank Up/Down: Das Display des FSM-432 zeigt immer die aktuell aus-
gewählte Banknummer. Um ein Preset in einer anderen Bank zu aktivie-
ren, muss diese Bank zunächst mit den Up/Down-Tastern vorausgewählt
werden. Das aktuell ausgewählte Preset bleibt während dieses Vorgangs
aktiviert und kann weiter gespielt werden. Die vorausgewählte Banknum-
mer blinkt im Display des FSM-432 so lange, bis auf der Zielbank durch
Betätigen eines der Preset-Taster A, B, C oder D ein neues Preset aktiviert
wird. Erst dann wird umgeschaltet.
3 Tap: Mit dem Tap-Taster kannst du schnell und bequem den Parameter
"Time" des Delays (siehe Kapitel 4.3) per Fuß einstellen. Diese Funktion
ist insbesondere auf der Bühne sehr hilfreich: einfach den Taster "Tap" im
Takt betätigen und die Delay-Zeit wird an das Tempo angepasst.
4 Mode-Schalter Preset/Stompbox: Mit dem Schiebeschalter über den
MIDI-Anschlüssen auf der Rückseite des Fußschalters kann man auswäh-
len, ob der FSM-432 MK III im Preset-Mode oder im Stompbox-Mode
betrieben werden soll.
Schaltet man nun per Schiebeschalter in den "Stompbox-Mode", er-
scheint im Display "Sb". In diesem Mode werden keine Presets abgerufen,
sondern die Kanäle werden direkt per Tastendruck angewählt, und unab-
hängig von den Kanälen können die Modulationseffekte, das Delay und
der Boost aktiviert bzw. deaktiviert werden.
Anmerkung: Der Stompbox-Mode ist speziell für Situationen gedacht, in
denen kein passendes Preset zur Verfügung steht, oder zur Erstellung von
Presets um z.B. den Sound per Knopfdruck mit und ohne Effekte zu ver-
gleichen. Die Tap-Funktion steht im Stompbox-Mode nicht zur Verfügung,
und die Effekt-Einstellungen gelten für alle vier Kanäle. Für die Live-Situa-
tion ist daher der Preset-Mode unbedingt zu empfehlen.
5 Control 1 und Control 2: Es lassen sich entweder Expression-Pedale
(empfohlen: Yamaha FC 7) oder einfache Fußschalter (empfohlen: Hughes
& Kettner FS-1) an diese beiden Klinkenbuchsen anschließen, so dass
dem Black Spirit 200 zusätzliche Kontrollfunktionen zugeordnet werden
können. Auf diese Weise lassen sich alle programmierbaren Funktionen
des Amps fernsteuern (Kapitel 8.3).
So kann man z.B. den Hall-Anteil mit einem Expression-Pedal regeln, das
Noise Gate per Fuß an- und ausschalten oder auch Gain stufenlos per
Pedal "rein- oder rausdrehen", ohne die Hände von der Gitarre nehmen
zu müssen. Die vermutlich am häufigst verwendeten Funktionen sind die
separate Fernsteuerung des Boost per Fußschalter (Aktivierung bzw. De-
aktivierung ohne Preset-Wechsel) und die Volume-Regelung mit einem
Pedal. Wie aus der Tabelle (Kapitel 8.3) ersichtlich ist, lässt sich Volume
über die Controller-Nummer 07 und sinnvollerweise über ein Expression-
Pedal regeln, Boost kann über einen Fußschalter und die Controller-Num-
mer 64 ein- und ausgeschaltet werden.
Grundsätzlich entspricht der MIDI-Wert von 0 dem Linksanschlag eines
Reglers bzw. der Stellung "aus" eines Tasters. Ein MIDI-Wert von 127 ent-
spricht dem Rechtsanschlag eines Reglers oder der Stellung "ein" eines
Tasters, so als würde man den Regler oder den Taster direkt am Amp
bedienen. Dabei gibt es eine Ausnahme: Der Regelbereich von Volume

15
Black Spirit 200 – Manual 1.1
ist stets durch den im Preset hinterlegten Wert nach oben begrenzt. Ist
z.B. Volume in Mittelstellung abgespeichert, regelt der größte Wert von
127 (bzw. das ganz durchgedrückte Expression-Pedal) wirklich nur bis
zu dieser Mittelstellung. Damit ist gewährleistet dass die Lautstärke eines
Presets in der Live-Situation wie mit einem üblichen Volume-Pedal kon-
trolliert werden kann.
Achtung: Die Stellung eines Expression-Pedals wird beim Preset-Wechsel
ignoriert! Das heißt: wenn z.B. die Lautstärke mit Hilfe eines Expression-
Pedals herunter geregelt wurde, entspricht die Lautstärke nach einem
Preset-Wechsel wieder dem im Preset hinterlegten Wert. Möchte man die
Gesamtlautstärke des Black Spirit 200 Preset-übergreifend fernsteuern,
also den Master-Regler, empfiehlt es sich ein analoges, nieder ohmiges
Volume-Pedal in den FX-Loop einzuschleifen.
Weitere Infos findest du in der Bedienungsanleitung des FSM-432 MK III.
2.4 Programmierung
Die Programmierung von Presets erfolgt denkbar einfach. Wenn du ei-
nen Sound gefunden hast, den du gerne abspeichern möchtest, so kannst
du mit Hilfe des Store-Tasters die Einstellungen aller Knöpfe, Taster und
Schalter (außer dem Master) in einem Preset speichern. Im Grunde ge-
nommen ist das so, als würdest du einen Amp mit 128 Kanälen spielen,
von denen jeder Kanal seine eigenen Gain- und Volume-Regler, seine
eigene Klangregelung und ein eigenes Effekt-Setting hat!
Speicherung durch Überschreiben des aktuell ausgewählten Presets
Um das zuletzt angewählte Preset mit neuen Einstellungen zu überschrei-
ben, muss der Store-Taster gedrückt und für ca. zwei Sekunden gehalten
werden, bis er kurz blinkt und dann erlischt. Die Channel-LED des aus-
gewählten Kanals (siehe Kapitel 3 "Kanal-Sektion") blinkt ebenfalls kurz,
um den erfolgreichen Speichervorgang zu bestätigen. Jetzt kannst du den
Store-Taster wieder loslassen; deine Einstellungen wurden auf dem zu-
letzt ausgewählten Speicherplatz gespeichert.
Speicherung durch Auswahl eines neuen Speicherplatzes
Wenn du das aktuell ausgewählte Preset nicht überschreiben möchtest,
kannst du stattdessen einen neuen Speicherplatz für deine aktuellen Ein-
stellungen auswählen, indem du den Store-Taster durch einmaliges, kur-
zes Betätigen aktivierst. Die Store-LED leuchtet und zeigt an, dass der
Black Spirit 200 "scharf geschaltet" ist. Nun musst du dem Black Spirit
200 durch Senden eines Program-Change-Befehls mitteilen, wohin die
aktuellen Sound-Einstellungen gespeichert werden sollen.
Hierzu gibt es zwei Möglichkeiten:
• FSM-432: Wähle auf dem FSM-432 mit Hilfe der Up/Down-Taster eine
MIDI-Bank von 1 bis 32 aus; die Banknummern-Anzeige im Display des
FSM-432 blinkt nun. Aktiviere anschließend einen der vier Preset-Taster
A, B, C oder D. Das Display hört auf zu blinken, die LED des Store-
Tasters erlischt, und das Preset wurde auf dem ausgewählten Speicher-
platz gespeichert.
• Anderer MIDI-Controller: Sobald ein Program-Change-Befehl gesendet
wird, wird das Preset gespeichert und kann durch erneutes Senden des-
selben Program-Change-Befehls wieder aufgerufen werden.
Reglereinstellungen auslesen
Wenn ein Preset aufgerufen wird, entsprechen die Reglerstellungen nicht
unbedingt den abgespeicherten Parameterwerten. Diese können jedoch
sehr leicht ausgelesen werden: Wähle ein Preset aus und drehe den Reg-
ler, dessen abgespeicherten Wert du auslesen möchtest, langsam hin und
her, bis die Store-LED aufleuchtet. Jetzt entspricht die Reglerstellung dem
hinterlegten Parameterwert.
2.5 Die Black Spirit-App für iPad
Da alle Regler und Taster des Black Spirit 200 über MIDI steuerbar sind,
konnten wir sogar eine App für das iPad programmieren, die über MIDI
den Funktionsumfang des Amps noch einmal deutlich erweitert.
Die App ermöglicht:
• alle Presets mit einem individuellen Namen zu versehen
• die optische Kontrolle aller Parameter in Echtzeit
• die Fernsteuerung aller Parameter in Echtzeit
• das Abspeichern von Presets in der App
• Download und Überspielen von Presets im Amp
• Einlesen/Versenden von Presets per E-mail oder Nachricht
• Preset-Listen zu erstellen und zu organisieren.
Die kostenlose App steht im Apple App Store zur Verfügung und verbindet
den Black Spirit 200 über Bluetooth (siehe Kapitel 7 "Bluetooth").
• English • Deutsch • Français • Italiano • Español
•
•

16
Black Spirit 200 – Manual 1.1
3 Die Kanal-Sektion
Der Black Spirit 200 verfügt über vier individuell abgestimmte Kanäle,
die über den einen Chickenhead-Wahlschalter anwählbar sind. Die End-
stufenschaltung, die einen entscheidenden Einfluss auf deinen Gesamt-
Sound hat, wird bei der Kanalumschaltung ebenfalls umgeschaltet, um
sich dem Sound-Charakter des jeweilig ausgewählten Kanals optimal an-
zupassen. Daneben hast du durch die Programmierbarkeit der Regler (vgl.
2.1) in jedem Kanal individuellen und uneingeschränkten Zugriff auf alle
Sound-Parameter. Und zu guter letzt, haben wir sogar die Regelbereiche
der einzelnen Potis für jeden Kanal separat feinabgestimmt.
●
1
Input: Instrumenten-Eingang zum Anschluss einer Gitarre über ein
abgeschirmtes Klinkenkabel.
●
2
Gain: Der Gain-Regler bestimmt die Eingangsempfindlichkeit und
damit die Sättigung bzw. den Grad der Verzerrung der Vorstufe. In
Kombination mit Boost und Sagging ist er das maßgebliche Werkzeug zur
Sound-Gestaltung.
●
3
Clean-Kanal: Der Clean-Kanal des Black Spirit 200 macht seinem
Namen alle Ehre. Er liefert perlend frische Sounds und bietet jede Menge
Head room. Unbedingt verschiedene Gain- und Sagging-Einstellungen in
Kombination mit dem schaltbaren Boost ausprobieren!
●
4
Crunch-Kanal: Klassischer Overdrive-Sound vom Feinsten! Dieser
Kanal deckt das vielfältige Sound-Spektrum zwischen cleanen und
übersteuerten Sounds ab. Mit dem zuschaltbaren Boost ist das Rockbrett
garantiert.
●
5
Lead-Kanal: Dank der feinabgestimmten Kompressionseigenschaften
dieses Kanals gehen Riffs und Licks wie von selbst von der Hand. Boost
verleiht diesem Kanal die extra Portion Druck.
●
6
Ultra-Kanal: Moderner, amerikanischer High-Gain-Sound mit fetten
Bässen und bissigen Höhen. Der Ultra-Kanal liefert eine gnadenlose
Performance für aggressive Metal-Riffs und ultrafetten Lead-Sound.
Drop-Tuning wird zum Erlebnis.
●
7
Boost: Der Boost hebt, abhängig vom ausgewählten Kanal, spezielle
Frequenzbereiche an. Dadurch werden je nach Kanal noch bissigere,
cremigere oder druckvollere Sounds erreicht.
●
8
Bass, Mid, Treble: Die Wirkung der Drei-Band-Klangregelung mit
Bass, Mid und Treble ist präzise auf die Kanäle abgestimmt. In jedem
Kanal greift die Regelung in die für den Grund-Sound des Kanals
charakteristischen Frequenzbereiche ein.
Hinweis: Es handelt sich um eine klassische, passive Klangregelung. Die
Regler beeinflussen sich gegenseitig. Ist z.B. "Mid" weit aufgedreht, zeigt
"Bass" weniger Wirkung als wenn "Mid" abgedreht ist. Presence und Re-
sonance sind von der Drei-Band-Klangregelung unabhängig und wirken
immer gleich stark.
●
9
Volume: Mit Volume wird die Lautstärke der Presets untereinander
angepasst.
Hinweis: Anders als gewohnt lässt sich der Volume-Regler nie ganz abdre-
hen. Er senkt den Pegel lediglich ab oder hebt ihn an. Die Mittelstellung ist
immer die beste Ausgangsbasis für eine Lautstärke-Anpassung.
Achtung: Bitte benutze diesen Regler nicht, um die Gesamtlautstärke des
Amps zu kontrollieren. Dafür ist der Master-Regler zuständig (siehe 5.17)!
●
10
Noise Gate: Dieser Regler bestimmt die Empfindlichkeit des Noise
Gates. Die IDB™-Technologie des Noise Gates passt die Standard-Attack-
und Threshold-Parameter automatisch an. Bei Linksanschlag des Reglers
wird das Noise Gate komplett aus dem Signalweg geschaltet (Bypass). Je
mehr der Regler nach rechts gedreht wird, umso härter greift das Noise
Gate ein. Auf der 9-Uhr-Position reagiert das Gate bereits sehr sensibel
auf Signale. Je weiter der Regler nach rechts gedreht wird, umso härter
greift das Noise Gate ein und schneidet leise Signale ab. Die Einstellung
der Noise Gate-Empfindlichkeit wird für jedes einzelne Preset gespeichert.
4 Die Effekt-Sektion
Der Black Spirit 200 bietet dir drei unabhängige Effekt-Module mit Re-
verb, Delay und Modulationseffekten sowie ein Noise Gate, die gleich-
zeitig genutzt werden können.
Hinweis: Sind die Regler "Reverb", "Dly Level" oder "Intensity" auf Links-
anschlag gestellt, wird das entsprechende Effekt-Modul komplett aus dem
Signalweg geschaltet (Bypass).
●
11
FX Access: Um Zugriff auf die Effekte Reverb, Delay und Modulation
zu erhalten, den FX Access-Taster drücken, bis er anfängt zu blinken. Das
Gerät befindet sich damit im FX-Modus, und die Kanalregler werden jetzt
für die Regelung der Effekte verwendet. Um den FX-Modus zu verlassen,
ist erneut der FX-Access-Taster zu drücken. Der Taster hört auf zu blinken,
und das Gerät arbeitet wieder im Normalmodus.
●
12
Reverb: Der digitale Hall des Black Spirit 200 hat die Wärme
und Musikalität eines klassischen Federhalls zum Vorbild. Eine echte
Verbesserung im Vergleich zum analogen Gegenstück ist die automatische
Anpassung der Nachhallzeit: Je mehr "Reverb Volume" dem Signal
zugemischt wird, desto länger wird der Hall.
31216
1017 1921 18 20
29
1
6
41115 5 7
13 14
8

17
Black Spirit 200 – Manual 1.1
●
13
Delay: Mit den Reglern für "Dly Level", "Feedback" und "Dly Time"
bietet das Delay-Modul volle Kontrolle über alle Parameter.
• Dly Level: Regelt die Lautstärke der Wiederholungen von "aus" bis
"genauso laut wie das Original-Signal".
• Feedback: Regelt die Anzahl der Wiederholungen von 1 bis unendlich.
• Dly Time: Regelt die Zeit bis zur nächsten Wiederholung von 50
Millisekunden bis 1,4 Sekunden. Bei einer Anpassung von "Dly Time"
über die Tap-Funktion des FSM-432 (siehe Kapitel 2.3) wird der Wert ab
dem zweiten Tastendruck des Tap-Tasters übernommen. Zur Kontrolle
blinkt die Tap-LED des FSM-432 ca. 5 Sekunden lang im Takt. Die Tap-
Funktion reagiert nur bei aktivem Delay. Ist das Delay abgeregelt (oder,
technisch akkurat ausgedrückt, im Bypass), wird das Tap-Tempo nicht
übernommen.
Hinweis: Der FSM-432 bietet als Besonderheit eine Tap-Funktion mit der
man die Delay-Time des Black Spirit 200 über MIDI steuern kann. Mit
MIDI-Controllern von Dritt-Anbietern ist dies nicht, oder zumindest nur
eingeschränkt möglich (nur einige wenige Hersteller wie etwa Behringer
mit dem FCB1010 bieten die Möglichkeit die Minimal- und Maximal-Zeiten
für Delay-Time voreinzustellen, so dass Tap zumindest eingeschränkt
nutzbar ist). Das liegt daran, dass es für Tap keinen Standard-MIDI-
Befehl gibt, sondern nur für Time. Der korrekte Wert für Time muss aber
erst ermittelt werden, und zwar anhand des Abstandes zwischen zwei
Taps. Im Gegensatz zu allen anderen Regler, bei denen 0=Minimum und
127=Maximum bedeuten, gibt es für Delay-Time keine definierten Werte,
da fast jedes Effkt-Gerät seine eigenen Minimal- und Maximal-Zeiten für
Delay bietet.
●
14
Modulation FX: Dieses Modul stellt gleich vier Modulations-Effekte
zur Auswahl: Chorus, Flanger, Phaser und Tremolo.
• Mod Type: Die Effekte liegen hintereinander auf diesem Regler. Im
ersten Viertel ist der Chorus aktiv, im zweiten Viertel der Flanger, im
dritten der Phaser und im vierten das Tremolo. Innerhalb jedes Viertels
lässt sich die Geschwindigkeit (Rate) der Modulations-Effekte einstellen:
je weiter "Mod Type" aufgedreht wird, umso höher ist die Geschwindig-
keit des jeweiligen Effekts.
• Intensity: Intensity bestimmt die Lautstärke des ausgewählten Modula-
tions-Effektes.
●
15
FX-Loop: Das programmierbare Effekt-Routing des Black Spirit
200 bietet dir, zusätzlich zu den integrierten Effekten, einen seriellen
Einschleifweg für externe Effektgeräte, dessen Einstellung im Preset mit
abgespeichert wird. Das heißt, pro Preset ist hinterlegt, ob der Effektweg
aktiviert oder deaktiviert ist. Verbinde die Send-Buchse in der FX-
Loop-Sektion auf der Rückseite des Verstärkers mit dem Input deines
Effektgerätes und die Return-Buchse mit dessen Output (siehe Kapitel
6.3). Mit dem FX-Loop-Schalter wird der Effektweg an- und ausgeschaltet.
●
16
Cab Type: Mit diesem Regler wird eine der acht sorgfältig abgebildeten
Speaker-Simulationen über den Red Box-Ausgang auf der Rückseite des
Amps gewählt (siehe 6.2 "Red Box AE+"). Auf der Rückseite kannst du
den Ausgangspegel von Mic auf Line schalten, so dass der Pegel an das
jeweils angeschlossenen Gerät abgestimmt ist. Damit ist die Red Box AE+
die perfekte Wahl, um deinen Sound an die PA, den Studio-Monitor oder
ein Aufnahmegerät zu übertragen. Die Abhängigkeit von Mikrofonen
oder Tontechnikern ist damit vorbei, die Red Box AE+ erledigt diesen Job
perfekt.
No. Cabinet Types
1 1x12" Modern Thiele-Port
2 1x12" Modern Front-Port
3 2x12" Vintage Open Back
4 4x10" Alnico Open Back
5 4x12" Vintage Cab
6 4x12" British Cab
7 4x12" Modern Cab
8 4x12" American Cab
Hinweis: Cab Type wirkt sich auf den Red Box-Ausgang und den
Kopfhörerausgang aus, jedoch nicht auf den Lautsprecherausgang
bei Anschluss an einen Gitarrenlautsprecher, da in diesem Fall keine
Cabinet-Simulation gebraucht wird. Bei Einsatz eines Fullrange-Cabinets
(siehe 6.1) wirkt sich die Anwahl der Cabinet-Simulation auch auf den
Lautsprecherausgang aus.
5 Die Master-Sektion
In der Master-Sektion werden die Gesamtlautstärke des Verstärkers sowie
Resonance und Presence eingestellt:
●
17
Master: Wie der Name schon vermuten lässt, hältst du mit diesem
Poti die Macht über die Endstufe und damit über die finale Lautstärke
des Amps zwischen Daumen und Zeigefinger. Aus diesem Grunde ist im
Umgang mit diesem Regler auch ein gewisses Maß an Vorsicht geboten,
gleichzeitig aber auch jede Menge Spaß garantiert. Der Master regelt
ebenfalls die Lautstärke des Kopfhörerausgangs (siehe 5.21).
Anmerkung: Im Gegensatz zu Hughes & Kettner-Röhrenverstärkern
wird der Ausgangspegel der Red Box des Black Spirit 200 nicht von der
Einstellung des Master-Reglers beeinflusst (siehe 6.2).
Hinweis: Im Gegensatz zu den Kanal- und Effekt-Reglern ist der Master-
Regler nicht programmierbar! Er funktioniert wie ein ganz normales Poti,
die Position des Reglers entspricht immer dem tatsächlichen Wert. Es ist
deshalb ratsam, Master vor dem Einschalten immer auf Linksanschlag zu
drehen.
●
18
Resonance: Bei Mittelstellung des Reglers hört man das "normale"
Resonanz-Verhalten zwischen Amp und Box. Durch Linksdrehung wird
der Effekt der Boxen-Resonanz gedämpft. Dies rundet Clean-Sounds noch
weicher ab. Durch Rechtsdrehung wird der Effekt verstärkt, was vor allem
bei verzerrten Sounds für heftigen Bass-Schub sorgt.
●
19
Presence: Dieser Regler bestimmt den Anteil an generierten,
harmonischen Obertönen. Je weiter er aufgedreht wird, desto "präsenter"
wirkt der Sound.
Hinweis: Die Einstellungen für Resonance und Presence können entweder
pro Preset abgespeichert werden, oder die beiden Regler können, genau
wie der Master Volume, als Master-Einstellung benutzt werden, die sich
beim Schalten von Presets nicht verändert. Im Auslieferungszustand
befindet sich der Amp im Preset-Mode, d.h., die Einstellungen der beiden
Regler werden pro Preset abgespeichert, sollen die beiden Regler im
Global-Mode funktionieren, siehe Kapitel 8.2)
• English • Deutsch • Français • Italiano • Español
•
•

18
Black Spirit 200 – Manual 1.1
●
20
Sagging: In Kombination mit dem Gain-Regler und dem Boost ist
Sagging dein wichtigstes Werkzeug für das Sound-Design. Mit diesem
Regler hast du die vollständige Kontrolle über das Sättigungsverhalten
der Endstufe bei jeder beliebigen Lautstärke. Mit einer Drehung kannst
du verschiedenste Gitarrensounds abrufen, die deinen Ton individuell
veredeln. Der Regler hat acht Positionen, mit jedem weiteren Strich nach
rechts nimmt der Sättigungsgrad der Endstufe zu.
●
21
Phones/Line: An diesen Ausgang werden handelsübliche Kopfhörer
mit Klinkenstecker angeschlossen. Anmerkung: Dieser Ausgang kann
auch verwendet werden, um ein Line-Signal an einen beliebigen
Stereo-Multimediaeingang wie z.B. ein HiFi-System zu senden. Bitte
beim Händler nach entsprechenden Adaptern oder Kabeln fragen. Um
diesen Ausgang mit einem typischen Aux In oder einem HiFi-System
zu verbinden, werden ein Kabel mit einem Stereo-Klinkenstecker an
einem Ende zum Anschluss an den Kopfhörerausgang des Black Spirit
200, sowie zwei Cinch-Steckern am anderen Ende zum Anschluss an den
linken und rechten Eingang des HiFi-Systems gebraucht (Y-Kabel). Zum
Anschluss an ein Mischpult werden statt der Cinch-Stecker zwei Mono-
Klinke bzw. XLR-Stecker gebraucht. Dabei ist darauf zu achten, dass die
Mischpulteingänge hart links/rechts im Panorama platziert werden, damit
der Stereo-Effekt richtig zur Geltung kommt.
Hinweis: Falls ein Kopfhörer an diesem Ausgang auf der Vorderseite
angeschlossen ist, ist der rückseitige Speaker Out ausgeschaltet.
Achtung: Der Kopfhörerausgang liefert einen Stereo-Effekt speziell für
Kopfhörer, um ein möglichst natürliches Hörerlebnis zu gewährleisten.
Für die meisten Anwendungen auf der Bühne oder im Studio dürfte die
Mono Red Box die bessere Wahl zur Übertragung deines Signals an das
Mischpult sein (siehe 6.2).
6 Rückseite
●
1
Speaker Out: Der Black Spirit 200 verfügt über eine Buchse zum
Anschluss von Lautsprecherboxen mit einer Impedanz zwischen 8 und
16 Ohm. An diese Buchse kann eine speziell für Guitar-Amps ausgelegte
Lautsprecherbox oder auch eine beliebige PA-Box angeschlossen werden.
In diesem Fall ist der Cabinet-Wahlschalter auf Fullrange Cab zu stellen.
Es kann über ein Boxenkabel jede Box oder Boxenkombination ange-
schlossen werden, deren Gesamtimpedanz zwischen 8 und 16 Ohm
liegt. Die Gesamtimpedanz R einer Kombination von 2 Boxen mit den
Impedanzen R1 und R2 lässt sich mit folgenden Formeln ausrechnen:
• Serielle Verkabelung:
R = R1 + R2
Beispiel: Bei Verwendung von zwei 8-Ohm-Boxen ergibt sich bei serieller
Verkabelung eine Gesamtimpedanz von 16 Ohm. Es gibt aber kaum noch
Boxen auf dem Markt mit seriellen Anschlüssen, viel häufiger findet man
eine parallele Verkabelung.
• Parallele Verkabelung:
R = (R1 x R2) / (R1 + R2)
Beispiel mit zwei 16-Ohm-Boxen
R = (16 x 16) / (16 + 16)
R = 256 / 32 = 8 Ohm
• Output Power: Mit dem Power-Wahlschalter können Ausgangsleistungen
zwischen 200, 20 und 2 W gewählt werden, je nachdem, ob zu Hause
ein kleiner Speaker im Schlafzimmer oder eine 4x12er-Box mit voller
Power zum Einsatz kommt. Im Fullrange-Modus sind 20 W die beste
Wahl, um HiFi-Lautsprecher oder ein Studio-Monitorsystem mit
niedrigerer Leistung anzusteuern.
• Cabinet: Dies ist ein einzigartiges und vielseitiges Feature. In der Position
Guitar Cab lassen sich Standard-Gitarrenlautsprecher anschließen. In
der Position Full Range können beliebige Fullrange-Passivlautsprecher
angeschlossen und betrieben werden - das liefert den großartigen Sound
von der Red Box AE+ mit der selbst gewählten Lautsprecher-Simulation
(siehe 6.2 und 4.16) und bis zu 200 Watt frappierender purer Leistung.
Falls du deinen Gitarrenlautsprecher nicht vom Proberaum zu dir nach
Hause transportieren möchtest, ist das kein Problem – schließe einfach
einen beliebigen Speaker – Studiomonitore, HiFi-Anlage oder PA-Box
– an das Gerät an, und der Sound und das Feeling sind wie bei einem
echten Gitarrenlautsprecher.
Achtung: Nur an Lautsprecher und Lautsprecherboxen
anschließen! Der Anschluss an geerdete Geräte (z.B. Power
Soak oder DI-Box) führt zu schweren Schäden!
●
2
Red Box AE+ DI Out: Seit Hughes & Kettner die Original-Red Box 1988
erfunden hat, gilt sie als Industriestandard, um den Sound von Gitarren-
Amps ohne Mikrofon abzunehmen. Ob Live oder im Studio – die Red Box
überträgt den Sound in gleichbleibender Qualität. Übersprechen anderer
Instrumente und zeitraubendes Experimentieren mit Mikrofonpositionen
gehören der Vergangenheit an. Die Red Box AE+ ist die neuste Version
der preisgekrönten DI-Box mit Speaker-Emulation.
Die DSP-gesteuerte Ambience-Emulation erzeugt die authentische
Raumfülle einer 4x12-er Box und einen ultradirekten Attack reinsten
Gitarrentons. Für den Black Spirit 200 haben wir die Red Box mit
zusätzlichen Features ausgestattet, um die Arbeit auf der Bühne oder im
Studio so einfach wie möglich zu gestalten.
12
4
5
6
3

19
Black Spirit 200 – Manual 1.1
• Red Box Mic/Line: Achte darauf, dass du die Red Box mit dem passenden
Pegel betreibst. Benutze wenn möglich die Stellung "Line". Durch ihren
hohen Output ist sie klanglich die erste Wahl und liefert das Sound-
Optimum. Sollte das Mischpult ausschließlich über Mikrofoneingänge
verfügen, schalte die Red Box in Position "Mic", so kannst du
Übersteuerungen am Mikrofoneingang vermeiden. Sollte das Mischpult
bzw. Audio-Interface über keinen XLR-Eingang verfügen, so benötigst du
einen XLR-Klinke-Adapter (6,3 mm), den du im Fachhandel erwerben
kannst. Achte darauf, dass die Red Box in Position "Line" betrieben wird,
solltest du einen 6,3 mm (1/4") Klinkeneingang benutzen.
• On/Off: Hier kannst du die Speaker-Simulation der Red Box ausschalten.
Die Red Box sendet dann ein ungefiltertes Signal zur Verwendung mit
der von dir bevorzugten Boxen- und Mikrofon-Emulationssoftware oder
eines Effektgerätes. Achte darauf, dass dieser Schalter immer auf "On"
steht, es sei denn, du möchtest eine externe Speaker-Simulation nutzen!
Anmerkung: Die Red Box AE+ bietet acht sorgfältig designte Boxen-
Emulationen, die auf der Vorderseite angewählt und mit jedem Preset
gespeichert werden können (siehe 4.16).
●
3
FX Loop
• FX Send: Verbinde diese Buchse mit dem Eingang deines externen
Effektgeräts.
• FX Return: Verbinde diese Buchse mit dem (Mono-) Ausgang deines
externen Effektgeräts.
Tipp: Es gibt auch die Möglichkeit, Effektpedale via "4-Kabel-Methode"
anzuschließen: Gitarre in Input des Effektpedals, Effektpedal-Ausgang in
Input des Amps, Effektpedal-Send in den FX-Return des Amps, FX-Send
des Amps in den Return des Effektpedals. So kann man typische Vor-
schalteffekte wie Chorus oder Phaser vor den Preamp des Black Spirit
200 schalten und typische Einschleifeffekte wie Hall und Delay hinter
den Preamp in den FX-Loop setzen.
●
4
MIDI
• MIDI In: Die MIDI In-Buchse am Black Spirit 200 ist als 7-Pin-Buchse
ausgelegt, die auf den beiden zusätzlichen Pins eine Phantomspeisung
von 20 Volt Gleichstrom liefert. Dadurch kann z.B. das Hughes
& Kettner FSM-432 MIDI-Board direkt ohne zusätzliches Netzteil
angeschlossen werden.
Wichtig: Wenn das FSM-432 über das mitgelieferte 7-Pin-MIDI-Kabel an
den Black Spirit 200 angeschlossen wird, ist keine externe Stromversor-
gung für das FSM-432 notwendig, da er über den Amp mit Phantom-
speisung versorgt wird. Wird jedoch ein 5-poliges MIDI-Kabel verwendet,
muss das MIDI-Board extern mit Strom versorgt werden. Für diesen Fall
verfügt das FSM-432 (ab Modell MK II) über einen innovativen Netzan-
schluss, an den jedes Gleichstrom- oder Wechselstrom-Netzteil ange-
schlossen werden kann, das 9 bis 15 Volt liefert.
MIDI Out/Thru: Diese Buchse dient zur Weiterleitung der am MIDI In
ankommenden (MIDI-) Signale. An diese Buchse kannst du jedes externe
MIDI-fähige Gerät anschließen, das zeitgleich mit dem Black Spirit 200
umgeschaltet werden soll.
●
5
Aux In: An den Eingang Aux In kannst du jede beliebige Audioquelle
anschließen, so dass du zu Play-Alongs jammen oder deine Lieblingsmusik
hören kannst. Die Audioquelle wird zu deinem Gitarrensound gemixt.
Über den Aux In-Eingang können ebenfalls Drum Machines oder
zusätzliche Instrumente angeschlossen werden. Das Aux In-Signal wird
in vollwertiger Stereoqualität auf den Kopfhörerausgang übertragen (und
dient gleichzeitig als Stereo-Line Out, siehe 5.21) und in Mono auf den
Speaker-Ausgang, wenn dieser Ausgang auf Fullrange Cab gesetzt ist
(siehe 6.1). So kannst du deine Stereoanlage an den Kopfhörerausgang
oder eine passive PA-Box anschließen und ohne zusätzliches Mischpult
zu deinen Jamtracks spielen.
●
6
AES: Gemäß Verordnung Nr. 1275/2008/EG müssen Geräte, unter die
laut EU-Richtlinie auch dein Black Spirit 200 fällt, mit einer Energiespar-
Vorrichtung versehen werden, die das Gerät nach einer bestimmten Zeit
der Nichtbenutzung abschaltet. Diese Aufgabe übernimmt beim Black
Spirit 200 das AES, das über den Minischalter neben der Speaker-Buchse
aktiviert und deaktiviert werden kann.
Im Auslieferzustand ist das AES aktiviert; der Minischalter befindet sich
in der Linksposition. In dieser Einstellung schaltet der Amp nach einer
Ruhephase von ca. 90 Minuten ab. Die Ruhephase wird zurückgesetzt
und beginnt von vorne, sobald der Verstärker ein Eingangssignal erhält,
wenn also z.B. ein kurzer Ton gespielt wird. Ein leises Signal reicht bereits
aus, und die 90 Minuten bis zum Abschalten beginnen von vorne. Hat
das Gerät nach vollständigem Durchlaufen der 90-minütigen Ruhephase
abgeschaltet, kann es mit dem Netzschalter erneut in Betrieb genommen
werden. Durch Schieben des Minischalters in die Rechtsposition wird das
AES und somit das automatische Abschalten des Gerätes deaktiviert.
7 Bluetooth
®
Der Black Spirit 200 hat eine integrierte Bluetooth-Funktion für
Audiostreaming und zur Verbindung mit der Remote App für iPad (siehe
2.5). Bitte darauf achten, dass nur ein einziges Gerät angeschlossen werden
kann. Das bedeutet: Falls du die App für iPad benutzt, kann kein zweites
Gerät für Audiostreaming angeschlossen werden. Audiostreaming und
Fernbedienung sind jedoch gleichzeitig über dasselbe iPad möglich.
Achtung: Zum Anschließen eines neuen Gerätes muss die Bluetooth-
Verbindung zurückgesetzt werden (siehe 7.4). Falls die Bluetooth-
Verbindung mit der App nicht zustande kommt, ist die App zu schließen
(Doppelklick auf die Home-Taste) und die App erneut zu öffnen.
Eine LED neben dem Bluetooth-Symbol zeigt den Status
der Bluetooth-Verbindung an.
1 Bluetooth Status-LED:
• LED aus: Bluetooth ist deaktiviert
• LED blinkt langsam: Black Spirit sucht nach verfügbaren Geräten
• LED leuchtet konstant: Er ist mit einem mobilen Gerät verbunden
• LED blinkt schnell: Verbindung fehlgeschlagen/unterbrochen
2 Aktivieren/Verbinden: Anschließen/Aktivieren: Um Bluetooth zu
aktivieren, Boost-Taster drücken und drei Sekunden lang halten. Die
Bluetooth-LED beginnt langsam zu blinken, und der Black Spirit 200
beginnt mit der Suche nach mobilen Geräten. Bitte darauf achten,
dass Bluetooth an dem Gerät aktiviert ist, das mit dem Black Spirit 200
verbunden werden soll. Wenn der Black Spirit 200 in der Bluetooth-
Geräteliste erscheint, wähle "Hughes & Kettner Black Spirit 200 XXXX"
(eine vierstellige ID). Sobald die Verbindung hergestellt ist, wechselt
die Bluetooth-LED des Amps vom Blinkmodus in den konstanten
Leuchtmodus.
• English • Deutsch • Français • Italiano • Español
•
•

20
Black Spirit 200 – Manual 1.1
3 Trennen/Deaktivieren der Bluetooth-Verbindung: Um Bluetooth zu
deaktivieren, Boost-Taster drücken und halten, bis die Bluetooth-LED
erlischt
4 Verbinden mit einem neuen Gerät: Der Black Spirit 200 erinnert sich
an das letzte angeschlossene mobile Gerät und beginnt nach Einschalten
des Amps oder erneuter Aktivierung von Bluetooth automatisch mit der
Suche nach diesem Gerät und stellt die Verbindung damit her. Dieses
Feature schützt vor einer unerwünschten Verbindung zu fremden
Geräten, so dass Streaming oder Fernbedienung nur mit deinem dafür
vorgesehenen mobilen Gerät möglich sind.
Verbindung mit einem neuen Gerät:
• Bluetooth am letzten angeschlossenen Gerät deaktivieren (oder Gerät
ausschalten)
• Bluetooth am Amp aktivieren, die LED beginnt langsam zu blinken
• Boost-Taster drücken und 7 Sekunden lang halten, bis die Bluetooth-
LED schnell blinkt (5x) und dann erlischt. Danach Boost-Taster erneut
drücken und 3 Sekunden lang halten. Die LED beginnt erneut langsam
zu blinken, und der Amp beginnt mit der Suche nach einem neuen
Gerät und stellt eine Verbindung zu diesem Gerät her.
• Bluetooth an dem neuen Gerät aktivieren, Amp anwählen – Verbindung
steht.
Anmerkung: Bei einem Reset auf die Werkseinstellungen werden auch
die Bluetooth-Einstellungen zurückgesetzt, und der Amp muss erneut
angeschlossen werden.
5 Bluetooth Audio Streaming: Du kannst ein Audiosignal an den Black
Spirit 200 streamen und deine Lieblingssongs begleiten. Das Audiosignal
wird in vollwertiger Stereoqualität auf den Kopfhörerausgang übertragen
(und dient gleichzeitig als Stereo-Line Out, siehe 5.21) und in Mono auf
den Speaker-Ausgang, wenn dieser Ausgang auf Fullrange Cab gesetzt ist
(siehe 6.1). So kannst du deine Stereoanlage an den Kopfhörerausgang
oder eine passive PA-Box anschließen und ohne zusätzliches Mischpult
zu deinen Jamtracks spielen.
8 MIDI
Wie du in Kapitel 2.2 erfahren hast, ist die MIDI-Funktion ein wesent-
liches Feature des Black Spirit 200, denn nur über MIDI hast du Zugriff
auf alle 128 Presets. Dabei müssen sowohl der Sender des MIDI-Befehls
(Controller) als auch der Empfänger (Verstärker) denselben MIDI-Kanal
verwenden. Im Auslieferungszustand ist MIDI-Kanal 1 und "Omni On"
eingestellt. Reagiert der Black Spirit 200 nicht korrekt auf Program-
Change-Befehle, muss der MIDI-Kanal geändert werden.
8.1 Einstellung des MIDI-Kanals sowie
Omni On/Off
Drückt man gleichzeitig die beiden Knöpfe Noise Gate und FX-Loop drei
Sekunden lang, beginnt die Store-Taste zu leuchen. Folgende LEDs und
Taster des Amps haben nun spezielle Programmier-Funktionen:
• Boost: Diese LED zeigt den Status des Omni-Mode an: Leuchtet sie, so
empfängt der Black Spirit 200 Programm-Change-Befehle auf allen MI-
DI-Kanälen (Omni On). Dies entspricht der Werkseinstellung. Leuchtet
die Boost-LED nicht, so empfängt der Verstärker lediglich auf dem ak-
tuell ausgewählten MIDI-Kanal (Omni Off). Um den Omni-Mode zu
wechseln, muss der Boost-Schalter gedrückt werden.
• FX-Loop fungiert nun als +1/up-Schalter, FX-Access fungiert nun als -1/
down-Schalter. Mit Hilfe dieser beiden Schalter kann nun der MIDI-
Kanal eingestellt werden.
• Die vier Channel-LEDs dienen während des Setups als Anzeige des
MIDI-Kanals. In der nachfolgenden Tabelle kann man den eingestell-
ten MIDI-Kanal ganz einfach ablesen (in der Fachsprache auch "Binär-
Code" genannt):
MIDI-Kanal Clean Crunch Lead Ultra
1 =
¢¢¢¢
2 =
¢¢¢{
3 =
¢¢£¢
4 =
¢¢££
5 =
¢£¢¢
6 =
¢£¢£
7 =
¢££¢
8 =
¢£££
9 =
£¢¢¢
10 =
£¢¢£
11 =
£¢£¢
12 =
£¢££
13 =
££¢¢
14 =
££¢£
15 =
£££¢
16 =
££££
Zum Beenden des MIDI-Setups und gleichzeitiger Speicherung der Ein-
stellungen wird die Store-Taste drei Sekunden gedrückt, der Amp kehrt in
den Normalbetrieb zurück.
8.2 Global Settings
Wenn du den Store-Taster und den FX Loop-Taster gleichzeitig drei
Sekunden lang drückst, beginnt der Store-Taster zu blinken. Über
die folgenden LEDs und Taster des Amps können sodann spezielle
Programmierfunktionen aufgerufen werden:
• FX-Access: Hier wird der Status des Global EQ-Mode angezeigt.
Leuchtet der Taster, ist der Global EQ-Mode aktiv, zum Deaktivieren
muss der FX-Access-Taster nochmals gedrückt werden.
• FX-Loop: Hier wird der Status des Global Cabinet Type-Mode
angezeigt. Der Taster leuchtet auf, wenn der Global Cabinet Type-
Mode aktiv ist. Zum Deaktivieren muss der FX Loop-Taster noch einmal
gedrückt werden.
Zum Beenden des Global Settings und gleichzeitiger Speicherung der
Einstellungen wird die Store-Taste drei Sekunden gedrückt, der Amp kehrt
in den Normalbetrieb zurück.
8.3 Controller-Liste und zugeordnete Funktionen
Neben reinen Umschaltfunktionen durch das Senden von Program-
Change-Befehlen können die Parameter aller Einstellungsmöglichkeiten
Black Spirit 200 per Control Change in Echtzeit angesteuert und verän-
dert werden. Die folgende Tabelle gibt einen Überblick über die steuer-
baren Funktionen und die dazugehörigen Controller-Nummern:
La pagina si sta caricando...
La pagina si sta caricando...
La pagina si sta caricando...
La pagina si sta caricando...
La pagina si sta caricando...
La pagina si sta caricando...
La pagina si sta caricando...
La pagina si sta caricando...
La pagina si sta caricando...
La pagina si sta caricando...
La pagina si sta caricando...
La pagina si sta caricando...
La pagina si sta caricando...
La pagina si sta caricando...
La pagina si sta caricando...
La pagina si sta caricando...
La pagina si sta caricando...
La pagina si sta caricando...
La pagina si sta caricando...
La pagina si sta caricando...
La pagina si sta caricando...
La pagina si sta caricando...
La pagina si sta caricando...
La pagina si sta caricando...
La pagina si sta caricando...
La pagina si sta caricando...
La pagina si sta caricando...
La pagina si sta caricando...
La pagina si sta caricando...
La pagina si sta caricando...
La pagina si sta caricando...
La pagina si sta caricando...
La pagina si sta caricando...
La pagina si sta caricando...
La pagina si sta caricando...
La pagina si sta caricando...
La pagina si sta caricando...
La pagina si sta caricando...
La pagina si sta caricando...
La pagina si sta caricando...
La pagina si sta caricando...
La pagina si sta caricando...
La pagina si sta caricando...
La pagina si sta caricando...
La pagina si sta caricando...
La pagina si sta caricando...
La pagina si sta caricando...
La pagina si sta caricando...
La pagina si sta caricando...
La pagina si sta caricando...
La pagina si sta caricando...
La pagina si sta caricando...
La pagina si sta caricando...
La pagina si sta caricando...
La pagina si sta caricando...
La pagina si sta caricando...
-
 1
1
-
 2
2
-
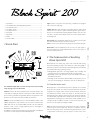 3
3
-
 4
4
-
 5
5
-
 6
6
-
 7
7
-
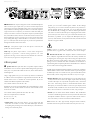 8
8
-
 9
9
-
 10
10
-
 11
11
-
 12
12
-
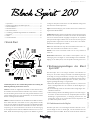 13
13
-
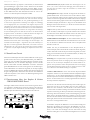 14
14
-
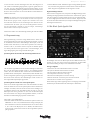 15
15
-
 16
16
-
 17
17
-
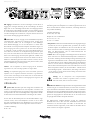 18
18
-
 19
19
-
 20
20
-
 21
21
-
 22
22
-
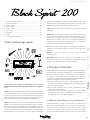 23
23
-
 24
24
-
 25
25
-
 26
26
-
 27
27
-
 28
28
-
 29
29
-
 30
30
-
 31
31
-
 32
32
-
 33
33
-
 34
34
-
 35
35
-
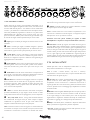 36
36
-
 37
37
-
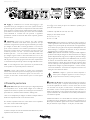 38
38
-
 39
39
-
 40
40
-
 41
41
-
 42
42
-
 43
43
-
 44
44
-
 45
45
-
 46
46
-
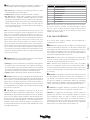 47
47
-
 48
48
-
 49
49
-
 50
50
-
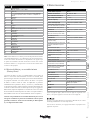 51
51
-
 52
52
-
 53
53
-
 54
54
-
 55
55
-
 56
56
-
 57
57
-
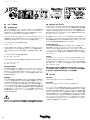 58
58
-
 59
59
-
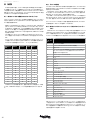 60
60
-
 61
61
-
 62
62
-
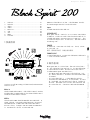 63
63
-
 64
64
-
 65
65
-
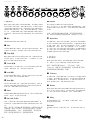 66
66
-
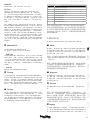 67
67
-
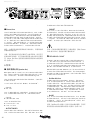 68
68
-
 69
69
-
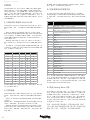 70
70
-
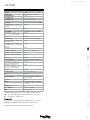 71
71
-
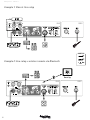 72
72
-
 73
73
-
 74
74
-
 75
75
-
 76
76


Hughes & Kettner Black Spirit 200 Manuale utente
- Categoria
- Amplificatore per strumenti musicali
- Tipo
- Manuale utente
in altre lingue
Documenti correlati
-
Hughes & Kettner SWITCHBLADE TSC Combo 50 Manuale utente
-
-
-
-
-
-
-
-
-
Altri documenti
-
Behringer FCB1010 Manuale del proprietario
-
Roland VT-3 Manuale utente
-
Fender Cyber-Twin SE Manuale del proprietario
-
Korg SV-1 Black Guida utente
-
Roland CUBE Lite Manuale utente
-
Ibanez ES2 Manuale del proprietario
-
Yamaha FS1R Manuale del proprietario
-
Eden CaliforniWAH Guida Rapida
-
CME WIDI Thru6 BT Guida utente
-
CME S-WT00B00 Guida utente