Analog way Pulse 4K Manuale utente
- Categoria
- Interruttori video
- Tipo
- Manuale utente
Questo manuale è adatto anche per


2
www.analogway.com
USER MANUAL
Information contained in this document, in particular data, pictures, information, trademarks and logos
are exclusive property of Analog Way and are protected by copyrights and other intellectual property
rights.
2020, Analog Way, all rights reserved – 03/2021
Consequently, any representation and/or reproduction, in part or in full, is prohibited and would be
considered a violation of Analog Way’s copyright and other intellectual property rights.
Visual representations (diagrams, photos, icons, pictograms, screenshots, spare parts, etc.) are not
contractual.

www.analogway.com
3
USER MANUAL
Contents
1 Disclaimer ....................................................................................................... 11
1.1 Copyrights ................................................................................................................................... 11
1.2 Warranty ..................................................................................................................................... 11
1.3 Liability ........................................................................................................................................ 11
1.4 Force Majeure ............................................................................................................................. 11
2 Terms and Definition ..................................................................................... 12
3 Hardware Specifications ............................................................................... 13
3.1 Safety instructions ...................................................................................................................... 13
English .................................................................................................................................................. 13
French .................................................................................................................................................. 14
Italian ................................................................................................................................................... 15
German ................................................................................................................................................ 16
Spanish ................................................................................................................................................ 17
Environmental specifications for all Midra™ 4K models ..................................................................... 18
3.2 Package Contents ........................................................................................................................ 18
3.3 Rack mount information ............................................................................................................. 18
4 Introducing Midra™ 4K.................................................................................. 19
4.1 Midra™ 4K product range ........................................................................................................... 19
4.2 Front and rear panel ................................................................................................................... 20
QuickVu 4K front panel ........................................................................................................................ 21
QuickMatrix 4K exclusive front panel keys .......................................................................................... 21
Front panel USB port ........................................................................................................................... 21
Inputs and Outputs .............................................................................................................................. 21
Genlock and Loop ................................................................................................................................ 22
Optional Analog and Dante audio card ............................................................................................... 22
4.3 Power on and off ......................................................................................................................... 22
Start the Midra™ 4K............................................................................................................................. 22
Power off ............................................................................................................................................. 22
Forced shutdown ................................................................................................................................. 23
4.4 Precautions when mounting a Midra™ 4K unit .......................................................................... 23
5 Using the Web RCS ....................................................................................... 24
5.1 Run the Web RCS ........................................................................................................................ 24
Web RCS requirements........................................................................................................................ 24
Default network settings ..................................................................................................................... 25
Connection .......................................................................................................................................... 25
Login page ............................................................................................................................................ 25
5.2 General tips ................................................................................................................................. 26
Web browser features ......................................................................................................................... 26
Section buttons (copy, paste and reset) .............................................................................................. 26
Set a number value .............................................................................................................................. 26
Search bar ............................................................................................................................................ 26
Alarms and notifications ...................................................................................................................... 26
Back panel shortcuts............................................................................................................................ 27

4
www.analogway.com
USER MANUAL
Standby / Restart ................................................................................................................................. 27
5.3 Dashboard - System settings ....................................................................................................... 27
Dashboard – Device ............................................................................................................................. 27
Dashboard – Firmware / Hardware (Firmware Update) ..................................................................... 28
Dashboard – Network .......................................................................................................................... 28
Dashboard – Cooling............................................................................................................................ 29
Dashboard – Power ............................................................................................................................. 29
Dashboard – Security ........................................................................................................................... 29
5.4 Save / Load Configuration ........................................................................................................... 30
Save the current Configuration in a Slot .............................................................................................. 31
Load a Configuration from a Slot ......................................................................................................... 31
Export a Configuration to the computer ............................................................................................. 32
Import a Configuration ........................................................................................................................ 32
5.5 Reset configuration ..................................................................................................................... 32
6 Midra™ 4K concepts ..................................................................................... 33
6.1 Inputs capacity ............................................................................................................................ 33
6.2 Outputs and Multiviewer capacity .............................................................................................. 33
6.3 Operating modes ........................................................................................................................ 33
Mixer mode ......................................................................................................................................... 33
Matrix mode ........................................................................................................................................ 33
Edge-blending mode ............................................................................................................................ 34
6.4 Images management in Midra 4K ............................................................................................... 34
Image Library ....................................................................................................................................... 34
Background and Foreground image slots ............................................................................................ 34
Images in Background set .................................................................................................................... 34
Image management - Quick recap ....................................................................................................... 35
6.5 Screen and Aux. Screen layers .................................................................................................... 36
Background layer ................................................................................................................................. 36
Live layers (Mixing and Split layers) ..................................................................................................... 36
Foreground layer ................................................................................................................................. 36
Aux layer .............................................................................................................................................. 36
7 Preconfig Menu .............................................................................................. 37
7.1 Preconfig > System ...................................................................................................................... 37
Genlock input settings ......................................................................................................................... 37
Genlock output settings ...................................................................................................................... 37
Color processing .................................................................................................................................. 37
Quick HDCP .......................................................................................................................................... 38
7.2 Preconfig > Screens / Aux Screens .............................................................................................. 38
Set Operating mode ............................................................................................................................ 38
7.3 Preconfig > Canvas ...................................................................................................................... 39
Rename a Screen ................................................................................................................................. 39
Tree view ............................................................................................................................................. 39
Set an output format ........................................................................................................................... 39
Patterns ............................................................................................................................................... 40
X and Y areas (Edge-blending mode) ................................................................................................... 41

www.analogway.com
5
USER MANUAL
Advanced output settings (in Preconfig > Canvas) .............................................................................. 42
7.4 Preconfig > Backgrounds ............................................................................................................. 42
Background sets .................................................................................................................................. 42
Background set for a single output Screen .......................................................................................... 43
Background set for an Eikos 4K in Edge-blending mode ..................................................................... 43
Reset a background set ....................................................................................................................... 43
8 Multiviewer ..................................................................................................... 44
8.1 Multiviewer settings ................................................................................................................... 44
8.2 Multiviewer signal ....................................................................................................................... 44
8.3 Multiviewer pattern .................................................................................................................... 45
8.4 Multiviewer adjustment (image correction) ............................................................................... 45
9 Outputs ........................................................................................................... 46
9.1 Outputs main screen ................................................................................................................... 46
9.2 Output settings ........................................................................................................................... 46
Output signal ....................................................................................................................................... 46
Output pattern .................................................................................................................................... 47
Output adjustment (image correction) ............................................................................................... 47
10 Inputs .............................................................................................................. 48
10.1 Inputs main screen ...................................................................................................................... 48
10.2 Input settings .............................................................................................................................. 48
Input signal .......................................................................................................................................... 49
Input adjustment (image correction) .................................................................................................. 49
Input aspect ......................................................................................................................................... 49
Input Keying ......................................................................................................................................... 50
11 Images and Library ........................................................................................ 51
11.1 Library ......................................................................................................................................... 51
Image formats ..................................................................................................................................... 51
Image specifications ............................................................................................................................ 51
Transfer images from the computer to the unit .................................................................................. 52
Download an image file from the unit ................................................................................................. 52
Delete an image file from the unit ...................................................................................................... 52
Manage Library from the Front panel ................................................................................................. 52
11.2 Images ......................................................................................................................................... 53
Images main screen ............................................................................................................................. 53
Image slots settings ............................................................................................................................. 53
Assign an imported image to a Foreground image slot ....................................................................... 54
Assign an imported image to a Background image slot ...................................................................... 54
Image aspect ........................................................................................................................................ 55
12 Formats and EDID .......................................................................................... 56
12.1 Formats ....................................................................................................................................... 56
Create a custom format ....................................................................................................................... 56
Edit a custom format ........................................................................................................................... 56
Delete a custom format ....................................................................................................................... 56
12.2 EDID ............................................................................................................................................. 57

6
www.analogway.com
USER MANUAL
EDID bank ............................................................................................................................................ 57
Save an EDID from inputs and outputs ................................................................................................ 57
Replace an Input EDID with an EDID from the bank ............................................................................ 57
Export an EDID to computer ................................................................................................................ 57
Import an EDID from computer ........................................................................................................... 58
Delete a custom EDID .......................................................................................................................... 58
13 Timers ............................................................................................................. 59
13.1 Create a timer ............................................................................................................................. 59
13.2 Control counter timers in the Multiviewer page ........................................................................ 59
14 Screens / Aux. ................................................................................................ 60
14.1 Screens menu interface .............................................................................................................. 60
Program and Preview .......................................................................................................................... 60
Views ................................................................................................................................................... 61
Sources - Left panel ............................................................................................................................. 61
Layer selection ..................................................................................................................................... 62
Transitions - Right panel ...................................................................................................................... 62
Bottom bar buttons ............................................................................................................................. 63
14.2 Layer properties .......................................................................................................................... 64
Set layer position ................................................................................................................................. 64
Set layer size ........................................................................................................................................ 64
Layer source......................................................................................................................................... 65
Set layer opacity .................................................................................................................................. 66
Set layer crop and aspect .................................................................................................................... 66
Set layer mask ...................................................................................................................................... 66
Set layer border ................................................................................................................................... 66
Set layer smooth border ...................................................................................................................... 67
Set layer shadow ................................................................................................................................. 67
Set layer color filter ............................................................................................................................. 67
Set layer Horizontal and Vertical flip ................................................................................................... 67
14.3 Layer transition ........................................................................................................................... 68
Set layer transition effect .................................................................................................................... 68
Set layer transition timing ................................................................................................................... 68
Set layer transition speed .................................................................................................................... 68
14.4 Aux Screen layer .......................................................................................................................... 68
15 Memories ........................................................................................................ 69
15.1 Memories tab .............................................................................................................................. 69
15.2 Master Memories ....................................................................................................................... 70
Save a Master memory from current Screens ..................................................................................... 70
Save a Master memory from existing Screen memories ..................................................................... 71
Load a Master memory ....................................................................................................................... 71
Edit a Master memory ......................................................................................................................... 71
15.3 Screen Memories ........................................................................................................................ 72
Save a Screen memory ........................................................................................................................ 72
Load a Screen memory ........................................................................................................................ 72
Edit a Screen memory.......................................................................................................................... 73

www.analogway.com
7
USER MANUAL
Quick overwrite or revert .................................................................................................................... 73
15.4 Aux Screen Memories ................................................................................................................. 73
15.5 Rename a Memory ...................................................................................................................... 73
15.6 Change the color of a Memory slot ............................................................................................ 73
15.7 Reorder memories ...................................................................................................................... 74
15.8 Delete a memory ........................................................................................................................ 74
16 Multiviewer ..................................................................................................... 75
16.1 Tips and recommendations ........................................................................................................ 75
16.2 Multiviewer menu interface ....................................................................................................... 75
Sources - Left panel ............................................................................................................................. 75
Widget selection .................................................................................................................................. 76
Multiviewer layout editor .................................................................................................................... 77
Bottom bar buttons ............................................................................................................................. 77
16.3 Widget properties ....................................................................................................................... 78
Widget position and size ..................................................................................................................... 78
Widget source - Assign content to a widget ........................................................................................ 79
16.4 Multiviewer memories ................................................................................................................ 79
Save a Multiviewer memory ................................................................................................................ 79
Load a Multiviewer memory ............................................................................................................... 79
Edit a Multiviewer memory ................................................................................................................. 79
Rename a Memory .............................................................................................................................. 79
Change the color of a Memory slot ..................................................................................................... 80
Reorder memories ............................................................................................................................... 80
17 User Maintenance and Troubleshooting ...................................................... 81
17.1 User Maintenance ....................................................................................................................... 81
17.2 Troubleshooting .......................................................................................................................... 81
18 Control from the front panel ......................................................................... 82
18.1 Monitor an input or output on the front panel LCD Screen ....................................................... 82
18.2 Status .......................................................................................................................................... 82
18.3 Quick access ................................................................................................................................ 83
Assign content to layers in Mixer mode .............................................................................................. 83
Assign content to layers in Matrix mode ............................................................................................. 83
Assign content to layers in Edge Blending mode ................................................................................. 83
Button color guide ............................................................................................................................... 84
18.4 Preconfig ..................................................................................................................................... 84
Set the Operating mode ...................................................................................................................... 84
Set Color Processing ............................................................................................................................ 84
Set a Screen Label ................................................................................................................................ 84
Set a Screen pattern ............................................................................................................................ 84
Set the Screen layer mode ................................................................................................................... 85
Set a covering (Edge-blending mode) .................................................................................................. 85
Set a Gap (Edge-blending mode) ......................................................................................................... 85
Set a Background set ........................................................................................................................... 85
18.5 Outputs ....................................................................................................................................... 85
Output signal status ............................................................................................................................. 85

8
www.analogway.com
USER MANUAL
Output plug status ............................................................................................................................... 86
Set an Output label .............................................................................................................................. 86
Output LED blink .................................................................................................................................. 86
Set an Output format .......................................................................................................................... 86
Set a framelock Output format............................................................................................................ 86
Set an output Area of interest (AOI) .................................................................................................... 86
Output HDMI plug settings .................................................................................................................. 87
Output SDI plug settings ...................................................................................................................... 87
Output Image correction ..................................................................................................................... 87
Output pattern .................................................................................................................................... 87
Monitor output on the front panel LCD Screen ................................................................................... 87
18.6 Inputs .......................................................................................................................................... 88
Inputs signal status .............................................................................................................................. 88
Autoset all inputs ................................................................................................................................. 88
Select the active plug (Input 1 & 2) ..................................................................................................... 88
Input LED blink ..................................................................................................................................... 88
Force Black on an input ....................................................................................................................... 88
Input HDMI, SDI or DisplayPort settings .............................................................................................. 88
Input image settings ............................................................................................................................ 89
Monitor input on the front panel LCD Screen ..................................................................................... 89
18.7 Images ......................................................................................................................................... 90
Transfer an image to the unit .............................................................................................................. 90
Capture an image from an input to the Image Library ........................................................................ 90
Capture an image from an input to a USB drive .................................................................................. 90
Images in the Library ........................................................................................................................... 90
Assign an image to a Background image slot ...................................................................................... 90
Assign an image to a Foreground image slot ....................................................................................... 91
18.8 Extra ............................................................................................................................................ 91
Create a Custom Format ...................................................................................................................... 91
Edit a Custom Format .......................................................................................................................... 91
Delete a Custom Format ...................................................................................................................... 91
Import EDID form USB drive ................................................................................................................ 91
Manage Input EDID .............................................................................................................................. 92
Manage output EDID ........................................................................................................................... 92
Export an EDID ..................................................................................................................................... 92
Create a Custom EDID ......................................................................................................................... 92
Set Quick Preset key to Fade to Black ................................................................................................. 92
Set Quick Preset key to call preset images .......................................................................................... 93
Set Quick Preset key to call a Master Memory .................................................................................... 93
18.9 Services ....................................................................................................................................... 93
Export device configuration to a USB drive ......................................................................................... 93
Import device configuration ................................................................................................................ 93
Save a configuration to the unit memory ............................................................................................ 93
Load a configuration from the unit memory ....................................................................................... 93
Export a saved configuration ............................................................................................................... 94
Delete a saved configuration ............................................................................................................... 94
18.10 Control ........................................................................................................................................ 94

www.analogway.com
9
USER MANUAL
Network connection ............................................................................................................................ 94
Firmware Update ................................................................................................................................. 94
Set after power failure behavior ......................................................................................................... 94
Set device Date and Time .................................................................................................................... 94
Front panel settings ............................................................................................................................. 95
Reset to default values ........................................................................................................................ 95
Factory reset ........................................................................................................................................ 95
Reset erase specific settings ................................................................................................................ 95
18.11 Live – Screen settings .................................................................................................................. 95
Global Settings ..................................................................................................................................... 95
Screen Transitions ............................................................................................................................... 95
Screen step back .................................................................................................................................. 95
Copy Program to Preview .................................................................................................................... 96
Set the Background layer ..................................................................................................................... 96
Set the Live layer ................................................................................................................................. 96
Set the Foreground layer ..................................................................................................................... 96
Set layer Transition .............................................................................................................................. 97
Set Aux Screen background color ........................................................................................................ 97
Set Aux Screen layer ............................................................................................................................ 97
18.12 Multiviewer ................................................................................................................................. 97
Set Multiviewer template .................................................................................................................... 97
Set Multiviewer widget manually ........................................................................................................ 97
Set a Current Time timer ..................................................................................................................... 97
Set a Countdown timer ........................................................................................................................ 98
Set a Stopwatch timer ......................................................................................................................... 98
Save a Multiviewer memory ................................................................................................................ 98
Load a Multiviewer memory ............................................................................................................... 98
Delete a Multiviewer memory ............................................................................................................. 98
18.13 Screen Memories ........................................................................................................................ 99
Autoscale on load ................................................................................................................................ 99
Save a Master Memory from current Screens (self-contained) .......................................................... 99
Save a Master Memory from current Screens (to Screen Memories) ................................................. 99
Save a Master Memory from Screens Memories ................................................................................ 99
Save a Screen Memory ........................................................................................................................ 99
Save a Aux. Screen Memory .............................................................................................................. 100
Load a Master Memory ..................................................................................................................... 100
Load a Screen Memory ...................................................................................................................... 100
Load an Aux Screen Memory ............................................................................................................. 100
Delete a Memory ............................................................................................................................... 100
19 Audio settings .............................................................................................. 101
19.1 Audio internal processing rate .................................................................................................. 101
Set a custom internal reference and global transition delay ............................................................ 101
Set the internal reference to follow Dante reference ....................................................................... 101
19.2 Audio in inputs .......................................................................................................................... 101
Select audio from another input plug................................................................................................ 101
Set an input audio (Basic mode) ........................................................................................................ 101

10
www.analogway.com
USER MANUAL
Set an input audio (Advanced mode) ................................................................................................ 102
Inputs audio level .............................................................................................................................. 102
Set Embed group for an SDI input ..................................................................................................... 102
19.3 Custom audio sources ............................................................................................................... 102
19.4 Audio in outputs........................................................................................................................ 103
Set the number of audio output channels ......................................................................................... 103
Set an output audio (Basic mode) ..................................................................................................... 103
Set an output audio (Advanced mode) .............................................................................................. 103
Set Dante output ............................................................................................................................... 104
Set Line output .................................................................................................................................. 104
19.5 Set Screen or Aux. Screen audio ............................................................................................... 104
Set a Screen to use the audio of one input ....................................................................................... 104
Set a Screen audio to follow the layer content ................................................................................. 104
Set a Screen to follow the audio layer ............................................................................................... 105
19.6 Set Multiviewer audio ............................................................................................................... 105
19.7 Dante settings ........................................................................................................................... 105
Reset the Dante card ......................................................................................................................... 105
Reboot the Dante card ...................................................................................................................... 105
APPENDICES ................................................................................................................ 106
CONTACT INFORMATION ............................................................................................ 107

www.analogway.com
11
USER MANUAL
1 Disclaimer
The information in this document is subject to change without notice, while every effort is made to be
accurate. Analog Way cannot be held liable for any kind of loss whatsoever that may be caused by the use of
or reliance in this manual.
1.1 Copyrights
The software installed in the Midra™ 4K remains the sole property of Analog Way unless stated otherwise in
a separate licensing agreement. Any attempt to copy or alter the software is prohibited and will render any
warranties void.
1.2 Warranty
The Midra™ 4K has been tested in various applications and is deemed to be suitable for uses described in this
manual. This product is provided “as is”, including all or any ‘perceived’ or possible faults. The Licensor grants
no warranty regarding the utility or contents of the software. Analog Way will warrant the hardware for three
years from the date of purchase on parts and labor, excluding I/O connector cards which are warranted for
one year. The method of warranty is Return to Base (transport costs from and to us are the owner’s
responsibility). In case of hardware fault please contact your local distributor or us (www.analogway.com).
While not an exhaustive list, the following are provided for guidance. Warranty claims will be invalidated in
these circumstances:
• A hardware failure is caused by inappropriate handling of hardware such as dropping the image
processor, using the image processor without proper ventilation, exposing the unit to water, other
liquids or dust.
• The software has been loaded or there has been an attempt to load software onto the unit in any
way other than described in the manual or recommended by Analog Way.
• The hardware has been modified by someone other than a certified Analog Way dealer.
1.3 Liability
Analog Way shall not be liable for any loss or damage, be it direct or indirect in regards to the utility or
contents of the software or hardware, except to the extent provided by law. Notwithstanding the above,
liability for indirect, special, incidental or consequential loss or damage that may arise in respect of the
software or hardware, is expressly excluded.
1.4 Force Majeure
Liability of Analog Way is excluded in all cases that constitute Force Majeure circumstances, namely,
circumstances beyond the control of Analog Way.

12
www.analogway.com
USER MANUAL
2 Terms and Definition
Auxiliary Screen or Aux: A specific Screen composed of a single output with a format up to 4K@60. The
content displayed can be an input or Screen’s Program.
Background Image: Image source ready to be used in a Background Set. Each Screen has four Background
Image slots.
Background Layer: Screen layer with lowest priority that can display a Background Set.
Background Set: A source content created for a Screen background layer. A Background Set is made by
assigning a Background Image or live input in every output of a Screen.
Foreground Image: Image source ready to be used in a Foreground layer. Each Screen has four Foreground
Image slots.
Foreground Layer: Resizable Screen layer with highest priority that can display a Foreground Image.
Image: Englobes all non-animated images. Images are imported through the Web RCS and used as content
in layers.
Keying: Electronic process where a video image is electronically superimposed over another source by
dynamically removing a portion of the first image. For example, removing all content of a certain color (such
as green or blue) is called Chroma Key and removing content based on its luminance levels is called Luma
Key. Keying is typically used for titles, logos and special effects.
Layer: Item displaying one live input. Layers can overlap, depending on their visual priority. Layers can be
repositioned, resized, displayed with borders, etc.
Multiviewer: Dedicated output used to monitor content in widgets. Midra™ 4K units have one Multiviewer
output able to display up to 16 widgets.
Preview (PRW): The content in Preview is not displayed on output Screens. All Preview screens replace their
corresponding Program screens during transition (or Take). Preview Screens are meant to load layers and
content before transitioning to Program.
Program (PGM): The content in Program shows what is currently displayed on Screens. It is possible to make
changes directly in the Program screens (drag and drop content in layers, layer size and position, etc.). It is
also possible to lock the Program screens to only edit the Preview screens.
Screen: Destination where the picture will be displayed. For example, a single display or a projection surface
which can be composed of one or multiple outputs. Each screen is composed of one or multiple layers.
Soft edge blending: Technology used to compensate for the covering area when two (or more) video
projectors are combined to display a continuous content across one screen. The resulting image will appear
as a single unified picture.
Web RCS: User interface to setup and operate the Midra™ 4K. It is a web browser based Remote Control
Software designed by Analog Way.
Widget: Multiviewer item displaying one content (Input, Timer, Preview or Program Screen). Similar to a
Layer but without visual priority, widgets are displayed on same level and cannot overlap.

www.analogway.com
13
USER MANUAL
3 Hardware Specifications
3.1 Safety instructions
English
All of the safety and operating instructions should be read before the product is operated and should be
maintained for further reference. Please follow all of the warnings on this product and its operating
instructions.
• WARNING: To prevent the risk of electric shock and fire, do not expose this device to rain, humidity or
intense heat sources (such as heaters and direct sunlight). This equipment is not suitable for use in locations
where children are likely to be present.
• INSTALLATION: Slots and openings in the device are provided for ventilation and to avoid overheating.
Make sure the device is never placed near a textile surface that could block the openings. Also keep away
from excessive dust, vibrations and shocks.
• POWER: Only use the power supply indicated on the device of the power source. Devices equipped with a
grounding plug should only be used with a grounding type outlet. In no way should this grounding be
modified, avoided or suppressed. Connection of equipment to main supply must be after branch circuit
breaker of the building installation.
• POWER CORD: The device is equipped with a detachable power cord, to remove mains, disconnect it at
appliance coupler.
Caution: The power cord constitutes the only mean to completely disconnect the equipment from the main power.
Use the following guidelines:
- The equipment connected to the network must have a release system easily accessible and located
outside the unit.
- Unplug the power cord; do not pull on the power cords but always on the plug itself.
- The outlet should always be near the device and easily accessible.
- A power supply cord should be routed so that it is not likely to be walked on or pinched by items placed
upon or against it.
If the power supply cord is damaged, unplug the device. Using the device with a damaged power supply cord
may expose your device to electric shocks or other hazards. Verify the condition of the power supply cords
periodically. Contact your dealer or service center for replacement if damaged.
• CONNECTIONS: All inputs and outputs (except for the power input) are Electrical energy source class 1 (ES1)
as defined in IEC/UL 62368-1 edition 2.
ES1 limits: 60Vdc or 30V rms/ 42.4V peak.
• SERVICING: Do not attempt to service this product yourself by opening or removing covers and screws since
it may expose your device to electric shocks or other hazards. The internal Lithium cell battery is not
replaceable. In case of problem, contact your supplier or Analog Way.
• OPENINGS: Never push objects of any kind into this product through the openings. If liquids have been
spilled or objects have fallen into the device, unplug it immediately and have it checked by a qualified
technician.

14
www.analogway.com
USER MANUAL
French
Afin de mieux comprendre le fonctionnement de cet appareil nous vous conseillons de bien lire toutes les
consignes de sécurité et de fonctionnement avant utilisation. Conservez les instructions de sécurité et de
fonctionnement afin de pouvoir les consulter ultérieurement. Respectez toutes les consignes marquées dans
la documentation, sur le produit et sur ce document.
• ATTENTION : Afin de prévenir tout risque de choc électrique et d’incendie, ne pas exposer cet appareil à la
pluie, à l’humidité ou à des sources de chaleur intense. Cet équipement ne convient pas pour une utilisation
dans des endroits où des enfants sont susceptibles d'être présents.
• INSTALLATION : Veillez à assurer une circulation d’air suffisante pour éviter toute surchauffe à l’intérieur
de l’appareil. Ne placez pas l’appareil sur ou à proximité d’une surface textile susceptible d’obstruer les
orifices de ventilation. N’installez pas l’appareil à proximité de sources de chaleur comme un radiateur ou
une poche d’air chaud, ni dans un endroit exposé au rayonnement solaire direct, à des poussières excessives,
à des vibrations ou à des chocs mécaniques. Ceci pourrait provoquer un mauvais fonctionnement et un
accident.
• ALIMENTATION : Ne faire fonctionner l’appareil qu’avec la source d’alimentation indiquée sur l’appareil.
Les appareils doivent être obligatoirement connectés sur une source équipée d’une mise à la terre efficace.
En aucun cas cette liaison de terre ne devra être modifiée, contournée ou supprimée. Raccordement des
équipements à l’alimentation principale doit être postérieur au disjoncteur de branchement de l’installation
électrique du bâtiment.
• CORDON D’ALIMENTATION : Les appareils sont équipés d’un cordon d’alimentation détachable, la mise
hors tension se fait en débranchant ce cordon de l’appareil.
Attention : Le cordon d’alimentation constitue le seul moyen de débrancher l’appareil totalement de l’alimentation secteur.
Appliquer les consignes suivantes :
- Le matériel relié à demeure au réseau, doit avoir un dispositif de sectionnement facilement accessible qui
doit être incorporé à l’extérieur de l’appareil.
- Débrancher le cordon d’alimentation de la prise murale si vous prévoyez de ne pas utiliser l’appareil pendant
quelques jours ou plus.
- Pour débrancher le cordon, tirez-les par la fiche. Ne tirez jamais sur le cordon proprement dit.
- Les prises d’alimentation doivent se trouver à proximité de l’appareil et être aisément accessibles.
- Ne laissez pas tomber le cordon d’alimentation et ne posez pas d’objets lourds dessus.
Si un cordon d’alimentation est endommagé, débranchez-le immédiatement de la prise murale. Il est
dangereux de faire fonctionner un appareil avec un cordon endommagé ; un câble abîmé peut provoquer un
risque d’incendie ou un choc électrique. Vérifiez les câbles d’alimentation de temps en temps. Contactez
votre revendeur ou le service après-vente pour un remplacement.
• CONNEXIONS : Toutes les entrées et sorties (exceptée l’entrée d’alimentation) sont des sources d’énergie
électrique de classe 1 (ES1) tel que défini dans IEC/UL 62368-1 édition 2.
ES1: Electrical energy source class 1 (limites : 60Vdc ou 30V rms/ 42.4V peak).
• RÉPARATION ET MAINTENANCE : L’utilisateur ne doit en aucun cas essayer de procéder aux opérations de
dépannage, car l’ouverture des appareils par retrait des capots ou de toutes autres pièces constituant les
boîtiers ainsi que le dévissage des vis apparentes à l’extérieur, risquent d’exposer l’utilisateur à des chocs
électriques ou autres dangers.
La pile bouton au Lithium présente à l’intérieur de la machine n’est pas remplaçable. En cas de problème,
contactez le service après-vente, votre revendeur ou adressez-vous à un personnel qualifié uniquement.
• OUVERTURES ET ORIFICES : Les appareils peuvent comporter des ouvertures (aération, fentes, etc.),
veuillez ne jamais y introduire d’objets et ne jamais obstruer ses ouvertures.

www.analogway.com
15
USER MANUAL
Si un liquide ou un objet pénètre à l’intérieur de l’appareil, débranchez immédiatement l’appareil et faites-
le contrôler par un personnel qualifié avant de le remettre en service.
Italian
Allo scopo di capire meglio il funzionamento di questa apparecchiatura vi consigliamo di leggere bene tutti i
consigli di sicurezza e di funzionamento prima dell’utilizzo. Conservare le istruzioni di sicurezza e di
funzionamento al fine di poterle consultare ulteriormente. Seguire tutti i consigli indicati su questo manuale
e sull’apparecchiatura.
• ATTENZIONE: Questo apparecchio non e’ adatto all’utilizzo da parte di bambini. Al fine di prevenire
qualsiasi rischio di shock elettrico e d’incendio, non esporre l’apparecchiatura a pioggia, umidità e a sorgenti
di eccessivo calore.
• INSTALLAZIONE: Assicuratevi che vi sia una sufficiente circolazione d’aria per evitare qualsiasi
surriscaldamento all’interno dell’apparecchiatura. Non collocare l’apparecchiatura in prossimità o su
superfici tessili suscettibili di ostruire il funzionamento della ventilazione. Non installate l’apparecchiatura in
prossimità di sorgenti di calore come un radiatore o una fuoruscita d’aria calda, né in un posto esposto
direttamente ai raggi del sole, a polvere eccessiva, a vibrazioni o a shock meccanici. Ció potrebbe provocare
un erroneo funzionamento e un incidente.
• ALIMENTAZIONE: Far funzionare l’apparecchiatura solo con la sorgente d’alimentazione indicata
sull’apparecchiatura. Le apparecchiature queste devono essere obbligatoriamente collegate su una sorgente
fornita di una efficiente messa a terra. In nessun caso questo collegamento potrà essere modificato,
sostituito o eliminato. Connessione delle apparecchiature alla rete elettrica deve essere successiva
interruttore di circuito dell’impianto dell’edificio.
• CAVO DI ALIMENTAZIONE: Il dispositivo è dotato di un cavo di alimentazione removibile, per rimuovere
alimentazione scollegare dalla Presa.
Attenzione: il cavo di alimentazione è il solo modo di disconnettere l’apparecchio dell’alimentazione.
Seguire le instruzioni seguenti:
- Il materiale collegato a residenza alla rete, deve avere un dispositivo di sezionamento facile da raggiungere
e che deve essere inserito all’esterno del apparecchio.
- Scollegare l’apparecchiatura dalla presa a muro se si prevede di non utilizzarla per qualche giorno.
- Per disconnettere il cavo, tirare facendo forza sul connettore.
- La prese d’alimentazione deve trovarsi a prossimità dell’apparecchiatura ed essere facilmente accessibile.
- Non far cadere il cavo di alimentazione né appoggiarci sopra degli oggetti pesanti. Se il cavo di alimentazione
é danneggiato, spegnere immediatamente l’apparecchiatura.
E’ pericoloso far funzionare questa apparecchiatura con un cavo di alimentazione danneggiati, un cavo
graffiato puó provocare un rischio di incendio o uno shock elettrico. Verificare il cavo di alimentazione spesso.
Contattare il vostro rivenditore o il servizio assistenza per una sostituzione.
• CONNESSIONE: Tutti gli ingressi e le uscite (ad eccezione per l’ingresso di alimentazione) sono sorgenti di
energia in classe 1 (ES1) come definito nelle normative IEC/UL 62368-1 edizione 2. Limiti ES1: 60Vdc or 30V
rms/ 42.4V di picco.
• RIPARAZIONI E ASSISTENZA: L’utilizzatore non deve in nessun caso cercare di riparare l’apparecchiatura,
poiché con l’apertura del coperchio metallico o di qualsiasi altro pezzo costituente la scatola metallica,
nonché svitare le viti che appaiono esteriormente, poiché ció puó provocare all’utilizzatore un rischio di shock
elettrico o altri rischi. La batteria al litio all’interno dell’apparato non e’ sostituibile. In caso di problemi
contattare il fornitore.
• APERTURE DI VENTILAZIONE: Le apparecchiature possono comportare delle aperture di ventilazione, si
prega di non introdurre mai oggetti o ostruire le sue fessure. Se un liquido o un oggetto penetra all’interno
dell’apparecchiatura, disconnetterla e farla controllare da personale qualificato prima di rimetterla in servizio.

16
www.analogway.com
USER MANUAL
German
Um den Betrieb dieses Geräts zu verstehen, raten wir Ihnen vor der Inbetriebnahme alle Sicherheits und
Betriebsanweisungen genau zu lesen. Diese Sicherheits- und Betriebsanweisungen für einen späteren
Gebrauch sicher aufbewahren. Alle in den Unterlagen, an dem Gerät und hier angegebenen
Sicherheitsanweisungen einhalten.
• ACHTUNG: Nicht für Kinder geeignet. Um jegliches Risiko eines Stromschlags oder Feuers zu vermeiden,
das Gerät nicht Regen, Feuchtigkeit oder intensiven Wärmequellen aussetzen.
• EINBAU: Eine ausreichende Luftzufuhr sicherstellen, um jegliche Überhitzung im Gerät zu vermeiden. Das
Gerät nicht auf und in Nähe von Textiloberflächen, die Belüftungsöffnungen verschließen können, aufstellen.
Das Gerät nicht in Nähe von Wärmequellen, wie z.B. Heizkörper oder Warmluftkappe, aufstellen und es nicht
dem direkten Sonnenlicht, übermäßigem Staub, Vibrationen oder mechanischen Stößen aussetzen. Dies
kann zu Betriebsstörungen und Unfällen führen.
• STROMVERSORGUNG: Das Gerät nur mit der auf dem Gerät bezeichnete Stromquelle betreiben. Gerät mit
geerdeter Hauptstromversorgung muss an eine Stromquelle mit effizienter Erdung angeschlossen werden.
Diese Erdung darf auf keinen Fall geändert, umgangen oder entfernt werden. Anschluss von Geräten ans
Stromnetz muss nach Abzweigschalter des Gebäudes Installation.
NETZKABEL: Das Gerät ist mit einem lösbaren Netzkabel ausgestattet ; um es völlig vom Netz zu trennen,
ziehen Sie bitte das Netzkabel aus der Kaltgerätebuchse.
Achtung: Das Netzkabel stellt die einzige Möglichkeit dar, das Gerät vollständig vom Netzanschluss zu trennen.
Bitte beachten Sie die folgenden Hinweise:
- Wenn Geräte dauerhaft am Netz bleiben, müssen sie über eine leicht zugängliche Trennvorrichtung
verfügen, die außen am Gerät angebracht sein muss.
- Das Kabel mittels des Steckers herausziehen. Niemals am Stromkabel selbst ziehen.
- Die Steckdose muss sich in der Nähe des Geräts befinden und leicht zugänglich sein.
- Das Stromkabel nicht fallen lassen und keine schweren Gegenstände darauf stellen.
Wenn das Stromkabel beschädigt ist, das Gerät sofort abschalten. Es ist gefährlich das Gerät mit einem
beschädigten Stromkabel zu betreiben; ein abgenutztes Kabel kann zu einem Feuer oder Stromschlag führen.
Die Stromkabel regelmäßig untersuchen. Für Ersatz wenden Sie sich an Ihren Verkäufer oder eine
Kundendienststelle.
• ANSCHLÜSSE: Alle Eingänge und Ausgänge (ausgenommen der Stromversorgung) entsprechen der der ES1
Klassifizierung entsprechend der IEC/UL 62368-1 Edition 2. ES1 max. Auslegung: 60Vdc oder 20V rms / 42,4V
Spitze.
• REPARATUR UND WARTUNG: Der Benutzer darf keinesfalls versuchen das Gerät selbst zu reparieren, die
Öffnung des Geräts durch Abnahme der Abdeckhaube oder jeglichen anderen Teils des Gehäusessowie die
Entfernung von außen sichtbaren Schrauben zu Stromschlägen oder anderen Gefahren für den Benutzer
führen kann. Die im Gerät eingebaute Lithium Batterie ist nicht austauschbar. Im Falle eines Problems
nehmen Sie Kontakt mit Ihrem Lieferanten auf.
• ÖFFNUNGEN UND MUNDUNGEN: Die Geräte können über Öffnungen verfügen (Belüftung, Schlitze, usw.).
Niemals Gegenstände in die Öffnungen einführen oder die Öffnungen verschließen. Wenn eine Flüssigkeit
oder ein Gegenstand in das Gerät gelangt, den Stecker herausziehen und es vor einer neuen Inbetriebnahme
von qualifiziertem Fachpersonal überprüfen lassen.

www.analogway.com
17
USER MANUAL
Spanish
Para comprender mejor el funcionamiento de este aparato, le recomendamos que le acuidadosamente todas
las consignas de seguridad y de funcionamiento del aparato antes de usarlo. Conserve las instrucciones de
seguridad y de funcionamiento para que pueda consultarlas posteriormente. Respete todas las consignas
indicadas en la documentación, relacionadas con el producto y este documento.
• CUIDADO: No recomendado para niños. Para prevenir cualquier riesgo de choque eléctrico y de incendio,
no exponga este aparato a la lluvia, a la humedad ni a fuentes de calorintensas.
• INSTALACIÓN: Cerciórese de que haya una circulación de aire suficiente para evitar cualquier
sobrecalentamiento al interior del aparato. No coloque el aparato cerca ni sobre una superficie textil que
pudiera obstruir los orificios de ventilación. No instale el aparato cerca de fuentes de calor como radiador o
boca de aire caliente, ni en un lugar expuesto a los rayos solares directos o al polvo excesivo, a las vibraciones
o a los choques mecánicos. Esto podría provocar su mal funcionamiento o un accidente.
• ALIMENTACIÓN: Ponga a funcionar el aparato únicamente con la fuente de alimentación que se indica en
el aparato. Los aparatos deben estar conectados obligatoriamente a una fuente equipada con una puesta a
tierra eficaz. Por ningún motivo este enlace de tierra deberá ser modificado, cambiado o suprimido. Conexión
del equipo a la red eléctrica debe ser posterior del interruptor de circuitos derivados de la instalación del
edificio.
• CABLE DE ALIMENTACION: El equipo se suministra con un cable de alimentación, si desconectamos el cable
dejamos al equipo sin alimentación.
Atención: El cable de alimentación constituye el único medio de desconectar el aparato totalmente de la red eléctrica.
Aplicar las siguientes consignas:
- El material conectado a residencia a la red informática, debe de tener un dispositivo de seccionamiento
fácilmente accesible que debe de ser incorporado al exterior del aparato.
- Desconectar el aparato del enchufe mural si no piensa utilizarlo durante varios días.
- Para desconectar el cable, tire de la clavija. No tire nunca del cable propiamente dicho.
- El enchufes de alimentación debe estar cerca del aparato y ser de fácil acceso.
- No deje caer el cable de alimentación ni coloque objetos pesados encima de ellos.
Si el cable de alimentación sufriera algún daño, ponga el aparato inmediatamente fuera de tensión. Es
peligroso hacer funcionar este aparato con un cable averiado, ya que un cable dañado puede provocar un
incendio o un choque eléctrico. Verifique el estado los cables de alimentación de vez en cuando. Póngase en
contacto con su distribuidor o con el servicio de posventa si necesita cambiarlo.
• CONEXIONES: Todas las entradas y salidas (excepto la entrada de corriente) son de nivel eléctrico clase 1
(ES1) tal como se define en la norma IEC / UL 62368-1 2. Límites de ES1 60 VCC ó 30 V rms / 42,4 V de pico.
• REPARACIÓN Y MANTENIMIENTO: Por ningún motivo, el usuario deberá tratar de efectuar operaciones de
reparación, ya que si abre los aparatos retirando el capó o cualquier otra pieza que forma parte de las cajas
o si destornilla los tornillos aparentes exteriores, existe el riesgo de producirse una explosión,choques
eléctricos o cualquier otro incidente. La batería interna de litio no es reemplazable. En caso de problema,
contacte con su proveedor.
• ABERTURAS Y ORIFICIOS: Los aparatos pueden contener aberturas (aireación, ranuras, etc.). Nointroduzca
allí ningún objeto ni obstruya nunca estas aberturas. Si un líquido o un objeto penetra al interior del aparato,
desconéctelo y hágalo revisar por personal cualificado antes de ponerlo nuevamente en servicio.

18
www.analogway.com
USER MANUAL
Environmental specifications for all Midra™ 4K models
General:
• Cooling air flows from front side to rear.
• Max ambient operating temperature: < 40°C (< 104°F).
• Operating temperature: 0 to +40°C / +32°F to +104°F
• Storage temperature: -40 to +70°C / -40°F to +158°F
• Operating humidity: 10 to 80% (non condensing)
• Input voltage range: 100-240 VAC autosensing, 50/60 Hz
Safety standard:
• IEC/EN/UL 62368-1
• CSA C22.2#62368-1
Electromagnetic compatibility:
• EN55032
• EN55024
• EN61000-3-2
• EN61000-3-3
• CFR47 Part 15
• ICES-003
Environment:
• RoHS
• WEEE
Caution: Should the unit lose power unexpectedly; unsaved settings may be lost.
3.2 Package Contents
The Midra™ 4K sales package includes:
- One Midra™ 4K unit
- One power supply cord
- One Rackmount kit
- One Ethernet cross cable
- One Quick start guide*
*The latest versions of the User manual and Quick start guide are also available on www.analogway.com
3.3 Rack mount information
All Midra™ 4K units are equipped with 4 handy anti-slip rubber feet and can be used directly on a table.
For rack mount installation, see document Midra 4K – Rack mount.pdf attached to this manual.

www.analogway.com
19
USER MANUAL
4 Introducing Midra™ 4K
Before setting up the Midra™ 4K for the first time, please read through all of the documentation to become
familiar with its powerful features. The Midra™ 4K is an ideally tailored video production tool for small and
mid-size live event staging and fixed installation applications.
4.1 Midra™ 4K product range
The Midra™ 4K product range includes four models:
- QuickVu 4K
- QuickMatrix 4K
- Pulse 4K
- Eikos 4K
All models have similar front panels and rear panels, they offer the same capabilities in terms of inputs and
outputs plugs. The models have different operating modes and capabilities.
Note: The Eikos 4K is more powerful than other models as it is able to use Images or Live Inputs as Background content.
Other models can only use Images as Background content.
Midra™ 4K Models Operating modes Output 1 Output 2
QuickVu 4K Mixer mode only (S-Aux) 1 ML or 2 SL AUX
QuickMatrix 4K Matrix mode only (S-S) 1 ML or 2 SL 1 ML or 2 SL
Pulse 4K
Mixer mode (S-Aux) 2 ML or 4 SL AUX
Matrix mode (S-S) 1 ML or 2 SL 1 ML or 2 SL
Eikos 4K
Mixer mode (S-Aux) 2 ML or 4 SL AUX
Matrix mode (S-S) 1 ML or 2 SL 1 ML or 2 SL
Edge-blending mode 2 ML or 4 SL
Note: ML = Mixing Layer and SL = Split Layer
Table 1 - Midra™ 4K family
For more information, see 6.3 Operating modes page 33.
All Midra™ 4K units can be fully operated from their front panel.

20
www.analogway.com
USER MANUAL
4.2 Front and rear panel
- All models share common keys on the front panel but some keys differ to match the functions of the device.
- All models have the same rear panel with the Analog and Dante audio card being an option.
Fig. 1 - Midra 4K front and rear panels (ex: Eikos 4K)
La pagina si sta caricando...
La pagina si sta caricando...
La pagina si sta caricando...
La pagina si sta caricando...
La pagina si sta caricando...
La pagina si sta caricando...
La pagina si sta caricando...
La pagina si sta caricando...
La pagina si sta caricando...
La pagina si sta caricando...
La pagina si sta caricando...
La pagina si sta caricando...
La pagina si sta caricando...
La pagina si sta caricando...
La pagina si sta caricando...
La pagina si sta caricando...
La pagina si sta caricando...
La pagina si sta caricando...
La pagina si sta caricando...
La pagina si sta caricando...
La pagina si sta caricando...
La pagina si sta caricando...
La pagina si sta caricando...
La pagina si sta caricando...
La pagina si sta caricando...
La pagina si sta caricando...
La pagina si sta caricando...
La pagina si sta caricando...
La pagina si sta caricando...
La pagina si sta caricando...
La pagina si sta caricando...
La pagina si sta caricando...
La pagina si sta caricando...
La pagina si sta caricando...
La pagina si sta caricando...
La pagina si sta caricando...
La pagina si sta caricando...
La pagina si sta caricando...
La pagina si sta caricando...
La pagina si sta caricando...
La pagina si sta caricando...
La pagina si sta caricando...
La pagina si sta caricando...
La pagina si sta caricando...
La pagina si sta caricando...
La pagina si sta caricando...
La pagina si sta caricando...
La pagina si sta caricando...
La pagina si sta caricando...
La pagina si sta caricando...
La pagina si sta caricando...
La pagina si sta caricando...
La pagina si sta caricando...
La pagina si sta caricando...
La pagina si sta caricando...
La pagina si sta caricando...
La pagina si sta caricando...
La pagina si sta caricando...
La pagina si sta caricando...
La pagina si sta caricando...
La pagina si sta caricando...
La pagina si sta caricando...
La pagina si sta caricando...
La pagina si sta caricando...
La pagina si sta caricando...
La pagina si sta caricando...
La pagina si sta caricando...
La pagina si sta caricando...
La pagina si sta caricando...
La pagina si sta caricando...
La pagina si sta caricando...
La pagina si sta caricando...
La pagina si sta caricando...
La pagina si sta caricando...
La pagina si sta caricando...
La pagina si sta caricando...
La pagina si sta caricando...
La pagina si sta caricando...
La pagina si sta caricando...
La pagina si sta caricando...
La pagina si sta caricando...
La pagina si sta caricando...
La pagina si sta caricando...
La pagina si sta caricando...
La pagina si sta caricando...
La pagina si sta caricando...
La pagina si sta caricando...
La pagina si sta caricando...
-
 1
1
-
 2
2
-
 3
3
-
 4
4
-
 5
5
-
 6
6
-
 7
7
-
 8
8
-
 9
9
-
 10
10
-
 11
11
-
 12
12
-
 13
13
-
 14
14
-
 15
15
-
 16
16
-
 17
17
-
 18
18
-
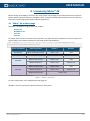 19
19
-
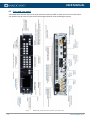 20
20
-
 21
21
-
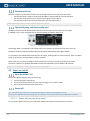 22
22
-
 23
23
-
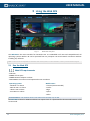 24
24
-
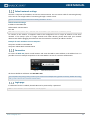 25
25
-
 26
26
-
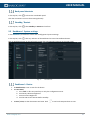 27
27
-
 28
28
-
 29
29
-
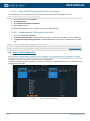 30
30
-
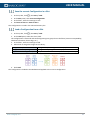 31
31
-
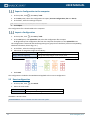 32
32
-
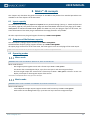 33
33
-
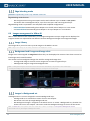 34
34
-
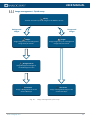 35
35
-
 36
36
-
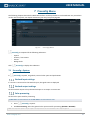 37
37
-
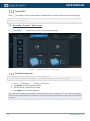 38
38
-
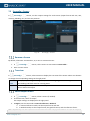 39
39
-
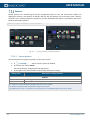 40
40
-
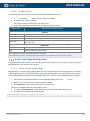 41
41
-
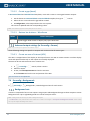 42
42
-
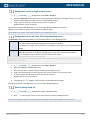 43
43
-
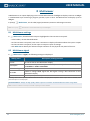 44
44
-
 45
45
-
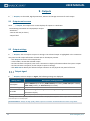 46
46
-
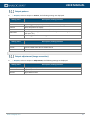 47
47
-
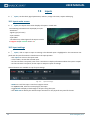 48
48
-
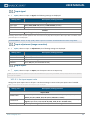 49
49
-
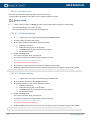 50
50
-
 51
51
-
 52
52
-
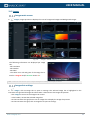 53
53
-
 54
54
-
 55
55
-
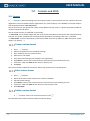 56
56
-
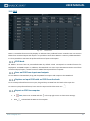 57
57
-
 58
58
-
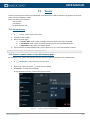 59
59
-
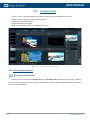 60
60
-
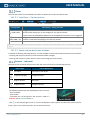 61
61
-
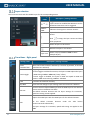 62
62
-
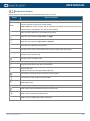 63
63
-
 64
64
-
 65
65
-
 66
66
-
 67
67
-
 68
68
-
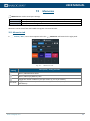 69
69
-
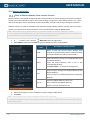 70
70
-
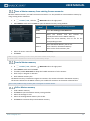 71
71
-
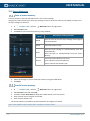 72
72
-
 73
73
-
 74
74
-
 75
75
-
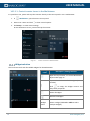 76
76
-
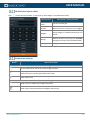 77
77
-
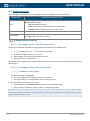 78
78
-
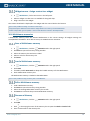 79
79
-
 80
80
-
 81
81
-
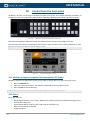 82
82
-
 83
83
-
 84
84
-
 85
85
-
 86
86
-
 87
87
-
 88
88
-
 89
89
-
 90
90
-
 91
91
-
 92
92
-
 93
93
-
 94
94
-
 95
95
-
 96
96
-
 97
97
-
 98
98
-
 99
99
-
 100
100
-
 101
101
-
 102
102
-
 103
103
-
 104
104
-
 105
105
-
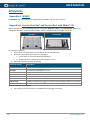 106
106
-
 107
107
-
 108
108


Analog way Pulse 4K Manuale utente
- Categoria
- Interruttori video
- Tipo
- Manuale utente
- Questo manuale è adatto anche per
in altre lingue
- English: Analog way Pulse 4K User manual
Documenti correlati
-
Analog way Eikos Manuale utente
-
Analog way Ascender 16 Manuale utente
-
-
-
-
-
-
-
-

