
Important
Please read this “Installation Manual”, and “Instructions for Use”
(separate volume) carefully to familiarize yourself with safe and
effective usage.
•
Refer to the “Instructions for Use” for information on the installation /
connection of the monitor.
•For the latest product information including the “Installation Manual”,
refer to our web site :
http://www.eizoglobal.com
Color LCD Monitor
Installation Manual

2
This product has been adjusted specically for use in the region to which it was originally shipped. If
operated outside this region, the product may not perform as stated in the specications.
No part of this manual may be reproduced, stored in a retrieval system, or transmitted, in any form or by
any means, electronic, mechanical, or otherwise, without the prior written permission of EIZO Corporation.
EIZO Corporation is under no obligation to hold any submitted material or information condential unless
prior arrangements are made pursuant to EIZO Corporation’s receipt of said information. Although every
effort has been made to ensure that this manual provides up-to-date information, please note that EIZO
monitor specications are subject to change without notice.

3
CONTENTS
CONTENTS
CONTENTS ............................................................. 3
Chapter 1 Basic Adjustment / Setting .............. 4
1-1. How to Use Buttons ...................................... 4
1-2. Switching the Input Signal ........................... 5
1-3. Switching Display Mode (CAL Switch
Mode) .............................................................. 5
1-4. Viewing the Monitor Information ................ 6
Chapter 2 Advanced Adjustment / Setting ...... 7
2-1. Basic Operation of the Setting Menu ......... 7
2-2. Setting Menu Functions ............................... 9
●CAL Switch Mode............................................ 9
●Signal .............................................................12
●Preferences ....................................................13
●Languages .....................................................14
●Information .....................................................14
Chapter 3 Administrator Settings ................... 15
3-1. Basic Operation of the "Administrator
Settings" menu .............................................15
3-2. "Administrator Settings" Menu
Functions ......................................................16
●On-Screen Logo .............................................16
●Key Lock .........................................................16
●DP Power Save ..............................................16
●Grayscale Warning .........................................16
Chapter 4 Troubleshooting .............................. 17
4-1. No Picture .....................................................17
4-2. Imaging Problems (for Both Digital and
Analog) ..........................................................17
4-3. Imaging Problems (for Analog Only) .........18
4-4. Other Problems ............................................18
Chapter 5 Reference ........................................ 19
5-1. Attaching the Optional Arm ........................19
5-2. Main Default Settings ................................. 20
Appendix .............................................................. 21
Trademark ................................................................21
License .....................................................................21
LIMITED WARRANTY ............................................. 22
Recycling Information ........................................... 23

4Chapter 1 Basic Adjustment / Setting
Chapter 1 Basic Adjustment / Setting
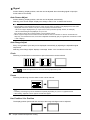
1-1. How to Use Buttons
1. Displaying the operation guide
Press any button (excluding ).
The operation guide appears on the screen.
Display Function
Turns the power on or off.
Displays the Setting menu. The Setting menu is used to congure advanced monitor
settings.
Displays the monitor information.
Switches display modes.
Switches input signals.
Selects an item.
Applies the selected content.
Cancels the selection.
2.
Adjusting / setting
1. Press a button for the icon to set.
The menu appears.
2. Operate each button to make the setting. If necessary, select to apply the setting.
3.
Exiting
Select to exit the menu.
Note
• The operation guide will automatically disappear after a few seconds if no buttons are operated.

5
Chapter 1 Basic Adjustment / Setting
1-2. Switching the Input Signal
When a monitor has multiple signal inputs, the signal to display on-screen can be changed.
Every time is selected, the signal connector to display is changed in sequence and displayed.
or also can be used to change modes while the menu appears.
Note
• When two or more computers are connected, select to change the computer displayed on the screen.
1-3. Switching Display Mode (CAL Switch Mode)
This function allows easy selection of a display mode according to the content displayed on the monitor.
The display mode changes in sequence every time is selected.
or also can be used to change modes while the menu appears.
√: Can be calibrated
Mode Purpose
1-DICOM Enables display using DICOM® Part 14-compliant grayscale characteristics. √
2- CAL1 Displays the calibration status using calibration software. √
3-CAL2 √
4-Custom Select this to dene a desired set of parameter settings. -
5-sRGB Suitable for color matching with sRGB compatible peripherals. -
6-Text Suitable to display documents, spreadsheets, or other text. -

6Chapter 1 Basic Adjustment / Setting
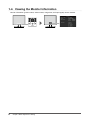
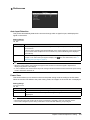
1-4. Viewing the Monitor Information
Monitor information (product name, serial number, usage time, and input signal) can be checked.

7
Chapter 2 Advanced Adjustment / Setting
Chapter 2 Advanced Adjustment / Setting
This chapter describes the advanced monitor adjustment and setting procedures using the Setting menu.
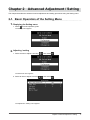
2-1. Basic Operation of the Setting Menu
1. Displaying the Setting menu
1. Select from the operation guide.
The Setting menu appears.
2.
Adjusting / setting
1. Select a menu to adjust / set using , then select .
The advanced menu appears.
2. Select an item to adjust / set using , then select .
The Adjustment / Setting menu appears.

8Chapter 2 Advanced Adjustment / Setting
3. Adjust / set the selected item using , and then select .
3.
Exiting
Select several times to exit the Setting menu.

9
Chapter 2 Advanced Adjustment / Setting
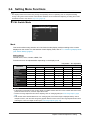
2-2. Setting Menu Functions
Note
• The display status of the monitor may change unexpectedly due to an operating error or unexpected setting
change. Using the monitor with the control buttons locked is recommended after adjusting or setting the monitor.
For details on how to set, refer to “Key Lock” (page 16).
●CAL Switch Mode
Mode
This function allows easy selection of a CAL Switch mode (display mode) according to the content
displayed on the monitor. For the features of each display mode, refer to “1-3. Switching Display Mode
(CAL Switch Mode)” (page 5).
Setting Range
DICOM, CAL1, CAL2, Custom, sRGB, Text
Functions that can be adjusted differ depending on the display mode.
√: Adjustable -: Not adjustable
Function CAL Switch Mode
DICOM CAL1 CAL2 Custom sRGB Text
Brightness √√√√√√
Contrast - - - √ √ √
Temperature - - - √ √ √
Gamma - - - √ √ √
Hue - - - √ √ √
Saturation - - - √ √ √
Gain - - - √ √ √
Reset √√√√√√
Attention
• It takes about 30 minutes for the monitor display to stabilize. Please wait 30 or more minutes after the monitor
power has been turned on, and then adjust the monitor.
• Perform the range adjustment rst when adjusting color for analog signals (see “Auto Range Adjust” (page
12)).
• Each monitor has individual differences. For analog signals, if the same image is displayed side by side on
multiple monitors, even the same image may appear different colors. Perform the range adjustment rst when
matching the colors of multiple monitors (see “Auto Range Adjust” (page 12)).

10 Chapter 2 Advanced Adjustment / Setting
Brightness
The screen brightness is adjusted by changing the brightness of the backlight (light source from the
LCD back panel).
Setting Range
0 % to 100 %
Note
• If the image is too dark even when the brightness is set to 100 %, increase the contrast value.
Contrast
The brightness of the screen is adjusted by varying the video signal level.
Setting Range
0 % to 100 %
Note
• When the contrast is set to 100 %, all the color gradations are shown.
• When adjusting the monitor, it is recommended to perform the brightness adjustment which may not lose the
grayscale characteristics, prior to the contrast adjustment.
• Perform the contrast adjustment in the following cases.
- If the screen is too bright even when the brightness is set to 0 %
Temperature
The color temperature can be adjusted.
The color temperature is normally used to express the color of "White" and/or "Black" by a numerical
value. The value is expressed in degrees "K" (Kelvin).
The screen becomes reddish at a low color temperature, and bluish at a high color temperature, like
a ame temperature. The gain preset values are set for each color temperature setting value.
Setting Range
Native, 6000 K to 15000 K (in increments of 100 K), sRGB
Note
• The value shown in "K" is available only as reference.
• Selecting "Gain" allows you to perform more advanced adjustment (see “Gain” (page 11)).
• If you set to "Off", the image is displayed in the preset color of the monitor (Gain: 100 for each RGB).
• When gain is changed, the color temperature is changed to "Off".
Gamma
Adjust the gamma. The brightness of the monitor varies depending on the input signal, however, the
variation rate is not simply proportional to the input signal. The control performed to keep the balance
between the input signal and the brightness of the monitor is called "Gamma correction".
Setting Range
1.6 to 2.7, sRGB

11
Chapter 2 Advanced Adjustment / Setting
Hue
Adjust the hue.
Setting Range
-100 to 100
Note
• Using this function may make some color gradations unavailable for display.
Saturation
Adjust the color saturation.
Setting Range
-100 to 100
Attention
• Using this function may make some color gradations unavailable for display.
Note
• The minimum value (-100) changes the screen to monochrome.
Gain
The brightness of each color component red, green, and blue is called Gain. You can change the hue
of "white" by adjusting gain.
Setting Range
0 % to 100 %
Attention
• Using this function may make some color gradations unavailable for display.
Note
• The gain value changes according to the color temperature.
• When gain is changed, the color temperature is changed to “User”.
Reset
Resets any setting value for the currently selected display mode back to the default settings.

12 Chapter 2 Advanced Adjustment / Setting
●Signal
Screen ickering, display position, and size can be adjusted when the analog signal is input (the
D-Sub cable is connected).
Auto Screen Adjust
Screen ickering, display position, and size can be adjusted automatically.
Selecting “Auto Screen Adjust” displays a message. Select “Yes” to enable this function.
Note
• The automatic screen adjustment function works correctly when an image is fully displayed over the entire
displayable area of the screen. They do not work properly in the below cases.
- When an image is displayed only on a part of the screen (command prompt window, for example)
- When a black background (wallpaper, etc.) is in use
Also, these functions cannot work properly in some graphic boards.
• When a signal is input into the monitor for the rst time or when a resolution or vertical / horizontal scan
frequency not used before is set, the screen is adjusted automatically (only for signals with a resolution of 800
× 600 or higher).
Auto Range Adjust
Every color gradation (0 to 255) can be displayed automatically by adjusting the adjustable signal
output level.
Selecting “Auto Range Adjust” displays a message. Select “Yes” to enable this function.
Clock
Flickering of vertical lines on the screen or part of the screen can be reduced.
Note
• Use to make ne adjustments so as not to miss any adjustment points.
Phase
Flickering and blurring over the entire screen can be reduced.
Note
• Flickering or blurring may not be eliminated completely depending on your PC or graphics board.
• After setting, adjust the “Clock” again if vertical bars appear.
Hor. Position / Ver. Position
The display position (horizontal and vertical) of the image misaligned can be adjusted.

13
Chapter 2 Advanced Adjustment / Setting
●Preferences
Auto Input Detection
This product automatically detects the connector through which a signal is input, and displays the
signal on the screen.
Setting Range
On, Off
Setting Function
On Automatically detects the connector through which a signal is input, and displays the signal
on the screen.
If the PC that is outputting the signal displayed on the screen enters the power saving mode
or is turned off when multiple PCs are connected, any other available signal is displayed
automatically.
Off The monitor displays the signal from the selected connector regardless of whether a signal
is input or not. Select the input signal to display using . For more information, see “1-2.
Switching the Input Signal” (page 5).
Note
• When the power cable is reconnected, the signal of the connector to which the signal is impressed is
displayed regardless of the settings.
• If "On" is selected, the monitor enters the power saving mode after all the PCs have entered the power saving
mode or have been switched off.
Power Save
This function allows you to set the monitor into the power saving mode according to the PC status.
When the monitor has shifted to the power saving mode, the images on the screen are not displayed.
Setting Range
On, Off
Setting Function
On The monitor shifts to the power saving mode synchronously with the state of the PC.
Off The monitor does not shift to the power saving mode regardless of the status of the PC or
signal input.
Note
• Disconnecting the power outlet cuts the power consumption completely, when not using the monitor.
• The monitor changes to power saving mode about 15 seconds after detecting no input signal.

14 Chapter 2 Advanced Adjustment / Setting
Indicator
This function allows you to set the power indicator (green) ON / OFF in the monitor ON condition. The
larger the set value, the brighter the power indicator lights up. On the other hand, the smaller the
value, the darker it becomes. The "Off" setting turns off the power switch indicator.
Setting Range
1 to 7, Off
Mode Skip
When selecting the display mode, the specic mode becomes unavailable (skipped). Use this function
to limit the display modes to appear, or avoid changing the display status randomly.
When "Mode skip" is selected, all display modes appear. Select the mode to be unavailable and
select "Skip" for it.
Attention
• Not all modes can be disabled (skipped). Set at least one mode to "-" (available).
Monitor Reset
Restore all settings to their default values (except for Input Signal and "Administrator Settings").
●Languages
This function allows you to select a language for the Setting menu or messages.
Selectable languages
English / German / French / Spanish / Italian / Swedish / Japanese / Simplied Chinese /
Traditional Chinese
●Information
Monitor information (product name, serial number, usage time, and input signal) can be checked.
Example:

15
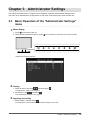
Chapter 3 Administrator Settings
Chapter 3 Administrator Settings
This chapter describes how to congure monitor operation using the "Administrator Settings" menu.
This menu is for administrators. Conguration on this menu is not required for normal monitor use.
3-1. Basic Operation of the "Administrator Settings"
menu
1. Menu display
1. Press to turn the monitor off.
2. While pressing the leftmost button, press for more than 2 seconds to turn on the monitor.
"Administrator Settings" appears.
2.
Setting
1. Select an item to set using , and then select .
The Adjustment / Setting menu appears.
2. Set the item using and select .
The "Administrator Settings" menu appears.
3.
Applying and exiting
1. Select "Apply", and then select .
The settings are conrmed and the "Administrator Settings" menu quits.

16 Chapter 3 Administrator Settings
3-2. "Administrator Settings" Menu Functions
●On-Screen Logo
You can select whether to display or hide the EIZO logo when the monitor starts.
Setting Range
On, Off
●Key Lock
Adjusted or set states can be made unchangeable.
Setting Range
Off, Menu, All
Setting Lockable functions
Off None (All buttons are enabled.)
Menu Adjusting or setting using the Setting menu
All All buttons except
●DP Power Save
Connecting a PC to the DisplayPort connector enables DisplayPort communication, and thus
consumes high power even in the power saving mode. The communication can be disabled by setting
"DP Power Save" to "On". This reduces power consumption in the power saving mode.
Setting Range
On, Off
Attention
• If "On" is selected, window and icon positions may shift when the monitor is powered back on or returned
from the power saving mode. In such cases, set this function to "Off".
●Grayscale Warning
It can be specied whether to display the Grayscale Display Error message to indicate that a 6-bit
(64-grayscale) signal has been detected when the DisplayPort signal is input at the recommended
resolution. If the error message appears, disconnect the monitor's power code and then connect it
again. If it does not work, check the settings of the computer and graphics board.
Setting Range
On, Off
Attention
• Always use with this set to "On" (the default setting is "On").
• Set this to "Off" only when using 6bit (64 grayscale) display.

17
Chapter 4 Troubleshooting
Chapter 4 Troubleshooting
4-1. No Picture
Problem Possible cause and remedy
1. No picture
• Power indicator does not light
• Check whether the power cord is connected properly.
• Press .
• Power indicator lights green. • Increase "Brightness", "Contrast", or "Gain" in the Setting
menu (see “CAL Switch Mode” (page 9)).
• Power indicator lights orange. • Switch the input signal with .
• Move the mouse or press any key on the keyboard.
• Check whether the PC is turned on.
• This problem may occur when the PC is connected via the
DisplayPort connector. Reconnect the power cord of the
monitor, or reboot the PC.
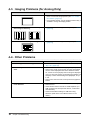
2. The message below appears. This message appears when the signal is not input correctly
even when the monitor functions properly.
• This message appears when no signal is
input.
Example:
• The message shown left may appear, because some PCs do
not output the signal soon after power-on.
• Check whether the PC is turned on.
• Check whether the signal cable is connected properly.
• Switch the input signal with .
• Check whether the PC is congured to meet the resolution
and vertical scan frequency requirements of the monitor (see
“Compatible Resolutions” in the Instructions for Use).
• Reboot the PC.
• Change to the appropriate setting using the graphics board's
utility. For details, refer to the User's Manual of the graphics
board.
4-2. Imaging Problems (for Both Digital and Analog)
Problem Possible cause and remedy
1. The screen is too bright or too dark. • Use “Brightness” or “Contrast” in the Setting menu to
adjust it (see “CAL Switch Mode” (page 9)). (The
LCD monitor backlight has a limited life span. When the
screen becomes dark or begins to icker, contact your
local EIZO representative.)
2. Characters are blurred. • Check whether the PC is congured to meet the
resolution and vertical scan frequency requirements
of the monitor (see “Compatible Resolutions” in the
Instructions for Use).
3. Afterimages appear • Afterimages are particular to LCD monitors. Avoid
displaying the same image for a long time.
• Use the screen saver or power saving function to avoid
displaying the same image for extended periods of time.
4. Green / red / blue / white dots or defective
dots remain on the screen.
• This is due to LCD panel characteristics and not a
malfunction.
5. Interference patterns or traces created when
selecting panels remain on the screen.
• Display a white or black image over the entire screen.
The symptom may disappear.

18 Chapter 4 Troubleshooting
4-3. Imaging Problems (for Analog Only)
Problem Possible cause and remedy
1. Display position is incorrect. • Use “Hor. Position” and “Ver. Position” in the Setting
menu to correct the image position (see “Hor. Position /
Ver. Position” (page 12)).
• If the problem persists, use the graphics board’s utility if
available to change the display position.
2. Vertical bars appear on the screen or a part
of the image is ickering.
• Use "Clock" in the Setting menu to adjust it (see “Clock”
(page 12)).
3. Whole screen is ickering or blurring. • Use "Phase" in the Setting menu to adjust it (see “Phase”
(page 12)).
4-4. Other Problems
Problem Possible cause and remedy
1. The Setting menu does not appear. • Check whether the operation lock function is active (see
“Key Lock” (page 16)).
2. The auto adjustment function does not
work.
• This function does not work during digital signal input.
• This function works correctly when an image is displayed
over the entire displayable area of the Windows screen,
etc. It does not work properly when an image is displayed
only on a part of the screen (command prompt window, for
example) or when a black background (wallpaper, etc.) is
in use.
• This function does not work correctly with some graphics
boards.
3. The monitor connected with the USB cable
is not detected.
• Check whether the USB cable is connected correctly.
• Reboot the PC.
• Check whether the PC and OS are USB compliant. (For
USB compliance of the respective devices, consult their
manufacturers.)
• Check the PC's BIOS setting for USB when using
Windows. (Refer to the User's Manual of the PC for
details.)

19
Chapter 5 Reference
Chapter 5 Reference
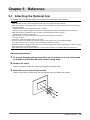
5-1. Attaching the Optional Arm
An optional arm (or an optional stand) can be attached by removing the stand section.
Attention
• When attaching an arm or stand, follow the instructions of the respective User's Manual.
• When using another manufacturer’s arm or stand, conrm the following in advance and select one conforming to
the VESA standard.
- Clearance between the screw holes: 100 mm × 100 mm
- Strong enough to support weight of the monitor unit (excluding the stand) and attachments such as cables
• When using another manufacturer's arm or stand, use the following screws to secure it.
- Screws xing the stand to the monitor
• When using an arm or stand, attach it to meet the following tilt angles of the monitor.
- 45˚ up to 45˚ down
• Connect the cables after attaching an arm or stand.
• Do not move the removed stand up and down. Doing so may result in injury or equipment damage.
• If you drop the monitor, arm, or stand, injury or equipment damage may result.
• Periodically check the tightness of the screws. If not sufciently tight, the monitor may detach from the arm, which
may result in injury or equipment damage.
• When installing the monitor in portrait mode, turn the monitor screen 90˚ in clockwise direction and place it.
Attachment procedure
1. To prevent damaging the panel surface, lay the monitor on a soft cloth spread
on a stable surface with the panel surface facing down.
2.
Remove the stand.
Using a screwdriver, loosen the screws securing the unit and the stand.
3.
Attach the arm or stand to the monitor.
Use the screws that you removed in step 2 to attach the arm (or stand) to the monitor.

20 Chapter 5 Reference
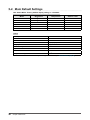
5-2. Main Default Settings
CAL Switch Mode: Factory default display setting is "1-DICOM".
Mode Brightness Temperature Gamma value
1-DICOM 180 cd / m27500 K DICOM GSDF
2- CAL1 180 cd / m27500 K 2.2
3-CAL2 120 cd / m27500 K DICOM GSDF
4-Custom Approx. 300 cd / m27500 K 2.2
5-sRGB Approx. 250 cd / m2sRGB sRGB
6-Text Approx. 100 cd / m26500 K 2.2
Others
Auto Input Detection Off
Power Save On
Indicator 4
Mode Skip - (Display all)
Language English
On-Screen Logo Off*1
Key Lock Off*1
DP Power Save Off*1
Grayscale Warning On*1
*1 These menus cannot be initialized by executing "Monitor Reset" (see “Monitor Reset” (page 14)).
La pagina si sta caricando...
La pagina si sta caricando...
La pagina si sta caricando...
La pagina si sta caricando...
La pagina si sta caricando...
La pagina si sta caricando...
La pagina si sta caricando...
-
 1
1
-
 2
2
-
 3
3
-
 4
4
-
 5
5
-
 6
6
-
 7
7
-
 8
8
-
 9
9
-
 10
10
-
 11
11
-
 12
12
-
 13
13
-
 14
14
-
 15
15
-
 16
16
-
 17
17
-
 18
18
-
 19
19
-
 20
20
-
 21
21
-
 22
22
-
 23
23
-
 24
24
-
 25
25
-
 26
26
-
 27
27


in altre lingue
- English: Eizo MX194 Owner's manual
- română: Eizo MX194 Manualul proprietarului
Documenti correlati
-
Eizo RX250 Manuale del proprietario
-
-
-
-
-
Eizo MX215 Manuale utente
-
-
Eizo CG318-4K Manuale utente
-
Eizo EV3237 Manuale utente
-