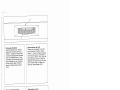
Pfaff Hobby 874 Manuale del proprietario
- Categoria
- Macchine da cucire
- Tipo
- Manuale del proprietario

PFAFF®
extra
874
875
876
Bedienungsanleitung
Mode
dbmploi
Libretto
istruzioni
Instruction
book

Ben
kiappen
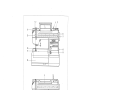
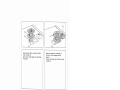
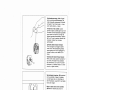
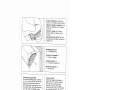
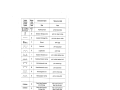
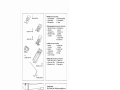
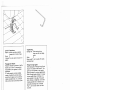
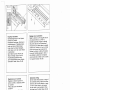
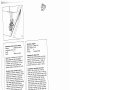
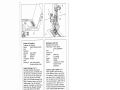
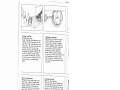
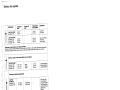
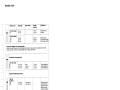
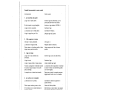
Parti
della
macchina
per
cucire
Parts
of
the
sewing
machine
1
Leva
tendifilo
2
Tensione
dello
spolatore
3
Maniglia
4
Portarocchetti
5
Spolatore
6
Volantino
7
Disco
di
disinnesto
8
Interruttore
principale
9
Regolatore
lunghezza
punto
10
Piano
variabile
con
scomparto
per
accessori
11
Placcadago
12
Supporto
del
piedino
con
piedino
13
Fessura
per
infilatura
14
Tensione
superiore
15
Leva
aizapiedino
16
Morsetto
d’ago
con
vite
17
Tabella
dei
punti
18
Base
piana
19
Sportello,
dietro
crochet
20
Guidafili
21
Fermo
per
rammendo
22
Manopola
per
selezione
motivi
23
Tasto
per
cucire
indietro
24
Braccio
libero
1
Take-up
lever
2
Bobbin
thread
retainer
3
Carrying
handle
4
Spool
pin
5
Bobbin
winder
6
Hand
wheel
7
Stop
motion
knob
8
Master
switch
9
Stitch
length
key
10
Detachable
work
support
with
accessory
box
11
Needle
plate
12
Sewing
foot
holder
with
sewing
foot
13
Threading
slots
14
Needle
thread
tension
15
Presser
bar
lifter
16
Needle
holder
with
screw
17
Table
of
stitch
patterns
18
Bed
plate
19
Free
arm
cover
(enclosing
sewing
hook)
20
Thread
guide
21
Stop
for
darning
operations
22
Stitch
pattern
selector
wheel
23
Reverse-feed
control
24
Free
arm
United
Kingdom
rs
I’extérieur
verso
I’esterno
ezza
per
macchine
per
famiglia
secondo
novimento
alternativo
nte
dove
prestare
suffi
lone
e
tenere
constante
nb
II
punto
di
lavoro.
•e
ago,
piedino,
spolina
igo,
nelle
interruzioni
te
del
lavoro
e
durante
i
nutenzione
Si
deve
a
corrente
della
gliendo
Ia
spina
dalla
•0.
nassima
consentita
per
a
di
15
Watt.
della
cinghia
di
trasmis
ssere
regolata
solamenta
avoid
injury
to
your
fin
needle
during
sewing.
‘ou
unplug
the
power
ver
you
have
to
leave
or
want
to
clean
it,
oil
mechanical
and
arts.
se
only
a
15-watt
light
ewing
lamp.
It
must
never
be
adjusted
t
an
authorized
agent.
7
ge
69
La pagina si sta caricando...
La pagina si sta caricando...
La pagina si sta caricando...

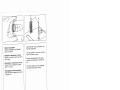
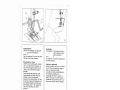
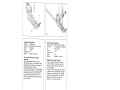
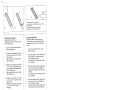
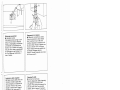
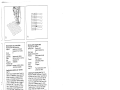
Spule
auf
den
Spuler
5
stecken.
Stift
P
mul3
in
Schlitz
Q.
Spule
nach
rechts
gegen
den
Anschlag
R
drücken.
Mettre
Ia
canette
sur
le
dévidoir
5;
le
tenon
P
dolt
s’engager
dans
Ia
fente
Q.
Pousser
a
canette
vers
Ia
droite,
contre
Ia
butée
A.
Mettere
Ia
spolina
su
spolatore
5.
Perno
P
deve
entrare
in
fessura
Q.
Spingere
Ia
spolina
verso
destra
contro
il
fermo
A.
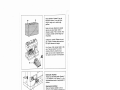
Place
a
bobbin
on
spindle
5,
making
sure
pin
P
enters
slot
Q.
Push
the
bobbin
to
the
right
against
stop
R.
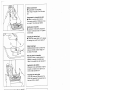
4

Nähwerk
ausschalten
Handrad
6
festhalten
mid
Scheibe
7
nach
vorn
drehen.
Débrayer
le
mécanisme
de
couture
Retenir
le
volant
6
et
tourner
le
disque
7
vers
l’avant.
Disirmestare
ii
meccanismo
del
cucito
Tenere
fermo
ii
volantino
6
e
girare
II
disco
7
in
avanti.
Disengaging
the
sewing
mechanism
Hold
hand
wheel
6
steady
and
turn
knob
7
toward
you.
Garnrollenstifte
4
ganz
hochziehen
und
Garnrolle
aufstecken.
Tirer
les
broches
a
fond
vers
le
haut
et
meltre
Ia
bobine
en
place.
Estrarre
completamerite
i
perni
porta
rocchetti
4
e
sistemarci
II
rocchetto
del
fib.
Pull
thread
stand
pins
4
up
completely
and
place
thread
reels
on
them.
5

Spulen
Hauptschalter
einschalten,
Den
Faden
von
der
Garnrolle
in
die
Spulervorspannung
2
ziehen
nach
rechts
führen
und
einige
Male
in
Pteilrichtung
urn
die
Spute
wicketn.
Dann
den
Fu13-
anlasser
betatigen
und
spulen.
1st
die
Spule
volt,
bleibt
sie
stehen.
Die
voIle
Spule
nach
links
drücken,
abnehrnen
und
den
Faden
abschneiden.
Bobinage
Mettre
Ia
rnachine
en
circuit
a
‘interrup
teur
general.
Tirer
le
fit
de
Ia
bobine
dans
Ia
preten
sion
2
du
dévidoir,
le
coucher
a
droite
et
I’enrouler
de
quelques
tours,
dans
le
sens
de
Ia
flèche,
sur
Ia
canette.
Agir
sur
Ia
pédale
du
rheostat
et
bobiner.
Des
que
Ia
canette
est
pleine,
le
dévidoir
s’arréte.
Pousser
Ia
canette
vers
Ia
gauche,
Ia
retirer
et
couper
le
fit.
Avvolgere
Ia
spolina
Inserire
l’interruttore
principale.
Tirare
it
fib
dat
rocchetto
nella
tensione
delbo
spolatore
2,
riportarto
verso
destra
e
avvolgerbo
alcune
volte
in
senso
delta
freccia
attorno
alla
spolina.
Quindi
azio
nare
it
reostato
e
avvotgere
Ia
spolina.
Quando
Ia
spolina
è
piena
si
ferma
da
sola.
Prernere
Ia
spolina
piena
verso
sinistra,
toglierla
e
tagliare
it
fib.
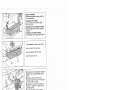
Bobbin
winding
Switch
on
master
switch.
Pull
thread
from
thread
reel
into
thread
retainer
2,
lead
to
the
right
and
wind
a
few
times
around
the
bobbin
in
the
direction
of
the
arrow.
Then
actuate
the
foot
control
and
wind
the
bobbin.
The
bobbin
stops
as
soon
as
it
is
full.
Push
the
full
bobbin
to
the
left,
remove
it
and
cut
off
the
thread.
6
La pagina si sta caricando...
La pagina si sta caricando...

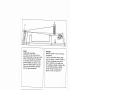
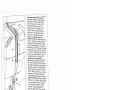
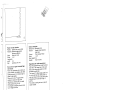
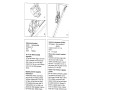
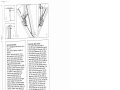
Oberfaden
einlegen:
•
Hauptschalter
8
ausschalten.
Nadel
und
Fadenhebel
müssen
oben
stehen.
Nähful3
anheben.
Den
Faden
von
der
Garnrolle
in
die
Spulervorspannung
2,
durch
die
Off
nung
F,
den
Schlitz
Q,
hinter
das
Fuhrungsstuck
R,
nach
oben
in
den
Schlitz
S,
durch
den
Fadenhebel
1
zurück
durch
den
Schlitz
5,
hinter
die
Fuhrung
T
und
in
die
rechte
Faden
fuhrung
U
am
Nadelhalter
ziehen.
Enfilage
de
l’aiguille:
•
Mettre
ía
machine
hors
circuit
a
I’interrupteur
gd
ndral
8.
L’aiguille
et
le
levier
releveur
de
til
doivent
se
trouver
en
position
haute.
Lever
le
pied
presseur.
Tirer
le
fil
de
Ia
bobine
dans
Ia
pretension
du
dévidoir
2,
par
les
fentes
P
et
Q,
derriere
le
guide-fil
R,
Remonter
dans
Ia
fente
S,
par
le
rele
veur
de
fil
1,
redescendre
par
Ia
fente
S
et
passer
derriere
le
guide-hI
T
et
dans
le
guide-fil
droit
U
du
pince-aiguille.
tnserimento
del
fib
superiore:
•
Disinserire
I’interrutt
ore
principale
8.
Ago
e
leva
tendifilo
devono
essere
in
alto.
Aizare
il
piedino.
Portare
il
fib
dab
rocchetto
nella
tensione
delbo
spolatore
attraverso
l’apertura
P,
nella
fessura
Q,
dietro
Ia
guida
R,
verso
l’alto
nella
fes
sura
S,
nella
leva
tendifilo
1,
di
ritorno
attraverso
Ia
fessura
S,
dietro
Ia
guida
T
e
nel
guidafilo
U
a
destra
dell’ago.
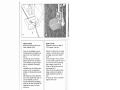
Upper
threading:
•
Switch
off
master
switch
8.
Roth
needle
and
take-up
lever
must
be
in
“up”
position.
Raise
sewing
foot.
Pull
thread
from
spool
and
draw
it
into
bobbin
tension
stud
2,
through
opening
P,
slot
Q,
behind
guiding
piece
R,
upwards
through
slot
S,
through
take-up
lever
1,
back
through
slot
5,
behind
guide
T
and
then
into
the
right
thread
guide
U
on
the
needle
holder.
Den
Oberfaden
von
vorn
nach
hinten
durch
das
Nadelöhr
fädeln.
Enfiler
le
fib
d’aiguille
de
l’avant
en
arrière
par
Ie
chas
d’aiguille.
lnfilare
lb
fib
superiore
dab
davanti
verso
dietro
attraverso
Ia
cruna
debl’ago.
Thread
the
needle
from
front
to
back.
9
La pagina si sta caricando...
La pagina si sta caricando...

Arilasser
niedertreten:
Je
tiefer
man
drückt,
um
so
schneller
näht
die
exclusiv.
Abaisser
Ia
pédale
du
rheostat:
Plus
Ia
pédale
sera
abaissée,
plus
Ia
exclusiv’
coudra
vite.
Premere
ii
reostato:
PiU
a
fondo
si
preme
ii
pedale,
piü
veloce
cucirà
a
“exclusiv”.
Operating
the
toot
control:
The
more
you
press
down
the
pedal,
the
faster
the
machine
runs.
Oberfadenspannung
14
P
=
Einstellmarkierung.
Tension
du
fil
d’aiguille
14
P
repère
de
reglage.
Tensione
superiore
14
P
=
marcatura
di
regolazione.
Needle
thread
tension
14
P
=
Setting
mark.
Fadenspannung
Uberprufen
Die
normale
Einstellung
liegt
im
Bereich
von
3—5.
Je
höher
die
Zahi,
je
fester
die
Spannung.
Die
Uberprufung
wird
mit
dem
Zickzackstich
vorgenommen.
Eine
kurze
Naht
nähen.
Die
Fadenverknotung
soil
in
der
Mitte
der
Stoffiagen
liegen.
Der
Bereich
3
ist
zum
Knopflochnahen.
\/\JV\/\/V\A,
/
Tensions
des
fils
Position
de
reglage
normale
dans
Ia
plage,
entre
3
et
5.
Tension
d’autant
plus
forte
que
ie
chiffre
est
êlevé.
ContrOler
a
l’aide
du
point
zigzag.
Coudre
quelques
points.
Les
fils
doivent
se
nouer
dans
i’épaisseur
des
tissus.
3:
Piage
de
réglage
pour
boutonnières.
VVV\/V\N\i
/V
12

Controtlo
delle
tensioni
del
fib
La
regolazione
normale
si
trova
nel
settore,
fra
3
e
5.
Piü
alto
ii
numero,
plO
forte
Ia
tensione.
Si
Ia
a
verifica
con
ii
punto
zigzag.
Eseguire
una
breve
cuci
tura.
L’annodamento
dei
fili
deve
avve
nire
nel
centro
della
stoffa.
II
settore
3
serve
per
cucire
occhielli.
Checking
the
needte
thread
tension
The
normal
setting
is
in
the
range
bet
ween
3
and
5.
The
higher
the
number,
the
tighter
the
tension.
To
check
the
ten
sion,
set
the
machine
at
a
wide
zigzag
stitch.
Sew
a
short
seam.
The
threads
must
interlock
in
the
middle
of
the
mate
rial.
Use
range
3
for
sewing
buttonholes.
/
Stoffdrückerhebel
15
hochstellen.
Stoff
nach
hinten
herausnehmen.
Relever
le
levier
15.
Degager
le
tissu
vers
l’arriOre.
Alzare
Ia
leva
alzapiedino
15.
Togliere
Ia
stoffa
verso
dietro.
Raise
presser
bar
lifter
15.
Remove
the
fabric
by
pulling
it
toward
the
back.
Fadenabschneider
P:
Fäden
einlegen
und
nach
unten
ziehen.
Coupe-fit
P:
Coucher
es
fils
dans
Ia
fente
et
les
firer
vers
le
bas.
Tagtiafito
P:
lnserire
i
fili
e
tirarli
verso
il
basso.
Thread
cutter
P:
Draw
the
threads
into
the
slot
and
pull
them
downwards.
13

Stichlängeri
einstellen
Die
Zahien
auf
dem
Stichlängen
Einsteller
9
geben
die
Stichlánge
in
mm
an.
Der
Einstellbereich
1st
0
bis
6
mm.
Die
gewunschte
Stichlange
wird
an
die
Einstellmarkierung
A
gedreht.
Die
Abbildung
0
unten
zeigt
die
Einstel
lung
des
Stichlängen-Einsteflers
zum
Nähen
der
Stretchstiche.
Réglage
de
Ia
longueur
du
point
Les
chiffres
sur
le
disque
9
indiquent
Ia
longueur
du
point
en
mm.
La
longueur
du
point
est
reglable
entre
0
et
6
mm.
La
longueur
de
point
choisie
est
indi
quée
face
au
repere
R.
L’illustration
Q
(en
bas)
montre
le
reglage
du
regle-point
pour
a
couture
des
points
elastiques.
Regolazione
della
Iunghezza
del
punto
I
numeri
sul
bottone
regolatore
della
lunghezza
del
punto
9
corrispondono
alla
lunghezza
del
punto
in
mm.
II
settore
di
regolazione
va
da
0
a
6
mm.
Regolare
Ia
lunghezza
di
punto
deside
rata
sulla
marcatura
di
regolazione
R.
La
figura
0
in
basso
mostra
a
rego
lazione
del
regolatore
del
punto
per
èucire
i
punti
stretch.
Regulating
the
stitch
length
The
numbers
on
stitch
length
control
9
indicate
the
stitch
length
in
milimeters.
The
stitch
length
range
is
0
to
6
mm.
Turn
the
control
to
set
the
number
indicating
the
stitch
length
at
mark
R.
Fig.
0
(bottom)
shows
how
to
set
the
stitch
length
control
for
sewing
the
stretch
stitches.
‘4
La pagina si sta caricando...

L
Sicherheitshinweise
für
Haushaltriähmaschinen
nach
DIN
57700
Tell
28
bzw.
IEC
335
Tell
28
a)
Der
Benutzer
hat
wegen
der
atif-
und
abgehenden
Nadel
geriugend
Vor
sicht
walten
zu
lassen
und
die
Näh
stelle
bei
der
Arbeit
standig
zu
beob
achten.
b)
Beim
Verlassen
der
Maschine,
bei
Wartungsarbeiten
oder
beim
Wech
sein
von
mechanischen
Teilen
oder
Zubehör,
1st
die
Maschine
durch
Herausziehen
des
Netzsteckers
aus
der
Steckdose
vom
Netz
zu
tren
nen.
c)
Die
maximal
zulässige
Leistung
der
Lampe
betragt
15
Watt.
d)
Die
Spannung
des
Antriebsriemens
dart
nur
von
einem
Mechaniker
em
gestelit
werden.
Mesures
de
sécurité
a)
Toujours
faire
preuve
de
prudence
et
continuellement
surveiller
le
travail.
b)
Toujours
débrancher
Ia
machine
du
secteur
avant
de
quitter
Ia
machine,
avant
les
travaux
d’entre
tien
et
en
cas
de
remplacement
de
pièces
mécaniques
ou
d’accessoi
res.
c)
Puissance
maximale
admissible
de
lampoule:
15
Watts.
d)
Contier
le
reglage
de
a
tension
de
Ia
courroie
d’entrainement
au
mécani
cien.
Norme
di
sicurezza
per
macchine
per
cucire
per
uso
famiglia
secondo
DIN
57700
parte
28
o
IEC
335
parte
28
a)
In
virti
del
movimento
alternativo
delI’ago,
lutente
deve
prestare
suffi
ciente
attenzione
e
tenere
constante
mente
d’occhio
ii
punto
di
lavoro.
b)
Ne!
cambiare
ago,
piedino,
spolina
e
placca
d’ago,
nelle
interruzioni
non
custodite
del
lavoro
e
durante
I
lavori
di
manutenzione
Si
deve
disinserire
Ia
corrente
della
macchina
togliendo
Ia
spina
dalla
presa
a
muro.
C)
La
potenza
massima
consentita
per
Ia
lampadina
e
di
15
Watt.
d)
La
tensione
della
cinghia
di
trasmis
sione
deve
essere
regolata
solamenta
dal
meccanico.
Notes
on
safety
a)
Take
care
to
avoid
injury
to
your
fin
gers
by
the
needle
during
sewing.
b)
Make
sure
you
unplug
the
power
cord
whenever
you
have
to
leave
the
machine
or
want
to
clean
it,
oil
it
or
change
mechanical
and
acces
sory
parts.
C)
Be
sure
to
use
only
a
15-watt
light
bulb
in
the
sewing
lamp.
d)
The
drive
belt
must
never
be
adju
sted
by
anyone
but
an
authorized
agent.
16

Stichmuster-Einstellrad
Jedem
Stichmuster
ist
em
Buchstabe
zugeordnet.
Das
Stichmuster
aus
der
Tabelle
17
auswählen.
Mit
dem
Einstell
rad
22
den
entsprechenden
Buchstaben
unter
die
Einstellmarkierung
P
drehen.
Zum
Nähen
der
Stretchstiche
den
Stich
langen-Einsteller
bis
zum
Anschlag
auf
das
rote
Symbol
stellen.
Stichmuster
tabelle
mit
Erläuterungen
siehe
Seite
18/19.
Disque
sélecteur
de
motif
Chaque
motif
correspond
a
une
lettre
code.
Determiner
le
motif
a
laide
du
tableau
17.
Tourner
le
disque
22
jusqu’à
ce
que
Ia
lettre-code
du
motif
désiré
se
trouve
sous
le
repère
P.
Pour
coudre
les
points
élastiques,
pousser
le
levier
du
regle-point
en
longueur
jusqu’à
Ia
butée,
sur
le
symbole
rouge.
Le
tableau
des
motifs
est
reproduit
pages
18/19.
Disco
regolatore
dei
motivi
Per
ogni
motivo
c’è
una
lettera.
Selezio
nare
il
motivo
nella
tabella
di
punti
17.
Girare
1
disco
regolatore
22
finchè
Ia
lettera
selezionata
si
trova
sotto
Ia
marcatura
P.
Per
cucire
i
punti
“stretch”
girare
1
regolatore
lunghezza
punto
sul
simbolo
rosso
fino
allarresto.
Per
Ia
tabella
di
punto
con
spiegazioni
vedere
pag.
18/19.
Stitch
pattern
control
Each
stitch
pattern
is
identified
by
a
letter.
Select
the
desired
stitch
pattern
from
Chart
17.
Turn
dial
22
until
the
corresponding
letter
is
positioned
below
mark
P.
For
sewing
stretch-stitch
patterns
move
the
stitch
length
control
onto
the
red
symbol
as
far
as
it
will
go.
For
the
various
stitch
patterns
with
explanations
see
pages
18/19.
17
La pagina si sta caricando...

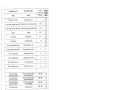
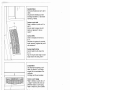
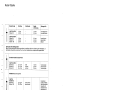
La
tabella
dei
punti
Stitch
pattern
table
Stiohiange
Modell
Longoear
do
pont
Modèles
Longhezze
del
punto
Modelli
Pupto
Stitch
Stfth
length
Model
874
Simbolo
per
occhiello
Buttonhole
symbols
875
876
874
Punto
diritto,
posizione
ago
destra
Straight
stitch,
right
needle
position
0,5—6
874
Punto
diritto,
posizione
ago
centro
Straight
stitch,
centre
needle
position
0,5—6
875
874
Zigzag
Zigzag
0,5—6
875
874
Punto
elastico
Elastic
stitch
0,5—4
875
876
.
874
Punto
festone
Scallopping
stitch
1—5
875
874
Punto
invisibile
elastico
largo
Elastic
blindstitch,
wide
1—4
875
876
Punto
invisibile
elastico
stretto
Elastic
blindstitch,
narrow
1—4
876
Punto
conchiglia
argo
Shell-edge
stitch,
wide
1—4
876
Punto
conchiglia
stretto
Shell-edge
stitch,
narrow
1—4
876
Punto
congiuntura
largo
Joining
stitch,
wide
1—4
876
Punto
congiuntura
stretto
Joining
stitch,
narrow
1—4
876
Punto
triplo
diritto,
Elastic
triple
straight
stitch,
875
posizione
ago
destra
right
needle
position
876
Punto
triplo
diritto,
Elastic
triple
straight
stitch,
875
posizione
ago
àentro
centre
needle
position
876
Punto
triplo
zigzag,
Elastic
triple
zigzag
stitch,
875
larghezza
regolabile
width
adjustable
876
Punto
nido
d’ape
Honeycomb
stitch
Punto
al
bordo
Edge
finishing
stitch
Punto
decorativo
Ornamental
stitch
Punto
decorativo
Ornamental
stitch
876
Punto
Overlock
argo
Overlock
stitch,
wide
876
Punto
Overlock
stretto
Overlock
stitch,
narrow
876
Punto
Overlock
chiuso
largo
Closed
overlock
stitch,
wide
876
Punto
Overlock
chiuso
stretto
Closed
overlock
stitch,
narrow
876
19
La pagina si sta caricando...
La pagina si sta caricando...

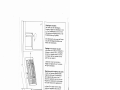
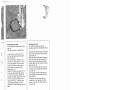
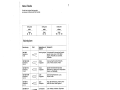
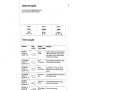
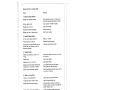
NähfUfle
(Normalzubehör)
1
Normalnähful3
4
Rei8verschlu6fu8
2
KlarsichtfuB
5
Knopflochful3
3
Blindstichful3
6
Lineal
Pieds
presseurs
(accessoires
standards)
1
Semelle
normale
4
Semelle
pour
2
Semelle poser
a
transparente
fermeture
a
3
Semelle
a
point
glissiere
invisible
5
Semelle
a
boutonnières
6
Guide-bord
I
pieciini
(corredo
normale)
1
piedino
4
piedino
per
normale
cerniere
2
piedino
5
piedino
per
trasparente
occhielli
3
piedino
per
6
lineale
punto
invisibile
Sewing
feet
(standard
accessories)
1
Plain
sewing
foot
4
Zipper
foot
2
Clear-view
foot
5
Buttonhole
foot
3
Blindstitch
foot
6
Edge
guide
98-694
563-0
1
a
Si
2
98-694
414-00
3
98-694 407-00
p
98-694
5
Zubehörfach:
Den
Deckel
der
Nãhflächenvergrol3erung
10
äffnen.
Darunter
ist
Platz
für
Nãh
zubehär.
Boite
de
rangement:
Ouvrir
le
couvercle
10.
Cette
boite
off
re
assez
de
place
pour
ranger
les
acces
soires.
Scomparto
per
accessori:
Aprire
ii
coperchio
del
piano
variabile
10.
Sotto
si
trova
posto
per
sistemare
gil
accessori.
Accessory
box:
Open
the
cover
of
work
support
10.
Under
this
lid
there
is
room
for
your
sewing
accessories.
22
La pagina si sta caricando...
La pagina si sta caricando...

Lavori
di
impunture:
Piedino:
piedino
normale
o
piedino
trasparente
e
lineale
di
guida
Punto:
E
II
lineale
P
si
puÔ
usare
con
quasi
tutti
I
piedini.
Fissaggio
del
lineale:
Passare
ii
lineale
P
attraverso
ii
foro
Q
e
fissarlo
con
a
vite
R,
a
seconda
della
neccessità
Si
pUO
regolare
a
distanza
desiderata.
E’
facile
eseguire
cuciture
parallele
usando
ii
lineale
che
scorrerà
lungo
ii
bordo
(fig.
S)
oppure
sul
a
cucitura
pa
rallela
precedente
(fig.
T).
La
direzione
della
cucitura
sara
cosi
sempre
corretta.
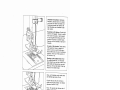
Topstitching
Sewing
foot:
Plain
Sewing
foot
or
clear-view
foot
and
edge
guide
Stitch:
E
Edge
guide
P
can
be
used
with
nearly
all
Sewing
feet.
Fitting
the
edge
guide
Push
edge
guide
P
through
hole
Q
and
secure
it
in
position
with
screw
R.
The
guide
can
be
adjusted
to
the
desired
stitching
margin
for
various
applications.
With
the
edge
guide
attached,
it
is
easy
to
sew
parallel
lines
of
stitches
or
to
stitch
parallel
to
the
edge.
The
guide
either
follows
an
edge
(Fig.
S)
or
when
making
parallel
lines
of
stitches
runs
along
the
preceding
line
of
stitches
(Fig.
T),
so
the
seam
looks
neat
and
accurate.
25
La pagina si sta caricando...

Punto
invisibile
elastico:
Piedino:
piedino
per
punto
invisibile
Tensione:
atlentare
leggermente
Ia
tensione
superiore
filato
per
cucire
Filato:
Punto:
o
K
Lunghezza
punto:
3—4
Ago:
grossezza
70
o
80
Ecco
come
si
regola
t’entrata
dell’ago
net
tessuto:
Porre
l’orlo
preparato
sotto
ii
piedino
per
punto
invisibile.
La
piegatura
delta
stoffa
superiore
scorre
in
tat
maniera
lungo
Ia
guida
Q
del
piedino.
Girare
con
a
vite
P
Ia
guida
Q
verso
sinistra
in
modo
che
l’ago
prenda
nell’entrata
a
sinistra
solo
un
fib
della
stoffa
superiore
(fig.
A
e
S).
Si
consiglia
di
eseguire
prima
una
prova
su
un
ritaglio
di
stoffa.
Elastic
blindstitch
Sewing
foot:
Slindstitch
foot
Tension:
Needle
thread
tension
a
little
slack.
Thread:
Plain
sewing
thread
Stitch:
I
or
K
Stitch
length:
3—4
Needle:
Size
70
or
80
Regulating
the
needle
penetration
Place
the
prepared
hem
under
the
blind-
stitch
foot.
The
crease
line
of
the
outer
fabric
runs
along
edge
guide
0
of
the
bbindstitch
sewing
foot.
Turn
screw
P
to
adjust
edge
guide
0
so
far
to
the
left
that
the
needle
picks
up
only
one
thread
of
the
outer
fabric
when
penetrating
on
the
left
side
(Figs.
A
and
S).
First
make
a
sewing
test
on
a
piece
of
waste
material.
27
La pagina si sta caricando...

29
Knoptioch
einstellen:
Oberfadenspannung
in
den
Knopfloch
bereich
bei
3
stellen.
Knopflochful3
anbringen.
Stichdichte
irn
Knopflochbereich
P
einstellen.
Einlauf
faden
wie
folgt
rn
Nähful3
einlegen:
Faden
über
die
hintere
Nocke
legen,
strafiziehen
und
in
der
vorderen
Nocke
Q
einklernrnen.
Beim
Nähen
láuft
der
Pteil
R
an
der
Skala
S
entlang.
Dadurch
kann
die
Knopflochlänge
bestimrnt
werden.
Zurn
Knopflochnähen
feinen
Nähfaden
verwenden.
Nadet:
Stärke
70
bis
80
Reglage
de
Ia
boutonniere:
Régler
Ia
tension
du
fit
d’aiguille
dans
Ia
zone
boutonnières
sur
3.
Fixer
Ia
semelle
boutonniere.
Regler
Ia
densité
des
points
daris
Ia
zone
boutonniere
P.
Introduire
le
fit
de
passe
dans
Ia
sernelle
cornrne
suit:
Coucher
le
fil
sur
le
crochet
arrière
et
le
pincer
dans
le
pince-fil
Q.
Pendant
a
couture,
a
flèche
R
coulisse
le
long
de
l’échelle
graduee
S.
Ainsi,
it
est
possible
de
déterrniner
Ia
longueur
de
Ia
boutonniere,
Utiliser
du
fit
a
coudre
fin.
Aiguille:
Grosseur
70
a
80
Regolazione
per
I’occhiello:
Regolare
Ia
tensione
superiore
nel
settore
occhiello
3.
Applicare
it
piedino
per
occhielli.
Fittezza
del
punto
net
settore
per
occhielti
P.
Inserire
corne
segue
it
fib
rinforzo:
appoggiare
it
fib
sopra
it
gancio
poste
riore,
tenderbo
bene
e
fissarlo
net
gancio
anteriore
0.
Cucendo,
Ia
freccia
A
scorre
lungo
Ia
scala
S.
In
tale
rnaniera
si
puo
deterrninare
con
esattezza
Ia
lunghezza
delI’occhielbo.
Usare
per
I’occhiello
del
filato
fine.
Ago:
grossezza
70—80
Buttonhole
setting:
Set
the
needle
thread
tension
at
range
3
for
buttonhole
sewing.
Attach
the
button
hole
foot.
Set
the
stitch
density
at
range
P.
Insert
a
girnp
thread
in
the
sewing
toot
as
shown
in
the
illustration:
Place
the
thread
over
the
back
ridge,
and
pull
it
taut
so
that
it
is
held
in
tab
Q
at
the
front.
During
sewing,
arrow
R
runs
along
scale
S.
This
is
how
the
buttonhole
length
is
deterrnined.
For
sewing
buttonholes
use
light
sewing
thread.
Needle
sizes:
70—80
La pagina si sta caricando...

Confezionare
occhielli
Manopola
del
motivi
su
A.
Spostare
Ia
feritoia
in
avanti
sino
poco
prima
dell’arresto.
Cucire
Ia
prima
costina
nella
un
ghezza
desiderata.
Regolare
Ia
manopola
del
motivi
22
su
B
e
cucire
4—6
punti
di
travetta.
Aizare
‘ago.
Nel
modello
874
premere
inoltre
II
tasto
indietro
23.
Regolare
Ia
manopola
del
motivi
22
su
C
e
cucire
Ia
seconda
costiria
nella
medesima
Iunghezza
della
prima.
Alzare
‘ago.
Nel
modello
874
premere
inoltre
ii
tasto
indietro
23.
Regolare
Ia
manopola
del
motivi
22
su
B
e
cucire
4—6
punti
di
travetta.
Aizare
l’ago.
Regolare
Ia
manopola
dei
motivi
22
su
D
e
cucire
alcuni
punti
di
fissagglo.
Togliere
ii
tessuto.
Tirare
II
cordon
cino
e
tagliarlo.
6.
Aprire
l’occhielllo
con
ii
taglia-asole
Si
consiglia
di
eseguire
un
campione
prima
di
cucire
sul
capo.
Zeichnungen
snd
ohne
Nähful3.
Les
itustrations
ne
montrent
pas
a
semeUe
du
pied
presseur.
disegni
sono
eseguiti
senza
piedino.
Drawings
do
not
show
sewing
foot
Sewing
buttonholes
Set
stitch
pattern
thumb
wheel
at
A.
Pull
the
bottom
of
the
buttonhole
foot
forward
nearly
to
the
end
of
its
move
ment.
1.
Sew
first
buttonhole
seam
in
the
length
required.
2.
Set
stitch
pattern
thumb
wheel
22
at
B
and
sew
four
to
six
tacking
stit
ches.
Raise
the
needle.
On
model 874,
press
reverse
button
23
in
addition.
3.
Set
stitch
pattern
thumb
wheel
22
at
C
and
sew
the
second
buttonhole
seam
as
long
as
the
first.
Raise
the
needle.
On
model
874,
press
reverse
button
23
in
addition.
4.
Set
stitch
pattern
thumb
wheel
22
at
B
and
sew
four
to
six
tacking
stit
ches.
Raise
the
needle.
Set
stitch
pattern
thumb
wheel
22
at
D
and
sew
a
few
securing
stitches.
5.
Remove
the
fabric,
pull
the
filler
cord
taut
and
trim.
6.
Cut
open
buttonhole
with
special
knife
Before
sewing
buttonholes
in
the
garment
it
is
recommended
to
sew
a
buttonhole
as
a
test.
1.
3.
4.
5.
31
La pagina si sta caricando...

Attaccatura
bottone
Piedino:
senza
piedino
oppure
piedino
trasparente
Punto:
D
sinistra
Trasporto:
abbassato
Filato:
filato
fine
Porre
ii
bottone
sul
punto
segnato,
e
spingerlo
sotto
ii
supporto
del
piedino.
Abbassare
ii
supporto
del
piedino.
Fare
penetrare
lago
nel
foro
a
destra
del
bottone.
Aizare
l’ago.
Regolare
Ia
mano
pola
dei
motivi
22
su
F.
Selezionare
ora
Ia
larghezza
dello
zigzag,
in
maniera
che
l’ago,
girando
ii
volantino
penetri
nel
foro
a
sinistra.
Cucire
6—8
punti
zig-zag
e
alcuni
punti
diritti
nel
foro
a
destra
(1).
Bottone
con
gambo,
per
bottoni
grossi
su
stoffe
pesanti.
Far
penetrare
‘ago
nel
foro
a
destra.
Porre
un
fiammifero
sul
centro
del
bottone.
Abbassare
il
piedino
(2).
Cucire
alcuni
sopragitti
e
lasciare
circa
15
cm
di
fib.
Passare
fili
superiore
ed
inferiore
(3)
e
avvolgere
il
gambo
(4)
e
annodare
i
fili.
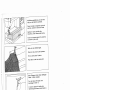
Sewing
on
buttons
Sewing
foot:
Without
sewing
foot
or
with
clear-view
foot
Place
the
button
in
the
location
marked
beforehand
and
push
it
under
the
sewing
foot
holder.
Lower
the
sewing
foot
holder
into
the
button.
Lower
the
needle
into
the
right
hole
of
the
button.
Raise
the
needle.
Set
stitch
pattern
thumb
wheel
22
at
F.
Now
select
a
zig
zag
width
that
allows
the
needle
to
enter
the
left
hole
of
the
button
when
the
hand
wheel
is
turned.
Sew
six
to
eight
zigzag
stitches.
Set
stitch
pattern
thumb
wheel
at
D
and
sew
a
number
of
securing
stitches
(1).
Sewing
on
buttons
with
stems
(for
large
buttons
in
heavy
materials).
Lower
the
needle
into
the
right
hole.
Place
a
match
on
the
middle
of
the
button.
Lower
the
sewing
foot
(2).
Sew
a
number
of
zigzag
stitches
and
leave
a
thread
end
of
about
6
inches.
Pull
the
needle
and
bobbin
threads
through
(3).
Wrap
the
stem
(4)
and
tie
off
the
threads.
4
Stitch:
Feed:
Thread:
D
Dropped
Fine
sewing
thread
33
La pagina si sta caricando...

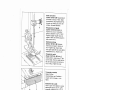
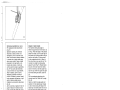
D
Attaccatura
della
cerniera
lampo:
Piedino:
piedino
per
cerniere
Lunghezza
punto:
2—3
Punto:
E
Filato:
filato
per
cucire
Agganciare
il
piedino
per
cerniere
con
il
perno
posterioro
nella
scanalatura
posteriore
S
e
prernere
Ia
suoletta
in
al
to,
finchè
ii
perno
antenore
T
si
innesti,
II
piedino
puô
essere
spostato
nelle
posizioni
destra,
sinistra
(fig.
P)
o
centro.
Cerniera
lampo
coperta
ai
due
lati:
Imbastire
Ia
cerniera.
Spostare
il
piedino
a
destra
fino
all’arresto,
porre
a
cerniera
aperta
sotto
ii
piedino
in
maniera
che
I
dentini
scorrano
lungo
a
guida
destra
(fig.
0).
Cucire
Ia
cerniera
per
circa
Ia
metà
nella
arghezza
desiderata.
Lasciare
‘ago
nella
stoffa.
Alzare
ii
piedino
e
chiudere
Ia
cerniera
(fig.
R).
Abbassare
ii
piedino,
cucire
fino
al
termine
della
cer
niera
ed
eseguire
infine
una
cucitura
trasversale
di
fissaggio.
Cucire
Ia
seconda
parte
della
cerniera
parallelamente
in
uguale
distanza.
Poco
prima
del
termine
lasciare
l’ago
nella
stoffa.
Alzare
ii
piedino
e
aprire
Ia
cerniera
(fig.
U).
Abbassare
ii
piedino,
terminare
Ia
cucitura.
Sewing
in
zippers
Sewing
foot:
Zipper
foot
Stitch
length:
2
to
3
Stitch:
E
Thread:
Sewing
thread
Engaging
the
zipper
foot
Insert
the
foot
with
the
back
pin
in
back
groove
S
and
push
the
shoe
of
the
foot
upwards,
until
the
front
pin
T
snaps
in.
The
zipper
foot
can
be
pushed
to
the
positions:
left
(Fig.
P),
right,
or
centre.
Completely
concealed
zip
closure
Baste
in
zip
by
hand
first.
Push
the
zipper
toot
to
the
left
as
far
as
it
will
go.
Place
the
open
zip
under
the
foot
so
that
its
teeth
run
along
the
right
guiding
edge
on
the
sole
of
the
foot
(Fig.
0).
Sew
about
half
the
length
of
the
zip
at
the
required
width.
Leave
the
needle
down
in
the
material,
raise
the
zipper
toot
and
close
the
zip
(Fig.
R).
Lower
the
zipper
foot
again,
continue
the
seam
and
then
sew
across
the
end.
Sew
the
other
side
of
the
zip
at
the
same
margin.
Shortly
before
the
end
of
the
seam
leave
the
needle
down
in
the
material,
raise
the
zipper
foot
and
open
the
zip
(Fig.
U).
Lower
the
zipper
foot
again
and
sew
to
the
end.
35
La pagina si sta caricando...

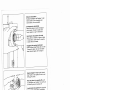
GlUhlampe
auswechseln
•
Netzstecker
ziehen.
Fuhrungslineal
etwas
schrag
in
die
Off
nung
S
auf
dem
Kopi
der
Maschine
stecken,
Lampengehause
niederdrücken
und
festhalten.
Die
Glühlampe
hoch
drücken,
nach
P
drehen
und
herausneh
men.
Die
neue
Lampe
so
einsetzen,
daB
die
Fuhrungen
in
den
Schlitzen
R
glei
ten.
Die
Gluhlampe
hochdrücken
und
nach
Q
drehen.
Changement
de
I’ampoule
•
Débrancher
ía
machine
du
secteur.
Placer
le
guide-bord
de
facon
oblique
dans
louverture
S
sur
Ia
tête
de
Ia
machine.
Descendre
et
maintenir
le
bol
tier
de
Ia
lampe.
Pousser
l’ampoule
vers
le
haut,
a
tourner
vers
P
et
l’enlever.
Placer
l’ampoule
neuve
de
manière
que
ses
tenons
s’engagent
dans
les
fentes
R.
Pousser
l’ampoule
vers
le
haut
et
Ia
tourner
vers
Q.
Sostituzione
della
lampadina
•
Togliere
ía
spina
dalla
presa
a
lntrodurre
il
lineale
di
guida
obliqua
mente
nell’apertura
S
sulla
testa
della
macchina.
Premere
in
giü
il
porta
lampade
e
tenerlo
fermo.
Spingere
Ia
lampadina
in
sü,
girarla
verso
P
e
toglierla.
lnserire
la
nuova
lampadina
in
maniera
che
i
perni
entrino
nelle
fessure
R.
Premere
Ia
lampadina
in
sü
e
girarla
in
senso
0.
Changing
the
bulb
•
Pull
out
the
mains
plug.
Place
the
edge
guide,
slightly
diagonally,
into
opening
S
in
the
head
of
the
machine.
Press
down
the
housing
of
the
lamp
and
hold
it
fast.
Push
the
bulb
upwards,
then
in
direction
P
and
pull
it
out.
Insert
the
new
bulb
so
that
the
pins
enter
slots
R,
push
the
bulb
upwards
and
turn
it
in
direction
Q.
45
La pagina si sta caricando...
La pagina si sta caricando...
La pagina si sta caricando...
La pagina si sta caricando...
La pagina si sta caricando...
La pagina si sta caricando...
La pagina si sta caricando...
La pagina si sta caricando...
La pagina si sta caricando...
La pagina si sta caricando...
La pagina si sta caricando...
La pagina si sta caricando...
La pagina si sta caricando...
La pagina si sta caricando...
La pagina si sta caricando...
La pagina si sta caricando...
La pagina si sta caricando...
La pagina si sta caricando...
La pagina si sta caricando...
La pagina si sta caricando...
La pagina si sta caricando...
La pagina si sta caricando...
La pagina si sta caricando...
La pagina si sta caricando...
La pagina si sta caricando...
La pagina si sta caricando...
La pagina si sta caricando...
La pagina si sta caricando...
La pagina si sta caricando...
La pagina si sta caricando...
La pagina si sta caricando...
-
 1
1
-
 2
2
-
 3
3
-
 4
4
-
 5
5
-
 6
6
-
 7
7
-
 8
8
-
 9
9
-
 10
10
-
 11
11
-
 12
12
-
 13
13
-
 14
14
-
 15
15
-
 16
16
-
 17
17
-
 18
18
-
 19
19
-
 20
20
-
 21
21
-
 22
22
-
 23
23
-
 24
24
-
 25
25
-
 26
26
-
 27
27
-
 28
28
-
 29
29
-
 30
30
-
 31
31
-
 32
32
-
 33
33
-
 34
34
-
 35
35
-
 36
36
-
 37
37
-
 38
38
-
 39
39
-
 40
40
-
 41
41
-
 42
42
-
 43
43
-
 44
44
-
 45
45
-
 46
46
-
 47
47
-
 48
48
-
 49
49
-
 50
50
-
 51
51
-
 52
52
-
 53
53
-
 54
54
-
 55
55
-
 56
56
-
 57
57
-
 58
58
-
 59
59
-
 60
60
-
 61
61
-
 62
62
-
 63
63
-
 64
64
-
 65
65
-
 66
66
-
 67
67
-
 68
68
-
 69
69
-
 70
70


Pfaff Hobby 874 Manuale del proprietario
- Categoria
- Macchine da cucire
- Tipo
- Manuale del proprietario
in altre lingue
- English: Pfaff Hobby 874 Owner's manual
- français: Pfaff Hobby 874 Le manuel du propriétaire
- Deutsch: Pfaff Hobby 874 Bedienungsanleitung
Documenti correlati
-
Pfaff tipmatic 1115 Manuale del proprietario
-
-
-
-
-
-
-
-
-
Huskystar ER10 Manuale del proprietario
Altri documenti
-
Bernina Bernette 100 Manuale del proprietario
-
-
Brother Innov-is 4750D Manuale utente
-
-
SINGER 2662 Excel Manuale del proprietario
-
BOMANN NM 6063 CB Istruzioni per l'uso
-
Bernina 1008 Manuale del proprietario
-
ELNA 845 - Manuale utente
-
Adler 166 Directions For Use Manual
-