Getac ZX70(52628791XXXX) Manuale utente
- Categoria
- Smartphone
- Tipo
- Manuale utente

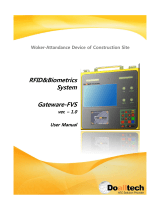
Rugged Mobile Computing Solution
ZX70
USER MANUAL

November 2017
Trademarks
Google and Google Play logo are trademarks of Google Inc.
The Bluetooth word mark and logos are owned by the Bluetooth SIG, Inc.
All other brand and product names are trademarks or registered trademarks
of their respective companies.
Disclaimer
Specifications and manuals are subject to change without notice. Getac
assumes no liability for damage incurred directly or indirectly from errors,
omissions, or discrepancies between the device and the manuals.
Notes
Depending on the specific model purchased, the color and look of your
device and accessories may not exactly match the graphics shown in this
document.
The screenshots and other presentations shown in this document are for
reference only. They may differ from the actual screens and presentations
generated by the actual product.
Your device is based on Google’s Android 6.0 operating system, with
additions by Getac.
For the latest version of the manual, please visit the Getac website at
www.getac.com.

i
Table of Contents
Chapter 1 Getting Started ................................................................. 1
Identifying Hardware Components .......................................... 1
Front Components ................................................................. 1
Back Components .................................................................. 3
Top Components.................................................................... 4
Bottom Components ............................................................. 5
Left-Side Components ........................................................... 6
Getting Your Device Ready for Use .......................................... 7
Installing the SIM Card (Select Models Only) ....................... 7
Connecting to AC Power and Charging the Battery ........... 8
Performing the Initial Startup .............................................. 9
Chapter 2 Basic Skills....................................................................... 10
Waking Up and Shutting Down .............................................. 10
Navigating on the Screen ........................................................ 10
Touch Mode ......................................................................... 11
Auto Rotate .......................................................................... 11
Home Screen ............................................................................ 12
Customizing Your Home Screen ......................................... 12
Using Applications ................................................................... 13
Navigation Bar ......................................................................... 13
Status Bar and Notifications Panel ......................................... 14
Quick Settings .......................................................................... 14
Entering Information ............................................................... 15
Chapter 3 Getting Connected ......................................................... 16
Wireless Connections ............................................................... 16
Using WWAN (Select Models Only) .................................... 16
Using Wi-Fi Networks .......................................................... 16
Using the Bluetooth Function ............................................. 17
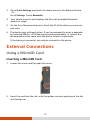
External Connections ............................................................... 18
Using a MicroSD Card .......................................................... 18
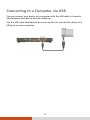
Connecting to a Computer via USB .................................... 20

ii
Chapter 4 Android Preinstalled Applications ................................ 21
Google Applications Overview................................................ 21
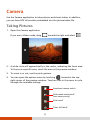
Camera ...................................................................................... 23
Taking Pictures ..................................................................... 23
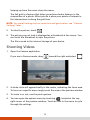
Shooting Videos ................................................................... 24
Camera Settings ................................................................... 25
Chapter 5 Getac Applications ......................................................... 27
Barcode Utility (Select Models Only) ...................................... 27
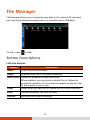
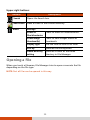
File Manager ............................................................................ 29
Button Descriptions ............................................................. 29
Opening a File ...................................................................... 30
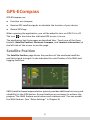
GPS-ECompass .......................................................................... 31
Satellite Position .................................................................. 31
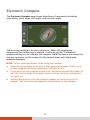
Electronic Compass .............................................................. 32
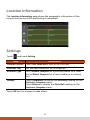
Location Information .......................................................... 33
Settings ................................................................................. 33
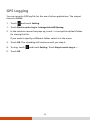
GPS Logging ......................................................................... 34
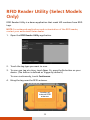
RFID Reader Utility (Select Models Only) ............................... 35
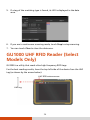
GU1000 UHF RFID Reader (Select Models Only) .................... 36
Chapter 6 Managing Your Device .................................................. 37
Managing Power ...................................................................... 37
Low Battery Signals and Actions ........................................ 37
Power-Saving Tips ................................................................ 38
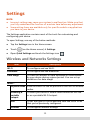
Settings ..................................................................................... 39
Wireless and Networks Settings ......................................... 39
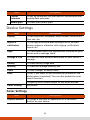
Device Settings ..................................................................... 40
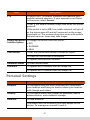
Personal Settings ................................................................. 41
System Settings .................................................................... 42
Chapter 7 Care and Maintenance ................................................... 43
Resetting Your Device ............................................................. 43
Caring for Your Device ............................................................ 43
Chapter 8 Regulatory Information ................................................. 45
Regulations Statements ........................................................... 45
USA Class B Regulations ...................................................... 45
European Union CE Marking and Compliance Notices ..... 49
Safety Precautions .................................................................... 51
About Charging ................................................................... 51
About the AC Adapter ........................................................ 51

1
Chapter 1
Getting Started
This chapter introduces you to the external components of your device and
guides you through the process of setting up your device for use.
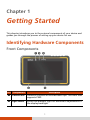
Identifying Hardware Components
Front Components
Ref Component Description
Camera lens
Takes still pictures or records video clips. The front lens
supports 2 MP.
Light sensor
Senses the ambient light for automatic adjustments of
the display backlight.

2
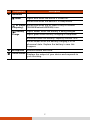
Ref Component Description
Indicators
Power Lights blue when the device is turned on.
Blinks blue when the device is in Sleep mode.
RF (Radio
Frequency)
Blinks blue when the RF radio of any RF feature
(WLAN/Bluetooth/WWAN) is on.
Battery
Charge
Lights amber when the battery is being charged.
Lights green when battery charging is completed.
Blinks red when the battery’s capacity is below 10%.
Blinks amber when the battery charging is in an
abnormal state. Replace the battery in case this
happens.
Microphone
Receives sound and voice.
Touch screen
Displays the output of your device and responds to
your touching.

3
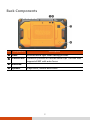
Back Components
Ref Component Description
Flash Provides extra light when taking pictures.
Camera lens
Takes still pictures or records video clips. The rear lens
supports 8 MP with auto focus.
Reserved
Speaker Plays music, sounds and voices.

4
Top Components
Ref Component Description
Barcode reader
lens (optional)
Scans and reads barcodes.
Power button Starts up your device.
Turns off or restores the screen.
When pressed longer:
Opens a menu with Power off option.
Minus button
Decreases the sound volume (default setting).
The type of sound adjusted depends on the current
operation.
Can be assigned to a different function through
Settings.
Plus button
Increases the sound volume (default setting).
The type of sound adjusted depends on the current
operation.
Can be assigned to a different function through
Settings.
Fn (Function)
button
Provides the “trigger/shutter” function (default
setting).
Depending on your model, it serves as one of the
below functions.
- Trigger button for the barcode reader/RFID
reader.
- Shutter button for the camera.
Can be assigned to a different function through
Settings.

5
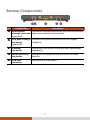
Bottom Components
Ref Component Description
WWAN pass-
through connector
(optional)
Connects the external antenna for WWAN (wireless
wide area network) connectivity.
GPS pass-through
connector
(optional)
Connects the external antenna for GPS signal
reception.
Docking
connector
Connects to the office or vehicle dock (purchased
separately).
Micro USB client
connector
Connects to a computer via USB cable for data
transfer.
USB host
connector
Connects to a USB device.

6
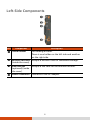
Left-Side Components
Ref Component Description
Tether holder For holding a tether.
There is one holder on the left side and another
on the right side.
MicroSD card slot
(inside the cover)
Accepts a microSD card for removable storage.
SIM card slot
(optional) (inside
the cover)
Accepts a SIM card for the WWAN function.
Power Connector Connects to the AC adapter.

7
Getting Your Device Ready for Use
Installing the SIM Card (Select Models Only)
NOTE: Make sure the device is turned off when installing or removing the
SIM card.
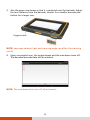
1. Loosen the screw and flip open the cover.
2. With the SIM card’s chip side facing the back of the device and the beveled
corner pointing to the slot, insert the card all the way into the slot.
NOTE: To remove the SIM card, slightly push in the card to release it and
then pull the card out of the slot.
3. Close the cover and tighten the screw.

8
4. When using your device in North America:
You must specify your North America mobile network operator in
Settings. After starting up the device, go to Settings
Getac Settings
LTE. Select the LTE module firmware that matches your mobile network
operator. If your operator is not listed in the menu, select Generic.
CAUTION:
When closing the cover, you must firmly press all
over the cover to ensure its sealing capability. And
keep the screw tightened to protect against
external impacts.
To ensure IP67 protection performance,
always have the cover closed with the screw
tightened unless you need to open it for
inserting or removing a card.
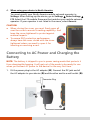
Connecting to AC Power and Charging the
Battery
NOTE: The battery is shipped to you in power saving mode that protects it
from charging/discharging. It will get out of the mode to be ready for use
when you connect AC power to the device for the very first time.
1. Fit the power plug to the AC adapter (
). Connect the DC jack end of
the AC adapter to your device (
) and the other end to a wall outlet (
).
Converter Plug

9
2. The charge indicator glows in amber when charging is in progress. Do
not disconnect your device from AC power until the battery is fully
charged, as indicated by the amber indicator turning into green. This will
take a couple of hours.
CAUTION: For optimal performance of the lithium battery, take note of the
following:
Use the included AC adapter only.
There is no need to fully discharge the battery before charging. You can
charge the battery before it is discharged.
Do not charge the battery where the temperature is high (e.g. in direct
sunlight).
As a battery protection, store the device where the temperature is
appropriate. Avoid high temperatures.
The battery can be charged when its temperature is between 0°C (32°F)
and 40°C (104°F).
If you will not use the product for a long period of time, be sure to fully
charge the battery at least once every two weeks. Over discharge of the
battery can affect the charging performance.
Performing the Initial Startup
NOTE: You must use AC power when starting up the device for the very first
time.
When turning on your device for the very first time, you will be guided
through a setup process.
1. Make sure that your device is connected to AC power
2. Press the power button.
The device powers up and displays the initial screen.
3. Follow the on-screen instructions to complete the initial setup process.
After the setup is completed, the Home screen appears. You can now use
your device.

10
Chapter 2
Basic Skills
This chapter familiarizes you with the basic operations of your device.
CAUTION: The device can get uncomfortably warm when you use it in high
temperatures. In such a circumstance, please take safety measures (such as
wearing gloves) to protect yourself. Prolonged body contact can cause
discomfort and potentially a burn.
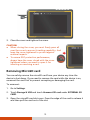
Waking Up and Shutting Down
Your device sleeps after a period of inactivity. To wake up, press the power
button and, at the lock screen, swipe upwards to unlock.
To shut down, press and hold the power button until a menu pops up. Touch
Power off and then OK.
Navigating on the Screen
CAUTION: Do not use sharp objects on the touch screen. Doing so may
damage the display surface.
Use your finger to navigate and select objects on the screen. Here are some
common terms that you should know when using the touch screen:
Touch
Touch the screen once with your finger to open an item or select an object.
Touch and hold
Touch and hold your finger on an item to see a list of actions available
for that item.

11
Drag
Hold your finger on an item and, without lifting the finger, move across
the screen until you reach the target position.
Swipe or slide
Move your finger across the screen, without pausing when you first
touch it (so you don’t “drag” instead). For example, you slide the screen
up or down to scroll a list.
Pinch
In some applications (such as Maps and Photos), you can zoom in and out
by placing two fingers on the screen at once and pinching them together
(to zoom out) or spreading them apart (to zoom in).
NOTE: When the touch screen does not seem to respond, put the device to
sleep and then wake it. The screen should function again.
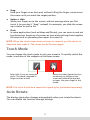
Touch Mode
You can change the touch mode to suit your scenario. To quickly switch the
mode, touch one of the widgets on the Home screen.
NOTE: The stylus should be a capacitive-tipped stylus (purchased separately).
Auto Rotate
The display orientation changes automatically when you rotate the device.
You can disable the function through Settings.
Select thi
s if you are using the
stylus. This mode responds to
finger touches as well.
Select this
when liquids (such as
raindrops) are falling on the
screen and should be rejected
as input. Use your finger in this
mode.

12
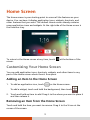
Home Screen
The Home screen is your starting point to access all the features on your
device. You can have it display application icons, widgets, shortcuts, and
other features that you want. The default Home screen already contains
some application icons and widgets. At the right side of the Home screen is
the Favorites tray.
To return to the Home screen at any time, touch
at the bottom of the
screen.
Customizing Your Home Screen
You can add application icons, shortcuts, widgets, and other items to any
part of the Home screen where there’s free space.
Adding an Item to the Home Screen
1. To add an application icon, touch on the Home screen.
To add a widget, touch and hold the background, then touch .
2. Touch and hold an item to add. Drag it to the where you want to place it
and then release it.
Removing an Item from the Home Screen
Touch and hold the item you want to remove. Drag it to the X icon at the
corner of the screen.

13
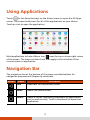
Using Applications
Touch (in the Favorites tray) on the Home screen to open the All Apps
screen. The screen holds icons for all of the applications on your device.
Touch an icon to open the application.
Most applications include a Menu icon near the top or lower right corner
of the screen. The menu contains tools that apply to the activities of the
current screen or application.
Navigation Bar
The navigation bar at the bottom of the screen provides buttons for
navigation purposes and frequently-used tasks.
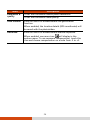
Button Name Description
Back Goes back to the previous screen.
Home Opens the Home screen.
Recent
Opens a screen containing thumbnails of applications
you’ve used recently. Touch a thumbnail to open that
application.

14
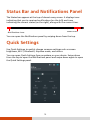
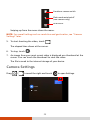
Status Bar and Notifications Panel
The Status bar appears at the top of almost every screen. It displays icons
indicating that you’ve received notifications (on the left) and icons
indicating the current status (on the right), along with the current time.
You can open the Notifications panel by swiping down from the top.
Quick Settings
Use Quick Settings to quickly change common settings such as screen
brightness, Wi-Fi, Bluetooth, Airplane mode, and others.
You can open Quick Settings from anywhere on your device. Swipe down
from the top to open the Notifications panel and swipe down again to open
the Quick Settings panel.
Status icons
Notifications icons

15
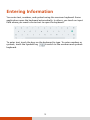
Entering Information
You enter text, numbers, and symbols using the onscreen keyboard. Some
applications open the keyboard automatically. In others, you touch an input
field where you want to enter text to open the keyboard.
To enter text, touch the keys on the keyboard to type. To enter numbers or
symbols, touch the Symbols key to switch to the numbers and symbols
keyboard.

16
Chapter 3
Getting Connected
This chapter tells you how you can get your device connected through a
variety of ways.
Wireless Connections
Using WWAN (Select Models Only)
NOTE: Your model only supports data transmission. Voice transmission is
not supported
Select models support UMTS/HSPA+/CDMA/GSM/GPRS/EDGE mobile
telephony communications protocol.
Mobile network is enabled by default. The icons in the Status bar indicate
which kind of data network you’re connected to and the voice and data
network signal strength.
To check or modify settings, touch (on the Home screen) Settings
More (under WIRELESS & NETWORKS) Cellular networks.
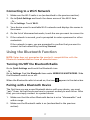
Using Wi-Fi Networks
Turning On/Off the Wi-Fi Radio
Go to Quick Settings and touch the Wi-Fi icon.
- Or –
Go to Settings. Find the Wi-Fi item under WIRELESS & NETWORKS. Slide the
Wi-Fi switch on or off.
When the Wi-Fi radio is turned on, the icon appears in the status bar. If
your device finds a network that you connected to previously, it connects to it.
La pagina si sta caricando...
La pagina si sta caricando...
La pagina si sta caricando...
La pagina si sta caricando...
La pagina si sta caricando...
La pagina si sta caricando...
La pagina si sta caricando...
La pagina si sta caricando...
La pagina si sta caricando...
La pagina si sta caricando...
La pagina si sta caricando...
La pagina si sta caricando...
La pagina si sta caricando...
La pagina si sta caricando...
La pagina si sta caricando...
La pagina si sta caricando...
La pagina si sta caricando...
La pagina si sta caricando...
La pagina si sta caricando...
La pagina si sta caricando...
La pagina si sta caricando...
La pagina si sta caricando...
La pagina si sta caricando...
La pagina si sta caricando...
La pagina si sta caricando...
La pagina si sta caricando...
La pagina si sta caricando...
La pagina si sta caricando...
La pagina si sta caricando...
La pagina si sta caricando...
La pagina si sta caricando...
La pagina si sta caricando...
La pagina si sta caricando...
La pagina si sta caricando...
La pagina si sta caricando...
-
 1
1
-
 2
2
-
 3
3
-
 4
4
-
 5
5
-
 6
6
-
 7
7
-
 8
8
-
 9
9
-
 10
10
-
 11
11
-
 12
12
-
 13
13
-
 14
14
-
 15
15
-
 16
16
-
 17
17
-
 18
18
-
 19
19
-
 20
20
-
 21
21
-
 22
22
-
 23
23
-
 24
24
-
 25
25
-
 26
26
-
 27
27
-
 28
28
-
 29
29
-
 30
30
-
 31
31
-
 32
32
-
 33
33
-
 34
34
-
 35
35
-
 36
36
-
 37
37
-
 38
38
-
 39
39
-
 40
40
-
 41
41
-
 42
42
-
 43
43
-
 44
44
-
 45
45
-
 46
46
-
 47
47
-
 48
48
-
 49
49
-
 50
50
-
 51
51
-
 52
52
-
 53
53
-
 54
54
-
 55
55


Getac ZX70(52628791XXXX) Manuale utente
- Categoria
- Smartphone
- Tipo
- Manuale utente
in altre lingue
- English: Getac ZX70(52628791XXXX) User manual
Documenti correlati
-
Getac T800 Android(52621222XXXX) Manuale utente
-
-
-
-
-
Getac Z710(52628476XXXX) Manuale utente
-
-
-
Altri documenti
-
LG 15Z995-V Manuale del proprietario
-
Datalogic Memor 10 Manuale utente
-
ZTE Savvy Z750C Manuale utente
-
ZTE SOURCE Manuale utente
-
Zhejiang Dahua Vision Technology Floodlight Network Camera Guida utente
-
 HIKMICRO M Series Handheld Thermography Camera Guida utente
-
LARK FreeBird 47.0 Manuale utente
-
comica Vimo C Manuale utente
-
Hama 00123936 Manuale del proprietario
-
 Doalltech Gateware FVS Manuale utente

