Getac T800 Android(52621222XXXX) Manuale utente
- Categoria
- Smartphone
- Tipo
- Manuale utente

Rugged Mobile Computing Solutions
T800 Android
USER MANUAL

December 2015
Trademarks
Google and Android are trademarks of Google Inc.
The Bluetooth word mark and logos are owned by the Bluetooth SIG, Inc.
All other brand and product names are trademarks or registered trademarks
of their respective companies.
Disclaimer
Specifications and manuals are subject to change without notice. Getac
assumes no liability for damage incurred directly or indirectly from errors,
omissions, or discrepancies between the device and the manuals.
Notes
Depending on the specific model purchased, the color and look of your
device and accessories may not exactly match the graphics shown in this
document.
The screenshots and other presentations shown in this document are for
reference only. They may differ from the actual screens and presentations
generated by the actual product.
Your device is based on Google’s Android 4.4 operating system, with
additions by Getac.
For the latest version of the manual, please visit the Getac website
at
www.getac.com.

i
Table of Contents
Chapter 1 Getting Started ................................................................. 1
Getting Your Device Ready for Use
.......................................... 1
Unpacking
.............................................................................. 1
Installing the SIM Card
.......................................................... 2
Connecting to AC Power
....................................................... 3
Using the Tether
.................................................................... 4
Performing the Initial Startup
.............................................. 5
Identifying Hardware Components
.......................................... 6
Front Components
................................................................. 6
Rear Components
.................................................................. 9
Top Components
.................................................................. 10
Bottom Components
........................................................... 11
Right-Side Components
....................................................... 11
Chapter 2
Basic Skills ....................................................................... 12
Waking Up and Shutting Down
.............................................. 12
Waking Up
........................................................................... 12
Shutting Down
..................................................................... 13
Navigating on the Screen
........................................................ 13
Home Screen
............................................................................ 14
Customizing Your Home Screen
......................................... 15
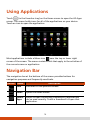
Using Applications
................................................................... 16
Navigation Bar
......................................................................... 16
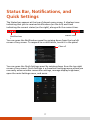
Status Bar, Notifications, and Quick Settings
......................... 17
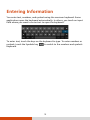
Entering Information
............................................................... 18
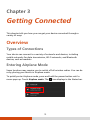
Chapter 3
Getting Connected ......................................................... 19
Overview
................................................................................... 19
Types of Connections
.......................................................... 19
Entering Airplane Mode
..................................................... 19
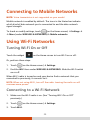
Connecting to Mobile Networks ............................................. 20
Using Wi-Fi Networks
.............................................................. 20
Turning Wi-Fi On or Off
...................................................... 20
Connecting to a Wi-Fi Network
.......................................... 20

ii
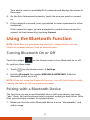
Using the Bluetooth Function ................................................. 21
Turning Bluetooth On or Off
.............................................. 21
Pairing with a Bluetooth Device
......................................... 21
Adding an Account
.................................................................. 22
Chapter 4
Android Preinstalled Applications ................................ 23
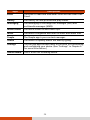
Google Applications Overview
................................................ 23
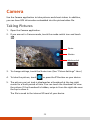
Camera
...................................................................................... 25
Taking Pictures
..................................................................... 25
Taking Panoramic Pictures
.................................................. 26
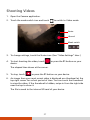
Shooting Videos
................................................................... 27
Chapter 5
Getac Applications ......................................................... 29
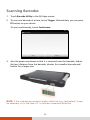
Barcode Utility (Optional)
....................................................... 29
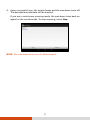
Scanning Barcodes
............................................................... 30
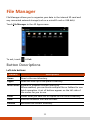
File Manager
............................................................................ 32
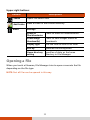
Button Descriptions
............................................................. 32
Opening a File
...................................................................... 33
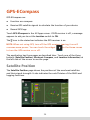
GPS-ECompass
.......................................................................... 34
Satellite Position
.................................................................. 34
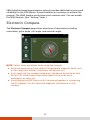
Electronic Compass
.............................................................. 35
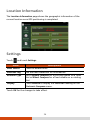
Location Information
.......................................................... 36
Settings
................................................................................. 36
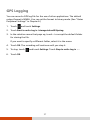
GPS Logging
......................................................................... 37
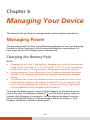
Chapter 6
Managing Your Device .................................................. 38
Managing Power
...................................................................... 38
Charging the Battery Pack
.................................................. 38
Low Battery Signals and Actions
........................................ 39
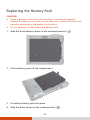
Replacing the Battery Pack
................................................. 40
Second Battery Pack (Optional)
.......................................... 41
Power-Saving Tips
................................................................ 42
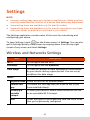
Settings
..................................................................................... 43
Wireless and Networks Settings
......................................... 43
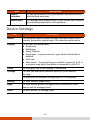
Device Settings
..................................................................... 44
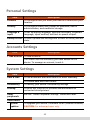
Personal Settings
................................................................. 45
Accounts Settings
................................................................ 45
System Settings
.................................................................... 45
Chapter 7
Expanding Your Device .................................................. 47
Connecting a USB Device
......................................................... 47
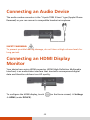
Connecting an Audio Device
................................................... 48
Connecting an HDMI Display Monitor
................................... 48
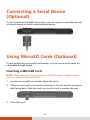
Connecting a Serial Device (Optional)
.................................... 49

iii
Using MicroSD Cards (Optional) ............................................. 49
Using the LAN (Optional)
........................................................ 50
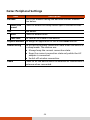
Chapter 8
Care and Maintenance ................................................... 51
Resetting Your Device
............................................................. 51
Caring for Your Device
............................................................ 51
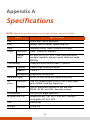
Appendix A
Specifications ................................................................. 53
Appendix B
Regulatory Information ................................................. 55
On the Use of the System
........................................................ 55
Class B Regulations
.............................................................. 55
ANSI Warning
....................................................................... 57
Safety Notices
....................................................................... 57
On the Use of the RF Device
.................................................... 59
USA and Canada Safety Requirements and Notices
.......... 59
European Union CE Marking and Compliance Notices
..... 60
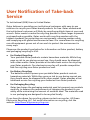
User Notification of Take-back Service
................................... 62
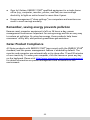
ENERGY STAR
........................................................................... 63

1
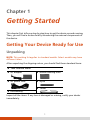
Chapter 1
Getting Started
This chapter first tells you step by step how to get the device up and running.
Then, you will find a section briefly introducing the external components of
the device.
Getting Your Device Ready for Use
Unpacking
NOTE: This packing list applies to standard models. Select models may have
different items.
After unpacking the shipping carton, you should find these standard items:
T800 Android tablet
AC adapter
Screen cleaning cloth
AC power cord
Stylus
Tether
Document(s)
Inspect all the items. If any item is damaged or missing, notify your dealer
immediately.

2
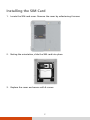
Installing the SIM Card
1. Locate the SIM card cover. Remove the cover by unfastening 4 screws.
2. Noting the orientation, slide the SIM card into place.
3. Replace the cover and secure with 4 screws.

3
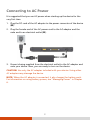
Connecting to AC Power
It is suggested that you use AC power when starting up the device for the
very first time.
1. Plug the DC cord of the AC adapter to the power connector of the device
(
).
2. Plug the female end of the AC power cord to the AC adapter and the
male end to an electrical outlet (
).
3. Power is being supplied from the electrical outlet to the AC adapter and
onto your device. Now, you are ready to turn on the device.
CAUTION: Use only the AC adapter included with your device. Using other
AC adapters may damage the device.
NOTE: When the AC adapter is connected, it also charges the battery pack.
For information on using battery power, see “Managing Power” in Chapter
6.

4
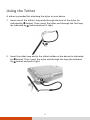
Using the Tether
A tether is provided for attaching the stylus to your device.
1. Insert one of the tether’s loop ends through the hole of the stylus (as
indicated by
below). Then, insert the other end through the first loop
(as indicated by
below) and pull it tight.
2. Insert the other loop end to the tether holder on the device (as indicated
by
below). Then, insert the stylus end through the loop (as indicated
by
below) and pull it tight.

5
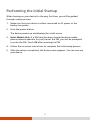
Performing the Initial Startup
When turning on your device for the very first time, you will be guided
through a setup process.
1. Make sure that your device is either connected to AC power or the
battery has power.
2. Press the power button.
The device powers up and displays the initial screen.
3. Select Models Only: If a SIM card has been inserted and the mobile
phone network operator (or you) has set the PIN, you will be prompted
to enter the PIN. Touch OK after entering the PIN.
4. Follow the on-screen instructions to complete the initial setup process.
5. After the setup is completed, the Home screen appears. You can now use
your device.

6
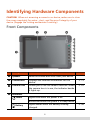
Identifying Hardware Components
CAUTION: When not accessing a connector or device, make sure to close
the cover completely for water-, dust-, and fire-proof integrity of your
device. (Engage the locking mechanism if existing.)
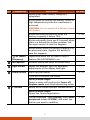
Front Components
Ref Component Description See Also
Speaker Sends out sound and voice from your device.
Touchscreen
Displays and receives information for the
device.
P. 13
Camera Lens
Allows you to use the camera function. When
the camera lens is in use, the indicator beside
it lights up.
P. 25
Indicators
Power
Lights blue when the power is on.
Blinks blue when the system is in Sleep mode.
Battery
Lights amber when the battery is being
charged.
P. 38

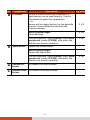
7
Ref Component Description See Also
Lights green when battery charging is
completed.
Blinks green to indicate the battery’s built-in
high temperature protection mechanism is
activated.
CAUTION: Do not remove the battery during
this period.
Blinks red (once per second) when the
battery’s capacity is below 10%.
P. 39
Blinks red rapidly (once per 0.5 second) when
there is a thermal protection problem. Ask
for repair service in case this happens.
Blinks amber when the battery charging is in
an abnormal state. Replace the battery in
case this happens.
RF (Radio
Frequency)
Lights blue when the RF radio of any RF
feature (Wi-Fi/BT/WWAN) is on.
Microphone Receives sound and voice to record voice.
Light Sensor
Senses the ambient light for automatic
adjustments of the display backlight.
Power Button Starts up your device. P. 12
Turns off or restores the screen.
When pressed longer:
Opens a menu with options for Power off,
Airplane mode, and silent/vibrate/ring mode.
P1 Button Serves as the camera shutter release button. P. 25
When pressed longer:
Opens the Camera application.
Can be redefined. Open Settings, select Getac
peripherals (under SYSTEM), and select the
button you want to redefine.
P. 46

8
Ref Component Description See Also
P2 Button
Opens a screen containing thumbnails of
applications you’ve used recently. Touch a
thumbnail to open that application.
– or –
Serves as the trigger button for the barcode
scanner if your model has the barcode
scanner module.
P. 29
When pressed longer:
Open Settings.
P. 43
Can be redefined. Open Settings, select Getac
peripherals (under SYSTEM), and select the
button you want to redefine.
P. 46
Home Button Opens the Home screen.
When pressed longer:
Opens the Search box.
Can be redefined. Open Settings, select Getac
peripherals (under SYSTEM), and select the
button you want to redefine.
P. 46
Volume Up
Button
Increases the sound volume.
Volume Down
Button
Decreases the sound volume.

9
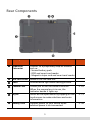
Rear Components
Ref Component Description
See Also
Expansion
Connector
Connect to a proprietary snap-on module
such as:
- Second battery pack
- RFID and smart card reader
- Magnetic stripe card and smart card reader
SIM Card Cover Inside is the SIM card slot.
Flash Provides extra light when taking pictures.
Camera Lens
Allows you to use the camera function.
When the camera lens is in use, the
indicator beside it lights up.
P. 25
Stylus
Serves as the input device by tapping on the
touchscreen to make selections and enter
information.
P. 13
Battery Pack
Supplies power to your device when
external power is not connected.
P. 38

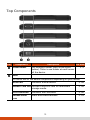
10
Top Components
Ref Component Description See Also
Tether Holder
For holding a tether (such as the stylus
tether). There is one holder at each corner
of the device.
P. 4
None
Or can be one of the below components depending on your model:
Serial Port Connects a serial device. P. 49
MicroSD Card Slot
Accepts a microSD card for removable
storage media.
P. 49
RJ-45 Connector Connects the LAN cable. P. 50
Barcode Saner
Lens
Scans and reads barcodes. P. 29

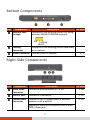
11
Bottom Components
Ref Component Description See Also
Antenna Pass-
through
Connects to the docking station for using
external GPS/Wi-Fi/WWAN antenna.
Docking
Connector
Connects to the docking station (available
as an option).
Power Connector
Connects the AC adapter. P. 3
Right-Side Components
Ref Component Description See Also
Micro HDMI
Connector
Connects a HDMI monitor or TV set. P. 48
USB 3.0 Port
Connects a USB device. P. 47
Combo Audio
Connector
Connects a set of headphones or external
speakers with amplifier
P. 48
Supports a headset microphone with 4-pole
TRRS 3.5mm jack.
WWAN
WLAN
GPS

12
Chapter 2
Basic Skills
This chapter familiarizes you with the basic operations of your device.
CAUTION:
Do not expose your skin to the device when operating it in a very hot or
cold environment.
The device can get uncomfortably warm when you use it in high
temperatures. As a safety precaution in such a circumstance, do not
place the device on your lap or touch it with your bare hands for
extended periods of time. Prolonged body contact can cause discomfort
and potentially a burn.
Waking Up and Shutting Down
Waking Up
Your device sleeps after a period of inactivity (1 minute by default). You can
also manually put your device to sleep by briefly pressing the power button.
To wake up, press the power button and, at the lock screen, drag the lock
icon up/down/left/right toward the unlock icon.

13
Shutting Down
Press and hold the power button until a menu pops up. Touch Power off and
then OK
Navigating on the Screen
Use the included stylus or your finger to communicate with the device.
CAUTION: Do not use a sharp object such as a ballpoint pen or pencil on the
touchscreen. Doing so may damage the touchscreen surface. Use the included
stylus or your finger.
NOTE:
An optical film has been attached to the screen before shipment. The
film is a consumable, which will be worn out by possible scratches. You
can purchase a new one when replacement is required.
Instead of a hard tip, your stylus has a soft tip so that it does not scratch
the AG film. It is normal for the soft tip to wear out after a long period
of use. You can purchase a new one when needed.

14
Here are some common terms that you should know when using the
touchscreen:
Touch
Touch the screen once with the stylus to open an item or select an object.
Touch and hold
Touch and hold the stylus on an item to see a list of actions available for
that item.
Drag
Hold the stylus on an item and, without lifting the stylus, move across
the screen until you reach the target position.
Swipe or slide
Move the stylus across the screen, without pausing when you first touch
it (so you don’t “drag” instead). For example, you slide the screen up or
down to scroll a list.
Pinch
In some applications (such as Maps and Gallery), you can zoom in and out
by placing two fingers on the screen at once and pinching them together
(to zoom out) or spreading them apart (to zoom in).
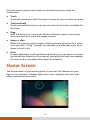
Home Screen
The Home screen is your starting point to access all the features on your
device. You can have it display application icons, widgets, shortcuts, and
other features that you want.

15
On the right side of every Home screen is the Favorites tray.
You can slide left or right across the Home screen to see other parts of the
Home screen. Extensions to the Home screen provide more space for
widgets, shortcuts, and other items.
To return to the Home screen at any time, touch
at the bottom of the
screen or press the Home button on your device.
Customizing Your Home Screen
You can add application icons, shortcuts, widgets, and other items to any
part of the Home screen where there’s free space. You can also change the
wallpaper.
Adding an Item to the Home Screen
1. Touch on the Home screen.
2. Touch APPS or WIDGETS depending on the type of item you want to
add.
3. Touch and hold an item to add. Drag it to the where you want to place it
and then release it.
Removing an Item from the Home Screen
Touch and hold the item you want to remove. Drag it to the X icon at the
upper left corner of the screen.
Changing the Wallpaper
1. Touch and hold an empty area of the Home screen and in the menu that
opens, touch a wallpaper source.
2. Select the image you want.
3. Touch Set wallpaper.
La pagina si sta caricando...
La pagina si sta caricando...
La pagina si sta caricando...
La pagina si sta caricando...
La pagina si sta caricando...
La pagina si sta caricando...
La pagina si sta caricando...
La pagina si sta caricando...
La pagina si sta caricando...
La pagina si sta caricando...
La pagina si sta caricando...
La pagina si sta caricando...
La pagina si sta caricando...
La pagina si sta caricando...
La pagina si sta caricando...
La pagina si sta caricando...
La pagina si sta caricando...
La pagina si sta caricando...
La pagina si sta caricando...
La pagina si sta caricando...
La pagina si sta caricando...
La pagina si sta caricando...
La pagina si sta caricando...
La pagina si sta caricando...
La pagina si sta caricando...
La pagina si sta caricando...
La pagina si sta caricando...
La pagina si sta caricando...
La pagina si sta caricando...
La pagina si sta caricando...
La pagina si sta caricando...
La pagina si sta caricando...
La pagina si sta caricando...
La pagina si sta caricando...
La pagina si sta caricando...
La pagina si sta caricando...
La pagina si sta caricando...
La pagina si sta caricando...
La pagina si sta caricando...
La pagina si sta caricando...
La pagina si sta caricando...
La pagina si sta caricando...
La pagina si sta caricando...
La pagina si sta caricando...
La pagina si sta caricando...
La pagina si sta caricando...
La pagina si sta caricando...
La pagina si sta caricando...
La pagina si sta caricando...
-
 1
1
-
 2
2
-
 3
3
-
 4
4
-
 5
5
-
 6
6
-
 7
7
-
 8
8
-
 9
9
-
 10
10
-
 11
11
-
 12
12
-
 13
13
-
 14
14
-
 15
15
-
 16
16
-
 17
17
-
 18
18
-
 19
19
-
 20
20
-
 21
21
-
 22
22
-
 23
23
-
 24
24
-
 25
25
-
 26
26
-
 27
27
-
 28
28
-
 29
29
-
 30
30
-
 31
31
-
 32
32
-
 33
33
-
 34
34
-
 35
35
-
 36
36
-
 37
37
-
 38
38
-
 39
39
-
 40
40
-
 41
41
-
 42
42
-
 43
43
-
 44
44
-
 45
45
-
 46
46
-
 47
47
-
 48
48
-
 49
49
-
 50
50
-
 51
51
-
 52
52
-
 53
53
-
 54
54
-
 55
55
-
 56
56
-
 57
57
-
 58
58
-
 59
59
-
 60
60
-
 61
61
-
 62
62
-
 63
63
-
 64
64
-
 65
65
-
 66
66
-
 67
67
-
 68
68
-
 69
69


Getac T800 Android(52621222XXXX) Manuale utente
- Categoria
- Smartphone
- Tipo
- Manuale utente
in altre lingue
Documenti correlati
-
Getac ZX70(52628791XXXX) Manuale utente
-
-
-
-
-
Getac Z710(52628476XXXX) Manuale utente
-
-
-
Altri documenti
-
Panasonic FZ-B2 Manuale del proprietario
-
Bigben GAMETAB-ONE Manuale del proprietario
-
Datalogic Memor 1 Manuale utente
-
Datalogic Falcon X4 Manuale utente
-
-
Datalogic 942500002 Manuale utente
-
 Zettaly ZA-407 Manuale utente
-
 Doalltech Gateware FVS Manuale utente
-
Supersonic IQ-4800 RED Scheda dati

