Carel compactSteam CHF Guida Rapida
- Categoria
- Componenti del dispositivo di sicurezza
- Tipo
- Guida Rapida

NO
C
NC
ALARMEXT FAN
N2
GND
N1
AB
AB
GND
IN
C
NO
GND
24V
5 G0
6 G
7 AOUT
8 G0
9 NTCE
10 DIN
1
2
compactSteam
clima
set point
(SPH)
Differential
(d FH)
10 V
0 V
%rH
+050001730- rel. 1.2 - 01.02.2008
Convenzione
Con “set point” si intende l’umidità che si desidera raggiungere.
Caratteristiche generali
Il kit compactSteam e clima permette di regolare in modo automatico l’umidità dell’ambiente. L’umidostato può
abilitare/disabilitare l’umidifi catore in base a due fasce orarie (GIORNO e NOTTE) e può regolare l’umidifi cazione in
due modalità diverse:
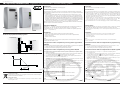
a regolazione proporzionale (default): l’algoritmo di controllo funziona come da diagramma in Fig. 2 dove la •
richiesta di umidifi cazione è massima (10 V in uscita sul morsetto 7 Aout in fi g. 1) fi no al raggiungimento della
soglia dell’intervallo “set point – differenziale”. Dopo il raggiungimento di tale soglia il segnale di uscita di Clima
diminuisce gradualmente all’interno del differenziale impostato fi no a portarsi a 0 V al raggiungimento del set point;
a regolazione ON/OFF: l’algoritmo di controllo funziona come da diagramma in Fig. 4 dove la richiesta di umidifi cazione •
viene attivata (il relè chiude i contatti 1 e 2 in fi g. 3) quando il valore di umidità è al di sotto dell’intervallo “set point
– differenziale” e viene disattivata (il relè apre i contatti 1 e 2 in fi g. 3) al raggiungimento del set point.
Attraverso l’umidostato Clima si imposta il set point e il differenziale per determinare l’intervallo di umidità relativa
all’interno del quale si vuole far lavorare l’umidifi catore.
Impostazioni di fabbrica
Clima ADCD000110: umidostato, a regolazione proporzionale dell’umidità, in modalità Inverno (Umidifi ca), con
dip-switch SW1= ON, SW2= OFF, SW3= OFF, SW4= ON. Setpoint umidità 50% rH, differenziale 5.
compactSteam CH******H*: umidifi catore, predisposto per essere controllato da un regolatore proporzionale
esterno 0…10 V (parametro P1= 1).
Installazione
Installare i due dispositivi seguendo le istruzioni dei rispettivi manuali di installazione;•
lasciare aperti i pannelli frontali: ambedue i dispositivi devono avere i morsetti di collegamento visibili;•
spegnere i due dispositivi;•
preparare il cavetto in dotazione.•
Nota:
Se il cavetto in dotazione non copre la distanza tra i dispositivi, utilizzare cavi con lunghezza non superiore a 10 m,
con fi li a sezione non inferiore a 0,5 mm².
Collegamento tra clima e compactSteam per una regolazione proporzionale
(DEFAULT)
I due dispositivi sono già impostati per regolare l’umidità in modo proporzionale, si può procedere con il collegamento:
collegare i due dispositivi con il cavetto in dotazione seguendo lo schema in Fig. 1;1.
proseguire facendo riferimento al paragrafo “Programmare il funzionamento”.2.
Collegamento tra clima e compactSteam per una regolazione ON/OFF
Se si desidera cambiare l’impostazione di default è necessario impostare compactSteam per la regolazione ON/OFF:
Spegnere il compactSteam.1.
Riaccendere il compactSteam tenendo premuti i due pulsanti “reset/sel” e “drain” (scarico) fi nché il display indica 2.
“00” e il simbolo della chiave inglese
lampeggia; rilasciare quindi i due pulsanti.
A questo punto tenendo premuto il tasto “reset/sel” si vedranno scorrere a display dei parametri numerici. 3.
Premere “reset/sel” per alcuni secondi fi nché il display indica “02”.
AVVERTENZA: Nel caso venga visualizzato un valore superiore a “02” non confermare, ma premere “reset/sel”
fi nché il display )torna alla modalità operativa normale e ricominciare dal punto 1.
Premere il tasto “drain” (scarico) per almeno 1 secondo per confermare: il display indicherà “P1” per 1 secondo 4.
e quindi il valore del parametro P1 attualmente impostato sarà visualizzata a fi anco.
Premendo “reset/sel” il valore di P1 commuterà tra “0” e “1”: 0 = umidostato; 1 = segnale esterno modulante 0...10 V.5.
Premere il tasto “drain” (scarico) per almeno 1 secondo una volta terminata la selezione per confermare il 6.
nuovo valore del parametro P1 e tornare alla modalità operativa normale.
Spegnere il compactSteam: a questo punto è possibile procedere al collegamento del clima seguendo lo 7.
schema in Fig. 3 con fi li di sez. 0.5 mm
2
(non in dotazione).
Nota: Se entro 3 s non viene fatta o confermata alcuna selezione il software torna automaticamente alla modalità
operativa normale.
Programmare il funzionamento del clima
Indipendentemente dal tipo di collegamento adottato, occorre accendere il clima e defi nire:
l’umidità desiderata (set point);•
il differenziale;•
le fasce orarie (se si vuole abilitare/disabilitare la regolazione in certe ore della giornata);•
sul display compare il simbolo •
.
Nota:
Se il valore di umidità è inferiore al set point meno il differenziale, a display compare anche il simbolo
.
Convention
“set point” indicates the level of humidity to be achieved.
General features
The compactSteam and clima kit lets you automatically regulate room humidity. The humidity gauge turns the
humidifi er on/off based on two periods (DAY and NIGHT) and regulates humidifying in two different ways:
proportional regulation (default): The control algorithm works as shown in Fig. 2 diagram where humidity •
request is at maximum (10 V on output on terminal 7 AOUT in fi g. 1) until the “set point – differential” range
threshold is reached. After this threshold is reached, the clima output signal gradually lowers within the set
differential to 0 V when the set point is reached;
ON/OFF regulation: The control algorithm works as shown in Fig. 4 diagram where the humidity request is •
turned on (the relay closes contacts 1 and 2 in fi g. 3) when humidity is under the “set point – differential” range
and is turned off (the relay opens contacts 1 and 2 in fi g. 3) when the set point is reached.
Set point and differential are set on the Clima humidity gauge to defi ne the relative humidity operating range.
Factory settings
Clima ADCD000110: Humidity gauge with proportional humidity regulation, in winter mode (humidify), with
dip-switch SW1=ON, SW2=OFF, SW3=OFF, SW4=ON. Humidity set point 50%rH, differential 5.
compactSteam CH******H*: Humidifi er, set to be controlled by an external proportional regulator 0 to 10 V
(parameter P1=1).
Installation
install the two devices following the instructions in the respective installation manuals;•
leave the front panels open: connection terminals in both devices must be visible;•
turn off the two devices;•
prepare the supplied wire.•
Note:
wire is not long enough to cover the distance between the devices, use 10 m with minimum
0.5 mm
2
section wires.
Connections between clima and compactSteam for proportional regulation
(DEFAULT)
The two devices are already set for proportional humidity regulation. Proceed as follows to connect:
connect the two devices with the supplied wire as shown in Fig. 1 diagram;1.
continue following the instructions in paragraph “Programming operations”.2.
Connections between clima and compactSteam for ON/OFF regulation
To change the default setting, it is necessary to set compactSteam for ON/OFF regulation:
1. Turn compactSteam off.
2. Turn compactSteam on again, while holding the two buttons, “reset/sel” and “drain”, until the display
shows“00” and the spanner symbol
fl ashes; then release the two buttons.
3. Then hold the “reset/sel” button to scroll the numeric parameters on the display. Hold “reset/sel” for a few
seconds until the display shows “02”.
WARNING: If the display shows a value higher than “02” do not confi rm, but rather press “reset/sel” until the
display returns to normal operating mode and start again from point 1.
4. Press the “drain” button for at least 1 second to confi rm the value: the display will show “P1” for 1 second and
then the value of parameter P1 currently set will be displayed alongside.
5. Pressing “reset/sel” switches the value of P1 between “0” and “1”: 0 = humidistat; 1 = external 0 to 10 V
modulating signal
6. Press the “drain” button for at least 1 second to confi rm the new value of parameter P1 and return to normal
operating mode.
7. Turn compactSteam off: now clima can be connected, following the diagramm in Fig. 3 using shielded cables
with a minimum cross-section of 0.5 mm² (not included).
Note: If no selection is made within 3 s, the software automatically returns to normal operating mode.
clima programming operations
Regardless of the type of connection, it is necessary to turn on the clima and defi ne the following:
desired humidity (set point);•
differential;•
periods (to turn regulation on/off during certain hours of the day);•
turn on Clima: •
appears on the display.
Note
If the humidity value is lower than set point less the differential,
also appears on the display.
CH (compactSteam) ADCD000110 (clima) - Regolazione controllata dell’umidità / Controlled humidity regulation
Collegamento per regolazione proporzionale dell’umidità
Connection for proportional humidity regulation
Regolazione proporzionale dell’umidità / Proportional humidity regulation
Fig. 2
Fig. 1
Smaltimento del prodotto
L’apparecchiatura (o il prodotto) deve essere oggetto di raccolta separata in conformità alle vigenti
normative locali in materia di smaltimento.
Disposal of the product
The appliance (or the product) must be disposed of separately in accordance with the local waste
disposal legislation in force.
CHF CH0
CLIMA

CAREL S.p.A.
Via dell’Industria, 11 - 35020 Brugine - Padova (Italy)
Tel. (+39) 0499716611 – Fax (+39) 0499716600 http://www.carel.com – e-mail: [email protected]
+050001730- rel. 1.2 - 01.02.2008
NO
C
NC
ALARMEXT FAN
N2
GND
N1
AB
AB
GND
IN
C
NO
GND
24V
5 G0
6 G
7 AOUT
8 G0
9 NTCE
10 DIN
1
2
compactSteam
clima
set point
(SPH)
Differential
(d FH)
%rH
1
2
3
CAREL si riserva la possibilità di apportare modifi che o cambiamenti ai propri prodotti senza alcun preavviso. / CAREL reserves the right to modify the features of its products without prior notice.
Impostare il set point
premere uno qualsiasi dei tasti • ª o ©: il valore di set point [2] lampeggia;
per impostare il valore desiderato, premere i tasti • ª o ©;
per confermare, premere il tasto •
PRG
.
Impostare il differenziale per l’avvio delle regolazioni/modulazioni
dell’umidità
per entrare in programmazione, premere • SET per almeno 5 s;
scorrere i parametri con • ª e © fi no alla comparsa del parametro dFH [2];
premere • SET: compare il valore attualmente impostato [1];
per cambiare il valore del differenziale, premere • ª o ©;
premere il tasto • SET;
per uscire dalla programmazione, premere il tasto •
PRG
.
Modalità di abilitazione della regolazione
Una volta acceso compactSteam, con il tasto di accensione è possibile abilitare/disabilitare la regolazione dell’umidi-
tà attraverso Clima in tre modalità e rispetto a due fasce orarie:
regolazione sempre abilitata (default, parametro SFH= 0);•
regolazione abilitata in modalità GIORNO (parametro SFH= 1);•
regolazione abilitata in modalità NOTTE (parametro SFH= 2).•
È possibile collegare a compactSteam un contatto di abilitazione remota. Per l’installazione fare riferimento al
manuale compactSteam.
Modalità di abilitazione
per entrare in programmazione, premere 1. SET per almeno 5 s;
scorrere i parametri con 2. ª o © fi no alla comparsa del parametro SFH;
premere 3. SET: compare il valore attualmente impostato;
premere i tasti 4. ª o © per impostare il valore a:
0: regolazione umidità sempre abilitata, le fasce orarie sono ignorate;•
1: regolazione attiva in modalità GIORNO;•
2: regolazione attiva in modalità NOTTE;•
premere il tasto 5. SET;
premere il tasto 6.
PRG
.
Impostare le fasce orarie GIORNO/NOTTE
In questa modalità è possibile abilitare/disabilitare la regolazione dell’umidità in determinate fasce orarie. Clima
permette l’impostazione di una fascia GIORNO e NOTTE. Si defi nisce prima l’ora di inizio delle due fasce orarie e
poi si indica se all’occorrenza di una o dell’altra fascia si deve abilitare o disabilitare la regolazione dell’umidità.
Impostare l’orologio
premere 1.
PRG
: compare l’ora e il parametro RTC;
premere 2. SET: compaiono anche i minuti;
premere i tasti 3. ª o © per impostare l’ora corrente;
premere il tasto 4. SET;
premere il tasto 5.
PRG
.
Impostare la fascia oraria GIORNO
premere 1.
PRG
: compare l’ora e il parametro RTC;
premere 2. ª o © fi no alla comparsa del parametro DAY;
premere il tasto 3. SET: compaiono anche i minuti;
premere i tasti 4. ª e © per incrementare/decrementare l’ora di inizio della fascia oraria GIORNO;
premere il tasto SET;5.
premere il tasto 6.
PRG
.
Impostare la fascia oraria NOTTE
premere 1.
PRG
: compare l’ora e il parametro RTC;
premere 2. ª e © fi no alla comparsa del parametro n9T;
premere il tasto SET: compaiono anche i minuti;3.
premere i tasti 4. ª e © per incrementare/decrementare l’ora di inizio della fascia oraria NOTTE;
premere il tasto SET;5.
premere il tasto 6.
PRG
.
Setting the set point
press either • ª or ©: the set point [2] blinks;
to set, press either • ª or ©;
to confi rm, press •
PRG
.
Setting the differential to start humidity regulation/modulation
to enter programming mode, press and hold down SET for at least 5 s;•
scroll parameters using • ª and © until the dFH [2] parameter appears;
press SET: the currently set value appears [1];•
to change the differential value, press • ª or ©;
press SET;•
to exit programming mode, press •
PRG
.
Regulation mode
Once on compactSteam is be turned, with the start key is posibile to enable/disable the humidity regulation using
clima in three modes and in two periods:
regulation always on (default, parameter SFH= 0);•
regulation on in DAY mode (parameter SFH= 1);•
regulation on in NIGHT mode (parameter SFH= 2).•
It is possible to connect to compactsteam a remote management contact. For the installation, refrer to compact-
steam user manual.
Operating mode
To enter programming mode, press and hold down 1. SET for at least 5 s;
Scroll parameters using 2. ª and © until the SFH parameter appears;
Press 3. SET: the currently set value appears;
Press to 4. ª or © set the value to:
0: Humidity regulation always on, periods are ignored;•
1: Regulation on in DAY mode;•
2: Regulation on in NIGHT mode;•
Press 5. SET;
Press 6.
PRG
.
How to set DAY/NIGHT periods
Humidity regulation can be set in defi ned time intervals using this mode. Clima lets you set a DAY and NIGHT
period. First set the starting time for the two intervals and then indicated whether humidity regulation should be
turned on or off in one or the other periods.
Clock settings
press 1.
PRG
: the hour and RTC parameter appear;
press SET: minutes appear;2.
press to 3. ª or © set the current time;
press SET;4.
press 5.
PRG
.
Setting DAY time interval
press 1.
PRG
: the hour and RTC parameter appear;
press 2. ª and © until the DAY parameter appears;
press SET: minutes appear;3.
press 4. ª and © to increase/decrease the DAY period start time;
press SET;5.
press 6.
PRG
.
Setting NIGHT time interval
press 1.
PRG
: the hour and RTC parameter appear;
press 2. ª and © until the n9T parameter appears;
Press SET: minutes appear;3.
press 4. ª and © to increase/decrease the NIGHT period start time;
press SET;5.
press 6.
PRG
.
Fig. 3
Fig. 4
Fig. 5
Regolazione ON/OFF dell’umidità / ON/OFF humidity regulation
Collegamento per regolazione ON/OFF dell’umidità
Connections for ON/OFF humidity regulation
relè chiuso
realy closed
relè aperto
realy open
Display
Legenda:
1. campo large: % di umidità misurata oppure, se in programmazione,
valore del parametro;
2. campo small: valore del set point oppure, se in programmazione,
nome del parametro;
3. indicazione modalità inverno, con regolazione attiva.
Legenda:
1. large fi eld: % humidity measured or parameter settings while
programming;
2. small fi eld: set point value or parameter name while programming;
3. winter mode indication with regulation ON.
AVVERTENZE IMPORTANTI
Il prodotto CAREL è un prodotto avanzato, il cui funzionamento è
specifi cato nella documentazione tecnica fornita col prodotto o scaricabile,
anche anteriormente all’acquisto, dal sito internet www.carel.com.
Il cliente (costruttore, progettista o installatore dell’equipaggiamento
fi nale) si assume ogni responsabilità e rischio in relazione alla fase di
confi gurazione del prodotto per il raggiungimento dei risultati previsti in
relazione all’installazione e/o equipaggiamento fi nale specifi co.
La mancanza di tale fase di studio, la quale è richiesta/indicata nel
manuale d’uso, può generare malfunzionamenti nei prodotti fi nali di cui
CAREL non potrà essere ritenuta responsabile.
Il cliente fi nale deve usare il prodotto solo nelle modalità descritte nella
documentazione relativa al prodotto stesso.
La responsabilità di CAREL in relazione al proprio prodotto è regolata
dalle condizioni generali di contratto CAREL editate nel sito www.carel.
com e/o da specifi ci accordi con i clienti.
IMPORTANT WARNINGS
The CAREL product is a state-of-the-art product, whose operation is
specifi ed in the technical documentation supplied with the product or
can be downloaded, even prior to purchase, from the website
www.carel.com.
The client (builder, developer or installer of the fi nal equipment)
assumes every responsibility and risk relating to the phase of
confi guration the product in order to reach the expected results in
relation to the specifi c fi nal installation and/or equipment. The lack of
such phase of study, which is requested/indicated in the user manual,
can cause the fi nal product to malfunction of which CAREL can not be
held responsible.
The fi nal client must use the product only in the manner described in
the documentation related to the product itself.
The liability of CAREL in relation to its own product is regulated by
CAREL’s general contract conditions edited on the website www.carel.
com and/or by specifi c agreements with clients.
-
 1
1
-
 2
2


Carel compactSteam CHF Guida Rapida
- Categoria
- Componenti del dispositivo di sicurezza
- Tipo
- Guida Rapida
in altre lingue
Documenti correlati
-
Carel Clima Manuale utente
-
-
Carel compactSteam Manuale utente
-
-
-
-
-
-
-