
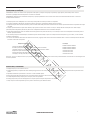
WWW.NIKOLAOUTOOLS.GR
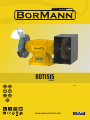
BDT1515
053842
v2.2
EN FR
IT EL
BG SL
RO

2WWW.NIKOLAOUTOOLS.GR WWW.NIKOLAOUTOOLS.GR
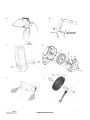
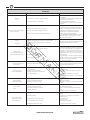
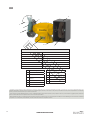
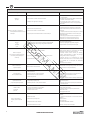
1 Safety eyeshield Προστασία Ματιών
2Protecon Cover Προστατευτικό κάλυμμα
3 Guard Προφυλακτήρας
4 Tool rest/work rest Θέση εργαλείων/εργασίας
5 ON/OFF switch Διακόπτης ΟΝ/OFF
6 Wheel Tροχός
7 Brush Βούρτσα
8Support Orice Oπή στήριξης
1
2
3
4
5
6
7
*The manufacturer reserves the right to make minor changes to product design and technical specicaons without prior noce unless these changes signicantly aect the performance and safety of
the products. The parts described / illustrated in the pages of the manual that you hold in your hands may also concern other models of the manufacturer's product line with similar features and may not
be included in the product you just acquired.
* To ensure the safety and reliability of the product and the warranty validity, all repair, inspecon, repair or replacement work, including maintenance and special adjustments, must only be carried out
by technicians of the authorized service department of the manufacturer.
* Always use the product with the supplied equipment. Operaon of the product with non-provided equipment may cause malfuncons or even serious injury or death. The manufacturer and the importer
shall not be liable for injuries and damages resulng from the use of non-conforming equipment.
*Ο κατασκευαστής διατηρεί το δικαίωμα να πραγματοποιήσει δευτερεύουσες αλλαγές στο σχεδιασμό του προϊόντος και στα τεχνικά χαρακτηριστικά χωρίς προηγούμενη ειδοποίηση, εκτός εάν οι
αλλαγές αυτές επηρεάζουν σημαντικά την απόδοση και λειτουργία ασφάλειας των προϊόντων. Τα εξαρτήματα που περιγράφονται/απεικονίζονται στις σελίδες του εγχειριδίου που κρατάτε στα χέρια
σας ενδέχεται να αφορούν και σε άλλα μοντέλα της σειράς προϊόντων του κατασκευαστή, με παρόμοια χαρακτηριστικά, και ενδέχεται να μην περιλαμβάνονται στο προϊόν που μόλις αποκτήσατε.
* Για να διασφαλιστεί η ασφάλεια και η αξιοπιστία του προϊόντος καθώς και η ισχύς της εγγύησης όλες οι εργασίες επιδιόρθωσης, ελέγχου, επισκευής ή αντικατάστασης συμπεριλαμβανομένης της
συντήρησης και των ειδικών ρυθμίσεων, πρέπει να εκτελούνται μόνο από τεχνικούς του εξουσιοδοτημένου τμήματος Service του κατασκευαστή.
* Χρησιμοποιείτε πάντα το προϊόν με τον παρεχόμενο εξοπλισμό. Η λειτουργία του προϊόντος με μη-προβλεπόμενο εξοπλισμό ενδέχεται να προκαλέσει βλάβη ή ακόμα και σοβαρό τραυματισμό ή
θάνατο. Ο κατασκευαστής και ο εισαγωγέας ουδεμία ευθύνη φέρει για τραυματισμούς και βλάβες που προκύπτουν από την χρήση μη προβλεπόμενου εξοπλισμού.
8
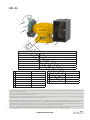
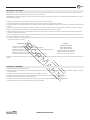
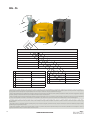
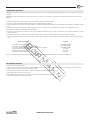
Fig. D - Εικ. D
a Axis Άξονας
bFlange Φλάντζα
c Nut Περικόχλιο
d Screw Bίδα
eWheel guard Διακόπτης ΟΝ/OFF
EN - EL
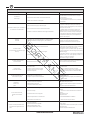
TECHNICAL DATA - TEXNIKA XAΡAKTHΡΙΣΤΙΚΑ
Μodel - Μοντέλο BDT1515
Μotor - Κινητήρας Ιnducon - Eπαγωγικός
Power - Ισχύς 250 W S1 continuous/συνεχής - 350 W S6 10% intermittent/μη συνεχής
Wheel Size - Διάμετρος Tροχού 150 x 20 x 12,7 (mm)
Voltage - Τάση 230 Volt
Frequency - Συχνότητα 50 Hz
Rotaonal Speed - Περιστρ. Ταχύτητα 2980 RPM
Accessories - Παρελκόμενα Brush - Bούρτσα

3
WWW.NIKOLAOUTOOLS.GR WWW.NIKOLAOUTOOLS.GR
A B
CD
D
EF

4WWW.NIKOLAOUTOOLS.GR WWW.NIKOLAOUTOOLS.GR
EN EN
SAFETY INSTRUCTIONS
DANGER! Failure to follow any of the following instrucons could result in serious personal injury to tool users and bystanders or damage to the tool and
property!
WARNING - Read, understand and follow all instrucons in this manual before using or operang the tool for which it was wrien and provided. Make sure
that anyone who is going to use the tool has read and understands the instrucons provided.
- Always wear eye protecon that conforms to a recognized standard (CSA or ANSI).
- Wear a mask or respirator when dust is generated.
- Keep bystanders out of the work area when operang the tool.
- WARNING! Always ensure that the work area is free of ammable materials, liquids or gases, as use of this tool may create sparks.
- Tighten the grinding wheel nuts, secure the screws and all clamps and guards.
- During each start-up, stand on one side of the twin wheel and acvate it by pressing the "ON" buon. Allow the twin wheel to run at full speed for approxi-
mately one minute to allow any undetected defects or cracks to appear.
- Keep the bumper(s) in place with proper operaon.
- Keep your hands away from the grinding wheel(s).
- Never touch the back or boom of the grinding wheels.
- Disconnect the tool from the power supply before any adjustment or maintenance. The grinding wheels connue to rotate aer the tool is switched o.
Always allow the wheels to come to a complete stop before any adjustment or maintenance.
-To avoid electric shock DO NOT use the tool in wet condions and do not expose it to rain.
- When installing a new grinding wheel, always check that the maximum RPM listed meets or exceeds that listed on the grinder. Also check the new wheel for
damage such as imperfecons or cracks. If the wheel appears to be in sasfactory condion, t it to the grinder.
- When a new grinding wheel has been ed, stand on one side of the tool and press "ON". Allow the tool to run at full speed for approximately one minute
to allow any undetected imperfecons or cracks to appear.
- Only use accessories recommended by the manufacturer for the model in queson.
- DO NOT aempt to cut anything with the grinding wheel.
-Grounded tools must be plugged into an outlet that is properly installed and grounded in accordance with all local codes and regulaons. Never remove the
grounding and do not modify it in any way. Do not use adapter plugs (adapters). If there is any doubt as to whether the outlet is properly grounded, consult a
qualied electrician.
-Do not use the tool when you are red or under the inuence of alcohol or drugs.
-Do not wear loose clothing or jewelry. Keep your hair ed up.
-Make sure the power switch is turned o before connecng the tool.
- WARNING! Replace the grinding wheel(s) immediately if they become cracked.
- Do not overghten the sha nuts.
- Service on these tools should only be performed by authorized and qualied technical personnel.
PREPARATION
Before you start - Safety informaon
- Always use eye protecon conforming to a recognized standard (for example: ANSI Z87.1) - (CSA or ANSI).
- Always wear a mask or respirator when dust is generated.
- Keep bystanders out of the work area when operang the tool.
- WARNING! Always ensure that the work area is free of ammable materials, liquids or gases, as use of this tool may create sparks.
- Do not wear loose clothing or jewellery. Keep your hair ed up.
- WARNING! Immediately replace the grinding wheel(s) which are cracked. Do not overghten the sha nuts.
- NEVER grind with the side of the wheel. Grinding should only take place with the front part of the wheel.
- NEVER apply pressure to the workpiece when the grinding wheel is cold. The wheel should be heated by applying the workpiece gradually.
- NEVER use the grinding machine without the wheel guards. Keep thumbs and ngers away from the wheel.
Before you start - Protecon against electricity
In the event of a malfuncon or short circuit, grounding provides the path of least resistance for electricity and reduces the risk of electric shock to the oper-
ator. This tool is equipped with an electrical cord that has an equipment grounding conductor and a grounding plug. The plug MUST be plugged into an outlet
that is properly installed and grounded in accordance with ALL local codes and regulaons.
DO NOT MODIFY THE SUPPLIED PLUG. If it does not t in the outlet, install the appropriate outlet with the assistance of an electrician.
Improper connecon of the equipment grounding conductor may result in an increased risk of electrical shock. The conductor with green insulaon (with or
without yellow strips) is the equipment grounding conductor. If it is necessary to repair or replace the electrical cord or plug, DO NOT connect the equipment
grounding conductor to a current-carrying terminal.
CHECK with a qualied electrician or service personnel if you do not fully understand the grounding instrucons, or if you are unsure if the equipment is
properly grounded.

5
WWW.NIKOLAOUTOOLS.GR WWW.NIKOLAOUTOOLS.GR
EN EN
EXTENSION CABLE USE
Use only 3-conductor extension cords with 3-pin plugs and 3-socket outlets that accept the tool's plug. Repair or replace damaged or worn cables immediately.
Ensure that the extension cord is properly connected and in good condion. Do not use damaged extension cords. Always replace an extension cord that is
damaged. When using an extension cord, make sure that it is sucient to carry the current that the tool will draw. An undersized cable will cause a voltage drop
in the line, resulng in power loss and overheang. Before connecng the motor to the power line, make sure the switch is in the OFF posion and that the
current is rated with the current on the motor nameplate. Operang at a lower voltage will damage the motor and is not covered under warranty.
UNPACKAGING
1. Unpack all the contents of the package and place them on a at and stable surface.
2. Remove all packing materials and transport devices (if any).
3. Ensure that all contents of the package are complete and free from damage. If any component is missing or if any component has been damaged during
shipment, contact your local dealer. Use of a damaged or incomplete product poses a risk of injury and property damage.
4. Ensure that you have all parts and tools required for assembly and operaon. This includes appropriate personal protecve equipment.
BENCH GRINDER PREPARATION
Bench Grinder xing.
WARNING: Do not use the bench grinder unless it has rst been securely installed on a suitable workbench.
Place the machine on a stable and level workbench or tool stand and ensure that it is properly secured. The front of the machine should be easily accessible
aer it has been xed.The power supply should be located at a maximum distance of 100 - 150 cm from the machine's xing point.
Assembly of the protecve glass eyeshield.
WARNING: Never use the bench grinder unless the protecve glass has rst been installed.
1. Align the slot of the protecve glass arm with the slot located in the upper part of the bench grinder guard and proceed to aach using a screw and nut.
2. Ensure that the gap between the protecve glass arm and the wheel is not more than 2 mm (Fig. A, B).
Assembly of the machining workpiece support surface.
The workpiece support surface shall be installed such that the gap between the wheel and the support surface does not exceed 2 mm.
1. Place the workpiece support surface against the rail of the wheel guard. Ensure that the support surface is "facing" in the correct direcon. The curved corner
should "face" away from the wheel.
2. Pass the screw through the slot in the rail and the mounng surface.
3. Place the groover and washer on the end of the screw on the other side.
4. Secure the screw using the knob (Fig. C)
Le wheel installaon
WARNING: Before performing any wheel installaon or replacement work, make sure the machine is turned o and disconnected from the power supply.
1. Remove the screws from the wheel guard and then pull it out.
2. Remove the nut from the axle using a suitable wrench. The nut on the right axle has a clockwise thread, while the nut on the le axle has a counterclockwise
thread.
3. Remove the outer gasket from the sha.
4. Place the wheel onto the sha and once seated in posion, rotate the wheel by hand to conrm that the wheel moves freely and does not contact any
surface.
5. Reinstall the gasket, nut and bumper.
6. Connect the machine to the power supply, turn the machine on and allow the wheel to rotate unloaded for one minute at maximum speed to ensure that
there are no cracks. (Fig. D)
WARNING: Before you can loosen/ghten the sha nut, hold the sha steady using a second wrench on the brush nut.

6WWW.NIKOLAOUTOOLS.GR WWW.NIKOLAOUTOOLS.GR
EN EN
Brush Installaon
WARNING: Before performing any wheel installaon or replacement work, make sure the machine is switched o and disconnected from the power supply.
1. Insert a suitable wrench into the le wheel nut to hold the pivot sha steady, and with a second wrench, loosen and remove the brush nut.
Remove the outer gasket from the sha.
3. Place the brush onto the sha and once it is seated in posion, rotate the brush by hand to conrm that the brush moves freely and that it is not in contact
with any surface.
4. Reinstall the gasket and nut.
5. Connect the machine to the power supply, turn the machine on and allow the brush to rotate unloaded for one minute at maximum speed to ensure that it
is in good condion (Fig. E, Fig. F).
OPERATION
CONNECTION TO POWER SUPPLY
WARNING: Check the voltage. The voltage of the power supply must match the voltage requirements of the tool as listed on the tool's rang label.
WARNING: Before connecng the machine to the power supply, make sure the ON/OFF switch is in the o posion.
Connect the machine to a properly grounded 230 V ~ 50 Hz power supply whose socket is compable with the machine's plug.
SWITCHING ON/OFF
Before connecng the machine to the power supply, rotate the wheel and brush by hand to ensure that they rotate freely.
- To turn the machine on, set the ON/OFF switch to the 'I' posion.
- To turn the machine o, set the ON/OFF switch to the 'O' posion.
GENERAL INSTRUCTIONS
1. Before each use, check the wheel and brush and make sure they are not damaged.
2. Aer turning the machine on, wait unl it reaches its maximum speed before starng your work.
3. The safety glass is adjustable and should be posioned to provide the operator with a clear eld of vision through it.
4. Hold the workpiece against the support surface and feed it smoothly and evenly into the wheel.
5. Proper adjustment of the workpiece support surfaces will provide the correct working angle for ecient grinding. As the diameter of the wheel is subject to
wear, you will need to readjust the posion of the support surface.
Secure the twin wheel to a horizontal, stable surface before using it. Posioning the twin wheel towards the forward end of the bench will make it easier to
handle long tools.
If possible, allow sucient space on the le side of the machine to allow easy access to the wheel.
An alternave method is to x the machine to a sheet of plywood, which could then be held in place by suitable means on a bench or table to give the twin
wheel the most convenient posion; before using the machine, ensure that the protecve glass is posioned as close to the wheel surface as possible to prevent
sparks ying.
It is a sensible precauon to use safety glasses when using the twin bench wheel.
The machine can be used to grind proles or virtually any cung tool, chisels, drills, etc.
However, care should be taken not to grind a tool too hard or for too long to avoid overheang.

7
WWW.NIKOLAOUTOOLS.GR WWW.NIKOLAOUTOOLS.GR
EN EN
Required Maintenance Frequency
a. Check the cable Before every me of use
b. Check the wheel for any sign of ware Before every me of use
c. Check the moving parts for alignment and connecon Before every me of use
d. Repair of abrasive wheels Whenever required
e. Replacement of abrasive wheels Whenever required
f. Clean and evacuate dust from the motor and wheel parts. Whenever required
Service, as menoned above, in addion to the recommended maintenance on these tools should only be carried out by an authorised, qualied technician/
personnel.
MAINTENANCE & CLEANING
WARNING: Before performing any maintenance, cleaning or repair work on the machine, turn off the machine, disconnect it from the power supply and
wait a few minutes for it to cool down.
WARNING: Carry out only the maintenance and repair work specied in this manual. Any other work should be carried out by an authorised technical support
centre.
1. Keep the machine clean. Remove any debris from it aer each use and before storing it.
2. Regular and proper cleaning will help ensure safety and extend the life of the machine.
3. Inspect the machine before each use for worn and damaged parts. Do not operate the machine if you nd any broken or worn component.
4. Clean the machine using a dry cloth. Use a brush for areas where access is not easy. Avoid using solvents when cleaning plasc parts. Most plasc parts are
suscepble to damage from the use of solvents.
5. Check for worn or damaged parts. Replace worn parts if necessary or contact an authorized technical support center to perform the necessary repair work.
6. All machine bearings have been adequately lubricated for the life of the machine under normal operang condions and therefore no further lubricaon is
required.
7. If the power cable is damaged in any way, ensure that it is immediately replaced by an authorised technical support centre before using the machine again.
STORAGE & TRANSPORT
1. Clean the machine as described above.
2. Store the machine and its components in their original packaging in a dry and frost-free place. The ideal storage temperature is 10°C and 30°C
3. Always store the machine in an area that is not accessible to children.
4. Turn the machine o and disconnect it from the power supply before aempng to transport it anywhere.
5. Install transport guards, if provided.
6. Protect the machine from any strong shocks or vibraons that may occur during transport by a vehicle.
7. Secure the machine properly to prevent it from slipping and/or falling.

8WWW.NIKOLAOUTOOLS.GR WWW.NIKOLAOUTOOLS.GR
EN EN
TROUBLESHOOTING
Possible problems Possible Cause Remedy
The motor
does not start.
1. Low voltage.
2. Open circuit in the motor or loose connecons.
3. Fault in fuse or decoupler.
1. Check power source for proper voltage.
2. Inspect for loose or open connecons (service required).
3. Short circuit (service required).
4. Incompability between tool and circuit, fuse or
disconnect.
ΤThe motor will not start - fuses and
disconnect switches are tripped..
1. Short circuit in the line, cable or plug.
2. Short circuit in the motor or loose connecons.
3. Faulty fuses or disconnectors in the distribuon line.
1. Inspect cable and/or plug for damaged insulaon and
shorted conductors.
2. Inspect all connecons to the motor for loose or
shorted terminals and/or damaged insulaon.
3. Install proper fuses or disconnect switches or replace
gear to correspond to an adequately sized circuit.
The motor
overheats.
1. The motor has received a load in excess of the maximum possible.
2. The extension cable is too long and of insucient weight.
1. Reduce the motor load.
2. Use an extension cord of appropriate weight and length
or plug directly into the outlet.
The motor stops
(resulng in fuses blowing or the circuit
breaking/tripping).
1. Short circuit in motor or loose connecons.
2. Low voltage.
3. Faulty fuses or disconnect switches on the line.
4. Motor overload.
1. Inspect connecons to the motor for loose or shorted
terminals or worn insulaon (service required).
2. Correct causes of low voltage (e.g. improper extension
cable length and/or weight of extension cable).
3. Install proper fuses or circuit breakers or connect the
tool to an appropriate circuit, paired with an appropriate
fuse or disconnect switch.
4. Reduce the load on the motor.
The motor slows down
during operaon. The feed rate is very high. Reduce the rate at which the workpiece is fed into the
working area of the tool (abrasive wheel).
The workpiece
has a corrugated surface.
1. The machine vibrates.
2. The workpiece is not held steady.
3. The front part of the wheel is uneven.
4. The wheel is too hard.
1. Make sure the machine is securely fastened to a solid
surface.
2. Use a holding device for the workpiece.
3. Restructure the abrasive wheel with the appropriate
tool.
4. Use soer wheel, or reduce feed rate.
Presented lines in the
on the surface of the workpiece.
1. Impuries on the wheel surface.
2. The workpiece is not held rmly.
1. Restructure the wheel.
2. Use support device for the stability of the workpiece.
Marks or cracks
on the workpiece.
1. Inappropriate type of abrasive wheel.
2. Improper feed rate.
3. Coolant required.
1. Try wheels with a soer connecon or more sharp steel
shavings
2. Reduce the rate at which the workpiece is fed to the
wheel.
3. Add coolant.
The wheel dulls very quickly,
the steel splinters fall o.
1. The feed rate is very aggressive.
2. The wheel is so.
3. The diameter of the wheel is too small.
4. Poor abrasive wheel repair.
5. Defecve wheel connecon.
1 Reduce the feed rate of the workpiece to the abrasive
wheel.
2. Select an abrasive wheel with a harder material
connecon.
3. Replace the wheel.
4. Repair the wheel.
5. USE PROHIBITED - DANGER !
Return the wheel to the point of purchase.
The wheel becomes clogged/clogged and
burn marks appear on the workpiece.
1. The wheel is too hard.
2. The feed rate is too low.
3. Poor wheel repair.
4. Coolant required.
1. Select a grinding wheel with a soer material
connecon.
2. Increase the feed rate of the workpiece to the grinding
wheel.
3. Repair the wheel.
4. Insert coolant.

9
WWW.NIKOLAOUTOOLS.GR WWW.NIKOLAOUTOOLS.GR
EN EN
Environmental Disposal
In order to avoid damage during transport, the tool must be delivered in solid packaging. The packaging as well as the unit and accessories are made of
recyclable materials and can be disposed of accordingly. The plasc parts of the tool are marked according to their material, which makes it possible to dispose
of environmentally friendly and dierenated due to the available collecon facilies.
Only for EU countries
Do not throw away power tools with household waste!
According to the European Direcve 2002/96/EC on waste electrical and electronic equipment and its implementaon according to naonal
legislaon, end-of-life power tools must be collected separately and returned to an environmentally compliant recycling facility.

10 WWW.NIKOLAOUTOOLS.GR WWW.NIKOLAOUTOOLS.GR
EL
OΔΗΓΙΕΣ ΑΣΦΑΛΕΙΑΣ
ΚΙΝΔΥΝΟΣ! Η μη τήρηση οποιασδήποτε από τις ακόλουθες οδηγίες θα μπορούσε να έχει ως αποτέλεσμα σοβαρό προσωπικό τραυματισμό των χρηστών
εργαλείων και των παρευρισκομένων ή να προκαλέσει βλάβη στο εργαλείο και σε περιουσιακά στοιχεία!
ΠΡΟΕΙΔΟΠΟΙΗΣΗ! - Διαβάστε, κατανοήστε και τηρήστε όλες τις οδηγίες του παρόντος εγχειριδίου πριν χρησιμοποιήσετε ή χειριστείτε το εργαλείο για το
οποίο έχει γραφτεί και παρασχεθεί. Βεβαιωθείτε ότι οποιοσδήποτε πρόκειται να χρησιμοποιήσει το εργαλείο έχει διαβάσει και κατανοήσει τις οδηγίες
που παρέχονται.
- Να φοράτε πάντοτε προστατευτικά µατιών που συμμορφώνονται µε ένα αναγνωρισμένο πρότυπο (CSA ή ANSI).
- Φοράτε μάσκα ή αναπνευστική συσκευή όταν δημιουργείται σκόνη.
- Κρατήστε τους παςρευρισκομένους εκτός της περιοχής εργασίας κατά τη λειτουργία του εργαλείου.
- ΠΡΟΕΙΔΟΠΟΙΗΣΗ! Πάντοτε να διασφαλίζετε ότι η περιοχή εργασίας είναι απαλλαγμένη από εύφλεκτα υλικά, υγρά ή αέρια, καθώς η χρήση αυτού του
εργαλείου μπορεί να δημιουργήσει σπινθήρες.
- Συσφίξτε τα περικόχλια του τροχού λείανσης, ασφαλίστε τις βίδες και όλους τους σφιγκτήρες και τους προφυλακτήρες.
- Κατά τη διάρκεια κάθε εκκίνησης, να στέκεστε στη µία πλευρά του δίδυμου τροχού και να τον ενεργοποιείτε πιέζοντας το "OΝ". Αφήστε τον δίδυμο τροχό να
λειτουργήσει με πλήρη ταχύτητα για ένα λεπτό περίπου, έτσι ώστε να εμφανιστούν τυχόν μη ανιχνευμένα ελαττώματα ή ρωγμές που δεν έχουν εντοπιστεί.
- Διατηρήστε τον/τους προφυλακτήρες στη θέση τους με ορθή λειτουργία.
- Κρατήστε τα χέρια σας μακριά από τον/τους τροχούς λείανσης.
- Ποτέ να µην αγγίζετε το πίσω ή το κάτω μέρος των τροχών λείανσης.
- Αποσυνδέστε το εργαλείο από την παροχή ρεύματος πριν από κάθε ρύθμιση ή τη συντήρηση. Οι τροχοί λείανσης συνεχίζουν να περιστρέφονται μετά την
απενεργοποίηση του εργαλείου. Να αφήνετε πάντα στους τροχούς να σταματούν εντελώς πριν από κάθε ρύθμιση ή τη συντήρηση.
-Για την αποφυγή ηλεκτροπληξίας ΜΗΝ χρησιμοποιείτε το εργαλείο σε υγρές συνθήκες και να μην εκτίθεται αυτό στη βροχή.
- Κατά την τοποθέτηση νέου τροχού λείανσης, να ελέγχετε πάντοτε ότι το αναγραφόμενο μέγιστο RPM πληροί ή υπερβαίνει το αναφερόμενο στη μηχανή
λείανσης. Ελέγξτε επίσης τον νέο τροχό για βλάβες, όπως ατέλειες ή ρωγμές. Αν ο τροχός φαίνεται σε ικανοποιητική κατάσταση, προσαρμόστε τον στη
μηχανή λείανσης.
- Όταν έχει τοποθετηθεί ένας νέος τροχός λείανσης, να στέκεστε στη μία πλευρά του εργαλείου και πιέστε το "OΝ". Αφήστε το εργαλείο να λειτουργήσει με
πλήρη ταχύτητα για ένα λεπτό περίπου, ώστε να εμφανιστούν τυχόν ατέλειες ή ρωγμές που δεν έχουν εντοπιστεί.
- Χρησιμοποιήστε μόνο εξαρτήματα που συνιστώνται από τον κατασκευαστή για το εκάστοτε μοντέλο.
- ΜΗΝ προσπαθήσετε να κόψετε οτιδήποτε με τον τροχό λείανσης.
-Τα γειωμένα εργαλεία πρέπει να είναι συνδεδεμένα σε πρίζα που έχει εγκατασταθεί σωστά και γειωθεί σύμφωνα με όλους τους τοπικούς κώδικες και
κανονισμούς. Μην αφαιρείτε ποτέ την γείωση και μην την τροποποιείτε με τον οποιονδήποτε τρόπο. Μη χρησιμοποιείτε βύσματα προσαρμογείς (αντάπτορες).
Εάν υπάρχουν αμφιβολίες για το εάν η πρίζα είναι ορθώς γειωμένη, συμβουλευτείτε έναν ειδικευμένο ηλεκτρολόγο.
-Μην χρησιμοποιείτε το εργαλείο όταν είστε κουρασμένοι ή υπό την επήρεια αλκοόλ ή φαρμάκων.
-Μην φοράτε χαλαρά ρούχα ή κοσμήματα. Κρατήστε τα μαλλιά σας δεμένα.
-Βεβαιωθείτε ότι ο διακόπτης ισχύος είναι απενεργοποιημένος πριν από την σύνδεση του εργαλείου.
- ΠΡΟΕΙΔΟΠΟΙΗΣΗ! Αντικαταστήστε αμέσως τον/τους τροχούς λείανσης εάν παρουσιάσουν ρωγμές.
- Μην συσφίγγετε υπερβολικά τα περικόχλια του άξονα.
- Το service σε αυτά τα εργαλεία πρέπει να εκτελείται μόνο από εξουσιοδοτημένο και ειδικευμένο τεχνικό προσωπικό.
ΠΡΟΕΤΟΙΜΑΣΙΑ
Πριν ξεκινήσετε - Zητήματα ασφάλειας
- Να χρησιμοποιείτε πάντα προστασία ματιών συμμορφούμενη με ένα αναγνωρισμένο πρότυπο (για παράδειγμα: ANSI Z87.1) - (CSA ή ANSI).
- Φοράτε πάντοτε μάσκα ή αναπνευστική συσκευή όταν δημιουργείται σκόνη.
- Κρατήστε τους παρευρισκομένους εκτός της περιοχής εργασίας κατά τη λειτουργία του εργαλείου.
- ΠΡΟΕΙΔΟΠΟΙΗΣΗ! Πάντοτε να διασφαλίζετε ότι η περιοχή εργασίας είναι απαλλαγμένη από εύφλεκτα υλικά, υγρά ή αέρια, επειδή η χρήση αυτού του
εργαλείου μπορεί να δημιουργήσει σπινθήρες.
- Μην φοράτε χαλαρά ρούχα ή κοσμήματα. Κρατήστε τα μαλλιά σας δεμένα.
- ΠΡΟΕΙΔΟΠΟΙΗΣΗ! Αντικαταστήστε αμέσως τον/τους τροχούς λείανσης οι οποίοι έχουν ρωγμές. Μην σφίγγετε υπερβολικά τα περικόχλια του άξονα.
- ΠΟΤΕ μην πραγμοποιείτε λείανση με την πλευρά του τροχού. Λείανση να λαμβάνει χώρα μόνο με το εμπρόσθιο τμήμα του τροχού.
- ΠΟΤΕ μην ασκείτε πίεση στο τεμάχιο κατεργασίας όταν ο τροχός λείανσης είναι ψυχρός. Ο τροχός πρέπει να θερμανθεί εφαρμόζοντας το αντικείμενο
κατεργασίας σταδιακά.
- ΠΟΤΕ μη χρησιμοποιείτε το μηχάνημα λείανσης χωρίς τα προστατευτικά των τροχών. Κρατήστε τους αντίχειρες και τα δάχτυλα μακριά από το τροχό.
Πριν ξεκινήσετε - Προστασία έναντι ηλεκτρισμού
Σε περίπτωση δυσλειτουργίας ή βραχυκυκλώματος, η γείωση παρέχει τη διαδρομή της ελάχιστης αντίστασης για το ηλεκτρικό ρεύμα και μειώνει τον κίνδυνο
ηλεκτροπληξίας για τον χειριστή. Το εργαλείο αυτό είναι εξοπλισμένο με ηλεκτρικό καλώδιο που διαθέτει αγωγό γείωσης εξοπλισμού και βύσμα γείωσης.
Το βύσμα ΠΡΕΠΕΙ να είναι συνδεθεί σε μια πρίζα που να έχει εγκατασταθεί σωστά και να είναι γειωμένη σύμφωνα με ΟΛΟΥΣ τους τοπικούς κώδικες και
κανονισμούς.
ΜΗΝ ΤΡΟΠΟΠΟΙΕΙΤΕ ΤΟ ΠΑΡΕΧΟΜΕΝΟ ΒΥΣΜΑ. Εάν δεν χωράει στην πρίζα, εγκαταστήστε την κατάλληλη πρίζα με την συνδρομή ηλεκτρολόγου.
Η ακατάλληλη σύνδεση του αγωγού γείωσης του εξοπλισμού μπορεί να οδηγήσει σε αυξημένο κίνδυνο ηλεκτροπληξίας. Ο αγωγός με την πράσινη μόνωση
(με ή χωρίς κίτρινες λωρίδες) είναι ο αγωγός γείωσης του εξοπλισμού. Εάν είναι απαραίτητη η επισκευή ή η αντικατάσταση του ηλεκτρικού καλωδίου ή του
βύσματος, ΜΗΝ συνδέετε τον αγωγό γείωσης του εξοπλισμού σε ρευματοφόρο ακροδέκτη.
ΕΛΕΓΞΤΕ με εξειδικευμένο ηλεκτρολόγο ή προσωπικό υπηρεσίας εάν δεν κατανοείτε πλήρως τις οδηγίες γείωσης, ή εάν δεν σίγουροι αν το εργαλείο είναι
ορθώς γειωμένο.

11
WWW.NIKOLAOUTOOLS.GR WWW.NIKOLAOUTOOLS.GR
EL
XΡΗΣΗ ΚΑΛΩΔΙΩΝ ΠΡΟΕΚΤΑΣΗΣ
Xρησιμοποιείτε μόνο καλώδια προέκτασης τριών αγωγών με βύσματα 3 ακροδεκτών και πρίζες 3 υποδοχών που δέχονται το βύσμα του φις του εργαλείου.
Επισκευάστε ή αντικαταστήστε κατεστραμμένα ή φθαρμένα καλώδια αμέσως. Βεβαιωθείτε ότι το καλώδιο προέκτασης είναι σωστά συνδεδεμένο και σε καλή
κατάσταση. Μην χρησιμοποιείτε κατεστραμμένα καλώδια προέκτασης. Πάντοτε να αντικαθιστάτε ένα καλώδιο προέκτασης το οποίο είναι κατεστραμμένο.
Κατά την χρήση ενός καλωδίου προέκτασης βεβαιωθείτε ότι είναι επαρκές ώστε να μεταφέρει το ρεύμα που θα απορροφά το εργαλείο. Ένα
υποδιαστασιολογημένο καλώδιο θα προκαλεί πτώση τάσης στην γραμμή, με αποτέλεσμα απώλεια ισχύος και υπερθέρμανση. Πριν την σύνδεση του μοτέρ
με την γραμμή ρεύματος, βεβαιωθείτε ότι ο διακόπτης βρίσκεται στην θέση OFF και ότι το ηλεκτρικό ρεύμα έχει τα ονομαστικά μεγέθη με το ρεύμα της
πινακίδας του μοτέρ. Λειτουργία σε χαμηλότερη τάση θα καταστρέψει το μοτέρ και δεν καλύπτεται από την εγγύηση.
AΠΟΣΥΣΚΕΥΑΣΙΑ
1. Αποσυσκευάστε όλα τα περιεχόμενα της συσκευασίας και τοποθετήστε τα επάνω σε μία επίπεδη και σταθερή επιφάνεια.
2. Αφαιρέστε όλα τα υλικά συσκευασίας και τις διατάξεις μεταφοράς (εφόσον υπάρχουν).
3. Βεβαιωθείτε ότι όλα τα περιεχόμενα της συσκευασίας είναι ολοκληρωμένα και χωρίς καμία ζημιά. Εάν λείπει κάποιο εξάρτημα ή εάν κάποιο εξάρτημα έχει
υποστεί ζημιά κατά τη διάρκεια της μεταφοράς, επικοινωνήστε με τον τοπικό σας αντιπρόσωπο. Η χρήση ενός χαλασμένου ή μη ολοκληρωμένου προϊόντος
αποτελεί κίνδυνο τραυματισμού και υλικών ζημιών.
4. Διασφαλίστε ότι διαθέτετε όλα τα εξαρτήματα και εργαλεία που απαιτούνται για τη συναρμολόγηση και τη λειτουργία. Σε αυτά περιλαμβάνεται και ο
κατάλληλος εξοπλισμός ατομικής προστασίας.
ΠΡΟΕΤΟΙΜΑΣΙΑ ΔΙΔΥΜΟΥ ΤΡΟΧΟΥ
Στερέωση δίδυμου τροχού
ΠΡΟΕΙΔΟΠΟΙΗΣΗ: Μην χρησιμοποιείτε τον δίδυμο τροχό εάν δεν έχει πρώτα εγκατασταθεί με ασφάλεια επάνω σε κατάλληλο πάγκο εργασίας.
Τοποθετήστε το μηχάνημα επάνω σε έναν σταθερό και επίπεδο πάγκο εργασίας ή βάση εργαλείου και φροντίστε για τη σωστή στερέωση του. Η μπροστινή
πλευρά του μηχανήματος θα πρέπει να είναι εύκολα προσβάσιμη, μετά την στερέωσή του.Η παροχή ρεύματος θα πρέπει να βρίσκεται σε μία μέγιστη
απόσταση 100 – 150 cm από το σημείο στερέωσης του μηχανήματος.
Συναρμολόγηση προστατευτικού τζαμιού
ΠΡΟΕΙΔΟΠΟΙΗΣΗ: Ποτέ μην χρησιμοποιείτε το δίδυμο τροχό εάν δεν έχει πρώτα εγκατασταθεί το προστατευτικό τζάμι.
1. Ευθυγραμμίστε τη σχισμή του βραχίονα του προστατευτικού τζαμιού με την υποδοχή που βρίσκεται στο άνω τμήμα του προφυλακτήρα τροχού και
προχωρήστε στην στερέωση χρησιμοποιώντας βίδα και περικόχλιο.
2. Βεβαιωθείτε ότι το διάκενο μεταξύ του βραχίονα του προστατευτικού τζαμιού και του τροχού, δεν είναι μεγαλύτερο από 2 mm (Σχ. Α, Β)
Συναρμολόγηση επιφάνειας στήριξης τεμαχίου κατεργασίας
Η επιφάνεια στήριξης τεμαχίου επεξεργασίας θα πρέπει να εγκατασταθεί με τέτοιο τρόπο ώστε το διάκενο μεταξύ του τροχού και της επιφάνειας στήριξης
να μην υπερβαίνει τα 2 mm.
1. Τοποθετήστε την επιφάνεια στήριξης τεμαχίου επεξεργασίας έναντι της ράγας του προφυλακτήρα τροχού. Βεβαιωθείτε ότι η επιφάνεια στήριξης «κοιτάζει»
προς τη σωστή κατεύθυνση. Η κυρτή γωνία θα πρέπει να «κοιτάζει» μακριά από τον τροχό.
2. Περάστε τη βίδα διαμέσου της σχισμής στη ράγα και της επιφάνειας στήριξης.
3. Τοποθετήστε το γκρόβερ και τη ροδέλα στο άκρο της βίδας από την άλλη πλευρά.
4. Ασφαλίστε τη βίδα χρησιμοποιώντας το πόμολο (Σχ. C)
Eγκατάσταση αριστερού τροχού
ΠΡΟΕΙΔΟΠΟΙΗΣΗ: Προτού προβείτε σε οποιαδήποτε εργασία εγκατάστασης ή αντικατάστασης των τροχών, βεβαιωθείτε ότι το μηχάνημα είναι
απενεργοποιημένο και αποσυνδεδεμένο από την παροχή ρεύματος.
1. Αφαιρέστε τις βίδες από τον προφυλακτήρα τροχού και στη συνέχεια τραβήξτε τον προς τα έξω.
2. Αφαιρέστε το περικόχλιο από τον άξονα χρησιμοποιώντας ένα κατάλληλο κλειδί. Το περικόχλιο στον δεξιό άξονα διαθέτει δεξιόστροφο σπείρωμα, ενώ το
περικόχλιο στον αριστερό άξονα διαθέτει αριστερόστροφο σπείρωμα.
3. Αφαιρέστε την εξωτερική φλάντζα από τον άξονα.
4. Τοποθετήστε τον τροχό επάνω στον άξονα και μόλις εδράσει στη θέση του, περιστρέψτε τον με το χέρι για να επιβεβαιώσετε ότι ο τροχός κινείται ελεύθερα
και ότι δεν έρχεται σε επαφή με καμία επιφάνεια.
5. Εγκαταστήστε εκ νέου τη φλάντζα, το περικόχλιο και τον προφυλακτήρα.
6. Συνδέστε το μηχάνημα στην παροχή ρεύματος, ενεργοποιήστε το μηχάνημα και αφήστε τον τροχό να περιστραφεί άνευ φορτίου, για ένα λεπτό σε μέγιστη
ταχύτητα, προκειμένου να βεβαιωθείτε ότι δεν έχει ρωγμές. (Σχ. D)
ΠΡΟΕΙΔΟΠΟΙΗΣΗ: Για να μπορέσετε να χαλαρώσετε / σφίξετε το περικόχλιο του άξονα, κρατήστε τον άξονα σταθερό χρησιμοποιώντας ένα δεύτερο κλειδί
στο περικόχλιο της βούρτσας.

12 WWW.NIKOLAOUTOOLS.GR WWW.NIKOLAOUTOOLS.GR
EL
Eγκατάσταση βούρτσας
ΠΡΟΕΙΔΟΠΟΙΗΣΗ: Προτού προβείτε σε οποιαδήποτε εργασία εγκατάστασης ή αντικατάστασης των τροχών, βεβαιωθείτε ότι το μηχάνημα είναι
απενεργοποιημένο και αποσυνδεδεμένο από την παροχή ρεύματος.
1. Τοποθετήστε ένα κατάλληλο κλειδί στο περικόχλιο του αριστερού τροχού προκειμένου να κρατήσετε τον άξονα περιστροφής σταθερό, και με ένα δεύτερο
κλειδί, χαλαρώστε και αφαιρέστε το περικόχλιο της βούρτσας.
Αφαιρέστε την εξωτερική φλάντζα από τον άξονα.
3. Τοποθετήστε τη βούρτσα επάνω στον άξονα και μόλις εδράσει στη θέση της, περιστρέψτε την με το χέρι για να επιβεβαιώσετε ότι η βούρτσα κινείται
ελεύθερα και ότι δεν έρχεται σε επαφή με καμία επιφάνεια.
4. Εγκαταστήστε εκ νέου τη φλάντζα και το περικόχλιο.
5. Συνδέστε το μηχάνημα στην παροχή ρεύματος, ενεργοποιήστε το μηχάνημα και αφήστε τη βούρτσα να περιστραφεί άνευ φορτίου, για ένα λεπτό σε
μέγιστη ταχύτητα, προκειμένου να βεβαιωθείτε ότι βρίσκεται σε καλή κατάσταση (Σχ. Ε, Σχ. F).
ΛΕΙΤΟΥΡΓΙΑ
ΣΥΝΔΕΣΗ ΣΕ ΠΑΡΟΧΗ ΡΕΥΜΑΤΟΣ
ΠΡΟΕΙΔΟΠΟΙΗΣΗ: Ελέγξτε την τάση. Η τάση της παροχής ρεύματος πρέπει να ταιριάζει με τις απαιτήσεις τάσης του εργαλείου, όπως αυτές αναγράφονται
στην ετικέτα χαρακτηριστικών του.
ΠΡΟΕΙΔΟΠΟΙΗΣΗ: Προτού συνδέσετε το μηχάνημα στην παροχή ρεύματος, βεβαιωθείτε ότι ο διακόπτης ενεργοποίησης / απενεργοποίησης βρίσκεται στην
απενεργοποιημένη θέση.
Συνδέστε το μηχάνημα σε κατάλληλα γειωμένη παροχή ρεύματος 230 V ~ 50 Hz, η υποδοχή της οποίας θα είναι συμβατή με το βύσμα του μηχανήματος.
ΕΝΕΡΓΟΠΟΙΗΣΗ/ΑΠΕΝΕΡΓΟΠΟΙΗΣΗ
Προτού συνδέσετε το μηχάνημα στην παροχή ρεύματος, περιστρέψτε τον τροχό και τη βούρτσα με το χέρι για να διασφαλίσετε ότι περιστρέφονται ελεύθερα.
• Για να ενεργοποιήσετε το μηχάνημα, θέστε το διακόπτη ενεργοποίησης / απενεργοποίησης στη θέση «Ι».
• Για να απενεργοποιήσετε το μηχάνημα, θέστε το διακόπτη ενεργοποίησης / απενεργοποίησης στη θέση «O»
ΓΕΝΙΚΕΣ ΟΔΗΓΙΕΣ ΧΡΗΣΗΣ
1. Πριν από κάθε χρήση, να ελέγχετε τον τροχό και τη βούρτσα και να βεβαιώνεστε ότι δεν έχουν υποστεί καμία ζημιά.
2. Μετά την ενεργοποίηση του μηχανήματος, περιμένετε έως ότου να φθάσει στη μέγιστη ταχύτητα του, προτού εκκινήσετε την εργασία σας.
3. Τα προστατευτικά τζάμια είναι ρυθμιζόμενα και θα πρέπει να τοποθετούνται έτσι ώστε να παρέχουν στον χειριστή ένα καθαρό οπτικό πεδίο διαμέσου
αυτών.
4. Να συγκρατείτε το τεμάχιο επεξεργασίας έναντι της επιφάνειας στήριξης και να το τροφοδοτείτε ομαλά και ομοιόμορφα στον τροχό.
5. Η σωστή ρύθμιση των επιφανειών στήριξης τεμαχίου επεξεργασίας θα παράσχουν τη σωστή γωνία εργασίας για αποτελεσματική λείανση. Καθώς η
διάμετρος του τροχού υπόκειται σε φθορά, θα χρειαστεί να ρυθμίσετε εκ νέου τη θέση της επιφάνειας στήριξης.
Στερεώστε τον δίδυμο τροχό σε μία οριζόντια, σταθερή επιφάνεια προτού τον χρησιμοποιήσετε. Η τοποθέτηση του δίδυμου τροχού προς το έμπροσθεν άκρο
του πάγκου, θα διευκολύνει τη διαχείριση εργαλείων μεγάλου μήκους.
Εάν είναι εφικτό, επιτρέψτε την ύπαρξη επαρκούς χώρου στην αριστερή πλευρά του μηχανήματος προκειμένου να υπάρχει εύκολη πρόσβαση στον τροχό.
Μία εναλλακτική μέθοδος είναι η στερέωση του μηχανήματος σε ένα φύλλο κόντρα πλακέ, το οποίο θα μπορούσε στη συνέχεια να συγκρατηθεί με κατάλληλα
μέσα σε έναν πάγκο ή τραπέζι, προκειμένου να διαθέτει ο δίδυμος τροχός την πιο βολική θέση. προτού χρησιμοποιήσετε το μηχάνημα, βεβαιωθείτε ότι το
προστατευτικό τζάμι είναι τοποθετημένο όσο το δυνατόν πιο κοντά στην επιφάνεια του τροχού προκειμένου να αποτρέπει να πετάγονται σπινθήρες.
Αποτελεί λογική προφύλαξη, να χρησιμοποιείτε γυαλιά ασφαλείας όταν χρησιμοποιείτε τον δίδυμο τροχό πάγκου.
Το μηχάνημα μπορεί να χρησιμοποιηθεί για τη λείανση προφίλ ή ουσιαστικά οποιουδήποτε εργαλείου κοπής, καλεμιών, τρυπανιών, κ.λπ.
Ωστόσο, θα πρέπει να δώσετε την απαραίτητη προσοχή ώστε να μην λειάνετε ένα εργαλείο πολύ σκληρά ή για μεγάλο χρονικό διάστημα προς αποφυγή
υπερθέρμανσης.

13
WWW.NIKOLAOUTOOLS.GR WWW.NIKOLAOUTOOLS.GR
EL
ΣΥΝΤΗΡΗΣΗ & ΚΑΘΑΡΙΣΜΟΣ
Απαιτούμενη Συντήρηση Συχνότητα
α. Ελέγξτε το καλώδιο Πριν από κάθε χρήση.
β. Ελέγξτε τους τροχούς για φθορές Πριν από κάθε χρήση.
γ. Ελέγξτε τα κινούμενα τμήματα για ευθυγράμμιση και σύνδεση Πριν από κάθε χρήση.
δ. Επιδιόρθωση λειαντικών τροχών Εφόσον και όταν απαιτηθεί.
ε.Αντικατάσταση λειαντικών τροχών Eφόσον και όταν απαιτηθεί.
στ. Καθαρίστε και εκκενώστε την σκόνη από το μοτέρ και μέρη του τροχού. Eφόσον και όταν απαιτηθεί.
Το σέρβις, όπως αναφέρθηκε ως άνω, πέραν της συνιστώμενης συντήρησης σε αυτά τα εργαλεία πρέπει να εκτελείται αποκλειστικά και μόνο από
εξουσιοδοτημένο, εξειδικευμένο τεχνικό/προσωπικό.
ΠΡΟΕΙΔΟΠΟΙΗΣΗ: Προτού προβείτε σε οποιαδήποτε εργασία συντήρησης, καθαρισμού ή επισκευής επάνω στο μηχάνημα, απενεργοποιήστε το μηχάνημα,
αποσυνδέστε το από την παροχή ρεύματος και περιμένετε λίγα λεπτά για να κρυώσει.
ΠΡΟΕΙΔΟΠΟΙΗΣΗ: Να προβαίνετε μόνο στις εργασίες συντήρησης και επισκευής που αναφέρονται στο εγχειρίδιο αυτό χρήσης. Οποιαδήποτε άλλη εργασία,
θα πρέπει να πραγματοποιείται από εξουσιοδοτημένα κέντρα τεχνικής υποστήριξης.
1. Διατηρείτε το μηχάνημα καθαρό. Απομακρύνετε τυχόν απορρίμματα από αυτό μετά από κάθε χρήση και πριν την αποθήκευση του.
2. Ο τακτικός και σωστός καθαρισμός θα βοηθήσει στη διασφάλιση της ασφάλειας και την επέκταση της διάρκειας ζωής του μηχανήματος.
3. Να επιθεωρείτε το μηχάνημα πριν από κάθε χρήση για φθαρμένα και χαλασμένα εξαρτήματα. Μην λειτουργείτε το μηχάνημα εάν εντοπίσετε το
οποιοδήποτε σπασμένο ή φθαρμένο εξάρτημα.
4. Να καθαρίζετε το μηχάνημα χρησιμοποιώντας ένα στεγνό πανί. Να χρησιμοποιείτε μία βούρτσα για τις περιοχές όπου δεν είναι εύκολη η πρόσβαση.
Αποφύγετε τη χρήση διαλυτών κατά τον καθαρισμό πλαστικών μερών. Τα περισσότερα πλαστικά μέρη είναι επιρρεπή σε ζημιές από τη χρήση διαλυτών.
5. Ελέγξτε για φθαρμένα ή χαλασμένα μέρη. Αντικαταστήστε τα φθαρμένα μέρη εάν χρειαστεί ή απευθυνθείτε σε εξουσιοδοτημένο κέντρο τεχνικής
υποστήριξης για την διεξαγωγή των απαραίτητων εργασιών επισκευής.
6. Όλα τα έδρανα του μηχανήματος έχουν λιπανθεί επαρκώς για καθ’ όλη τη διάρκεια ζωής του μηχανήματος, υπό φυσιολογικές συνθήκες λειτουργίας και ως
εκ τούτου δεν απαιτείται περαιτέρω λίπανση.
7. Εάν το καλώδιο ρεύματος υποστεί την οποιαδήποτε ζημιά, φροντίστε για την άμεση αντικατάσταση του από εξουσιοδοτημένο κέντρο τεχνικής υποστήριξης
προτού χρησιμοποιήσετε το μηχάνημα ξανά.
ΑΠΟΘΗΚΕΥΣΗ & ΜΕΤΑΦΟΡΑ
1. Καθαρίστε το μηχάνημα, όπως περιγράφεται ανωτέρω.
2. Αποθηκεύστε το μηχάνημα και τα εξαρτήματα του εντός της αρχικής του συσκευασίας, σε ένα στεγνό και χωρίς παγετό χώρο. Η ιδανική θερμοκρασία
αποθήκευσης είναι 10°C και 30°C
3. Πάντα να αποθηκεύετε το μηχάνημα σε χώρο ο οποίος δεν είναι προσβάσιμος σε παιδιά.
4. Απενεργοποιήστε το μηχάνημα και αποσυνδέστε το από την παροχή ρεύματος, προτού επιχειρήσετε να το μεταφέρετε οπουδήποτε.
5. Εγκαταστήστε τους προφυλακτήρες μεταφοράς, εφόσον παρέχονται.
6. Να προστατεύετε το μηχάνημα από τυχόν δυνατές κρούσεις ή κραδασμούς που ενδέχεται να υπάρξουν κατά τη διάρκεια μεταφοράς με ένα όχημα.
7. Να ασφαλίζετε το μηχάνημα κατάλληλα προκειμένου να αποτραπεί η ολίσθηση του και / ή η πτώση του.

14 WWW.NIKOLAOUTOOLS.GR WWW.NIKOLAOUTOOLS.GR
EL
ΑΝΤΙΜΕΤΩΠΙΣΗ ΑΝΑΔΥΟΜΕΝΩΝ ΠΡΟΒΛΗΜΑΤΩΝ
Είδη πιθανών προβλημάτων Πιθανή Αιτία Επισκευή
Tο μοτέρ
δεν εκκινεί.
1. Χαμηλή τάση.
2. Ανοικτό κύκλωμα στο μοτέρ ή χαλαρές συνδέσεις.
3. Βλάβη σε ασφάλεια ή σε αποζεύκτη.
1. Ελέγξτε πηγή ισχύος για ορθή τάση.
2. Επιθεωρήστε για χαλαρές ή ανοικτές συνδέσεις
(απαιτείται service).
3. Bραχυκύκλωμα (απαιτείται service).
4. Ασυμβατότητα μεταξύ εργαλείου και κυκλώματος,
ασφάλειας ή αποζεύκτη.
Το μοτέρ δεν εκκινεί - ασφάλειες και
διακόπτες απόζευξης τίθενται σε λειτουργία.
1. Βραχυκύκλωμα στην γραμμή, καλώδιο ή βύσμα.
2. Βραχυκύκλωμα στο μοτέρ ή χαλαρές συνδέσεις.
3. Λανθασμένες ασφάλειες ή αποζεύκτες στην γραμμή διανομής.
1. Επιθεωρήστε καλώδιο ή/και βύσμα για κατεστραμμένη
μόνωση και βραχυκυκλωμένους αγωγούς.
2. Επιθεωρήστε όλες τις συνδέσεις στο μοτέρ για
χαλαρούς ή βραχυκυκλωμένους ακροδέκτες ή/και
φθαρμένη μόνωση.
3. Εγκαταστήστε σωστές ασφάλειες ή διακόπτες
απόζευξης ή αντικαταστήστε το εργαλείο ώστε να
αντιστοιχεί σε επαρκώς διαστασιολογημένο κύκλωμα.
Το μοτέρ
υπερθερμαίνεται.
1. Το μοτέρ έχει παραλάβει φορτίο πέραν του μέγιστου δυνατού.
2. Το καλώδιο επέκτασης είναι πολύ μακρύ και ανεπαρκούς βάρους.
1. Μειώστε το φορτίο του μοτέρ.
2. Χρησιμοποιήστε ένα καλώδιο επέκτασης κατάλληλου
βάρους και μήκους ή βύσμα απευθείας στην πρίζα.
Το μοτέρ στολάρει
(με αποτέλεσμα ασφάλειες να εκρήγνυνται
ή το κύκλωμα να διακόπτεται/τριπάρει).
1. Βραχυκύκλωμα σε μοτέρ ή χαλαρές συνδέσεις.
2. Χαμηλή τάση.
3. Λανθασμένες ασφάλειες ή διακόπτες απόζευξης στην γραμμή.
4. Υπερφόρτωση κινητήρα.
1. Επιθεωρήστε τις συνδέσεις στον κινητήρα για
χαλαρούς ή βραχυκυκλωμένους ακροδέκτες ή φθαρμένη
μόνωση (απαιτείται service).
2. Διορθώστε τα αίτια χαμηλής τάσης (π.χ. ακατάλληλο
μήκος καλωδίου επέκτασης ή/και βάρος αυτού).
3. Εγκαταστήστε σωστές ασφάλειες ή διακόπτες
ασφαλείας ή συνδέστε το εργαλείο σε κατάλληλο
κύκλωμα, αντιστοιχιζόμενο με κατάλληλη ασφάλεια ή
διακόπτη απόζευξης.
4. Μειώστε το φορτίο στον κινητήρα.
Η μηχανή επιβραδύνει
κατά την λειτουργία. O ρυθμός τροφοδοσίας είναι πολύ μεγάλος.
Μειώστε τον ρυθμό με το οποίο το τεμάχιο κατεργασίας
τροφοδοτείται στην περιοχή εργασίας του εργαλείου
(λειαντικός τροχός).
Το τεμάχιο κατεργασίας
έχει κυματοειδή επιφάνεια.
1. Η μηχανή δονείται.
2. Το τεμάχιο κατεργασίας δεν κρατιέται σταθερό.
3. Το εμπρόσθιο τμήμα του τροχού είναι ανομοιόμορφο.
4. Ο τροχός είναι πολύ σκληρός.
1. Βεβαιωθείτε ότι το μηχάνημα είναι ασφαλώς
στερεωμένο σε στερεά επιφάνεια.
2. Χρησιμοποιήστε συσκευή συγκράτησης για το τεμάχιο
εργασίας.
3. Αναδομήστε τον λειαντικό τροχό με το κατάλληλο
εργαλείο.
4. Χρησιμοποιήστε μαλακότερο τροχό, ή μειώστε τον
ρυθμό τροφοδοσίας.
Παρουσιάζονται γραμμές στην
επιφάνεια του τεμαχίου κατεργασίας.
1. Ακαθαρσίες στην επιφάνεια του τροχού.
2. Το τεμάχιο κατεργασίας δεν κρατιέται σταθερά.
1. Aπομακρύνετε τις ακαθαρσίες από τον τροχό.
2. Χρησιμοποιήστε συσκευής στήριξης για την
σταθερότητα του τεμαχίου κατεργασίας.
Σημάδια ή ρωγμές
στο τεμάχιο κατεργασίας.
1. Ακατάλληλος τύπος λειαντικού τροχού.
2. Ακατάλληλος ρυθμός τροφοδοσίας.
3. Απαιτείται ψυκτικό.
1. Δοκιμάστε τροχούς με μαλακότερη σύνδεση ή
περισσότερο κοφτερά χαλυβδορινίσματα
2. Μειώστε τον ρυθμό κατά τον οποίο το τεμάχιο
κατεργασίας τροφοδοτείται στον τροχό.
3. Προσθέστε ψυκτικό.
Ο τροχός στομώνει πολύ γρήγορα,
τα χαλυβδορινίσματα πέφτουν.
1. Ο ρυθμός τροφοδοσίας είναι πολύ επιθετικός.
2. Ο τροχός είναι μαλακός.
3. Η διάμετρος του τροχού είναι πολύ μικρή.
4. Κακή επιδιόρθωση λειαντικού τροχού.
5. Eλαττωματική σύνδεση τροχών.
1 Μειώστε τον ρυθμό τροφοδοσίας του τεμαχίου
κατεργασίας στον λειαντικό τροχό.
2. Επιλέξτε λειαντικό τροχό με σκληρότερη σύνδεση
υλικού.
3. Αντικαταστήστε τον τροχό.
4. Επιδιορθώστε τον τροχό.
5. ΑΠΑΓΟΡΕΥΕΤΑΙ Η ΧΡΗΣΗ - ΚΙΝΔΥΝΟΣ !
Επιστρέψτε τον τροχό στο σημείο αγοράς.
O τροχός φράζει/στομώνει και στο τεμάχιο
κατεργασίας φαίνονται σημάδια καψίματος.
1. Ο τροχός είναι πολύ σκληρός.
2. Ο ρυθμός τροφοδοσίας είναι πολύ χαμηλός.
3. Κακή επιδιόρθωση τροχού.
4. Απαιτείται ψυκτικό.
1. Επιλέξτε τροχό λείανσης με μαλακότερη σύνδεση
υλικού.
2. Αυξήστε τον ρυθμό τροφοδοσίας του τεμαχίου
κατεργασίας στον λειαντικό τροχό.
3. Επιδιορθώστε τον τροχό.
4. Εισάγετε ψυκτικό.

15
WWW.NIKOLAOUTOOLS.GR WWW.NIKOLAOUTOOLS.GR
EL
ΑΠΟΡΡΙΨΗ ΣΤΟ ΠΕΡΙΒΑΛΛΟΝ
Προκειμένου να αποφευχθούν ζημιές κατά τη μεταφορά, το εργαλείο πρέπει να παραδίδεται σε στερεά συσκευασία. Η συσκευασία καθώς και η μονάδα
και τα εξαρτήματα είναι κατασκευασμένα απο ανακυκλώσιμα υλικά και μπορούν να απορριφθούν αναλόγως. Τα πλαστικά εξαρτήματα του εργαλείου
φέρουν σήμανση ανάλογα με το υλικό τους, γεγονός που καθιστά δυνατή την απομάκρυνση φιλικών προς το περιβάλλον και διαφοροποιημένων λόγω των
διαθέσιμων εγκαταστάσεων συλλογής.
Μόνο για χώρες της Ευρωπαϊκής Ένωσης
Μην πετάτε τα ηλεκτρικά εργαλεία μαζί με τα οικιακά απορρίμματα!
Σύμφωνα με την Ευρωπαϊκή Οδηγία 2002/96/ΕΚ για τα απόβλητα ηλεκτρικού και ηλεκτρονικού εξοπλισμού και την εφαρμογή της σύμφωνα
με την εθνική νομοθεσία, τα ηλεκτρικά εργαλεία που έχουν φτάσει στο τέλος της ζωής τους πρέπει να συλλέγονται χωριστά και να
επιστρέφονται σε μια περιβαλλοντικά συμβατή εγκατάσταση ανακύκλωσης.

16 WWW.NIKOLAOUTOOLS.GR WWW.NIKOLAOUTOOLS.GR
1Écran de sécurité pour les
yeux
Parabrezza di sicurezza
2Couverture de protecon Copertura di protezione
3 Garde Guardia
4Porte-oul/travail Appoggio per utensili
5Interrupteur ON/OFF Interruore ΟΝ/OFF
6 Roue Ruota
7 Brosse Spazzola
1
2
3
4
5
6
7
* Le fabricant se réserve le droit d'apporter des modicaons mineures à la concepon et aux spécicaons techniques des produits sans préavis, à moins que ces modicaons n'aectent de manière
signicave les performances et la sécurité des produits. Les pièces décrites / illustrées dans les pages du manuel que vous tenez entre vos mains peuvent également concerner d'autres modèles de la
gamme de produits du fabricant ayant des caractérisques similaires et peuvent ne pas être incluses dans le produit que vous venez d'acquérir.
* Pour garanr la sécurité et la abilité du produit et la validité de la garane, tous les travaux de réparaon, d'inspecon, de réparaon ou de remplacement, y compris l'entreen et les réglages spéciaux,
doivent être eectués uniquement par des techniciens du service après-vente agréé du fabricant.
* Ulisez toujours le produit avec l'équipement fourni. L'ulisaon du produit avec un équipement non fourni peut entraîner des dysfonconnements, voire des blessures graves ou la mort. Le fabricant
et l'importateur ne sont pas responsables des blessures et des dommages résultant de l'ulisaon d'un équipement non conforme.
* Il produttore si riserva il diritto di apportare modifiche minori al design e alle specifiche tecniche del prodotto senza preavviso, a meno che tali modifiche non influiscano significativamente sulle
prestazioni e sulla sicurezza dei prodotti. Le parti descritte/illustrate nelle pagine del manuale che avete tra le mani possono riguardare anche altri modelli della linea di prodotti del produttore con
caratteristiche simili e potrebbero non essere incluse nel prodotto appena acquistato.
* Per garantire la sicurezza e l'affidabilità del prodotto e la validità della garanzia, tutti gli interventi di riparazione, ispezione, riparazione o sostituzione, compresa la manutenzione e le regolazioni speciali,
devono essere eseguiti esclusivamente da tecnici del servizio di assistenza autorizzato dal produttore.
* Utilizzare sempre il prodotto con l'attrezzatura fornita. L'utilizzo del prodotto con apparecchiature non in dotazione può causare malfunzionamenti o addirittura lesioni gravi o morte. Il produttore e
l'importatore non sono responsabili per lesioni e danni derivanti dall'uso di apparecchiature non conformi.
8
Fig. D
a Axe Asse
b Bride Flangia
cEcrou Dado
d Vis Vite
eProtecon de roue Protezione ruota
FR - IT
DONNÉES TECHNIQUES - DATI TECNICI
Modèle - Μodello BDT1515
Μoteur - Motore Ιnducon - Ιnduzione
Puissance - Potenza 250 W S1 en continu/continuo - 350 W S6 10% intermittent/intermittent
Taille des roues - Dimensioni della ruota 150 x 20 x 12,7 (mm)
Tension - Τensione 230 Volt
Fréquence - Frequenza 50 Hz
Vitesse de rotaon - Velocità di rotazione 2980 RPM
Accessoires - Accessori Brosse/Spazzola

17
WWW.NIKOLAOUTOOLS.GR WWW.NIKOLAOUTOOLS.GR
A B
CD
D
EF

FR
4
WWW.NIKOLAOUTOOLS.GR
INSTRUCTIONS DE SÉCURITÉ
DANGER ! Le non-respect de l'une des instructions suivantes peut entraîner des blessures graves pour les utilisateurs de l'outil et les personnes présentes ou
des dommages à l'outil et aux biens !
AVERTISSEMENT - Lisez, comprenez et suivez toutes les instructions de ce manuel avant d'utiliser ou de faire fonctionner l'outil pour lequel il a été rédigé et
fourni. Assurez-vous que toute personne qui va utiliser l'outil a lu et compris les instructions fournies.
- Portez toujours une protection oculaire conforme à une norme reconnue (CSA ou ANSI).
- Portez un masque ou un respirateur lorsque des poussières sont générées.
- Maintenez les spectateurs hors de la zone de travail lorsque vous utilisez l'outil.
- AVERTISSEMENT ! Assurez-vous toujours que la zone de travail est exempte de matériaux, de liquides ou de gaz flammables, car l'utilisation de cet outil peut
créer des étincelles.
- Serrez les écrous de la meule, fixez les vis et tous les dispositifs de serrage et de protection.
- Lors de chaque démarrage, placez-vous d'un côté de la roue jumelée et activez-la en appuyant sur le bouton "ON". Laissez la roue jumelée tourner à plein
régime pendant environ une minute pour permettre à tout défaut ou fissure non détecté d'apparaître.
- Maintenez le(s) pare-chocs en place grâce à un bon fonctionnement.
- Gardez vos mains éloignées de la (des) meule(s).
- Ne touchez jamais l'arrière ou le dessous des meules.
- Débranchez l'outil de l'alimentation électrique avant tout réglage ou entretien. Les meules continuent de tourner après la mise hors tension de l'outil
off. Laissez toujours les meules s'arrêter complètement avant tout réglage ou entretien.
-Pour éviter tout choc électrique, n'utilisez pas l'outil dans des conditions humides et ne l'exposez pas à la pluie.
- Lorsque vous installez une nouvelle meule, vérifiez toujours que le régime maximal indiqué correspond ou dépasse celui indiqué sur la meuleuse. Vérifiez
également que la nouvelle meule ne présente pas de dommages tels que des imperfections ou des fissures. Si la meule semble être dans un état satisfaisant,
fitez-la sur la meuleuse.
- Lorsqu'une nouvelle meule a été fitted, tenez-vous d'un côté de l'outil et appuyez sur "ON". Laissez l'outil fonctionner à pleine vitesse pendant environ
une minute pour permettre à toute imperfection ou fissure non détectée d'apparaître.
- N'utilisez que les accessoires recommandés par le fabricant pour le modèle en question.
- N'essayez PAS de couper quoi que ce soit avec la meule.
-Les outils mis à la terre doivent être branchés dans une prise correctement installée et mise à la terre conformément à tous les codes et règlements locaux.
Ne retirez jamais la mise à la terre et ne la modifiez en aucune façon. N'utilisez pas de fiches d'adaptation (adaptateurs). En cas de doute sur la mise à la
terre correcte de la prise, consultez un électricien qualifié.
-Ne pas utiliser l'outil lorsque vous êtes fatigué ou sous l'influence de l'alcool ou de drogues.
-Ne portez pas de vêtements amples ni de bijoux. Gardez vos cheveux attachés.
-S'assurer que l'interrupteur d'alimentation est en position off avant de connecter l'outil.
- AVERTISSEMENT ! Remplacez immédiatement la ou les meules si elles sont fissurées.
- Ne serrez pas trop les écrous de l'arbre.
- L'entretien de ces outils ne doit être effectué que par un personnel technique autorisé et qualifié.
PRÉPARATION
Avant de commencer - Informations sur la sécurité
- Utilisez toujours une protection oculaire conforme à une norme reconnue (par exemple : ANSI Z87.1) - (CSA ou ANSI).
- Portez toujours un masque ou un respirateur lorsque de la poussière est générée.
- Maintenez les spectateurs hors de la zone de travail lorsque vous utilisez l'outil.
- AVERTISSEMENT ! Assurez-vous toujours que la zone de travail est exempte de matériaux, de liquides ou de gaz flammables, car l'utilisation de cet outil peut
créer des étincelles.
- Ne portez pas de vêtements amples ni de bijoux. Gardez vos cheveux attachés.
- AVERTISSEMENT ! Remplacez immédiatement la ou les meules qui sont fissurées. Ne serrez pas trop les écrous de l'arbre.
- Ne JAMAIS meuler avec le côté de la meule. Le meulage doit se faire uniquement avec la partie avant de la meule.
- Ne JAMAIS appliquer de pression sur la pièce lorsque la meule est froide. La meule doit être chauffée en appliquant progressivement la pièce à usiner.
- N'utilisez JAMAIS la meuleuse sans les protections de la meule. Gardez les pouces et les finges éloignés de la meule.
Avant de commencer - Protection contre l'électricité
En cas de dysfonctionnement ou de court-circuit, la mise à la terre fournit le chemin de moindre résistance pour l'électricité et réduit le risque de choc
électrique pour l'opérateur. Cet outil est équipé d'un cordon électrique comportant un conducteur de mise à la terre et une fiche de mise à la terre. La fiche
DOIT être branchée dans une prise correctement installée et mise à la terre conformément à TOUS les codes et règlements locaux.
NE MODIFIEZ PAS LA FICHE FOURNIE. Si elle ne fit pas dans la prise, installez la prise appropriée avec l'aide d'un électricien.
Une connexion incorrecte du conducteur de mise à la terre de l'équipement peut entraîner un risque accru de choc électrique. Le conducteur à isolation verte
(avec ou sans bandes jaunes) est le conducteur de mise à la terre de l'équipement. S'il est nécessaire de réparer ou de remplacer le cordon ou la fiche
électrique, NE PAS connecter le conducteur de mise à la terre de l'équipement à une borne conductrice de courant.
VÉRIFIEZ auprès d'un électricien qualifié ou du personnel de service si vous ne comprenez pas entièrement les instructions de mise à la terre, ou si vous
n'êtes pas sûr que l'équipement soit correctement mis à la terre.

FR
WWW.NIKOLAOUTOOLS.GR
5
UTILISATION D'UN CÂBLE D'EXTENSION
N'utilisez que des rallonges à 3 conducteurs avec des fiches à 3 broches et des prises à 3 fiches qui acceptent la fiche de l'outil. Réparez ou remplacez
immédiatement les câbles endommagés ou usés. Assurez-vous que la rallonge est correctement connectée et en bon état. N'utilisez pas de rallonges
endommagées. Remplacez toujours une rallonge endommagée. Lorsque vous utilisez une rallonge, assurez-vous qu'elle est sufficient de transporter le
courant que l'outil va tirer. Un câble sous-dimensionné provoquera une chute de tension dans la ligne, entraînant une perte de puissance et une surchauffe.
Avant de raccorder le moteur à la ligne électrique, assurez-vous que l'interrupteur est en position OFF et que le courant correspond à celui indiqué sur la
plaque signalétique du moteur. Le fonctionnement à une tension inférieure endommagera le moteur et n'est pas couvert par la garantie.
DÉBALLAGE
PRÉPARATION DE LA MEULEUSE D'ÉTABLI
Meuleuse d'établi fixing.
AVERTISSEMENT : n'utilisez pas la meuleuse d'établi si elle n'a pas été firstablement installée sur un établi approprié.
Placez la machine sur un établi ou un support d'outils stable et de niveau et assurez-vous qu'elle est correctement fixée. L'avant de la machine doit être
facilement accessible après avoir été fixé.L'alimentation électrique doit être située à une distance maximale de 100 à 150 cm du point de fixage de la
machine.
Montage de l'écran de protection en verre.
AVERTISSEMENT : n'utilisez jamais la meuleuse d'établi si le verre de protection n'a pas firsté installé.
1. Alignez la fente du bras du verre de protection avec la fente située dans la partie supérieure de la protection de la meuleuse de table et procédez à la fixation
à l'aide d'une vis et d'un écrou.
2. Veillez à ce que l'espace entre le bras du verre de protection et la roue ne soit pas supérieur à 2 mm (Fig. A, B).
Montage de la surface d'appui de la pièce à usiner.
La surface d'appui de la pièce doit être installée de telle sorte que l'écart entre la roue et la surface d'appui ne dépasse pas 2 mm.
1. Placez la surface de support de la pièce contre le rail de la protection des roues. Assurez-vous que la surface de support est "orientée" dans la bonne
direction. Le coin incurvé doit être "orienté" dans le sens opposé à la roue.
2. Faites passer la vis à travers la fente du rail et la surface de montage.
3. Placez la rainure et la rondelle sur l'extrémité de la vis de l'autre côté.
4. Fixez la vis à l'aide du bouton (Fig. C)
Installation de la roue gauche
AVERTISSEMENT : avant d'effectuer tout travail d'installation ou de remplacement des roues, assurez-vous que la machine est off et déconnectée de
l'alimentation électrique.
1. Retirez les vis de la protection de la roue, puis retirez-la.
2. Retirez l'écrou de l'essieu à l'aide d'une clé appropriée. L'écrou de l'essieu droit a un filetage dans le sens des aiguilles d'une montre, tandis que l'écrou de
l'essieu gauche a un filetage dans le sens inverse des aiguilles d'une montre.
3. Retirez le joint extérieur de l'arbre.
4. Placez la roue sur l'arbre et une fois en place, faites tourner la roue à la main pour confirmer que la roue se déplace librement et ne touche aucune
surface.
5. Réinstallez le joint, l'écrou et le pare-chocs.
6. Connectez la machine à l'alimentation électrique, mettez-la en marche et laissez la roue tourner à vide pendant une minute à la vitesse maximale pour
vous assurer qu'il n'y a pas de fissures. (Fig. D)
AVERTISSEMENT : avant de pouvoir desserrer/serrer l'écrou de l'arbre, maintenez l'arbre en place à l'aide d'une deuxième clé sur l'écrou de la brosse.
1. Déballez tout le contenu de l'emballage et placez-le sur une surface plane et stable.
2. Retirez tous les matériaux d'emballage et les dispositifs de transport (le cas échéant).
3. Assurez-vous que tout le contenu de l'emballage est complet et ne présente aucun dommage. Si un composant est manquant ou si un composant a été
endommagé pendant l'expédition, contactez votre revendeur local. L'utilisation d'un produit endommagé ou incomplet présente des risques de blessures
et de dommages matériels.
4. Assurez-vous d'avoir toutes les pièces et tous les outils nécessaires au montage et au fonctionnement. Cela inclut un équipement de protection
individuelle approprié.

FR
6
WWW.NIKOLAOUTOOLS.GR
Installation des brosses
AVERTISSEMENT : avant d'effectuer tout travail d'installation ou de remplacement des roues, assurez-vous que la machine est off et déconnectée de
l'alimentation électrique.
1. Insérez une clé appropriée dans l'écrou de la roue gauche pour maintenir l'arbre pivot en place, et avec une deuxième clé, desserrez et
retirez l'écrou de la brosse. Retirez le joint extérieur de l'arbre.
3. Placez la brosse sur l'arbre et une fois qu'elle est en place, faites tourner la brosse à la main pour confirmer que la brosse se déplace librement et qu'elle
n'est en contact avec aucune surface.
4. Réinstallez le joint et l'écrou.
5. Connectez la machine à l'alimentation électrique, mettez-la en marche et laissez la brosse tourner à vide pendant une minute à la vitesse maximale pour
vous assurer qu'elle est en bon état (Fig. E, Fig. F).
OPERATION
CONNEXION À L'ALIMENTATION ÉLECTRIQUE
AVERTISSEMENT : Vérifiez la tension. La tension de l'alimentation électrique doit correspondre aux exigences de tension de l'outil, telles qu'elles sont
indiquées sur l'étiquette signalétique de l'outil.
AVERTISSEMENT : Avant de connecter la machine à l'alimentation électrique, assurez-vous que l'interrupteur marche/arrêt est en position off.
Branchez la machine sur un réseau électrique de 230 V ~ 50 Hz correctement mis à la terre et dont la prise est compatible avec la fiche de la machine.
MISE EN MARCHE/ARRÊT
Avant de brancher la machine à l'alimentation électrique, faites tourner la roue et la brosse à la main pour vous assurer qu'elles tournent librement.
- Pour mettre la machine en marche, mettez l'interrupteur MARCHE/ARRÊT sur la position "I".
- Pour mettre la machine en marche off, mettez l'interrupteur marche/arrêt sur la position 'O'.
INSTRUCTIONS GÉNÉRALES
1. Avant chaque utilisation, vérifiez la roue et la brosse et assurez-vous qu'elles ne sont pas endommagées.
2. Après avoir mis la machine en marche, attendez qu'elle atteigne sa vitesse maximale avant de commencer votre travail.
3. Le verre de sécurité est réglable et doit être positionné de manière à offrir à l'opérateur un field de vision clair à travers celui-ci.
4. Maintenez la pièce contre la surface d'appui et faites-la avancer doucement et régulièrement dans la roue.
5. Un réglage correct des surfaces d'appui de la pièce permettra d'obtenir un angle de travail correct pour un meulage efficient. Comme le diamètre de la
meule est sujet à l'usure, vous devrez réajuster la position de la surface d'appui.
Fixez la roue jumelée sur une surface horizontale et stable avant de l'utiliser. En plaçant la roue jumelée vers l'extrémité avant de l'établi, il sera plus facile de
manipuler les outils longs.
Si possible, prévoyez un espace sufficient sur le côté gauche de la machine pour permettre un accès facile à la roue.
Une méthode alternative consiste à fixer la machine à une feuille de contreplaqué, qui pourrait ensuite être maintenue en place par des moyens appropriés
sur un banc ou une table pour donner à la roue jumelle la position la plus pratique ; avant d'utiliser la machine, assurez-vous que le verre de protection est
positionné aussi près que possible de la surface de la roue pour éviter les étincelles flying.
Il est judicieux d'utiliser des lunettes de sécurité lors de l'utilisation de la roue à banc double.
La machine peut être utilisée pour affûter des profiles ou pratiquement tout outil de coupe,
ciseaux, forets, etc. Il faut toutefois veiller à ne pas affûter un outil trop fort ou trop longtemps pour éviter toute surchauffe.
La pagina si sta caricando...
La pagina si sta caricando...
La pagina si sta caricando...
La pagina si sta caricando...
La pagina si sta caricando...
La pagina si sta caricando...
La pagina si sta caricando...
La pagina si sta caricando...
La pagina si sta caricando...
La pagina si sta caricando...
La pagina si sta caricando...
La pagina si sta caricando...
La pagina si sta caricando...
La pagina si sta caricando...
La pagina si sta caricando...
La pagina si sta caricando...
La pagina si sta caricando...
La pagina si sta caricando...
La pagina si sta caricando...
La pagina si sta caricando...
La pagina si sta caricando...
La pagina si sta caricando...
La pagina si sta caricando...
La pagina si sta caricando...
La pagina si sta caricando...
La pagina si sta caricando...
La pagina si sta caricando...
La pagina si sta caricando...
La pagina si sta caricando...
La pagina si sta caricando...
La pagina si sta caricando...
La pagina si sta caricando...
La pagina si sta caricando...
La pagina si sta caricando...
La pagina si sta caricando...
La pagina si sta caricando...
La pagina si sta caricando...
La pagina si sta caricando...
La pagina si sta caricando...
La pagina si sta caricando...
-
 1
1
-
 2
2
-
 3
3
-
 4
4
-
 5
5
-
 6
6
-
 7
7
-
 8
8
-
 9
9
-
 10
10
-
 11
11
-
 12
12
-
 13
13
-
 14
14
-
 15
15
-
 16
16
-
 17
17
-
 18
18
-
 19
19
-
 20
20
-
 21
21
-
 22
22
-
 23
23
-
 24
24
-
 25
25
-
 26
26
-
 27
27
-
 28
28
-
 29
29
-
 30
30
-
 31
31
-
 32
32
-
 33
33
-
 34
34
-
 35
35
-
 36
36
-
 37
37
-
 38
38
-
 39
39
-
 40
40
-
 41
41
-
 42
42
-
 43
43
-
 44
44
-
 45
45
-
 46
46
-
 47
47
-
 48
48
-
 49
49
-
 50
50
-
 51
51
-
 52
52
-
 53
53
-
 54
54
-
 55
55
-
 56
56
-
 57
57
-
 58
58
-
 59
59
-
 60
60


in altre lingue
- français: BorMann BDT1515 Manuel utilisateur
- română: BorMann BDT1515 Manual de utilizare
Documenti correlati
Altri documenti
-
BORMANN PRO BMF5000 Manuale utente
-
 BORMANN PRO BBP3500 Cordless Angle Grinder 20v Manuale utente
-
Makita 9565P Manuale utente
-
-
Makita MT902 Manuale del proprietario
-
Makita GA4034 Manuale utente
-
-
Dexter 800AG2-125.5 Manuale utente
-
Dolmar EC-2412 Manuale del proprietario
-
Makita 4112S Manuale del proprietario
