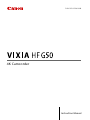
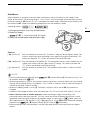
Canon VIXIA HF G50 Manuale utente
- Categoria
- Videocamere
- Tipo
- Manuale utente

PUB.DIE-0528-000B
4K Camcorder
Instruction Manual

2
COPYRIGHT WARNING
Unauthorized recording of copyrighted materials may infringe on the rights of copyright owners and be contrary to copyright
laws.
Trademark Acknowledgements
• SD, SDHC and SDXC Logos are trademarks of SD-3C, LLC.
• Microsoft and Windows are trademarks or registered trademarks of Microsoft Corporation in the United States and/or other countries.
• macOS is a trademark of Apple Inc., registered in the U.S. and other countries.
• HDMI, the HDMI logo and High-Definition Multimedia Interface are trademarks or registered trademarks of HDMI Licensing
Administrator, Inc. in the United States and other countries.
• Other names and products not mentioned above may be trademarks or registered trademarks of their respective companies.
• This device incorporates exFAT technology licensed from Microsoft.
• “Full HD 1080” refers to Canon camcorders compliant with high-definition video composed of 1,080 vertical pixels
(scanning lines).
• This product is licensed under AT&T patents for the MPEG-4 standard and may be used for encoding MPEG-4
compliant video and/or decoding MPEG-4 compliant video that was encoded only (1) for a personal and non-
commercial purpose or (2) by a video provider licensed under the AT&T patents to provide MPEG-4 compliant video. No license is
granted or implied for any other use for MPEG-4 standard.
• THIS PRODUCT IS LICENSED UNDER THE AVC PATENT PORTFOLIO LICENSE FOR THE PERSONAL USE OF A CONSUMER OR OTHER
USES IN WHICH IT DOES NOT RECEIVE REMUNERATION TO (i) ENCODE VIDEO IN COMPLIANCE WITH THE AVC STANDARD (“AVC
VIDEO”) AND/OR (ii) DECODE AVC VIDEO THAT WAS ENCODED BY A CONSUMER ENGAGED IN A PERSONAL ACTIVITY AND/OR WAS
OBTAINED FROM A VIDEO PROVIDER LICENSED TO PROVIDE AVC VIDEO. NO LICENSE IS GRANTED OR SHALL BE IMPLIED FOR ANY
OTHER USE. ADDITIONAL INFORMATION MAY BE OBTAINED FROM MPEG LA, L.L.C. SEE HTTP://WWW.MPEGLA.COM

3
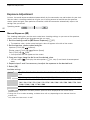
Highlights of the Camcorder
The Canon VIXIA HF G50 4K Camcorder is a high-performance camcorder whose compact size
makes it ideal in a variety of situations. The following are just some of the many functions featured in
the camcorder.
4K Recording
CMOS sensor and DIGIC DV 6 image
processor
The camcorder is equipped with a
1/2.3-inch CMOS sensor that captures video
at an effective pixel count of approximately
8.29 megapixels (3840x2160). The video is
then processed by the DIGIC DV 6 image
processor. In addition to recording 4K video,
the camcorder employs oversampling to
record Full HD video.
Wide zoom lens and 8-bladed aperture
The zoom lens is equipped with 20x optical
zoom and has a focal length at full wide angle
of 29.3 mm* (35 mm equivalent), making the
camcorder versatile in a variety of shooting
situations. The 8-bladed aperture delivers a
pleasing out-of-focus blur (“bokeh”) to your
recordings.
* When the resolution is 3840x2160 and the
image stabilization is a setting other than
Dynamic IS. The focal length is 30.6 mm
when using Dynamic IS.
4K recording at 29.97P and HD
recording at 59.94P
The camcorder can record clips in MP4 format
at 3840x2160 with a frame rate of 29.97P or
1920x1080 with a frame rate of 59.94P, giving
you the freedom to choose the video
configuration that is most suitable for your
project.
Convenience and Functionality
Recording for extended periods
With its two SD card slots, the camcorder
allows you to use dual recording (A 30) to
record the same clip on two SD cards, or relay
recording to automatically switch to the other
SD card when the one being used becomes
full. Dual recording is a convenient way to
create a backup of your recordings while relay
recording effectively extends the available
recording time.
Emphasis on versatility
This camcorder has features to make it usable
as a main camera but is also small enough to
be very portable. The advanced image
stabilization (A 60), which stabilizes the
image along 5 axes, will let you shoot in a
variety of situations in the field. The LCD touch
panel and viewfinder can be angled in a variety
of positions, allowing for shooting in tight
places, for example.
Manual controls at your fingertips
The focus/zoom ring helps you achieve the
focus you are looking for. You can easily
change the ring's functionality so that you can
operate the zoom. You can also assign certain
frequently used functions to a customizable
button and adjust those functions with the
accompanying dial (A 80). Additionally, the
camcorder also features 5 assignable buttons
on the camcorder and one onscreen
assignable touch button to which you can
assign a variety of functions to access them
with ease (A 81).
Face detection & tracking (A 58)
After detecting a subject's face, the camcorder
can focus on it and even track it. Furthermore,
the camcorder can be in manual focus but
switch to autofocus when a face is detected,
ensuring that important subjects are in focus.

4
Creativity and Artistic Expression
Special recording modes (A 36, 75)
When you make recordings, you can change
the recording frame rate to achieve a fast or
slow motion effect. Alternatively, you can use
pre-recording to record 3 seconds before you
decide to start recording, helping you capture
those hard-to-catch opportunities.
Looks (A 49)
You can adjust various aspects of the picture,
such as the color depth, sharpness and
brightness, to create a desired “look”.
Other Features
• Battery packs compatible with Intelligent
System give you an estimate (in minutes) of
the remaining recording time.
• Compatibility with the optional GP-E2 GPS
Receiver to geotag your recordings (A 78).
• Compatibility with the optional RC-V100
Remote Controller (A 77) when you need a
professional level of remote control.

5
1 Introduction 7
About this Manual 7
Conventions Used in this Manual 7
Supplied Accessories 9
Names of Parts 10
2 Preparations 14
Attaching the Ferrite Core 14
Charging the Battery Pack 14
Preparing the Camcorder 17
Using the Lens Hood 17
Adjusting the LCD Screen 18
Using the Viewfinder 19
Grip Belt and Straps 19
Basic Operation of the Camcorder 21
Turning the Camcorder On and Off 21
Setting the Camera Mode 22
Using the MENU Button and
Joystick 22
First Time Settings 23
Setting the Date and Time 23
Changing the Language 24
Changing the Time Zone 24
Using the Menus 25
Setup Menus 25
FUNC Menu 26
Using SD Cards 28
Compatible SD Cards 28
Inserting and Removing an SD Card 29
Initializing an SD Card 30
Selecting the SD Card for
Recordings 30
Dual Recording and Relay Recording 30
Recovering Clips 31
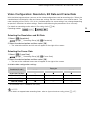
3 Recording 32
Recording Clips and Photos 32
Basic Recording 32
Reviewing the Latest Clip Recorded 34
Video Configuration: Resolution, Bit Rate
and Frame Rate 35
Selecting the Resolution and Bit
Rate 35
Selecting the Frame Rate 35
Slow & Fast Motion Recording 36
Shooting Modes 37
Special Scene Modes 38
Exposure Adjustment 40
Manual Exposure (n)40
Automatic Exposure 41
Touch Exposure 42
Exposure Lock (AE Lock) 43
Exposure Compensation 43
ND Filter 44
Using the Zebra Pattern 44
Backlight Correction 45
Automatic Gain Control (AGC) Limit 46
White Balance 47
Using Looks 49
Zooming 50
Using the Focus/Zoom Ring 50
Using the Zoom Rocker 51
Using the Touch Screen’s Zoom
Controls 52
Using an Optional Remote Controller 52
Soft Zoom Control 53
Digital Tele-Converter 53
Focus Adjustment 54
Manual Focus 54
Autofocus 57
Face Detection & Tracking 58
Image Stabilization 60
Dynamic IS or Standard IS 60
Setting the Time Code 61
Selecting the Time Code Mode 61
Selecting Drop Frame or Non-Drop
Frame 63
Setting the User Bit 64
Using the Mini Advanced Shoe 65
Recording Audio 66
Using an External Microphone 66
Audio Scenes 67
Audio Recording Level (Built-in
Microphone/MIC Terminal) 68
Microphone Attenuator (Built-in
Microphone or External
Microphone) 69
Low-Cut Filter (MIC Terminal) 69
Wind Screen (Built-in Microphone) 70
Microphone Directionality (Built-in
Microphone) 70
Table of contents

6
Audio Equalizer (Built-in Microphone) 71
Audio Limiter 71
Audio Compressor 72
Using Headphones 73
Color Bars/Audio Reference Signal 74
Recording Color Bars 74
Recording an Audio Reference
Signal 74
Pre-Recording 75
Onscreen Displays 76
Using the Optional RC-V100 Remote
Controller 77
Using the GP-E2 GPS Receiver 78
Connecting the GPS Receiver 78
4 Customization 80
CUSTOM Dial and Button 80
Assignable Buttons 81
Saving and Loading Menu Settings 83
Saving Camcorder Settings 83
Loading Camcorder Settings 83
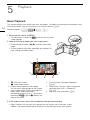
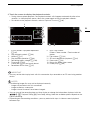
5 Playback 84
Basic Playback 84
Playback Controls 86
Adjusting the Volume 87
Displaying Clip Information 87
Clip and Photo Operations 88
Deleting Clips and Photos 88
Trimming Clips 89
6 External Connections 90
Video Output Configuration 90
Connecting to an External Monitor 92
Connection Diagram 92
Using the HDMI OUT Terminal 92
7 Saving Clips 94
Working with Clips on a Computer 94
Copying Clips and Photos Between SD
Cards 95
8 Additional Information 96
Menu Options 96
FUNC Menu 96
Setup Menus 97
Appendix: Onscreen Icons and
Displays 105
Troubleshooting 109
List of Messages 113
Safety Instructions and Handling
Precautions 115
Camcorder 116
Battery Pack 117
SD Card 117
Built-in Rechargeable Lithium
Battery 118
Disposal 118
Maintenance/Others 119
Cleaning 119
Condensation 119
Viewing the Certification Logo 119
Using the Camcorder Abroad 120
Optional Accessories 121
Specifications 124
Reference Tables 127
Approximate recording times 127
Charging, Recording and Playback
Times 127
Index 128

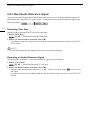
About this Manual
7
Introduction
About this Manual
Thank you for purchasing the Canon VIXIA HF G50. Please read this manual carefully before you use
the camcorder and retain it for future reference. Should your camcorder fail to operate correctly, refer
to
Troubleshooting
(A 109).
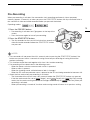
Conventions Used in this Manual
• IMPORTANT: Precautions related to the camcorder’s operation.
• NOTES: Additional topics that complement the basic operating procedures.
• A: Reference page number within this manual.
• The following terms are used in this manual:
“SD card” refers to an SD, SDHC or SDXC memory card.
“Screen” refers to the LCD screen and the viewfinder screen.
“Clip” refers to one movie unit from the point you press the START/STOP button to start recording
until you press again to pause the recording.
• The photos included in this manual are simulated pictures taken with a still camera.
• Some screenshots in this manual have been simplified to show only relevant icons.
IMPORTANT
• Observe the following precautions while the ACCESS indicator is on or flashing. Failing to do so
may result in permanent data loss or damage to the memory.
- Do not disconnect the power source or turn off the camcorder.
- Do not open the SD card compartment cover.
- Do not change the camcorder’s camera mode.
- Do not set the camcorder to MEDIA mode.
- When a USB cable is connected to the camcorder, do not disconnect the USB cable.
1
Introduction

About this Manual
8
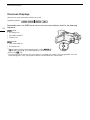
Brackets [ ] are used to
refer to onscreen buttons
and menu options you will
select and to other
onscreen messages and
displays.
These icons indicate the camcorder’s operating mode and whether a function is available in that
mode.
: Indicates whether the
camcorder is in shooting (CAMERA) or
playback (MEDIA) mode. In this example, the
function is available only in mode. For
details, refer to
Turning the Camcorder On
and Off
(A 21).
: Indicates the camera mode. For
details, refer to
Setting the Camera Mode
(A 22).
The > arrow is used to abbreviate menu
selections. For details on how to use the
menus, refer to
Using the Menus
(A 25).
For a summary of available menu options
and settings, refer to the appendix
Menu
Options
(A 96).

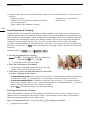
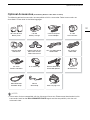
Supplied Accessories
9
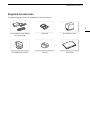
Supplied Accessories
The following accessories are supplied with the camcorder:
CA-570 Compact Power Adapter
(incl. power cord)
Ferrite core BP-820 Battery Pack
Lens hood with lens barrier Lens cap Quick Guide

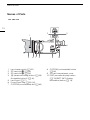
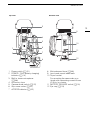
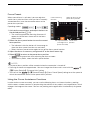
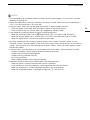
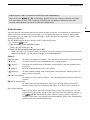
Names of Parts
10
Names of Parts
1 Lens barrier switch (A 32)
2SD card slot 2 (A 28)
3SD card slot 3 (A 28)
4 u (review recording) button (A 34)/
Assignable button 5 (A 81)
5 Lens hood (A 17)
6 Focus/Zoom ring (A 50, 54)
7 CUSTOM (customizable) dial (A 80)
8 CUSTOM (customizable) button
(A 80)
9 SD card compartment cover
10 DISP (onscreen display) button
(A 76)/BATT. INFO (battery
information) button (A 16)
4
108765
1
32
9
Left side view


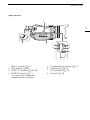
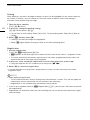
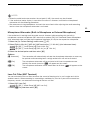
Names of Parts
12
1 Instant AF sensor (A 57, 119)
2 AF/MF button (A 54)/
Assignable button 1 (A 81)
3 PRE REC (pre-recording) button
(A 75)/
Assignable button 2 (A 81)
4 LCD touch screen (A 18)
5 Focus/Zoom ring switch (A 50, 54)
6Viewfinder (A 19)
7 Dioptric adjustment lever (A 19)
8 Joystick/SET button (A 22)
9 Strap mount (A 19)
10 Assignable button 3 (A 81)
11 Assignable button 4 (A 81)
12 Battery attachment unit (A 14)
13 START/STOP button (A 32)
14 MENU button (A 25)
15 Serial number
1
45
6
7
8
9
14
15
13121110
3
2
Front view
Back view

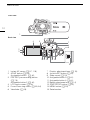
Names of Parts
13
1 Power switch (A 21)
2 POWER / CHG (battery charging)
indicator (A 14)
3 Built-in stereo microphone
(A 66)
4 Accessory shoe
5 Camera mode switch (A 22)
6 Grip zoom rocker (A 51)
7 ACCESS indicator (A 32)
8 Mini advanced shoe (A 65)
9 Lens hood mount index mark
10 Tripod socket
For mounting the camcorder on a
tripod with a mounting screw 6.5 mm
(0.26 in.) or shorter.
11 BATTERY RELEASE switch (A 15)
12 Eye cup (A 19)
3
4
5
6
7
8
1
2
9
10
11
12
Top view Bottom view

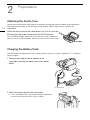
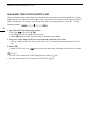
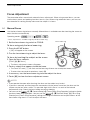
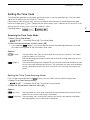
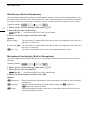
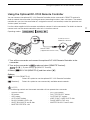
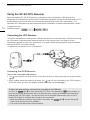
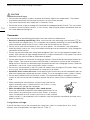
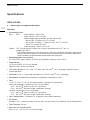
Attaching the Ferrite Core
14
Preparations
Attaching the Ferrite Core
Attach the enclosed ferrite core before you connect the compact power adapter to the camcorder.
Attaching the ferrite core to the compact power adapter cable is necessary to suppress RF
interference.
Attach the ferrite core to the cable about 6 cm (2.4 in.) from the
DC plug (the plug to be connected to the DC IN terminal).
Pass the cable through the center of the core and wrap it around the
core (as shown in the illustration), then close the unit until it clicks shut.
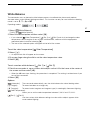
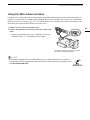
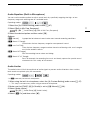
Charging the Battery Pack
The camcorder can be powered with a battery pack or directly using the supplied CA-570 Compact
Power Adapter.
1 Connect the compact power adapter to the
camcorder and plug the power cord into a power
outlet.
2 Attach the battery pack to the camcorder.
• Press the battery pack softly into the battery attachment
unit and slide it forward until it clicks in place.
DC IN terminal
2
Preparations

Charging the Battery Pack
15
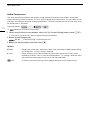
3 Charging will start when the camcorder is turned off.
• If the camcorder was on, the green POWER/CHG indicator
will go out when you turn off the camcorder. After a
moment, the POWER/CHG indicator will turn on in red
(battery pack charging). The red POWER/CHG indicator will
go out when the battery pack is fully charged.
• If the indicator flashes, refer to
Troubleshooting
(A 111).
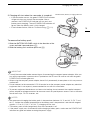
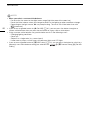
To remove the battery pack
1 Slide the BATTERY RELEASE switch in the direction of the
arrow and hold it pressed down (
햲).
2 Slide the battery pack and then pull it out (
햳).
IMPORTANT
• Turn off the camcorder before connecting or disconnecting the compact power adapter. After you
turn off the camcorder, important data is updated on the SD card. Be sure to wait until the green
POWER/CHG indicator goes out.
• When using the compact power adapter, do not fix it permanently to one place as this may cause a
malfunction.
• Do not connect to the camcorder’s DC IN terminal or to the compact power adapter any electrical
equipment that is not expressly recommended for use with this camcorder.
• To prevent equipment breakdowns and excessive heating, do not connect the supplied compact
power adapter to voltage converters for overseas travels or special power sources such as those on
aircraft and ships, DC-AC inverters, etc.
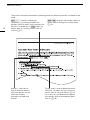
NOTES
• We recommend charging the battery pack in temperatures between 10 °C and 30 °C (50 °F and
86 °F). If either the ambient temperature or the battery pack’s temperature is outside the range of
approx. 0 °C to 40 °C (32 °F to 104 °F), charging will not start.
• The battery pack will be charged only when the camcorder is off.
• If the power supply was disconnected while charging a battery pack, make sure the POWER/CHG
indicator has gone out before restoring the power supply.
POWER/CHG (battery charging) indicator
BATTERY
RELEASE
switch

Charging the Battery Pack
16
• If remaining battery time is an issue, you can power the camcorder using the compact power
adapter so the battery pack will not be consumed.
• Charged battery packs continue to discharge naturally. Therefore, charge them on the day of use, or
the day before, to ensure a full charge.
• The first time you use a battery pack, fully charge it and then use the camcorder until the battery
pack is completely depleted. Doing so will ensure that the remaining recording time will be displayed
accurately.
• We recommend that you prepare battery packs to last 2 to 3 times longer than you think you might
need.
• For handling precautions regarding the battery pack, refer to
Safety Instructions and Handling
Precautions
(A 115).
• For charging times and approximate usage times, refer to
Reference Tables
(A 127).
Checking the Remaining Battery Charge
With the camcorder turned off, press the BATT. INFO button to display for about 5 seconds a screen
showing the approximate battery charge level. Note that if the battery charge is too low, the battery
information screen may not appear.

Preparing the Camcorder
17
Preparing the Camcorder
This section covers the basic preparations for the camcorder such as attaching the lens hood,
adjusting the grip belt and adjusting the viewfinder and LCD screen.
IMPORTANT
• Be careful not to drop the camcorder when attaching, removing or adjusting the various
accessories. Using a table or other stable surface is recommended.
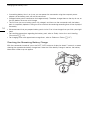
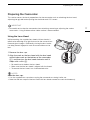
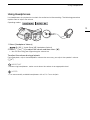
Using the Lens Hood
While recording, the supplied lens hood with lens barrier is
effective for reducing stray light that can be the cause of lens
flare and ghost images. Additionally, closing the lens barrier
can help prevent fingerprints and dirt accumulation on the
lens.
1 Remove the lens cap.
2 Align the mark on the lens hood with the lens hood
mount index mark on the bottom of the camcorder
(
햲), and then turn the lens hood clockwise until it
stops with a click
(햳).
• Be careful not to deform the lens hood.
• Make sure that the lens hood is aligned with the thread.
• To remove the lens hood, turn it counterclockwise.
NOTES
About the lens cap:
• Use the supplied lens cap when carrying the camcorder or storing it after use.
• Note that the lens cap and the lens hood with lens barrier cannot be used simultaneously.

Preparing the Camcorder
18
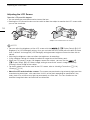
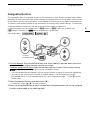
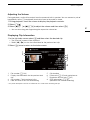
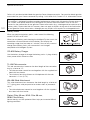
Adjusting the LCD Screen
Open the LCD panel 90 degrees.
• You can rotate the panel downward or toward the lens.
• Rotating the LCD toward the lens can be useful to allow the subject to monitor the LCD screen while
you use the viewfinder.
NOTES
• You can adjust the brightness of the LCD screen with the > [£ Display Setup] > [LCD
Brightness] or [LCD Backlight] setting. Also, you can hold the DISP button pressed down for more
than 2 seconds to change the [LCD Backlight] setting between bright and normal or from dim to
normal.
• Adjusting the brightness does not affect the brightness of recordings.
• Using a brighter setting will shorten the effective usage time of the battery pack.
• When the LCD panel is turned 180 degrees toward the subject, you can use the >
[£ Display Setup] > [LCD Mirror Image] setting to reverse the screen’s image horizontally,
showing a mirror image of the subject.
• For details about how to take care of the LCD screen, refer to
Handling Precautions
(A 116),
Cleaning
(A 119).
• About the LCD and viewfinder screens: The screens are produced using extremely high-precision
manufacturing techniques, with more than 99.99% of the pixels operating to specification. Very
rarely, pixels may misfire or may light up permanently as white dots. This has no effect on the
recorded image and does not constitute a malfunction.
Subject can monitor the LCD screen

Preparing the Camcorder
19
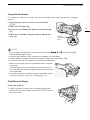
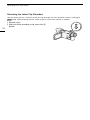
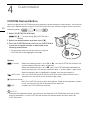
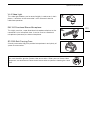
Using the Viewfinder
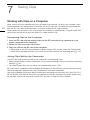
If it is difficult to use the LCD screen, you can use the viewfinder, which can be tilted 45 degrees
upward.
1 Use the power switch to turn on the camcorder.
(A 21).
2 Close the LCD panel (
햲).
3 Pull out the viewfinder and adjust the viewing angle
(
햳).
4 Adjust the viewfinder using the dioptric adjustment
lever (
햴).
NOTES
• You can adjust the brightness of the viewfinder with the > [£ Display Setup] >
[Viewfinder Backlight] setting.
• Adjusting the brightness does not affect the brightness of recordings.
• Using a brighter setting will shorten the effective usage time of the battery pack.
• You cannot use the LCD screen and viewfinder simultaneously.
• Make sure you keep the eye cup attached when using the
camcorder.
If you wear glasses, you may find the viewfinder easier to
use if you flip back the outer edge of the eye cup toward the
camcorder body.
• For details about how to take care of the viewfinder, refer to
Handling Precautions
(A 116),
Cleaning
(A 119).
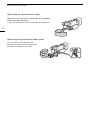
Grip Belt and Straps
Fasten the grip belt.
• Adjust the grip belt so that you can reach the grip zoom
rocker with your index finger, and the START/STOP button
with your thumb.
햲
햴
햳
햳
Dioptric
adjustment
lever

Preparing the Camcorder
20
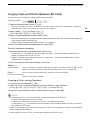
Attaching an optional wrist strap
Attach the wrist strap to the strap mount on the grip belt,
adjust the length and fasten.
• You can use both for extra convenience and protection.
Attaching an optional shoulder strap
Pass the ends of the shoulder strap
through the strap mount on the grip belt
and adjust the length of the strap.
La pagina si sta caricando...
La pagina si sta caricando...
La pagina si sta caricando...
La pagina si sta caricando...
La pagina si sta caricando...
La pagina si sta caricando...
La pagina si sta caricando...
La pagina si sta caricando...
La pagina si sta caricando...
La pagina si sta caricando...
La pagina si sta caricando...
La pagina si sta caricando...
La pagina si sta caricando...
La pagina si sta caricando...
La pagina si sta caricando...
La pagina si sta caricando...
La pagina si sta caricando...
La pagina si sta caricando...
La pagina si sta caricando...
La pagina si sta caricando...
La pagina si sta caricando...
La pagina si sta caricando...
La pagina si sta caricando...
La pagina si sta caricando...
La pagina si sta caricando...
La pagina si sta caricando...
La pagina si sta caricando...
La pagina si sta caricando...
La pagina si sta caricando...
La pagina si sta caricando...
La pagina si sta caricando...
La pagina si sta caricando...
La pagina si sta caricando...
La pagina si sta caricando...
La pagina si sta caricando...
La pagina si sta caricando...
La pagina si sta caricando...
La pagina si sta caricando...
La pagina si sta caricando...
La pagina si sta caricando...
La pagina si sta caricando...
La pagina si sta caricando...
La pagina si sta caricando...
La pagina si sta caricando...
La pagina si sta caricando...
La pagina si sta caricando...
La pagina si sta caricando...
La pagina si sta caricando...
La pagina si sta caricando...
La pagina si sta caricando...
La pagina si sta caricando...
La pagina si sta caricando...
La pagina si sta caricando...
La pagina si sta caricando...
La pagina si sta caricando...
La pagina si sta caricando...
La pagina si sta caricando...
La pagina si sta caricando...
La pagina si sta caricando...
La pagina si sta caricando...
La pagina si sta caricando...
La pagina si sta caricando...
La pagina si sta caricando...
La pagina si sta caricando...
La pagina si sta caricando...
La pagina si sta caricando...
La pagina si sta caricando...
La pagina si sta caricando...
La pagina si sta caricando...
La pagina si sta caricando...
La pagina si sta caricando...
La pagina si sta caricando...
La pagina si sta caricando...
La pagina si sta caricando...
La pagina si sta caricando...
La pagina si sta caricando...
La pagina si sta caricando...
La pagina si sta caricando...
La pagina si sta caricando...
La pagina si sta caricando...
La pagina si sta caricando...
La pagina si sta caricando...
La pagina si sta caricando...
La pagina si sta caricando...
La pagina si sta caricando...
La pagina si sta caricando...
La pagina si sta caricando...
La pagina si sta caricando...
La pagina si sta caricando...
La pagina si sta caricando...
La pagina si sta caricando...
La pagina si sta caricando...
La pagina si sta caricando...
La pagina si sta caricando...
La pagina si sta caricando...
La pagina si sta caricando...
La pagina si sta caricando...
La pagina si sta caricando...
La pagina si sta caricando...
La pagina si sta caricando...
La pagina si sta caricando...
La pagina si sta caricando...
La pagina si sta caricando...
La pagina si sta caricando...
La pagina si sta caricando...
La pagina si sta caricando...
La pagina si sta caricando...
La pagina si sta caricando...
La pagina si sta caricando...
La pagina si sta caricando...
La pagina si sta caricando...
La pagina si sta caricando...
-
 1
1
-
 2
2
-
 3
3
-
 4
4
-
 5
5
-
 6
6
-
 7
7
-
 8
8
-
 9
9
-
 10
10
-
 11
11
-
 12
12
-
 13
13
-
 14
14
-
 15
15
-
 16
16
-
 17
17
-
 18
18
-
 19
19
-
 20
20
-
 21
21
-
 22
22
-
 23
23
-
 24
24
-
 25
25
-
 26
26
-
 27
27
-
 28
28
-
 29
29
-
 30
30
-
 31
31
-
 32
32
-
 33
33
-
 34
34
-
 35
35
-
 36
36
-
 37
37
-
 38
38
-
 39
39
-
 40
40
-
 41
41
-
 42
42
-
 43
43
-
 44
44
-
 45
45
-
 46
46
-
 47
47
-
 48
48
-
 49
49
-
 50
50
-
 51
51
-
 52
52
-
 53
53
-
 54
54
-
 55
55
-
 56
56
-
 57
57
-
 58
58
-
 59
59
-
 60
60
-
 61
61
-
 62
62
-
 63
63
-
 64
64
-
 65
65
-
 66
66
-
 67
67
-
 68
68
-
 69
69
-
 70
70
-
 71
71
-
 72
72
-
 73
73
-
 74
74
-
 75
75
-
 76
76
-
 77
77
-
 78
78
-
 79
79
-
 80
80
-
 81
81
-
 82
82
-
 83
83
-
 84
84
-
 85
85
-
 86
86
-
 87
87
-
 88
88
-
 89
89
-
 90
90
-
 91
91
-
 92
92
-
 93
93
-
 94
94
-
 95
95
-
 96
96
-
 97
97
-
 98
98
-
 99
99
-
 100
100
-
 101
101
-
 102
102
-
 103
103
-
 104
104
-
 105
105
-
 106
106
-
 107
107
-
 108
108
-
 109
109
-
 110
110
-
 111
111
-
 112
112
-
 113
113
-
 114
114
-
 115
115
-
 116
116
-
 117
117
-
 118
118
-
 119
119
-
 120
120
-
 121
121
-
 122
122
-
 123
123
-
 124
124
-
 125
125
-
 126
126
-
 127
127
-
 128
128
-
 129
129
-
 130
130
-
 131
131
-
 132
132


Canon VIXIA HF G50 Manuale utente
- Categoria
- Videocamere
- Tipo
- Manuale utente
in altre lingue
- English: Canon VIXIA HF G50 User manual
Documenti correlati
-
Canon Vixia HF-G70 Manuale utente
-
Canon LEGRIA HF G60 Manuale utente
-
Canon LEGRIA HF G26 Manuale utente
-
-
Canon VIXIA HF G60 Manuale utente
-
-
-
Canon XC10 Guida Rapida
-
Canon XA40 Manuale utente
-