Français
Contenu de la boîte
Microphone
Filtre antibruit
Support pour microphone
Guide d'utilisation rapide
Consignes de sécurité et informations concernant la garantie
Configuration du micro
1. Veuillez suivre les instructions d’installation pour votre système d’exploitation dans la section
Configuration audio.
2. Utilisez le câble USB-A intégré afin de relier le port USB à votre appareil.
3. Branchez un casque d'écoute à la sortie casque de votre appareil.
4. Vérifiez que le filtre antibruit est bien installé. Placez le filtre antibruit près du microphone, mais
sans qu’il le touche. Orientez le microphone et le filtre antibruit à la position 10 h ou 14 h afin de
réduire les claquements.
Remarque : Pour retirer le filtre antibruit, poussez doucement la plaque nom dans le haut du filtre
afin de le faire sortir du cadre. Pour réinstaller le filtre, réinsérez-le à l’intérieur du cadre.
5. (Facultatif) Ajustez le commutateur pad de 0 dB à -10 dB afin de réduire le niveau de la sortie
microphone lorsque le niveau de la source d’enregistrement est très élevé.
Configuration audio
Pour définir le Umpire comme appareil d’enregistrement audio par défaut, veuillez suivre les instructions
pour votre appareil/système d’exploitation ci-dessous :
Windows
1. Utilisez le câble USB intégré pour relier le Umpire à votre ordinateur.
2. Dans la barre des tâches, recherchez l'icône de la commande de volume (haut-parleur). Faites
un clic droit sur l'icône du haut-parleur et sélectionnez Périphériques de lecture. Vous pouvez
également cliquer sur Démarrer > Panneau de configuration (ou Paramètres > Panneau de
configuration en Affichage classique) > Matériel et audio > Son.
3. Dans le panneau de configuration Son, sélectionnez l'onglet Lecture, puis sélectionnez la carte
son de l’ordinateur comme périphérique de lecture audio par défaut.
4. Cliquez sur l'onglet Enregistrement et sélectionnez Umpire USB Microphone comme appareil
par défaut.
5. Cliquez sur Propriétés dans le coin inférieur droit. À partir de la nouvelle fenêtre, cliquez sur
l'onglet Advancé et sélectionnez l'option 2 canaux, 24 bits, 48 0000 Hz (Qualité CD) comme le
format par défaut.
Remarque : Bien que l'interface audio du Umpire peut prendre en charge un signal audio 24 bits,
la sortie du microphone est de 16 bits.
6. Décochez les deux options sous Mode exclusif.
7. Cliquez OK pour fermer la fenêtre Propriétés et cliquez OK pour fermer le panneau de
configuration Son.
8. Lancez le logiciel que vous utilisez pour l’enregistrement audio, le podcasting ou les jeux vidéo.
9. Accédez aux paramètres du logiciel et sélectionnez Umpire USB Microphone comme entrée
audio.
macOS
1. Utilisez le câble USB inclus pour brancher le Umpire à votre ordinateur.
2. Allez à Applications > Utilitaires > Configuration audio et MIDI.
3. Dans la fenêtre Périphériques audio qui s'affiche, sélectionnez Umpire USB Microphone dans
la fenêtre de gauche.
4. Faite un clic droit sur Umpire USB Microphone et sélectionnez Utiliser ce périphérique pour
l'entrée audio.
5. Faite un clic droit sur Haut-parleurs internes (sortie intégrée) et sélectionnez Utiliser ce
périphérique pour la sortie audio.
6. Quitter le menu de Configuration audio et MIDI.
7. Lancez le logiciel que vous utilisez pour l’enregistrement audio, le podcasting ou les jeux vidéo.
8. Accédez aux paramètres du logiciel et sélectionnez Umpire USB Microphone comme entrée
audio.
Italiano
Contenuti della confezione
Microfono
Filtro anti schiocchi
Supporto per microfono
Guida rapida
Istruzioni di sicurezza e garanzia
Configurazione del microfono
1. Seguire le istruzioni di configurazione per il proprio sistema operativo nella sezione Audio Setup
(configurazione audio).
2. Servirsi del cavo USB-A integrato per collegare la porta USB al dispositivo.
3. Collegare le cuffie all’uscita cuffie del dispositivo.
4. Assicurarsi che il filtro anti schiocchi sia ben fissato. Posizionare il filtro anti schiocchi vicino ma non
a contatto con il microfono. Angolare il microfono e il filtro anti schiocchi a ore 10 o a ore 2 per ridurre
gli schiocchi.
Nota bene: per rimuovere il filtro anti schiocchi, premere delicatamente il badge in cima allo schermo
fino a quando non salta fuori dal telaio che lo fissa in posizione. Per fissare nuovamente lo schermo,
farlo scattare in posizione nel telaio.
5. (Opzionale) Regolare l’interruttore pad da 0 dB a -10 dB per ridurre l’uscita del microfono se si
registra una fonte forte.
Configurazione audio
Per impostare il Umpire come dispositivo di registrazione audio predefinito, seguire le indicazioni specifiche
per il proprio dispositivo/sistema operativo:
Windows
1. Servirsi del cavo USB integrato per collegare il Umpire al computer.
2. Nella Barra delle applicazioni, individuare l'icona "Speaker" di controllo del Volume. Fare clic col
tasto destro del mouse e selezionare Dispositivi di riproduzione. Cliccare sul menu Start > Pannello
di controllo (o Impostazioni > Pannello di controllo nella vista Classica) > Hardware e suoni >
Suoni.
3. Nel pannello di controllo Audio di Windows selezionare la scheda Riproduzione e selezionare la
scheda audio del computer come periferica predefinita.
4. Cliccare sulla scheda Registrazione e selezionare l'Umpire USB Microfono come periferica
predefinita.
5. Cliccare su Proprietà nell'angolo inferiore destro. Nella nuova finestra, cliccare sulla scheda
Avanzate e selezionare 2 canali, 24-bit, 48000 Hz (qualità da Studio) come formato predefinito.
Nota bene: sebbene l’interfaccia audio del Umpire supporti audio fino a 24 bit, l’uscita microfono è di
soli 16 bit.
6. Togliere il segno di spunta da entrambe le caselle in Modalità esclusiva.
7. Cliccare su OK per chiudere la finestra Proprietà e cliccare su OK per chiudere il pannello di controllo
Audio.
8. Aprire il proprio software di registrazione, podcast o di gioco preferito.
9. Recarsi alla pagina delle impostazioni del software e selezionare l'Umpire USB Microfono come
ingresso audio.
macOS
1. Servirsi del cavo USB in dotazione per collegare l'Umpire al computer.
2. Recarsi su Applicazioni > Utilità > Audio MIDI Setup.
3. Nella finestra Audio Devices (dispositivi audio), selezionare l'Umpire USB Microfono nella colonna
sinistra.
4. Fare clic col tasto destro su l'Umpire USB Microfono e selezionare Use this device for sound input
(utilizza questo dispositivo per ingresso audio).
5. Fare clic col tasto destro su Altoparlanti interni (uscita integrata) e selezionare Use this device for
sound output (utilizza questo dispositivo per uscita audio).
6. Lasciare Audio MIDI Setup.
7. Aprire il proprio software di registrazione, podcast o di gioco preferito.
8. Recarsi alla pagina delle impostazioni del software e selezionare l'Umpire USB Microfono come
ingresso audio.
Deutsch
Lieferumfang
Mikrofon
Poppfilter
Mikrofonständer
Schnellstart-Anleitung
Sicherheitshinweise und Garantieinformationen
Mikrofon-Setup
1. Befolgen Sie die Setup-Anweisungen für Ihr Betriebssystem im Abschnitt Audio-Setup.
2. Verwenden Sie das integrierte USB-A-Kabel, um den USB-Port mit Ihrem Gerät zu verbinden.
3. Schließen Sie Kopfhörer an den Kopfhörerausgang Ihres Geräts an.
4. Achten Sie darauf, dass der Pop-Filter gesichert ist. Positionieren Sie den Pop-Filter in der Nähe
des Mikrofons, aber so, dass er es nicht berührt. Richten Sie das Mikrofon und den Pop-Filter auf
die 10 Uhr- oder 2 Uhr-Position aus, um Knackgeräusche zu reduzieren.
Hinweis: Um den Pop-Filter zu entfernen, drücken Sie vorsichtig auf das Emblem am oberen Teil
des Filters, bis er aus dem fixierenden Rahmen springt. Um den Filter wieder anzubringen,
drücken Sie ihn einfach wieder in den Rahmen bis er einrastet.
5. (Optional) Stellen Sie den Pad-Schalter von 0 dB auf -10 dB, um die Mikrofonausgabe zu
reduzieren, falls eine laute Quelle aufgenommen wird.
Audio-Setup
Befolgen Sie diese Anweisungen für Ihr Gerät/Betriebssystem, um Umpire als Ihr Standard-
Audioaufnahmegerät einzustellen:
Windows
1. Verwenden Sie das integrierte USB-Kabel, um das Umpire mit Ihrem Computer zu verbinden.
2. Suchen Sie das Lautsprechersymbol für die Lautstärke in der Taskleiste. Klicken Sie mit der
rechten Maustaste auf den Lautsprecher und wählen Wiedergabegeräte. Klicken Sie auf
Startmenü > Systemsteuerung (oder Einstellungen > Systemsteuerung in der klassischen
Ansicht) > Hardware und Sound > Sound.
3. In der Windows-Systemsteuerung für Sound wählen Sie die Registerkarte Wiedergabe und
wählen Ihre Computer-Soundkarte als Standardgerät.
4. Klicken Sie auf die Registerkarte Aufnahme und wählen Sie Umpire USB Mikrofon als Standard-
Gerät aus.
5. Klicken Sie in der rechten unteren Ecke auf Eigenschaften. Klicken Sie im neuen Fenster auf die
Registerkarte Erweitert und wählen Sie 2-Kanal, 24 Bit, 48000 Hz (Studio-Qualität) als
Standardformat aus.
Hinweis: Obwohl die Audio-Schnittstelle von Umpire bis zu 24-Bit-Audio unterstützt, ist der
Ausgang des Mikrofons nur 16-Bit.
6. Deaktivieren Sie beide Kontrollkästchen unter Exklusivmodus.
7. Klicken Sie auf OK, um das Fenster Eigenschaften zu schließen und klicken Sie auf OK, um das
Fenster Sound zu schließen.
8. Öffnen Sie Ihre Lieblingsaufnahme-, Podcasting- oder Gaming-Software.
9. Gehen Sie zu den Einstellungen Ihrer Software und wählen Sie Umpire USB Mikrofon als Audio-
Eingang.
macOS
1. Schließen Sie Ihr Umpire mit dem mitgelieferten USB-Kabel an Ihren Computer an.
2. Wählen Sie Anwendungen > Dienstprogramme > Audio-MIDI-Setup.
3. Wählen Sie im Fenster Audiogeräte die Option Umpire USB Mikrofon in der linken Spalte aus.
4. Klicken Sie mit der rechten Maustaste auf Umpire USB Mikrofon, und wählen Sie Dieses Gerät
für Soundeingabe verwenden.
5. Klicken Sie mit der rechten Maustaste auf Interne Lautsprecher (integrierte Ausgabe), und
wählen Sie Dieses Gerät für Soundausgabe verwenden.
6. Schließen Sie das Fenster Audio-MIDI-Setup.
7. Öffnen Sie Ihre Lieblingsaufnahme-, Podcasting- oder Gaming-Software.
8. Gehen Sie zu den Einstellungen Ihrer Software und wählen Sie Umpire USB Mikrofon als Audio-
Eingang.
Technical Specifications
Pop Windscreen: Integrated removable/replaceable windscreen
Condenser Mic Capsule: 14 mm electret condenser
Polar Pattern: Cardioid
Frequency Response: 80 Hz – 15 kHz
Sensitivity: -34 dB (± 2 dB)
Equivalent Noise Level: < 12 dbA (A-weighted)
Sample Rate: 32 kHz / 44.1 kHz / 48 kHz @ 16-bit
Pad Switch: 0 dB / -10 dB
USB: USB-A connector / USB 2.0 connection
Operating Systems: Windows 7, 8, 10; macOS 10.10 or above
Dimensions (width x length x depth): 5.0” x 5.5” x 7.4” / 126.3 x 138.8 x 188.3 mm
Weight: 0.88 lbs. / 0.4 kg
Trademarks & Licenses
Marantz is a trademark of D&M Holdings Inc., registered in the U.S. and other countries. Marantz
Professional products are produced by inMusic Brands, Inc., Cumberland, RI 02864, USA.
Apple and macOS are trademarks or service marks of Apple Inc., registered in the U.S. and other countries.
Windows is a registered trademark of Microsoft Corporation in the United States and other countries.
All other product names, company names, trademarks, or trade names are those of their respective
owners.
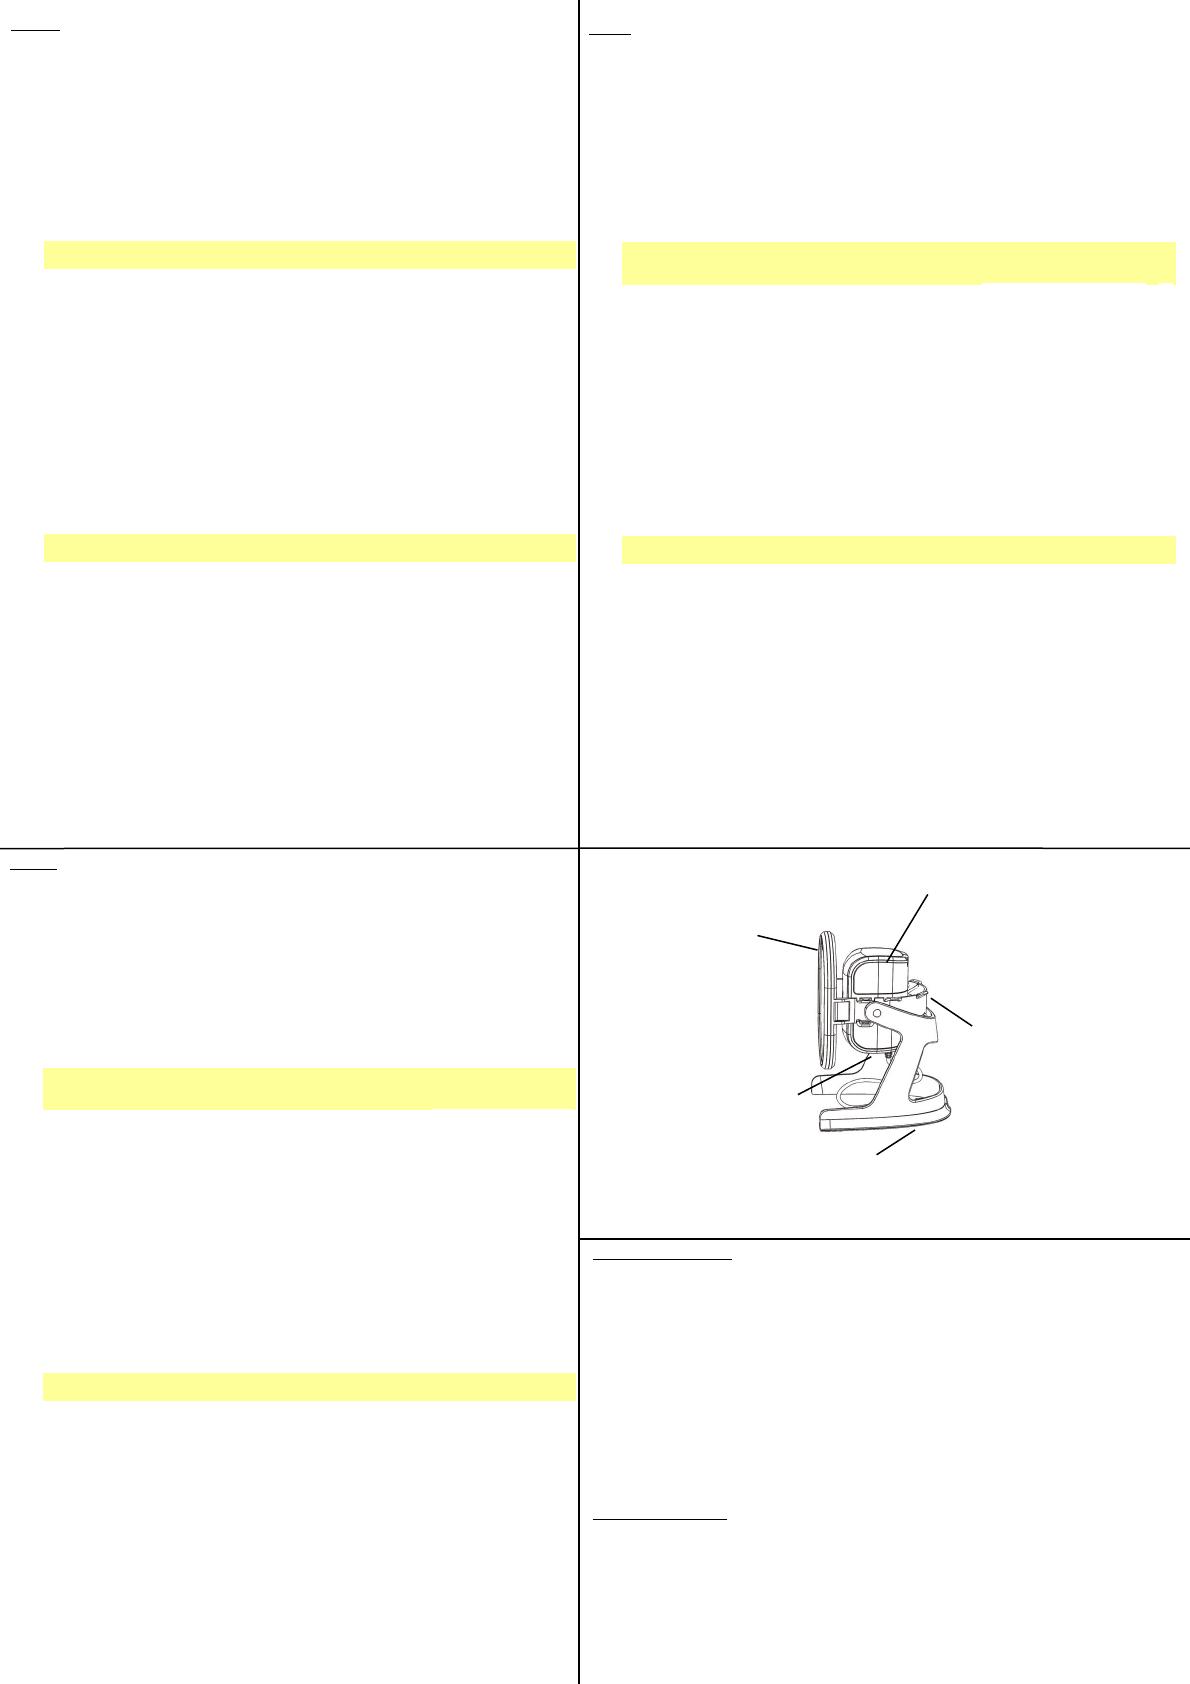
Diagram, Diagrama, Schéma, Diagramma, Diagramm
Pop Filter
Filtro anti-pop
Filtre antibruit
Filtro anti schiocchi
Poppfilter
Microphone
Micrófono
Microphone
Microfono
Mikrofon
Stand
Soporte
Support
Supporto
Ständer
Pad Switch
Montaje a prueba de golpes
Commutateur pad
Interruttore pad
Pad-Schalter
Shock Mount
Montaje a prueba de golpes
Suspension antichoc
Dispositivo di montaggio antiurto
Schwingungsdämpfer
Manual Version 1.4
