
CRONUS ATS
THERMAL SCOPE
50-640 | 50-400 | 35-400
QUICK START GUIDE
athlonoptics.com

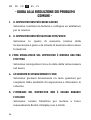
- CONTENTS -
CRONUS ATS Series Thermal Scopes
Quickstart Guide ...................................................................1-22
Wärmebild-Zielfernrohre der CRONUS ATS-Serie
Schnellstartanleitung ......................................................23-48
Lunettes thermiques série CRONUS ATS
Guide de démarrage rapide ............................................49-73
Ottici termici serie CRONUS ATS
Guida Rapida.......................................................................75-99
Visores térmicos de la serie CRONUS ATS
Guía de inicio rápido .....................................................101-126
Celowniki termowizyjne serii CRONUS ATS
Skrócona instrukcja obsługi .......................................127-153
EN
IT
ES
DE
FR
PL

1
EN DE FR IT ES PL
- IMPORTANT -
Welcome to the Athlon family and thank you for your
purchase. Please read this guide before use and keep it for
future reference.
This is a general guide for Cronus ATS family of thermal
scopes, which means that the specic model you receive
may differ from the picture in this guide.

2
EN DE FR IT ES PL
- FCC WARNING -
This equipment may generate or use radio frequency energy.
Changes or modications to this equipment may cause
harmful interference unless the modications are expressly
approved in the instruction manual. The user could lose
the authority to operate this equipment if an unauthorized
change or modication is made.
This device complies with part 15 of the FCC Rules. Operation
is subject to the following two conditions: (1) This device
may not cause harmful interference, and (2) this device must
accept any interference received, including interference that
may cause undesired operation.
The device has been evaluated to meet general RF exposure
requirement. The device can be used in portable exposure
condition without restriction.
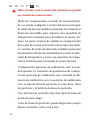
NOTE: This equipment has been tested and found to comply
with the limits for a Class B digital device, pursuant to part
15 of the FCC Rules. These limits are designed to provide
reasonable protection against harmful interference in a
residential installation. This equipment generates, uses
and can radiate radio frequency energy and, if not installed
and used in accordance with the instructions, may cause
harmful interference to radio communications. However,

3
EN DE FR IT ES PL
there is no guarantee that interference will not occur in a
particular installation. If this equipment does cause harmful
interference to radio or television reception, which can be
determined by turning the equipment off and on, the user is
encouraged to try to correct the interference by one or more
of the following measures:
• Reorient or relocate the receiving antenna.
• Increase the separation between the equipment and
receiver.
• Connect the equipment into an outlet on a circuit different
from that to which the receiver is connected.
• Consult the dealer or an experienced radio/TV technician
for help.
• The rating information is located at the bottom of the unit.

4
EN DE FR IT ES PL
- PRECAUTIONS -
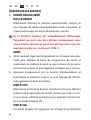
DANGER
1) Please charge the battery with the method described
in this guide and follow the charging procedure and
precautions. Improper battery charging will cause
heating, damage and even physical injury.
2) Do not try to open or disassemble the battery at any
time.
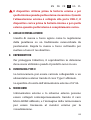
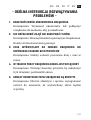
WARNING
1) This scope contains advanced electronics. To
prolong the life of this optic, avoid any undue
physical damage or violent actions;
2) Do not use or store the equipment in an environment
that exceeds the allowable operating or storage
temperature;
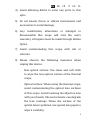
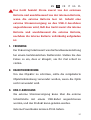
3) Do not directly aim the equipment at high-intensity
thermal radiation sources, such as the sun, lasers,
spot welding machines, etc.;

5
EN DE FR IT ES PL
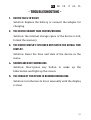
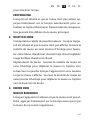
4) Avoid allowing debris to enter any ports in this
optic.
5) Do not knock, throw or vibrate instruments and
accessories to avoid damage;
6) Any modifcation, alterations or attempts to
dissassemble this scope will void the user's
warranty. All repairs must be made through Athlon
Optics.
7) Avoid contaminating this scope with oils or
solvents.
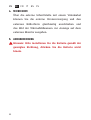
8) Please observe the following measures when
wiping this device:
· Non-optical surface: Use clean and soft cloth
to wipe the non-optical surface of the thermal
scope;
· Optical surface: When using the thermal scope,
avoid contaminating the optical lens surfaces
of this scope. Avoid touching the objective lens
with your hands. Oils and solvents, can degrade
the lens coatings. When the surface of the
optical lens is polluted, use special lens paper to
wipe it carefully;

6
EN DE FR IT ES PL
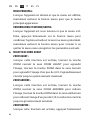
9) Do not place the battery in a high temperature or
near a high-temperature object;
10) Do not short circuit the positive and negative poles
of the battery;
11) Do not expose the battery to moisture or water;
12) Only use the original chargers and adapters
provided with this scope.

7
EN DE FR IT ES PL
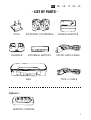
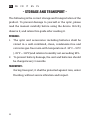
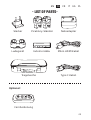
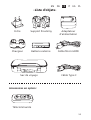
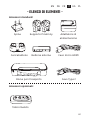
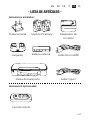
- LIST OF PARTS -
Options:
REMOTE CONTROL
PLUG
CHARGER
PICATINNY COMPATIBLE
MICRO HDMI CABLE
POWER ADAPTER
BAG TYPE-C CABLE
EXTERNAL BATTERY

8
EN DE FR IT ES PL
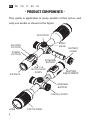
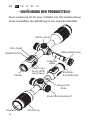
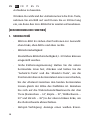
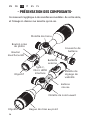
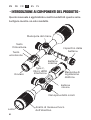
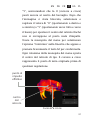
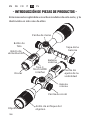
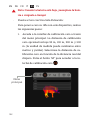
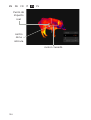
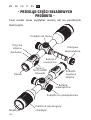
- PRODUCT COMPONENTS -
This guide is applicable to many models of this series, and
only one model is shown in the gure.
DIOPTER
ADJUSTMENT
USB-C &
MICRO HDMI
PORTS
DIGITAL ZOOM
MENU
KNOB
M BUTTON
SHUTTER
BUTTON
POWER
BUTTON
FOCUS RINGLENS
BATTERY
COVER
EXTERNAL
BATTERY
EYEPIECE
INTERNAL
BATTERY

9
EN DE FR IT ES PL
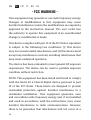
The device draws current from external battery rst and
then internal battery when external one runs out power.
When external power is connected to the USB-C port,
the device will charge internal battery rst, and then
external battery when internal one is fully charged.
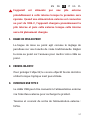
1. FOCUS RING
The focus ring acts like the parallax adjustment on a
traditional riescope. Adjust the focus ring to bring your
target into focus.
2. LENS COVER
To protect the lens, the supplied lens cover should be
used when the scope is not in use.
3. USB-C PORT
The external port with USB cable can be connected to the
external power supply to charge the product.
The output of the external power supply is 5V2A.
4. MICRO HDMI
A micro HDMI to HDMI cable can be connected to
the optic to provide a live feed to an external monitor
equipped with HDMI.
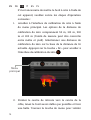
5. BATTERY COVER
NOTE: please insert the battery in the direction shown in
the gure, and do not push the battery forcibly.

10
EN DE FR IT ES PL
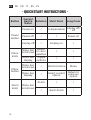
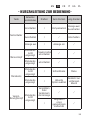
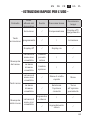
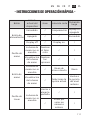
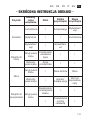
- QUICKSTART INSTRUCTIONS -
Button
Current
Device
Status
Rotation Short Press Long Press
Power
button
Power on / Compensation Display o/
o
Power o / / Power on
Display o / Display on /
Menu
knob
Menu bar
not shown
Switch
to color
palettes / /
Menu bar
display Toggle
options / /
Menu
button
Menu bar
not shown / Shortcut menu Menu
Menu bar
display / Select current
option
Return to
previous
option
Zoom
knob Menu bar
not shown
Zoom / /
/ Quick Zoom /

11
EN DE FR IT ES PL
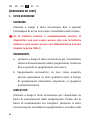
[BUTTON DESCRIPTION]
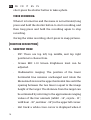
1. POWER BUTTON
POWER ON:
Long press and hold the power button until the startup
picture appears in the eyepiece.
If internal battery is completely discharged, the device
can not be turned on with external battery only, and
can be turned on with external power supply through
USB-C port.
POWER OFF:
a. Manual power-off: long press and hold the power
button, the power-off progress bar will be displayed,
and the power-off is completed after the progress bar
is nished.
b. Automatic power-off: In the set automatic power-off
time, without any button operation, the scope will
power down.
DISPLAY OFF:
Press and hold the power button, the progress bar of
power-off will be displayed. Before the progress bar is
nished, release the power-off button to cancel the power
off process and activate the Display off mode.
DISPLAY ON:
In Display off mode, press any button to wake the screen.

12
EN DE FR IT ES PL
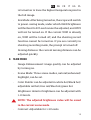
COMPENSATION:
When it is turned on and the menu is not activated, short-
press the power on/off button to refresh the thermal
sensor. Two Compensation modes can be set through the
Main Menu.
2. MENU KNOB
Quick color palette switching: when it is turned on
and the menu is not activated, turn the menu knob
counterclockwise to switch between white hot, black
hot, adjustable red hot, iron red, blue hot, and green hot
pseudo color in turn.
Menu movement: When the menu is activated, turn the
menu knob clockwise to move menu or option down/to
the left; Turn the knob counterclockwise to move menu
or option up/to the right.
3. MENU BUTTON ("M")
SHORTCUT MENU:
When it is powered on and the menu is not activated,
short-press the "M" button, and the shortcut menu option
will appear.
MAIN MENU:
Main menu option is activated by long-pressing the "M"
button.

13
EN DE FR IT ES PL
CONFIRM AND BACK/EXIT:
When it is powered on and the menu is activated, short-
press the "M" button to conrm the current selection
and return to the previous menu; Press and hold the "M"
button to return to or exit the menu without saving the
current settings.
4. DIGITAL ZOOM KNOB
ZOOM-IN:
When it is turned on, rotate the zoom knob in the ZOOM-
IN direction to enlarge the image, rotate the zoom knob
clockwise to enlarge the image in 0.1X steps, and zooming
stops when the maximum magnication is reached.
ZOOM-OUT:
When it is turned on, rotate the zoom knob in the ZOOM-
OUT direction to shrink the image, rotate the zoom knob
counterclockwise to shrink the image by 0.1X, and stop
when it reaches the minimum value.
QUICK ZOOM:
When it is turned on, the quick zoom can be obtained by
short-pressing the button on the zoom knob.
5. SHUTTER BUTTON
TAKE PHOTOS:
When it is turned on and the menu is not activated,

14
EN DE FR IT ES PL
short-press the shutter button to take a photo.
VIDEO RECORDING:
When it is turned on and the menu is not activated, long
press and hold the shutter button to start recording, and
then long press and hold the recording again to stop
recording.
During the video recording, short-press to snap pictures.
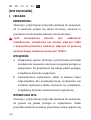
[FUNCTION DESCRIPTION]
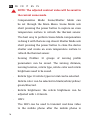
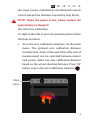
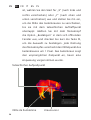
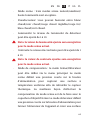
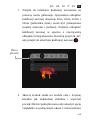
1. SHORTCUT MENU
· PIP: There are top left, top middle, and top right
positions to choose from.
· Screen BRI: 1-10 Screen Brightness level can be
adjusted.
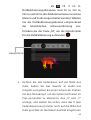
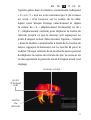
· Stadiametric ranging: The position of the lower
horizontal line remains unchanged and rotate the
Menu knob to move the upper horizontal line until the
spacing between the two lines is equal to the image
height of the target. The distance from the target can
be estimated by referring to the approximate ranging
values of the four animals (rabbit - 14", coyote - 21",
wild boar - 30", and deer - 36") in the upper left corner.
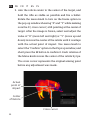
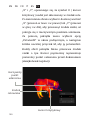
· Hot track: a white cross cursor is displayed when it

15
EN DE FR IT ES PL
is turned on to trace the highest temperature point in
the full image.
· Eco Mode: After being turned on, the scope will switch
to power-saving mode, under which OLED brightness
will be xed to 20% and cannot be adjusted, and WIFI
will not be turned on. If the current WIFI is already
on, WIFI will be turned off, and the shooting record
function cannot be turned on. If you are currently in
shooting recording mode, the prompt is turned off.
Zeroing distance: the current zeroing distance can be
adjusted quickly.
2. MAIN MENU
· Image Enhancement: image quality can be adjusted
by turning on.
· Scene Mode: Three scene modes, natural/enhanced/
highlight, can be set.
· Color Palette: can be adjusted in white hot/black hot/
adjustable red hot/iron red/blue hot/green hot.
Brightness: detector brightness can be adjusted with
1-10 levels.
NOTE: The adjusted brightness value will be saved
in the current scene mode.
· Contrast: Adjustable for 1-10 levels.

16
EN DE FR IT ES PL
NOTE: The adjusted contrast value will be saved in
the current scene mode.
· Compensation Mode: Scene/Shutter Mode can
be set through the Main Menu. Scene Mode sets
short pressing the power button to capture an even
temperature surface to refresh the thermal sensor.
The best way to perform Scene Mode compensation
is doing it with the lens cap closed. Shutter Mode sets
short pressing the power button to close the device
shutter and create an even temperature surface to
refresh the thermal sensor.
· Zeroing Proles: 10 groups of zeroing prole
parameters can be saved. The zeroing distance,
zeroing location, reticle type, reticle color and reticle
brightness need to be saved.
· Reticle type: 10 reticle types in total can be selected.
Reticle color: can be selected in black/white/yellow/
green/blue/red.
· Reticle brightness: the reticle brightness can be
adjusted with 1-10 levels.
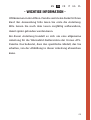
· WiFi:
The WiFi can be used to transmit real-time video
to the mobile phone after the mobile phone is

17
EN DE FR IT ES PL
connected to your device, and the device can be
operated through the Athlon Thermal APP to access
the photos/videos of the device; photos/videos can be
played, shared, deleted, etc.
NOTE: Search and download Athlon Thermal APP in
the mobile phone APP store, open the APP, nd the
WiFi name 'Cronus ATS XX-XXX' in the settings of
mobile phone WiFi, and enter the password '12345678',
to start remote operation after successful connection.
· Recording Mode: it can be selected in single shooting/
shooting record after being turned on.
· Watermark Settings: can be selected with Time Only/
Date Only/Time Date/Off when turned on.
· Auto Stand-by: the Auto Stand-by time can be set to
5/10/15 min. If there is no operation within the set
time, the scope will enter sleep mode.
· Automatic Power-off: The automatic Power-off time
can be set to 15/30/60 minutes. If there is no operation
within the set time, the power-off will be activated,
and the scope will be powered off.
· Charging indication light: Switch that turns On/Off
the charging port indication light.

18
EN DE FR IT ES PL
· Time Formats: selectable between 12H/24H.
· Date Formats: Optional from YYYY-MM-DD/MM-DD-
YYYY/DD-MM-YYYY.
· Time Setup: enter the Time Setup, rotate the Menu
knob to move among different options, and press
the "M" button to enter the next level adjustment,
ant then rotate the Menu knob to move between the
specic time values.
· Language Setting: Available in English/French/
German/Italian/Spanish
· Memory Formatting: Select Memory Card Formatting.
Select "Yes" to conrm formatting, and select "No" to
cancel the operation.
· Restore default: You can choose to restore the factory
settings. Select 'Yes' to restore all parameters to
factory settings; Select 'No' to cancel the operation.
· About: Check the current device in the APP version
number and MAC address.
NOTE: It shall be used together with optional
accessories.
· Remote control: After being turned on, it will search
for Bluetooth remote control connection. After
successful connection, all functions of the button on
La pagina si sta caricando...
La pagina si sta caricando...
La pagina si sta caricando...
La pagina si sta caricando...
La pagina si sta caricando...
La pagina si sta caricando...
La pagina si sta caricando...
La pagina si sta caricando...
La pagina si sta caricando...
La pagina si sta caricando...
La pagina si sta caricando...
La pagina si sta caricando...
La pagina si sta caricando...
La pagina si sta caricando...
La pagina si sta caricando...
La pagina si sta caricando...
La pagina si sta caricando...
La pagina si sta caricando...
La pagina si sta caricando...
La pagina si sta caricando...
La pagina si sta caricando...
La pagina si sta caricando...
La pagina si sta caricando...
La pagina si sta caricando...
La pagina si sta caricando...
La pagina si sta caricando...
La pagina si sta caricando...
La pagina si sta caricando...
La pagina si sta caricando...
La pagina si sta caricando...
La pagina si sta caricando...
La pagina si sta caricando...
La pagina si sta caricando...
La pagina si sta caricando...
La pagina si sta caricando...
La pagina si sta caricando...
La pagina si sta caricando...
La pagina si sta caricando...
La pagina si sta caricando...
La pagina si sta caricando...
La pagina si sta caricando...
La pagina si sta caricando...
La pagina si sta caricando...
La pagina si sta caricando...
La pagina si sta caricando...
La pagina si sta caricando...
La pagina si sta caricando...
La pagina si sta caricando...
La pagina si sta caricando...
La pagina si sta caricando...
La pagina si sta caricando...
La pagina si sta caricando...
La pagina si sta caricando...
La pagina si sta caricando...
La pagina si sta caricando...
La pagina si sta caricando...
La pagina si sta caricando...
La pagina si sta caricando...
La pagina si sta caricando...
La pagina si sta caricando...
La pagina si sta caricando...
La pagina si sta caricando...
La pagina si sta caricando...
La pagina si sta caricando...
La pagina si sta caricando...
La pagina si sta caricando...
La pagina si sta caricando...
La pagina si sta caricando...
La pagina si sta caricando...
La pagina si sta caricando...
La pagina si sta caricando...
La pagina si sta caricando...
La pagina si sta caricando...
La pagina si sta caricando...
La pagina si sta caricando...
La pagina si sta caricando...
La pagina si sta caricando...
La pagina si sta caricando...
La pagina si sta caricando...
La pagina si sta caricando...
La pagina si sta caricando...
La pagina si sta caricando...
La pagina si sta caricando...
La pagina si sta caricando...
La pagina si sta caricando...
La pagina si sta caricando...
La pagina si sta caricando...
La pagina si sta caricando...
La pagina si sta caricando...
La pagina si sta caricando...
La pagina si sta caricando...
La pagina si sta caricando...
La pagina si sta caricando...
La pagina si sta caricando...
La pagina si sta caricando...
La pagina si sta caricando...
La pagina si sta caricando...
La pagina si sta caricando...
La pagina si sta caricando...
La pagina si sta caricando...
La pagina si sta caricando...
La pagina si sta caricando...
La pagina si sta caricando...
La pagina si sta caricando...
La pagina si sta caricando...
La pagina si sta caricando...
La pagina si sta caricando...
La pagina si sta caricando...
La pagina si sta caricando...
La pagina si sta caricando...
La pagina si sta caricando...
La pagina si sta caricando...
La pagina si sta caricando...
La pagina si sta caricando...
La pagina si sta caricando...
La pagina si sta caricando...
La pagina si sta caricando...
La pagina si sta caricando...
La pagina si sta caricando...
La pagina si sta caricando...
La pagina si sta caricando...
La pagina si sta caricando...
La pagina si sta caricando...
La pagina si sta caricando...
La pagina si sta caricando...
La pagina si sta caricando...
La pagina si sta caricando...
La pagina si sta caricando...
La pagina si sta caricando...
La pagina si sta caricando...
La pagina si sta caricando...
La pagina si sta caricando...
La pagina si sta caricando...
La pagina si sta caricando...
La pagina si sta caricando...
La pagina si sta caricando...
-
 1
1
-
 2
2
-
 3
3
-
 4
4
-
 5
5
-
 6
6
-
 7
7
-
 8
8
-
 9
9
-
 10
10
-
 11
11
-
 12
12
-
 13
13
-
 14
14
-
 15
15
-
 16
16
-
 17
17
-
 18
18
-
 19
19
-
 20
20
-
 21
21
-
 22
22
-
 23
23
-
 24
24
-
 25
25
-
 26
26
-
 27
27
-
 28
28
-
 29
29
-
 30
30
-
 31
31
-
 32
32
-
 33
33
-
 34
34
-
 35
35
-
 36
36
-
 37
37
-
 38
38
-
 39
39
-
 40
40
-
 41
41
-
 42
42
-
 43
43
-
 44
44
-
 45
45
-
 46
46
-
 47
47
-
 48
48
-
 49
49
-
 50
50
-
 51
51
-
 52
52
-
 53
53
-
 54
54
-
 55
55
-
 56
56
-
 57
57
-
 58
58
-
 59
59
-
 60
60
-
 61
61
-
 62
62
-
 63
63
-
 64
64
-
 65
65
-
 66
66
-
 67
67
-
 68
68
-
 69
69
-
 70
70
-
 71
71
-
 72
72
-
 73
73
-
 74
74
-
 75
75
-
 76
76
-
 77
77
-
 78
78
-
 79
79
-
 80
80
-
 81
81
-
 82
82
-
 83
83
-
 84
84
-
 85
85
-
 86
86
-
 87
87
-
 88
88
-
 89
89
-
 90
90
-
 91
91
-
 92
92
-
 93
93
-
 94
94
-
 95
95
-
 96
96
-
 97
97
-
 98
98
-
 99
99
-
 100
100
-
 101
101
-
 102
102
-
 103
103
-
 104
104
-
 105
105
-
 106
106
-
 107
107
-
 108
108
-
 109
109
-
 110
110
-
 111
111
-
 112
112
-
 113
113
-
 114
114
-
 115
115
-
 116
116
-
 117
117
-
 118
118
-
 119
119
-
 120
120
-
 121
121
-
 122
122
-
 123
123
-
 124
124
-
 125
125
-
 126
126
-
 127
127
-
 128
128
-
 129
129
-
 130
130
-
 131
131
-
 132
132
-
 133
133
-
 134
134
-
 135
135
-
 136
136
-
 137
137
-
 138
138
-
 139
139
-
 140
140
-
 141
141
-
 142
142
-
 143
143
-
 144
144
-
 145
145
-
 146
146
-
 147
147
-
 148
148
-
 149
149
-
 150
150
-
 151
151
-
 152
152
-
 153
153
-
 154
154
-
 155
155
-
 156
156


in altre lingue
- English: Athlon 50-640 User guide
- français: Athlon 50-640 Mode d'emploi
- español: Athlon 50-640 Guía del usuario
- Deutsch: Athlon 50-640 Benutzerhandbuch
- polski: Athlon 50-640 instrukcja
Altri documenti
-
Pulsar Trail 2 LRF Manuale del proprietario
-
-
-
-
Yukon digital NV riflescopes Sentinel Manuale del proprietario
-
-
-
-