Pulsar Thermion Manuale del proprietario
- Tipo
- Manuale del proprietario

OPERATING INSTRUCTIONS
THERMION
Thermal Imaging
Riescopes
ENGLISH / FRANÇAIS / DEUTSCH / ESPAÑOL / ITALIANO / РУССКИЙ


ENGLISH
Technical Specications
SKU 76525 76526 76522 76523 76542 76543
MODEL XM38 XM50 XQ38 XQ50 XP38 XP50
MICROBOLOMETER
Type Uncooled
Resolution, pixels 320x240 384x288 640x480
Pixel size, microns 12 17
Frame refresh rate, Hz 50
OPTICAL SPECIFICATIONS
Lens, mm
F38
F/1.2
F50
F/1.2
F38
F/1.2
F50
F/1.2
F38
F/1.2
F50
F/1.2
Magnication ratio, x 4-16 5.5-22 2.5-10 3.5-14 1.5-12 2-16
Eye relief, mm 50
Field of view angle (horizontal), ° 5.8 4.4 9.8 7.5 16.3 12.4
Eyepiece focusing range, dioptres -3/+5
Detection distance*, m (y) 1700 (1860) 2300 (2515) 1350 (1475) 1800 (1970) 1350 (1475) 1800 (1970)
AIMING RETICLE
Click value (H/V), mm@100 m – when magnifying, x
10 – 4x
5 – 8х
2.5 – 16х
7 – 5.5х
3.5 – 11х
1.75 – 22х
17 – 2.5х
8.5 – 5х
4.25 – 10х
13 - 3.5х
6.5 – 7х
3.25 – 14х
28 – 1.5х
14 – 3х
7 – 6х
3.5 – 12х
21 – 2х
10.5 – 4х
5.25 – 8х
2.6 – 16х
Click range (H/V), mm@100 m 2000/2000 1400/1400 3400/3400 2600/2600 5600/5600 4200/4200
DISPLAY
Type AMOLED
Resolution, pixels 1024х768
OPERATING FEATURES
Diameter of the riescope body to assemble the mounting rings, mm 30
Battery Packs (built-in APS3 and removable APS2) operating time at temp. = 22 °C (Wi-Fi off), hrs 7
Operating voltage, V 3–4.2
Battery type / Capacity / Rated Output Voltage
Li-Ion Battery Pack АPS2 / 2000 mAh / DC 3.7 V (removable)**
APS3 / 3200 mAh / DC 3.7 V (built-in)
External power supply Micro USB type B (5 V)
Maximum recoil power on a ried weapon, Joules 6000
Maximum recoil power on a smooth-bore weapon, caliber 12
Degree of protection IP code (IEC60529) IPX7
Operating temperature, °C (°F) -25 – +50 (-13 – +122)
Dimensions with an eyecup (LxWxH), mm
(inch)
395 х 78 х 72
(15.55 x 3.07 x 2.83)
407 х 78 х 80
(16.02 x 3.07 x 3.15)
395 х 78 х 72
(15.55 x 3.07 x 2.83)
407 х 78 х 80
(16.02 x 3.07 x 3.15)
407 x 78 x 80
(16.02х3.07х3.15)
416 x 78 x 80
(16.38 х 3.07 х 3.15)
Weight (without removable battery), kg (oz) 0.75 (26.45) 0.9 (31.75) 0.75 (26.45) 0.9 (31.75) 0.75 (26.45) 0.9 (31.75)
VIDEO RECORDER
Photo/video resolution, pixels 1024x768
Video / photo format .mp4 / .jpg
Built-in memory 16 GB
Frequency 2.4 GHz
Standard 802.11 b/g
* Object of deer type
** APS3 Battery Pack can be used (sold separately)
Improvements may be made to the design of this product to enhance its user features.
The current version of the User’s Manual can be found on the website pulsar-vision.com
1

Description
thermal imaging riescopes are designed for use with hunting weapons both at night-time and
during the day in adverse weather conditions (fog, smog, rain) as well as having the obstacles (branches, tall
grass, dense bushes etc.) hindering the target detection. Unlike the riescopes based on electrical-to-optical
converters, thermal imaging riescopes do not require an external light source and are resistant to high-
illumination level.
Application areas of the riescopes are as follows: hunting, observation and orientation under conditions of
limited visibility.
Distinctive Features
•
High range detection
•
High-resolution image
•
Variable magnication
•
12 micron thermal imaging sensor (XM models)
•
Heavy caliber shock resistance: 12-gauge, 9.3x64, .375H&H
•
Mounting with standard 30 mm rings
•
Strong metal housing
•
Completely waterproof IPX7
•
Custom spot options
•
HD AMOLED color display
•
Photo and video recording
•
Picture in Picture Function
•
Color Modes
•
Stream Vision App Support
•
Advanced features (It is possible to update riescope software using free Stream Vision app
•
User-friendly control
•
B-Pack mini combined power system
•
Functional and ergonomic design
•
Wide operating temperature range (-25 °С...+50°С)
Useful Functions and Modes
•
User-friendly interface
•
Stadiametric rangender (estimate distance to object)
•
Built-in 3-axis accelerometer gyroscope (slope angle indication)
•
Four observation modes: Forest, Rocks, Identication and User
•
Three calibration modes: manual, semi-automatic and automatic
•
Smooth Digital Zoom
•
A large number of electronic spots
•
Scalable reticles (reticle graduation changes proportional to Zoom)
•
5 zeroing proles (10 distances per prole)
•
One-shot zero function
•
Precise “Zoom zeroing” (reducing the minute of angle click when zooming in)
•
“Freeze Zeroing” function
•
8 color modes
•
Defective sensor pixel removal function
•
“Display off” function
•
“Image Detail Boost” function (XP and XQ models only), which increases the sharpness and overall image detail.
•
Wi-Fi. Remote control and observation with a smartphone
Video recording
•
Built-in photo and video recorder with sound recording
•
16 GB internal memory
•
Integration with iOS and Android devices.
•
Youtube. Live video streaming and recording in the Internet via smartphone and using a free Stream Vision
application
Batteries
•
Built-in 3200 mAh Battery Pack APS3
•
Quick Change Li-Ion Battery Packs APS2/APS3
•
You can charge the built-in and external Battery Packs APS2 and APS3 via micro USB port
Components and Controls
1
2
4
3
5
7
8
6
12
11
9
10
Eyecup
Eyepiece dioptre
adjusting ring
Micro
USB cover
Micro USB
port
REC button
ZOOM button
ON button
Battery
com-
partment
cover
Battery Pack
APS2
Controller
Lens focus ring
Lens cover
2

Buttons Operation
Control
Condition / Operating
Mode
First short
press
Subsequent
short presses
Long press Rotation
ON button
Device is switched off
Switch
device on
Device
calibration
Switch device on –
Display is switched off
Switch
display on
Device
calibration
Switch device off –
Device is switched on,
quick menu, main menu
Device calibration
Switch display off/
Switch device off
–
ZOOM
button
Device is switched on,
quick menu, main menu
Zoom Switch PiP on/off –
REC button
Device is switched on,
quick menu, main menu,
video mode
Video
recording
start
Pause
Toggle between
video/photo mode
–
Device is switched on,
quick menu, main menu,
video recording activated
Pause
Video
recording
start
Stop video recording –
Device is switched on,
quick menu, main menu,
photo mode
Photography
Toggle between
video/photo mode
–
Controller
Device is switched on
Access quick
menu
– Access main menu –
Quick menu Navigation Exit quick menu
Parameter
change
Main menu
Conrm value, enter menu
items
Exit menu items,
main menu
Navigation
through menu
Zoom – –
Smooth
Zooming
Using Battery Pack
thermal imaging riescopes come with a built-in rechargeable lithium-ion APS3 Battery Pack with a
capacity of 3200 mAh and removable rechargeable lithium-ion APS2 Battery Pack with a capacity of 2000 mAh.
Battery should be charged before the rst use.
Charging:
•
Open the micro USB cover (9) by turning it counterclockwise.
•
Connect the micro USB plug of the USB cable (16) to the micro USB
port (10) in the body of the riescope.
•
Connect the second micro USB plug of the USB cable (16) to the
micro USB port on the mains adapter (17). Plug the device into a
100–240 V socket (18).
ATTENTION! When charging batteries via the micro USB port (10),
the built-in APS3 Battery Pack is the rst to be charged. When it
is completely charged, the removable APS2 Battery Pack starts
charging. When the device is in use, power consumption occurs in
reverse sequence.
The rechargeable lithium-ion APS2 Battery Pack can be recharged
using the APS charger*.
•
Insert the APS2* Battery Pack (8) along the rail into the APS charger
slot as far as it will go. The APS charger is supplied with your
device.
16
10
17
18
9
Mains adapter
USB cable
Micro USB port
Micro USB cover
Socket
•
Point A on the battery and point B on the charger should match.
•
Two batteries can be charged at the same time: the second slot is
designed for it.
•
Connect the micro USB plug of the USB cable (16) to the micro USB port
on the mains adapter (17). Plug the device into a 100–240 V socket (18).
•
Connect the second plug of the micro USB cable to the APS battery
charger port (14).
•
The LED indicator (15) will display battery charge status:
LED Indicator** Battery charge status
Battery level is from 0% to 10%.
Charger is not connected to the mains.
Battery level is from 0% to 10%.
Charger is connected to the mains.
Defective battery. It is forbidden to use the battery.
Battery level is from 10% to 20%.
Battery level is from 20% to 60%.
Battery level is from 60% to 95%.
The battery is completely charged and can be
disconnected from the charger.
*Supplied as part of package. APS3 Battery Pack is available (sold
separately).
** LED indicator displays the current battery charge status for 30 seconds
when the APS charger is not plugged in. When the power is being supplied,
the indicator is constantly displaying the current battery charge status, the LEDs are additionally ickering to
display the battery charging process.
Installation:
•
Turn the battery cover (7) counterclockwise and remove it.
•
Install the battery (8) into the battery compartment along the special guides in the device body designed for it.
•
When properly installed, the battery is xed in the battery compartment of the device.
•
Close the battery cover (7) by turning it clockwise.
Precautions:
•
When charging, always use the charger supplied with the scope of supply. The use of any other charger may
irreparably damage the battery or the charger.
•
After being stored for a long time, the battery should be partially charged: it
should not be completely charged or completely discharged.
•
Do not charge the battery immediately after bringing it from cold to warm. Wait
for 30-40 minutes so that the battery may warm up.
•
After being stored for a long time, the batteries should be partially charged: it
should not be completely charged or completely discharged.
•
Do not charge the battery immediately after bringing it from cold to warm. Wait
for 30-40 minutes so that the battery may warm up.
•
Do not leave the battery unattended while charging.
•
Do not use the charger if it has been modied or damaged.
•
The battery should be charged at an air temperature of 0 °C ... + 45 °C.
Otherwise, lifespan of the battery will decrease signicantly.
•
Do not leave the charger with the battery connected to the mains for more
than 24 hours after it has been completely charged.
•
Do not expose the battery to high temperatures and naked ame.
16
14
15
А
B
B
А
8
18 17
13
Battery Pack
Charger
Micro USB
port
USB
cable
Socket
LED indicator
Mains
adapter
8
7
Battery
compartment
cover
Battery
Pack APS2
3

•
Do not submerge the battery.
•
Do not connect external device with a current consumption that exceeds permitted levels.
•
The battery has a short-circuit protection. However, any situation that may cause short-circuiting should be
avoided.
•
Do not disassemble or deform the battery.
•
Do not drop or strike the battery.
•
When using the battery at low temperatures, the battery capacity decreases, this is normal and not a defect.
•
Do not use the battery at the temperatures above those shown in the Table – this may decrease battery’s life.
•
Keep the battery out of the reach of children.
Switching and changing the batteries:
Thermion devices are powered by 2 batteries: built-in Battery Pack APS3 and removable Battery Pack APS3/APS2.
•
If there are two batteries in the device, two battery icons are displayed in the status bar (1 - built-in battery,
2 - removable battery ). The battery from which the device is powered is displayed in blue, inactive - in gray.
•
If there is no removable battery in the device, only one blue icon of the internal battery is displayed in the
status bar.
•
When both batteries are fully charged, the device is powered by the removable battery. If there is low
removable battery level, the device will switch to the built-in battery.
•
When charging the batteries using the micro USB port (10), the built-in battery is charged rst. When the
built-in battery charge level reaches 100%, the device switches to charging the removable battery. The battery
level is displayed in percentage above the icons in the status bar.
•
It is possible to replace removable battery with device turned on when it is powered by built-in battery (the
device will continue to work properly).
Attention! When removing the removable battery from the device, if the device is powered by it, the device will
reboot and switch to operation from the built-in battery. When installing a removable battery with a sufcient
charge level, the device will automatically switch to it.
External Power Supply
External power can be supplied from an external source, such as a Power Bank (5 V).
•
Connect the external power supply to the micro USB port (10) of the riescope.
•
The riescope switches to external power source, while built-in Battery Pack APS3 and removable Battery
Pack APS2 (or APS3*) will gradually recharge.
•
A rechargeable battery icon indicating a percentage of the battery life will appear in the status bar.
•
When you turn off external power source, riescope switches over to the removable battery without turning
off. When there is no removable battery or low power level the device switches to the built-in battery.
Attention! Charging Power Bank APS2 / APS3 batteries at air temperatures below 0 °C can result in reduced
battery life. When using external power, connect Power Bank to the switched-on riescope, which have worked
for several minutes.
*Optional.
Operation
damage arising from failure to comply with the operating rules.
Mounting on the weapon:
To ensure accurate shooting the riescope should be properly mounted on the weapon.
•
The riescope is xed using the mount, which is purchased separately. Use only high-quality mounts and
rings that are designed especially for your weapon. Follow the mounting manufacturer's recommendations on
the installation procedure and use the proper tool.
•
When mounting the riescope, adjust the position on the weapon so that proper (comfortable) holding
of weapon ensures the distance between the riescope and eye (eye relief) specied by the Technical
. Failure to comply with this recommendation may result in injury to the shooter by the parts of
the riescope eyepiece when shooting.
•
It is recommended to install the riescope as low as possible, at the same time it should not be in contact
with barrel or receiver.
•
In order to avoid pinching the riescope body, a tightening torque for the screws of the mounting rings must
be not more than 2.5 Nm. A torque wrench is recommended to control the tightening torque.
•
Before using the riescope when hunting, follow instructions in the Zeroing section.
•
It is recommended to use an eyecup while using the riescope in the dark in order to avoid detection of
camouage. Mounting the eyecup on the riescope eyepiece is carried out using built-in magnets.
Powering On and Image Setting
•
Open the lens cover (12).
•
Press the ON (3) button briey to power the riescope on.
•
Adjust the sharp resolution of the symbols on the display by rotating the dioptre adjusting ring of the
eyepiece (2).
•
Rotate the lens focus ring (11) to focus on the object being observed.
•
Select the desired calibration mode in the main menu: Manual (M), Semi-automatic (SA) or Automatic (A).
•
Calibrate the image with a short press of the ON (3) button (if the SA or M calibration mode has been
selected). Close the lens cover (12) when calibrating manually.
•
Select the required operating mode (Forest, Rocks, , User) in the main menu. User mode allows
you to congure and save custom brightness and contrast settings.
•
Adjust the brightness and contrast of the display using the controller (6) (for more details, see the Quick
Access Menu Functions section).
•
Switch the device off with a long press of the ON (3) button.
Zeroing
The riescope features two zeroing methods: one shot zeroing and using the “Freeze” function. Zeroing is
recommended to be done at the temperature close to the riescope operating temperature.
•
Mount the weapon with the riescope installed on a
bench rest.
•
Set a target at a certain distance.
•
Adjust the riescope according to the Powering On and
Image Setting section.
•
Select the zeroing prole (see main
menu item)
•
Point a weapon at the center of the target and shoot.
•
If the impact point does not match the aiming point
(center of the riescope’s reticle), press and hold down
the controller button (6) to enter the main menu.
X=31.00
Y=26.00
Windage
4

•
Rotate the controller ring (6) to select the Zeroing submenu . To conrm the selection, briey press the
controller button (6).
•
Set the zeroing distance value (see Zeroing menu item =>Add New Distance submenu ).
•
Conrm the selected zeroing distance value by long pressing the controller button (6).
•
The Zeroing Parameters Settings additional menu will appear on the screen.
•
Cross hairs appear in the center of the display
. X and Y coordinates of the cross hairs are in the upper
right corner.
•
Rotate the controller ring (6) to select the icon . Press the controller button (6) briey.
•
Holding the reticle in the aiming point, move the cross hairs by rotating the controller ring (6) until the cross
hairs match the point of impact. To switch the direction, briey press the controller button (6).
Attention! Not to hold the reticle at the aiming point, you can use the Freeze function – freezing the zeroing
screen (refer to Zeroing menu item => Distance submenu => Zeroing Parameters Settings submenu => Freeze
submenu
).
•
Press the controller button (6) briey to switch the cross hairs movement direction from horizontal to vertical.
•
To save the new reticle position, press and hold the controller button (6). The reticle is aligned with the point
of impact and the submenu
exits.
•
Press and hold the controller button (6) again to exit the zeroing settings menu - the message “Zeroing
coordinates saved” appears, conrming the successful operation.
•
Fire a second shot - now the point of impact and the aiming point must be matched.
Smart Reticle Function
*
When changing the riescope digital magnication, the reticle that appears on the display is scaled; the
reticle appearance will change (enlarge or reduce) proportionally to the magnication. It allows the use of the
rangender reticles with any digital magnication.
*Only for scalable reticles X51Fi-300, M56Fi, M57Fi
Sensor Calibration
Calibration enables to equalize the microbolometer temperature and eliminate the image defects (such as
vertical bars, phantom images etc.).
There are three calibration modes: manual (M), semi-automatic (SA) and automatic (A).
Select the required mode in the Calibration Mode
item.
•
M mode (manual). Close the lens cover and press the ON (3) button briey. Open the cover after the
calibration is completed.
•
SA mode (semi-automatic). Press the ON (3) button briey to activate calibration. There is no need to close
the lens cover (internal shutter covers the sensor).
•
A Mode (automatic) The riescope is calibrated autonomously according to the software algorithm. There
is no need to close the lens cover (internal shutter covers the sensor). In this mode, the riescope may be
calibrated by the user with the ON (3) button.
Discrete Digital Zoom
The riescope functionality allows you to quickly increase the basic magnication (see line in
the table of ) by 2 and 4 times (8 times for XP models), as well as to return to the basic
magnication.
•
Press the ZOOM (5) button successively to change the magnication ratio of the riescope.
•
While the icon is visible on the screen, rotate the controller ring (6) for smooth digital zooming from the
current magnication.
Image Detail Boost*
The “Image Detail boost” function increases the sharpness of the contours of heated objects, which increases
their detail. The result of the function depends on the selected mode and observation conditions: the higher
the contrast of objects, the more noticeable the effect. This option is enabled by default, but can be disabled in
the main menu.
*XP and XQ models only
Quick Access Menu Functions
The basic settings (adjusting brightness and contrast, using the function of smooth digital zoom, a stadiametric
rangender, information on the current prole and distance) can be changed using the quick access menu.
•
Press the controller button (6) briey to enter the quick menu.
•
A short press of the controller button (6) enables you to switch between functions, as described below.
•
Brightness – rotate the controller ring (6) to change the display brightness value from 00 to 20.
•
Contrast – rotate the controller ring (6) to change the image contrast value from 00 to 20.
•
– information on the current prole and zeroing distance in this prole (e.g., prole A, zeroing
distance of 100 m). This information is always displayed in the status bar. Rotate the controller ring (6) to
switch between the zeroing distances in the selected prole. This function is available if there are two or
more distances in the prole.
•
– rotating the controller ring (6), change the distance between the special
mark points to determine the distance to the observed object (for more details on the rangender, see the
section).
•
Basic mode – it allows you to select one of the three modes as the basic one for the user mode.
•
Press and hold the controller button (6) to exit the menu or wait 10 seconds to exit automatically.
5

Main Menu Functions
•
Enter the main menu with a long press of the controller button (6).
•
To move through the main menu items, rotate the controller ring (6).
•
Main menu navigation is cyclical: as soon as the last menu item of the rst tab is reached, rst menu item of
the second tab starts.
•
Press the controller button (6) briey to open subitems of the main menu.
•
Press and hold the controller button (6) to exit from a subitem of the main menu.
•
Automatic exit from the main menu occurs after 10 seconds of inactivity.
•
Upon exit from the main menu the cursor location ( ) is stored only for a single working session (i.e. until
the riescope is turned off). Upon restarting the riescope and entering the menu the cursor will be on the
rst menu item.
General view of the menu:
On
On
10
A
Automatic
Tab 1 Tab 2
White hot
On
Microphone
Mode
MenuMenu
Main Menu Contents and Description
MENU ITEM SUBMENU
Mode The devices have three operating modes of the thermal imager: Forest (observation
mode of objects within low thermal contrast conditions), Rocks (observation mode
of objects within high thermal contrast conditions), (high detalization
mode), User (individual brightness and contrast settings).
Each mode has been created to provide the best image quality of a wild nature object
being observed within various observation conditions.
•
Press and hold the controller button (6) to enter the main menu.
•
Rotate the controller ring (6) to select the Mode menu item.
•
Press the controller button (6) briey to enter the Mode submenu.
•
Rotate the controller ring (6) to select one of the modes: Forest, Rocks, ,
User.
•
Press the controller button (6) briey to conrm the selection.
Forest
This is the best mode when searching and observing within eld
conditions, against the background of leaves, bushes and grass.
The mode is highly informative about an object being observed as
well as landscape details.
Rocks
This is the best mode when observing objects after a sunny day or
within urban conditions.
This is the best mode when observing objects within adverse weather
conditions (fog, mist, rain and snow). It allows you to recognize
the characteristics of an object being observed more clearly. Zoom
increase may be accompanied by insignicant image graininess.
User
It allows you to congure and save custom brightness and contrast
settings, as well as one of the three modes as basic.
Image Detail Boost Turn on/off Image Detail Boost:
•
Press and hold the controller button (6) to enter the main menu.
•
Rotate the controller ring (6) to select the Image Detail Boost menu item.
•
To turn Image Detail Boost off, briey press the controller button (6).
Off
•
To turn Image Detail Boost on, briey press the controller button (6).
On
This item of the main menu allows you to select one of ve proles (А, В, С, D, E) to use.
Each prole includes the following parameters:
1. A set of zeroed distances
2. Reticle color
3. Reticle type
Different proles can be used when using the riescope on different weapons or when
shooting with different bullets.
•
Press and hold the controller button (6) to enter the main menu.
•
Rotate the controller ring (6) to select the menu item.
•
Press the controller button (6) briey to enter the submenu.
•
Rotate the controller ring (6) to select one of the zeroing proles (marked with the
letters A, B, C, D, E).
•
Conrm your selection with a short press of the controller button (6).
•
The name of the selected prole appears in the status bar at the bottom of the
display.
6

MENU ITEM SUBMENU
Reticle Setup
This main menu item allows you to select the reticle shape, color and brightness.
•
Press and hold the controller button (6) to enter the main menu.
•
Rotate the controller ring (6) to select the Reticle Setup menu item.
•
Press the controller button (6) briey to enter the Reticle Setup submenu.
Reticle Type
Selection of the aiming reticle shape.
•
Rotate the controller ring (6) to select the Reticle Type submenu.
•
Press the controller button (6) briey to enter the Reticle Type submenu.
•
Rotate the controller ring (6) to select the desired aiming reticle shape from the list that appears. The reticle type changes as the cursor goes down the reticle list.
•
Press the controller button (6) briey to conrm the selection.
Reticle Color
Selection of reticle color.
•
Rotate the controller ring (6) to select the Reticle Color submenu.
•
Press the controller button (6) briey to enter the Reticle Color submenu.
•
Rotate the controller ring (6) to select one of the color options for the reticle:
- Black/Red - White/Ggreen - Yellow - Black/White
- White/Red - Red - Blue - White/Black
- Black/Green - Green - Orange
•
Press the controller button (6) briey to conrm the selection.
Reticle
Brightness
Adjust the brightness level of the aiming reticle.
•
Rotate the controller ring (6) to select the Reticle Brightness submenu.
•
Press the controller button (6) briey to enter the Reticle Brightness submenu.
•
Rotate the controller ring (6) to set the desired brightness level (1 to 10).
•
Press the controller button (6) briey to conrm the selection.
Icon Brightness
•
Press and hold the controller button (6) to enter the main menu.
•
Rotate the controller ring (6) to select the Icon Brightness menu item.
•
Press the controller button (6) briey to enter the Icon Brightness submenu.
•
Rotate the controller ring (6) to set the desired brightness level (1 to 10).
•
Press the controller button (6) briey to conrm the selection.
Wi-Fi activation
Turn on/off Wi-Fi
•
Press and hold the controller button (6) to enter the main menu.
•
Rotate the controller ring (6) to select the Wi-Fi activation menu item.
•
To turn Wi-Fi on, briey press the controller button (6).
On
•
To turn Wi-Fi off, briey press the controller button (6).
Off
Calibration Mode Calibration mode selection
There are three calibration modes: manual, semi-automatic and automatic.
The selected calibration mode is displayed in the status bar (see Status Bar section).
•
Press and hold the controller button (6) to enter the main menu.
•
Rotate the controller ring (6) to select the Calibration Mode menu item.
•
Press the controller button (6) briey to enter the Calibration Mode submenu.
•
Rotate the controller ring (6) to select one of the calibration modes described below.
•
Press the controller button (6) briey to conrm your selection.
Automatic
(A)
The software determines the need for calibration in automatic mode. The calibration process starts automatically.
Semi-automatic
(SA)
The user independently determines the need for calibration (according to the image being observed).
Manual
(M)
Manual calibration. Close the lens cover before starting calibration.
7

MENU ITEM SUBMENU
Zeroing Add New
Distance
To zero your riescope, you need to set a zeroing distance rst in the range of 1 to 910 m (955 yards).
•
Press and hold the controller button (6) to enter the main menu.
•
Rotate the controller ring to select a menu item and enter by briey pressing the controller button.
•
Press the controller button (6) briey to enter the Add New Distance submenu .
•
Rotate the controller ring to select a value for each digit. Press the controller button (6) briey to switch between digits.
•
Having set the desired distance, press and hold the controller button to save it.
The distance you set rst becomes a primary distance – shown with icon on the right to the distance value.
Note: Maximum number of zeroing distances is ten for each prole.
Distance
•
Press and hold the controller button (6) to enter the main menu.
•
Rotate the controller ring (6) to select the Zeroing menu item and enter by briey pressing the controller button (6) – the zeroed distances are displayed.
•
The values (e.g., +7.0) shown on the right of the distance values, stand for the number of clicks along the Y axis, at which the reticle position at other distances differs from the reticle
position in the primary distance.
Zeroing
Parameters
Settings
•
To zero at any distance again, rotate the controller ring (6) to select the required distance and briey press the controller button (6).
•
Rotate the controller ring (6) to select the Zeroing Parameters Settings and enter by briey pressing the controller button (6).
•
Zeroing screen, which allows the change of zeroing coordinates, will appear.
Windage/
Elevation
The Windage/Elevation additional menu item allows you to adjust the reticle position. For a detailed description of the reticle adjusting, refer to the Zeroing
section
allows you to magnify a digital zoom of the riescope when zeroing, which reduces the minute of angle click. It improves the zeroing accuracy.
•
Rotate the controller ring (6) to select the submenu item and enter by briey pressing the controller button.
•
Rotate the controller ring (6) to select a digital magnication value of the riescope (e.g., x4).
•
Press the controller button (6) briey to conrm your selection.
The minute of angle click when using the function is indicated in the Table of .
Freeze
The feature of the function is that there is no need to constantly keep the riescope at the point of aiming.
•
Rotate the controller ring (6) to move the cursor to the Freeze function.
•
Align the reticle with the point of aiming and press the controller (6) or ON (3) button. A screenshot will be taken, an icon will appear.
•
Go to the additional Windage/Elevation submenu and adjust the position of the reticle (see the Zeroing section).
•
Select the Freeze submenu item again and briey press the controller (6) or ON (3) button - the image will “unfreeze”.
Name Distance
•
Rotate the controller ring (6) to select the Name Distance submenu item and enter it by briey pressing the controller button.
•
Rotate the controller ring (6) to select a value for each digit. Press the controller button (6) briey to switch between digits.
•
Press and hold the controller button (6) to conrm the selection.
Change
Primary
Distance
•
Select a non-primary distance and enter the submenu for operating the distance with a brief press of the controller button (6).
•
Select Change Primary Distance item .
•
Press the controller button (6) briey.
•
Icon next to the selected distance conrms the change of primary distance.
The differences of other distances from a new standard distance are recalculated as per clicks.
Delete
Distance
•
Select the distance you wish to delete and enter the submenu for operating the distances with a brief press of the controller button (6).
•
Select Delete Distance item.
•
Select “Yes” in the appeared dialog box to delete a distance. “No” – to cancel deletion.
Attention! If the primary distance is deleted, the rst distance on the list automatically becomes the new primary distance.
Microphone
Turning on/off Microphone
This item allows you to enable (or disable) the microphone for recording sound during video recording.
•
Press and hold the controller button (6) to enter the main menu.
•
Rotate the controller ring (6) to select the Microphone menu item.
•
To turn on the microphone, briey press the controller button (6).
On
•
To turn off the microphone, briey press the controller button (6).
Off
8

MENU ITEM SUBMENU
Color Modes Color mode selection. White hot is a default display mode for an observed image. The Color Modes menu item allows you to select an alternative palette:
•
Press and hold the controller button (6) to enter the main menu.
•
Select the Color Modes menu item.
•
Press the controller button (6) briey to enter the Color Modes submenu.
•
Rotate the controller ring (6) to select one of the palettes described below.
- White hot – a black and white palette (the black color corresponds to cold temperature, the white color – hot temperature).
- Black hot – a black and white palette (the white color corresponds to cold temperature, the black color – hot temperature).
- Red hot
- Red monochrome
- Rainbow
- Ultramarine
- Violet
- Sepia
•
Press the controller button (6) briey to conrm your selection.
Attention! The device does not measure the temperature of objects being observed. The image is formed based on the temperature differences of the objects.
General Settings
This menu item allows you to congure the following settings:
Language
Language selection
•
Press the controller button (6) briey to enter the Language submenu .
•
Rotate the controller ring (6) to select one of the available interface languages: English, German, Spanish, French, Italian or Russian.
•
Conrm your selection with a short press of the controller button (6).
•
Press and hold the controller button (6) to save your selection and exit from the submenu.
Date Date Setting
•
Press the controller button (6) briey to enter the Date submenu . The date is displayed in dd/mm/yyyy format.
•
Rotate the controller ring (6) to select the desired year, month and date. Press the controller button (6) briey to switch between digits.
•
Press and hold the controller button (6) to save your selected date and exit from the submenu.
Time
Time Setting
•
Press the controller button (6) briey to enter the Time submenu .
•
Rotate the controller ring (6) to select the time format - 24 or AM/PM.
•
Press the controller button (6) to proceed to the hour setting.
•
Rotate the controller ring (6) to select the hour value.
•
Press the controller button (6) to proceed to the minute setting.
•
Rotate the controller ring (6) to select the minutes value.
•
Press and hold the controller button (6) to save your selected time and exit from the submenu.
Units of
Measure
Units of measurement selection
•
Press the controller button (6) briey to enter the Units of measure submenu .
•
Rotate the controller ring (6) to select the unit of measurement - meters or yards, press the controller button (6).
•
Return to submenu will happen automatically.
Default Settings
Restore default settings.
•
Press the controller button (6) briey to enter the Default Settings submenu with a short press of the controller button (6).
•
Rotate the controller ring (6) to select “Yes” to restore default settings or “No” to cancel the action.
•
Conrm your selection with a short press of the controller button (6).
•
If “Yes” is selected, display will show “Do you want to restore default settings?” and “Yes” and “No” options. Select “Yes” to restore default settings.
•
If “No” optionis selected: the action will be aborted and you will return to the submenu.
The following settings will be returned to their defaults:
•
Operating Mode – Video
•
Mode – Forest
•
Calibration Mode – automatic
•
Interface Language – English
•
Wi-Fi – off (default password)
•
Magnication – initial value
•
PiP – off
•
Color Mode – White hot
•
Units of Measurement – metric
•
Side Incline – Off
•
Weapon Prole – A
•
Reticle selection from the
riescope’s memory – 1
Attention! After restoring default settings, the date, time and user pixel map as well as the zeroing proles data entered by the user are saved.
9

MENU ITEM SUBMENU
General Settings Format Format. This function enables formatting the memory card (delete all les).
•
Press the controller button (6) briey to enter the Format submenu .
•
Rotate the controller ring (6) to select “Yes” to format the memory card, or “No” to return to the submenu.
•
Conrm your selection by pressing the controller button (6). If the “Yes” option has been selected, the Do you want to format memory? message and “Yes” and “No” options will appear on
the display. Select “Yes” to format the memory card.
•
The Memory is formatting message means that formatting is in progress.
•
The Memory format complete message means that formatting is completed.
•
If “No” option is selected: formatting is cancelled and return to the submenu.
Wi-Fi Settings
This item enables you to set up your riescope for operation in a Wi-Fi network.
Password Setup
This item enables you to set a password to access the riescope from an external device. The password is used to connect an external device (i.e. smartphone) to the riescope.
Press the controller button (6) to enter the Password Setup submenu.
•
The default password (12345678) will appear on the screen.
•
Rotate the controller ring (6) to set the desired password. Press the controller button (6) to toggle through the digits.
•
Press and hold the controller button (6) to save the password and exit from the submenu.
Access Level
Setup
This sub-function enables you to congure the appropriate level of access to your device made available to the Stream Vision application.
Owner level. A Stream Vision user has full access to all the device’s functions.
Guest level. A Stream Vision user can only view video footage from the device in real time.
•
Press and hold the controller button (6) to enter the main menu.
•
Press the controller button (6) briey to enter the submenu.
•
Rotate the controller ring (6) to select the access level.
•
Press and hold the controller button (6) to conrm your selection and exit from the submenu.
Accelerometer
This menu item includes two subitems - Auto Shutdown and Side Incline.
Auto Shutdown
This item allows you to activate auto shutdown function for riescope in a non-operating position (tilt up or down at an angle of more than 70°, right or left - at an angle of more than 30°).
In this event, the controls (buttons, controller) are disabled.
•
Press and hold the controller button (6) to enter the main menu.
•
Rotate the controller ring (6) to select the Accelerometer submenu, conrm the selection by briey pressing the controller (6).
•
Rotate the controller ring (6) to select Auto Shutdown.
•
Press the controller button (6) briey to enter the submenu.
•
Rotate the controller ring (6) to select the time period (1 min, 3 min, 5 min) upon expiry of which the riescope will automatically shut down, or select Switch off if you wish to deactivate
Auto Shutdown.
•
Conrm your selection with a short press of the controller button (6).
Note: If the automatic shutdown function is activated, the status bar shows an icon and shutdown time period as 1 min.
Side Incline
This item allows you to turn on/off the indication of horizontal (side) incline of the weapon. Side incline is indicated by “sector” arrows to the right and left of the reticle. Arrows show the
direction in which you should move your rie to eliminate incline.
There are three modes of incline:
- 5°-10 ° – one sector arrow;
- 10°-20 ° - two sector arrow;
- > 20° - three sector arrow.
A side incline of less than 5° is not displayed.
•
Press and hold the controller button (6) to enter the main menu.
•
Rotate the controller ring to select the Accelerometer menu item.
•
Press the controller button (6) briey to enter the Accelerometer submenu.
•
Rotate the controller ring to select Side Incline
•
Press the controller button (6) briey to enter the Side Incline submenu.
•
Rotate controller ring to select On for turning on the incline indication or Off for turning it off.
•
Conrm your selection with a short press of the controller button (6).
10

MENU ITEM SUBMENU
Defective Pixel Repair Defective Pixel
Repair
When using the device, defective (dead) pixels may appear on the sensor. These are bright or dark points of a constant brightness that are visible on the image. riescopes offer
the possibility of removing any defective pixels on the sensor using software, as well as to cancel any deletion.
•
Press the controller button (6) to open the submenu.
•
Press the controller button (6) briey to select the icon .
•
A marker will appear on the left side of the display.
•
A “magnifying glass” will appear on the right side of the display — a rectangle with an enlarged view of the marker for precise pixel
selection — and marker coordinates under the “magnifying glass”
X=100
Y=100
.
•
Rotate the controller ring (6) to move the marker to align its center with the defective pixel.
•
Press the controller button (6) shortly to switch the marker direction from the horizontal to the vertical and vice versa.
•
Rotate the controller ring (6) to align the defective pixel with the xed cross in the frame – the pixel should disappear.
•
Delete the defective pixel with a short press of the ON (3) button.
•
Where the pixel has been successfully deleted, the OK message will appear on the screen for a short time.
•
Then, by moving the marker across the display, you can delete the next defective pixel.
•
Press and hold the controller button (6) to exit the Defective Pixel Repair function.
Restore Default
Pixel Map
Return all defective pixels previously disabled by the user to their original state:
•
Press the controller button (6) to open the submenu.
•
Press the controller button (6) to select the icon .
•
Select “Yes” if you want to return to the factory pixel map and “No” if you do not.
•
Press the controller button (6) briey to conrm the selection.
Attention! One or two pixels on the display of the riescope in the form of bright white, black or colored (blue, red or green) dots may appear. These points cannot be removed and not a defect.
Device Information
•
Press and hold the controller button (6) to enter the main menu.
•
Rotate the controller ring (6) to select the Device Information menu item.
•
Press the controller button (6) briey to enter the Device Information submenu.
This item allows the user to view the following information about the riescope:
- Full name of the riescope,
- SKU number,
- Serial number of the riescope,
- Riescope software version,
- Hardware version,
- Service information
- Battery information
X=100
Y=100
11

Status Bar
The status bar is at the bottom of the display and shows information on the actual operating status of the
riescope, including:
•
Image inversion mode (Black hot only)
•
Actual zeroing prole (e.g., A).
•
Zeroing distance (e.g., 900 m)
•
Observation mode (e.g., Forest)
•
Calibration mode (a countdown timer will appear instead of the calibration icon when in automatic
calibration mode with 3 seconds remaining until automatic calibration).
•
Current compound magnication
•
Microphone
•
Wi-Fi connection
•
Auto Shutdown function (e.g., 1 min.)
•
Clock
•
Batteries discharge level (when riescope is powered by a built-in or removable battery pack) or
•
External battery power indicator (if the riescope is powered by an external power supply) or
•
Battery indicator with current percentage of charge (when charging from an external power source)
Note: a display image freezes until the calibration is in progress.
Video Recording and Photography
The riescope is equipped with a function for video recording (photography) of the observed image that is
saved on the built-in memory card.
Before using the photo and video functions, read the Date Setting and Time Setting subsections of the Main
Menu Functions section of this Manual.
Built-in recorder operates in two modes:
•
Photo (photography; the icon is displayed in the upper left corner of the display).
•
Video (video recording; the icon is displayed in the upper right corner of the display, the total remaining
recording time is given taking into account the current resolution in the HH:MM format (hours:minutes).
When switched on, the riescope is in the Video mode. Toggle (switch) between the riescope operating modes
with a long press of the REC (4) button. Switching between the modes is cyclical (Video–> Photo–> Video...).
Photo mode. Photographing an image
•
Switch to Photo mode.
•
Press the REC (4) button briey to take a photo. The image freezes for 0.5 sec - a photo is saved to the
internal memory.
Video Mode. Recording a video
•
Switch to the Video mode with a long press of the REC (4) button.
•
Press the REC (4) button briey to start video recording.
•
When the video recording starts, the icon will disappear, instead of it the REC icon as well as the video
recording timer displayed in the MM:SS (minutes:seconds) format will appear;
•
Pause/continue recording by briey pressing the REC button (4).
•
Press and hold the REC (4) button to stop video recording.
•
Video les are stored in the built-in memory card after video recording has been turned off.
- after turning off the video recording / after photography;
- upon powering the riescope off if recording was on;
- When the memory card is overlled during recording (Memory Full message appears on the display).
Notes:
•
You can enter and navigate the menu during video recording.
•
Recorded videos and photos are saved to the built-in memory card of the riescope in the format img_xxx.
jpg (for photos); video_xxx. mp4 (for video). xxx – three-digit counter (for videos and photos);
•
The counter used for the names of multimedia les cannot be reset;
•
If a le is deleted from the middle of the list, its number is not taken by the other le;
•
When the counter is full, a new folder is created: img_xxxx; xxxx being a le counter;
•
Maximum duration of a recorded video le is 5 minutes. After this time expires, the video is recorded to a new
le. The number of recorded les is limited by the capacity of unit’s internal memory.
•
Regularly check free memory within the built-in memory card and move the footage to other storage media to
free up the memory card space.
Wi-Fi Function
The riescope has a function for wireless communication with mobile devices (smartphone or tablet) via Wi-Fi.
•
To enable the wireless module, enter the main menu by long pressing the controller button (6).
•
Rotate the controller ring (6) to select the Wi-Fi activation menu item.
•
Press the controller button (6) briey to turn on/off Wi-Fi module.
•
Wi-Fi is displayed in the status bar as follows:
Connection Status Indication in the status bar
Wi-Fi is switched off
Wi-Fi is switched on by the user, Wi-Fi connection in the riescope is in progress.
Wi-Fi is switched on, there is no connection to the riescope
Wi-Fi is switched on, there is connection to the riescope
•
The riescope is recognized by an external device under the name Thermion_XXXX, where XXXX are the four
last digits of the serial number.
•
After entering the password (default: 12345678) on a mobile (see Password Setup section of the Main Menu
Functions section of the Manual for more information on setting a password) and setting up a connection, the
icon in the riescope status bar changes to .
•
Launch Stream Vision application on your mobile device (see Stream Vision section).
•
Video broadcasting on a mobile screen starts after the viewnder button on the mobile screen is activated.
Stadiametric Rangender
Thermal imaging riescopes are equipped with a stadiametric rangender, which allows you to determine the
approximate distance to an object, if its size is known.
•
To select the function, enter the quick access menu by briey pressing the
controller button (6)
•
Press the controller button (6) briey to select the icon .
•
The display will show the lines for measurements, the icons and numbers of the measured distance for three
objects.
12

•
There are three predened values for objects:
- – 0.3 m high
- Boar – 0.7 m high
- Deer – 1.7 m high
•
Place the bottom xed line under the object and
rotating the controller ring (6), move the upper
line relative to the lower horizontal xed line so
that the object is located directly between the
lines. A target range automatically recalculated
along with movement.
•
If the object is not measured within 10 seconds,
the information disappears from the display.
•
To select a unit of measurement (meters or
yards), go to the General Settings menu item =>
Units of measurement submenu .
•
The measured range value is rounded off before being displayed – for large range values up to 5 m, for
shorter range – up to 1 m.
•
To exit the rangender mode, briey press the controller button (6) or wait 10 seconds to exit automatically.
Display O Function
When this function is in use, the riescope switches to the standby mode, which allows it to be switched on
quickly if necessary.
Options for operating with the Display Off function
Option 1. Riescope off. It is necessary to power the riescope on and activate the Display Off function.
•
Press the ON (3) button briey to power the riescope on.
•
Activate the Display Off function: press and hold the ON (3) button. The Display off
message with a countdown will appear on the screen.
•
Release the ON (3) button.
•
Press the ON (3) button briey to deactivate the Display Off function (to activate the display).
Option 2. The Display off function is activated; the riescope should be turned off.
•
Press and hold the ON (3) button. Display off message with 3, 2, 1 countdown will appear on the screen.
•
Hold ON (3) button until the riescope turns off (the riescope turns off after counting up to 1).
PiP Function
The PiP function (Picture-in-Picture) allows you to see both a magnied image in a particular dialog box and
the main image.
•
Press and hold the ZOOM button (5) to turn on/off the PiP function.
•
To change digital magnication in the PiP window, rotate the controller ring (6), while the icon is visible on
the screen.
•
The magnied image is displayed in a particular dialog box, with the full magnication being used.
•
The rest of the image is displayed only with the optical zoom (digital zoom is off).
•
When PiP is turned off, the display shows the full magnication set for the PiP mode.
Stream Vision
thermal imaging riescopes support Stream Vision technology, which allows you to stream an image
from the thermal imager to smartphone or tablet via Wi-Fi in real time mode.
You can nd detailed instructions on Stream Vision in the separate brochure or at the site pulsar-vision.com.
Note: The design of the riescope provides the software update option. Updating is possible via the Stream
Vision application.
To download the Stream Vision application scan the QR codes or follow the links:
Google Play (Android OS)
https://play.google.com/store/apps/details?id=com.yukon.app
iTunes (iOS)
https://itunes.apple.com/us/app/stream-vision/id1069593770?mt=8
USB Connection
•
Press the ON (3) button briey to power the riescope on (the computer will not detect the riescope if it is
turned off).
•
Connect one end of the USB cable to the riescope micro USB port (10), and the other one to the port on your
computer.
•
The riescope is detected by the computer automatically and no installation of drivers is required.
•
After a few seconds, two connection options appear on the display: Power and Memory card.
•
Rotate the controller ring (6) to select the
connection mode.
•
Press the controller button (6) briey to
conrm your selection.
Connection options:
•
Power. Upon choosing this mode, your PC
is used as an external power supply. An
icon will appear in the status bar.
The riescope continues operating and all
functions are accessible. The Battery Packs
installed in the riescope are not charged.
•
Memory card. When selecting this mode,
the computer recognizes the riescope as a
memory card. This mode is designed to manage the les saved in riescope’s memory. The riescope’s functions
are not available in this mode; the riescope turns on. The device continues to operate after being disconnected
from the computer.
- If a video was being recorded at the moment of connection, the recording will stop and will be saved.
USB disconnection
•
When the USB is disconnected from the riescope connected in the Power mode, the riescope continues to
operate on battery packs when they are sufciently charged.
•
When the USB is disconnected from the riescope connected in the Memory card mode, the riescope
remains switched on.
13

Technical Inspection
It is recommended to carry out a technical inspection each time before using the riescope. Check the
following:
•
The riescope appearance (there should be no cracks on the body).
•
The condition of the lens and eyepiece (there should be no cracks, greasy spots, dirt or other deposits).
•
The state of the battery pack (must be charged to a level of 50-70%) and the electric contacts within it (there
should be no signs of salts or oxidation).
•
The controls should be in working order.
Maintenance
The maintenance should be carried out at least twice a year and includes the following steps:
•
Wipe the exterior surfaces of metal and plastic parts off dust and dirt with a cotton cloth. Silicone grease may
be used for this.
•
Clean the electric contacts of the battery pack and battery slots on the riescoepe using a non-greasy organic
solvent.
•
Check the optics of the eyepiece and the lens. If necessary, remove dust and sand from the optics (it is
preferable to use a non-contact method). Cleaning of the exterior surfaces of the optics should be done with
cleaners designed especially for this purpose.
Troubleshooting
The table shows a list of problems that may occur when using the riescope. Carry out the recommended
checks and troubleshooting steps in the order listed in the Table. If there are defects that are not listed in the
Table or it is impossible to repair the defect yourself, return the riescope for repair service.
MALFUNCTION POSSIBLE CAUSE CORRECTIVE ACTION
Riescope will not turn on. The batteries are completely
discharged.
Charge the battery.
Riescope will not work
from an external power
source.
USB cable is damaged. Replace USB cable.
External power source is
discharged.
Charge the external power source.
The image is fuzzy. There
are distortions in the form
of bars of different widths
lying in different directions,
or dots of different size
and brightness.
Calibration is required.
Perform image calibration according to Sensor
Calibration section of the Manual.
The image is too dark. Brightness or contrast level
is too low.
Adjust brightness or contrast.
Color bars appeared on
the display or image
disappeared.
The device was exposed
to static stress during the
operation.
After the exposure to static stress, the device may
either reboot automatically or require to be switched
off and on again.
There is a clear image of
the aiming reticle, but a
fuzzy image of the object.
There is dust or condensate
on the interior or exterior
optical surfaces of the lens.
Wipe off the outside optical surfaces with a soft
cotton cloth. Let the riescope dry by leaving it in a
warm environment for 4 hours.
The lens is not focused. Adjust the image sharpness by rotating the lens
adjuster.
MALFUNCTION POSSIBLE CAUSE CORRECTIVE ACTION
The aiming reticle shifts
after ring rounds.
The riescope is not
mounted securely or the
mount is not xed on the
riescope.
Check that the riescope has been securely
mounted.
Make sure you are using the same type and caliber
of the bullets as when the riescope and weapon
were initially zeroed.
If your riescope was zeroed in the summer and
using in the winter (or the other way round), a
slight shift of the zero point is possible.
The riescope will not
focus.
Wrong settings.
Adjust the riescope according to the Powering On
and Image Setting section.
Check the outer surfaces of the objective lenses
and eyepiece and, where necessary, wipe them
from dust, condensation, frost, etc.
In cold weather, you can use special anti-fogging
coatings (e.g., the same as for corrective glasses).
Smartphone or tablet
cannot be connected to the
riescope.
Password in the riescope
was changed.
Delete network and connect again typing the
password saved in the riescope.
The device is in an area
with a large number of Wi-Fi
networks that may cause
interference.
To ensure stable Wi-Fi connection, relocate the
device to an area with fewer Wi-Fi networks or into
an area with none.
Wi-Fi signal is missing or
interrupted.
Smartphone or tablet is out
of range of a strong Wi-Fi
signal. There are obstacles
between the device and the
smartphone or tablet (e.g.,
concrete walls).
Relocate smartphone or tablet into the Wi-Fi signal
line of sight.
The image of the object
being observed is missing.
Observation through glass. Remove the glass from the eld of vision.
Poor image quality/
Reduced detection
distance.
These problems may occur during the observation in adverse weather conditions
(snow, rain, fog etc.).
When the riescope is
used in low temperature
conditions the image
quality of the surroundings
is worse than in positive
temperature conditions.
In positive temperature conditions, objects being observed (surroundings
and background) heat up differently because of thermal conductivity, thereby
generating a high temperature contrast. Accordingly, image quality produced by
the thermal imager will be higher.
In low-temperature conditions, objects being observed (background) will cool
down to roughly the same temperature, as a rule, and thus the temperature
contrast is substantially reduced and image quality (zoom) goes down. This is a
distinctive feature of the thermal imaging riescopes.
Repair of the device is possible within 5 years.
By following the link below you can nd answers to the most frequently asked questions about thermal
imaging https://www.pulsar-nv.com/glo/support/faq/79
14

Package Contents
•
Thermal Imaging Riescope
•
Rechargeable APS2 Battery Pack
•
APS battery charger
•
Mains charger
•
USB cable
•
Carrying case
•
Lens-cleaning cloth
•
Quick User Manual
•
Warranty card
•
APS3 battery cover
thermal imaging riescopes require a licence when exported outside your country.
Electromagnetic compatibility. This product complies with the requirements of European standard EN 55032:
2015, Class A.
Caution: Operating this product in a residential area may cause radio interference.
15

FRANÇAIS
Specication techniques
SKU 76525 76526 76522 76523 76542 76543
MODÈLE XM38 XM50 XQ38 XQ50 XP38 XP50
MICROBOLOMÈTRE
Type Non refroidi
Résolution, pixels 320x240 384x288 640x480
Taille de pixel, micron 12 17
Fréquence de rafraîchissement des images, Hz 50
CARACTÉRISTIQUES OPTIQUES
Lentille, mm
F38
F/1,2
F50
F/1,2
F38
F/1,2
F50
F/1,2
F38
F/1,2
F50
F/1,2
Amplication, x 4-16 5,5-22 2,5-10 3,5-14 1,5-12 2-16
Enlèvement de cercle oculaire, mm 50
Angle de vue (horizon), grêle 5,8 4,4 9,8 7,5 16,3 12,4
Gamme de mise au point d'oculaire, dioptrie -3/+5
Distance de detection*, m 1700 2300 1350 1800 1350 1800
RÉTICULE DE VISÉE
Valeur graduée d’un clic, mm @ 100 m – en ampliant, x
10 – 4x
5 – 8х
2,5 – 16х
7 – 5,5х
3,5 – 11х
1,75 – 22х
17 – 2,5х
8,5 – 5х
4,25 – 10х
13 - 3,5х
6,5 – 7х
3,25 – 14х
28 – 1,5х
14 – 3х
7 – 6х
3,5 – 12х
21 – 2х
10,5 – 4х
5,25 – 8х
2,6 – 16х
Réserve de marche du réticule de visée, H / V, mm par 100 m 2000/2000 1400/1400 3400/3400 2600/2600 5600/5600 4200/4200
L’ÉCRAN
Type AMOLED
Résolution, pixels 1024х768
CARACTÉRISTIQUES DE FONCTIONNEMENT
Diamètre du boîtier de viseur pour le montage des anneaux de xation, mm 30
Temps de fonctionnement à partir d'un ensemble de batteries (APS3 intégré et APS2 amovible,
Wi-Fi est arrêté) à t = 22°C, h
7
Tension d’alimentation, V 3–4,2
Type de batterie/capacité’tension nominale de sortie
Batterie li-ion
АPS2 / 2000 mAh / DC 3,7 V (amovible)**
APS3 / 3200 mAh / DC 3,7 V (intégré)
Alimentation externe Micro USB type B (5 V)
Max résistance aux chocs pour des fusil, Joule 6000
Max résistance aux chocs pour des armes à canon lisse, calibre 12
Degré de protection Code IP (IEC60529) IPX7
Température de fonctionnement, °C -25 – +50
Dimensions avec l’œiller en caoutchouc (LxLxH), mm 395 x 78 x 72 407 x 78 x 80 395 x 78 x 72 407 x 78 x 80 407 x 78 x 80 416 x 78 x 80
Poids (sans batterie amovible), kg 0,75 0,9 0,75 0,9 0,75 0,9
ENREGISTREUR VIDÉO
Résolution vidéo/ photo, pixels 1024x768
Format vidéo / photo .mp4 / .jpg
Mémoire intégrée 16 GB
Fréquence 2,4 GHz
Standard 802.11 b/g
* Type d’objet «cerf»
** La batterie APS3 peut être utilisée (vendue séparément)
La conguration peut être modiée an d’améliorer l’utilisation d’un appareil.
La version actuelle du manuel d’utilisation est disponible sur pulsar-vision.com
16

Description
Les viseurs thermiques sont conçus pour l’utilisation pour les armes de chasse, le jour comme la
nuit, dans des conditions météorologiques difciles (brouillard, smog, pluie) ainsi qu’en présence d’obstacles
rendant difcile la détection d’une cibles (branches, herbes hautes, arbustes denses, etc.). Contrairement aux
viseurs basés sur des convertisseurs électro-optiques, les viseurs pour imagerie thermique n’ont pas besoin de
source de lumière externe et résistent au niveau élevé d’éclairage.
Champs d’application des viseurs: chasse, observation et orientation dans des conditions de visibilité réduite.
Caractéristiques distinctives
•
Haute plage de détection
•
Image de haute résolution
•
Amplication variable
•
Capteur d’imagerie thermique de 12 microns (modèles XM)
•
Résistance aux chocs en cas de gros calibres: 12 cal., 9.3x64, .375H&H
•
Montage avec des anneaux standard de 30 mm
•
Boîtier métallique robuste
•
Etanchéité complète (IPX7)
•
Options des réticules accordables
•
Écran couleur de moniteur HD AMOLED
•
Enregistrement des photos et des vidéos
•
Fonction l’image dans l’image
•
Modes de couleurs
•
Support d’application «Stream Vision»
•
Fonctionnalité extensible (possibilité de mettre à jour le logiciel du viseur à l’aide de l’application gratuite
«Stream Vision»)
•
Gestion pratique
•
Système d’alimentation combiné B-Pack mini
•
Design fonctionnel et ergonomique
•
Large gamme de température de fonctionnement (-25 ... +50°C)
Fonctions et modes utiles
•
Interface de l’utilisateur pratique
•
Télémètre stadiométrique (estimation de la distance à l’objet)
•
Gyroscope accéléromètre intégré à 3 axes (indication de glissement de l’arme)
•
Quatre modes d’observation: Forêt, Montagnes, Identication, Utilization.
•
Trois modes de calibrage: manuel, semi-automatique, automatique
•
Zoom numérique souple
•
Un grand nombre des réticules électroniques
•
Les réticules évolutives (les gradations de réticule changent proportionnellement au Zoom)
•
5 prols de tir de ajustage (10 distances dans le prol)
•
Fonction de réglage de l’arme par un coup unique
•
Tir de réglage précis «Zoom Zeroing» (réduction de la valeur d’un clic lorsque vous augmentez Zoom)
•
Fonction de réglage de l’arme «Freeze (Geler) Zeroing»
•
8 modes de couleurs
•
Fonction d’élimination de pixels défectueux du capteur
•
Fonction d’arrêt de moniteur
•
Fonction «Image Detail Boost» (modèles XP et XQ uniquement), qui augmente la netteté et le détail global de
l’image.
•
Wi-Fi Télécommande et surveillance d’un smartphone
Enregistrement vidéo
•
Enregistreur photo-vidéo intégré avec enregistrement sonore
•
16 GB de mémoire interne
•
Intégration avec des appareils iOS et Android
•
Youtube. Streaming vidéo en direct et enregistrement sur Internet via un smartphone et à l’aide de
l’application gratuite «Stream Vision»
Batterie
•
Batterie APS3 intégrée de 3200 mAh
•
Batteries Li-Ion à changement rapide APS2 / APS3
•
Possibilité de charger les batteries intégrées et externes APS2 et APS3 via microUSB
Éléments et contrôles
1
2
4
3
5
7
8
6
12
11
9
10
Œillère en caoutchouc
Anneau de réglage
dioptrique d’oculaire
Couvercle de
compartiment de
micro-USB
Connecteur de
micro-USB
Bouton
ENREGISTREMENT (REC)
Bouton ZOOM
Bouton
MARCHE (ON)
Couvercle de
compartiment
de batterie
Batterie
APS2
Contrôleur
Bague de mise au
point de l’objectif
Bouchon
d’objectif
17

Fonctions des boutons
Contrôle
Condition / Mode de
fonctionnement
Premier
appui court
La presse
courte
suivante
Appui long Rotation
Bouton
(ON)
L'appareil est éteint
Allumage de
l'appareil
Calibrage de
l’appareil
Allumage de
l'appareil
–
L’afchage est éteint
Allumage
d'afchage
Calibrage de
l’appareil
Extinction de
l’appareil
–
L'appareil est allumé, menu
rapide, menu principal
Calibrage de l’appareil
Arrête d'afchage/
Arrête de l’appareil
–
Bouton
ZOOM
L'appareil est allumé, menu
rapide, menu principal
Changement
d’amplication (Zoom)
Marche / Arrêt PiP –
Bouton
Enregis-
trement
(REC)
L'appareil est allumé, menu
rapide, menu principal
Lancement
de l'enregis-
trement
vidéo
Pause
Changement des
modes vidéo /
photo
–
L'appareil est allumé, menu
rapide, menu principal, enre-
gistrement vidéo est allumé
Pause
Lancement
de l’enre-
gistrement
vidéo
L’arrêt de
l'enregistrement
vidéo
–
L'appareil est allumé, menu
rapide, menu principal,
mode photo
Photographie
Changement des
modes vidéo /
photo
–
Contrô-
leur
L’appareil est allumé
Accès dans
le menu
rapide
–
Accès dans le
menu principal
–
Menu rapide Navigation
Sortie du menu
rapide
Changement de
paramètre
Menu principal
Conrmation de valeur,
accès dans les éléments
de menu
Sortie des
éléments du menu,
du menu principal
Navigation dans le
menu
Zoom – –
Changement
souple de Zoom
Utilisation de la batterie
Les viseurs numériques de vision nocturne sont livrés
avec une batterie APS3 Li-ion rechargeable intégrée de 3200 mAh et
une batterie APS2 Li-ion rechargeable amovible de 2000 mAh. Les
batteries doivent être chargées avant la première utilisation.
Chargement:
•
Ouvrez le couvercle du compartiment MicroUSB (9) en le tournant
dans le sens antihoraire.
•
Connectez la che microUSB du câble USB (16) au connecteur
microUSB (10) dans le compartiment du viseur.
•
Connectez la deuxième che microUSB du câble USB (16) au
connecteur microUSB du réseau périphérique (17). Branchez
l’appareil dans une prise 100-240 V (18).
ATTENTION. Lors du chargement des batteries via le connecteur
microUSB (10), la batterie intégrée APS3 est chargée en premier.
Lorsque la charge complète est atteinte, la batterie amovible
APS2 commence à se charger. Lors de l’utilisation de l’appareil, la
consommation d’énergie est inversée.
16
10
17
18
9
Appareil de
chargement
Câble USB
Connecteur de
micro-USB
Couvercle de
compartiment
de MicroUSB
Prise de
courant
La batterie lithium-ion rechargeable APS2 rechargeable peut également être chargé à l’aide du chargeur APS*.
•
Insérez la batterie APS2* (8) tout au long du guide dans la fente du chargeur APS fournie avec votre appareil.
•
Le point A de la batterie et le point B du chargeur doivent être alignés.
•
Vous pouvez charger deux batteries en même temps - un second
emplacement est prévu à cet effet.
•
Connectez la deuxième che microUSB du câble USB (16) au connecteur
microUSB du réseau périphérique (17). Branchez l’appareil dans une prise
100-240 V (18).
•
Branchez la deuxième che microUSB du câble USB (14) au connecteur (14)
du chargeur (13).
•
L’indication de LED (15) s’afchera état de charge de la batterie:
Indication de LED** L’état de la batterie
Charge de la batterie varie est de 0 à 10%.
Le chargeur n’est pas connecté au secteur.
Charge de la batterie varie est de 0 à 10%.
Le chargeur est connecté au secteur.
Batterie est défectueuse. Ne pas utiliser la batterie.
Charge de la batterie varie de 10 à 20%.
Charge de la batterie est de 20 à 60%.
Charge de la batterie est de 60 à 95%.
La batterie est chargée complètement.
Elle peut être déconnecté du chargeur.
* Inclus dans la livraison. L’utilisation de la batterie APS3 est disponible
(vendue séparément).
** L’indication afche l’état de charge actuel de la batterie pendant
30 secondes. au cas où le chargeur APS n’est pas branché. Lorsque
l’alimentation est connectée, l’afcheur indique en permanence l’état actuel
de la batterie, les voyants clignotent en outre, indiquant le processus de charge de la batterie.
Installation:
•
Tourner dans le sens antihoraire et retirer le couvercle de la batterie (7).
•
Installez la batterie le long des guides spéciaux du compartiment de la batterie (8) prévu à cet effet dans le
boîtier de l’illuminateur IR.
•
Lorsqu’elle est installée correctement la batterie se verrouille dans le
compartiment à batterie .
•
Fermez le couvercle du compartiment de batterie (7) en le tournant dans le
sens horaire.
Précautions:
•
Utilisez toujours le chargeur fourni pour charger. L’utilisation de tout autre
chargeur peut causer des dommages irréparables à la batterie ou au chargeur.
•
Pendant le stockage à long terme les batteries doivent être partiellement
chargées - elles ne doivent pas être complètement chargées ou complètement
déchargées.
•
Ne chargez pas la batterie directement après l’avoir déplacée d’un
environnement froid ou chaud. Attendez 30-40 minutes avant que la
batterie se réchauffe.
•
Pendant le stockage à long terme la batterie doit être partiellement
chargée - elle ne doit pas être complètement chargée ou complètement
déchargée.
16
14
15
А
B
B
А
8
18 17
13
Batterie
recharchable
Chargeur
Connecteur de
micro-USB
Câble
USB
Prise de
courant
Indicateur LED
Appareil de
chargement
8
7
Couvercle de
compartiment
de batterie
Batterie
recharchable
18
La pagina si sta caricando...
La pagina si sta caricando...
La pagina si sta caricando...
La pagina si sta caricando...
La pagina si sta caricando...
La pagina si sta caricando...
La pagina si sta caricando...
La pagina si sta caricando...
La pagina si sta caricando...
La pagina si sta caricando...
La pagina si sta caricando...
La pagina si sta caricando...
La pagina si sta caricando...
La pagina si sta caricando...
La pagina si sta caricando...
La pagina si sta caricando...
La pagina si sta caricando...
La pagina si sta caricando...
La pagina si sta caricando...
La pagina si sta caricando...
La pagina si sta caricando...
La pagina si sta caricando...
La pagina si sta caricando...
La pagina si sta caricando...
La pagina si sta caricando...
La pagina si sta caricando...
La pagina si sta caricando...
La pagina si sta caricando...
La pagina si sta caricando...
La pagina si sta caricando...
La pagina si sta caricando...
La pagina si sta caricando...
La pagina si sta caricando...
La pagina si sta caricando...
La pagina si sta caricando...
La pagina si sta caricando...
La pagina si sta caricando...
La pagina si sta caricando...
La pagina si sta caricando...
La pagina si sta caricando...
La pagina si sta caricando...
La pagina si sta caricando...
La pagina si sta caricando...
La pagina si sta caricando...
La pagina si sta caricando...
La pagina si sta caricando...
La pagina si sta caricando...
La pagina si sta caricando...
La pagina si sta caricando...
La pagina si sta caricando...
La pagina si sta caricando...
La pagina si sta caricando...
La pagina si sta caricando...
La pagina si sta caricando...
La pagina si sta caricando...
La pagina si sta caricando...
La pagina si sta caricando...
La pagina si sta caricando...
La pagina si sta caricando...
La pagina si sta caricando...
La pagina si sta caricando...
La pagina si sta caricando...
La pagina si sta caricando...
La pagina si sta caricando...
La pagina si sta caricando...
La pagina si sta caricando...
La pagina si sta caricando...
La pagina si sta caricando...
La pagina si sta caricando...
La pagina si sta caricando...
La pagina si sta caricando...
La pagina si sta caricando...
-
 1
1
-
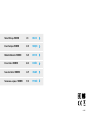 2
2
-
 3
3
-
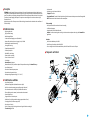 4
4
-
 5
5
-
 6
6
-
 7
7
-
 8
8
-
 9
9
-
 10
10
-
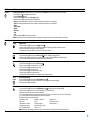 11
11
-
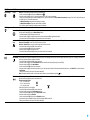 12
12
-
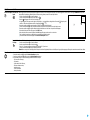 13
13
-
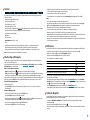 14
14
-
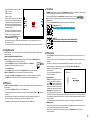 15
15
-
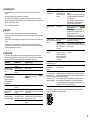 16
16
-
 17
17
-
 18
18
-
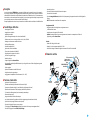 19
19
-
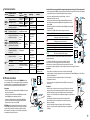 20
20
-
 21
21
-
 22
22
-
 23
23
-
 24
24
-
 25
25
-
 26
26
-
 27
27
-
 28
28
-
 29
29
-
 30
30
-
 31
31
-
 32
32
-
 33
33
-
 34
34
-
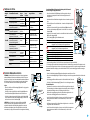 35
35
-
 36
36
-
 37
37
-
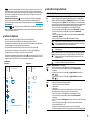 38
38
-
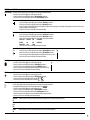 39
39
-
 40
40
-
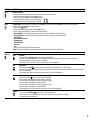 41
41
-
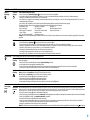 42
42
-
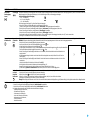 43
43
-
 44
44
-
 45
45
-
 46
46
-
 47
47
-
 48
48
-
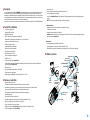 49
49
-
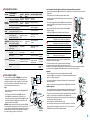 50
50
-
 51
51
-
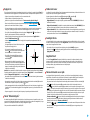 52
52
-
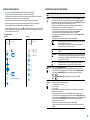 53
53
-
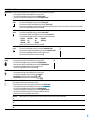 54
54
-
 55
55
-
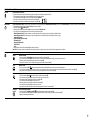 56
56
-
 57
57
-
 58
58
-
 59
59
-
 60
60
-
 61
61
-
 62
62
-
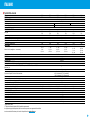 63
63
-
 64
64
-
 65
65
-
 66
66
-
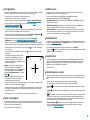 67
67
-
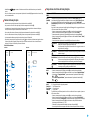 68
68
-
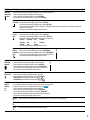 69
69
-
 70
70
-
 71
71
-
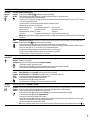 72
72
-
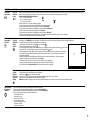 73
73
-
 74
74
-
 75
75
-
 76
76
-
 77
77
-
 78
78
-
 79
79
-
 80
80
-
 81
81
-
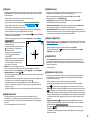 82
82
-
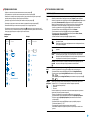 83
83
-
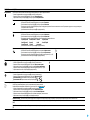 84
84
-
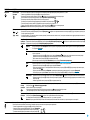 85
85
-
 86
86
-
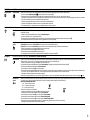 87
87
-
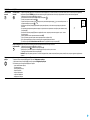 88
88
-
 89
89
-
 90
90
-
 91
91
-
 92
92


Pulsar Thermion Manuale del proprietario
- Tipo
- Manuale del proprietario
in altre lingue
- English: Pulsar Thermion Owner's manual
- français: Pulsar Thermion Le manuel du propriétaire
- español: Pulsar Thermion El manual del propietario
- Deutsch: Pulsar Thermion Bedienungsanleitung
Documenti correlati
-
Pulsar Thermion Manuale del proprietario
-
-
-
-
-
-
-
-
-
Altri documenti
-
Yukon digital NV riflescopes Sentinel Manuale del proprietario
-
Hama 00115512 Manuale del proprietario
-
-
 Athlon 50-640 Guida utente
-
-
