Breville VFM021X-01 HeatSoft Manuale del proprietario
- Categoria
- Miscelatori
- Tipo
- Manuale del proprietario
Questo manuale è adatto anche per

Hand Mixer with
HEATSOFT
TM
Technology
VFM021X

32
EN
Instructions for Use............................................................................................................. 5
FR
Instructions ........................................................................................................................11
ES
Instrucciones de uso......................................................................................................... 16
PL
Instrukcja użytkowania ..................................................................................................... 22
IT
Istruzioni per l’uso............................................................................................................. 27
DE
Bedienungsanleitung ........................................................................................................ 33
PT
Instruções de Utilização ................................................................................................... 38
NL
Gebruiksaanwijzing .......................................................................................................... 44
SE
Bruksanvisning ................................................................................................................. 49
CZ
Návod k použití ................................................................................................................. 54
RO
Instrucţiuni de utilizare ...................................................................................................... 59
1
12
13 14
11
10
2
3
4
5
6
7
8
9

54
Figure 1 Figure 2
Figure 3
Figure 4
Figure 5
Figure 6
Heater Vent Filter
Figure 7
EN
IMPORTANT SAFETY INFORMATION
READ CAREFULLY AND KEEP FOR
FUTURE REFERENCE
Children shall not use this appliance.
Appliances can be used by persons with
reduced physical, sensory or mental
capabilities or lack of experience and
knowledge if they have been given
supervision or instruction concerning use of
the appliance in a safe way and understand
the hazards involved. Children shall not play
with the appliance.
Keep the appliance and its cord out of the
reach of children.
Never use this appliance for anything other
than its intended use. This appliance is
for household use only. Do not use this
appliance outdoors.
If the supply cord is damaged, it must be
replaced by the manufacturer, its service
agent or similarly qualied persons in order to
avoid a hazard.
This appliance generates heat during use.
Adequate precautions must be taken to
prevent the risk of burns, scalds, res or
other damage to persons or property caused
by touching hot surfaces whilst in use or
during cooling.
Always switch off and disconnect from the
mains supply socket if it is left unattended
and before assembling, disassembling or
cleaning or approaching parts that move
during use.
Always allow the appliance to cool before
assembling, disassembling, cleaning or
before storage.
Do not immerse the main body of the
appliance, power cord and plug in water or
any other liquid. The dough hooks, beaters
and whisk should be washed in hot soapy
water or in a dishwasher. See cleaning
section for full details.
All accessories (beaters, dough hooks, whisk)
should not be used for longer than 4 minutes
30 seconds. When mixing extremely heavy
loads the appliance should not be operated
for more than 1 minute 30 seconds or use the
HeatSoft
TM
feature for longer than 5 minutes
continuously.
IMPORTANT: In the case of the mixer
overheating due to excessive load, the safety
cutout will activate, preventing the mixer from
operating. Should this occur, switch the mixer
off at the power outlet and allow the mixer to
cool for 10 minutes before switching back on.
• Always ensure that hands are dry before handling the plug or
switching on the appliance.
• Always use the appliance on a stable, secure, dry and level
surface.
• This appliance must not be placed on or near any potentially
hot surfaces (such as a gas or electric hob).
• Never let the power cord hang over the edge of a worktop,
touch hot surfaces or become knotted, trapped or pinched.
• Do not use the appliance if it has been dropped or if there are
any visible signs of damage.
• Never use any accessory or attachment not recommended by
the manufacturer.
• Remove attachments from the appliance before washing or
cleaning them.
• Keep ngers, hair and clothing away from the moving parts of
the appliance when it is in use.
HEAT CAUTIONS
1. Do not turn on the HeatSoft
TM
feature while the mixer is in the
storage container.
2. Do not put anything else in the storage container except the
contents of this box.
3. Do not touch or hold your hands beneath the heat nozzle while
the HeatSoft
TM
feature is on.
4. Do not have the HeatSoft
TM
feature on while unit is sitting on the
counter on its base.
5. Do not use without the heater vent cover and lter in place.

76
PARTS
USING YOUR HAND MIXER
Learning About Your Hand Mixer
The Breville
®
Hand Mixer with HeatSoft
TM
Technology has been
designed to allow you to bake when inspired. No more waiting for
ingredients like butter to reach room temperature! Now you can
soften and mix in one step!
Did You Know?
Many recipes require ingredients like butter to be at room
temperature. Butter will only reach room temperature after hours of
sitting on the counter. If you use butter that’s cold, straight from the
refrigerator, it will result in heavy and dense baked goods. Butter
that is microwaved or melted can create an oily batter resulting in
soggy, at cookies. Using room temperature ingredients creates
ufer results and better baked goods.
HeatSoft
TM
Button:
The HeatSoft
TM
button allows for butter to be softened while
mixing. HeatSoft
TM
Technology uses gentle heat to bring cold
ingredients to room temperature while mixing eliminating the need
to plan ahead.
Boost Button
The boost button features allows for an added boost to the selected
speed setting at the press of the button.
Beater Eject Button
The beater eject button design allows for a separate push of the
thumb to release the beaters, dough hooks or whisk.
CAUTION: Make sure hand mixer is unplugged before removing or
inserting any attachments.
Power Cord Management
The power cord strap that comes attached to the power cord keeps
it organised when wrapped.
Beaters
The beater design allows for thorough, fast mixing results for all
types of mixtures. The beaters are dishwasher safe.
Dough Hooks
Use these hooks (see Figure 1) to knead bread dough, pizza dough
or other heavy mixtures and doughs. Use at lower speeds for best
results.
Whisk
The whisk (see Figure 3) is used to beat air into mixtures such as
egg whites, yolks or cream.
Storage Case
Lets you store your hand mixer, accessories, and power cord
conveniently together for easy access and travel (see Figure 4).
Magnetic Nozzle
The magnetic nozzle is removable for easy cleaning. (see Figure 5).
Prepping your Mixer
Before using your mixer for the rst time, wash the beaters, dough
hooks and whisk. Rinse and dry.
To place the beaters in the unit rst ensure speed control is “0
(OFF)” and unit is unplugged. Then ensure magnetic nozzle is
in place. Insert beaters one at a time, by placing the stem end of
beaters into the opening drive holes on the bottom of the mixer. Turn
beater slightly and push in until beater clicks into position.
Note that the beaters are interchangeable but dough hooks are
not. When using dough hooks, the dough hook with the collar on
the stem (see Figure 2) ts into the large drive hole on the mixer. If
dough hooks do not click into the drive holes, reverse and try again.
Plug cord into an appropriate outlet.
Softening Butter/Creaming
1. Cut of cold butter into approximately 2.5cm cubes and place
them into the mixing bowl with sugar.
2. Press the HeatSoft
TM
button once, and then turn on the beaters.
Start mixing at speed setting 1 for approximately 45 seconds
or until there are no more large chunks of butter. Then turn to
speed 5-7 for the remainder of time recommended in the chart.
NOTE: When the HeatSoft
TM
button is functioning, a white light
will illuminate and the heat fan will turn on.
CAUTION: Do not touch or hold your hand beneath the
heat nozzle while the HeatSoft
TM
feature is ON.
NOTE: Turn off the HeatSoft
TM
feature after the amount of time
listed in the chart above to avoid over creaming.
Sugar Amount
(grams)
Butter Amount
(grams)
Softening Time
(minutes)
100g 100g 1 to 1 ½ minutes
200g 200g 2 to 2 ½ minutes
3. Once the creaming is completed press the HeatSoft
TM
button
again to turn off the heat and the white light will fade out and the
fan will turn off.
4. Continue mixing with the rest of the ingredients following the
recipe. For more details continue to the mixing section.
Mixing
1. Add in the rest of the ingredients into the mixing bowl.
NOTE: To avoid splatters start unit on lowest speed and slowly
increase to the desired speed setting.
2. Slowly guide mixer around sides and through centre of bowl,
going in the same direction. Be careful not to overbeat the
mixture. Overbeating tends to make some mixtures tough.
NOTE: Whenever scraping of the bowl is required, stop the
mixer and scrape sides and bottom of bowl with a rubber
spatula as needed. Turn speed control to “0 (OFF)” while adding
ingredients. Be sure to position beaters over the mixing bowl so
any excess mixture will fall back into the mixing bowl.
3. When mixing is complete, set speed control to “1” and raise
beaters slowly from the mixing bowl clean off the excess
mixture. Be sure to turn unit to “0 (OFF)” before raising beaters
completely out of the mixing bowl.
Ejecting Beaters, Dough Hooks, or Whisk
CAUTION: Turn off and unplug the appliance before ejecting any
accessories.
Be sure speed control is at the “0 (OFF)” position and cord is
removed from electrical outlet. Press the beater eject button and
accessories will release.
How To Adjust the Speed
1. Move the speed selector from 1 to 7 and to turn off set to “0
(OFF)”.
2. To engage a higher speed immediately press and hold the boost
button. The speed will go to 7 until released and will return to
orginal setting.
3. NOTE: This feature is intended to be used for short bursts. For
long mixing use speed 7.
CARING FOR YOUR MIXER
Care and Cleaning
CAUTION: Turn off and unplug appliance and eject any accessories
before cleaning.
1. Before cleaning any part of the mixer, set the speed control to
the “0 (OFF)” position to turn off. Then unplug the cord from the
outlet and eject the beaters.
2. The beaters, dough hooks and whisk may be washed in hot,
soapy water or in a dishwasher. This appliance features a
magnetic nozzle designed to be removed for cleaning (always
allow to cool). It is dishwasher safe or it can be washed in soapy
water. Do not use scouring pad to avoid scratching.
3. For easy cleaning, press down the extended tab to pull off the
heater vent cover. Then remove the heater vent lter. Wash with
soapy water and dry before placing it back into the unit. The lter
should be cleaned every 3-6 months depending on usage. Do
not use without the heater vent cover and lter in place.
CAUTION: Do not immerse mixer, power cord and plug in
water or any other liquid. This may cause electric shock, injury,
or damage to the product.
Speed Guide for Hand Mixer
Speed Mixing Tasks
1 Stir
Use to start softening butter with the
HeatSoft
TM
button. Also use when stirring liquid
ingredients or when mixing dry and liquid
ingredients together alternately in a recipe.
Use when preparing any of the ready-prepared
or packaged instant puddings.
2 Mix
Use when a recipe calls for combining
ingredients together. Use for quick breads or
mufns that require a brisk action, just enough
to blend.
3 Blend
Use when preparing cake mixes or for
directions calling for medium speed. Use to
cream butter and sugar together.
NOTE: This is the maximum recommended
speed for dough hook usage.
4-5 Beat
Use when preparing a frosting from a recipe
or package. Use when whipping cream for
desserts.
6-7 Whip
Use to mash potatoes to develop a light and
uffy texture. Use when whipping egg whites.
Boost Button
During especially heavy mixing tasks, press
the button to drive through the mixture with
ease.
q
Magnetic Nozzle
w
Beater Eject Button
e
HeatSoft
TM
Button
r
Boost Button
t
7-Speed Control
y
Ergonomic Handle
MAX
600ml
7
1
2
3
A
B
C
D
E
8
7
8
4
5
6
Power Cord
MAX
600ml
7
1
2
3
A
B
C
D
E
8
7
8
4
5
6
Heater Vent Cover
o
Heater Vent Filter
a
Storage Case
s
Power Cord Strap
d
Dough Hooks
f
Whisk
g
Beaters

98
4. To remove stubborn spots on the hand mixer, wipe surfaces with
a piece of cloth, slightly dampened in soapy water or a mild,
non-abrasive cleaner.
5. Do not use any abrasive cleaner or material to clean any part of
the hand mixer or storage case as it can scratch the product.
Storage
CAUTION:
1. Do not store any materials, other than the mixer, its accessories,
power cord and the user manual in the storage case.
2. Do not turn on the HeatSoft
TM
feature or power ON the appliance
while stored in the storage case.
Using the Storage Case
The storage case is designed to help you store all accessories and
unit in the same place.
To remove the hand mixer from the storage case, push front tab
away from the mixer and pull out the mixer. (see Figure 7)
To place it back on the storage case, have the magnetic nozzle
facing the tab on the storage case. Push the mixer on and the tab
will click onto the mixer.
NOTE: Allow for 8-10 inches of uncoiled cord from the back of the
unit in order to t into the storage case. (see Figure 7)
Replacing Heater Vent Filter
The heater vent lter should be replaced when it’s worn out or
damaged.
Maintenance
This appliance has no user serviceable parts. Any servicing
beyond that described in the cleaning and the replacing heater
vent lter sections should be performed by an Authorised Service
Representative only. See warranty section.
Troubleshoot
1. Problem: Hand mixer stops working.
a. Unplug the power cord from outlet and wait 30 minutes before
the next use.
2. Problem: Inserting beaters and other accessories into the hand
mixer.
a. Rotate beaters or other accessories slightly clockwise until
they snap into the unit.
3. Problem: Removing beaters or other accessories from the hand
mixer.
a. Unplug the mixer and then press down the beater eject button
and gently pull accessories out.
4. Problem: If HeatSoft
TM
continues to operate.
a. Press the HeatSoft
TM
button once to turn off or unplug the
power cord from the outlet.
5. Problem: If the heater fan cover cannot be reinstalled.
a. Check that heater fan cover locking tab is not broken, if so
call Consumer Service for replacement part (The number is
listed warranty section on pages 9-10).
6. Problem: Missing any components.
a. Call Consumer Service (The number is listed warranty section
on pages 9-10) to obtain replacement parts.
RECIPES
Cupcakes
Makes: 12 cupcakes
• 125g chilled butter, cubed
• 125g caster sugar
• 2 large eggs
• 1 tsp vanilla extract
• 125g self-rising our
• 2 tbsp milk
1. Pre-heat oven to 190˚C (170˚C fan).
2. Place butter and sugar into a large bowl.
3. Press HeatSoft
TM
button and mix using speed 1, increasing to
speed 5 for approximately 2 minutes until softened and creamy.
4. Turn off HeatSoft
TM
.
5. Add eggs 1 at a time, mixing well between additions on speed 7.
Gently mix in the vanilla.
6. Add our and milk and using speed 1, gently mix together until
smooth.
7. Spoon the mixture carefully into the cupcake cases, lling ¾ full.
8. Bake in the centre of oven for approximately 20-22 minutes until
risen and golden. Place onto a wire cooling rack until cold.
Chocolate Chip Cookies
Makes: 30 cookies
• 150g chilled butter, cubed
• 125g soft light brown sugar
• 100g caster sugar
• 2 tsp vanilla extract
• 1 medium egg yolk
• 1 medium egg
• 300g plain our
• 1 tsp bicarbonate of soda
• 200g milk chocolate chips
1. Preheat oven to 170˚C (150˚C fan). Line 2 baking sheets with
greaseproof paper.
2. Add butter into a bowl with both sugars.
3. Press HeatSoft
TM
button and mix on speed 1 until combined
and softened, then increase the Speed to 7 for approximately
2 minutes.
4. Turn off HeatSoft
TM
.
5. Add vanilla, eggs and mix until light and creamy.
6. Slowly mix in our and bicarbonate of soda until just blended,
then fold in chocolate chips.
7. Roll 2 level tablespoonfuls of mixture into balls and place on
prepared trays, 3cm apart. Press down slightly.
8. Place the trays into oven and bake for approximately 15
minutes. Allow to cool for a few minutes on the tray before
removing to a wire rack.
GUARANTEE
Please keep your receipt as this will be required for any claims
under this guarantee.
This appliance is guaranteed for 2 years after your purchase as
described in this document.
During this guaranteed period, if in the unlikely event the appliance
no longer functions due to a design or manufacturing fault, please
take it back to the place of purchase, with your till receipt and a copy
of this guarantee.
The rights and benets under this guarantee are additional to your
statutory rights, which are not affected by this guarantee. Only
Jarden Consumer Solutions (Europe) Ltd. (“JCS (Europe)”) has the
right to change these terms.
JCS (Europe) undertakes within the guarantee period to repair
or replace the appliance, or any part of appliance found to be not
working properly free of charge provided that:
you promptly notify the place of purchase or JCS (Europe) of the
problem; and
the appliance has not been altered in any way or subjected to
damage, misuse, abuse, repair or alteration by a person other than
a person authorised by JCS (Europe).
Faults that occur through, improper use, damage, abuse, use with
incorrect voltage, acts of nature, events beyond the control of
JCS (Europe), repair or alteration by a person other than a person
authorised by JCS (Europe) or failure to follow instructions for use
are not covered by this guarantee. Additionally, normal wear and
tear, including, but not limited to, minor discoloration and scratches
are not covered by this guarantee.
The rights under this guarantee shall only apply to the original
purchaser and shall not extend to commercial or communal use.
If your appliance includes a country-specic guarantee or warranty
insert please refer to the terms and conditions of such guarantee or
warranty in place of this guarantee or contact your local authorised
dealer for more information.
Waste electrical products should not be disposed of with
Household waste. Please recycle where facilities exist. E-mail us
at [email protected] for further recycling and WEEE
information.
Jarden Consumer Solutions (Europe) Limited
5400 Lakeside
Cheadle Royal Business Park
Cheadle
SK8 3GQ
UK

1110
CONNECTION TO THE MAINS SUPPLY
This appliance is tted with either a moulded or rewirable BS1363,
13 amp plug. The fuse should be rated at 5 amps and be ASTA
approved to BS1362.
If the fuse in a moulded plug needs to be changed, the fuse cover
must be retted. The appliance must not be used without the fuse
cover tted.
If the plug is unsuitable, it should be dismantled and removed from
the supply cord and an appropriate plug tted as detailed below. If
you remove the plug it must not be connected to a 13 amp socket
and the plug must be disposed of immediately.
The wires of the mains lead are coloured in accordance with the
following code:
BLUE – NEUTRAL BROWN – LIVE
The wire which is coloured Blue, must be connected to the terminal
which is marked with the letter N or coloured Black.
The wire which is coloured Brown, must be connected to the
terminal which is marked with the letter L or coloured Red.
If any other plug is used, a 5 amp fuse must be tted either in the
plug or adaptor or at the distribution board.
CAUTION: DO NOT CONNECT EITHER WIRE TO THE EARTH
TERMINAL IN THE PLUG WHICH IS MARKED E OR WITH THE
EARTH SYMBOL ( ) OR COLOURED GREEN OR GREEN AND
YELLOW.
This symbol indicates that this unit is a Class II
appliance and therefore an earth connection is not
required.
AFTER SALES SERVICE
These appliances are built to the very highest of standards. There
are no user serviceable parts. Follow these steps if the unit fails to
operate:
1. Check the instructions have been followed correctly.
2. Check that the fuse has not blown.
3. Check that the mains supply is functional.
If the appliance will still not operate, return the appliance to the
place it was purchased for a replacement. To return the appliance to
the Customer Service Department, follow the steps below:
1. Pack it carefully (preferably in the original carton). Ensure the
unit is clean.
2. Enclose your name and address and quote the model number
on all correspondence.
3. Give the reason why you are returning it.
4. If within the guarantee period, state when and where it was
purchased and include proof of purchase (e.g. till receipt).
5. Send it to our Customer Service Department at the address
below:
Customer Service Department
Jarden Consumer Solutions (Europe) Limited
Middleton Road, Royton, Oldham
OL2 5LN, UK.
Telephone: 0161 621 6900 Fax: 0161 626 0391
e-mail: [email protected]
Plug should be BS1363/A approved Fit a 5 Amp
Fuse
Ensure that the outer sheath of the cable is rmly held
by the clamp
BROWN (Live)
5 Amp Fuse
BLUE (Neutral)
FR
INSTRUCTIONS DE SÉCURITÉ IMPORTANTES
LISEZ AVEC ATTENTION ET CONSERVEZ
POUR RÉFÉRENCE.
Tenir cet appareil à l’écart des enfants. Cet
appareil peut être utilisé par des personnes
ayant un handicap physique, sensoriel
ou mental, ou manquant d’expérience, à
condition de disposer de la supervision ou
des instructions nécessaires du fait des
risques encourus. Ne laissez pas les enfants
jouer avec l’appareil.
Rangez l’appareil et ses cordons hors de
portée des enfants.
Utilisez cet appareil exclusivement dans le
cadre de son utilisation prévue. Cet appareil
est réservé à un usage personnel. N’utilisez
pas l’appareil en extérieur.
Si le câble d’alimentation est endommagé,
il doit être remplacé par le fabricant, son
service après-vente ou toute personne ayant
des qualications similaires, an d’écarter
tout danger.
Cet appareil chauffe en cours d’utilisation.
Prenez les précautions d’usage pour
éviter tout risque de brûlure légère ou
grave, d’incendie ou toute autre forme de
dommages personnels ou matériels pouvant
être causés par un contact avec une surface
chaude en cours d’utilisation ou pendant la
période de refroidissement.
Débranchez systématiquement la prise
d’alimentation si vous n’utilisez plus
l’appareil, et avant d’installer, retirer, nettoyer
ou approcher les pièces mobiles.
Attendez que l’appareil soit froid avant
d’installer ou de retirer ses accessoires, de le
nettoyer ou de le ranger.
N’immergez pas la partie principale de
l’appareil; son cordon ou sa prise dans de
l’eau ou tout autre liquide. Les crochets
pétrisseurs, les batteurs et le fouet doivent
être lavés dans de l’eau savonneuse
chaude ou au lave-vaisselle. Voir la section
Nettoyage pour plus de détails.
Tout accessoire (batteurs, crochets
pétrisseurs, fouet) ne doit pas être utilisé
plus de 4,30 minutes. Lors du travail d’une
matière épaisse, l’appareil ne doit pas être
utilisé pendant plus de 1,30 minute. D’autre
part, vous ne devez pas utiliser la fonction
Heatsoft
TM
pendant plus de 5 minutes
continues.
IMPORTANT: Si le mixeur surchauffe en
raison d’une charge excessive, le dispositif
de sécurité se déclenche et arrête l’appareil.
Dans ce cas, débranchez le mixeur et
laissez-le refroidir pendant 10 minutes avant
de le réutiliser.
• Toujours s’assurer d’avoir les mains sèches avant de
brancher ou de mettre en marche l’appareil.
• Toujours utiliser l’appareil sur une surface stable, à niveau,
sèche et sans danger.
• Cet appareil ne doit pas être placé sur, ou à proximité, d’une
surface potentiellement brûlante (à l’instar d’une cuisinière,
par exemple).
• Le cordon d’alimentation ne doit jamais être noué, pincé,
écrasé, ni en contact avec des surfaces brûlantes, ni posé
sur le rebord d’un plan de travail.
• Ne pas utiliser l’appareil s’il est déjà tombé ou s’il présente
des dommages visibles.
• Ne jamais utiliser d’accessoires qui ne sont pas
recommandés par le fabricant.
• Retirer tous les accessoires de l’appareil avant de les laver
ou de les nettoyer.
• Toujours garder les doigts, les cheveux et les vêtements à
distance des pièces de l’appareil lorsque celles-ci sont en
mouvement.
PRÉCAUTIONS RELATIVES À LA CHALEUR
1. Ne pas activer la fonction Heatsoft
TM
lorsque le batteur est dans
la boîte de rangement.
2. Ne pas entreposer quoi que ce soit dans la boîte de rangement
à l’exception de son contenu initial.
3. Ne pas toucher ou placer ses mains en dessous de la buse
magnétique de transfert de chaleur lorsque la fonction
Heatsoft
TM
est activée.
4. Ne pas activer ou laisser activer la fonction Heatsoft
TM
lorsque la
base de l’équipement repose sur une surface.
5. Ne pas utiliser l’appareil si le ltre et le couvercle de l’élément
thermique ne sont pas en place..
FITTING OF A PLUG - FOR U.K. AND
IRELAND ONLY

1312
PIÈCES
UTILISATION DU BATTEUR À MAIN
Instructions relatives au batteur à main
Le batteur à main Breville
®
, équipé de la technologie HeatSoft
TM
,
a été conçu pour que vous puissiez faire des pâtisseries lorsque
bon vous semble. N’attendez plus que vos ingrédients atteignent la
température ambiante de la pièce, comme le beurre! Grâce à cet
appareil, vous pouvez ramollir et mélanger les ingrédients en même
temps !
Le saviez-vous ?
De nombreuses recettes comportent des ingrédients (le beurre,
par exemple) qui doivent être à température ambiante. Cependant,
plusieurs heures sont parfois nécessaires pour que le beurre
ramollisse une fois sorti du réfrigérateur. Si vous utilisez du
beurre trop froid, les pâtisseries confectionnées seront lourdes
ou compactes. À l’inverse, du beurre fondu ou réchauffé au
micro-ondes peut produire un mélange particulièrement huileux,
qui formera par la suite des cookies plats et mous. Il est fortement
recommandé de laisser les ingrédients atteindre une température
ambiante pour confectionner de délicieuses pâtisseries.
Bouton HeatSoft
TM
:
Le bouton Heatsoft
TM
permet de ramollir le beurre tout en
le mélangeant. La technologie HeatSoft
TM
chauffe légèrement
les ingrédients pour les aider à atteindre plus rapidement la
température ambiante de la pièce et vous fait gagner du temps.
Bouton Boost
Le bouton Boost, lorsqu’il est enfoncé, permet d’accroître
temporairement la vitesse sélectionnée.
Bouton d’éjection des batteurs
Le bouton d’éjection des batteurs permet, d’une simple pression du
doigt, de libérer les batteurs, les crochets pétrisseurs ou le fouet.
ATTENTION : S’assurer que le batteur à main est débranché avant
de retirer ou d’ajouter tout accessoire.
Gestion du cordon d’alimentation
La lanière, qui est attachée au cordon d’alimentation, permet de
bien ranger et conserver ce dernier.
Batteurs
Les batteurs ont été conçus pour obtenir des résultats rapides et
optimisés, quel que soit le mélange. Ils peuvent être nettoyés au
lave-vaisselle.
Crochets pétrisseurs
Utiliser ces crochets (voir Figure 1) pour pétrir une pâte à pain, une
pâte à pizza ou tout autre type de pâtes et de mélanges épais. Pour
des résultats optimaux, combiner l’utilisation des crochets à une
faible vitesse.
Fouet
Le fouet (voir Figure 3) peut être utilisé pour incorporer de l’air à
divers mélanges, tels que des blancs d’œufs, des jaunes d’œufs ou
de la crème.
Boîte de rangement
La boîte de rangement peut contenir le batteur à main, des
accessoires et le cordon d’alimentation pour emporter l’appareil
avec soi en tout confort (voir Figure 4).
Buse magnétique
La buse magnétique peut être retirée pour faciliter l’entretien (voir
Figure 5).
Préparation du batteur à main
Avant d’utiliser le batteur pour la première fois, nettoyer les batteurs,
crochets pétrisseurs et le fouet. Rincer, puis sécher l’ensemble des
pièces.
Avant d’insérer les batteurs dans l’équipement, s’assurer
préalablement que le sélecteur de vitesse est sur « 0 (OFF) » et
que l’équipement est débranché. S’assurer ensuite que la buse
magnétique est bien en place. Insérer les batteurs, l’un après
l’autre, en présentant l’extrémité de la tige dans les trous situés
sur la face inférieure de l’équipement. Tourner légèrement chaque
batteur puis enfoncer ces derniers jusqu’à ce qu’ils s’enclenchent en
produisant un léger « clic ».
Remarque : les batteurs sont interchangeables, mais les crochets
pétrisseurs ne le sont pas. Pour utiliser les crochets pétrisseurs,
insérer celui avec le collier au niveau de la tige (voir Figure 2)
dans le plus grand trou du batteur. Si les crochets pétrisseurs ne
s’enclenchent pas dans les trous en produisant un « clic », les
retirer puis réessayer.
Raccorder le cordon d’alimentation à une prise électrique.
Ramollir le beurre/Réaliser un crémage
1. Couper le beurre froid en petits cubes d’environ 2,5 cm de côté,
puis les mettre dans un saladier avec du sucre.
2. Appuyer une fois sur le bouton Heatsoft
TM
, puis démarrer les
batteurs. Commencer à mélanger à la vitesse 1 pendant environ
45 secondes ou jusqu’à ce qu’il ne reste plus de gros morceaux
de beurre. Changer ensuite le réglage de vitesse sur 5, 6 ou 7
pendant la durée restante recommandée dans le tableau.
REMARQUE : Lorsque la fonction HeatSoft
TM
est activée, un
voyant lumineux blanc s’allume et le ventilateur de l’élément
thermique se met en marche.
ATTENTION : Ne pas toucher ou placer sa main en
Dessous de la buse magnétique lorsque la fonction Heatsoft
TM
est ACTIVÉE.
REMARQUE : Pour éviter d’effectuer un crémage excessif,
éteindre la fonction Heatsoft
TM
une fois la durée décrite dans le
tableau ci-dessus écoulée
3. Une fois le crémage terminé, appuyer à nouveau sur le bouton
HeatSoft
TM
pour arrêter le transfert de chaleur. Le voyant
lumineux blanc disparaît et le ventilateur s’arrête alors.
4. Continuer de mélanger avec les ingrédients suivants en
respectant la recette. Pour obtenir plus d’informations,
poursuivre la lecture avec la section « Mélange ».
Mélange
1. Ajouter le reste des ingrédients dans le saladier.
REMARQUE : An d’éviter tout risque de projection, démarrer
l’équipement à la vitesse la plus faible, puis augmenter
progressivement jusqu’à atteindre la vitesse souhaitée.
2. Guider lentement le batteur vers les côtés et le centre du
saladier, sans changer de direction. Prendre soin de ne pas trop
battre le mélange. Battre un mélange de manière excessive
peut nuire à sa qualité.
REMARQUE : Dès qu’il est nécessaire de racler les parois
du saladier, arrêter le batteur et racler le fond et les côtés du
récipient avec une spatule en caoutchouc. Régler la vitesse sur
« 0 (OFF) » avant d’ajouter des ingrédients. S’assurer que les
batteurs sont bien positionnés au-dessus du saladier pour que
l’excès de la préparation retombent bien dans le saladier.
3. Lorsque le mélange est terminé, régler la vitesse sur « 1 »
puis relever lentement les batteurs du mélange an de retirer
l’excès de la préparation accroché sur les batteurs. S’assurer
que l’appareil est sur la position « 0 (OFF) » avant de sortir
complètement les batteurs du saladier.
Éjecter les batteurs, les crochets pétrisseurs ou le fouet
ATTENTION : Éteindre et débrancher l’appareil avant d’éjecter tout
accessoire.
S’assurer que le réglage de vitesse est sur la position « 0 (OFF) » et
que le cordon d’alimentation n’est plus raccordé à la prise électrique.
Appuyer sur le bouton d’éjection des batteurs pour libérer tout
accessoire inséré dans l’appareil.
Ajuster la vitesse
1. Régler le sélecteur de vitesse sur l’une des valeurs comprises
entre 1 et 7 en fonction de la vitesse souhaitée. Retourner sur la
position « 0 (OFF) » pour arrêter l’équipement.
2. Pour passer immédiatement à une vitesse supérieure, appuyer
et maintenir le bouton Boost. La vitesse atteint alors celle de la
position 7, puis revient au réglage préalablement sélectionné.
3. REMARQUE : Cette fonction a été conçue pour des utilisations
courtes et temporaires. Pour de plus longues utilisations,
privilégier la vitesse 7.
Guide relatif aux réglages de vitesse du batteur à main
q
Buse magnétique
w
Bouton d’éjection des batteurs
e
Bouton HeatSoft
TM
r
Bouton Boost
t
Sélecteur à 7 vitesses
y
Poignée ergonomique
MAX
600ml
7
1
2
3
A
B
C
D
E
8
7
8
4
5
6
Cordon d’alimentation
MAX
600ml
7
1
2
3
A
B
C
D
E
8
7
8
4
5
6
Couvercle de l’élément thermique
o
Filtre de l’élément thermique
a
Boîte de rangement
s
Lanière du cordon d’alimentation
d
Crochets pétrisseurs
f
Fouet
g
Batteurs
Vitesse Usages
1 Remuer
Choisir ce réglage pour commencer à ramollir
le beurre avec le bouton HeatSoft
TM
. Il doit
également être choisi pour mélanger des
liquides, ou des ingrédients secs et liquides
ensemble. Choisir ce réglage pour préparer un
pouding instantané.
2 Mélanger
Choisir ce réglage lorsque la recette indique
qu’il faut mélanger plusieurs ingrédients
ensemble. Il doit également être choisi pour
préparer des pains rapides ou des mufns qui
nécessitent un mélange rapide.
3 Mixer
Choisir ce réglage pour mélanger des
préparations pour gâteau, ou lorsque les
instructions indiquent « à vitesse moyenne ».
Choisir également ce réglage pour obtenir une
crème à partir de beurre et de sucre.
REMARQUE : Il s’agit de la vitesse
maximale recommandée pour l’utilisation des
crochets pétrisseurs.
4-5 Battre
Choisir ce réglage pour préparer un glaçage,
dans le cadre d’une recette ou non. Choisir
ce réglage pour préparer une crème fraîche
liquide pour des desserts.
6-7 Fouetter
Choisir ce réglage pour écraser des pommes
de terre et ainsi obtenir une texture légère.
Il doit également être choisi pour battre des
œufs en neige.
Bouton Boost
Lors de certains mélanges particulièrement
complexes, appuyer sur ce bouton pour
faciliter l’utilisation du batteur à main.
Quantité de
sucre(en
grammes)
Quantité de
beurre (en
grammes)
Durée de
ramollissement
(en minutes)
100 g 100 g
entre 1 et
1 min 30 s
200 g 200 g
entre 2 et
2 min 30 s

1514
ENTRETIEN DU BATTEUR
Entretien et nettoyage
ATTENTION : Éteindre et débrancher l’appareil, puis éjecter tout
accessoire inséré dans l’équipement avant de le nettoyer.
1. Avant de réaliser toute opération de nettoyage, s’assurer que
le sélecteur de vitesse est sur « 0 (OFF) » et que l’appareil
est éteint. Débrancher le cordon d’alimentation de la prise de
courant et éjecter les batteurs.
2. Les batteurs, les crochets pétrisseurs et le fouet peuvent être
nettoyés dans de l’eau chaude savonneuse ou au lave-vaisselle.
Cet appareil comporte une buse magnétique qui a été conçue
pour être retirée lors d’un nettoyage (avant d’essayer de la
retirer, laisser la buse refroidir). Elle peut être nettoyée au
lave-vaiselle ou avec de l’eau savonneuse. Ne pas utiliser
d’éponge métallique ou de tampon à récurer pour éviter de rayer
l’équipement.
3. Pour faciliter le nettoyage, appuyer sur la languette déployée
pour retirer le couvercle de l’élément thermique. Retirer
ensuite le ltre de l’élément thermique. Nettoyer avec de l’eau
savonneuse et laisser sécher avant de replacer la pièce dans
l’équipement. Le ltre doit être nettoyé tous les 3-6 mois en
fonction de la fréquence d’utilisation de l’appareil. Ne pas utiliser
l’appareil si le ltre et le couvercle de l’élément thermique ne
sont pas en place.
ATTENTION : Ne pas immerger le batteur, le cordon
d’alimentation et la prise dans l’eau ou dans tout autre liquide.
Cela peut entraîner un choc électrique, une blessure et/ou
pourrait endommager le produit.
4. Pour enlever les taches les plus tenaces sur le batteur à main,
nettoyer les surfaces avec un tissu légèrement humidié avec
de l’eau savonneuse ou un nettoyant non abrasif et doux.
5. Ne pas utiliser de nettoyant ou de matériau abrasif pour nettoyer
une pièce de l’équipement ou la boîte de rangement.
Entreposage
ATTENTION :
1. Ne pas entreposer de matériaux ou d’objets autres que le
batteur à main, ses accessoires, le cordon d’alimentation et le
manuel d’utilisation dans la boîte de rangement.
2. Ne pas activer la fonction Heatsoft
TM
lorsque le batteur est dans
sa boîte de rangement.
Utilisation de la boîte de rangement
La boîte de rangement a été conçue pour faciliter le stockage de
tous les accessoires et de l’appareil en un seul et unique endroit.
Pour sortir le batteur à main de la boîte de rangement, appuyer sur
la languette frontale puis extraire le batteur de la boîte (voir Figure
7).
Pour le remettre sur la boîte de rangement, la buse magnétique
doit faire face à la languette. Appuyer ensuite sur le batteur à
main jusqu’à entendre un « clic » indiquant que la languette s’est
enclenchée.
REMARQUE : Prévoir entre 20 et 25 cm de cordon non enroulé à
l’arrière de l’appareil pour le ranger dans la boîte de rangement.
(voir Figure 7)
Remplacer le ltre de l’élément thermique
Le ltre de l’élément thermique doit être changé s’il est usé ou
endommagé.
Entretien
Cet appareil ne comporte pas de pièces dont l’entretien peut être
effectué par l’utilisateur. Tout entretien, à l’exception des tâches
décrites plus haut concernant le nettoyage et le ltre de l’élément
thermique, doit être réalisé par un service après-vente agréé
uniquement. Consulter la section relative à la garantie pour plus
d’informations.
Dépannage
1. Problème : Le batteur à main ne fonctionne plus.
a. Débrancher le cordon d’alimentation de la prise électrique et
attendre 30 minutes avant la prochaine utilisation.
2. Problème : Les batteurs et les autres accessoires ne s’insèrent
pas dans l’équipement.
a. Tourner légèrement les batteurs ou les accessoires souhaités
dans le sens horaire jusqu’à ce qu’ils s’enclenchent dans
l’équipement en produisant un « clic ».
3. Problème : Les batteurs ou les autres accessoires ne peuvent
pas être retirés de l’équipement.
a. Débrancher l’appareil de la prise électrique, puis appuyer sur
le bouton d’éjection des batteurs avant de tirer doucement sur
les accessoires.
4. Problème : La fonction HeatSoft
TM
ne s’arrête pas.
a. Appuyer une fois sur le bouton HeatSoft
TM
pour désactiver la
fonction, ou débrancher le cordon d’alimentation de la prise
électrique.
5. Problème : Le couvercle du ventilateur de l’élément thermique
ne retourne pas dans son emplacement.
a. S’assurer que la languette de sûreté du couvercle n’est pas
cassée. Si elle l’est, contacter le service après-vente pour
obtenir une pièce de rechange (le numéro à appeler gure
dans la section « Garantie », pages 16).
6. Problème : Il manque un composant.
a. Contacter le service après-vente (le numéro à appeler gure
dans la section « Garantie », pages 16) pour obtenir des
pièces de rechange.
RECETTES
Cupcakes
Pour : 12 cupcakes
• 125 g de beurre froid, coupé en cubes
• 125 g de sucre en poudre
• 2 gros œufs
• 1 cuillère à café d’extrait de vanille
• 125 g de farine autolevante
• 2 cuillères à soupe de lait
1. Préchauffer le four à 190 °C (170 °C si four avec ventilateur)
2. Mettre le beurre et le sucre dans un grand saladier.
3. Appuyer sur le bouton HeatSoft
TM
et commencer à mélanger à
la vitesse 1. Passer ensuite à la vitesse 5 pendant 2 minutes, ou
jusqu’à ce que le mélange soit ramolli et crémeux.
4. Arrêter la fonction HeatSoft
TM
.
5. Ajouter les œufs, l’un après l’autre. Bien mélanger à la vitesse 7
après chaque ajout. Incorporer et mélanger lentement la vanille.
6. Ajouter la farine et le lait, puis mélanger l’ensemble lentement
(vitesse 1) jusqu’à obtenir une texture lisse.
7. Remplir avec précautions les moules à cupcakes au ¾ à l’aide
d’une cuillère.
8. Placer les cupcakes au centre du four et laisser cuire pendant
environ 20-22 minutes, jusqu’à ce qu’ils aient monté et soient
dorés. Déposer ensuite les cupcakes sur une grille et les laisser
refroidir.
Cookies avec pépites de chocolat
Pour : 30 cookies
• 150 g de beurre froid, coupé en cubes
• 125 g de sucre blond
• 100 g de sucre en poudre
• 2 cuillères à café d’extrait de vanille
• 1 jaune d’œuf de moyenne taille
• 1 œuf de moyenne taille
• 300 g de farine
• 1 cuillère à café de biocarbonate de soude
• 200g de pépites de chocolat au lait
1. Préchauffer le four à 170 °C (150 °C si four avec ventilateur)
Aligner deux plaques de cuisson, chacune contenant du papier
sulfurisé.
2. Ajouter le beurre dans un saladier avec les deux types de sucre.
3. Appuyer sur le bouton HeatSoft
TM
et commencer à mélanger
avec la vitesse 1 jusqu’à ce que le mélange soit ramolli et
homogène. Passer ensuite à la vitesse 7 pendant environ
2 minutes.
4. Arrêter la fonction HeatSoft
TM
.
5. Ajouter la vanille et les œufs, puis mélanger jusqu’à obtenir une
texture légère et crémeuse.
6. Mélanger lentement la farine avec le bicarbonate de soude, puis
incorporer les pépites de chocolat.
7. Faire rouler l’équivalent de deux cuillères à soupe du mélange
jusqu’à obtenir une petite boule, puis la placer sur la plaque de
cuisson. Répéter l’opération autant de fois que nécessaire en
veillant à laisser 3 cm entre chaque boule. Appuyer doucement
sur chaque boule.
8. Placer les plaques de cuisson dans le four et laisser cuire
pendant environ 15 minutes. Laisser les cookies refroidir
pendant quelques minutes sur la plaque avant de les placer sur
une grille.

1716
GARANTIE
Veuillez conserver votre ticket de caisse, il vous sera demandé lors
de toute réclamation sous garantie.
Cet appareil est garanti 2 ans à partir de la date d’achat, comme
indiqué dans le présent document.
Dans le cas peu probable d’une panne résultant d’un défaut de
conception ou de fabrication au cours de la période de garantie,
veuillez rapporter l’appareil au magasin où vous l’avez acheté avec
votre ticket de caisse et une copie de cette garantie.
Vos droits statutaires ne sont aucunement affectés par cette
garantie. Seul Jarden Consumer Solutions (Europe) Limited (« JCS
(Europe) ») peut modier ces dispositions.
JCS (Europe) s’engage à réparer ou remplacer gratuitement,
pendant la période de garantie, toute pièce de l’appareil qui se
révèle défectueuse sous réserve que :
• vous avertissiez rapidement le magasin ou JCS (Europe) du
problème ; et
• l’appareil n’ait pas été altéré de quelque manière que ce soit
ou endommagé, utilisé incorrectement ou abusivement, ou
bien réparé ou altéré par une personne autre qu’une personne
agréée par JCS (Europe) Products Europe.
Cette garantie ne couvre pas les défauts liés à une utilisation
incorrecte, un dommage, une utilisation abusive, l’emploi d’une
tension incorrecte, les catastrophes naturelles, les événements hors
du contrôle de JCS (Europe), une réparation ou une altération par
une personne autre qu’une personne agréée par JCS (Europe) ou
le non-respect des instructions d’utilisation. De plus, cette garantie
ne couvre pas non plus l’usure normale, y compris, mais sans
limitation, les petites décolorations et éraures.
Cette garantie s’applique uniquement à l’acheteur d’origine et elle
n’étend aucun droit à toute personne acquérant l’appareil pour un
usage commercial ou communal.
Si votre appareil est accompagné d’une garantie locale ou d’une
carte de garantie, veuillez en consulter les dispositions et conditions
en vigueur, ou vous adresser à votre revendeur local pour en savoir
plus.
Les déchets d’équipement électrique ne doivent pas être mélangés
aux ordures ménagères. Veuillez recycler si vous en avez la
possibilité. Envoyez-nous un email à
[email protected] pour plus d’informations sur le
recyclage et la directive WEEE.
Jarden Consumer Solutions (Europe) Limited
5400 Lakeside
Cheadle Royal Business Park
Cheadle
SK8 3GQ
United Kingdom
ES
INSTRUCCIONES IMPORTANTES DE SEGURIDAD
LÉALAS DETENIDAMENTE Y
CONSÉRVELAS PARA CONSULTARLAS EN
EL FUTURO
Este aparato no debe ser utilizado por
niños. Los aparatos pueden ser utilizados
por personas con discapacidades físicas,
sensoriales o mentales o sin experiencia
ni conocimientos si reciben supervisión o
instrucciones relativas al uso seguro del
aparato y comprenden los riesgos que
implica. Los niños no deben jugar con el
aparato.
Mantenga el aparato y su cable fuera del
alcance de niños.
No utilice nunca el aparato para ningún
n distinto de aquel para el que ha sido
diseñado. Este aparato es para uso
doméstico exclusivamente. No utilice este
aparato al aire libre.
Si el cable de alimentación está dañado,
deberá ser sustituido por el fabricante, su
agente de servicio técnico o personas que
cuenten con una cualicación equivalente
para evitar posibles riesgos.
Este aparato genera calor durante su uso.
Deberán adoptarse precauciones para evitar
quemaduras, irritaciones, fuego u otros
daños a personas u objetos provocados
por el contacto con las supercies calientes
mientras esté utilizándose o enfriándose.
Apague y desconecte siempre el aparato
de la toma eléctrica si lo va a dejar sin
supervisión y antes de montarlo, desmontarlo
o limpiarlo, así como al aproximarse a piezas
móviles durante su uso.
Deje siempre que el aparato se enfríe
antes de montarlo, desmontarlo, limpiarlo o
guardarlo.
Nunca sumerja el cuerpo principal del
aparato, el cable de alimentación o el
conector en agua ni en ningún otro líquido.
Los ganchos de amasar, las varillas y el
montaclaras deben lavarse en agua caliente
y jabonosa o en un lavavajillas. Consulte la
sección de limpieza para obtener información
completa.
Ninguno de los accesorios (varillas, ganchos
de amasar y montaclaras) debe utilizarse
durante más de 4 minutos y 30 segundos.
Al batir cargas extremadamente pesadas,
el aparato no debe utilizarse durante más
de 1 minuto y 30 segundos, y la función
HeatSoft
TM
no debe utilizarse durante más de
5 minutos seguidos.
IMPORTANTE: En el caso de que la batidora
se recaliente debido a un exceso de carga,
se activará el interruptor de seguridad, que
impedirá que la batidora funcione. En el caso
de que esto suceda, apague la batidora en
la toma de corriente y deje que se enfríe
durante 10 minutos antes de volver a
encenderla.
• Asegúrese siempre de que tiene las manos secas antes de
manipular el enchufe o encender el aparato.
• Utilice siempre el aparato sobre una supercie estable,
segura, seca y horizontal.
• Este aparato no debe colocarse sobre supercies que
puedan estar calientes (como una cocina eléctrica o de gas)
ni en las proximidades de estas.
• Nunca permita que el cable de alimentación quede colgando
del borde de una supercie de trabajo, que entre en contacto
con supercies calientes, que presente nudos o que quede
atrapado.
• No utilice el aparato si este se ha caído al suelo o si presenta
signos visibles de daños.
• No utilice nunca ningún accesorio o pieza no recomendados
por el fabricante.
• Quite todos los accesorios del aparato antes de lavarlos o
limpiarlos.
• Mantenga los dedos, el pelo y la ropa alejados de las piezas
móviles del aparato cuando lo esté utilizando.
PRECAUCIONES CON ALTA TEMPERATURA
1. No active la función HeatSoft
TM
mientras la batidora está en el
contenedor de almacenamiento.
2. Coloque únicamente el contenido de esta caja en el contenedor
de almacenamiento.
3. No toque ni sujete la zona situada por debajo de la boquilla de
calor mientras está activada la función HeatSoft
TM
.
4. No active la función HeatSoft
TM
con la base de la unidad situada
sobre la encimera.
5. No utilice la unidad si no están instalados la cubierta de
ventilación y el ltro del calentador.
PIEZAS
UTILIZACIÓN DE LA BATIDORA DE MANO
Descripción de la batidora de mano
La batidora de mano Breville
®
con tecnología HeatSoft
TM
ha
sido diseñada para permitirle preparar tartas y otros alimentos
horneados sin planicación previa. ¡Ya no tendrá que esperar a
que ingredientes como la mantequilla alcancen la temperatura
ambiente! ¡Ahora puede ablandarlos y batirlos en un solo paso!
¿Sabía que...?
Muchas recetas requieren que ingredientes como la mantequilla
estén a temperatura ambiente. Para que la mantequilla alcance
la temperatura ambiente hay que dejarla durante horas fuera del
frigoríco. Si utiliza mantequilla fría, recién sacada del frigoríco,
los alimentos horneados resultarán pesados y densos. La
mantequilla calentada en el microondas o derretida puede provocar
que la masa resulte grasienta y que unas galletas salgan pastosas
y sin volumen. Utilizar ingredientes a temperatura ambiente permite
que los alimentos horneados salgan más esponjosos.
Botón HeatSoft
TM
:
El botón HeatSoft
TM
permite que la mantequilla se ablande
mientras se bate. La tecnología HeatSoft
TM
aplica temperatura
de manera suave para que los ingredientes fríos alcancen la
temperatura ambiente mientras se baten, lo que evita tener que
planicar con antelación.
Botón de velocidad máxima
El botón de velocidad máxima permite dar un impulso adicional al
ajuste de velocidad simplemente pulsando un botón.
q
Boquilla magnética
w
Botón de expulsión de las varillas
e
Botón HeatSoft
TM
r
Botón de velocidad máxima
t
Control de 7 velocidades
y
Asa ergonómica
MAX
600ml
7
1
2
3
A
B
C
D
E
8
7
8
4
5
6
Cable de alimentación
MAX
600ml
7
1
2
3
A
B
C
D
E
8
7
8
4
5
6
Cubierta de ventilación del calentador
o
Filtro de ventilación del calentador
a
Contenedor de almacenamiento
s
Correa del cable de alimentación
d
Ganchos de amasar
f
Montaclaras
g
Varillas

1918
Botón de expulsión de las varillas
El diseño del botón de expulsión de las varillas permite liberar las
varillas, los ganchos de amasar y el montaclaras presionándolo con
el pulgar.
PRECAUCIÓN: Asegúrese de que la batidora de mano está
desenchufada antes de desmontar o montar un accesorio.
Correa del cable de alimentación
La correa que presenta el cable de alimentación permite plegar el
cable de forma ordenada.
Varillas
El diseño de las varillas permite batir de forma rápida y en
profundidad todo tipo de mezclas. Las varillas pueden lavarse en el
lavavajillas.
Ganchos de amasar
Utilice los ganchos de amasar (observe la Figura 1) para amasar
masa de pan, pizza u otras mezclas o masas pesadas. Utilícelos a
baja velocidad para obtener un resultado óptimo.
Montaclaras
El montaclaras (observe la Figura 3) se utiliza para que entre aire
en la mezcla al batir alimentos como las claras de huevo, las yemas
o la nata.
Contenedor de almacenamiento
Le permite almacenar juntos la batidora de mano, los accesorios y
el cable de alimentación y acceder a ellos o transportarlos de forma
cómoda (observe la Figura 4).
Boquilla magnética
La boquilla magnética es desmontable, lo que facilita su limpieza
(observe la Figura 5).
Preparación de la batidora
Antes de usar la batidora por primera vez, lave las varillas, los
ganchos de amasar y el montaclaras. Enjuáguelos y séquelos.
Para colocar las varillas en la unidad, asegúrese primero de que el
control de velocidad está situado en el valor «0 (OFF)» y la unidad
está desenchufada. Seguidamente, asegúrese de que la boquilla
magnética está en su sitio. Introduzca las varillas de una en una,
colocando el extremo del eje de las varillas en los oricios de
accionamiento situados en la parte inferior de la batidora. Gire las
varillas ligeramente y empújelas hasta que oiga un «clic» que indica
que están en su sitio.
Tenga en cuenta que las varillas son intercambiables pero los
ganchos de amasar no. Cuando utilice los ganchos de amasar,
el gancho de amasar que presenta un collarín en el eje (observe
la Figura 2) encaja en el oricio de accionamiento grande de la
batidora. Si los ganchos de amasar no se ajustan con un «clic»
en los oricios de accionamiento, cámbielos de oricio y vuelva a
intentarlo.
Conecte el cable a una toma eléctrica adecuada.
Ablandar mantequilla/hacer crema
1. Corte la mantequilla fría en dados de aproximadamente 2,5 cm
y póngala en el cuenco de batir con azúcar.
2. Pulse el botón HeatSoft
TM
una vez y después active las
varillas. Comience a batir con el ajuste de velocidad 1 durante
aproximadamente 45 segundos o hasta que no queden trozos
grandes de mantequilla. Seguidamente, cambie a velocidad 5-7
para el resto del tiempo recomendado en la tabla.
NOTA: Cuando esté en funcionamiento el botón HeatSoft
TM
, se
encenderá una luz blanca y se accionará el ventilador de calor.
PRECAUCIÓN: No toque ni sujete la zona situada por
debajo de la boquilla de calor mientras está activada la función
HeatSoft
TM
.
NOTA: Desactive la función HeatSoft
TM
una vez transcurrido el
tiempo indicado en la tabla anterior para evitar que se forme un
exceso de crema.
3. Una vez que haya formado la crema, pulse el botón HeatSoft
TM
de nuevo para desactivar el calor, con lo que la luz blanca se
atenuará progresivamente hasta apagarse y el ventilador se
desactivará.
4. Siga batiendo junto al resto de ingredientes según indique la
receta correspondiente. Para más detalles, continúe con la
sección Batir.
Batir
1. Añada el resto de ingredientes al cuenco de batir.
NOTA: Para evitar salpicaduras, ponga en marcha la unidad a
la velocidad más baja y aumente lentamente hasta alcanzar el
ajuste de velocidad deseado.
2. Desplace la batidora lentamente por el perímetro del cuenco y
por el centro siguiendo la misma dirección. Tenga cuidado de no
recalentar la mezcla. El recalentamiento provoca que algunas
mezclas tiendan a endurecerse.
NOTA: Si es preciso rebañar el cuenco, pare la batidora y
rebañe los lados y el fondo del cuenco con una espátula de
goma. Sitúe el control de velocidad en el valor «0 (OFF)»
mientras añade ingredientes. Asegúrese de que coloca las
varillas sobre el cuenco de batir para asegurarse de que la
mezcla que quede en ellas vuelva a caer dentro del cuenco de
batir.
3. Cuando termine de batir, sitúe el control de velocidad en el valor
«1» y levante las varillas lentamente del cuenco de batir para
que se desprenda de ellas la mezcla. Asegúrese de que sitúa el
control de velocidad de la unidad en el valor «0 (OFF)» antes de
sacar por completo las varillas del cuenco de batir.
Cantidad
de azúcar
(gramos)
Cantidad de
mantequilla
(gramos)
Tiempo para
ablandar
(minutos)
100 g 100 g 1 - 1 ½ minutos
200 g 200 g 2 - 2 ½ minutos
Guía de velocidades de la batidora de mano
Expulsión de las varillas, los ganchos de amasar o el
montaclaras
PRECAUCIÓN: Apague y desenchufe el aparato antes de expulsar
los accesorios.
Asegúrese de que el control de velocidad está en la posición «0
(OFF)» y que el cable está desenchufado de la toma eléctrica. Pulse
el botón de expulsión de las varillas para liberar los accesorios.
Cómo ajustar la velocidad
1. Mueva el selector de velocidad del 1 al 7 y, para apagarlo,
ajústelo con el valor «0 (OFF)».
2. Para alcanzar una velocidad superior de inmediato, mantenga
pulsado el botón de velocidad máxima. La velocidad cambiará
a 7 hasta que suelte el botón, momento en el que el aparato
recuperará el ajuste original.
3. NOTA: Esta función está pensada para aumentos de velocidad
breves. Para batir durante más tiempo, utilice la velocidad 7.
CONSERVACIÓN DE LA BATIDORA
Conservación y limpieza
PRECAUCIÓN: Apague y desenchufe el aparato y expulse los
accesorios antes de limpiarlos.
1. Antes de limpiar cualquier parte de la batidora, sitúe el control
de velocidad en la posición «0 (OFF)». Seguidamente,
desenchufe el cable de la toma y expulse las varillas.
2. Las varillas, los ganchos de amasar y el montaclaras deben
lavarse en agua caliente y jabonosa o en un lavavajillas. Este
aparato presenta una boquilla magnética diseñada para que
pueda desmontarse y lavarse (déjela enfriar siempre). Es apta
para lavavajillas y puede lavarse también con agua jabonosa.
No utilice estropajo para evitar rayarla.
3. Para limpiarla fácilmente, presione hacia abajo la pestaña que
sobresale para tirar de la cubierta de ventilación del calentador
y extraerla. Seguidamente, retire el ltro de ventilación del
calentador. Lávelo con agua jabonosa y déjelo secar antes de
volver a colocarlo en la unidad. El ltro debe limpiarse cada 3-6
meses, dependiendo de su uso. No utilice la unidad si no están
instalados la cubierta de ventilación y el ltro del calentador.
PRECAUCIÓN: No sumerja el dispositivo, el cable o el
enchufe en agua u otros líquidos. Si lo hace, podría provocar
una descarga eléctrica, sufrir lesiones o dañar el producto.
4. Para quitar manchas difíciles de la batidora de mano, limpie las
supercies con un paño ligeramente humedecido en agua con
jabón o un producto de limpieza suave no abrasivo.
5. No utilice ningún producto o material abrasivo para limpiar
ninguna pieza de la batidora de mano o el contenedor de
almacenamiento, ya que estos podrían rayar el producto.
Almacenamiento
PRECAUCIÓN:
1. No almacene en el contenedor de almacenamiento ningún
material que no sea la batidora, sus accesorios, el cable de
alimentación y el manual del usuario.
2. No active la función HeatSoft
TM
ni encienda el aparato mientras
esté guardado en el contenedor de almacenamiento.
Utilización del contenedor de almacenamiento
El contenedor de almacenamiento está diseñado para ayudarle a
guardar todos los accesorios y la unidad en un mismo sitio.
Para extraer la batidora de mano del contenedor de
almacenamiento, empuje la pestaña delantera en dirección contraria
a la batidora y tire de la batidora hacia fuera (observe la Figura 7).
Para volver a colocarla en el contenedor de almacenamiento,
oriente la boquilla magnética hacia la pestaña del contenedor
de almacenamiento. Empuje la batidora sobre el contenedor y la
pestaña se encajará con un «clic» a la batidora.
NOTA: Deje sin recoger entre 20 y 25 cm de cable en la parte
posterior de la unidad para que pueda encajar en el contenedor de
almacenamiento (observe la Figura 7).
Velocidad Operaciones de batido
1 Remover
Utilícela para empezar a ablandar la
mantequilla con el botón HeatSoft
TM
. Utilícela
también para remover ingredientes líquidos
o al mezclar alternamente los ingredientes
secos y líquidos de una receta. Utilícela
para preparar cualquier mezcla de postre
instantánea lista para usar o de paquete.
2 Mezclar
Utilícela cuando la receta indique que deben
mezclarse los ingredientes. Utilícela para
panes rápidos o mufns que requieran una
operación rápida, solo lo suciente para
mezclar.
3 Combinar
Utilícela al preparar la masa de pasteles o si
la receta indica que debe utilizarse velocidad
media. Utilícela para obtener una crema a
partir de mantequilla y azúcar.
NOTA: Esta es la velocidad máxima
recomendada cuando se utilizan los ganchos
de amasar.
4-5 Batir
Utilícela al preparar una cobertura de pastel
siguiendo una receta o utilizando una mezcla
de paquete. Utilícela para montar nata para
postres.
6-7 Montar
Utilícela para hacer puré de patata y obtener
una textura ligera y esponjosa. Utilícela para
montar claras de huevo.
Botón de
velocidad
máxima
Al batir mezclas especialmente densas, pulse
el botón para realizar la tarea con facilidad.

2120
Sustitución del ltro de ventilación del calentador
El ltro de ventilación del calentador deberá ser sustituido cuando
esté gastado o dañado.
Mantenimiento
Este aparato carece de piezas que pueda reparar el usuario.
Todo mantenimiento al margen de lo descrito en las secciones de
limpieza y de sustitución del ltro de ventilación del calentador solo
deberá realizarlo un representante autorizado del servicio técnico.
Consulte la sección de garantía.
Solución de problemas
1. Problema: La batidora de mano deja de funcionar.
a. Desenchufe el cable de alimentación de la toma eléctrica y
espere 30 minutos antes de volver a utilizarla.
2. Problema: Introducción de las varillas y otros accesorios en la
batidora de mano.
a. Gire las varillas u otros accesorios ligeramente en sentido
horario hasta que se ajusten a la unidad.
3. Problema: Extracción de las varillas u otros accesorios de la
batidora de mano.
a. Desenchufe la batidora, presione el botón de expulsión de las
varillas y tire suavemente de los accesorios para extraerlos.
4. Problema: Si HeatSoft
TM
continúa activada.
a. Pulse el botón HeatSoft
TM
una vez para desactivarla o
desenchufe el cable de alimentación de la toma.
5. Problema: Si no es posible volver a instalar la cubierta del
ventilador del calentador.
a. Compruebe que la pestaña de bloqueo de la cubierta del
ventilador del calentador no está rota. Si lo está, llame al
servicio de atención al consumidor para obtener la pieza de
repuesto (el número gura en la sección de la garantía, en
las páginas 21.
6. Problema: Falta cualquier componente.
a. Llame al servicio de atención al consumidor (el número gura
en la sección de la garantía, en las páginas 21) para obtener
piezas de repuesto.
RECETAS
Cupcakes
Para: 12 cupcakes
• 125 g de mantequilla fría en dados
• 125 g de azúcar extrano
• 2 huevos grandes
• 1 cucharadita de extracto de vainilla
• 125 g de harina con levadura
• 2 cucharadas de leche
1. Caliente el horno a 190˚C (170˚C si es de ventilador).
2. Coloque la mantequilla y el azúcar en un cuenco grande.
3. Pulse el botón HeatSoft
TM
y bata usando la velocidad 1,
aumentando a la velocidad 5 durante aproximadamente 2
minutos hasta que la mezcla se ablande y esté cremosa.
4. Desactive HeatSoft
TM
.
5. Añada los huevos de uno en uno, batiendo bien a velocidad
7 antes de añadir el siguiente. Añada y bata suavemente la
vainilla.
6. Añada la harina y la leche y, utilizando la velocidad 1, bata
suavemente hasta obtener una mezcla suave.
7. Utilizando una cuchara, pase la mezcla a los moldes de los
cupcakes, llenándolos a ¾ de su capacidad.
8. Horneelos en el centro del horno hasta que suban y se doren
(aproximadamente 20-22 minutos). Colóquelos sobre una rejilla
de metal para que se enfríen.
Galletas con virutas de chocolate
Para: 30 galletas
• 150 g de mantequilla fría en dados
• 125 g de azúcar moreno claro blando
• 100 g de azúcar extrano
• 2 cucharaditas de extracto de vainilla
• 1 yema de huevo mediano
• 1 huevo mediano
• 300 g de harina normal
• 1 cucharadita de bicarbonato
• 200 g de virutas de chocolate con leche
1. Caliente el horno a 170˚C (150˚C si es de ventilador). Cubra
dos bandejas de horno con papel de horno.
2. Añada a un cuenco la mantequilla y los dos tipos de azúcar.
3. Pulse el botón HeatSoft
TM
y bata a la velocidad 1 hasta
que se ablande la mantequilla y la mezcla sea uniforme.
Seguidamente, aumente a la velocidad 7 durante
aproximadamente 2 minutos.
4. Desactive HeatSoft
TM
.
5. Añada la vainilla y los huevos y bata hasta obtener una mezcla
ligera y cremosa.
6. Añada la harina y el bicarbonato y bata lentamente para que se
mezclen y luego añada las virutas de chocolate.
7. Forme bolas de dos cucharadas rasas y colóquelas en las
bandejas preparadas a una distancia de 3 cm. Aplástelas
ligeramente.
8. Coloque las bandejas en el horno y hornéelas 15 minutos
aproximadamente. Déjelas enfriar unos minutos en la bandeja,
antes de colocarlas en una rejilla de metal.
GARANTÍA
Guarde su recibo de compra, ya que lo necesitará para cualquier
reclamación dentro de esta garantía.
Este producto tiene una garantía de 2 años desde la fecha de
compra tal como se describe en este documento.
Durante este período de garantía, en el improbable caso de que el
aparato ya no funcione debido a un fallo de diseño o fabricación,
devuélvalo al lugar donde lo compró con su recibo de compra y una
copia de esta garantía.
Los derechos y ventajas de esta garantía son adicionales a sus
derechos estatutarios, que no se verán afectados por esta garantía.
Sólo Jarden Consumer Solutions (Europe) Limited (“JCS (Europe)”)
tiene derecho a cambiar estos términos.
JCS (Europe) se compromete, durante el período de garantía, a
reparar o cambiar el aparato, o cualquier parte del aparato que no
funcione correctamente, de manera gratuita siempre que:
• Informe inmediatamente al establecimiento de compra o a JCS
(Europe) del problema; y
• No se haya modicado el aparato de ninguna forma ni se haya
sometido a daños, uso indebido, mal uso o reparación por
cualquier otra persona no autorizada por JCS (Europe).
Los fallos que se produzcan por uso indebido, daños, mal uso, uso
con un voltaje incorrecto, desastres naturales, acontecimientos que
escapan al control de JCS (Europe), reparaciones o modicaciones
realizadas por una persona no autorizada por JCS (Europe) o
por no seguir las instrucciones de uso no están cubiertas por
esta garantía. Además, el desgaste o deterioro debidos al uso
normal, incluidos, sin limitación, los arañazos y las pequeñas
decoloraciones, no están cubiertos por esta garantía.
Los derechos de esta garantía sólo se aplicarán al comprador
original y no cubrirán el uso comercial o comunitario.
Si el aparato incluye una garantía especíca de algún país, consulte
los términos y condiciones de dicha garantía en sustitución de
la presente garantía, o póngase en contacto con el comerciante
autorizado de su localidad para obtener más información.
Los productos eléctricos desechados no se deben eliminar con la
basura doméstica. Recíclelos donde existan instalaciones para tal
n. Envíenos un mensaje de correo electrónico a
[email protected] para obtener más información
sobre WEEE y el reciclaje.
Jarden Consumer Solutions (Europe) Limited
Edif. Vázquez Krasnow
C/ Camino de la Zarzuela, 21
1º - Ocina 1B
28023 – Aravaca
Madrid, España
Tel: +34 902 515 588

2322
PL
WAŻNE INFORMACJE DOTYCZĄCE
BEZPIECZEŃSTWA
UWAŻNIE PRZECZYTAJ I ZACHOWAJ NA
PRZYSZŁOŚĆ.
Dzieci nie powinny używać tego urządzenia.
Urządzenia mogą być używane przez
osoby o ograniczonej sprawności zycznej,
czuciowej lub psychicznej, lub osoby
niemające doświadczenia ani wiedzy,
pod warunkiem że korzystają z nich pod
nadzorem lub zostały poinstruowane w
zakresie bezpiecznego używania urządzenia
i mają świadomość ryzyka związanego z jego
użytkowaniem. Dzieci nie powinny bawić się
urządzeniem.
Przechowuj urządzenie i przewód w miejscu
niedostępnym dla dzieci.
Nigdy nie używaj urządzenia niezgodnie
z przeznaczeniem. Urządzenie jest
przeznaczone wyłącznie do użycia w
gospodarstwie domowym. Nie wolno go
używać na zewnątrz.
W celu uniknięcia zagrożenia uszkodzony
przewód zasilający może być wymieniony
jedynie przez producenta, autoryzowany
serwis lub wykwalikowaną osobę.
Urządzenie wytwarza ciepło podczas
działania. Należy zachować odpowiednie
środki ostrożności, aby nie dopuścić do
spalenia, oparzenia, pożaru ani jakichkolwiek
obrażeń u osób oraz szkód materialnych
w wyniku dotknięcia gorących powierzchni
podczas działania urządzenia lub stygnięcia.
Zawsze wyłączaj i odłączaj urządzenie od
gniazdka zasilania, gdy jest zostawiane bez
nadzoru oraz przed montażem, demontażem,
czyszczeniem lub zbliżaniem się do części,
które poruszają się podczas użytkowania
urządzenia.
Przed montażem, demontażem,
czyszczeniem lub odłożeniem do
przechowywania urządzenie musi ostygnąć.
Nie zanurzaj korpusu urządzenia, przewodu
zasilającego ani wtyczki w wodzie ani żadnej
innej cieczy. Mieszaki do ciasta, trzepaki
i ubijaczkę należy myć w gorącej wodzie
z mydłem lub w zmywarce do naczyń.
Szczegółowe informacje na ten temat można
znaleźć w części dotyczącej czyszczenia.
Akcesoriów (trzepaków, mieszaków do
ciasta, ubijaczki) nie należy używać dłużej
niż 4 minuty i 30 sekund. Podczas mieszania
bardzo ciężkich produktów urządzenia nie
należy używać dłużej niż półtorej minuty.
Funkcji HeatSoft
TM
nie należy używać dłużej
niż 5 minut bez przerwy.
WAŻNE: jeśli mikser przegrzeje się na
skutek pracy z nadmiernym obciążeniem,
nastąpi aktywacja wyłącznika termicznego,
który wyłączy urządzenie i uniemożliwi
jego działanie. W takim przypadku należy
odłączyć mikser od gniazdka zasilania i
pozostawić go do ostygnięcia na 10 minut
przed ponownym włączeniem.
• Nigdy nie dotykaj wtyczki ani wyłącznika zasilania wilgotnymi
rękami.
• Zawsze używaj urządzenia na stabilnej, bezpiecznej, suchej i
poziomej powierzchni.
• Tego urządzenia nie można umieszczać na żadnych
potencjalnie gorących powierzchniach (takich jak kuchenki
gazowe lub elektryczne) ani w ich pobliżu.
• Przewód zasilający nie może zwisać nad krawędzią blatu
ani dotykać gorących powierzchni; nie wolno go zapętlać,
przycinać ani przyciskać.
• Nie używaj urządzenia, które zostało upuszczone lub ma
widoczne oznaki uszkodzenia.
• Nie wolno używać żadnych akcesoriów ani przystawek, które
nie są zalecane przez producenta.
• Przed myciem lub czyszczeniem akcesoriów odłącz je od
urządzenia.
• Trzymaj palce, włosy i ubranie z dala od ruchomych części
działającego urządzenia.
OSTRZEŻENIA DOTYCZĄCE WYSOKIEJ
TEMPERATURY
1. Nie włączaj funkcji HeatSoft
TM
, gdy mikser znajduje się w
pojemniku do przechowywania.
2. Nie umieszczaj w pojemniku do przechowywania żadnych
elementów poza zawartością tego pudełka.
3. Nie dotykaj dyszy ciepłego powietrza ani nie umieszczaj pod nią
rąk, gdy funkcja HeatSoft
TM
jest włączona.
4. Nie włączaj funkcji HeatSoft
TM
, gdy urządzenie znajduje się na
podstawie ustawionej na blacie.
5. Nie używaj tej funkcji bez założonej osłony nawiewu ciepłego
powietrza i ltra.
CZĘŚCI
UŻYWANIE MIKSERA RĘCZNEGO
Podstawowe informacje na temat miksera ręcznego
Mikser ręczny Breville
®
z technologią HeatSoft
TM
pomoże Ci
zrealizować wszelkie kuchenne inspiracje w każdej chwili. Nie
musisz już czekać, aż składniki takie jak masło osiągną temperaturę
pokojową. Teraz możesz je podgrzewać i miksować jednocześnie.
Czy wiesz, że...?
Wiele przepisów wymaga, aby składniki takie jak masło miały
temperaturę pokojową. Ogrzanie masła do temperatury pokojowej
wymaga pozostawienia go na kilka godzin na blacie, poza lodówką.
Jeśli użyjesz zimnego masła prosto z lodówki, ciasto będzie ciężkie
i gęste. Masło podgrzane w kuchence mikrofalowej lub roztopione
może z kolei spowodować, że ciasto będzie oleiste, przez co
ciastka będą wilgotne i niewyrośnięte. Używanie składników w
temperaturze pokojowej pozwala uzyskać bardziej puszyste ciasto i
smaczniejsze wypieki.
Przycisk HeatSoft
TM
:
Przycisk HeatSoft
TM
umożliwia jednoczesne miksowanie i
podgrzewanie masła. Technologia HeatSoft
TM
delikatnie ogrzewa
zimne składniki ciepłym powietrzem, doprowadzając je do
temperatury pokojowej, co eliminuje konieczność planowania
pieczenia z wyprzedzeniem.
Przycisk zwiększania mocy
Funkcja zwiększania mocy umożliwia szybkie zwiększenie mocy
wybranego ustawienia prędkości jednym przyciskiem.
Przycisk zwalniania trzepaków
Przycisk zwalniania trzepaków umożliwia zwolnienie trzepaków,
mieszaków do ciasta lub ubijaczki przy użyciu kciuka.
PRZESTROGA: Przed odłączeniem lub podłączeniem akcesoriów
należy się upewnić, że mikser jest odłączony od gniazdka zasilania.
Zwijanie przewodu zasilającego
Pasek przewodu zasilającego dostarczany wraz z przewodem
umożliwia spięcie zwiniętego przewodu.
Trzepaki
Konstrukcja trzepaków zapewnia dokładne i szybkie miksowanie
różnych produktów. Trzepaki można myć w zmywarce.
Mieszaki do ciasta
Mieszaków do ciasta (patrz rys. 1) można używać do wyrabiania
ciasta na chleb, pizzę lub innych ciężkich mas bądź ciast. Najlepsze
rezultaty osiąga się, używając ustawień niższych prędkości.
Ubijaczka
Ubijaczka (patrz rys. 3) służy do napowietrzania produktów takich
jak białka jajek, żółtka lub śmietana.
Pojemnik do przechowywania
Umożliwia przechowywanie miksera ręcznego, akcesoriów i
przewodu zasilającego w jednym miejscu, zapewniając wygodny
dostęp do nich oraz ułatwiając ich transport (patrz rys. 4).
Dysza magnetyczna
Dyszę magnetyczną można odłączyć w celu jej łatwiejszego
wyczyszczenia (patrz rys. 5).
Przygotowanie miksera do pracy
Przed pierwszym użyciem miksera umyj trzepaki, mieszaki do ciasta
oraz ubijaczkę. Opłucz je i wysusz.
Przed podłączeniem trzepaków do urządzenia upewnij się,
że regulator prędkości jest ustawiony na „0 (OFF)” (Wył.) i że
urządzenie jest odłączone od gniazdka zasilania. Następnie upewnij
się, że dysza magnetyczna znajduje się na swoim miejscu. Podłącz
po kolei trzepaki, umieszczając ich trzonki w otworach na spodniej
części miksera. Lekko przekręć trzepak i wepchnij głębiej jego
trzonek, aż zablokuje się z kliknięciem.
Pamiętaj, że trzepaki można podłączać po dowolnej stronie, nie
dotyczy to jednak mieszaków do ciasta. Podczas podłączania
mieszaków do ciasta pamiętaj, że mieszak z kołnierzem na trzonku
(patrz rys. 2) należy podłączyć do dużego otworu w mikserze. Jeśli
mieszaki do ciasta nie zablokują się w otworach z kliknięciem,
wyjmij je i spróbuj ponownie.
Podłącz przewód zasilający do gniazdka zasilania.
q
Dysza magnetyczna
w
Przycisk zwalniania trzepaków
e
Przycisk HeatSoft
TM
r
Przycisk zwiększania mocy
t
7-stopniowy regulator prędkości
y
Ergonomiczny uchwyt
MAX
600ml
7
1
2
3
A
B
C
D
E
8
7
8
4
5
6
Przewód zasilający
MAX
600ml
7
1
2
3
A
B
C
D
E
8
7
8
4
5
6
Osłona nawiewu ciepłego powietrza
o
Filtr nawiewu ciepłego powietrza
a
Pojemnik do przechowywania
s
Pasek przewodu zasilającego
d
Mieszaki do ciasta
f
Ubijaczka
g
Trzepaki

2524
Zmiękczanie/ucieranie masła
1. Pokrój zimne masło w kostkę o boku ok. 2,5 cm i umieść wraz z
cukrem w misie.
2. Naciśnij jednokrotnie przycisk HeatSoft
TM
, a następnie włącz
trzepaki. Rozpocznij miksowanie przy ustawieniu prędkości 1
przez około 45 sekund lub do momentu, kiedy masło zostanie
rozdrobnione. Następnie miksuj z ustawieniem prędkości 5–7
przez pozostały czas zalecany w tabeli.
UWAGA: po naciśnięciu przycisku HeatSoft
TM
zaświeci się biała
kontrolka i włączy się nawiew ciepłego powietrza.
PRZESTROGA: nie dotykaj dyszy ciepłego powietrza
ani nie umieszczaj pod nią rąk, gdy funkcja HeatSoft
TM
jest
włączona.
UWAGA: po upływie czasu podanego w tabeli powyżej wyłącz
funkcję HeatSoft
TM
, aby uniknąć nadmiernego zmiękczenia
masła.
3. Po zakończeniu ucierania naciśnij ponownie przycisk HeatSoft
TM
aby wyłączyć nadmuch ciepłego powietrza. Biała kontrolka
zgaśnie i nawiew się wyłączy.
4. Kontynuuj miksowanie, dodając pozostałe składniki zgodnie z
przepisem. Szczegółowe informacje można znaleźć w części
dotyczącej miksowania.
Miksowanie
1. Dodaj pozostałe składniki do misy.
UWAGA: aby uniknąć rozprysków, uruchom urządzenie z
najniższym ustawieniem prędkości i powoli zwiększaj je do
żądanego ustawienia.
2. Powoli przesuwaj mikser wzdłuż ścianek i przez środek misy,
w jednym kierunku. Uważaj, aby nie ubić nadmiernie masy.
Nadmierne ubicie może sprawić, że niektóre rodzaje mas staną
się zbyt twarde.
UWAGA: Jeśli występuje konieczność zeskrobania masy ze
ścianek i dna misy, zatrzymaj mikser i zeskrob masę gumową
łopatką. Dodając składniki do misy, ustaw regulator prędkości
na „0 (OFF)” (Wył.). Pamiętaj o ustawieniu trzepaków nad misą,
aby nadmiar masy z trzepaków spadł z powrotem do misy.
3. Po zakończeniu miksowania ustaw regulator prędkości na
„1” i powoli wyjmij trzepaki z misy, aby oczyściły się z masy.
Przed całkowitym wyjęciem trzepaków z misy ustaw regulator
prędkości na „0 (OFF)” (Wył.).
Odłączanie trzepaków, mieszaków do ciasta lub ubijaczki
PRZESTROGA: przed odłączeniem akcesoriów wyłącz urządzenie i
odłącz je od gniazdka zasilania.
Upewnij się, że regulator prędkości jest w pozycji „0 (OFF)” (Wył.)
i że przewód zasilający został odłączony od gniazdka zasilania.
Naciśnij przycisk zwalniania trzepaków. Akcesoria zostaną
odłączone.
Regulacja prędkości
1. Regulator prędkości można przesuwać w zakresie ustawień
od 1 do 7 oraz w pozycję „0 (OFF)” (Wył.), aby wyłączyć
urządzenie.
2. Aby błyskawicznie zwiększyć obroty, naciśnij i przytrzymaj
przycisk zwiększenia mocy. Prędkość zwiększy się do
ustawienia 7 i utrzyma na tym poziomie do momentu zwolnienia
przycisku, po czym powróci do oryginalnego ustawienia.
3. UWAGA: tej funkcji należy używać do chwilowego zwiększenia
mocy. Aby miksować z większą prędkością przez dłuższy czas,
używaj ustawienia 7.
Objaśnienie ustawień prędkości miksera ręcznego
Ilość cukru (w
gramach)
Ilość masła (w
gramach)
Czas
zmiękczania
(W minutach)
100 g 100 g 1–1 ½ minuty
200 g 200 g 2–2 ½ minuty
Prędkość Rodzaje miksowania
1 Mieszanie
Ustawienie używane do zmiękczania masła
z włączoną funkcją HeatSoft
TM
. Używane
również do mieszania płynnych składników
lub łączenia suchych i płynnych składników
na przemian, zgodnie z przepisem. Używane
do przygotowywania gotowych deserów w
proszku.
2 Miksowanie
Ustawienie używane, gdy przepis wymaga
połączenia składników. Używane do ciasta
na chleb lub babeczki wymagające szybkiego
wyrabiania, ograniczającego się do połączenia
składników.
3 Mieszanie
składników
na gładką
masę
Ustawienie używane do przygotowywania
ciast lub mas wymagających miksowania ze
średnią prędkością. Używane również do
miksowania masła z cukrem na gładką masę.
UWAGA: to maksymalne ustawienie
zalecane do stosowania z mieszakami do
ciasta.
4–5 Ubijanie
Ustawienie używane do przygotowywania
polewy na podstawie przepisu lub z proszku.
Używane również do ubijania śmietany do
deserów.
6–7
Roztrzepywanie
Ustawienie używane do miksowania
ziemniaków na lekkie i puszyste purée.
Używane również do ubijania białek jajek.
Przycisk
zwiększania
mocy
Podczas miksowania szczególnie ciężkich
składników naciśnij ten przycisk, aby ułatwić
miksowanie.
KONSERWACJA MIKSERA
Konserwacja i czyszczenie
OSTRZEŻENIE: przed czyszczeniem urządzenia wyłącz urządzenie
i odłącz je od gniazdka zasilania oraz odłącz od niego wszelkie
akcesoria.
1. Przed przystąpieniem do czyszczenia jakichkolwiek elementów
miksera ustaw regulator prędkości na „0 (OFF)” (Wył.), aby
wyłączyć urządzenie. Następnie odłącz przewód zasilający od
gniazdka zasilania i odłącz trzepaki od miksera.
2. Trzepaki, mieszaki do ciasta i ubijaczkę można myć w gorącej
wodzie z mydłem lub w zmywarce do naczyń. Urządzenie jest
wyposażone w dyszę magnetyczną, którą należy zdjąć do
czyszczenia (należy zawsze poczekać, aż dysza wystygnie).
Dyszę można myć w zmywarce do naczyń lub w wodzie z
mydłem. Nie należy używać myjki, aby nie zarysować dyszy.
3. Aby łatwiej oczyścić dyszę, naciśnij wystającą wypustkę w
celu zdjęcia osłony nawiewu ciepłego powietrza. Następnie
wyjmij ltr nawiewu ciepłego powietrza. Umyj dyszę i ltr
wodą z mydłem i osusz przed umieszczeniem z powrotem w
urządzeniu. Filtr należy czyścić co 3–6 miesięcy, w zależności
od intensywności użytkowania. Nie używaj tej funkcji bez
założonej osłony nawiewu ciepłego powietrza i ltra.
OSTRZEŻENIE: Nie zanurzaj miksera, przewodu
zasilania i wtyczki w wodzie, ani w żadnym innym płynie.
Może to spowodować porażenie prądem, obrażenia ciała lub
uszkodzenie produktu.
4. Aby usunąć uporczywe zabrudzenia z miksera ręcznego,
przetrzyj jego powierzchnię szmatką lekko zwilżoną wodą z
mydłem lub łagodnym, nieżrącym środkiem czyszczącym.
5. Nie używaj żadnych żrących środków czyszczących ani
materiałów ściernych do czyszczenia jakiejkolwiek części
miksera ręcznego lub pojemnika do przechowywania, ponieważ
może to spowodować ich zarysowanie.
Przechowywanie
OSTRZEŻENIE:
1. w pojemniku do przechowywania nie należy przechowywać
żadnych materiałów ani urządzeń poza mikserem, jego
akcesoriami, przewodem zasilającym i instrukcją obsługi.
2. Nie włączaj funkcji HeatSoft
TM
ani samego miksera, gdy
urządzenie znajduje się w pojemniku do przechowywania.
Używanie pojemnika do przechowywania
Pojemnik do przechowywania ułatwia przechowywanie wszystkich
akcesoriów i urządzenia w jednym miejscu.
Aby wyjąć mikser ręczny z pojemnika do przechowywania, odsuń
wypustkę z przodu miksera i wyjmij mikser z pojemnika
(patrz rys. 7).
Aby umieścić mikser z powrotem w pojemniku do przechowywania,
ustaw mikser dyszą magnetyczną zwróconą w stronę wypustki w
pojemniku do przechowywania. Wepchnij mikser do pojemnika tak,
aby wypustka go zablokowała.
UWAGA: zwijając przewód zasilający, zostaw około 8–10 cali
(20–25 cm) niezwiniętego przewodu zasilającego z tyłu urządzenia,
aby umożliwić ułożenie go w pojemniku do przechowywania (patrz
rys. 7).
Wymiana ltra nawiewu ciepłego powietrza
Filtr nawiewu ciepłego powietrza należy wymienić, gdy ulegnie
zużyciu lub uszkodzeniu.
Konserwacja
Urządzenie nie zawiera żadnych części podlegających naprawie
przez użytkownika. Wszystkie czynności serwisowe poza opisanymi
w sekcji dotyczącej czyszczenia oraz wymiany ltra nawiewu
ciepłego powietrza powinny być wykonywane wyłącznie przez
pracownika autoryzowanego serwisu. Więcej informacji można
znaleźć w gwarancji.
Rozwiązywanie problemów
1. Problem: mikser ręczny przestał działać.
a. Odłącz przewód zasilający od gniazdka zasilania i odczekaj
30 minut przed ponowną próbą użycia urządzenia.
2. Problem: podłączanie trzepaków i innych akcesoriów do miksera
ręcznego.
a. Lekko obróć akcesoria w kierunku zgodnym z ruchem
wskazówek zegara póki nie zablokują się w urządzeniu.
3. Problem: odłączanie trzepaków i innych akcesoriów od miksera
ręcznego
a. Odłącz mikser od gniazdka zasilania, a następnie naciśnij
przycisk zwalniania trzepaków i ostrożnie wysuń akcesoria z
urządzenia.
4. Problem: funkcja HeatSoft
TM
wciąż działa.
a. Naciśnij jednokrotnie przycisk HeatSoft
TM
, aby wyłączyć
funkcję, lub odłącz przewód zasilający od gniazdka zasilania.
5. Problem: nie można zainstalować z powrotem osłony nawiewu
ciepłego powietrza.
a. Sprawdź, czy wypustka blokująca osłonę nawiewu ciepłego
powietrza nie jest uszkodzona. Jeśli jest uszkodzona,
skontaktuj się telefonicznie z działem obsługi klienta, aby
zamówić część zamienną (numer można znaleźć w części
dotyczącej gwarancji na stronach 27).
6. Problem: brakujące komponenty.
a. Skontaktuj się telefonicznie z działem obsługi klienta, aby
zamówić części zamienne (numer można znaleźć w części
dotyczącej gwarancji na stronach 27).

2726
PRZEPISY
Babeczki
Liczba porcji: 12 babeczek
• 125 g schłodzonego masła, pokrojonego w kostkę
• 125 g cukru pudru
• 2 duże jajka
• 1 łyżeczka ekstraktu waniliowego
• 125 g mąki ze środkiem spulchniającym
• 2 łyżki mleka
1. Rozgrzej piekarnik do temperatury 190˚C (170˚C z
termoobiegiem).
2. Umieść masło i cukier w dużej misie.
3. Naciśnij przycisk HeatSoft
TM
i miksuj masło z cukrem na miękką,
kremową masę przez około 2 minuty, używając początkowo
ustawienia prędkości 1, na następnie zwiększając to ustawienie
do 5.
4. Wyłącz funkcję HeatSoft
TM
.
5. Dodaj pojedynczo jajka, miksując masę cały czas z ustawieniem
7. Dodaj do masy wanilię i wymieszaj ją ostrożnie.
6. Dodaj mąkę i mleko; wymieszaj ostrożnie na gładką masę przy
użyciu ustawienia 1.
7. Przełóż masę ostrożnie do foremek na babeczki, wypełniając
je w ¾.
8. Piecz na środkowej półce piekarnika przez około 20–22 minut
na złoty kolor, aż wyrosną. Ustaw na kratce i pozostaw do
ostygnięcia.
Ciasteczka z kawałkami czekolady
Liczba porcji: 30 ciasteczek
• 150 g schłodzonego masła, pokrojonego w kostkę
• 125 g drobnego, jasnego brązowego cukru
• 100 g cukru pudru
• 2 łyżeczki ekstraktu waniliowego
• 1 średnie żółtko jajka
• 1 średnie jajko
• 300 g mąki
• 1 łyżeczka sody oczyszczonej
• 200 g czekolady mlecznej w kawałkach
1. Rozgrzej piekarnik do temperatury 170˚C (150˚C z
termoobiegiem). Wyłóż 2 blachy papierem do pieczenia.
2. Umieść masło w misie wraz z dwoma rodzajami cukru.
3. Naciśnij przycisk HeatSoft
TM
i zmiksuj masło z cukrem, używając
początkowo ustawienia 1, aby zmiękczyć masło i połączyć je z
cukrem, a następnie zwiększ prędkość do ustawienia 7 na około
2 minuty.
4. Wyłącz funkcję HeatSoft
TM
.
5. Dodaj ekstrakt waniliowy i jajka, zmiksuj na lekką i kremową
masę.
6. Nie przerywając miksowania, dodawaj stopniowo mąkę i sodę
oczyszczoną, aby połączyć je z masłem, a następnie dodaj
kawałki czekolady i wymieszaj z ciastem.
7. Uformuj w kulki porcje ciasta wielkości 2 płaskich łyżek i ułóż je
na blasze, w odległości około 3 cm od siebie. Rozpłaszcz kulki,
naciskając je lekko.
8. Wstaw blachy do piekarnika i piecz przez około 15 minut.
Pozostaw do ostygnięcia na kilka minut na tacy przed wyjęciem
na kratkę.
GWARANCJA
Prosimy o zachowanie rachunku, ponieważ jego okazanie będzie
konieczne w przypadku jakichkolwiek roszczeń gwarancyjnych.
Niniejszy produkt objęty gwarancją obowiązującą przez okres 2 lat
od daty zakupu produktu, zgodnie z warunkami określonymi w tym
dokumencie.
Jeżeli w okresie gwarancyjnym urządzenie przestanie prawidłowo
funkcjonować (co jest mało prawdopodobne) z powodu wad
konstrukcyjnych lub wykonawczych, należy dokonać jego zwrotu w
punkcie zakupu, załączając rachunek i kopię niniejszej gwarancji.
Prawa i świadczenia z tytułu niniejszej gwarancji uzupełniają prawa
określone w przepisach, na które niniejsza gwarancja nie ma
wpływu. Zmiany niniejszych warunków może dokonać tylko rma
Jarden Consumer Solutions (Europe) Limited („JCS (Europe)”).
Firma JCS (Europe) zobowiązuje się w okresie gwarancyjnym do
przeprowadzenia bezpłatnej naprawy lub wymiany urządzenia
lub dowolnej jego części, która funkcjonuje nieprawidłowo, pod
warunkiem, że:
Użytkownik powinien natychmiast poinformować o zaistniałym
problemie punkt sprzedaży lub rmę JCS (Europe); oraz
• Urządzenie nie było w żaden sposób modykowane,
uszkodzone lub eksploatowane w niewłaściwy sposób ani
naprawiane przez osobę nie posiadającą upoważnienia ze
strony rmy JCS (Europe).
Gwarancją nie są objęte uszkodzenia będące wynikiem
niewłaściwego używania, zniszczenia, użytkowania przy
nieprawidłowym napięciu, działania sił natury lub zdarzeń, na
które rma JCS (Europe) nie ma wpływu, napraw dokonywanych
przez osoby nie posiadające upoważnienia ze strony rmy JCS
(Europe) lub postępowania niezgodnego z zasadami określonymi w
instrukcji użytkowania. Ponadto, niniejsza gwarancja nie obejmuje
normalnego zużycia i zniszczenia, w tym między innymi, drobnych
odbarwień i zadrapań.
Prawa określone w tej gwarancji dotyczą tylko pierwotnego nabywcę
produktu i nie obejmują użytkowania o charakterze komercyjnym i
komunalnym.
Jeżeli do urządzenia załączona jest ulotka gwarancyjna
przeznaczona dla danego kraju, prosimy odwołać się do warunków
określonych w tej gwarancji, która zastępuje niniejszą gwarancję,
lub skontaktować się z lokalnym autoryzowanym dealerem w
sprawie uzyskania dokładniejszych informacji.
Nie należy wyrzucać zużytych artykułów elektrycznych razem
z odpadami domowymi. Należy je, w miarę możliwości, poddać
recyklingowi. W celu uzyskania szczegółowych informacji na temat
recyklingu lub dyrektywy WEEE, skontaktuj się z nami pod adresem
Jarden Consumer Solutions (Europe) Limited
5400 Lakeside
Cheadle Royal Business Park
Cheadle
SK8 3GQ
United Kingdom
IT
IMPORTANTI INFORMAZIONI SULLA SICUREZZA
LEGGERE ATTENTAMENTE E
CONSERVARE PER LA CONSULTAZIONE
FUTURA
I bambini non devono utilizzare l’apparecchio.
L’apparecchio può essere utilizzato da
individui con ridotte capacità siche,
sensoriali o mentali, o privi di esperienza,
se sotto supervisione oppure qualora siano
state loro impartite istruzioni in merito
all’utilizzo sicuro dell’apparecchio e qualora
comprendano i rischi che ne possono
derivare. I bambini non devono giocare con
l’apparecchio.
Tenere l’apparecchio e il relativo cavo al di
fuori della portata di bambini.
Non utilizzare mai il presente apparecchio per
ni diversi da quello della sua destinazione
d’uso. Il presente apparecchio è destinato
esclusivamente all’uso domestico. Non
utilizzare l’apparecchio all’aperto.
Nel caso in cui il cavo di alimentazione sia
danneggiato, deve essere sostituito dalla
casa produttrice, dal servizio di assistenza o
da persone debitamente qualicate al ne di
evitare possibili rischi.
Questo apparecchio genera calore durante
l’utilizzo. Adottare le debite precauzioni al
ne di evitare il rischio di ustioni, bruciature,
incendi o altri danni a persone o proprietà
provocati dal contatto con l’esterno
dell’apparecchio mentre questo è in uso o in
fase di raffreddamento.
Scollegare sempre l’apparecchio dalla presa
elettrica se lasciato incustodito e prima delle
operazioni di montaggio, smontaggio o
pulizia, nonché prima di avvicinarsi a parti in
movimento durante l’utilizzo.
Lasciare sempre raffreddare l’apparecchio
prima delle operazioni di montaggio,
smontaggio e pulizia, nonché prima di riporlo.
Non immergere il corpo principale
dell’apparecchio, il cavo dell’alimentazione

2928
o la spina nell’acqua o in altri liquidi. I ganci
per impasto, i frullini e la frusta devono
essere lavati in acqua calda saponata o in
lavastoviglie. Consultare la sezione relativa
alla pulizia per maggiori informazioni.
Tutti gli accessori (frullini, ganci per impasto,
frusta) non devono essere utilizzati per più di
4 minuti e 30 secondi. Quando si miscelano
carichi estremamente pesanti, l’apparecchio
non deve essere utilizzato per più di 1 minuto
e 30 secondi oppure utilizzare la funzione
HeatSoft
TM
in caso di funzionamento per più
di 5 minuti in modo continuo.
IMPORTANTE: in caso di surriscaldamento
dell’apparecchio a causa di un carico
eccessivo, si attiva il meccanismo di
sicurezza, impedendo il funzionamento
del mixer. In tal caso, spegnere il mixer
nel punto della presa di corrente e lasciare
raffreddare l’apparecchio per 10 minuti prima
di riaccenderlo.
• Controllare sempre che le mani siano asciutte prima di
maneggiare la presa o di accendere l’apparecchio.
• Utilizzare sempre l’apparecchio su una supercie stabile,
sicura, asciutta e piana.
• L’apparecchio non deve essere collocato sopra o in
prossimità di superci potenzialmente calde (come cucine a
gas o elettriche).
• Evitare sempre che il cavo di alimentazione penzoli sopra il
bordo di un piano di lavoro, tocchi superci calde oppure si
attorcigli, resti intrappolato o schiacciato.
• Non utilizzare l’apparecchio nel caso in cui sia stato fatto
cadere o presenti segni visibili di danneggiamento.
• Utilizzare esclusivamente accessori o connettori consigliati
dalla casa produttrice.
• Rimuovere gli accessori dall’apparecchio prima di lavarli o
pulirli.
• Tenere le dita, i capelli e gli indumenti lontani dalle parti in
movimento dell’apparecchio quando è in uso.
PRECAUZIONI RELATIVE AL CALORE
1. Non attivare la funzione HeatSoft
TM
mentre il mixer si trova nel
contenitore per la conservazione.
2. Non mettere altri oggetti nel contenitore per la conservazione,
che è destinato esclusivamente al contenuto di questa scatola.
3. Non toccare o tenere le mani sotto l’ugello di calore mentre la
funzione HeatSoft
TM
è attivata.
4. Non lasciare la funzione HeatSoft
TM
attivata mentre l’unità è
appoggiata sul piano di lavoro sulla propria base.
5. Non utilizzare se il coperchio dello sato dell’elemento
riscaldante e il ltro non sono in posizione.
COMPONENTI
UTILIZZO DEL MIXER MANUALE
Informazioni sullo sbattitore elettrico manuale
Lo sbattitore elettrico manuale Breville
®
con tecnologia HeatSoft
TM
è
stato progettato per consentire all’utilizzatore di preparare piatti da
forno quando arriva l’ispirazione. Niente più attese che ingredienti
come il burro raggiungano la temperatura ambiente! Ora è possibile
ammorbidire e miscelare in un unico passaggio!
Lo sapevate?
Molte ricette prevedono che ingredienti come il burro siano a
temperatura ambiente. Il burro raggiunge la temperatura ambiente
solo dopo essere stato lasciato per ore sul piano di lavoro. Se si
utilizza il burro freddo, direttamente dal frigorifero, i piatti preparati al
forno risulteranno densi e pesanti. Il burro riscaldato nel micro-onde
o sciolto può creare un impasto oleoso che produce biscotti piatti e
mollicci. Grazie a ingredienti a temperatura ambiente si ottengono
risultati più morbidi e piatti preparati al forno di qualità migliore.
Pulsante HeatSoft
TM
:
Il pulsante HeatSoft
TM
consente di ammorbidire il burro durante
la miscelatura. La tecnologia HeatSoft
TM
utilizza una quantità
moderata di calore per portare gli ingredienti freddi a temperatura
ambiente durante la miscelatura, eliminando la necessità di
pianicare in anticipo.
q
Beccuccio magnetico
w
Pulsante di espulsione del sbattitori
e
Pulsante HeatSoft
TM
r
Pulsante Boost
t
Comando a 7 velocità
y
Impugnatura ergonomica
MAX
600ml
7
1
2
3
A
B
C
D
E
8
7
8
4
5
6
Cavo di alimentazione
MAX
600ml
7
1
2
3
A
B
C
D
E
8
7
8
4
5
6
Coperchio sato dell'elemento riscaldante
o
Filtro sato dell'elemento riscaldante
a
Custodia per la conservazione
s
Fascetta per il cavo di alimentazione
d
Ganci per impasto
f
Frusta
g
Sbattitori
Pulsante Boost
Il pulsante Boost consente di aumentare ulteriormente
l’impostazione della velocità selezionata premendo semplicemente
un pulsante.
Pulsante di espulsione dello sbattitore
Il pulsante di espulsione dello sbattitore consente di premere
separatamente con il pollice per rilasciare i frullini, i ganci per
impasto o la frusta.
ATTENZIONE: assicurarsi che il mixer manuale sia scollegato
dall’alimentazione elettrica prima di staccare o inserire qualsiasi
accessorio.
Gestione del cavo di alimentazione
La fascetta fornita in dotazione con il cavo di alimentazione lo
mantiene organizzato quando avvolto.
Frullini
Il design dei frullini consente di ottenere risultati rapidi e omogenei
per tutti i tipi di miscele. I frullini sono lavabili in lavastoviglie.
Ganci per impasto
Utilizzare i ganci per impasto (Figura 1) per impastare l’impasto per
la pizza o per il pane, nonché altre miscele e impasti di notevole
consistenza. Utilizzare a basse velocità per ottenere risultati ottimali.
Sbattitore
La frusta (Figura 3) viene utilizzata per battere l’aria in miscele come
albumi, tuorli o panna.
Custodia per la conservazione
Consente di conservare lo sbattitore elettrico manuale, gli accessori
e il cavo di alimentazione in modo pratico tutti insieme, per
agevolare l’accesso e in caso di viaggi (Figura 4).
Ugello beccuccio magnetico
Il beccuccio magnetico può essere rimosso per facilitare la pulizia
(Figura 5).
Preparazione del mixer
Prima di utilizzare il mixer per la prima volta, lavare i frullini, i ganci
per impasto e la frusta. Risciacquare e asciugare.
Per inserire i frullini nell’unità, assicurarsi prima che il comando
della velocità sia impostato su “0 (OFF)” e che l’unità sia scollegata
dall’alimentazione elettrica. Assicurarsi quindi che l’ugello magnetico
sia in posizione. Inserire i frullini uno per volta, collocando l’estremità
a stelo dei frullini negli appositi fori situati nella parte inferiore del
mixer. Ruotare leggermente il frullatore e spingerlo no a quando
non scatta in posizione.
Nota bene: i frullini sono intercambiabili, mentre i ganci per impasto
non lo sono. Quando si utilizzano i ganci per impasto, il gancio per
impasto con il collare sullo stelo (Figura 2) entra nel foro grande
del mixer. Se i ganci per impasto non scattano in posizione negli
appositi fori, invertirli e riprovare.
Inserire il cavo in una presa elettrica adatta.
Mantecatura del burro/scrematura
1. Tagliare il burro freddo in cubetti di circa 2,5 cm e unirli allo
zucchero in una terrina.
2. Premere il pulsante HeatSoft
TM
una volta, quindi accendere i
frullini. Iniziare a miscelare impostando la velocità su 1 per circa
45 secondi o no a quando non ci sono più pezzi di burro di
grandi dimensioni. Passare quindi alla velocità 5-7 per il resto
del tempo indicato nello schema.
NOTA: quando il pulsante HeatSoft
TM
è in funzione, una spia
bianca si accende e la ventola dissipa-calore entra in funzione.
ATTENZIONE: non toccare o tenere le mani sotto l’ugello di
calore mentre la funzione HeatSoft
TM
è attivata.
NOTA: disattivare la funzione HeatSoft
TM
allo scadere del
tempo indicato nella tabella sopra riportata al ne di evitare una
scrematura eccessiva.
3. Al termine della scrematura, premere di nuovo il pulsante
HeatSoft
TM
per disattivare l’erogazione di calore; la spia bianca
si spegne e la ventola si disattiva.
4. Continuare a miscelare con il resto degli ingredienti attenendosi
alla ricetta. Per ulteriori dettagli consultare la sezione relativa
alla miscelatura.
Miscelatura
1. Unire il resto degli ingredienti nella terrina.
NOTA: per evitare schizzi, avviare l’unità alla velocità più bassa,
quindi aumentare lentamente no alla velocità desiderata.
2. Guidare lentamente il mixer sui lati e attraverso il centro della
terrina, procedendo nella stessa direzione. Prestare attenzione
a non sbattere eccessivamente la miscela. Se si sbatte
eccessivamente alcune miscele possono indurirsi.
NOTA: nel caso in cui sia necessario raschiare la ciotola,
arrestare il mixer, quindi raschiare i lati e la parte inferiore della
terrina con una spatola di gomma secondo necessità. Portare
il comando della velocità su “0 (OFF)” mentre si uniscono gli
ingredienti. Assicurarsi di collocare i frullini sopra la terrina
in modo tale che l’eventuale miscela in eccesso ricada nella
terrina.
3. Al termine della miscelatura, impostare il comando della velocità
su “1”, sollevare lentamente i frullini dalla terrina e pulire la
miscela in eccesso. Assicurarsi di impostare l’unità su “0 (OFF)”
prima di estrarre completamente i frullini dalla terrina.
Quantità di
zucchero
(grammi)
Quantità di
burro
(grammi)
Tempo di
mantecatura
(minuti)
100 g 100 g Da 1 a 1½ minuti
200 g 200 g
Da 2 a 2 ½
minuti

3130
Guida alla velocità per il mixer manuale
Espulsione dei frullini, dei ganci per impasto o della frusta
ATTENZIONE: prima dell’espulsione di qualsiasi accessorio,
spegnere l’apparecchio e scollegarlo dall’alimentazione elettrica.
Assicurarsi che il comando della velocità sia nella posizione “0
(OFF)” e che il cavo sia staccato dalla presa elettrica. Premere il
pulsante di espulsione dei frullini per rilasciare gli accessori.
Regolazione della velocità
1. Portare il selettore della velocità su un valore compreso fra 1 e
7; per spegnere, impostare su “0 (OFF)”.
2. Per attivare immediatamente una velocità superiore, premere e
tenere premuto il pulsante Boost. La velocità passerà a 7; dopo
il rilascio del pulsante tornerà all’impostazione originale.
3. NOTA: questa funzionalità va utilizzata per brevi scariche. Per
miscelature prolungate, utilizzare la velocità 7.
MANUTENZIONE DELLO SBATTITORE
Manutenzione e pulizia
ATTENZIONE: prima delle operazioni di pulizia, spegnere
l’apparecchio, scollegarlo dall’alimentazione elettrica ed espellere
eventuali accessori.
1. Prima di pulire qualsiasi parte del mixer, impostare il comando
della velocità sulla posizione “0 (OFF)” per spegnere
l’apparecchio. Scollegare quindi il cavo dalla presa ed espellere
i frullini.
2. I frullini, i ganci per impasto e la frusta possono essere lavati in
acqua calda saponata o in lavastoviglie. L’apparecchio è dotato
di un ugello magnetico progettato per essere rimosso per la
pulizia (farlo sempre raffreddare prima). L’apparecchio è lavabile
in lavastoviglie e può essere lavato in acqua saponata. Non
utilizzare pagliette metalliche per evitare graf.
3. Per agevolare la pulizia, premere la linguetta estesa per
staccare il coperchio dello sato dell’elemento riscaldante.
Rimuovere quindi il ltro dello sato dell’elemento riscaldante.
Lavare con acqua saponata e lasciare asciugare prima di
rimetterlo nell’unità. A seconda dell’utilizzo, il ltro deve essere
lavato ogni 3-6 mesi. Non utilizzare se il coperchio dello sato
dell’elemento riscaldante e il ltro non sono in posizione.
ATTENZIONE: Non immergere lo sbattitore elettrico o il
cavo di alimentazione in acqua o altro liquido. La mancata
osservanza di questa norma può provocare scosse elettriche,
lesioni o danni al prodotto.
4. Per rimuovere le macchie più ostinate sul mixer manuale, pulire
le superci con un panno, leggermente inumidito con acqua
saponata o un detergente delicato e non abrasivo.
5. Non utilizzare detergenti o materiali abrasivi per pulire qualsiasi
parte del mixer manuale o della custodia poiché potrebbero
grafare il prodotto.
Conservazione
ATTENZIONE:
1. non conservare alcun materiale, ad eccezione del mixer, dei
suoi accessori, del cavo di alimentazione e del manuale d’uso,
nella custodia.
2. Non attivare la funzione HeatSoft
TM
e non accendere
l’apparecchio mentre è conservato nella custodia.
Utilizzo della custodia
La custodia è progettata per aiutare a riporre tutti gli accessori e
l’unità nello stesso luogo.
Per rimuovere il mixer manuale dalla custodia, allontanare la
linguetta anteriore dal mixer ed estrarre l’apparecchio (Figura 7).
Per rimetterlo nella custodia, fare in modo che l’ugello magnetico sia
rivolto verso la linguetta posta sulla custodia. Spingere il mixer e la
linguetta farà clic sul mixer.
NOTA: lasciare 20-25 cm cavo non avvolto dal retro dell’unità per
inserirlo nella custodia (Figura 7).
Velocità Attività
1 Mescolare
Utilizzare questa velocità per cominciare
ad ammorbidire il burro con il pulsante
HeatSoft
TM
. Utilizzare inoltre quando si
mescolano ingredienti liquidi o quando
si uniscono ingredienti secchi e liquidi
alternandoli in una ricetta. Utilizzare quando si
preparano dei pudding già pronti o istantanei.
2 Unire
Utilizzare quando una ricetta richiede che gli
ingredienti vengano uniti fra loro. Utilizzare
per pani a preparazione rapida o mufn che
richiedono un'azione rapida, sufciente per
miscelare.
3 Miscelare
Utilizzare quando si preparano miscele per
torte oppure se le istruzioni richiedono una
velocità media. Utilizzare per amalgamare
burro e zucchero.
NOTA: questa è la velocità massima
consigliata per utilizzare i ganci per impasto.
4-5 Battere
Utilizzare quando si prepara una glassa da
una ricetta o già confezionata. Utilizzare
quando si monta la panna per i dessert.
6-7 Montare
Utilizzare per schiacciare le patate al ne di
ottenere una consistenza sofce e leggera.
Utilizzare quando si montano gli albumi.
Pulsante
Boost
In caso di miscelature particolarmente
difcili, premere il pulsante per attraversare
agevolmente la miscela.
Sostituzione del ltro di sato dell’elemento riscaldante
Il ltro di sato dell’elemento riscaldante deve essere sostituito
quando è usurato o danneggiato.
Manutenzione
Questo apparecchio non contiene parti sostituibili dall’utente.
Tutti gli interventi tecnici che esulano da quelli descritti nelle
sezioni dedicate alla pulizia e alla sostituzione del ltro dello sato
dell’elemento riscaldante devono essere eseguiti esclusivamente da
un rappresentante autorizzato del servizio di assistenza. Consultare
la sezione relativa alla garanzia.
Risoluzione dei problemi
1. Problema: Lo sbattitore elettrico manuale smette di funzionare.
a. Scollegare il cavo di alimentazione dalla presa e attendere 30
minuti prima di ricominciare a utilizzare l’apparecchio.
2. Problema: inserimento dei frullini e di altri accessori nel mixer
manuale.
a. Ruotare i frullini o altri accessori leggermente in senso orario
no a quando si agganciano all’unità.
3. Problema: rimozione dei frullini o di altri accessori dal mixer
manuale.
a. Scollegare il mixer, quindi premere verso il basso il pulsante
di espulsione del frullino ed estrarre delicatamente gli
accessori.
4. Problema: la funzione HeatSoft
TM
continua a essere attiva.
a. Premere il pulsante HeatSoft
TM
una volta per disattivare la
funzione oppure scollegare il cavo di alimentazione dalla
presa.
5. Problema: non è possibile reinserire il coperchio della ventola
dell’elemento riscaldante.
a. Controllare che la linguetta di blocco del coperchio della
ventola dell’elemento riscaldante non sia rotta. Qualora fosse
rotta, chiamare il servizio di assistenza clienti per richiedere il
pezzo di ricambio (il numero è riportato nella sezione garanzia
alle pagine 32).
6. Problema: manca qualche componente.
a. Chiamare il servizio di assistenza clienti (il numero è riportato
nella sezione garanzia alle pagine 32) per richiedere i pezzi
di ricambio.
RICETTE
Tortine cupcake
Ricetta per: 12 tortine cupcake
• 125 g di burro refrigerato, a cubetti
• 125 g di zucchero semolato
• 2 uova grandi
• 1 cucchiaino di estratto di vaniglia
• 125 g di farina autolievitante
• 2 cucchiai di latte
1. Preriscaldare il forno a 190 ˚C (170 ˚C se ventilato).
2. Versare burro e zucchero in una grande terrina.
3. Premere il pulsante HeatSoft
TM
e miscelare utilizzando la
velocità 1, passando alla velocità 5 per circa 2 minuti no a
ottenere un impasto morbido e cremoso.
4. Disattivare la funzione HeatSoft
TM
.
5. Aggiungere le uova una alla volta, miscelando bene fra
un’aggiunta e l’altra a velocità 7. Unire delicatamente la vaniglia.
6. Aggiungere farina e latte; utilizzando la velocità 1, mescolare
delicatamente no a ottenere un impasto omogeneo
7. Versare delicatamente la miscela con il cucchiaio nei cupcake,
riempiendoli per tre quarti.
8. Cuocere al centro del forno per circa 20-22 minuti no a quando
le tortine si gonano e assumono un colore dorato. Mettere su
una griglia a raffreddare.

3332
DE
WICHTIGE SICHERHEITSHINWEISE
LESEN SIE DIESE HINWEISE SORGFÄLTIG
DURCH UND VERWAHREN SIE SIE GUT.
Dieses Gerät ist nicht für die Verwendung
durch Kinder geeignet. Geräte können von
Personen mit eingeschränkten körperlichen,
sensorischen oder geistigen Fähigkeiten
oder mangelnder Erfahrung und Wissen
verwendet werden, wenn sie entsprechend
in die sichere Anwendung eingewiesen
wurden und die damit verbundenen Gefahren
verstehen. Kinder dürfen das Gerät nicht als
Spielzeug verwenden.
Achten Sie darauf, dass sich das Gerät
und das dazugehörige Kabel außerhalb der
Reichweite von Kindern benden.
Setzen Sie das Gerät nie für Zwecke ein, für
die es nicht bestimmt ist. Das Gerät wurde
für die Verwendung in Privathaushalten
entwickelt. Verwenden Sie das Gerät nicht im
Freien.
Beschädigte Stromkabel müssen durch den
Hersteller, den Kundendienst oder andere
qualizierte Personen ersetzt werden, um
Gefahren auszuschließen.
Dieses Geräts erzeugt während des
Betriebs Hitze. Treffen Sie angemessene
Vorsichtsmaßnahmen, um Verbrennungen,
Verbrühungen, Brände und andere Schäden
an Personen und Eigentum, die durch die
Berührung heißer Oberächen während des
Betriebs oder der Abkühlphase entstehen
können, zu vermeiden.
Schalten Sie das Gerät immer aus und
trennen Sie es vom Netz, wenn Sie es
unbeaufsichtigt lassen oder bevor Sie
bewegliche Teile anbringen, abnehmen,
reinigen oder sich ihnen nähern.
Lassen Sie das Gerät abkühlen, bevor Sie
Teile anbringen, abnehmen, reinigen oder
das Gerät lagern.
Tauchen Sie das Gerät selbst, das
Stromkabel oder den Stecker nicht in Wasser
oder andere Flüssigkeiten. Die Knethaken,
Quirle und Rührbesen sollten mit heißem
Seifenwasser oder in der Spülmaschine
gereinigt werden. Hinweise zur Reinigung
entnehmen Sie dem entsprechenden
Abschnitt.
Sämtliches Zubehör (Rührbesen, Knethaken
usw.) sollte nicht länger als 4 Minuten und
30 Sekunden verwendet werden. Werden
besonders schwere Mischungen verarbeitet,
sollte das Gerät nicht länger als 1 Minute und
30 Sekunden verwendet werden. Verwenden
Sie die HeatSoft
TM
-Funktion nicht länger
durchgängig als 5 Minuten.
WICHTIG: Überhitzt der Handrührer
aufgrund von Überlastung, kommt die
Sicherheitsabschaltung zum Einsatz und
verhindert, dass der Handrührer weiter
verwendet wird. Schalten Sie den Handrührer
in diesem Fall aus und lassen Sie ihn
mindestens 10 Minuten lang abkühlen, bevor
Sie ihn wieder einschalten.
• Stellen Sie immer sicher, dass Ihre Hände trocken sind, bevor
Sie den Stecker berühren oder das Gerät einschalten.
• Verwenden Sie das Gerät nur auf einer stabilen, sicheren,
trockenen und ebenen Unterlage.
• Stellen Sie das Gerät nicht in die Nähe von oder auf
Oberächen, die heiß werden können (z. B. einen Herd oder
Kochfelder).
• Achten Sie darauf, dass das Stromkabel nicht über den
Rand der Arbeitsäche hängt, heiße Oberächen berührt,
verknotet, eingeklemmt wird oder sich verfängt.
• Verwenden Sie das Gerät nicht, wenn es heruntergefallen ist
oder Beschädigungen sichtbar sind.
• Verwenden Sie kein Zubehör, das nicht vom Hersteller
empfohlen wird.
• Entfernen Sie Zubehör vom Gerät, bevor Sie es reinigen oder
spülen.
• Achten Sie darauf, während des Betriebs Finger, Haare oder
Kleidungsstücke in sicherem Abstand zu halten.
VORSICHTMASSNAHMEN BEI NUTZUNG DER
WÄRMEFUNKTION
1. Schalten Sie die HeatSoft
TM
-Funktion nicht ein, während sich der
Handrührer im Aufbewahrungsbehälter bendet.
2. Nutzen Sie den Aufbewahrungsbehälter nur für das in diesem
Karton enthaltene Zubehör.
Biscotti con gocce di cioccolato
Ricetta per: 30 biscotti
• 150 g di burro refrigerato, a cubetti
• 125 g di zucchero di canna leggero
• 100 g di zucchero semolato
• 2 cucchiaini di estratto di vaniglia
• 1 tuorlo d’uovo di grandezza media
• 1 uovo di grandezza media
• 300 g di farina normale
• 1 cucchiaino di bicarbonato di soda
• 200 g di gocce di cioccolato al latte
1. Preriscaldare il forno a 170 ˚C (150 ˚C se ventilato ). Rivestire 2
teglie con carta da forno.
2. Aggiungere il burro in una terrina con entrambi i tipi di zucchero.
3. Premere il pulsante HeatSoft
TM
e miscelare a velocità 1 no
ad amalgamare e ammorbidire, quindi aumentare la velocità
portandola a 7 per circa 2 minuti.
4. Disattivare la funzione HeatSoft
TM
.
5. Aggiungere la vaniglia e le uova, quindi mescolare no a
ottenere un impasto leggero e cremoso.
6. Mescolare lentamente unendo la farina e il bicarbonato di soda
no ad amalgamare, quindi ripiegare le gocce di cioccolato.
7. Preparare delle palline con 2 cucchiai di impasto e metterle su
vassoi preparati in precedenza a 3 cm di distanza. Premere
leggermente verso il basso.
8. Mettere i vassoi in forno e cuocere per circa 15 minuti. Lasciare
raffreddare per alcuni minuti sul vassoio prima di trasferire su
una griglia.
GARANZIA
Conservare lo scontrino d’acquisto poiché esso sarà necessario
per qualsiasi reclamo esposto in base alle condizioni di questo
certicato di garanzia.
Questo prodotto è garantito per 2 anni dall’acquisto, secondo le
modalità descritte nel presente documento.
Durante il periodo di validità della garanzia, nell’improbabile
eventualità che l’apparecchiatura si guasti a causa di un problema
tecnico o di fabbricazione, riportarla al punto d’acquisto insieme allo
scontrino scale e ad una copia di questo certicato di garanzia.
I diritti spettanti all’acquirente in base alle condizioni di questo
certicato di garanzia sono in aggiunta a quelli previsti dalla legge
che non risultano alterati dalle condizioni di questo certicato. Solo
Jarden Consumer Solutions (Europe) Limited (“JCS (Europe)”) ha
l’autorità di modicare queste condizioni.
JCS (Europe) si impegna a riparare o a sostituire gratuitamente
nell’arco del periodo di garanzia qualsiasi parte dell’apparecchiatura
dovesse risultare difettosa, a condizione che:
• Si segnali tempestivamente il problema al punto d’acquisto o a
JCS (Europe); e
• l’apparecchiatura non sia stata modicata in alcun modo né
soggetta a danni, uso improprio o abuso, a riparazione o
alterazione per opera di un tecnico non autorizzato da JCS
(Europe).
I guasti intervenuti durante l’uso normale, per uso improprio, danno,
abuso, tensione incorretta, cause naturali, eventi non determinati
da JCS (Europe), riparazione o alterazione per opera di un tecnico
non autorizzato da JCS (Europe) o la mancata ottemperanza alle
istruzioni d’uso sono esclusi dalla presente garanzia. Inoltre, l’uso
normale compreso, a titolo di esempio, una lieve alterazione del
colore (sbiadimento) e i graf, non sono coperti dalla presente
garanzia.
I diritti spettante all’utente ai sensi della presente garanzia si
applicano unicamente all’acquirente originale e non si estendono
all’uso commerciale o comunitario.
Se l’apparecchiatura è fornita con un accordo specico per il paese
o una cartolina di garanzia, consultare le condizioni di tale accordo,
che prevalgono su quelle esposte in questa sede oppure rivolgersi a
un rivenditore autorizzato per ulteriori informazioni.
I prodotti elettrici vanno smaltiti separatamente dai riuti domestici.
Consegnarli ad un centro di riciclaggio, se disponibile. Scrivere
a [email protected] per istruzioni sul riciclaggio e
informazioni sulla direttiva RAEE.
Jarden Consumer Solutions (Europe) Limited
5400 Lakeside
Cheadle Royal Business Park
Cheadle
SK8 3GQ
United Kingdom

3534
3. Halten Sie Ihre Hand nicht an oder unter die Wärmedüse, wenn
die HeatSoft
TM
-Funktion aktiviert ist.
4. Lassen Sie die HeatSoft
TM
-Funktion nicht eingeschaltet, wenn
Sie das Gerät auf der Anrichte ablegen.
5. Verwenden Sie das Gerät nur, wenn Lüftungsgitter und Filter
montiert sind.
BESTANDTEILE
VERWENDUNG DES HANDRÜHRERS
Hinweise zur Verwendung des Handrührers
Der Breville
®
Handrührer mit HeatSoft
TM
-Technologie wurde
entwickelt, damit Sie mit dem Backen loslegen können, wenn Sie
die Inspiration packt. Kein Warten mehr darauf, dass die Butter
endlich Raumtemperatur erreicht. Jetzt können Sie in einem Schritt
aufweichen und mixen!
Haben Sie‘s gewusst?
Für viele Rezepte müssen Zutaten wie Butter auf Raumtemperatur
sein. Doch Butter erreicht diese Temperatur erst nach vielen
Stunden außerhalb des Kühlschranks. Wenn Sie kalte Butter direkt
aus dem Kühlschrank verwenden, sind das Ergebnis häug sehr
feste und schwere Backwaren. In der Mikrowelle oder auf dem Herd
geschmolzene Butter kann dazu führen, dass der Teil ölig ist und
die Kekse feucht werden und nicht richtig aufgehen. Zutaten bei
Raumtemperatur sorgen dafür, dass die Backwaren besser gelingen
und lockerer sind.
HeatSoft
TM
-Taste:
Mit der HeatSoft
TM
-Taste wird die Butter während des Mixens
weich. HeatSoft
TM
-Technologie nutzt sanfte Wärme, um kalte
Zutaten während des Mixens auf Raumtemperatur zu bringen. Sie
können also Backen, ohne lange vorausplanen zu müssen.
Boost-Taste
Mit der Boost-Taste können Sie der jeweils eingestellten
Geschwindigkeitseinstellung einen zusätzlichen Boost verleihen.
Auswurftaste
Mit der Auswurftaste können Sie per Daumendruck die Quirle,
Knethaken oder den Rührbesen freigeben.
VORSICHT: Vergewissern Sie sich, dass das Gerät ausgesteckt ist,
bevor Sie Zubehör anbringen oder entfernen.
Kabelaufbewahrung
Mit dem am Kabel angebrachten Kabelbefestiger können Sie das
Netzkabel ordentlich aufbewahren.
Quirle
Mit den Quirlen können Sie alle Arten von Mischungen schnell und
gründlich vermengen. Die Quirle sind spülmaschinengeeignet.
Knethaken
Mit diesen Knethaken (siehe Abb. 1) können Sie Brot- und Pizzateig
oder andere schwere Mischungen oder Teige verarbeiten. Beste
Ergebnisse erzielen Sie, wenn Sie die Knethaken bei geringer
Geschwindigkeit verwenden.
Rührbesen
Mit dem Rührbesen (Abb. 3) können Sie leichte Zutaten wie Eiweiß
oder Eigelb oder auch Sahne schlagen.
Aufbewahrungsbehälter
Hier können Sie Ihren Handrührer, das Zubehör und das Netzkabel
praktisch gemeinsam verstauen, damit diese immer zugreifbar und
leicht zu transportieren sind.
Magnetische Düse
Die magnetische Düse können Sie zum Reinigen einfach abnehmen
(siehe Abbildung 5).
Handrührer vorbereiten
Spülen Sie die Rührbesen, Knethaken und Quirle vor dem ersten
Gebrauch. Spülen Sie mit klarem Wasser nach und trocknen Sie die
Zubehörteile ab.
Beim Einsetzen der Quirle prüfen Sie zunächst, ob die
Geschwindigkeitssteuerung auf 0 (Aus) gesetzt und das Gerät vom
Netz getrennt ist. Vergewissern Sie sich, dass die magnetische
Düse richtig angebracht ist. Setzen Sie die Quirle nacheinander ein,
indem Sie das gerade Ende der Quirle in die Öffnungen unten am
Handrührer einführen. Drehen Sie den Quirl leicht und drücken Sie
ihn nach unten, bis er einrastet.
Bei den Quirlen ist es anders als bei den Knethaken gleichgültig,
welchen Sie in welche Öffnung einsetzen. Beim Einsetzen der
Knethaken setzen Sie den Knethaken, der mit einem Kragen
versehen ist (siehe Abb. 2) in die größere Öffnung ein. Wollen
die Knethaken nicht einrasten, versuchen Sie es mit der anderen
Öffnung.
Schließen Sie das Gerät an eine geeignete Netzdose an.
Butter weich machen/cremig schlagen
1. Schneiden Sie die Butter in etwa 2,5 cm breite Würfel und
geben Sie diese Würfel mit dem Zucker in die Rührschüssel.
2. Drücken Sie die HeatSoft
TM
-Taste einmal und schalten Sie die
Quirle ein. Beginnen Sie etwa 45 Sekunden lang auf Stufe 1,
bis sich keine größeren Stücke Butter mehr in der Schüssel
benden. Wechseln Sie dann für die verbleibende, in der Tabelle
genannten Zeit auf Stufe 5-7.
HINWEIS: Wenn die HeatSoft
TM
-Funktion eingeschaltet ist,
leuchtet eine weiße Leuchte und der Ventilator rotiert.
VORSICHT: Halten Sie Ihre Hand nicht an oder unter die
Wärmedüse, wenn die HeatSoft
TM
-Funktion aktiviert ist.
HINWEIS: Schalten Sie die HeatSoft
TM
-Funktion nach Ablauf der
in der Tabelle angegebenen Zeitspanne aus, um die Butter nicht
zu cremig zu rühren.
3. Ist die Butter fertig geschlagen, drücken Sie die HeatSoft
TM
-
Taste erneut, um die Wärme auszuschalten. Die weiße Leuchte
verblasst und der Ventilator hört auf, sich zu drehen.
4. Geben Sie gemäß Rezept die weiteren Zutaten hinzu und
vermengen Sie diese. Weitere Einzelheiten entnehmen Sie dem
Abschnitt zum Mixen.
Mixen
1. Geben Sie die restlichen Zutaten in die Rührschüssel.
HINWEIS: Um Spritzer zu vermeiden, beginnen Sie mit
der untersten Geschwindigkeitsstufe und steigern Sie die
Geschwindigkeit langsam bis zur gewünschten Stufe.
2. Führen Sie den Handrührer langsam durch die Mitte und an den
Seiten der Schüssel entlang. Behalten Sie dabei die Richtung
bei. Achten Sie darauf, die Masse nicht zu stark zu verrühren.
Manche Mischungen werden dadurch zäh.
HINWEIS: Wenn Sie Zutaten vom Schüsselrand kratzen
müssen, stoppen Sie den Handrührer und kratzen Sie die
Seiten und den Boden der Schüssel mit einem Gummispatel
ab. Stellen Sie die Geschwindigkeitssteuerung auf 0, wenn Sie
Zutaten hinzufügen. Achten Sie darauf, die Quirle so über die
Schüssel zu halten, dass abtropfende Zutaten wieder in die
Rührschüssel fallen.
3. Wenn die Zutaten gut verrührt sind, setzen Sie die
Geschwindigkeit auf Stufe 1 und heben die Quirle langsam
aus der Masse, damit die Mischung abtropft. Stellen Sie die
Geschwindigkeit auf Stufe 0, bevor Sie die Quirle vollständig
aus der Schüssel heben.
Quirle, Knethaken und Rührbesen auswerfen
VORSICHT: Schalten Sie das Gerät aus und trennen Sie es vom
Netz, bevor Sie das Zubehör auswerfen.
Vergewissern Sie sich, dass sich die Geschwindigkeitssteuerung
auf Stufe 0 (Aus) bendet und das Netzkabel von der Steckdose
getrennt wurde. Drücken Sie auf die Auswurftaste. Das Zubehör wird
freigegeben.
Einstellung der Geschwindigkeit
1. Drehen Sie die Geschwindigkeitssteuerung von 1 auf 7. Zum
Ausschalten stellen Sie die Geschwindigkeitssteuerung auf 0
(Aus).
2. Um die Geschwindigkeit mit sofortiger Wirkung zu erhöhen,
drücken Sie die Boost-Taste und halten Sie diese gedrückt.
Die Geschwindigkeit wird auf Stufe 7 gesteigert und kehrt
nach Loslassen der Boost-Taste wieder zur ursprünglichen
Geschwindigkeit zurück.
3. HINWEIS: Diese Funktion ist nur für eine kurzfristige Steigerung
der Geschwindigkeit gedacht. Wenn Sie längere Zeit bei hoher
Geschwindigkeit mixen wollen, verwenden Sie die Stufe 7.
Hinweise zu Geschwindigkeitsstufen
q
Magnetische Düse
w
Auswurftaste
e
HeatSoft
TM
-Taste
r
Boost-Taste
t
7 Geschwindigkeitsstufen
y
Ergonomischer Griff
MAX
600ml
7
1
2
3
A
B
C
D
E
8
7
8
4
5
6
Netzkabel
MAX
600ml
7
1
2
3
A
B
C
D
E
8
7
8
4
5
6
Lüftungsgitter
o
Heizelementlter
a
Aufbewahrungsbehälter
s
Kabelbefestiger
d
Knethaken
f
Rührbesen
g
Quirle
Zuckermenge
(Gramm)
Buttermenge
(Gramm)
Weich in
(Minuten)
100 g 100 g
1 bis 1 ½
Minuten
200 g 200 g
2 bis 2 ½
Minuten
Geschwin-
digkeit
Verwendung
1 Rühren
Zu Beginn des Mixvorgangs, wenn die Butter
mit der HeatSoft
TM
-Funktion weich gemacht
wird. Auch beim Einrühren üssiger Zutaten
oder beim Vermengen trockener und üssiger
Zutaten im Wechsel. Fertigmischungen und
Instant-Pudding werden ebenfalls auf dieser
Stufe vermengt.
2 Mixen
Für Zutaten, die laut Rezept miteinander
vermengt werden müssen. Verwenden Sie
diese Stufe für schnelle Brotteige oder Mufns,
bei denen die Zutaten schnell miteinander
vermengt werden müssen, so dass sie gerade
vermischt sind.
3 Mischen
Für Kuchenmischungen oder Rezepte, die bei
mittlerer Geschwindigkeit vermengt werden
sollen. Verwenden Sie diese Geschwindigkeit,
um Butter und Zucker miteinander zu
vermischen.
HINWEIS: Dies ist die für die
Verwendung der Knethaken empfohlene
Höchstgeschwindigkeit.
4 -5 Schlagen
Für Zuckerguss nach Rezept oder aus der
Packung. Für Schlagsahne oder leichte
Nachspeisen
6 -7
Verquirlen
Für leichtes und lockeres Kartoffelpüree. Für
Eischnee.
Boost-Taste
Nutzen Sie diese Taste, um in Momenten, in
denen der Handrührer nur schwer durch die
Masse zu führen ist, dem Gerät mehr Kraft zu
verleihen.

3736
PFLEGE DES HANDRÜHRERS
Pege und Reinigung
VORSICHT: Vor dem Reinigen schalten Sie das Gerät aus, trennen
Sie es vom Netz und werfen Sie das Zubehör aus.
1. Bevor Sie den Handrührer oder Bestandteile reinigen, setzen
Sie die Geschwindigkeitssteuerung auf Stufe 0 (Aus). Trennen
Sie das Gerät dann vom Netz und werfen Sie die Quirle aus.
2. Die Knethaken, Quirle und Rührbesen sollten mit heißem
Seifenwasser oder in der Spülmaschine gereinigt werden.
Dieses Gerät ist mit einer magnetischen Düse ausgestattet, die
für die Reinigung abgenommen werden kann (lassen Sie die
Düse zuerst abkühlen). Die Düse kann in der Spülmaschine
oder mit Seifenwasser gereinigt werden. Verwenden Sie hierfür
keinen Scheuerschwamm, um die Düse nicht zu zerkratzen.
3. Um die Reinigung zu erleichtern, drücken Sie den Druckhebel
nach unten, um das Lüftungsgitter des Heizelements
abzunehmen. Entnehmen Sie dann den Filter des Heizelements.
Waschen Sie ihn mit Seifenwasser und trocknen Sie ihn,
bevor Sie ihn wieder einsetzen. Der Filter sollte je nach
Nutzungsintensität alle 3 bis 6 Monate gereinigt werden.
Verwenden Sie das Gerät nur, wenn Lüftungsgitter und Filter
montiert sind.
VORSICHT: Der Mixer, das Netzkabel und der Stecker
dürfen nicht in Wasser oder andere Flüssigkeiten getaucht
werden. Dies kann zu Stromschlägen, Verletzungen oder
Beschädigungen des Geräts führen.
4. Zur Entfernung hartnäckiger Schmutzreste wischen Sie die
Oberäche mit einem in Seifenwasser oder einem milden, nicht
scheuerndem Reinigungsmittel getränkten Tuch ab.
5. Verwenden Sie keine scheuernden Reinigungsmittel
oder Materialien, um den Handrührer oder den
Aufbewahrungsbehälter zu reinigen, da diese Kratzer
verursachen können.
Lagerung
VORSICHT:
1. Lagern Sie mit Ausnahme des Handrührers, des Zubehörs,
des Netzkabels und des Benutzerhandbuchs keine anderen
Materialien im Aufbewahrungsbehälter.
2. Schalten Sie weder das Gerät noch die HeatSoft
TM
-Funktion
ein, während sich der Handrührer im Aufbewahrungsbehälter
bendet.
Nutzung des Aufbewahrungsbehälters
Der Aufbewahrungsbehälter dient dazu, das Gerät gemeinsam mit
dem Zubehör lagern zu können.
Um den Handrührer aus dem Aufbewahrungsbehälter zu
entnehmen, drücken Sie die vordere Drucklasche vom Handrührer
weg und ziehen Sie den Handrührer heraus (siehe Abbildung 7)
Wenn Sie den Handrührer wieder sicher verwahren wollen, richten
Sie die magnetische Düse an dieser Lasche aus. Drücken Sie den
Handrührer nach unten, bis die Lasche einrastet.
HINWEIS: Denken Sie daran, ausreichend Platz für 20 bis 25 cm
Gerätekabel zu lassen (siehe Abbildung 7).
Auswechseln des Heizelementlters
Der Heizelementlter ist auszutauschen, wenn er abgenutzt oder
beschädigt ist.
Wartung
Dieses Gerät enthält keine Teile, die vom Nutzer gewartet werden
können. Wartungsvorgänge, die über die in den Abschnitten
zur Reinigung und zum Auswechseln des Heizelementlters
beschriebenen Handgriffe hinausgehen, sind nur von
einem autorisierten Wartungstechniker auszuführen. Siehe
Garantieerklärung.
Fehlerbehebung
1. Problem: Handrührer funktioniert nicht mehr.
a. Ziehen Sie das Netzkabel aus der Steckdose und warten Sie
30 Minuten, bevor Sie einen erneuten Versuch starten.
2. Problem: Einführen der Quirle und anderen Zubehörs in den
Handrührer.
a. Drehen Sie die Quirle oder das andere Zubehör leicht im
Uhrzeigersinn, bis es einrastet.
3. Problem: Entfernen der Quirle und anderen Zubehörs vom
Handrührer.
a. Trennen Sie den Handrührer vom Netz, drücken Sie die
Auswurftaste nach unten und ziehen Sie leicht am Zubehör.
4. Problem: HeatSoft
TM
-Funktion schaltet nicht aus
a. Drücken Sie die HeatSoft
TM
-Taste einmal, um die Funktion
auszuschalten, oder trennen Sie das Gerät vom Netz.
5. Problem: Abdeckung des Heizelementventilators kann nicht
befestigt werden.
a. Prüfen Sie, ob die Befestigungslasche defekt ist. Ist dies
der Fall, bestellen Sie beim Kundendienst Ersatz. (Die
Nummern des Kundendienstes nden Sie im Abschnitt mit der
Garantieerklärung auf den Seiten 38.)
6. Problem: Fehlende Teile.
a. Wenden Sie sich an den Kundendienst, um Ersatz zu
bestellen.(Die Nummern des Kundendienstes nden Sie im
Abschnitt mit der Garantieerklärung auf den Seiten 38.)
REZEPTE
Cupcakes
Menge: 12 Cupcakes
• 125 g gekühlte Butter, gewürfelt
• 125 g Zucker
• 2 große Eier
• 1 EL Vanilleextrakt
• 125 g Mehl, mit 1,5 TL Backpulver vermischt
• 2 EL Milch
1. Heizen Sie den Ofen auf 190˚C (Umluft 170˚C) vor.
2. Geben Sie Butter und Zucker in eine große Schüssel.
3. Drücken Sie die HeatSoft
TM
-Taste und beginnen Sie auf Stufe 1
mit dem Mixen. Steigern Sie die Geschwindigkeit dann für etwa
2 Minuten auf Stufe 5, bis die Mischung weich und cremig ist.
4. Schalten Sie die HeatSoft
TM
-Funktion aus.
5. Fügen Sie nacheinander die Eier hinzu und vermischen Sie
die Zutaten jeweils gut bei Stufe 7. Fügen Sie langsam das
Vanilleextrakt hinzu.
6. Geben Sie bei Stufe 1 Mehl und Milch hinzu und vermischen Sie
alles gut, bis die Mischung glatt ist.
7. Füllen Sie die Cupcake-Formen vorsichtig bis zu ¾ mit dem
Teig.
8. Backen Sie die Cupcakes auf der mittleren Schiene für 20-22
Minuten, bis sie aufgegangen und goldbraun sind. Stellen Sie
sie auf ein Abkühlgitter.
Chocolate-Chip-Cookies
Menge: 30 Cookies
• 150 g gekühlte Butter, gewürfelt
• 125 g hellbrauner Zucker
• 100 g Zucker
• 2 EL Vanilleextrakt
• 1 Eigelb, mittelgroß
• 1 Ei, mittelgroß
• 300 g Mehl
• 1 TL Natron
• 200 g Milchschokoladensplitter
1. Heizen Sie den Ofen auf 170˚C (Umluft 150˚C) vor. Legen Sie 2
Backbleche mit Backpapier aus.
2. Geben Sie die Butter und den braunen und weißen Zucker in
eine Schüssel.
3. Drücken Sie die HeatSoft
TM
-Taste und mixen Sie die Zutaten auf
Stufe 1, bis sie weich und gut vermischt sind. Steigern Sie die
Geschwindigkeit dann für ca. 2 Minuten auf Stufe 7.
4. Schalten Sie die HeatSoft
TM
-Funktion aus.
5. Fügen Sie das Vanilleextrakt und die Eier hinzu und vermischen
Sie alles, bis eine leichte, cremige Masse entstanden ist.
6. Geben Sie langsam das Mehl und das Natron hinzu und rühren
Sie diese unter die anderen Zutaten. Zum Schluss heben Sie
die Schokoladensplitter unter.
7. Formen Sie je zwei Esslöffel Teig zu Kugeln und legen Sie diese
mit 3 cm Abstand auf die Backbleche. Drücken Sie die Kugeln
leicht ach.
8. Schieben Sie die Backbleche in den Ofen und backen Sie
die Cookies für etwa 15 Minuten. Lassen Sie die Cookies
einige Minuten auf dem Blech abkühlen, bevor Sie sie auf ein
Abkühlgitter legen.

3938
GARANTIE
Bewahren Sie bitte unbedingt den Kaufbeleg auf. Dieser ist für die
Geltendmachung von Garantieansprüchen zwingend erforderlich.
Die in diesem Dokument beschriebene Gerätegarantie gilt für einen
Zeitraum von 2 Jahren ab Kaufdatum.
Sollte das Gerät entgegen allen Erwartungen innerhalb dieses
Zeitraums aufgrund eines Konzeptions- oder Herstellungsfehlers
nicht mehr einwandfrei funktionieren, können Sie es zusammen mit
dem Kaufbeleg und einer Kopie dieses Garantiebelegs am Kaufort
abgeben.
Die aus dieser Garantie erwachsenden Ansprüche und Leistungen
sind als Ergänzung zu Ihren gesetzlichen Ansprüchen anzusehen.
Diese werden von dieser Garantie nicht beeinträchtigt. Diese
Bedingungen können ausschließlich durch Jarden Consumer
Solutions (Europe) Limited (“JCS (Europe)”) geändert werden.
JCS (Europe) verpichtet sich innerhalb der Garantiedauer zur
kostenlosen Reparatur oder zum kostenlosen Austausch des Geräts
bzw. von Geräteteilen, die nachweislich nicht ordnungsgemäß
funktionieren. Es gelten jedoch folgende Voraussetzungen:
Sie müssen den Händler oder JCS (Europe) unverzüglich über das
Problem informieren.
• An dem Gerät wurden keinerlei Änderungen vorgenommen,
es wurde nur bestimmungsgemäß eingesetzt, nicht beschädigt
und nicht von Personen repariert, die von JCS (Europe) nicht
autorisiert wurden.
Mängel, die auf unsachgemäße Nutzung, Beschädigung, nicht
zugelassene elektrische Spannung, Naturgewalten, Ereignisse
außerhalb der Kontrolle durch JCS (Europe), Reparaturen
oder Änderungen durch Personen, die von JCS (Europe) nicht
autorisiert wurden, oder Nichtbeachtung der Nutzungsanweisungen
zurückzuführen sind, werden von dieser Garantie nicht abgedeckt.
Außerdem sind durch normale Gebrauchsabnutzung entstandene
Mängel, wie beispielsweise geringfügige Verfärbungen und Kratzer,
von dieser Garantie ausgenommen.
Die im Rahmen dieser Garantie eingeräumten Rechte gelten
ausschließlich für den ursprünglichen Käufer und dürfen nicht auf
die kommerzielle oder kommunale Nutzung ausgedehnt werden.
Elektrische Altgeräte dürfen nicht über den Hausmüll entsorgt
werden. Geben Sie, falls möglich, diese Geräte bei geeigneten
Rücknahmestellen ab. Wenn Sie weitere Informationen zur
Rücknahme und Entsorgung von Elektrogeräten erhalten möchten,
senden Sie bitte eine E-Mail an die Adresse
Jarden Consumer Solutions (Europe) Limited
5400 Lakeside
Cheadle Royal Business Park
Cheadle
SK8 3GQ
United Kingdom
PT
IMPORTANTES INFORMAÇÕES DE SEGURANÇA
LEIA ATENTAMENTE E GUARDE PARA
FUTURA REFERÊNCIA
As crianças não devem usar este aparelho.
Os aparelhos podem ser utilizados por
pessoas com capacidades físicas, sensoriais
e mentais reduzidas, ou falta de experiência
e conhecimento, desde que lhes tenha sido
fornecida supervisão ou instruções relativas
à utilização segura dos aparelhos e que
tenham compreendido os perigos envolvidos.
As crianças não devem brincar com este
aparelho.
Mantenha o aparelho e o respetivo cabo
elétrico fora do alcance das crianças.
Nunca utilize este aparelho para outro efeito
que não o destinado. Este aparelho destina-
se apenas a uso doméstico. Não utilize este
aparelho no exterior.
Se o cabo de alimentação estiver danicado,
deverá ser substituído pelo fabricante, pelo
seu agente de serviço, ou uma pessoa com
qualicação semelhante a m de evitar
riscos.
Este aparelho gera calor durante a utilização.
Devem ser tomadas precauções adequadas
para evitar o risco de queimaduras, incêndios
ou outros danos a pessoas ou bens
causados por tocar em superfícies quentes,
enquanto em uso ou durante o arrefecimento.
Desligue sempre o aparelho, e desligue o
cabo de alimentação elétrica da tomada,
caso o aparelho seja deixado sem
supervisão, antes de o montar, desmontar
ou se aproximar de peças em movimento
durante a utilização.
Deixe sempre que o aparelho arrefeça antes
de o montar, desmontar, limpar ou antes de
o arrumar.
Não submerja o corpo principal do aparelho,
cabo ou cha elétrica, em água ou qualquer
outro líquido. Os ganchos de massa, varas
de amassar e vara emulsionadora devem ser
lavados com água quente e detergente ou
na máquina da louça. Consulte a secção de
limpeza para detalhes completos.
Nenhum dos acessórios (varas de amassar,
ganchos de massa e vara emulsionadora)
deve ser utilizado durante mais de 4 minutos
e 30 segundos. Quando se misturam
conteúdos extremamente pesados o
aparelho não deve ser utilizado por mais
de 1 minuto e 30 segundos, nem usar a
função HeatSoft
TM
por mais de 5 minutos
consecutivos.
IMPORTANTE: No caso da batedeira
sobreaquecer devido a excesso de carga,
o protetor de segurança será ativado,
impedindo o funcionamento da batedeira. Se
isso ocorrer, desligue a batedeira na tomada
de corrente elétrica e deixe que a batedeira
arrefeça durante 10 minutos antes de ligar
novamente.
• Certique-se sempre de que tem as mãos secas antes de
mexer na tomada ou ligar o aparelho.
• Utilize sempre o aparelho sobre uma superfície estável,
segura, seca e nivelada.
• Este aparelho não deve ser colocado sobre ou junto de
qualquer potencial superfície quente (como forno a gás ou
elétrico).
• Nunca deixe o cabo pendurado sobre a extremidade de uma
bancada de trabalho, superfícies quentes, nem permita que
que com nós, preso ou pisado.
• Não utilize o aparelho se o tiver deixado cair ou se houver
quaisquer sinais visíveis de danos.
• Nunca utilize acessórios ou extras não recomendados pelo
fabricante.
• Retire os extras do aparelho antes de o lavar ou limpar.
• Mantenha os dedos, cabelos e roupas longe das peças
móveis do aparelho quando estiver a ser usado.
CUIDADOS COM TEMPERATURAS ELEVADAS
1. Não ative a função HeatSoft
TM
enquanto a batedeira estiver no
recipiente de armazenamento.
2. Não coloque nada no recipiente de armazenamento além do
conteúdo desta caixa.
3. Não toque nem mantenha as mãos por baixo da saída de calor
enquanto a função HeatSoft
TM
estiver ativa.
4. Não deixe ligada a função HeatSoft
TM
enquanto a batedeira
estiver na mesa sobre a respetiva base.
5. Não utilize sem a tampa de saída de calor e ltro montados.
PEÇAS
COMO UTILIZAR A BATEDEIRA AMOVÍVEL
Descobrir a sua batedeira amovível
A batedeira amovível Breville
®
Hand Mixer com Tecnologia
HeatSoft
TM
foi projetada para permitir que faça bolos quando estiver
inspirada. Acabou-se a espera para que ingredientes como a
manteiga atinjam a temperatura ambiente! Agora pode amolecer e
misturar de uma só vez!
Sabia?
Muitas receitas exigem que ingredientes como a manteiga estejam
à temperatura ambiente. A manteiga só atinge a temperatura
ambiente após várias horas fora do frigoríco. Se usar manteiga
fria, diretamente do frigoríco, o resultado serão bolos pesados e
densos. A manteiga que é aquecida no micro-ondas ou derretida
pode criar uma massa oleosa que resulta em bolachas ensopadas
e sem volume. Usar ingredientes à temperatura ambiente produz
resultados mais fofos e melhores bolos em geral.
Botão HeatSoft
TM
:
O botão HeatSoft
TM
permite que a manteiga seja amolecida
enquanto é misturada. A Tecnologia HeatSoft
TM
usa calor suave
para aquecer os ingredientes frios até à temperatura ambiente,
ao mesmo tempo que os mistura, eliminando a necessidade de
planear com antecedência.
Botão Boost
O botão Boost proporciona um impulso adicional à velocidade
selecionada quando prime este botão.
Botão de ejeção das varas de bater
O botão de ejeção das varas de bater permite que a ação
independente do polegar solte as varas de amassar, ganchos de
massa ou vara emulsionadora.
q
Bocal magnético
w
Botão de ejeção das varas de bater
e
Botão HeatSoft
TM
r
Botão Boost
t
Controlo de 7 velocidades
y
Pega ergonómica
MAX
600ml
7
1
2
3
A
B
C
D
E
8
7
8
4
5
6
Cabo de alimentação
MAX
600ml
7
1
2
3
A
B
C
D
E
8
7
8
4
5
6
Tampa de respiração do aquecedor
o
Filtro de respiração do aquecedor
a
Caixa de arrumação
s
Faixa do cabo de alimentação
d
Ganchos de massa
f
Vara emulsionadora
g
Varas de amassar
La pagina sta caricando ...
La pagina sta caricando ...
La pagina sta caricando ...
La pagina sta caricando ...
La pagina sta caricando ...
La pagina sta caricando ...
La pagina sta caricando ...
La pagina sta caricando ...
La pagina sta caricando ...
La pagina sta caricando ...
La pagina sta caricando ...
La pagina sta caricando ...
La pagina sta caricando ...
La pagina sta caricando ...
La pagina sta caricando ...
-
 1
1
-
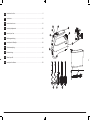 2
2
-
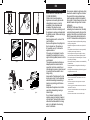 3
3
-
 4
4
-
 5
5
-
 6
6
-
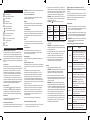 7
7
-
 8
8
-
 9
9
-
 10
10
-
 11
11
-
 12
12
-
 13
13
-
 14
14
-
 15
15
-
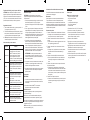 16
16
-
 17
17
-
 18
18
-
 19
19
-
 20
20
-
 21
21
-
 22
22
-
 23
23
-
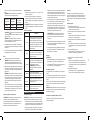 24
24
-
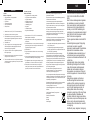 25
25
-
 26
26
-
 27
27
-
 28
28
-
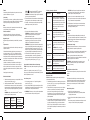 29
29
-
 30
30
-
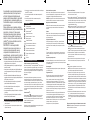 31
31
-
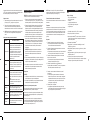 32
32
-
 33
33
-
 34
34
-
 35
35


Breville VFM021X-01 HeatSoft Manuale del proprietario
- Categoria
- Miscelatori
- Tipo
- Manuale del proprietario
- Questo manuale è adatto anche per
in altre lingue
- English: Breville VFM021X-01 HeatSoft Owner's manual
- français: Breville VFM021X-01 HeatSoft Le manuel du propriétaire
- español: Breville VFM021X-01 HeatSoft El manual del propietario
- Deutsch: Breville VFM021X-01 HeatSoft Bedienungsanleitung
- Nederlands: Breville VFM021X-01 HeatSoft de handleiding
- português: Breville VFM021X-01 HeatSoft Manual do proprietário
- čeština: Breville VFM021X-01 HeatSoft Návod k obsluze
- polski: Breville VFM021X-01 HeatSoft Instrukcja obsługi
- svenska: Breville VFM021X-01 HeatSoft Bruksanvisning
- română: Breville VFM021X-01 HeatSoft Manualul proprietarului
Altri documenti
-
Tristar MX-4159 Manuale utente
-
Tristar MX-4152 Manuale utente
-
Morphy Richards Total Control Manuale utente
-
Hotpoint HM 0306 AX0 Manuale del proprietario
-
Silvercrest SKM 550 EDS A1 Operating Instructions Manual
-
-
Unold 78710 Manuale del proprietario
-
-
-
Carrera 555 Manuale utente