Suntec Wellness MIX-8137 COMFORT PRO Manuale del proprietario
- Categoria
- Piccoli elettrodomestici da cucina
- Tipo
- Manuale del proprietario

DE
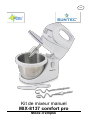
Handmixer-Set
MIX-8137 comfort pro
Bedienungsanleitung

Wir danken Ihnen für den Kauf dieses Gerätes der Marke Suntec Wellness. Bitte lesen Sie die
Bedienungsanleitung aufmerksam, bevor Sie das Gerät in Betrieb nehmen. Bitte bewahren Sie diese
Bedienungsanleitung zum späteren Nachschlagen auf.
Sicherheitshinweise
VORSICHT!
Dieses Gerät kann von Kindern ab 8 Jahren und
darüber und von Personen mit reduzierten
physischen, sensorischen oder mentalen
Fähigkeiten oder Mangel an Erfahrung und/oder
Wissen benutzt werden, wenn sie beaufsichtigt
oder bezüglich des sicheren Gebrauchs des
Gerätes unterwiesen wurden und die daraus
resultierenden Gefahren verstanden haben.
Kinder dürfen nicht mit dem Gerät spielen.
Reinigung und Benutzer-Wartung dürfen nicht
durch Kinder ohne Beaufsichtigung durchgeführt
werden. Kinder unter 3 Jahren ohne permanente
Aufsicht müssen daran gehindert werden, auf das
Gerät zugreifen zu können.
Kinder ab 3 Jahren und unter 8 Jahren dürfen das
Gerät nur unter der Voraussetzung ein- und
ausschalten, dass das Gerät in seiner
vorgesehenen Gebrauchslage positioniert oder
installiert, sie bezüglich des sicheren Gebrauchs
des Gerätes unterwiesen und beaufsichtigt
werden und die möglichen Gefahren verstanden
haben. Kinder ab 3 Jahren und unter 8 Jahren
dürfen das Gerät nicht an die Steckdose
anschließen, es regulieren, reinigen oder die
Wartung durchführen.
• Bitte stellen Sie sicher, dass die angegebene
Netzspannung mit dem Ihres Stromnetzes
übereinstimmt.
• Bitte betreiben Sie das Gerät nicht, wenn das
Stromkabel, der Netzstecker oder das Gerät und

seine Bestandteile Schäden aufweisen. Ist eine
Reparatur notwendig, wenden Sie sich bitte an Ihre
Verkaufsstelle.
• Das Gerät darf nur im Haushalt und für den
Verwendungszweck, für den es hergestellt wurde,
genutzt werden. Bitte nicht im Freien nutzen.
• Bitte entfernen Sie den Netzstecker von der
Steckdose, wenn Sie das Gerät für längere Zeit
nicht nutzen, es reinigen oder eine Störung auftritt.
• Bitte führen Sie keine fremden Objekte in das Gerät
hinein. Diese können zu Stromschlägen, Feuer oder
Schäden am Gerät führen.
• Bitte lassen Sie das Gerät nicht unbeaufsichtigt.
• Bitte lassen Sie das Kabel nicht über der Tischkante
oder der Arbeitsfläche hängen und nicht in
Berührung mit heißen Oberflächen kommen.
• Um Stromschläge zu vermeiden, tauchen Sie das
Gerät bitte nicht in Wasser oder andere
Flüssigkeiten ein.
• Bitte halten Sie das Gerät von Gas und Heizquellen
fern.
• Bitte versuchen Sie nicht das Gerät selbstständig zu
reparieren, auseinanderzubauen oder zu verändern.
• Der Gebrauch von fremden Zubehörteilen kann zu
Verletzungen führen.

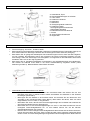
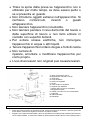
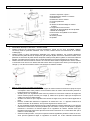
Bestandteile
A: Auswurftaste „Eject“
B: Geschwindigkeitsregler mit 5 Stufen
C: Turbo-Taste
D: Handmixer-Gehäuse
E: Knethaken
F: Rührbesen
G: Entriegelungstaste Handmixer
H: Handmixer-Halter
I: Entriegelungstaste Schwenkarm
J: Rührständer-Gehäuse
K: Edelstahlschüssel mit Zahnrad
L: Deckel
M: Schwenkbares Sichtfenster
N: Teigschaber
Inbetriebnahme
• Stromversorgung: 220-240V~, 50-60Hz, 500W
• Bitte reinigen Sie die Zubehörteile (Knethaken, Rührbesen, Edelstahlschüssel, Teigschaber, Deckel) vor
dem ersten Gebrauch. Bitte folgen Sie dazu den Anweisungen aus dem Abschnitt „Reinigung“.
• Bitte wählen Sie ein geeignetes Aufsatzpaar: Die Knethaken eignen sich für feste und zähe Teigarten,
wie z.B. Hefeteig. Die Rührbesen eignen sich wiederum für lockere und flüssige Teigarten, wie z.B.
Kuchenteige, sowie zum Aufschlagen von Flüssigkeiten. Im Gegensatz zu den Rührbesen wird bei den
Knethaken keine Luft in den Teig eingearbeitet.
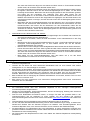
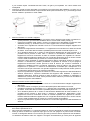
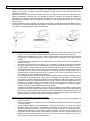
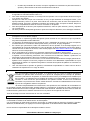
• Bitte setzen Sie Ihr gewähltes Aufsatzpaar nacheinander in die Aufsatzhalterungen des Handmixers.
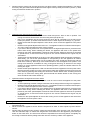
Der Aufsatz mit Zahnrad muss dabei in die rechte Aufsatzhalterung eingesetzt werden (siehe
Markierung auf Bild 1). Beide Aufsätze sollten hörbar einrasten.
Bild 1 Bild 2 Bild 3
• Inbetriebnahme mit Rührschüssel und -ständer:
o Bitte platzieren Sie den Handmixer auf den Handmixer-Halter und drücken Sie ihn zum
Einrasten nach unten. In dieser Position sollten die Aufsätze am Handmixer in die Schüssel
hineinragen (siehe Bild 2).
o Bitte legen Sie Ihre Zutaten in die Schüssel hinein und schieben Sie den Deckel bis zum
Anschlag in den Handmixer-Halter (siehe Bild 3). Bitte achten Sie darauf, dass sich keine
Gegenstände, wie z.B. Löffel, im Teig befinden.
o Bitte stellen Sie sicher, dass sich der Geschwindigkeitsregler auf 0 befindet und schließen Sie
das Gerät anschließend an die Steckdose an.
o Bitte stellen Sie nun den Geschwindigkeitsregler von 0 auf 1. Das Gerät schaltet sich mit der
niedrigsten Geschwindigkeitsstufe ein. Je nach Bedarf können Sie auf die höheren
Geschwindigkeitsstufen 2-5 wechseln.
o Möchten Sie von einer niedrigen Geschwindigkeitsstufe direkt auf die höchste Stufe 5 wechseln,
können Sie beim Mixen die Turbo-Taste C gedrückt halten. Beim Loslassen arbeitet das Gerät
wieder auf der am Geschwindigkeitsregler eingestellten Geschwindigkeitsstufe. Bitte beachten

Sie, dass das Gerät nicht länger als eine Minute auf Stufe 5 bzw. im Turbo-Modus betrieben
werden sollte, da der Motor sonst überhitzt werden kann.
o Durch das schwenkbare Sichtfenster können Sie während der Inbetriebnahme weitere Zutaten
hinzugeben. Alternativ können Sie den Geschwindigkeitsregler auf 0 stellen, um das Gerät
kurzzeitig auszuschalten. Bitte halten Sie die Entriegelungstaste für den Schwenkarm gedrückt
und heben Sie den Handmixer inkl. Halterung nach oben. Bitte lassen Sie die
Entriegelungstaste los, um das Gerät in dieser Position einzurasten. Die Schüssel ist nun zum
Befüllen und Entnehmen sowie für den Teigschaber frei zugänglich. Um das Gerät wieder in die
ursprüngliche Position zu bringen, drücken Sie bitte erneut auf die Entriegelungstaste für den
Schwenkarm.
o Bitte stellen Sie den Geschwindigkeitsregler nach dem Gebrauch auf 0 und entfernen Sie das
Gerät von der Stromzufuhr. Bitte entnehmen Sie den Deckel durch Herausziehen aus dem
Handmixer-Halter und trennen Sie den Handmixer von dem Rührständer, indem Sie die
Entriegelungstaste für den Handmixer gedrückt halten und den Handmixer hochheben. Um die
Schüssel zu entfernen, halten Sie die Entriegelungstaste für den Schwenkarm gedrückt und
heben Sie den Handmixer-Halter hoch.
• Inbetriebnahme ohne Rührschüssel und -ständer:
o Bitte stellen Sie sicher, dass sich der Geschwindigkeitsregler auf 0 befindet und schließen Sie
das Gerät anschließend an die Steckdose an.
o Um Spritzer zu vermeiden, führen Sie bitte die Aufsätze vor der Inbetriebnahme in den Teig
hinein.
o Bitte wechseln Sie nun den Geschwindigkeitsregler von 0 auf 1. Das Gerät schaltet sich mit der
niedrigsten Geschwindigkeitsstufe ein. Je nach Bedarf können Sie auf die höheren
Geschwindigkeitsstufen 2-5 wechseln.
o Möchten Sie von einer niedrigen Geschwindigkeitsstufe direkt auf die höchste Stufe 5 wechseln,
können Sie beim Mixen die Turbo-Taste C gedrückt halten. Beim Loslassen arbeitet das Gerät
wieder auf der am Geschwindigkeitsregler eingestellten Geschwindigkeitsstufe. Bitte beachten
Sie, dass das Gerät nicht länger als eine Minute auf Stufe 5 bzw. im Turbo-Modus betrieben
werden sollte, da der Motor sonst überhitzt werden kann.
o Bitte stellen Sie den Geschwindigkeitsregler nach dem Mixen auf 0, um das Gerät
auszuschalten und entfernen Sie es von der Stromzufuhr.
Reinigung
• Bitte entfernen Sie das Gerät vor jeder Reinigung von der Stromzufuhr. Der Geschwindigkeitsregler
muss auf 0 eingestellt sein.
• Tauchen Sie das Gerät und seine elektrischen Bestandteile bitte nie unter Wasser oder andere
Flüssigkeiten ein, um Stromschläge zu vermeiden.
• Bitte reinigen Sie die Aufsätze, die Schüssel und den Deckel nach jedem Gebrauch mit einem feuchten,
weichen Schwamm oder Tuch sowie mildem Spülmittel. Zum Entnehmen der Aufsätze drücken Sie bitte
auf die Auswurftaste am Handmixer. Der Handmixer sollte sich dabei nicht auf dem Rührständer
befinden. Bitte trocknen Sie die Aufsätze gründlich bevor Sie sie wieder in das Gerät einsetzen.
• Bitte verwenden Sie zur Reinigung der Gehäuse-Außenflächen ein feuchtes, weiches Tuch und zum
Abtrocknen ein trockenes Tuch.
• Bitte nutzen Sie keine aggressiven und chemischen Reinigungsmittel sowie keine scheuernden
Putzmittel, wie z.B. Stahlwolle.
Für den Reklamationsfall
• Möchten Sie das Gerät reklamieren, so können Sie das binnen 24 Monate ab Kaufdatum (Quittung) tun.
• Ein kostenloser Ersatz oder eine kostenlose Reparatur ist bei vorheriger unsachgemäßer
Produktmanipulation ausgeschlossen.
• Defekte an Verschleißteilen, Verbrauchsmaterialien, ebenso wie Reinigung, Wartung oder Austausch
besagter Teile sind folglich kostenpflichtig.
• Falls Sie eine Reklamation durchführen wollen, so bringen Sie bitte das gesamte Gerät in der
Originalverpackung und mit Kaufbeleg zu Ihrem Händler. Für eine zeitnahe und bequeme
Serviceanmeldung besuchen Sie ferner unsere Internetseite www.suntec-wellness.de und erfahren Sie
mehr.
• Ohne Kaufbeleg erfolgt grundsätzlich keine kostenlose Reparatur oder ein Austausch.
• Für den Fall, dass der Reklamationsfall analog unserer Service Bestimmungen erfolgt, so werden alle
Defekte des Gerätes oder des Zubehörs aufgrund von Material- oder Herstellungsfehlern durch
kostenlose Reparatur oder, nach unserem Ermessen, durch Austausch des Gerätes beseitigt.
• Die Beschädigung von Zubehörteilen führt nicht automatisch zu einem kostenlosen Austausch des
gesamten Gerätes. Kontaktieren Sie in diesen Fällen bitte Ihren Fachhändler. Glasbruch oder Bruch von
Plastikteilen ist immer kostenpflichtig.
• Der Fachhändler oder Reparaturservice kann nach Ablauf der Garantie Reparaturen kostenpflichtig
durchführen.

Hinweise zum Umweltschutz
Dieses Produkt darf am Ende seiner Lebensdauer nicht über den normalen Haushaltsabfall
entsorgt werden, sondern muss an einem Sammelpunkt für das Recycling von elektrischen und
elektronischen Geräten abgegeben werden. Das Symbol auf dem Produkt, der Gebrauchsanleitung
oder der Verpackung weist darauf hin. Die Werkstoffe sind gemäß ihrer Kennzeichnung wieder
verwertbar. Mit der Wiederverwendung, der stofflichen Verwertung oder anderen Formen der
Verwertung von Altgeräten leisten Sie einen wichtigen Beitrag zum Schutze unserer Umwelt. Bitte
erfragen Sie bei der Gemeindeverwaltung die zuständige Entsorgungsstelle.
Im Rahmen unserer erweiterten Herstellerverantwortung ist dieses Gerät gemäß der Europäischen Richtlinie
2012/19/EU für Elektro- und Elektronik-Altgeräte (WEEE) gekennzeichnet. Ziel ist das Vermeiden, Verringern
sowie umweltverträgliche Entsorgen an Elektronikschrott. Bitte helfen Sie aktiv mit, die Umwelt zu schonen und
entsorgen Sie Elektroschrott über die örtlichen Sammelstellen.
Die Verpackung sowie diese Bedienungsanleitung sind recycelbar.
EG-Konformitätserklärung
Das Gerät entspricht den wesentlichen Gesundheits- und Sicherheitsanforderungen der Europäischen Union.
Die EG-Konformitätserklärung ist Basis für die CE-Kennzeichnung dieses Gerätes.
Mit Erscheinen dieser Bedienungsanleitung verlieren alle bisherigen ihre Gültigkeit. SUNTEC, SUNTEC
Wellness, KLIMATRONIC und das Sonnenlogo sind eingetragene Marken. © 2019/02 SUNTEC WELLNESS
GMBH.
Für Druckfehler und Irrtümer wird keine Haftung übernommen.
© 2019 Suntec Wellness® MIX-8137 comfort pro
SUNTEC WELLNESS GMBH / HOLZSTRASSE 2 / 40 221 DÜSSELDORF / DEUTSCHLAND

GB
Hand mixer set
MIX-8137 comfort pro
Instruction manual

Thank you for purchasing this product of the brand Suntec Wellness. Before the first use, please read the manual
carefully. Keep it for later reference and hand it over to its new owner, if you give the appliance to another person.
Safety Precautions
CAUTION!
This appliance can be used by children aged from
8 years and above and persons with reduced
physical, sensory and mental capabilities or lack
of experience and knowledge if they have been
given supervision or instruction concerning use of
the appliance in a safe way and understand the
hazards involved. Cleaning and user maintenance
shall not be made by children without supervision.
Children of less than 3 years should be kept away
unless continuously supervised.
Children aged from 3 years and less than 8 years
shall only switch on/off the appliance provided
that it has been placed or installed in its intended
normal operating position and they have been
given supervision or instruction concerning use of
the appliance in a safe way and understand the
hazards involved.
Children aged from 3 years and less than 8 years
shall not plug in, regulate and clean the appliance
or perform user maintenance.
• Before connecting the appliance to the power
supply, please check that the voltage indicated on
the appliance corresponds with the voltage at your
home.
• Please refrain from further usage if the power cord,
power plug, the appliance or its parts are damaged
and contact your seller.
• Please do not use the appliance for other than its
intended use. For domestic indoor use only.
• Please remove the appliance from the wall socket

when it is not in use, before cleaning and in case of
malfunctions.
• Please do not insert any objects into the appliance
as this may cause electric shocks, fire or damages
to the appliance.
• Please do not leave the appliance unattended.
• Please keep the power cord from table edges,
working surfaces or any hot surfaces.
• Never immerse the appliance in water or other
liquids to prevent electric shocks.
• Please keep the appliance from gas and heating
sources.
• Do not attempt to repair, disassemble or change the
appliance by yourself.
• The usage of accessories not provided by SUNTEC
may cause harm.
Components
A: Eject button
B: Speed adjuster with 5 levels
C: Turbo button
D: Hand mixer main body
E: Dough hooks
F: Beaters
G: Hand mixer release button
H: Hand mixer holder
I: Moving arm release button
J: Mixer stand body
K: Stainless steel mixing bowl with gear wheel
L: Lid
M: Movable window
N: Dough scraper
Operation
• Operating voltage: 220-240V~, 50-60Hz, 500W
• Please clean the accessories (dough hooks, beaters, mixing bowl, dough scraper, lid) prior to first use.
Please follow the instructions from the segment “Cleaning”.
• Please choose a suitable pair of mixing accessory: The dough hooks are suitable for solid and tough
doughs, e.g. yeast dough. The beaters are more suitable for loose and liquid doughs, e.g. cake dough,
as well as for beating liquids. In contrast to the beaters, the dough hooks cannot create air into the
dough.

• Please insert the chosen pair of mixing accessory into the accessory outlets of the appliance. The mixing
accessory with gear wheel should be placed into the right accessory outlet (see mark on picture 1). Both
mixing accessories should lock in position.
Picture 1 Picture 2 Picture 3
• Operation with mixing bowl and mixer stand:
o Place the hand mixer onto the hand mixer holder and press it down to lock in position. The
mixing accessories should reach into the mixing bowl (see picture 2).
o Place your ingredients into the mixing bowl and push the lid completely into the hand mixer
holder (see picture 3). Please make sure there are no other objects in the dough, e.g. spoons.
o Please ensure that the speed adjuster is set to level 0, then connect the appliance to the power
supply.
o Please turn the speed adjuster from level 0 to 1. The appliance will turn on with the lowest speed.
You can increase the speed to levels 2-5 as required.
o If you want to directly switch from a low speed level to the highest speed level 5, press the turbo
button while mixing. When releasing the button, the appliance will return to the speed level
previously set at the speed adjuster. Please be aware that the appliance shall not be operated
on speed level 5 or with turbo button longer than one minute. Otherwise the engine may be
overheated.
o Thanks to the movable window on the lid you can add ingredients while operating the appliance.
Alternatively, you can set the speed adjuster to 0 temporarily to turn the appliance off. Please
press and hold the release button for the movable arm down and lift the hand mixer and the
hand mixer holder up. Now let go of the release button to lock the appliance into position. The
mixing bowl should be accessible for easy pouring and removing, as well as for the dough
scraper. To put the appliance back into its operating position, press the release button for the
moving arm again.
o Please set the speed adjuster to 0 after use and disconnect the appliance from the power oulet.
Remove the lid by pulling it out of the hand mixer holder and separate the hand mixer from the
mixer stand by pressing and holding the hand mixer release button down and lifting the hand
mixer up. To remove the mixing bowl, press and hold the release button for the moving arm
down and lift the hand mixer holder up.
• Operation without mixing bowl and mixer stand:
o Please make sure that the speed adjuster is set at 0 and connect the appliance to the power
supply.
o To avoid splashing, lead the mixing accessories into the dough before turning on the appliance.
o Please turn the speed adjuster from level 0 to 1. The appliance will turn on with the lowest speed.
You can increase the speed to levels 2-5 as required.
o If you want to directly switch from a low speed level to the highest speed level 5, press the turbo
button while mixing. When releasing the button, the appliance will return to the speed level
previously set at the speed adjuster. Please be aware that the appliance shall not be operated
on speed level 5 or with turbo button longer than one minute. Otherwise the engine may be
overheated.
o Please turn the speed adjuster to level 0 after mixing to turn off the appliance and disconnect
the appliance from the power outlet.
Cleaning
• Please always disconnect the appliance from the power outlet before cleaning. The speed adjuster
should be set to 0.
• Never immerse the appliance and its electric components in water or other liquids to prevent electric
shocks.
• Please clean the dough hooks, beaters, mixing bowl and lid after each use with a soft, wet sponge or
cloth and mild dish soap. To release the dough hooks and beaters from the appliance, press the eject
button on the hand mixer. The hand mixer should be separated from the mixing stand. Completely dry
the mixing accessories before putting them back into the accessory outlets of the appliance.

• Please wipe over the exterior of the appliance with a soft, wet cloth and then wipe dry with a dry cloth.
• Do not use any chemicals or other abrasive cleaning solvents to clean.
In case of complaint
• You can claim the device within 24 months from date of purchase (receipt).
• A free replacement or repair will be excluded from prior improper product handling.
• Defects in wear parts, consumables, as well as cleaning, maintenance or replacement of said parts are
therefore with costs.
• If you want to make a complaint, please bring the entire device in its original packaging and with proof of
purchase to your dealer. For a timely and convenient service register, visit our website www.suntec-
wellness.de and learn more.
• Without a proof of purchase, generally there will be no repair or replacement.
• In the event that the complaint case is analogous to our terms of service, all defects of the device or its
accessories due to material or manufacturing defects will be eliminated by repair or, at our discretion,
replacing the unit.
• The damage of accessories does not automatically lead to a free exchange of the whole device. In these
cases, please contact your dealer. Glass breakage, or breakage of plastic parts are always to charge.
• The dealer or repair service can perform the repair after the expiration of warranty against charge.
Note concerning protection of environment
This product must not be disposed of via normal household waste after its service life, but must be
taken to a collection station for the recycling of electrical and electronic devices. The symbol on the
product, the operating instructions or the packaging indicates such disposal procedures. The
materials are recyclable in accordance with their respective symbols. By means of re-use, material
recycling or any other form of recycling old appliances you are making an important contribution to
the protection of our environment.
Please ask your local council where your nearest disposal station is located.
As part of our extended producer responsibility, this product is indicated in accordance to the European Directive
2012/19/EU on Waste Electrical and Electronic Equipment (WEEE). The aim is to avoid, reduce, and
environmentally friendly disposal of electronic waste. Please help actively to protect the environment and
dispose electronic waste through local collection points. The packaging and this manual can be recycled.
EC declaration of conformity
The device meets the essential health and safety requirements of the European Union. The EC declaration of
conformity is the basis for CE marking this unit.
With publication of this manual supersedes all previous their validity. SUNTEC, SUNTEC Wellness,
KLIMATRONIC and the Sun-Logo are registered trademarks. © 2019/02 SUNTEC WELLNESS GMBH
Liability is excluded for all printing errors and omissions.
© 2019 Suntec Wellness® MIX-8137 comfort pro
SUNTEC WELLNESS GMBH / HOLZSTRASSE 2 / 40 221 DÜSSELDORF / GERMANY

IT
Set sbattitore
MIX-8137 comfort pro
Istruzioni per l'uso

Grazie per l'acquisto di questo dispositivo del marchio Suntec Wellness. Prima del primo utilizzo, ti preghiamo
di leggere attentamente il manuale. Lo mantieni per riferimento e poi lo inoltri al suo nuovo proprietario, se dai
l'apparecchio a un'altra persona.
Precauzioni di sicurezza
Questo apparecchio può essere utilizzato da
bambini di almeno 8 anni di età e da persone con
ridotte facoltà psichiche, sensoriali o mentali
oppure con mancanza di esperienza e/o
conoscenza, se vengono controllati o se sono stati
istruiti relativamente all’utilizzo sicuro
dell’apparecchio e se ne hanno compreso i
pericoli correlati. I bambini non devono giocare
con questo apparecchio. Le operazioni di
manutenzione per la pulizia e l’utilizzo non devono
essere condotte da bambini senza la dovuta
sorveglianza. I bambini di età inferiore ai 3 anni
senza sorveglianza devono non devono toccare il
dispositivo. I bambini a partire dai 3 anni e fino agli
8 anni possono accendere e spegnere il
dispositivo solo se posizionato o installato
correttamente, se rispettano l’utilizzo corretto del
dispositivo e comprendono i possibili pericoli
derivanti dall’uso dello stesso.
I bambini a partire dai 3 anni e inferiori agli 8 non
possono collegare il dispositivo alla presa, non
possono regolarlo, pulirlo o eseguire lavori di
manutenzione.
• Verificare che la tensione indicata sulla targhetta del
modello corrisponda con quella della rete di
corrente.
• Non usare l'apparecchio se il cavo, la spina o
l'apparecchio e i suoi componenti sono difettosi. Se
è necessaria la riparazione contattare il rivenditore.
• L’apparecchio può essere impiegato solo in casa e
per lo scopo concepito. Non utilizzare all’aperto.

• Tirare la spina dalla presa se l'apparecchio non è
utilizzato per molto tempo, se deve essere pulito o
se si presenta un guasto.
• Non introdurre oggetti estranei nell'apparecchio. Si
rischiano cortocircuiti, incendi o guasti
all'apparecchio.
• Non lasciare l'apparecchio incustodito.
• Non lasciare pendere il cavo dal bordo del tavolo o
dalla superficie di lavoro e non farlo entrare in
contatto con superfici bollenti.
• Per evitare scosse elettriche, non immergere
l'apparecchio in acqua o altri liquidi.
• Tenere l'apparecchio lontano da gas e fonti di calore.
• Non cercare di
riparare, smontare o modificare l'apparecchio per
conto proprio.
• L'uso di accessori non originali può causare lesioni.
Componenti
A: Tasto di espulsione "Eject"
B: Regolatore di velocità a 5 livelli
C: Tasto turbo
D: Corpo sbattitore
E: Ganci per impastare
F: Fruste
G: Tasto di sblocco sbattitore
H: Supporto per sbattitore
I: Tasto di sblocco braccio orientabile
J: Alloggiamento base
K: Ciotola in acciaio inox con ruota dentata
L: Coperchio
M: Oblò orientabile
N: Raschietto
Messa in funzione
• Alimentazione elettrica: 220-240V~, 50-60Hz, 500W
• Pulire gli accessori (gancio per impastare, frusta, ciotola in acciaio inox, raschietto, coperchio) prima del
primo utilizzo. A tale scopo seguire le istruzioni nel capitolo "Pulizia".
• Scegliere una coppia di inseriti adatta: i ganci per impastare sono adatti per tipi d'impasto solidi e densa,
come la pasta lievitata. Le fruste sono adatte per tipi d'impasto morbidi e liquidi, come impasti per dolci,

e per montare liquidi. Contrariamente alle fruste, nei ganci per impastare non viene inserita aria
nell'impasto.
• Inserire la coppia di inserti prescelta in successione nel porta-inserti dello sbattitore. L'inserto con la
ruota dentata deve essere inserito nel porta-inserti destro (vedi marcatura in fig. 1). Entrambi gli inserti
devono scattare in posizione in modo udibile.
Fig. 1 Fig. 2 Fig. 3
• Messa in funzione con ciotola e supporto:
o Posizionare lo sbattitore sul supporto e premerlo verso il basso fino allo scatto in posizione. In
questa posizione, gli inserti sullo sbattitore devono entrare nella ciotola (vedi fig. 2).
o Inserire gli ingredienti nella ciotola e scorrere il coperchio fino alla battuta nel supporto dello
sbattitore (vedi fig. 3). Verificare che non vi siano oggetti come cucchiai nell'impasto.
o Accertarsi che il regolatore di velocità si trovi su 0 e successivamente collegare l'apparecchio
alla presa.
o Posizionare il regolatore di velocità da 0 a 1. L'apparecchio si accenderà con il livello di velocità
più basso. A seconda della necessità è possibile passare ai livelli di velocità superiori 2-5.
o Se si desidera passare da un livello di velocità basso direttamente al livello massimo 5, è
possibile tenere premuto il tasto turbo C durante la miscelazione. Rilasciando il tasto,
l'apparecchio ritorna a funzionare al livello di velocità impostato sul regolatore di velocità.
Prestare attenzione affinché l'apparecchio non venga fatto funzionare più di un minuto al livello
5 ovvero nella modalità turbo per evitare che il motore possa surriscaldarsi.
o Attraverso l'oblò orientabile è possibile aggiungere ulteriori ingredienti durante la messa in
funzione. In alternativa è possibile posizionare il regolatore di velocità su 0 per spegnere
l'apparecchio brevemente. Tenere premuto il tasto di sblocco per il braccio orientabile e
sollevare lo sbattitore insieme al supporto. Rilasciare il tasto di sblocco per fare scattare
l'apparecchio in posizione. La ciotola è ora liberamente accessibile per il riempimento e la
rimozione nonché per il raschietto. Per riportare l'apparecchio nella posizione iniziale, premere
nuovamente il tasto di sblocco per il braccio orientabile.
o Dopo l'uso posizionare il regolatore di velocità su 0 e staccare l'apparecchio dall'alimentazione
elettrica. Rimuovere il coperchio estraendolo dal supporto dello sbattitore e separare lo
sbattitore dalla base, tenendo premuto il tasto di sblocco per lo sbattitore e sollevando lo
sbattitore Per rimuovere la ciotola, tenere premuto il tasto di sblocco per il braccio orientabile e
sollevare il supporto dello sbattitore.
• Messa in funzione senza ciotola e supporto:
o Accertarsi che il regolatore di velocità si trovi su 0 e successivamente collegare l'apparecchio
alla presa.
o Per evitare schizzi, immergere gli inserti nell'impasto prima della messa in funzione.
o Cambiare il regolatore di velocità da 0 a 1. L'apparecchio si accenderà con il livello di velocità
più basso. A seconda della necessità è possibile passare ai livelli di velocità superiori 2-5.
o Se si desidera passare da un livello di velocità basso direttamente al livello massimo 5, è
possibile tenere premuto il tasto turbo C durante la miscelazione. Rilasciando il tasto
l'apparecchio ritorna a funzionare al livello di velocità impostato sul regolatore di velocità.
Prestare attenzione affinché l'apparecchio non venga fatto funzionare più di un minuto al livello
5 ovvero nella modalità turbo per evitare che il motore possa surriscaldarsi.
o Dopo l'uso posizionare il regolatore di velocità su 0 e staccare l'apparecchio dall'alimentazione
elettrica.
Pulizia
• Scollegare l'apparecchio dall'alimentazione di corrente prima di ogni pulizia. Il regolatore di velocità
deve essere posizionato su 0.
• Non immergere il dispositivo e i componenti elettrici in acqua o altri liquidi per evitare scosse elettriche.
• Pulire gli inserti, la ciotola e il coperchio dopo ogni uso con una spugna o un panno umido e morbido
nonché un detergente delicato. Per rimuovere gli inserti, premere il tasto di espulsione sullo sbattitore.
Lo sbattitore dovrebbe trovarsi sul supporto. Asciugare accuratamente gli inserti prima di applicarli

all'apparecchio.
• Per la pulizia della superficie esterna del corpo utilizzare un panno umido e morbido e asciugare con un
panno asciutto.
• Non utilizzare detersivi aggressivi e chimici o detersivi acidi, come ad es. lana d’acciaio.
In caso di reclami
• È possibile presentare reclami relativi all'apparecchio entro 24 mesi dalla data d'acquisto (ricevuta).
• L'eventuale precedente manipolazione impropria del prodotto annulla la possibilità di avvalersi
gratuitamente della sostituzione o della riparazione.
• Eventuali difetti presenti sulle parti soggette a usura, sui materiali di consumo nonché la pulizia, la
manutenzione o la sostituzione di tali parti sono a pagamento.
• Per presentare un reclamo, si prega di restituire l'apparecchio al rivenditore, completo di ogni sua parte,
nell'imballo originale e unitamente al documento d'acquisto. Per ottenere assistenza in modo pratico e
veloce è possibile trovare ulteriori informazioni sul sito Internet www.suntec-wellness.de.
• Si tenga presente che in assenza di documentazione d'acquisto non sarà possibile effettuare riparazioni
o sostituzioni a titolo gratuito.
• Qualora l'oggetto del reclamo si presenti in forma analoga a quanto stabilito dal Centro di assistenza, si
provvederà a eliminare tutti i difetti dei materiali o di fabbricazione dell'apparecchio o di un accessorio
mediante riparazione o, a nostra discrezione, mediante sostituzione dell'apparecchio.
• Eventuali danneggiamenti di parti di accessori non comportano la sostituzione automatica e gratuita
dell'intero apparecchio. In questi casi rivolgersi al rivenditore specializzato. La rottura del vetro o delle
parti in plastica è sempre a pagamento.
• Successivamente alla scadenza della garanzia, il rivenditore specializzato o il centro di assistenza
potranno addebitare le spese di riparazione.
Nota per quanto riguarda la tutela dell'ambiente
Questo prodotto non deve essere smaltito attraverso i normali rifiuti domestici dopo la sua durata,
ma deve essere portato in una stazione di raccolta per il riciclaggio di apparecchi elettrici ed
elettronici. Il simbolo sul prodotto, le istruzioni per l'uso o la confezione indicano esaminato le
procedure di smaltimento. I materiali sono riciclabili in ballo Accor con i loro simboli respectivement.
Per mezzo di riutilizzo, il riciclaggio dei materiali o qualunque altra forma di riciclaggio di vecchi
apparecchi si stanno facendo sul contributo importante alla tutela del nostro ambiente. Si prega di
chiedere il vostro consiglio locale in cui si trova la stazione di smaltimento più vicino.
Nell’ambito delle nostre responsabilità estese in qualità di produttore, si certifica che il presente apparecchio è
conforme alla Direttiva Europea 2012/19/UE sui rifiuti delle apparecchiature elettriche ed elettroniche (RAEE).
L'obiettivo è quello di evitare, ridurre e smaltire in modo ecocompatibile i rifiuti elettronici. Si prega di contribuire
attivamente alla tutela dell'ambiente e allo smaltimento dei rifiuti elettronici nei punti di raccolta locali.
L'imballaggio e il presente manuale di istruzioni sono riciclabili.
Dichiarazione di conformità CE
L’apparecchio soddisfa i requisiti essenziali per la salute e la sicurezza prescritti dall'Unione europea. La
dichiarazione di conformità CE è la base per la marcatura CE di questo apparecchio.
La pubblicazione di questo manuale di istruzioni sostituisce tutte le pubblicazioni precedentemente valide.
SUNTEC, SUNTEC Wellness, KLIMATRONIC e il logo Sun sono marchi registrati. © 2019/02 SUNTEC
WELLNESS GMBH
La responsabilità è esclusa per tutti gli errori di stampa e omissioni.
© 2019 Suntec Wellness® MIX-8137 comfort pro
SUNTEC WELLNESS GMBH / HOLZSTRASSE 2 / 40 221 DÜSSELDORF / GERMANIA

FR
Kit de mixeur manuel
MIX-8137 comfort pro
Mode d‘emploi

Nous vous remercions pour l'achat de cet appareil de la marque Suntec Wellness. Avant la première utilisation,
lire le manuel attentivement. Gardez-le pour référence ultérieure et remettez-le à son nouveau propriétaire, si
vous donnez l'appareil à une autre personne.
Précautions de sûreté
Cet appareil peut être utilisé par des enfants à
partir de 8 ans et plus, ainsi que par des personnes
ayant des capacités physiques, sensorielles ou
mentales réduites, ou ayant un manque
d’expérience ou de connaissance, à condition
qu'ils soient surveillés ou qu’ils soient dûment
instruits pour ce qui concerne l’utilisation de
l’appareil et qu'ils aient compris les dangers qui en
résultent. Les enfants ne doivent pas jouer avec
l'appareil. Le nettoyage et l'entretien utilisateur ne
doivent pas être réalisés par des enfants sans
surveillance. Empêchez que les enfants de moins
de 3 ans qui ne sont pas surveillés en permanence
n’accèdent à l’appareil.
Les enfants âgés de 3 à 8 ans ne doivent allumer
et éteindre l’appareil que si celui-ci est placé ou
installé dans sa position d’utilisation normale,
s’ils ont appris à utiliser l’appareil en toute
sécurité, s’ils sont surveillés et s’ils ont compris
les dangers potentiels.
Les enfants âgés de 3 à 8 ans ne doivent pas
brancher l’appareil sur la prise de courant, le
régler, le nettoyer ou l’entretenir.
• Veuillez vous assurer que la tension de réseau
indiquée correspond à celle de votre réseau
électrique.
• Veuillez ne pas exploiter l’appareil lorsque le câble
d’alimentation, la fiche ou l’appareil et ses
composants sont endommagés. Si une réparation
est nécessaire, veuillez vous adresser à votre point
de vente.

• L'appareil ne doit être utilisé que dans la cadre
d'une utilisation domestique et pour l'usage pour
lequel il a été conçu. Veillez à ne pas l’utiliser à l’air
libre.
• Veuillez débrancher la fiche de la prise de courant,
si vous n’utilisez pas l’appareil pendant une période
prolongée, si vous le nettoyez ou en cas de
survenance d’une défaillance.
• Veuillez ne pas insérer d’objets étrangers dans
l’appareil. Cela peut conduire à des décharges
électriques, des incendies ou à des dommages au
niveau de l’appareil.
• Veuillez ne pas laisser l'appareil sans surveillance.
• Veuillez ne pas laisser pendre le câble au bord de
la table ou sur la surface de travail et évitez de le
faire entrer en contact avec des surfaces chaudes.
• Veuillez ne pas plonger l’appareil dans de l’eau ou
un autre liquide pour éviter tout risque
d’électrocution.
• Veuillez tenir l’objet éloigné du gaz et des sources
de chaleur.
• N’essayez pas de réparer, de démonter ou de
modifier
l’appareil par vous-même.
• L’utilisation d’accessoires d’autres fabricants peut
causer des blessures.

Composants
A: Bouton d’éjection « Eject »
B: Régulateur de vitesse à 5 niveaux
C: Bouton turbo
D: Boîtier du mixeur manuel
E: Crochet pétrisseur
F: Fouet
G: Bouton de déverrouillage du mixeur
manuel
H: Support du mixeur manuel
I: Bouton de déverrouillage du bras pivotant
J: Boîtier du mélangeur
K: Bol en acier inoxydable et roue dentée
L: Couvercle
M: Hublot pivotant
N: Spatule
Mise en service
• Alimentation électrique: 220-240V~, 50-60Hz, 500W
• Veuillez nettoyer les accessoires (crochets pétrisseurs, fouets, bol en acier inoxydable, spatule,
couvercle) avant la première utilisation. Pour ce faire, veuillez suivre les instructions de la section
« Nettoyage ».
• Veuillez choisir la paire d’accessoires adéquate pour chaque utilisation: les crochets pétrisseurs
conviennent aux pâtes fermes et visqueuses, par exemple la pâte à la levure. Quant aux fouets, ils se
prêtent à la confection de pâtes aérées et liquides, telles que les pâtes à gâteau, et servent à battre les
liquides. Contrairement aux fouets, les crochets pétrisseurs ne font pas pénétrer d’air dans la pâte.
• Veuillez fixer les deux accessoires choisis l’un à côté de l’autre dans les logements du mixeur manuel.
L’accessoire muni d’une roue dentée doit être inséré dans le logement de droite (voir marquage sur
l’image 1). Les deux accessoires doivent s’encliqueter de manière audible.
Image 1 Image 2 Image 3
• Mise en service avec bol rotatif et mélangeur:
o Veuillez placer le mixeur manuel sur le support du mixeur manuel et enfoncez-le jusqu’à ce qu’il
s’encliquète. Dans cette position, les accessoires fixés au mixeur manuel doivent pénétrer à
l’intérieur du bol (voir image 2).
o Veuillez placer vos ingrédients dans le bol et poussez le couvercle à l’intérieur du support du
mixeur manuel jusqu’à la butée (voir image 3). Veillez à ce qu’aucun objet, par exemple une
cuillère, ne se trouve dans la pâte.
o Veuillez vous assurer que le régulateur de vitesse est réglé sur 0 puis raccordez l’appareil à la
prise.
o Ensuite, veuillez faire basculer le régulateur de vitesse de 0 sur 1. L’appareil s’allume à la
vitesse minimale. Si nécessaire, vous pouvez augmenter la vitesse à 2-5.
o Si vous souhaitez passer directement d’une vitesse basse à la vitesse maximale 5, vous pouvez
maintenir le bouton turbo C enfoncé pendant que vous mixez. Lorsque vous le lâchez, l’appareil
fonctionne à nouveau à la vitesse réglée sur le régulateur de vitesse. Veuillez noter que
l’appareil ne doit pas fonctionner plus d’une minute à la vitesse 5 ou en mode turbo afin que le
moteur ne surchauffe pas.
o Grâce au hublot pivotant, vous pouvez ajouter d’autres ingrédients pendant la mise en service.
Vous pouvez également régler le régulateur de vitesse sur 0 afin d’éteindre brièvement
La pagina sta caricando ...
La pagina sta caricando ...
La pagina sta caricando ...
La pagina sta caricando ...
La pagina sta caricando ...
La pagina sta caricando ...
La pagina sta caricando ...
La pagina sta caricando ...
La pagina sta caricando ...
La pagina sta caricando ...
La pagina sta caricando ...
La pagina sta caricando ...
-
 1
1
-
 2
2
-
 3
3
-
 4
4
-
 5
5
-
 6
6
-
 7
7
-
 8
8
-
 9
9
-
 10
10
-
 11
11
-
 12
12
-
 13
13
-
 14
14
-
 15
15
-
 16
16
-
 17
17
-
 18
18
-
 19
19
-
 20
20
-
 21
21
-
 22
22
-
 23
23
-
 24
24
-
 25
25
-
 26
26
-
 27
27
-
 28
28
-
 29
29
-
 30
30
-
 31
31
-
 32
32


Suntec Wellness MIX-8137 COMFORT PRO Manuale del proprietario
- Categoria
- Piccoli elettrodomestici da cucina
- Tipo
- Manuale del proprietario
in altre lingue
Documenti correlati
Altri documenti
-
Turmix Kraftvoller Handmixer, der im Nu und ganz einfach zum Stabmixer umgewandelt wird. Nur Manuale utente
-
Silvercrest SHMS 300 A1 Operating Instructions Manual
-
Bifinett KH 1132 Operating Instructions Manual
-
Zanussi ZSM1250 Manuale utente
-
Silvercrest 90843 Istruzioni per l'uso
-
SEVERIN HM 3810 Manuale del proprietario
-
Breville VFM021X-01 HeatSoft Manuale del proprietario
-
AEG SM3300 Manuale utente
-
Carrera 555 Manuale utente
-
Morphy Richards Total Control Manuale utente