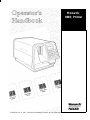
Monarch 9403 Operator's Handbook Manual
- Categoria
- Stampanti per etichette
- Tipo
- Operator's Handbook Manual

Monarch
9403
Printer
TC9403OH Rev. A 1/98 ©1997 Monarch Marking Systems, Inc. All rights reserved.

Each product and program carries a respective written warranty, the only
warranty on which the customer can rely. Monarch reserves the right to make
changes in the product, the programs, and their availability at any time and
without notice. Although Monarch has made every effort to provide complete
and accurate information in this manual, Monarch shall not be liable for any
omissions or inaccuracies. Any update will be incorporated in a later edition of
this manual.
©1997 Monarch Marking Systems, Inc. All rights reserved. No part of this
publication may be reproduced, transmitted, stored in a retrieval system, or
translated into any language in any form by any means, without the prior
written permission of Monarch Marking Systems, Inc.
WARNING
This equipment has been tested and found to comply with the limits for a Class B digital
device, pursuant to Part 15 of the FCC Rules. These limits are designed to provide
reasonable protection against harmful interference when the equipment is operated in a
commercial environment. This equipment generates, uses, and can radiate radio frequency
energy and, if not installed and used in accordance with the instruction manual, may cause
harmful interference to radio communications. Operation of this equipment in a residential
area is likely to cause harmful interference in which case the user will be required to correct
the interference at his own expense.
CANADIAN D.O.C. WARNING
This digital apparatus does not exceed the Class A limits for radio noise emissions from
digital apparatus set out in the Radio Interference Regulations of the Canadian Department
of Communications.
Le présent appareil numérique n’émet pas de bruits radioélectriques dépassant les limites
applicables aux appareils numériques de la classe A prescrites dans le Réglement sur le
brouillage radioélectrique édicte par le ministère des Communications du Canada.
Trademarks
Monarch is a registered trademark of Monarch Marking Systems, Inc.
9403, 9800, 9820, and 9830 are trademarks of Monarch Marking Systems, Inc.
TrueType is a trademark of Apple Computer, Inc.
Hewlett-Packard is a registered trademark of Hewlett-Packard Company.
Adobe and Acrobat are trademarks of Adobe Systems Incorporated which may be registered in certain
jurisdictions.
Microsoft and MS-DOS are registered trademarks of Microsoft Corporation.
Windows is a registered trademark of Microsoft in the U.S and other countries.
Monarch Marking Systems, Inc. Technical Support in Switzerland: Gomaro s.a. - 1123 Aclens
P.O. Box 608 http://www.gomaro.ch
Dayton, Ohio 45401 e-mail: [email protected] Tel.: 021 869 97 70

STATEMENT OF WARRANTY ON MONARCH MACHINES
Limited Warranty
THIS LIMITED WARRANTY IS IN LIEU OF AND EXCLUDES ALL OTHER
WARRANTIES OR REPRESENTATIONS EXPRESSED OR IMPLIED,
INCLUDING MERCHANTABILITY OR FITNESS FOR BUYER’S PURPOSES.
THERE IS NO WARRANTY WHICH EXTENDS BEYOND THE LIMITED
WARRANTY.
The Monarch product covered by this limited warranty is warranted to be free
from defects in materials and workmanship for a period of one (1) year from the
date of shipment to the original purchaser. The limited warranty on the
printhead is one million inches.
Monarch further warrants the satisfactory operation of the Monarch product
during the warranty period, unless the product is damaged by accident, abuse
or violence, or the original purchaser uses other than the standard supplies
furnished by or meeting the specification of Monarch, or the Monarch product is
operated or maintained contrary to the instructions provided by Monarch. This
warranty is void if the machine is altered or repaired by other than Monarch
representatives.
This warranty does not include the furnishing of ribbons, ink rollers, tags,
labels, or other supplies.
The Monarch product requiring warranty service may be shipped to the nearest
authorized Monarch service facility with the transportation charges PREPAID.
Monarch is NOT responsible for damage that occurs during shipment if the
product is not shipped in the original Monarch packaging. The Monarch
product will be repaired free of charge during the warranty period.
This warranty is valid only in the United States.


TABLE OF CONTENTS
GETTING STARTED . . . . . . . . . . . . . . . . . . . . . . . . . . . . . . . . . . . . . . . . . . . . . . . . . . . . 1-1
Standard Features . . . . . . . . . . . . . . . . . . . . . . . . . . . . . . . . . . . . . . . . . . . . . . . 1-1
Audience. . . . . . . . . . . . . . . . . . . . . . . . . . . . . . . . . . . . . . . . . . . . . . . . . . . . . . . 1-2
Ordering Programmer’s Manuals. . . . . . . . . . . . . . . . . . . . . . . . . . . . . . . . . . . . 1-2
Unpacking the Printer. . . . . . . . . . . . . . . . . . . . . . . . . . . . . . . . . . . . . . . . . . . . . 1-2
Connecting the Power Cable . . . . . . . . . . . . . . . . . . . . . . . . . . . . . . . . . . . . . . . 1-3
Establishing Communications . . . . . . . . . . . . . . . . . . . . . . . . . . . . . . . . . . . . . . 1-4
Connecting the Communication Cable . . . . . . . . . . . . . . . . . . . . . . . . 1-4
Default Serial Port Communication Values . . . . . . . . . . . . . . . . . . . . . 1-4
About This Manual . . . . . . . . . . . . . . . . . . . . . . . . . . . . . . . . . . . . . . . . . . . . . . . 1-5
Menu Charts . . . . . . . . . . . . . . . . . . . . . . . . . . . . . . . . . . . . . . . . . . . . 1-5
Using the Keypad . . . . . . . . . . . . . . . . . . . . . . . . . . . . . . . . . . . . . . . . . . . . . . . 1-6
Control Keys. . . . . . . . . . . . . . . . . . . . . . . . . . . . . . . . . . . . . . . . . . . . . 1-6
Startup . . . . . . . . . . . . . . . . . . . . . . . . . . . . . . . . . . . . . . . . . . . . . . . . . . . . . . . . 1-7
Selecting a Function. . . . . . . . . . . . . . . . . . . . . . . . . . . . . . . . . . . . . . . . . . . . . . 1-8
Exiting an Option . . . . . . . . . . . . . . . . . . . . . . . . . . . . . . . . . . . . . . . . . . . . . . . . 1-8
Setting Up the Printer. . . . . . . . . . . . . . . . . . . . . . . . . . . . . . . . . . . . . . . . . . . . . 1-9
LOADING SUPPLIES. . . . . . . . . . . . . . . . . . . . . . . . . . . . . . . . . . . . . . . . . . . . . . . . . . . . 2-1
Supply Loading Diagram . . . . . . . . . . . . . . . . . . . . . . . . . . . . . . . . . . . . . . . . . . 2-2
Loading Supply. . . . . . . . . . . . . . . . . . . . . . . . . . . . . . . . . . . . . . . . . . . . . . . . . . 2-3
Printing a Test Label. . . . . . . . . . . . . . . . . . . . . . . . . . . . . . . . . . . . . . . . . . . . . . 2-4
LOADING RIBBON . . . . . . . . . . . . . . . . . . . . . . . . . . . . . . . . . . . . . . . . . . . . . . . . . . . . . 3-1
Loading a Ribbon Roll . . . . . . . . . . . . . . . . . . . . . . . . . . . . . . . . . . . . . . . . . . . . 3-2
i

SETTING SUPPLY OPTIONS . . . . . . . . . . . . . . . . . . . . . . . . . . . . . . . . . . . . . . . . . . . . . 4-1
Ribbon . . . . . . . . . . . . . . . . . . . . . . . . . . . . . . . . . . . . . . . . . . . . . . . . . . . . . . . . 4-2
Batch Separators. . . . . . . . . . . . . . . . . . . . . . . . . . . . . . . . . . . . . . . . . . . . . . . . 4-3
Print Position . . . . . . . . . . . . . . . . . . . . . . . . . . . . . . . . . . . . . . . . . . . . . . . . . . . 4-3
Supply Position . . . . . . . . . . . . . . . . . . . . . . . . . . . . . . . . . . . . . . . . . . . . . . . . . 4-5
Margin Position . . . . . . . . . . . . . . . . . . . . . . . . . . . . . . . . . . . . . . . . . . . . . . . . . 4-6
Supply Type . . . . . . . . . . . . . . . . . . . . . . . . . . . . . . . . . . . . . . . . . . . . . . . . . . . . 4-8
COMMUNICATION VALUES. . . . . . . . . . . . . . . . . . . . . . . . . . . . . . . . . . . . . . . . . . . . . . 5-1
Baud Rate . . . . . . . . . . . . . . . . . . . . . . . . . . . . . . . . . . . . . . . . . . . . . . . . . . . . . 5-2
Word Length. . . . . . . . . . . . . . . . . . . . . . . . . . . . . . . . . . . . . . . . . . . . . . . . . . . . 5-2
Stop Bits. . . . . . . . . . . . . . . . . . . . . . . . . . . . . . . . . . . . . . . . . . . . . . . . . . . . . . . 5-3
Parity . . . . . . . . . . . . . . . . . . . . . . . . . . . . . . . . . . . . . . . . . . . . . . . . . . . . . . . . . 5-3
Flow Control. . . . . . . . . . . . . . . . . . . . . . . . . . . . . . . . . . . . . . . . . . . . . . . . . . . . 5-4
Reset to Default Values. . . . . . . . . . . . . . . . . . . . . . . . . . . . . . . . . . . . . . . . . . . 5-4
SETTING CONTRAST. . . . . . . . . . . . . . . . . . . . . . . . . . . . . . . . . . . . . . . . . . . . . . . . . . . 6-1
SETTING DEFAULTS . . . . . . . . . . . . . . . . . . . . . . . . . . . . . . . . . . . . . . . . . . . . . . . . . . . 7-1
Monetary Sign . . . . . . . . . . . . . . . . . . . . . . . . . . . . . . . . . . . . . . . . . . . . . . . . . . 7-3
Secondary Sign . . . . . . . . . . . . . . . . . . . . . . . . . . . . . . . . . . . . . . . . . . . . . . . . . 7-4
Decimal Places . . . . . . . . . . . . . . . . . . . . . . . . . . . . . . . . . . . . . . . . . . . . . . . . . 7-5
Slashed Zero . . . . . . . . . . . . . . . . . . . . . . . . . . . . . . . . . . . . . . . . . . . . . . . . . . . 7-5
Power-Up Mode. . . . . . . . . . . . . . . . . . . . . . . . . . . . . . . . . . . . . . . . . . . . . . . . . 7-6
Prompt Set. . . . . . . . . . . . . . . . . . . . . . . . . . . . . . . . . . . . . . . . . . . . . . . . . . . . . 7-7
PRINTING. . . . . . . . . . . . . . . . . . . . . . . . . . . . . . . . . . . . . . . . . . . . . . . . . . . . . . . . . . . . . 8-1
Interrupting a Batch . . . . . . . . . . . . . . . . . . . . . . . . . . . . . . . . . . . . . . . . . . . . . . 8-2
Restarting a Batch. . . . . . . . . . . . . . . . . . . . . . . . . . . . . . . . . . . . . . . . . . . . . . . 8-3
Canceling a Paused Batch. . . . . . . . . . . . . . . . . . . . . . . . . . . . . . . . . . . . . . . . . 8-4
Repeating a Batch. . . . . . . . . . . . . . . . . . . . . . . . . . . . . . . . . . . . . . . . . . . . . . . 8-6
ii

Offline Printing. . . . . . . . . . . . . . . . . . . . . . . . . . . . . . . . . . . . . . . . . . . . . . . . . . 8-7
Entering Numbers . . . . . . . . . . . . . . . . . . . . . . . . . . . . . . . . . . . . . . . . 8-8
Entering Letters . . . . . . . . . . . . . . . . . . . . . . . . . . . . . . . . . . . . . . . . . . 8-8
Entering Symbols. . . . . . . . . . . . . . . . . . . . . . . . . . . . . . . . . . . . . . . . . 8-9
Using Bar Code 128. . . . . . . . . . . . . . . . . . . . . . . . . . . . . . . . . . . . . . 8-10
Entering and Changing Data. . . . . . . . . . . . . . . . . . . . . . . . . . . . . . . 8-10
Types of Data Entry . . . . . . . . . . . . . . . . . . . . . . . . . . . . . . . . . . . . . . 8-11
Entering a Batch . . . . . . . . . . . . . . . . . . . . . . . . . . . . . . . . . . . . . . . . 8-13
Using the Standard Formats . . . . . . . . . . . . . . . . . . . . . . . . . . . . . . . 8-15
CLEANING . . . . . . . . . . . . . . . . . . . . . . . . . . . . . . . . . . . . . . . . . . . . . . . . . . . . . . . . . . . . 9-1
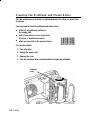
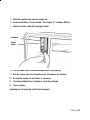
Cleaning the Printhead and Platen Roller . . . . . . . . . . . . . . . . . . . . . . . . . . . . . 9-2
DIAGNOSTICS. . . . . . . . . . . . . . . . . . . . . . . . . . . . . . . . . . . . . . . . . . . . . . . . . . . . . . . . 10-1
Factory Set Password. . . . . . . . . . . . . . . . . . . . . . . . . . . . . . . . . . . . . . . . . . . . 10-1
Checking the Software Version . . . . . . . . . . . . . . . . . . . . . . . . . . . . . . . . . . . . 10-2
Printing a Test Pattern. . . . . . . . . . . . . . . . . . . . . . . . . . . . . . . . . . . . . . . . . . . . 10-3
Printing a Test Label. . . . . . . . . . . . . . . . . . . . . . . . . . . . . . . . . . . . . . . . . . . . . 10-4
Checking Sensor Mark Quality. . . . . . . . . . . . . . . . . . . . . . . . . . . . . . . . . . . . . 10-5
Service Diagnostics . . . . . . . . . . . . . . . . . . . . . . . . . . . . . . . . . . . . . . . . . . . . . 10-6
SPECIFICATIONS . . . . . . . . . . . . . . . . . . . . . . . . . . . . . . . . . . . . . . . . . . . . . . . . . . . . . . A-1
Printer. . . . . . . . . . . . . . . . . . . . . . . . . . . . . . . . . . . . . . . . . . . . . . . . . . . . . . . . . A-1
Supplies . . . . . . . . . . . . . . . . . . . . . . . . . . . . . . . . . . . . . . . . . . . . . . . . . . . . . . . A-2
iii

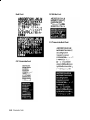
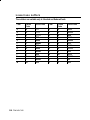
CHARACTER SETS . . . . . . . . . . . . . . . . . . . . . . . . . . . . . . . . . . . . . . . . . . . . . . . . . . . . B-1
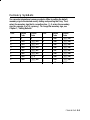
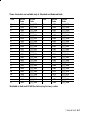
Character Sets. . . . . . . . . . . . . . . . . . . . . . . . . . . . . . . . . . . . . . . . . . . . . . . . . . B-1
Uppercase Letters . . . . . . . . . . . . . . . . . . . . . . . . . . . . . . . . . . . . . . . . . . . . . . . B-3
Lowercase Letters . . . . . . . . . . . . . . . . . . . . . . . . . . . . . . . . . . . . . . . . . . . . . . . B-4
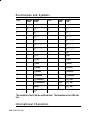
Currency Symbols . . . . . . . . . . . . . . . . . . . . . . . . . . . . . . . . . . . . . . . . . . . . . . . B-5
Punctuation and Symbols . . . . . . . . . . . . . . . . . . . . . . . . . . . . . . . . . . . . . . . . . .B-6
International Characters . . . . . . . . . . . . . . . . . . . . . . . . . . . . . . . . . . . . . . . . . . B-6
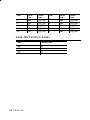
Code 128 Function Codes. . . . . . . . . . . . . . . . . . . . . . . . . . . . . . . . . . . . . . . . . B-8
iv

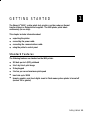
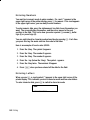
GETTING STARTED 1
The Monarch
®
9403 printer prints text, graphics, and bar codes on thermal
transfer (ribbon) or thermal direct supplies. The 9403 printer prints labels
continuously (in one strip).
This chapter includes information about
u
unpacking the printer.
u
connecting the power cable.
u
connecting the communications cable.
u
using the printer’s control panel.
Standard Features
The following features are standard on the 9403 printer:
u
203 dots per inch (DPI) printhead
u
2-inch by 6-inch print image
u
21-key keypad
u
2 inches per second maximum print speed
u
baud rate up to 19200
u
formats, graphics, and check digits saved in Flash memory when printer is turned off
(version 2.0 or greater)
Getting Started 1-1

Audience
The Operator’s Handbook is for the person who prints and applies labels.
Ordering Programmer’s Manuals
An online version of the Packet Reference Manual describes how to create a
format and batch packets for printing labels, how to diagnose printer error
messages, and how to perform other advanced techniques. It is included with
the MONARCH
®
quick-set software where you can print this manual, or you can
order a hard-copy version (part number TC9800PM). e-mail to [email protected]
Unpacking the Printer
After you unpack the printer, you should have
u
9403 printer
u
power cord
u
Operator’s Handbook
u
MONARCH quick-set software.
Keep the box and packaging material in case the printer
ever needs repair.
1-2 Getting Started

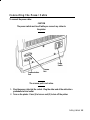
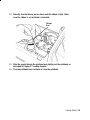
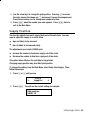
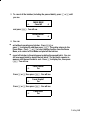
Connecting the Power Cable
To connect the power cable:
CAUTION
The power switch must be off while you connect any cables to
the printer.
The scanner port is not active.
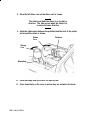
1. Plug the power cable into the socket. Plug the other end of the cable into a
grounded electrical outlet.
2. Turn on the printer. Press (I) to turn on and (O) to turn off the printer.
Power
Switch
Communication
Port
Scanner
Port
Getting Started 1-3

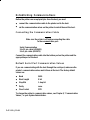
Establishing Communications
Before the printer can accept print jobs from the host, you must
u
connect the communication cable to the printer and to the host.
u
set the communication values on the printer to match those at the host.
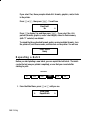
Connecting the Communication Cable
Make sure the printer is off before connecting the cable
to the communication port.
Serial Communication
9 to 25 pin cable (#110451)
9 to 9 pin cable (#112073)
Connect the communication cable into the bottom port on the printer and the
appropriate port of the host.
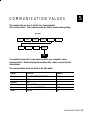
Default Serial Port Communication Values
If you are communicating with the host through the serial port, make sure the
printer’s communication values match those at the host. The factory default
values are:
u
Baud 9600
u
Word Length 8 bit
u
Stop Bits 1 stop bit
u
Parity none
u
Flow Control DTR
To change the printer’s communication values, see Chapter 5, "Communication
Values," or your System Administrator.
1-4 Getting Started

About This Manual
This manual explains how to
u
load supplies and ribbons.
u
set up and begin using the printer.
u
select menu options.
u
enter data.
u
print supplies online or offline.
u
perform general maintenance procedures.
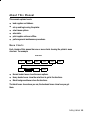
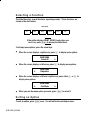
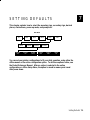
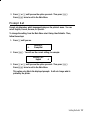
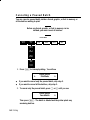
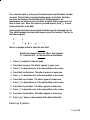
Menu Charts
Each chapter of this manual has one or more charts showing the printer’s menu
structure. For example:
u
Normal border boxes show the menu options.
u
Heavy border boxes show the selections to get to the functions.
u
Black background boxes show the functions.
The black boxes show where you are; the bordered boxes show how you got
there.
SUPPLY CONTRAST DEFAULTS
PORT
SETTINGS
MAIN MENU
CANCEL
ALL
PRINT
MODE
REPEAT
BATCH
SETUP DIAG.
BATCH
ENTRY
Getting Started 1-5

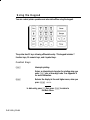
Using the Keypad
You can control printer operation and enter data offline using the keypad.
The printer has 21 keys allowing offline data entry. This keypad includes 7
function keys, 10 numeric keys, and 4 symbol keys.
Control Keys
P Interrupts printing.
Enters an international character for printing when you
enter P plus a three-digit code. See Appendix B
for more information.
e Returns the display to the next higher menu, when you
press e
once.
In data entry, press s, then press e to return to
the Main Menu.
1-6 Getting Started

R Displays the next menu item.
L Displays the previous menu item.
E Selects the displayed menu item.
Use the alphanumeric keys to enter batch data. To switch between characters
and numbers, press s.
Startup
When you turn the printer on, the printer displays a copyright message. You will
see other messages as the printer loads formats.
The next message depends on how your printer is set up.
u
If your printer is set for online power-up mode, you will see:
PRINT MODE
Ready
u
If your printer is set for offline power-up mode, you will see:
MAIN MENU
l Print Mode r
Getting Started 1-7

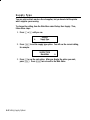
Selecting a Function
The Main Menu has several functions (operating modes). These functions are
shown in the chart below.
If the printer displays PRINT MODE Ready when you
turn it on, press e to display the Main Menu.
To display menu options, press the arrow keys.
u
When the screen displays a right arrow, press R to display more options.
MAIN MENU
Cancel All r
u
When the screen displays a left arrow, press L to display more options.
MAIN MENU
l Diagnostics
u
When the screen displays a left and a right arrow, press either L or R to
display more options.
MAIN MENU
l Print Mode r
u
When you see the menu option you want, press E to select it.
Exiting an Option
To exit an option, press e once. You will exit to the next higher menu.
MAIN MENU
CANCEL
ALL
PRINT
MODE
REPEAT
BATCH
SETUP DIAG.
BATCH
ENTRY
1-8 Getting Started

When you press e, you lose any entries you have
made since the last time you pressed E.
Setting Up the Printer
Before you use the 9403 printer, you will need to set up your printer correctly.
You may need to refer to the Packet Reference Manual as well as this manual.
To set up your printer:
1. Load your supply. See Chapter 3, "Loading Supplies."
2. Load your ribbon, if needed. See Chapter 2, "Loading a Ribbon."
3. Set the supply type. See Chapter 4, "Setting Supply Options."
4. Set the printer port options to match your computer’s online communication
values. See Chapter 5, "Communication Values."
5. Set the defaults. See Chapter 7, "Setting Defaults."
6. Download a label design with a bar code. See the Packet Reference
Manual.
7. Check the print quality of the bar code with a verifier or your scanner.
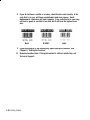
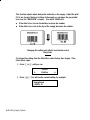
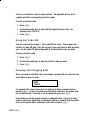
Getting Started 1-9

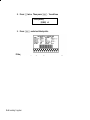
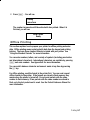
8. If you do not have a verifier or scanner, check the bar code visually. A bar
code that is in spec will have complete bars and clear spaces. Small
alphanumeric characters will look complete. A bar code that is in spec may
not look as good as one that is too dark, but it will have the highest scan
rate.
9. If your print quality is not satisfactory, adjust your print contrast. See
Chapter 6, "Setting the Contrast."
10. Download another label. If the print contrast is still not satisfactory, call
Technical Support.
Dark
IN SPEC
Light
1-10 Getting Started

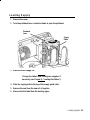
LOADING SUPPLIES 2
This chapter explains how to load supplies for continuous printing. The 9403
printer prints tags or labels in one strip.
The 9403 printer uses a standard 3-inch (76.2mm) core supply.
Loading Supplies 2-1

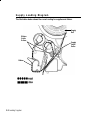
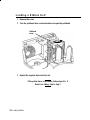
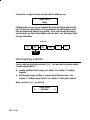
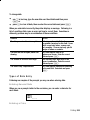
Supply Loading Diagram
The illustration below shows the correct routing for supplies and ribbon.
Guide the ribbon around the ribbon guide rollers when
loading.
Ribbon
Guide
Rollers
Ribbon
Supply
Guide
Roller
Supply
Roll
2-2 Loading Supplies
La pagina si sta caricando...
La pagina si sta caricando...
La pagina si sta caricando...
La pagina si sta caricando...
La pagina si sta caricando...
La pagina si sta caricando...
La pagina si sta caricando...
La pagina si sta caricando...
La pagina si sta caricando...
La pagina si sta caricando...
La pagina si sta caricando...
La pagina si sta caricando...
La pagina si sta caricando...
La pagina si sta caricando...
La pagina si sta caricando...
La pagina si sta caricando...
La pagina si sta caricando...
La pagina si sta caricando...
La pagina si sta caricando...
La pagina si sta caricando...
La pagina si sta caricando...
La pagina si sta caricando...
La pagina si sta caricando...
La pagina si sta caricando...
La pagina si sta caricando...
La pagina si sta caricando...
La pagina si sta caricando...
La pagina si sta caricando...
La pagina si sta caricando...
La pagina si sta caricando...
La pagina si sta caricando...
La pagina si sta caricando...
La pagina si sta caricando...
La pagina si sta caricando...
La pagina si sta caricando...
La pagina si sta caricando...
La pagina si sta caricando...
La pagina si sta caricando...
La pagina si sta caricando...
La pagina si sta caricando...
La pagina si sta caricando...
La pagina si sta caricando...
La pagina si sta caricando...
La pagina si sta caricando...
La pagina si sta caricando...
La pagina si sta caricando...
La pagina si sta caricando...
La pagina si sta caricando...
La pagina si sta caricando...
La pagina si sta caricando...
La pagina si sta caricando...
La pagina si sta caricando...
La pagina si sta caricando...
La pagina si sta caricando...
La pagina si sta caricando...
La pagina si sta caricando...
La pagina si sta caricando...
La pagina si sta caricando...
La pagina si sta caricando...
La pagina si sta caricando...
La pagina si sta caricando...
La pagina si sta caricando...
La pagina si sta caricando...
La pagina si sta caricando...
La pagina si sta caricando...
La pagina si sta caricando...
La pagina si sta caricando...
La pagina si sta caricando...
La pagina si sta caricando...
La pagina si sta caricando...
-
 1
1
-
 2
2
-
 3
3
-
 4
4
-
 5
5
-
 6
6
-
 7
7
-
 8
8
-
 9
9
-
 10
10
-
 11
11
-
 12
12
-
 13
13
-
 14
14
-
 15
15
-
 16
16
-
 17
17
-
 18
18
-
 19
19
-
 20
20
-
 21
21
-
 22
22
-
 23
23
-
 24
24
-
 25
25
-
 26
26
-
 27
27
-
 28
28
-
 29
29
-
 30
30
-
 31
31
-
 32
32
-
 33
33
-
 34
34
-
 35
35
-
 36
36
-
 37
37
-
 38
38
-
 39
39
-
 40
40
-
 41
41
-
 42
42
-
 43
43
-
 44
44
-
 45
45
-
 46
46
-
 47
47
-
 48
48
-
 49
49
-
 50
50
-
 51
51
-
 52
52
-
 53
53
-
 54
54
-
 55
55
-
 56
56
-
 57
57
-
 58
58
-
 59
59
-
 60
60
-
 61
61
-
 62
62
-
 63
63
-
 64
64
-
 65
65
-
 66
66
-
 67
67
-
 68
68
-
 69
69
-
 70
70
-
 71
71
-
 72
72
-
 73
73
-
 74
74
-
 75
75
-
 76
76
-
 77
77
-
 78
78
-
 79
79
-
 80
80
-
 81
81
-
 82
82
-
 83
83
-
 84
84
-
 85
85
-
 86
86
-
 87
87
-
 88
88
-
 89
89
-
 90
90


Monarch 9403 Operator's Handbook Manual
- Categoria
- Stampanti per etichette
- Tipo
- Operator's Handbook Manual
in altre lingue
- English: Monarch 9403
Documenti correlati
Altri documenti
-
Paxar Monarch 917 Operating Instructions Manual
-
Avery Dennison 9906 Printer Quick Reference Manual
-
Intermec 3400 Manuale utente
-
Intermec EasyCoder 4420 Manuale utente
-
-
Intermec EasyCoder 4100 Manuale utente
-
-
-
-
Hobart SP600 Scale Supervisor Manuale del proprietario