
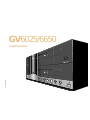
GV6025/6650
USER’S GUIDE
SSC-GV6025/6650

GV6025/6650
User’s Guide
Go-Video/Sensory Science
7835 East McClain Drive
Scottsdale, Arizona USA 85260
www.sensoryscience.com
www.govideo.com

WARNING:
To reduce the risk of fire or electric shock, do not
expose this appliance to rain or moisture. Do not open
the cabinet; dangerous high voltage is present. Refer
servicing to qualified personnel only. This video
cassette recorder should only be used with 120V, 60Hz
(standard U.S. household) current.
Federal law provides severe civil and criminal penal-
ties for the unauthorized reproduction, distribution, or
exhibition of copyrighted motion pictures and video-
tapes. (Title 17, United States Code, Sections 501
and 506).
USER/INSTALLER CAUTION:
Your authority to operate this FCC certified equipment
could be voided if you make changes or modifications
not expressly approved by the manufacturer, who is
responsible for compliance with Part 15 FCC rules.
NOTE TO CATV SYSTEM INSTALLER:
This reminder is provided to call the CATV system
installer’s attention to Article 820-40 of the National
Electronic Code that provides guidelines for proper
grounding and, in particular, specifies that the cable
ground shall be connected to the grounding system of
the building, as close to the point of cable entry as
practical.
This symbol is intended to alert the user to
the presence of uninsulated dangerous
voltage within the product’s enclosure that
may be of sufficient magnitude to consti-
tute risk of fire or electric shock.
This symbol is intended to alert the user to
the presence of important operating and
maintenance instructions in the literature
accompanying this product.
CAUTION:
To prevent fire, shock hazard, or annoying interference, use only the recommended accessories.
To prevent electric shock, do not use this (polarized) plug with an extension cord, receptacle, or other
outlet unless the blades can be fully inserted to prevent blade exposure.
To reduce the risk of electric shock, do not remove the unit cover or back. There are no serviceable parts
inside. Refer servicing to qualified personnel only.
CUIDADO:
Para prevenir incendio, riesgo de choque, o interferencia enfadosa, use solamente los accesorios
recomendados.
Para prevenir electrochoque, no use este enchufe (polarizado) con un cordón de extensión, toma de
corriente, o cualquier otra toma a menos que los dientes puedan ser completamente insertados para
prevenir exposición de los dientes.
Para reducir el riesgo de descarga eléctrica, no remueva la cubierta o la parte posterior del VCR. Dentro
del VCR no hay partes que requieren servicio. Diríjase solamente a personal calificado cuando requiera
servicio.
ATTENTION:
Pour éviter les incendis, risque de chocs, ou interférences fâcheuses, employer seulement les accessoires
recommandés.
Pour éviter les chocs électriques, ne pas employer cette prise (polarisée) avec une rallonge, une prise de
courant ou une autre sortie de courant à moins que les lames peuvent être insérées à fond pour
l’exposition des lames.
Pour réduire les risques de chocs électriques, ne pas retirer le couvercle ou l'arrière du module. Il n'y a
pas de pièce utilisable à l'intérieur. Ne faire effectuer l'entretien que par un personnel qualifié.

SAFETY i
Important Safety Instructions
1. READ INSTRUCTIONS - All the safety and operating instructions should be read before the unit is operated.
2. RETAIN INSTRUCTIONS - The safety and operating instructions should be retained for future reference.
3. HEED WARNINGS - All warnings on the unit and in the operating instructions should be adhered to.
4. FOLLOW INSTRUCTIONS - All operating and maintenance instructions should be followed.
5. CLEANING - Unplug this video unit from the wall outlet before cleaning. Do not use liquid or aerosol cleaners. Use a dry cloth for
dusting cabinet.
6. ATTACHMENTS - Do not use attachments not recommended by the video product manufacturer, as they may be hazardous.
7. WATER & MOISTURE - Do not use this video unit near water—for example, near a bathtub, wash bowl, kitchen sink, laundry tub, in a
wet basement, near a swimming pool or the like.
8. ACCESSORIES - Do not place this video unit on an unstable cart, stand, tripod, bracket or table. The video unit may fall, causing serious
injury to a child or adult, and serious damage to the unit. Use only with a cart, stand, tripod, bracket or table recommended by the
manufacturer or sold with the video unit. Any mounting of the unit should follow the manufacturer’s instructions and should use a
mounting accessory recommended by the manufacturer.
8a. An appliance and cart combination should be moved with care. Quick stops, excessive force, and uneven surfaces may cause the
appliance and cart combination to overturn.
9. VENTILATION - Slots and openings in the cabinet are provided for ventilation to ensure reliable operation of the video unit and to
protect it from overheating. These openings must not be blocked or covered. Never place your VCR on a bed, sofa, rug or other similar
surface, on or near a radiator or heat register. This video unit should not be placed in a built-in installation such as a bookcase or rack
unless proper ventilation is provided or the manufacturer’s instructions have been adhered to.
10. POWER SOURCES - This video unit should be operated only from the type of power source indicated on the marking label. If you are
not sure of the type of power supply to your home consult your appliance dealer or local power company. For video units intended to be
operated from battery power, or other sources, refer to the operating instructions.
11. GROUNDING OR POLARIZATION - This video unit may be equipped with either a polarized 2-wire AC line plug (a plug having one
blade wider than the other) or a 3-wire grounding plug having a third (grounding) pin.
The 2-wire polarized plug will fit into the power outlet only one way. This is a safety feature. If you are unable to insert the plug fully
into the outlet try reversing the plug. If the plug still fails to fit, contact your electrician to replace your obsolete outlet. Do not defeat the
safety purpose of the polarized plug.
12. POWER-CORD PROTECTION - Power-supply cords should be routed so that they are not likely to be walked on or pinched by items
placed upon or against them, paying particular attention to cords of plugs, convenience receptacles, and the point where they exit from
the unit.
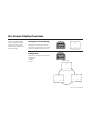
13. OUTDOOR ANTENNA GROUNDING - If an outside antenna or cable system is connected to the video unit, be sure the antenna or
cable system is grounded to provide some protection against voltage surges and built-up static charges. Section 810 of the National
Electrical Code, ANSI/NFPA No. 70-1984, provides information with respect to proper grounding of the mast and supporting structure,
grounding of the lead-in wire to an antenna discharge unit, size of grounding conductors, location of antenna-discharge unit, connection
to grounding electrodes, and requirements for the grounding electrode. See figure below.
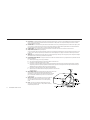
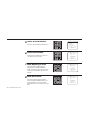
PORTABLE CART WARNING
(Symbol provided by RETAC)

ii GV6025/6650 USER’S GUIDE
14. LIGHTNING - For added protection of this video unit during a lightning storm, or when it is left unattended and unused for long periods
of time, unplug it from the wall outlet and disconnect the antenna or cable system. This will prevent damage to the video unit due to
lightning and power line surges.
15. POWER LINES - An outside antenna system should not be located in the vicinity of overhead power lines or other electric light or power
circuits, where it can fall into such power lines or circuits. When installing an outside antenna system extreme care should be taken to
keep from touching such power lines or circuits as contact with them might be fatal.
16. OVERLOADING - Do not overload wall outlets and extension cords as this can result in the risk of fire or electric shock.
17. OBJECTS AND LIQUIDS - Never push objects
of any kind into this video unit through openings as they may touch dangerous voltage points or short out parts that could result in a fire
or electric shock. Never spill liquids of any kind onto the unit. Should spillage occur, unplug unit and have it checked by a technician
before use.
18. SERVICING - Do not attempt to service this video unit yourself as opening or removing covers may expose you to a dangerous voltage or
other hazards. Refer all servicing to qualified service personnel.
19. DAMAGE REQUIRING SERVICE - Unplug this video unit from the wall outlet and refer servicing to qualified service personnel under the
following conditions:
a. When the power supply cord or plug is damaged.
b. If any liquid has been spilled onto or objects have fallen into the video unit.
c. If the video unit has been exposed to rain or water.
d. If the video unit does not operate normally by following the operating instructions. Adjust only those controls that are covered by
the operating instructions. Improper adjustment of other controls may result in damage and will often require extensive work by a
qualified technician to restore the video unit to its normal operation.
e. If the video unit has been dropped or the cabinet has been damaged.
f. When the video unit exhibits a distinct change in performance—this indicates
a need for service.
20. REPLACEMENT PARTS - When replacement parts are required, be sure the
service technician has used replacement parts specified by the
manufacturer or those having the same characteristics as the original
part. Unauthorized substitutions may result in fire, electric shock
or other hazards.
21. SAFETY CHECK - Upon completion of any service or repairs to
this video unit ask the service technician to perform safety
checks to determine that the video unit is in safe operating
order.
22. HEAT - This video unit should be situated away from heat
sources such as radiators, stoves, or other products (including
amplifiers) that produce heat.

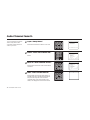
TABLE OF CONTENTS iii
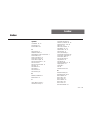
Table of Contents
1 - Basic Connections 1
First Things First..................................................................................................................................................................1
Connect Antenna/Basic Cable ............................................................................................................................................2
2 - Initial Settings 5
Auto Setup..........................................................................................................................................................................5
Set Language Manually.......................................................................................................................................................6
Set Clock Manually ............................................................................................................................................................7
Set Daylight Savings ...........................................................................................................................................................9
Set Time Zone...................................................................................................................................................................10
Set Auto Clock Set Channel.............................................................................................................................................. 11
3 - The Dual-Deck System 13
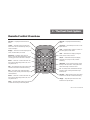
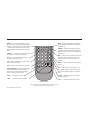
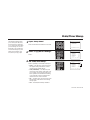
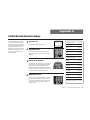
Remote Control Overview................................................................................................................................................13
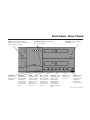
Front Panel - Door Closed ................................................................................................................................................15
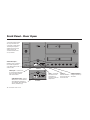
Front Panel - Door Open..................................................................................................................................................16
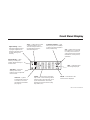
Front Panel Display ..........................................................................................................................................................17
Front Panel Display Settings .............................................................................................................................................18
Child Lock ........................................................................................................................................................................19
Remote Eject.....................................................................................................................................................................20
Main Menu Tree ...............................................................................................................................................................21
Setup Menu Tree...............................................................................................................................................................22
Menu Navigation - Remote Control..................................................................................................................................23
Menu Navigation - Front Panel ........................................................................................................................................24
On-Screen Display Overview...........................................................................................................................................25
On-Screen Display Elements ............................................................................................................................................26
On-Screen Display Settings ..............................................................................................................................................27
Go-Video is a registered trademark of
Sensory Science Corporation. Copy
Tape, Video Sequencing, and Dual-
Deck VCR are trademarks of Sensory
Science Corporation. All other brand
and product names are trademarks or
registered trademarks of their
respective companies.

iv GV6025/6650 USER’S GUIDE
4 - Tuner & Channel List 29
Tuner Band .......................................................................................................................................................................29
Auto Channel Search........................................................................................................................................................30
Add Channel ....................................................................................................................................................................31
Remove Channel ..............................................................................................................................................................32
Show Weak Channels.......................................................................................................................................................33
Tuner Audio ......................................................................................................................................................................34
5 - Copy Features 37
Basic Copying...................................................................................................................................................................37
EZ Copy............................................................................................................................................................................38
Copy Mode.......................................................................................................................................................................39
Speed Matching................................................................................................................................................................40
Copy Audio Insert.............................................................................................................................................................41
6 - Playback Features 43
Basic Playback..................................................................................................................................................................43
Special Playback Features ................................................................................................................................................44
Tracking ............................................................................................................................................................................45
Sequential/Loop Playback ................................................................................................................................................46
Auto Play/Rewind.............................................................................................................................................................47
Playback Audio Settings (GV6650 only)...........................................................................................................................48
7 - Recording Features 49
Basic Recording................................................................................................................................................................49
Recording Options ...........................................................................................................................................................50
One-Touch Recording (OTR) ............................................................................................................................................ 51
Record Speed ...................................................................................................................................................................52
Record Source ..................................................................................................................................................................53
Sequential/Loop Recording...............................................................................................................................................54
Date/Time Stamp ..............................................................................................................................................................55

TABLE OF CONTENTS v
8 - Timer Recording 57
How to Set a Timer Recording..........................................................................................................................................57
Timer Recording Errors .....................................................................................................................................................62
9 - Editing Features 63
8-Scene Editor ..................................................................................................................................................................63
Sync Editing......................................................................................................................................................................66
How to Cut Commercials with Skip Edit...........................................................................................................................68
On-Screen Titler ...............................................................................................................................................................69
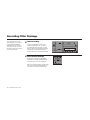
Recording Titler Message..................................................................................................................................................70
10 - Search/Index Features 71
Overview..........................................................................................................................................................................71
Placing Index Marks .........................................................................................................................................................72
Index Scan........................................................................................................................................................................73
Index Search.....................................................................................................................................................................74
Blank Search.....................................................................................................................................................................75
Return to 0:00:00 .............................................................................................................................................................76
11 - Advanced Connections 77
Cable Box Hookup ...........................................................................................................................................................77
Stereo Audio Connections (GV6650 only)........................................................................................................................79
TV Monitor Connections ..................................................................................................................................................80
Connecting Other Video Equipment.................................................................................................................................81
Appendix A 83
Multi-Brand Remote Setup ...............................................................................................................................................83
Multi-Brand Remote Operation ........................................................................................................................................84

vi GV6025/6650 USER’S GUIDE
Appendix B - Help 85
Frequently Asked Questions (FAQs) .................................................................................................................................85
Technical Specifications ...................................................................................................................................................90
Dual-Deck VCR Limited Warranty ...................................................................................................................................91
Index 93

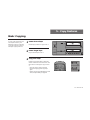
BASIC CONNECTIONS 1
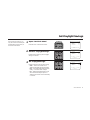
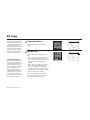
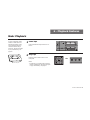
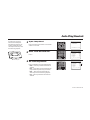
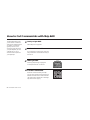
First Things First
Unpack your Dual-Deck VCR
As you unpack, please check that the following
items are included in your Dual-Deck VCR
packing case:
• Dual-Deck VCR
• User’s Guide
• Warranty/Registration Card
• Read Me First/Quick Reference Guide
• Remote Control
• 2 “AA” Batteries
• 1 RF (Radio Frequency) Antenna Cable
Insert Remote Control Batteries
Remove the battery cover in the direction of the
arrow as shown. Insert 2 “AA” batteries, paying
attention to the correct polarities (+/–). Replace
the cover.
1
2
1 - Basic Connections

2 GV6025/6650 USER’S GUIDE
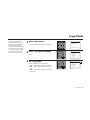
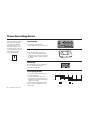
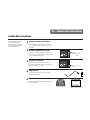
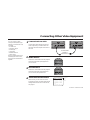
Connect Antenna to VCR
Connect the RF antenna cable from your
indoor/outdoor antenna or cable wall
outlet to the ANT. IN jack on the back
panel of the VCR.
Connect VCR to TV
Connect the supplied RF cable from the TV
OUT jack on the back panel of the VCR to
your television’s ANTENNA IN jack.
Set VCR Output Channel
Set the channel switch on the back panel of
the VCR to 3 or 4, whichever is not an
active channel in your area.
Plug In VCR
Connect the VCR power cord to a standard
120V/60Hz wall outlet.
Connect Antenna/Basic Cable
1
2
3
Follow these steps only if you
are using an indoor/outdoor
antenna or basic cable. If you
have a:
• Cable Box
• Stereo Receiver
• TV Monitor
• Third VCR
• Laserdisc Player
• DVD Player
• Camcorder
• Satellite Receiver
• Video Game
...or other advanced connection,
please refer to Chapter 11.
4
From Antenna
or Cable
To TV

BASIC CONNECTIONS 3
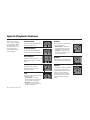
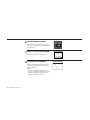
Turn On VCR
Press the power button on the remote control
or on the VCR’s front panel.
Turn On TV
Press the power button on the TV.
Tune TV to Channel 3 or 4
Be sure to use the same channel you used in
Step 3.
Basic Connection is Complete!
The Set Language menu will appear on your
television screen. Please proceed with Auto
Setup in Chapter 2.
5
6
7
8
POWER
DISPLAY
Set
CLOCK
Set
TIMER
CLEAR
SEARCH/IDX
CLK/CTR
COPY TAPE
VIEW
Power
ON
CH3/4
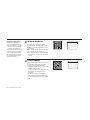
LANGUAGE / LANGUE / IDIOMA
1 English
2 : Français
3 : Español
Select = 1 - 3
Choisir = 1 - 3
Elegir = 1 - 3
➔

4 GV6025/6650 USER’S GUIDE

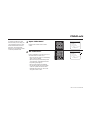
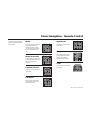
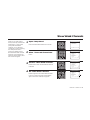
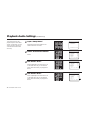
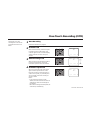
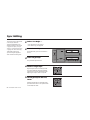
INITIAL SETTINGS 5
2 - Initial Settings
SLOW
100+
PREV. CH/
INPUT SEL
0
MUTE
VOL
VCR
TV
CH
123
456
789
TV/VCR
GV6025/6650
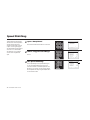
Set Language
Press 1, 2, or 3 to select English, French, or Spanish. To
change the language at any other time, see page 6.
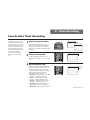
Auto Setup
1
2
3
The first time you hook up and
turn on your Dual-Deck VCR,
it will run Auto Setup. First,
you will be prompted to select
the on-screen language, then
the Dual-Deck VCR will
automatically search for
channels and set the VCR’s
internal clock.
Searching for Channels
And Setting Clock
Recherche de canaux
et réglage de l'horloge
en cours
Buscando canales
y fijando el reloj
LANGUAGE / LANGUE / IDIOMA
1 English
2 : Français
3 : Español
Select = 1 - 3
Choisir = 1 - 3
Elegir = 1 - 3
➔
Run Auto Setup
As soon as you set the language, the VCR will automati-
cally perform the following steps:
• Auto Channel Search — Automatically detects
whether you have an antenna or cable, then searches
for all channels in your area. If Auto Setup is unable to
search for channels in your area, you may do so at
any time; see page 30.
• Auto Time Set — Sets the VCR’s internal clock. If Auto
Setup is unable to find a clock set channel in your
area, you can set the clock manually; see page 7.
This procedure may take a few minutes to complete, at
which point it will tune the VCR to the lowest channel
found.
Auto Setup is Complete!
For an overview of the Dual-Deck System, please refer
to Chapter 3.

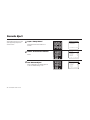
6 GV6025/6650 USER’S GUIDE
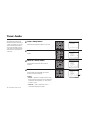
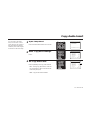
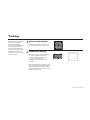
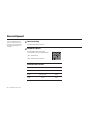
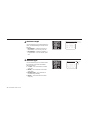
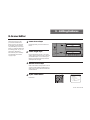
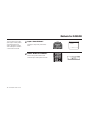
Open “Main Menu”
Press the menu button on the remote
control.
Select On-Screen Language
Press 5 repeatedly to cycle among English,
French, and Spanish. As you do this, the
entire Main Menu will be translated into
English, French or Spanish.
Set Language Manually
1
2
If you want to change the on-
screen language at any time,
follow these steps.
MAIN MENU
1 EZ Copy Off
2 : Child Lock Off
3 : 8-Scene Edit List
4 : Setup Titler Message
5 : Language/Langue/Idioma
____________________________________
/ To Move To Select
MENU to Quit
Hold MENU Key For Setup
➔
➔
➔
➔
DECK 1
PLAY
DECK 2
STOP/EJ.
EDIT/TITLE
REPEAT
SP/EP
SKIP
MENU
REW
FF
STILL/FRAME
TRACKING
SHUTTLE
REC/OTR
SLOW
100+
PREV. CH/
INPUT SEL
0
MUTE
VOL
VCR
TV
CH
123
456
789
TV/VCR
GV6025/6650
MAIN MENU
1 EZ Copy Off
2 : Child Lock Off
3 : 8-Scene Edit List
4 : Setup Titler Message
5 : Language/Langue/Idioma
____________________________________
/ To Move To Select
MENU to Quit
Hold MENU Key For Setup
➔
➔
➔
➔
MENU PRINCIPAL
1 : Copie facile non
2 : Contrôle d'enfant non
3 : Montage de 8 scènes
4 : Titres à l'écran
5 Language/Langue/Idioma
____________________________________
/ = Choisir = Changer
MENU = Fin
MENU pendant 3s = Réglages
➔
➔
➔
➔
MENU PRINCIPAL
1 : Copiar fácilmente no
2 : Seguridad de niños no
3 : Montaje de 8 escenas
4 : Títulos de crédito
5 Language/Langue/Idioma
____________________________________
/ = Cambiar = Elegir
MENU = Salir
MENU por 3 seg. = Ajustes
➔
➔
➔
➔
English
French
Spanish

INITIAL SETTINGS 7
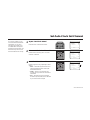
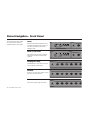
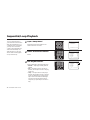
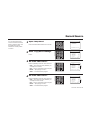
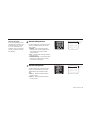
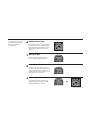
Open “Set Clock Menu”
Press Set Clock on the remote control.
Turn Off “Auto Clock Set”
Press the right arrow key once. The menu
choices will change when you turn this
feature off.
Move to “Set Clock”
Press the down arrow key until “Set Clock”
is selected.
Select “Set Clock”
Press the right arrow key to select “Set
Clock”.
Set Clock Manually
1
2
3
If Auto Clock Set is not avail-
able in your area, follow these
steps to set the clock manually.
If Auto Clock Set has set the
time incorrectly, try adjusting
Daylight Savings Time (page 9)
and Time Zone (page 10)
before setting the clock
manually.
POWER
DISPLAY
Set
CLOCK
Set
TIMER
CLEAR
SEARCH/IDX
CLK/CTR
COPY TAPE
VIEW
SET CLOCK MENU
Auto Clock Set On
Daylight Savings Auto
Time Zone Auto
Clock Set Channel Auto
____________________________________
/ To Move To Select
MENU to Quit
➔
➔
➔
➔
DECK 1
PLAY
DECK 2
STOP/EJ.
EDIT/TITLE
REPEAT
SP/EP
SKIP
MENU
REW
FF
STILL/FRAME
TRACKING
SHUTTLE
REC/OTR
SET CLOCK MENU
Auto Clock Set Off
Daylight Savings Auto
Set Clock
____________________________________
/ To Move To Select
MENU to Quit
➔
➔
➔
➔
4
DECK 1
PLAY
DECK 2
STOP/EJ.
EDIT/TITLE
REPEAT
SP/EP
SKIP
MENU
REW
FF
STILL/FRAME
TRACKING
SHUTTLE
REC/OTR
SET CLOCK MENU
Auto Clock Set Off
Daylight Savings Auto
Set Clock
____________________________________
/ To Move To Select
MENU to Quit
➔
➔
➔
➔
SET MONTH [1-12] : 08
Aug 1999 12:25 PM
Su Mo Tu We Th Fr Sa
1
2345678
9101112131415
16 17 18 19 20 21 22
23 24 25 26 27 28 29
30 31
To Set MENU to Quit
➔
DECK 1
PLAY
DECK 2
STOP/EJ.
EDIT/TITLE
REPEAT
SP/EP
SKIP
MENU
REW
FF
STILL/FRAME
TRACKING
SHUTTLE
REC/OTR

8 GV6025/6650 USER’S GUIDE
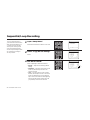
Set the Time
Use the number keys or the up/down arrow
keys to adjust the following items. To skip
an item, press the right arrow key:
• Set Month — Enter the month as 2-digit
number; i.e. August = “08”
• Set Year — Enter the year as 2-digit
number; i.e. 1999 = “99”
• Set Day — Enter the day as 2-digit
number; i.e. the ninth = “09”
• Set Hour — Enter the hour as 2-digit
number; i.e. 12:xx = “12”
• Set Minute — Enter the minute as 2-digit
number; i.e. xx:25 = “25”
• Set AM/PM — Press “1” for AM, “2” for
PM
Save Settings
The Clock is set! Press the Menu button at
any time to save and quit.
5
6
SLOW
100+
PREV. CH/
INPUT SEL
0
MUTE
VOL
VCR
TV
CH
123
456
789
TV/VCR
GV6025/6650
DECK 1
PLAY
DECK 2
STOP/EJ.
EDIT/TITLE
REPEAT
SP/EP
SKIP
MENU
REW
FF
STILL/FRAME
TRACKING
SHUTTLE
REC/OTR
SET MONTH [1-12] : 08
Aug 1999 12:25 PM
Su Mo Tu We Th Fr Sa
1
2345678
9101112131415
16 17 18 19 20 21 22
23 24 25 26 27 28 29
30 31
To Set MENU to Quit
➔
SET MONTH [1-12] :08
SET YEAR [00-99] :99
SET DAY [1-31] :12
SET HOUR [1-12] :12
SET MINUTE [0-59] :30
SET AM/PM [1/2] :1
Y2K Compliant
Go-Video Inc. hereby certifies
that this Dual-Deck VCR is
fully compliant with the
calendar year 2000. Note that
the year 2000 is a leap year.
DECK 1
PLAY
DECK 2
STOP/EJ.
EDIT/TITLE
REPEAT
SP/EP
SKIP
MENU
REW
FF
STILL/FRAME
TRACKING
SHUTTLE
REC/OTR

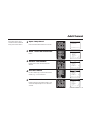
INITIAL SETTINGS 9
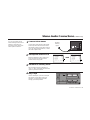
Open “Set Clock Menu”
Press Set Clock on the remote control.
Move to “Daylight Savings”
Press the down arrow key until “Daylight
Savings” is selected.
Set “Daylight Savings”
Press the right arrow key to select among:
• Auto — Uses local channel info to
determine Daylight Savings Time status.
• Off — Turns off Daylight Savings perma-
nently, i.e. the time never changes.
• On — Enables Daylight Savings at 2:00
AM on the first Sunday of April and
disables it at 2:00 AM on the last Sunday
in October.
Set Daylight Savings
1
2
3
From the Set Clock Menu, you
may also choose to manually set
Daylight Savings, Time Zone, or
Auto Clock Set channel.
DECK 1
PLAY
DECK 2
STOP/EJ.
EDIT/TITLE
REPEAT
SP/EP
SKIP
MENU
REW
FF
STILL/FRAME
TRACKING
SHUTTLE
REC/OTR
DECK 1
PLAY
DECK 2
STOP/EJ.
EDIT/TITLE
REPEAT
SP/EP
SKIP
MENU
REW
FF
STILL/FRAME
TRACKING
SHUTTLE
REC/OTR
SET CLOCK MENU
Auto Clock Set On
Daylight Savings Auto
Time Zone Auto
Clock Set Channel Auto
____________________________________
/ To Move To Select
MENU to Quit
➔
➔
➔
➔
Auto
Off
On
SET CLOCK MENU
Auto Clock Set On
Daylight Savings Auto
Time Zone Auto
Clock Set Channel Auto
____________________________________
/ To Move To Select
MENU to Quit
➔
➔
➔
➔
POWER
DISPLAY
Set
CLOCK
Set
TIMER
CLEAR
SEARCH/IDX
CLK/CTR
COPY TAPE
VIEW
SET CLOCK MENU
Auto Clock Set On
Daylight Savings Auto
Time Zone Auto
Clock Set Channel Auto
____________________________________
/ To Move To Select
MENU to Quit
➔
➔
➔
➔

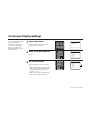
10 GV6025/6650 USER’S GUIDE
Open “Set Clock Menu”
Press Set Clock on the remote control.
Move to “Time Zone”
Press the down arrow key until “Time
Zone” is selected.
Set “Time Zone”
Press the right arrow key to select among:
• Auto — The Time Zone is selected
automatically.
• Eastern — Eastern Standard Time
• Central — Central Standard Time
• Mountain — Mountain Standard Time
• Pacific — Pacific Standard Time
• Alaska — Alaska Standard Time
• Hawaii — Hawaii Standard Time
Set Time Zone
SET CLOCK MENU
Auto Clock Set On
Daylight Savings Auto
Time Zone Auto
Clock Set Channel Auto
____________________________________
/ To Move To Select
MENU to Quit
➔
➔
➔
➔
DECK 1
PLAY
DECK 2
STOP/EJ.
EDIT/TITLE
REPEAT
SP/EP
SKIP
MENU
REW
FF
STILL/FRAME
TRACKING
SHUTTLE
REC/OTR
DECK 1
PLAY
DECK 2
STOP/EJ.
EDIT/TITLE
REPEAT
SP/EP
SKIP
MENU
REW
FF
STILL/FRAME
TRACKING
SHUTTLE
REC/OTR
SET CLOCK MENU
Auto Clock Set On
Daylight Savings Auto
Time Zone Auto
Clock Set Channel Auto
____________________________________
/ To Move To Select
MENU to Quit
➔
➔
➔
➔
Auto
Eastern
Central
Mountain
Pacific
Alaska
Hawaii
1
2
3
You can set your Time Zone
manually to one of the six
preset choices. Use this feature
if Auto Clock Set has set the
time incorrectly by detecting a
nearby time zone. Note: If you
are an Arizona resident,
choose Mountain Standard
Time and turn Daylight
Savings Time off.
POWER
DISPLAY
Set
CLOCK
Set
TIMER
CLEAR
SEARCH/IDX
CLK/CTR
COPY TAPE
VIEW
SET CLOCK MENU
Auto Clock Set On
Daylight Savings Auto
Time Zone Auto
Clock Set Channel Auto
____________________________________
/ To Move To Select
MENU to Quit
➔
➔
➔
➔

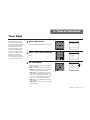
INITIAL SETTINGS 11
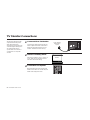
Open “Set Clock Menu”
Press Set Clock on the remote control.
Move to “Clock Set Channel”
Press the down arrow key until “Clock Set
Channel” is selected.
Set “Clock Set Channel”
Press the right arrow key repeatedly to select
among:
• Auto — Automatically searches for chan-
nels broadcasting the time via XDS (Ex-
tended Data Services)
• Ch ## — Allow you to manually set a
channel which you know to receive XDS
information
• Aux — allows the clock to be set from
another AV (Audio/Video) device attached
to your VCR’s front line inputs
SET CLOCK MENU
Auto Clock Set On
Daylight Savings Auto
Time Zone Auto
Clock Set Channel Auto
____________________________________
/ To Move To Select
MENU to Quit
➔
➔
➔
➔
Auto
Ch ##
Aux
1
2
Set Auto Clock Set Channel
If you know a station in your
local area that broadcasts time
information, you can set it
manually. For example, your
local PBS station usually will
transmit the time and date. Use
this feature only if Auto Clock
Set has set the time incorrectly.
3
SET CLOCK MENU
Auto Clock Set On
Daylight Savings Auto
Time Zone Auto
Clock Set Channel Auto
____________________________________
/ To Move To Select
MENU to Quit
➔
➔
➔
➔
DECK 1
PLAY
DECK 2
STOP/EJ.
EDIT/TITLE
REPEAT
SP/EP
SKIP
MENU
REW
FF
STILL/FRAME
TRACKING
SHUTTLE
REC/OTR
POWER
DISPLAY
Set
CLOCK
Set
TIMER
CLEAR
SEARCH/IDX
CLK/CTR
COPY TAPE
VIEW
SET CLOCK MENU
Auto Clock Set On
Daylight Savings Auto
Time Zone Auto
Clock Set Channel Auto
____________________________________
/ To Move To Select
MENU to Quit
➔
➔
➔
➔
DECK 1
PLAY
DECK 2
STOP/EJ.
EDIT/TITLE
REPEAT
SP/EP
SKIP
MENU
REW
FF
STILL/FRAME
TRACKING
SHUTTLE
REC/OTR
La pagina si sta caricando...
La pagina si sta caricando...
La pagina si sta caricando...
La pagina si sta caricando...
La pagina si sta caricando...
La pagina si sta caricando...
La pagina si sta caricando...
La pagina si sta caricando...
La pagina si sta caricando...
La pagina si sta caricando...
La pagina si sta caricando...
La pagina si sta caricando...
La pagina si sta caricando...
La pagina si sta caricando...
La pagina si sta caricando...
La pagina si sta caricando...
La pagina si sta caricando...
La pagina si sta caricando...
La pagina si sta caricando...
La pagina si sta caricando...
La pagina si sta caricando...
La pagina si sta caricando...
La pagina si sta caricando...
La pagina si sta caricando...
La pagina si sta caricando...
La pagina si sta caricando...
La pagina si sta caricando...
La pagina si sta caricando...
La pagina si sta caricando...
La pagina si sta caricando...
La pagina si sta caricando...
La pagina si sta caricando...
La pagina si sta caricando...
La pagina si sta caricando...
La pagina si sta caricando...
La pagina si sta caricando...
La pagina si sta caricando...
La pagina si sta caricando...
La pagina si sta caricando...
La pagina si sta caricando...
La pagina si sta caricando...
La pagina si sta caricando...
La pagina si sta caricando...
La pagina si sta caricando...
La pagina si sta caricando...
La pagina si sta caricando...
La pagina si sta caricando...
La pagina si sta caricando...
La pagina si sta caricando...
La pagina si sta caricando...
La pagina si sta caricando...
La pagina si sta caricando...
La pagina si sta caricando...
La pagina si sta caricando...
La pagina si sta caricando...
La pagina si sta caricando...
La pagina si sta caricando...
La pagina si sta caricando...
La pagina si sta caricando...
La pagina si sta caricando...
La pagina si sta caricando...
La pagina si sta caricando...
La pagina si sta caricando...
La pagina si sta caricando...
La pagina si sta caricando...
La pagina si sta caricando...
La pagina si sta caricando...
La pagina si sta caricando...
La pagina si sta caricando...
La pagina si sta caricando...
La pagina si sta caricando...
La pagina si sta caricando...
La pagina si sta caricando...
La pagina si sta caricando...
La pagina si sta caricando...
La pagina si sta caricando...
La pagina si sta caricando...
La pagina si sta caricando...
La pagina si sta caricando...
La pagina si sta caricando...
La pagina si sta caricando...
La pagina si sta caricando...
La pagina si sta caricando...
La pagina si sta caricando...
La pagina si sta caricando...
La pagina si sta caricando...
-
 1
1
-
 2
2
-
 3
3
-
 4
4
-
 5
5
-
 6
6
-
 7
7
-
 8
8
-
 9
9
-
 10
10
-
 11
11
-
 12
12
-
 13
13
-
 14
14
-
 15
15
-
 16
16
-
 17
17
-
 18
18
-
 19
19
-
 20
20
-
 21
21
-
 22
22
-
 23
23
-
 24
24
-
 25
25
-
 26
26
-
 27
27
-
 28
28
-
 29
29
-
 30
30
-
 31
31
-
 32
32
-
 33
33
-
 34
34
-
 35
35
-
 36
36
-
 37
37
-
 38
38
-
 39
39
-
 40
40
-
 41
41
-
 42
42
-
 43
43
-
 44
44
-
 45
45
-
 46
46
-
 47
47
-
 48
48
-
 49
49
-
 50
50
-
 51
51
-
 52
52
-
 53
53
-
 54
54
-
 55
55
-
 56
56
-
 57
57
-
 58
58
-
 59
59
-
 60
60
-
 61
61
-
 62
62
-
 63
63
-
 64
64
-
 65
65
-
 66
66
-
 67
67
-
 68
68
-
 69
69
-
 70
70
-
 71
71
-
 72
72
-
 73
73
-
 74
74
-
 75
75
-
 76
76
-
 77
77
-
 78
78
-
 79
79
-
 80
80
-
 81
81
-
 82
82
-
 83
83
-
 84
84
-
 85
85
-
 86
86
-
 87
87
-
 88
88
-
 89
89
-
 90
90
-
 91
91
-
 92
92
-
 93
93
-
 94
94
-
 95
95
-
 96
96
-
 97
97
-
 98
98
-
 99
99
-
 100
100
-
 101
101
-
 102
102
-
 103
103
-
 104
104
-
 105
105
-
 106
106


GoVideo GV6650 Manuale utente
- Tipo
- Manuale utente
- Questo manuale è adatto anche per
in altre lingue
- English: GoVideo GV6650 User manual
Altri documenti
-
Haier 21F7A Manuale del proprietario
-
-
Sylvania 6260VE Manuale del proprietario
-
Magnavox VRZ464AT Manuale utente
-
Yamaha DRX-1 Manuale utente
-
 Tech Line DVRC 700 Manuale utente
-
Panasonic PVV4620 Manuale utente
-
JVC GR-AX96 Instructions Manual
-
 Symphonic VCR SE436D Manuale utente
-

