Star Trac E Series Recumbent E-RB Manuale del proprietario
- Categoria
- Fitness, ginnastica
- Tipo
- Manuale del proprietario

E-UB Upright Bike
E-RB Recumbent Bike
O WNER’ S
M ANUAL

Introduction . . . . . . . . . . . . . . . . . . . . . . . . . . . . . . . . . . . . . . . . . . . . . . . . . . . . . . . . . . . . . . . . . . . . . . . . . . . . . . . . . . . . . . 4
About This Manual . . . . . . . . . . . . . . . . . . . . . . . . . . . . . . . . . . . . . . . . . . . . . . . . . . . . . . . . . . . . . . . . . . . . . . . . . 4
Safety Instructions . . . . . . . . . . . . . . . . . . . . . . . . . . . . . . . . . . . . . . . . . . . . . . . . . . . . . . . . . . . . . . . . . . . . . . . . . . . . . . . . . 5
English . . . . . . . . . . . . . . . . . . . . . . . . . . . . . . . . . . . . . . . . . . . . . . . . . . . . . . . . . . . . . . . . . . . . . . . . . . . . . . . . . . 5
Dutch . . . . . . . . . . . . . . . . . . . . . . . . . . . . . . . . . . . . . . . . . . . . . . . . . . . . . . . . . . . . . . . . . . . . . . . . . . . . . . . . . . . 6
French . . . . . . . . . . . . . . . . . . . . . . . . . . . . . . . . . . . . . . . . . . . . . . . . . . . . . . . . . . . . . . . . . . . . . . . . . . . . . . . . . . 6
German . . . . . . . . . . . . . . . . . . . . . . . . . . . . . . . . . . . . . . . . . . . . . . . . . . . . . . . . . . . . . . . . . . . . . . . . . . . . . . . . . 7
Italian . . . . . . . . . . . . . . . . . . . . . . . . . . . . . . . . . . . . . . . . . . . . . . . . . . . . . . . . . . . . . . . . . . . . . . . . . . . . . . . . . . . 7
Portuguese . . . . . . . . . . . . . . . . . . . . . . . . . . . . . . . . . . . . . . . . . . . . . . . . . . . . . . . . . . . . . . . . . . . . . . . . . . . . . . . 8
Spanish . . . . . . . . . . . . . . . . . . . . . . . . . . . . . . . . . . . . . . . . . . . . . . . . . . . . . . . . . . . . . . . . . . . . . . . . . . . . . . . . . 8
Swedish . . . . . . . . . . . . . . . . . . . . . . . . . . . . . . . . . . . . . . . . . . . . . . . . . . . . . . . . . . . . . . . . . . . . . . . . . . . . . . . . . 9
Chinese . . . . . . . . . . . . . . . . . . . . . . . . . . . . . . . . . . . . . . . . . . . . . . . . . . . . . . . . . . . . . . . . . . . . . . . . . . . . . . . . . 9
Japanese . . . . . . . . . . . . . . . . . . . . . . . . . . . . . . . . . . . . . . . . . . . . . . . . . . . . . . . . . . . . . . . . . . . . . . . . . . . . . . . . 10
Assembly and Setup . . . . . . . . . . . . . . . . . . . . . . . . . . . . . . . . . . . . . . . . . . . . . . . . . . . . . . . . . . . . . . . . . . . . . . . . . . . . . . . 11
E-UB Upright Bike Assembly and Setup . . . . . . . . . . . . . . . . . . . . . . . . . . . . . . . . . . . . . . . . . . . . . . . . . . . . . . . . 11
E-RB Recumbent Bike Assembly and Setup . . . . . . . . . . . . . . . . . . . . . . . . . . . . . . . . . . . . . . . . . . . . . . . . . . . . . 15
Operating Instructions . . . . . . . . . . . . . . . . . . . . . . . . . . . . . . . . . . . . . . . . . . . . . . . . . . . . . . . . . . . . . . . . . . . . . . . . . . . . . 19
Seat Adjustments . . . . . . . . . . . . . . . . . . . . . . . . . . . . . . . . . . . . . . . . . . . . . . . . . . . . . . . . . . . . . . . . . . . . . . . . . 19
Pedal Strap Operation . . . . . . . . . . . . . . . . . . . . . . . . . . . . . . . . . . . . . . . . . . . . . . . . . . . . . . . . . . . . . . . . . . . . . 20
Heart Rate Bar Operation (E-RB Recumbent Bike) . . . . . . . . . . . . . . . . . . . . . . . . . . . . . . . . . . . . . . . . . . . . . . . 20
Display Panel Features . . . . . . . . . . . . . . . . . . . . . . . . . . . . . . . . . . . . . . . . . . . . . . . . . . . . . . . . . . . . . . . . . . . . . 20
Hints and Tips for Getting Started . . . . . . . . . . . . . . . . . . . . . . . . . . . . . . . . . . . . . . . . . . . . . . . . . . . . . . . . . . . . . 22
Viewing Workout Data During a Program . . . . . . . . . . . . . . . . . . . . . . . . . . . . . . . . . . . . . . . . . . . . . . . . . . . . . . . 22
Cooldown Cycle . . . . . . . . . . . . . . . . . . . . . . . . . . . . . . . . . . . . . . . . . . . . . . . . . . . . . . . . . . . . . . . . . . . . . . . . . . . 22
Using the Personal Fan . . . . . . . . . . . . . . . . . . . . . . . . . . . . . . . . . . . . . . . . . . . . . . . . . . . . . . . . . . . . . . . . . . . . . 23
Heart Rate Monitoring . . . . . . . . . . . . . . . . . . . . . . . . . . . . . . . . . . . . . . . . . . . . . . . . . . . . . . . . . . . . . . . . . . . . . . 23
Quick Start . . . . . . . . . . . . . . . . . . . . . . . . . . . . . . . . . . . . . . . . . . . . . . . . . . . . . . . . . . . . . . . . . . . . . . . . . . . . . . . 24
Preset Programs . . . . . . . . . . . . . . . . . . . . . . . . . . . . . . . . . . . . . . . . . . . . . . . . . . . . . . . . . . . . . . . . . . . . . . . . . . 24
Training Tools Programs
. . . . . . . . . . . . . . . . . . . . . . . . . . . . . . . . . . . . . . . . . . . . . . . . . . . . . . . . . . . . . . . . . . . . 27
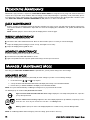
Preventative Maintenance . . . . . . . . . . . . . . . . . . . . . . . . . . . . . . . . . . . . . . . . . . . . . . . . . . . . . . . . . . . . . . . . . . . . . . . . . . . 32
Daily Maintenance . . . . . . . . . . . . . . . . . . . . . . . . . . . . . . . . . . . . . . . . . . . . . . . . . . . . . . . . . . . . . . . . . . . . . . . . . 32
Weekly Maintenance . . . . . . . . . . . . . . . . . . . . . . . . . . . . . . . . . . . . . . . . . . . . . . . . . . . . . . . . . . . . . . . . . . . . . . . 32
Monthly Maintenance . . . . . . . . . . . . . . . . . . . . . . . . . . . . . . . . . . . . . . . . . . . . . . . . . . . . . . . . . . . . . . . . . . . . . . . 32
Manager / Maintenance Mode . . . . . . . . . . . . . . . . . . . . . . . . . . . . . . . . . . . . . . . . . . . . . . . . . . . . . . . . . . . . . . . . . . . . . . . . 32
Manager Mode . . . . . . . . . . . . . . . . . . . . . . . . . . . . . . . . . . . . . . . . . . . . . . . . . . . . . . . . . . . . . . . . . . . . . . . . . . . . 32
Maintenance Mode . . . . . . . . . . . . . . . . . . . . . . . . . . . . . . . . . . . . . . . . . . . . . . . . . . . . . . . . . . . . . . . . . . . . . . . . 33
Troubleshooting . . . . . . . . . . . . . . . . . . . . . . . . . . . . . . . . . . . . . . . . . . . . . . . . . . . . . . . . . . . . . . . . . . . . . . . . . . . . . . . . . . . 35
Start-Up Service Messages . . . . . . . . . . . . . . . . . . . . . . . . . . . . . . . . . . . . . . . . . . . . . . . . . . . . . . . . . . . . . . . . . . 35
Regulatory Information . . . . . . . . . . . . . . . . . . . . . . . . . . . . . . . . . . . . . . . . . . . . . . . . . . . . . . . . . . . . . . . . . . . . . . . . . . . . . 35
2 STAR TRAC E SERIES BIKES OWNER’S GUIDE
T
ABLE OF
C
ONTENTS
Copyright 2009. Star Trac by Unisen, Inc. All rights reserved, including those to reproduce this book or parts thereof in any form without first obtaining written permission
from Star Trac.
Every effort has been made to keep this information current; however, periodically, changes are made to the information herein, and these changes will be incorporated into
new editions of this publication. All product names and logos are trademarks of their respective owners. Printed in the USA.

STAR TRAC E SERIES BIKES OWNER’S GUIDE
3
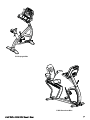
E-UB Upright Bike
E-RB Recumbent Bike

4
STAR TRAC E SERIES BIKES O
WNER’S GUIDE
Thank you for choosing the STAR TRAC E SERIES BIKE. The Upright and Recumbent Bikes have been designed to provide the user
with the most rewarding experience based upon the carefully planned features they possess. The design elements of these Bikes will
provide you with a comfortable, intuitive, safe and reliable experience, guiding you to a habit-forming lifestyle. Star Tracs mission is to
provide products to mold lifelong habits for health and fitness, and STAR TRAC E SERIES BIKES will provide the path to meet your
goals. Enjoy the ride.
ABOUT THIS MANUAL
This manual is applicable to the STAR TRAC E-UB UPRIGHT BIKE and the STAR TRAC R-RB RECUMBENT BIKE. The manual is
divided into eight sections, as follows:
Introduction
Provides an overview of each section within the manual.
Safety Instructions
Provides guidelines, in multiple languages, for safely operating the Star Trac E SERIES BIKES.
Assembly and Setup
Provides instructions for unpacking, assembling and setting up the Star Trac E SERIES BIKES.
Operating Instructions
Provides a detailed description of the Display Panel, and includes step-by-step instructions for operating the Star Trac E
SERIES BIKES.
Preventative Maintenance
Describes the preventative maintenance measures required to keep the Star Trac E SERIES BIKES in top condition.
Manager / Maintenance Mode
Provides step-by-step instructions for changing universal parameters on Star Trac E SERIES BIKES, and for performing built-
in testing procedures.
Troubleshooting
Describes the start-up and shutdown messages provided as a result of the self-test routine.
Regulatory Information
Provides regulatory information for the Star Trac E SERIES BIKES.
I
NTRODUCTION

STAR TRAC E SERIES BIKES OWNER’S GUIDE
5
This chapter includes fitness safeguards and precautions for the installation and use of the Star Trac E SERIES BIKES. Please read this
chapter carefully before installing or using your equipment.
Safety instructions are provided in the following languages (in the order shown):
I English
I Dutch
I French
I German
I Italian
I Portuguese
I Spanish
I Swedish
I Chinese
I Japanese
PRECAUTIONS
These safety notes are directed to you as the owner of the Star Trac E SERIES BIKE. Please train all your users and fitness staff to fol-
low these safety instructions.
S
AFETY
I
NSTRUCTIONS
Do
I Do encourage each of your users to discuss their health
program or fitness regimen with a healthcare profes-
sional.
I Do stop operating your E SERIES BIKE if you feel dizzy
or faint.
I Do perform regular preventative maintenance.
I Do exercise slowly until you reach a level of comfort.
I Do use the E SERIES BIKE only for its intended use, as
described in this manual.
Do Not
I Do not let unsupervised children operate your E
SERIES BIKE.
I Do not use without athletic shoes.
I Do not use in rainy weather outdoors, or in an enclosed
pool environment.
I Do not drop or insert any object, hands, or feet into any
opening, or underneath your E SERIES BIKE.
I Do not attempt to remove any shrouds or modify your E
SERIES BIKE.
W
ARNING
Your Star Trac E SERIES BIKE is designed for aerobic exercise in a commercial or consumer environment.
Please check with your physician prior to beginning any exercise program.
Do not push yourself to excess. Stop if you are feeling faint, dizzy, or exhausted. Use common sense when
cycling.
Read the Owner's Manual in its entirety before operating your cycle.
Failure to obey this warning can result in injury or death.

VEILIGHEIDSINSTRUCTIES
Deze veiligheidsinstructies zijn aan u gericht als de eigenaar van de Star Trac E SERIES BIKEs. Train uw leden en fitness-personeel
om dezelfde veiligheidsinstructies te volgen.
CONSIGNES DE SÉCURITÉ
Ces consignes de sécurité sont destinées au propriétaire du Vélo d,exercice Star Trac. Veuillez enseigner ces consignes à tous vos
membres et employés.
Doe Dit Wel
I Moedig uw leden aan om hun gezondheids- of fit-
nessprogramma met een geneeskundige te bespreken.
I Stop met de fiets als u zich duizelig voelt of het gevoel
heeft dat u flauwvalt.
I Verricht regelmatig preventief onderhoud.
I Begin langzaam totdat u een comfortabel en veilig
niveau heeft bereikt.
I Gebruik het apparaat alleen voor het doel waarvoor het
bestemd is en zoals in dit handboek beschreven.
Doe Dit Neit
I Laat kinderen niet zonder toezicht de fiets bedienen.
I Plaats uw voeten niet onder uw fiets.
I Gebruik de fiets niet zonder sportschoenen.
I Niet buiten in regenachtig weer gebruiken of in een
omgeving met een overdekt zwembad.
I Laat nooit objecten in het apparaat vallen en steek geen
objecten, handen of voeten in welke opening dan ook of
onder het apparaat.
I Verwider nooit afschermingen en verander het apparaat
niet.
W
AARSCHUWING
Uw Star Trac E SERIES BIKE is ontworpen voor aerobics in een commerciële of consumentenomgeving.
Vraag advies aan uw arts voordat u met een fitnessprogramma begint.
Vraag niet teveel van uzelf. Stop als u het gevoel heeft dat u flauw gaat vallen, als u duizelig bent of uitgeput.
Gebruik uw gezonde verstand bij het steppen. Lees de gebruikshandleiding helemaal door voordat u uw fiets
gebruikt.
À Faire
I Encouragez vos membres à disuter de leur programme
de santé ou d'exercice avec un médecin.
I Arrêtez tout exercice sur le vélo si vous éprouvez un
étourdissement ou une défaillance.
I Effectuez régulièrement un entretien préventif.
I Exercez-vous lentement jusqu'à ce que vous vous sen-
tiez à l'aise et en sécurité.
I N'utilisez cet appareil que dans le but pour lequel il est
conçu.
À Ne Pas Faire
I Ne laissez pas des enfants utiliser le vélo sans surveil-
lance.
I Ne placez pas vos pieds sous le vélo.
I Ne permettez à personne de s'exercer sans chaussures
athlétiques.
I N'utilisez pas l'appareil à l'extérieur par temps pluvieux
ou à proximité d'une piscine.
I N'insérez jamais la main, le pied ou un objet dand les
ouvertures de l'appareil, ni sous l'appareil.
I Ne mofifiez jamais cet appareil et ne retirez aucun de
ses éléments protecteurs.
M
ISE
E
N
G
ARDE
Votre Vélo Star Trac est conçu pour l'exercice d'aérobic dans un contexte commercial ou à la maison.
Veuillez consulter votre médecin avant d'entreprendre tout programme d'exercice.
Évitez tout exercice excessif. Arrêtez us viys éprouvez un étourdissement, une défaillance ou de la fatigue. Fiez-
vous à votre bon sens. Lisez attentivement la notice d'utilisation dans son intégralité avant d'utiliser votre vélo.
6
STAR TRAC E SERIES BIKES O
WNER’S GUIDE

STAR TRAC E SERIES BIKES OWNER’S GUIDE
7
SICHERHEITSVORSCHRIFTEN
Diese Sicherheitshinweise sind an Sie, den Besitzer des Fitness-Bikes von Star Trac gerichtet. Bitte weisen Sie Ihre Mitglieder und
Mitarbeiter an, sich an die folgenden Sicherheitsvorschriften zu halten.
INSTRUZIONI DI SICUREZZA
Queste indicazioni sono indirizzate ai proprietari dello Star Trac cyclette. Chiedete a tutti I membri della vostra palestra e al vostro staff
di seguire queste istruzioni di sicurezza.
Sie Sollten
I Ihren Mitgliedern nahelegen, ihr Gesundheitspro-gramm
oder Fitneß-Trainning mit einem Arzt zu besprechen.
I Die Benutzung des Fitneß-Bikes beenden, wenn
Benommenheit oder Schwindel aufritt.
I Das Gerät regelmäßig warten.
I Langsam trainieren, bis Sie sicher mit dem Gerät umge-
hen können.
I Dieses Gerät nur für den vorgesehenen Zweck gemäß
der Beschreibung in diesem Handbuch verwenden.
Sie Sollten Niemals
I Kinder das Fitneß-Bike unbeaufsichtigt benutzen
lassen.
I Die Füße unter das Fitneß-Bike stellen.
I Die Benutzung des Fitneß-Bikes ohne die passenden
Sportschuhe zulassen.
I Das Gerät bei Regenwetter im Freien oder in einem
Hallen-bzw, überdachten Schwimmbad verwenden.
I Gegensände in eine Öffnung des Geräts stecken oder
darunter fallen lassen oder Hände bzw. Füße unter das
Gerät halten.
I Abdeckungen abnehmen oder das Gerät ändern.
WARNUNG
Das Fitness-Bike von Star Trac ist für das Aerobik-Training in einem kommerziellen oder Verbraucherumfeld
vorgesehen.
Bitte konsultieren Sie Ihren Arzt, bevor Sie mit einem Trainingsprogramm beginnen.
Überanstrengen Sie sich nicht. Hören Sie auf, wenn Schwindel, Benommenheit oder Erschöpfung eintretrn.
Gehen Sie beim Training vernünftig vor. Lesen Sie bitte das Benutzerhandbuch vor Verwendung des Fitneß-Bikes
vollständig durch.
Da Fare
I Incoraggiate i membri della vostra palestra a discutere il
loro programma o regime di allenamento con uno spe-
cialista medico.
I Fermate lo cyclette se avete dei capogiri o vi sentite
svenire.
I Eseguite la manutenzione regolarmente.
I Esercitatevi lentamente fino a quando raggiungete un
livello confortevole e sicuro.
I Usate questo attrezzo solo per l'uso inteso, come
descritto in questo manuale.
Da Non Fare
I Non permettete a bambini di usare lo cyclette senza
sorveglianza.
I Non inserite i piedi sotto lo cyclette.
I Non usate lo cyclette se non calzate scarpe da ginnasti-
ca.
I Non usatelo all'aperto quendo piove o vicino ad una
piscina coperta.
I Non lasciate cadere oggetti e non inserite mani o piedi
nelle aperature o al di sotto di questo attrezzo.
I Non remuovete nessun coperchio o modificate questo
attrezzo.
A
TTENZIONE
Lo Star Trac Cyclette è stato progettato per l'esercizio aerobico in un ambiente commerciale o domestico.
Consultatevi con il volsro medico di famiglia prima di intraprendere un programma di esercizi.
Siate coscienti dei vostri limiti. Fermatevi se avete dei capogiri, vi sentite svenire o siete esausti. Usate il vostro
buon senso quando usate lo cyclette. Leggete tutto il manuale delle istruzioni prima di usare lo cyclette.

8
STAR TRAC E SERIES BIKES O
WNER’S GUIDE
INSTRUÇÕES DE SEGURANÇA
Estas observações de segurança destinam-se à você, proprietário da bicicleta Star Trac. Treine todos os membros e funcionários que
utilizarão o equipamento para que sigam estas instruções de segurança.
INSTRUCCIONES DE SEGURIDAD
Estas notas de seguridad van dirigidas a Vd. Como proprietario del bicicleta Star Trac. Haga que todos los usuarios y preparadores físi-
cos cumplan estas instrucciones de seguridad.
Faça
I Estimule seus usuários para que discutam seus progra-
mas de saúde ou de exercícios com um profissional de
saúde.
I Pare de usar a bicicleta se você se sentir fraco ou com
tontura.
I Faça manutenção preventiva regularmente.
I Faça o exercício lentamente até que você alcance um
nível de conforto e segurança.
I Utilize este equipamento única e exclusivamente para o
seu devido fim, conforme descrito neste manual.
Não Faça
I Não permita que crianças operem a bicicleta sem super-
visão de um adulto.
I Não coloque seus pés embaixo da bicicleta.
I Não utilize a bicicleta sem calçar tênis.
I Não use este equipamento ao ar livre, em dias chu-
vosos ou em um ambiente de piscina interna.
I Nunca deixe cair ou introduza nenhum objeto, as mãos
ou pés em nenhuma abertura do equipamento ou
debaixo deste.
I Não remova nenhum protetor ou modifique este equipa-
mento.
ADVERTÊNCIA
A sua bicicleta Star Trac foi projetada para exercício aeróbico em um ambiente comercial ou residencial.
Faça um exame físico com seu médico antes de iniciar qualquer programa de exercícios.
Não abuse. Para se estiver sentindo tontura, fraqueza ou exaustão. Use bom senso quando se exercitar. Leia o
manual do proprietário por completo antes de operar a sua bicicleta.
Qué Hacer
I Anime a sus miembros a que discutan su progama de
saud o régimen de ejercicio con un profesional de la
salud.
I Detenga el escalón si se nota desfallecido o mareado.
I Realice un mantenimiento preventivo de manera regu-
lar.
I Haga ejercicio despacio hasta alcanzar un nivel de
comodidad y seguirdad.
I Utilice este producto sólo para los usos indicados, tal
como se describe en este manual.
Qué No Hacer
I No permita que los niños utilicen el bicicleta sin super-
visión.
I No ponga los pies debajo del bicicleta.
I No permita su uso sin calzado deportivo.
I No lo utilice en el exterior con tiempo lluvioso o en un
recinto cerrado con piscina.
I No deje caer ni introduzca ningún objeto, manos o pies
en ninguna bertura del aparato o debajo del mismo.
I No quite ninguna cubierta ni modifique este equipo.
ADVERTENCIA
Su bicicleta Star Trac está diseñado para realizar ejercicio aeróbico en un entorno comercial o en forma individ-
ual.
Consulte a su médico antes de empezar cualquier programa de ejercicio.
No se exceda. Interrumpa el ejercicio si se nota desfallecido, mareado o agotado. Utilice el sentido común al usar
este ararato. Lea el manual del propietario en su totalidad antes de poner en marcha el escalón.

STAR TRAC E SERIES BIKES OWNER’S GUIDE
9
SIKKERHEDSINSTRUKTIONER
Disse sikkerhedsinstrukioner henvendes til ejeren af Star Trac cyckel. Sørg venligst for, at alle medlemmer og alt kondipersonale kender
og følger disse sikkerhedsregler.
注意事项
以下安全注意事项是专门为STAR TRAC E SERIES BIKE 的拥有人而制订的。 请务必训
练所有设备使用者和健身房工作人员遵守这些安全注意事项。
要:
鼓励所有使用者与专业医疗保健人员商讨他们的医疗保健方案或健身进程。
使用E SERIES BIKE 时若感觉到晕眩或虚弱,请立即停止使用。
定期维护设备。
锻炼要慢慢开始直至达到一个自如的程度。
仅将E SERIES BIKE 用作本使用手册所列的用途。
不要:
不要让无人看管的儿童使用您的E SERIES BIKE。
没穿运动鞋时不要使用。
下雨时不要在室外使用,也不要在室内游泳池附近使用。
E SERIES BIKE 的敞开部位或底下不要掉落或塞进任何附件,包括手或脚。
不要尝试拆除任何覆盖物或改装您的E SERIES BIKE。
Råd
I Medlemmer bør opfordres til at tale om deres helsepro-
gram eller kondiregime med en læge.
I Stig af cyklen, hvis du bliver mat i kroppen eller svimmel.
I Foretag forebyggende vedligeholdelse med regelmæs-
sige mellemrum.
I Gør øvelserne langsomt, indtil du når et behageligt og
sikkert niveau.
I Udstyret bør udelukkende bruges til det formål, det er
beregnet til ifølge denne brugsanvisning.
Advarsler
I Tillad ikke børn uden opsyn at bruge cyklen.
I Sæt ikke fødderne under cyklen.
I Brug ikke cyklen uden kondisko.
I Brug ikke cyklen udendørs i regnvejr eller i et indelukket
område med svømmebasin.
I Undgå at tabe eller at stikke genstande, hænder eller
fødder ind i en åbning i eller under udstyret.
I Undlad at fjerne afskærmning eller forandre udstyret på
nogen måde.
ADVARSEL
Din Star Trac cykel er konstrueret til konditræning i et erhvervseller forbrugermiljø.
Vær venlig at rådføre dig med din læge, før du påbegynder et kondiprogram.
Du må ikke overanstrenge dig alt for meget. Stop hvis du føler dig mat i kroppen, svimmel eller udmattet. Brug
sund fornuft, når du cykler. Vær venlig at læse hele brugsanvisningen, før du stiger på cyklen.
警告
STAR TRAC E SERIES BIKE 是专门设计用于商业或消费用途的健身锻炼设备。
开始任何锻炼计划之前, 请先与您的医生进行商讨。
不要过于勉强自己,如果感觉到虚弱,晕眩或疲倦就应停止运动。运用常识正确举步。
使用E SERIES BIKE 前请先完整阅读使用手册。
如不尊从以上警告有可能会导致受伤或死亡。

10
STAR TRAC E SERIES BIKES O
WNER’S GUIDE
注意事項
これらの安全に関する事項は、スタートラックEシリーズバイクの所有者に対し提供されている。安全のため、すべてのメンバーおよ
びフィットネスのスタッフが安全に関する指示に従うよう教育(指示)する事。
スタートラック
E
シリーズバイク使用にあたってしなけらばならない項目
- ご利用の方に、健康維持のためのプログラムやフィットネス計画についてヘルスケアの専門家と話し合うことを勧める。
- めまいがしたり、めまいであると感じるならあなたのE SERIES BIKEの操作 利用を中止する。
- 定期的に予防保守を行うこと。
- 快適さや安全性を感じるまで、ゆっくり運動を行うこと。
- スタートラックEシリーズバイクは本説明書に記載の意図された目的にのみ使用すること。
スタートラック
E
シリーズバイク使用にあたってしなけらばならない項目
- 子供がスタートラックEシリーズバイクを操作しないようにする。
- 運動靴をはかないで使用しない。
- 雨の天気のときに野外や、またはプールのある屋内で、設置、使用しないこと。
- スタートラックEシリーズバイクは、シュラウド(本体カバー)が付いていない状態もしくは、機器を改造して利用しない。
警告
スタートラックEシリーズバイクは、ジムやスポーツクラブ内で行う有酸素運動を目的に設計されている。運動のプログラムを開始す
る前にかかりつけの医師に相談すること。
やりすぎないこと。気が遠くなったり、ふらついたり、疲労が激しい場合は運動を中止する。
バイクを利用するときは、常識の範囲内で行うこと。
バイクを使用始める前に必ず取扱説明を読むこと。

STAR TRAC E SERIES BIKES OWNER’S GUIDE
11
A
SSEMBLY AND
S
ETUP
E-UB UPRIGHT BIKE ASSEMBLY AND SETUP
Use the following procedures to unpack and assemble your STAR TRAC E-UB UPRIGHT BIKE.
UNPACKING
Open the shipping carton, remove all parts from the carton and foam inserts, and verify that the following parts are included in your ship-
ment:
Take time now to enter your E SERIES BIKE serial number in the space below. If parts are missing, or if you have any operational ques-
tions, please call Star Trac’s Service Department at (800) 503-1221; have your serial number ready.
Serial No. ___________________________
ASSEMBLY
1. Install the Front Foot
NOTE
:
The front foot assembly has wheels attached to the front edge.
Be sure the wheels face forward when installing the front foot assem-
bly.
Stand the bike frame upright and place the front foot assembly under
the frame, aligning the holes in the foot with the holes in the frame.
Using the 6mm hex wrench and four M10 X 30 button head screws,
secure the front foot assembly to the frame. Tighten all four screws
securely.
2. Install the Rear Foot
NOTE: Be sure the rear foot assembly is positioned with the curved
edge facing forward (similar to the front foot).
Lift up the rear of the bike frame and place the rear foot assembly in
position under the frame, aligning the holes in the foot with the holes
in the frame.
Using the 6mm hex wrench and four M10 X 30 button head screws,
secure the rear foot assembly to the frame. Tighten all four screws
securely.
Description Qty.
Bike Frame . . . . . . . . . . . . . . . . . . . . . . . . . . . . . . . . . . . . . 1
Display Console Assembly . . . . . . . . . . . . . . . . . . . . . . . . . 1
Seat Post Assembly . . . . . . . . . . . . . . . . . . . . . . . . . . . . . . 1
Front Foot . . . . . . . . . . . . . . . . . . . . . . . . . . . . . . . . . . . . . . 1
Rear Foot . . . . . . . . . . . . . . . . . . . . . . . . . . . . . . . . . . . . . . 1
Pedals (set of two) . . . . . . . . . . . . . . . . . . . . . . . . . . . . . . . 1
Screw, Button Head, M10 X 30 . . . . . . . . . . . . . . . . . . . . . 8
Screw, Button Head, M8 X 20 . . . . . . . . . . . . . . . . . . . . . . 4
Description Qty.
Screw, Socket Head, M6 X 10 with Star Washer . . . . . . . . 1
Screw, Socket Head, M4 X 20 . . . . . . . . . . . . . . . . . . . . . . 2
Wrench, Hex, 6mm . . . . . . . . . . . . . . . . . . . . . . . . . . . . . . . 1
Wrench, Hex, 5mm . . . . . . . . . . . . . . . . . . . . . . . . . . . . . . . 1
Wrench, Hex, 4mm . . . . . . . . . . . . . . . . . . . . . . . . . . . . . . . 1
Multi-end Wrench, 10mm, 12mm, 15mm . . . . . . . . . . . . . . 1
Wrench, Hex, 3mm . . . . . . . . . . . . . . . . . . . . . . . . . . . . . . . 1
Step 1
Step 2

12
STAR TRAC E SERIES BIKES O
WNER’S GUIDE
3. Install the Seat Post
Carefully slide the seat post into the seat tube.
Pull out on the seat release knob, and slide the seat post fully into the
seat tube. Release the seat release knob.
Install two M4 X 20 socket head screws into the seat sleeve to secure
it. Tighten the screws securely using the 3mm hex wrench.
4. Install the Pedals
Install the pedals on the pedal cranks using a multi-end wrench or a 5/8-
inch open-end wrench. Tighten the pedals securely.
NOTE: Turn the left pedal spindle counterclockwise when threading into the
crank arm; turn the right pedal spindle clockwise when threading into the
crank arm.
5. Install the Display Console
a) Remove (2) Pillips Head Screws from the back of the display. Retain for
later use. Separate the front from the back display. Place the front display
aside on a safe none scratch surface.
b) Insert the cables through the neck.
NOTE: It may be necessary to have one person support and position the
display console while a second person feeds the cables through the neck.
SEAT
POST
SEAT
RELEASE
KNOB
SEAT
TUBE
Step 3
Step 4
Step 5a
Step 5b

c) Slide the display console neck onto the neck brackets of the bike
frame. CAUTION: Be careful not to pinch the wires or your fingers
between the console neck and the bike frame when sliding the con-
sole into place.
d) Secure the display console to the frame with four M8 X 20 Button
Head screws (two screws in front side and two screws in back side).
Using the 4mm hex wrench, tighten all four screws securely.
e) Take the front display to the bike. Attach the cables from the
neck to the front display.
NOTE: If you are installing STAR TRAC Entertainment, Refer to the
PVS Install guide before you perform this step. If not take the Coax
and the DC Power cables and return them back down the neck.
f) Attach front display to back bysliding the bottom of the front display
under the two tabs at the base of the round bar. Press the display
against the round bar and rotate it to the back. Be careful not to
pinch any wires.
g) Secure the front display to the back with (8) m4 x 0.7 x 19mm long
Phillips Head Screws. Us a #2 Phillips head screwdriver and tighten
the screws snug to the plastic.
STAR TRAC E SERIES BIKES OWNER’S GUIDE
13
Step 5c
Heart
Rate
Board
J4
Ground
Wire
Ground Quick
Disconnect
Step 5d
Step 5g
Step 5e
Step 5f
1) Plug in the 12 pin display cable from the neck into the
front display circut board at J4.
2) Plug in the Heart Rate cable from the handlebars into
the HR board.
3) Plug the HR ground into the quick disconnect tab on
the display frame.

6. Leveling the Bike
Place the bike on the floor in the position in which it will be used. Use
the leveling adjusters (located on the underside of the front and rear
feet) to compensate for uneven floor surfaces and to eliminate wob-
bling.
You have now completed assembly of your STAR TRAC E-UB UPRIGHT BIKE.
14
STAR TRAC E SERIES BIKES O
WNER’S GUIDE

STAR TRAC E SERIES BIKES OWNER’S GUIDE
15
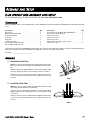
E-RB RECUMBENT BIKE ASSEMBLY AND SETUP
Use the following procedures to unpack and assemble your STAR TRAC E-UB RECUMBENT BIKE.
UNPACKING
Open the shipping carton, remove all parts from the carton and foam inserts, and verify that the following parts are included in your ship-
ment:
Take time now to enter your E SERIES BIKE serial number in the space below. If parts are missing, or if you have any operational ques-
tions, please call Star Trac’s Service Department at (800) 503-1221; have your serial number ready.
Serial No. ___________________________
ASSEMBLY
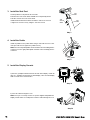
1. Install the Front Foot
NOTE: The front foot assembly has wheels attached to the front
edge. Be sure the wheels face forward when installing the front foot
assembly.
Stand the bike frame upright on the floor. Raise the front end of the
bike frame by placing a 2-inch Styrofoam spacer under the front main
beam. Insert four M10 X 30 button head screws through the holes in
the front foot attachment plate.
Position the front foot assembly under the attachment plate, aligning
the holes in the foot with the four screws.
Using the 6mm hex wrench, secure the front foot assembly to the
frame with the four M10 X 30 button head screws. Tighten all four
screws securely.
2. Install the Rear Foot
NOTE: Be sure the rear foot assembly is positioned with the curved
edge facing forward (similar to the front foot).
Lift up the rear of the bike frame and place the rear foot assembly in
position under the frame, aligning the holes in the foot with the holes
in the frame.
Using the 6mm hex wrench and four M10 X 30 button head screws,
secure the rear foot assembly to the frame. Tighten all four screws
securely.
Description Qty.
Bike Frame . . . . . . . . . . . . . . . . . . . . . . . . . . . . . . . . . . . . . 1
Display Console Assembly . . . . . . . . . . . . . . . . . . . . . . . . . 1
Seat Frame Assembly . . . . . . . . . . . . . . . . . . . . . . . . . . . . 1
Front Foot . . . . . . . . . . . . . . . . . . . . . . . . . . . . . . . . . . . . . . 1
Rear Foot . . . . . . . . . . . . . . . . . . . . . . . . . . . . . . . . . . . . . . 1
Pedals (set of two) . . . . . . . . . . . . . . . . . . . . . . . . . . . . . . . 1
Screw, Button Head, M10 X 30 . . . . . . . . . . . . . . . . . . . . . 8
Description Qty.
Screw, Socket Head, M10 X 10 . . . . . . . . . . . . . . . . . . . . . 4
Screw, Button Head, M8 X 20 . . . . . . . . . . . . . . . . . . . . . . 4
Wrench, Hex, 6mm . . . . . . . . . . . . . . . . . . . . . . . . . . . . . . . 1
Wrench, Hex, 4mm . . . . . . . . . . . . . . . . . . . . . . . . . . . . . . . 1
Wrench, Hex, 3mm . . . . . . . . . . . . . . . . . . . . . . . . . . . . . . . 1
Multi-end Wrench, 10mm, 12mm,15mm . . . . . . . . . . . . . . 1

3. Install the Seat Frame
Carefully position the seat frame over the seat carriage on the bike
frame, aligning the attachment holes in the sides of the seat frame
with the holes in the seat carriage.
Using the 6mm hex wrench and four M10 X 10 socket head screws,
secure the seat frame to the seat carriage. Tighten all four screws
securely.
4. Install the Pedals
Install the pedals on the pedal cranks using a multi-end wrench or a
5/8-inch open-end wrench. Tighten the pedals securely.
NOTE: Turn the left pedal spindle counterclockwise when threading
into the crank arm; turn the right pedal spindle clockwise when
threading into the crank arm.
5. Install the Display Console
a) Remove (2) Pillips Head Screws from the back of the display.
Retain for later use. Separate the front from the back display. Place
the front display aside on a safe none scratch surface
b) Insert the cables through the neck.
NOTE: It may be necessary to have one person support and posi-
tion the display console while a second person feeds the cables
through the neck.
16
STAR TRAC E SERIES BIKES O
WNER’S GUIDE
Step 5b
Step 5a

c) Slide the display console neck onto the neck brackets of the
bike frame. CAUTION: Be careful not to pinch the wires or your
fingers between the console neck and the bike frame when sliding
the console into place.
d) Secure the display console to the frame with four M8 X 20
Button Head screws (two screws in front side and two screws in
back side). Using the 4mm hex wrench, tighten all four screws
securely.
e) Take the front display to the bike. Attach the cables from the
neck to the front display.
NOTE: If you are installing STAR TRAC Entertainment, Refer to the
PVS Install guide before you perform this step. If not take the Coax
and the DC Power cables and return them back down the neck.
f) Attach front display to back by sliding the bottom of the front dis-
play under the two tabs at the base of the round bar. Press the
display against the round bar and rotate it to the back. Be careful
not to pinch any wires.
g) Secure the front display to the back with (8) m4 x 0.7 x 19mm
long Phillips Head Screws. Us a #2 Phillips head screwdriver and
tighten the screws snug to the plastic.
STAR TRAC E SERIES BIKES OWNER’S GUIDE
17
1
2
Step 5c
Step 5e
Step 5f
Step 5g
Heart
Rate
Board
J4
Ground
Wire
Ground
Quick
Disconnect
1) Plug in the 12 pin display cable from the neck into
the front display circut board at J4.
2) Plug in the Heart Rate cable from the handlebars
into the HR board.
3) Plug the HR ground into the quick disconnect tab on
the display frame.

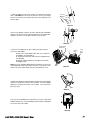
h) Take the Adjustable Heart Rate Bar and attatch the cable from the
hole in the neck to the cable at the end of the Heart Rate mount.
Use (4) M6 x 25mm Button Head Screws and (4) M6 Washers to
mount the Heart Rate bar to the Display neck.
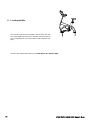
6. Leveling the Bike
Place the bike on the floor in the position in which it will be used. Use
the leveling adjusters (located on the underside of the front and rear
feet) to compensate for uneven floor surfaces and to eliminate wob-
bling.
7. Adjusting the Armrests
If needed, the arm rest angle may be adjusted by turning a screw
under the arm rest. Using the 3mm hex wrench, turn the screw clock-
wise to lower or counterclockwise to raise the arm rest angle. Both
arm rests should be adjusted to the same angle, slightly above level.
You have now completed assembly of your STAR TRAC E-RB RECUMBENT BIKE.
18
STAR TRAC E SERIES BIKES O
WNER’S GUIDE
Adjustment
Screw
Heart
Rate Cables
M6 x 25mm
M6 Washers
Step 5h

STAR TRAC E SERIES BIKES OWNER’S GUIDE
19
O
PERATING
I
NSTRUCTIONS
Operating the STAR TRAC E SERIES BIKE is very easy. Simply mount the bike, begin pedaling, and press QUICK START. Learning
the features and incorporating the STAR TRAC E SERIES BIKE into your members' fitness programs is just as easy. In this chapter,
you will learn the display function and how to get the most out of every STAR TRAC E SERIES BIKE workout.
IMPORTANT: Before operating the bike, you must be familiar with the following equipment limitations:
I Maximum Weight: Your STAR TRAC E SERIES BIKE is designed for a maximum user weight of 350 lbs/159 kg. DO NOT
exceed the maximum user weight.
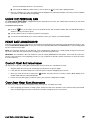
SEAT ADJUSTMENTS
Proper seat positioning helps ensure maximum exercise efficiency and comfort, while reducing the risk of injury. Always adjust the seat
position prior to beginning your workout.
IMPORTANT: When adjusting the seat height for either bike, your knee should never completely “lock out” during any portion of the cycle
pattern.
Adjusting Seat Height (E-UB Upright Bike)
When sitting on the seat of your E-UB Upright Bike, your knees should be almost
fully extended when the pedals are at the lowest point of their rotation. To adjust
the seat height:
NOTE: When raising the seat, the seat will ratchet up when pulled.
When lowering the seat, you must use the seat release knob.
With the pedal at its lowest point of rotation, stand on the pedal with
your knee slightly bent. To raise the seat, carefully lift up on the “nose”
of the saddle and raise the seat to the desired position (the seat release
knob does not need to be pulled out). To lower the seat, carefully pull
out on the seat release knob (located at the rear of the seat tube) and
lower the seat to the desired position. Release the knob, ensuring that
the spring retracts to its original position, and that the seat stays firmly
in place.
Note your height adjustment (shown on the front of the seat post) for
future reference. This number is the highest number visible on the seat
post.
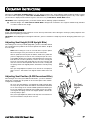
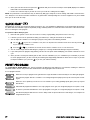
Adjusting Seat Position (E-RB Recumbent Bike)
When sitting on the seat of your E-RB Recumbent Bike, your knees should be
almost fully extended when the pedals are at the lowest point of their rotation.
To adjust the seat position:
Sit on the seat and grasp the seat adjustment handle (located under
the seat). Lift up on the handle, and slide the seat forward or backward
on the seat carriage to the closest available position that allows your
knees to be slightly bent toward the lower pedal. Release the handle,
ensuring that the spring retracts to its original position, and that the
seat stays firmly in place.
Note your height adjustment (shown on the top of the seat rail either in
front of or behind the seat) for future reference.
SEAT
POST
SEAT
RELEASE
KNOB
Red Seat
Adjustment
Handle

20
STAR TRAC E SERIES BIKES O
WNER’S GUIDE
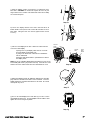
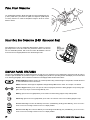
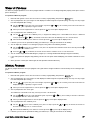
PEDAL STRAP OPERATION
The pedal straps should be adjusted to hold each foot comfortably but firm-
ly on the pedal. Place your foot on the pedal, then adjust the pedal strap as
necessary. Pull the free end of the strap down to tighten. Press the release
button to loosen.
HEART RATE BAR OPERATION (E-RB RECUMBENT BIKE)
After adjusting the seat to a comfortable riding position, grasp the heart rate
grip and press the red release button with your thumb. Pull the heart rate bar
out to a comfortable position, and release the button. BE SURE to return the
heart rate bar to its original position before dismounting the bike.
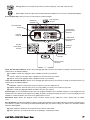
DISPLAY PANEL FEATURES
Your Star Trac E SERIES BIKE is equipped to provide you and your users unlimited exercise opportunities. Experiment with its features
to find the right combination for your fitness regimen. The Display panel provides the operating controls and display elements described
in the following paragraphs, and is consistent for both the E-UB Upright and E-RB Recumbent bikes.
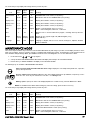
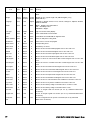
QUICK START Key: Enables the bike for manual operation using a default weight of 155 pounds, a default LEVEL of
"1", and a default time limit of 99 minutes.
NOTE: Default time and weight are adjustable through Manager/Maintenance mode. See Chapter 7 for details.
Numeric Keypad: Allows you to enter specific values for program parameters during program setup. During a pro-
gram, these keys may be used to change difficulty level.
OK Key: (part of numeric keypad) Allows you to confirm selections during program setup and operation.
A
RROW Key: (part of numeric keypad) Allows you to make corrections to values entered during program setup.
Increase L
EVEL Key: Increases the difficulty level from 1 (least difficulty) to 20 (greatest difficulty), in one-level incre-
ments. Current level setting is shown in the L
EVEL display window.
Decrease LEVEL Key: Decreases the difficulty level from 20 (greatest difficulty) to 1 (least difficulty), in one-level incre-
ments. Current level setting is shown in the L
EVEL display window.
RED
RELEASE
BUTTON
La pagina si sta caricando...
La pagina si sta caricando...
La pagina si sta caricando...
La pagina si sta caricando...
La pagina si sta caricando...
La pagina si sta caricando...
La pagina si sta caricando...
La pagina si sta caricando...
La pagina si sta caricando...
La pagina si sta caricando...
La pagina si sta caricando...
La pagina si sta caricando...
La pagina si sta caricando...
La pagina si sta caricando...
La pagina si sta caricando...
La pagina si sta caricando...
-
 1
1
-
 2
2
-
 3
3
-
 4
4
-
 5
5
-
 6
6
-
 7
7
-
 8
8
-
 9
9
-
 10
10
-
 11
11
-
 12
12
-
 13
13
-
 14
14
-
 15
15
-
 16
16
-
 17
17
-
 18
18
-
 19
19
-
 20
20
-
 21
21
-
 22
22
-
 23
23
-
 24
24
-
 25
25
-
 26
26
-
 27
27
-
 28
28
-
 29
29
-
 30
30
-
 31
31
-
 32
32
-
 33
33
-
 34
34
-
 35
35
-
 36
36


Star Trac E Series Recumbent E-RB Manuale del proprietario
- Categoria
- Fitness, ginnastica
- Tipo
- Manuale del proprietario
in altre lingue
Documenti correlati
Altri documenti
-
Schwinn 123 Manuale utente
-
Matrix FC27 Manuale del proprietario
-
Matrix RB317 Manuale del proprietario
-
-
-
Spirit JOHNNY G SPIRIT BIKE Manuale del proprietario
-
Life Fitness Classic Serie Manuale utente
-
-
Fabrication Enterprises AirBike AB900 Manuale del proprietario
-
Pioneer CA500セットの最新アップデート後 Manuale del proprietario