A&D Blood Pressure Monitor UA-767 Manuale utente
- Categoria
- Unità di pressione sanguigna
- Tipo
- Manuale utente
Questo manuale è adatto anche per

Digital Blood Pressure Monitor
Model UA-767
Instruction Manual
Manuel d’instructions
Manual de Instrucciones
Manuale di Istruzioni
UA-767EX-C U4-5659E

ENGLISH 1
ENGLISH
Dear Customers
Congratulations. You have purchased an A&D blood pressure monitor, one of
the most technologically advanced, yet easy to use products available in the
marketplace today.
We strongly recommend you read this instruction manual carefully prior to using
it the first time.
General Information
This device conforms to the European Directive 93/42/EEC for Medical
Products. This is evidenced by the CE mark of conformity accompanied by the
reference number of a designated authority.
This device is designed for monitoring your blood pressure and pulse rate at
home. Therefore, intended use of this device is limited to monitoring blood
pressure and pulse for the general public, except newborns and infants.
Note
1. This device is designed for personal use and not for public use.
2. This device is not designed for measuring newborns or infants. Using this
device on newborns and infants could cause injury to the child. DO NOT
USE on newborns or infants.
Precautions
1. Precision components were used in the
construction of this device. Extremes in
temperature, humidity, direct sunlight, shock
or dust should be avoided.
2. Clean the device with a dry, soft cloth. Never
use thinner, alcohol, benzine, or wet dusters.
3. Avoid folding the cuff tightly or storing the
hose tightly twisted for long periods, as such
treatment may shorten the life of the
components.
4. The device and cuff are not water resistant. Protect the device and cuff from
rain, sweat and water.
5. Measurements may be impaired if the device is used close to televisions,
microwave ovens, cellular telephones, X-ray or other devices with strong
electrical fields.
6. Used equipment, parts and batteries are not treated as ordinary household
waste, and must be disposed of according to the applicable regulations

ENGLISH 2
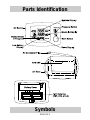
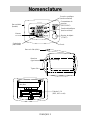
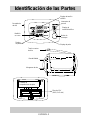
Parts Identification
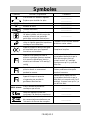
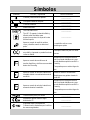
Symbols

ENGLISH 3
Symbols Function / Meaning Treatment
Turns the device on and off. ___________
Guide to install battery ___________
Direct current ___________
SN Serial number ___________
Date of manufacture ___________
Type BF: Device, cuff and tubing
are designed to provide special
protection against electrical
shocks.
___________
Appears when measurement is in
progress and flashes when the
pulse is detected.
Measurement is in progress -
- remain still.
Appears when the battery voltage
is too low for the device to work
properly.
Replace all batteries with
new ones.
Appears if the systolic and diastolic
measurements are within 10
mmHg of each other.
Verify that the air hose is
properly connected and that
the exhaust rate is between 2
and 5 mmHg.
Check for air leaks.
Appears if the pressure value is
unstable due to movement during
the measurement.
Try the measurement again.
Remain very still during the
measurement.
Appears if the pressure value
does not increase during inflation.
Verify that the air hose is
properly connected and that
the exhaust rate is between 2
and 5 mmHg.
Check for air leaks.
Pulse beats per minute ___________
The medical device label by the
EC directive
___________
Registered with the Australian
Communication Authority by the
Trademarks office.
___________

ENGLISH 4
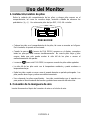
Using the Monitor
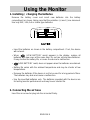
1. Installing / changing the batteries
Remove the battery cover and insert new batteries into the battery
compartment as shown, taking care that the polarities (+) and (-) are observed.
Use only R6P, LR6, AA or similar type batteries.
• Insert the batteries as shown in the battery compartment. If not, the device
will not work.
• When (LOW BATTERY mark) appears in the display, replace all
batteries with new ones at the same time. Do not mix old and new batteries.
It may shorten the battery life, or cause the device to malfunction.
• (LOW BATTERY mark) does not appear when the batteries are drained.
• Battery life varies with the ambient temperature and may be shorter at low
temperatures.
• Remove the batteries if the device is not to be used for a long period of time.
The batteries may leak and cause a malfunction.
• Use the specified batteries only. The batteries provided with the device are
for testing monitor performance and may have a shorter life.
2. Connecting the air hose
Insert the air connector plug into the air socket firmly.

ENGLISH 5
Using the Monitor
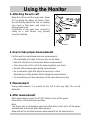
3. Attaching the arm cuff
Wrap the cuff around the upper arm, about
2-3 cm above the elbow, as shown. Place
the cuff directly against the skin, as clothing
may cause a faint pulse, and result in a
measurement error.
Constriction of the upper arm, caused by
rolling up a shirt sleeve, may prevent
accurate readings.
4. How to take proper measurements
For the most accurate blood pressure measurement:
• Sit comfortably at a table. Rest your arm on the table.
• Relax for about five to ten minutes before measurement.
• Place the center of the cuff at the same height as your heart.
• Remain still and keep quiet during measurement.
• Do not measure right after physical exercise or a bath.
Rest twenty or thirty minutes before taking the measurement.
• Try to measure your blood pressure at the same time every day.
5. Measurement
During measurement, it is normal for the cuff to feel very tight. (Do not be
alarmed).
6. After measurement
After measurement, press the START button to turn off the power.
Remove the cuff and record your data.
Note
The device has an automatic power shut-off function, which turns off the power
automatically one minute after measurement.
Allow at least ten minutes between measurements on the same person.

ENGLISH 6
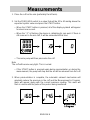
Measurements
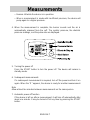
1. Place the cuff on the arm (preferably the left arm).
2. Set the PRESSURE switch to a value that will be 30 to 40 mmHg above the
expected systolic value and press the START button.
• When the START button is pressed, all of the display symbols will appear
for about one second.
• When the " 0 " is flashing, the device is calibrating its zero point. If there is
still some air in the arm cuff, it will be exhausted at this time.
• The micro pump will then pressurize the cuff.
Note
The cuff will become very tight. This is normal.
• If the START button is pressed again during pressurization or during the
measurement, the pump will stop and the air will be released from the cuff.
3. When pressurization is complete, the automatic exhaust mechanism will
gradually reduce the pressure in the cuff and the Measurement in Progress
mark will appear along with the current pressure reading. This mark will
flash in unison with the pulse of the person being monitored.

ENGLISH 7
Measurements
• Remain still while the device is in operation.
• When a measurement is made with insufficient pressure, the device will
pump again to a higher pressure.
4. When the measurement is complete, the buzzer sounds and the air is
automatically released from the cuff. The systolic pressure, the diastolic
pressure readings, and the pulse rate are displayed.
5. Turning the power off
Press the START button to turn the power off. The device will remain in
standby mode.
6. Subsequent measurements
If a subsequent measurement is required, turn off the power and turn it on
again. When the "0 " appears, the device is ready for another measurement.
Note
Allow at least ten minutes between measurements on the same person.
7. Automatic power-off function
If the device is left on after a measurement, it will turn off automatically after
about one minute. It may be turned off at any time by pressing the START
button.

ENGLISH 8
Measurements
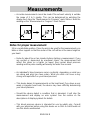
• Accurate measurement cannot be made if the exhaust velocity is outside
the range of 2 to 5 mmHg. This can be determined by watching the
display each time the "Measurement in Progress" mark flashes. Note the
reading as the "Measurement in Progress" mark flashes.
Notes for proper measurement
Sit in a comfortable position. Place the arm to be used for the measurement on a
table or other support so that the center of the cuff will be at the same height as
your heart.
• Relax for about five or ten minutes before starting a measurement. If you
are excited or depressed by emotional stress, the measurement will
reflect this stress as a higher (or lower) than normal blood pressure
reading and the pulse reading will usually be faster than normal.
• An individual’s blood pressure varies constantly, depending on what you
are doing and what you have eaten. What you drink can have a very
strong and rapid effect on your blood pressure.
• This device bases its measurements on the heart beat. If you have a very
weak or irregular heart beat, the device may have difficulty determining
your blood pressure.
• Should the device detect a condition that is abnormal, it will stop the
measurement and display an error symbol. See the section on the
descriptions of display symbols for details.
• This blood pressure device is intended for use by adults only. Consult
with your physician before using this device on a child. A child should not
use this device unattended.

ENGLISH 9
About Blood Pressure
1. What is blood pressure?
Blood pressure is the force exerted by blood against the walls of the arteries.
Systolic pressure occurs when the heart contracts. Diastolic pressure occurs
when the heart expands.
Blood pressure is measured in millimeters of mercury (mmHg). One's natural
blood pressure is represented by the fundamental pressure, which is measured
first thing in the morning while one is still at rest and before taking food or drink.
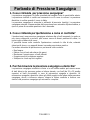
2. What is hypertension and how is it controlled?
Hypertension is abnormally high blood pressure. If left unattended, it can cause
many health problems including stroke and heart attack.
Hypertension can be controlled by altering lifestyle, avoiding stress and with
medication under a doctor’s supervision.
To help prevent hypertension or keep it under control:
• Do not smoke.
• Reduce salt and fat intake.
• Maintain proper weight.
• Exercise regularly.
• Have regular physical checkups.
3. Why measure blood pressure at home?
Blood pressure measured at a clinic or doctor's office may cause apprehension
or fear and can produce an elevated reading, 25 to 30 mmHg higher than that
measured at home. Home measurement reduces the effects of outside
influences on blood pressure readings, supplements the doctor's readings and
provides a more accurate, complete blood pressure history.

ENGLISH 10
About Blood Pressure
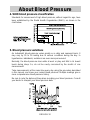
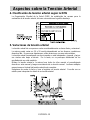
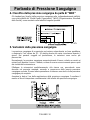
4. WHO blood pressure classification
Standards for assessment of high blood pressure, without regard to age, have
been established by the World Health Organization (WHO), as shown in the
chart below.
5. Blood pressure variations
An individual’s blood pressure varies greatly on a daily and seasonal basis. It
may vary by 30 to 50 mmHg due to various conditions during the day. In
hypertensive individuals, variations are even more pronounced.
Normally, the blood pressure rises while at work or play and falls to its lowest
levels during sleep. So, do not be overly concerned by the results of one
measurement.
Take measurements at the same time every day using the procedure described
in this manual, and know your normal blood pressure. Multiple readings give a
more comprehensive blood pressure history.
Be sure to note the date and time when recording your blood pressure. Consult
your doctor to interpret your blood pressure data.

ENGLISH 11
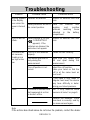
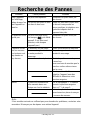
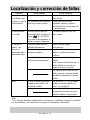
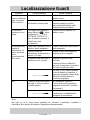
Troubleshooting
Problem Probable cause Corrective action
Batteries are drained. Replace all batteries with new
ones.
Nothing appears
in the display,
even when the
power is turned
on.
Battery terminals are not in
the correct position.
Place the batteries with
negative and positive
terminals matching those
indicated in the battery
compartment.
The cuff will not
inflate.
Battery voltage is too low.
( , LOW BATTERY
mark appears). If the
batteries are drained, the
mark does not appear.
Replace all batteries with new
ones.
The cuff is not fastened
properly.
Fasten the cuff correctly.
You moved your arm or
body during the
measurement.
Make sure you remain very
still and quiet during the
measurement.
The cuff position is not
correct.
Adjust the cuff position.
Raise your hand so that the
cuff is at the same level as
your heart.
The device will
not measure.
Readings are
too high or too
low.
If you have a very weak or
irregular heat beat, the device
may have difficulty in deter-
mining your blood pressure.
The value is different from
that measured at a clinic
or doctor’s office.
See “3. Why measure blood
pressure at home” on page 9.
Other
Remove the batteries. Place
them back in correctly, and try
the measurement again.
Note
If the actions described above do not solve the problem, contact the dealer.

ENGLISH 12
Do not attempt to repair the device yourself.
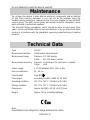
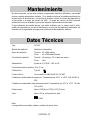
Maintenance
Do not open the device. It uses delicate electronic components and an intricate
air unit that could be damaged. If you can not fix the problem using the
troubleshooting instructions, request service from your supplier or from the A&D
service group. The A&D service group will provide technical information, spare
parts and units to authorized suppliers.
The technical testing procedures, which should be done at least every three
years, can be performed either by the manufacturer or by an authorized repair
service in accordance with the regulations governing manufacturing of medical
products.
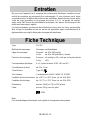
Technical Data
Type UA-767
Measurement method Oscillometric measurement
Measurement range Pressure : 20 - 280 mmHg
Pulse : 40 - 200 beats / minute
Measurement accuracy Pressure : ±3 mmHg or 2%, whichever is greater
Pulse : ±5%
Power supply 4 x 1.5V batteries (R6P, LR6, or AA)
Arm circumference 22 - 32 cm
Classification Type BF
Clinical test According to ANSI / AAMI SP-10 1987
Operating condition ?10 °C to ?40 °C / 30%RH to 85 %RH
Storage condition ?20 °C to ?70 °C / 30%RH to 85 %RH
Dimensions Approx. 164 [W] x 67 [H] x 111 [D] mm
Weight Approx. 320 g, excluding batteries
Note
Specifications are subject to change without prior notice.

FRANÇAIS 1
FRANÇAIS
Chers clients
Nous vous remercions de votre confiance et nous vous garantissons que le moniteur de
tension artérielle A&D que vous venez d’acquérir, tout en étant d’emploi facile, est sur le
plan technologique l’un des appareils les plus avancés que vous puissiez trouver sur le
marché.
Nous vous recommandons vivement de lire attentivement ce mode d’emploi avant d’utiliser
l’appareil pour la première fois.
Observations d’ordre général
Cet appareil est conforme à la directive européenne 93/42/EEC sur les produits médicaux
ce que prouve la marque CE de conformité accompagnée du numéro de référence de
l'autorité désignée.
Cet appareil est conçu pour le contrôle de la tension artérielle et de la fréquence caridaque
(pouls) à domicile, il est donc destiné au grand public, nouveaux-nés et jeunes enfants
exclus.
Note:
1. Cet appareil est conçu pour un usage personnel et non pas pour un usage public.
2. Cet appareil n’ est pas conçu pour les nouveaux-nés ni pour les jeunes enfants chez
lesquels il pourrait provoquer des dommages corporels. IL EST INTERDIT d’utiliser cet
appareil pour mesure la tension ou le pouls des nouveaux-nés ou des enfants en bas
âge.
Précautions
1. Cet appareil est équipé de pièces de précision. C'est
pourquoi il faut éviter de le laisser à de fortes
températures, une humidité extrême et au soleil. De même
il faut éviter de lui donner des chocs ou de laisser la
poussière s'y accumuler.
2. Nettoyez cet appareil avec un chiffon doux et sec.
N'utilisez jamais de diluant, d'alcool, de benzène ou de
chiffons mouillés.
3. Evitez de tordre le manchon ou de laisser le tuyau trop
plié pendant de longues périodes ce qui pourraient avoir
une influence néfaste sur la durée de vie des pièces.
4. L’appareil de même que le manchon ne sont pas étanches. Gardez-les donc à l’abri de la
pluie et évitez de les mouiller (notamment avec la transpiration).
5. Les mesures peuvent être faussées si l'appareil est utilisé près d'un poste de télévision, un
four à micro ondes, un téléphone cellulaire, des appareils à rayon X ou tout autre appareil
dégageant de forts champs électriques.
6. L'appareil usé, les pièces et les piles ne doivent pas être jetés comme les déchets
ménagers ordinaires, ils doivent être traités conformément à la législation en vigueur.

FRANÇAIS 2
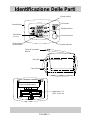
Nomenclature
Pression systolique
(tension maxima)
Commutateur de
pression
(PRESSURE)
Pression diastolique
(tension minima)
Raccord d’air
(femelle)
Symbole de
piles faibles
Pouls
Raccord d’air (mâle)
Manchon
(type brassard)
Tuyau d’air
Piles de 1,5 V
(R6P, LR6 ou AA)
Bouton de départ
(START)
Couvercle du logement
des piles
Mesure
en cours

FRANÇAIS 3
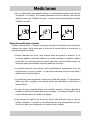
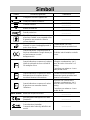
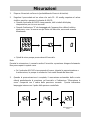
Symboles
Symboles Fonction / Signification Traitement
Pour allumer ou éteindre l’appareil.
___________
Répères pour installer les piles. ___________
Courant continu
___________
SN
Numéro de série
___________
Date de fabrication
___________
Type BF : L'appareil, le manchon et
les tubes isolants ont été conçus de
manière à fournir une protection
particulière contre les électrochocs.
___________
Apparaît lorsque la mesure est en
cours et clignote quand les impulsions
cardiaques sont détectées.
L’appareil est en train de mesurer
la tension: restez calme.
Apparaît lorsque la tension des piles
est trop faible pour que l’appareil
fonctionne correctement.
Remplacez les piles.
Apparaît si la différence entre la
pression systolique (tension maxima)
et la pression diastolique (tension
minima) est inférieure à 10 mmHg (1
cmHg)
Vérifiez que le tuyau d’air est
correctement branché et que le
débit d’évacuation d’air est
compris entre 2 et 5 mmHg/s.
Assurez-vous qu’il n’y a pas de
fuite d’air.
Apparaît en cas de fluctuation de la
pression due à un mouvement
pendant la mesure.
Recommencez la mesure.
Restez parfaitement tranquille
pendant la mesure.
Apparaît lorsque la pression
n’augmente pas pendant le
gonflement du manchon.
Vérifiez que le tuyau d’air est
correctement branché et que le
débit d’air est compris entre 2 et 5
mmHg/s. Assurez-vous qu’il n’y a
pas de fuite d’air.
IMPUL./minuto
Pouls: nombre de pulsations
cardiaques par minute
___________
Label des appareils médicaux
conformes à la directive européenne.
___________
Modèle déposé auprès des autorités
de communication australiennes par
l’entremise du Bureau des marques.
___________

FRANÇAIS 4
Utilisation de l’appareil
1. Mise en place et remplacement des piles
Enlevez le couvercle du logement des piles et insérez quatre piles neuves dans le
logement en respectant bien les polarités (+) et (-) indiquées. N’utilisez que des piles
LR6, R6P, AA ou de type similaire.
ATTENTION
• Veillez à insérer les piles dans le bon sens, sinon l’appareil ne fonctionnera
pas.
• Lorsque la marque (pile faible) apparaît sur l'écran, changez les quatre
piles par des neuves. Ne mélangez pas les piles neuves et anciennes car
cela pourrait raccourcir leur durée de vie ou détériorer l'appareil.
• La marque (pile faible) n'apparaît pas lorsque les piles sont épuisées.
• La durée de vie des piles varie avec la température ambiante et peut être
raccourcie par des températures basses.
• Retirez les piles lorsque l'appareil n'est pas utilisé pendant un moment. Les
piles pourraient fuir ce qui entraînerait un mauvais fonctionnement de
l'appareil.
• Utilisez uniquement les piles spécifiées. Les piles fournies avec l'appareil
sont pour tester les performances de l'écran d’affichage et peuvent dont
avoir une courte durée de vie.
2. Branchement du tuyau d’air
Insérez fermement le raccord d’air mâle dans le raccord d’air femelle.

FRANÇAIS 5
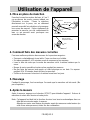
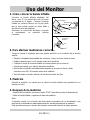
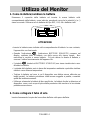
Utilisation de l’appareil
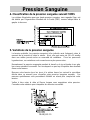
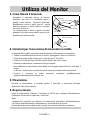
3. Mise en place du manchon
Enroulez le manchon autour du bras, à 2 ou 3
cm au-dessus du coude, comme indiqué sur
l’illustration ci-contre. Placez le manchon
directement sur la peau, car un vêtement
pourrait assourdir les pulsations et provoquer
une erreur de mesure. Evitez également de
remonter la manche, car elle comprimerait le
bras ce qui pourrait aussi provoquer une
erreur de mesure.
4. Comment faire des mesures correctes
Pour une meilleure précision des mesures de la pression sanguine :
• S'asseoir confortablement à une table. Poser son bras sur la table.
• Se relaxer pendant 5 à 10 minutes avant de commencer les mesures.
• Lever le bras de sorte que le centre du manchon soit à la même hauteur que le
coeur.
• Bouger le moins possible et rester calme pendant les mesures.
• Ne pas faire de mesure juste après un effort physique ou un bain. Se reposer
pendant 20 à 30 minutes avant de faire les mesures.
• S’efforcer de mesurer la tension à la même heure tous les jours.
5. Mesurage
Pendant le mesurage, il est normal que l'on sente que le manchon est très serré. (Ne
pas s'inquiéter.)
6. Après la mesure
Après la mesure, appuyez sur le bouton (START) pour éteindre l’appareil. Enlevez le
manchon et notez votre tension et votre pouls.
Note: Cet appareil est doté de la fonction de mise hors tension automatique dans un
délai de trois minutes après la mesure.
Attendez au moins une dizaine de minutes avant de remesurer votre tension (ou
celle d’une autre personne) à des fins de confirmation.
Manche relevée
comprimant le bras
Manchon
Bras gauche
Tuyau
Coude
2 à 3 cm

FRANÇAIS 6
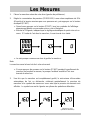
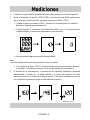
Les Mesures
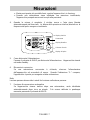
1. Placez le manchon autour de votre bras (gauche de préférence).
2. Réglez le commutateur de pression (PRESSURE) à une valeur supérieure de 30 à
40 mmHg à la tension maxima que vous pensez avoir, puis appuyez sur le bouton
de départ (START).
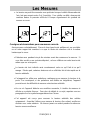
?
Quand vous appuyez sur le bouton (START), tous les symboles de l’affichage
apparaissent durant une seconde environ, puis s’éteignent.
?
Ensuite le“0”clignote, indiquant que le réglage automatique du point zéro est en
cours. S’il reste de l’air dans le manchon, il sera évacué à ce stade.
?
La mini-pompe commencera alors à gonfler le manchon.
Note:
Le manchon serre le bras très fort: cela est normal.
?
Si vous appuyez de nouveau sur le bouton (START) pendant le gonflement du
manchon ou pendant la mesure, la pompe s’arrêtera aussitôt et l’air sera
évacué du manchon.
3. Une fois que le manchon est complètement gonflé, le mécanisme d’évacuation
automatique de l’air se déclenche, réduisant graduellement la pression du
manchon et le symbole de mesure en cours ainsi que la pression du moment sont
affichés. Le symbole se met à clignoter au rythme des pulsations détectées.
Mesure en cours
(pulsations détectées)

FRANÇAIS 7
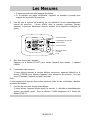
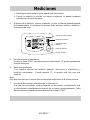
Les Mesures
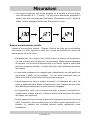
?
Restez tranquille tant que l’appareil fonctionne.
?
Si la pression est jugée insuffisante, l’appareil se remettra à pomper pour
augmenter la pression du manchon.
4. Une fois que la mesure est terminée, un son retentit et l’air est automatiquement
évacué du manchon. L’écran affiche alors la pression systolique (tension
maxima), la pression diastolique (tension minima) et la fréquence cardiaque (le
pouls).
5. Mise hors tension de l’appareil
Appuyez sur le bouton (START) pour mettre l’appareil hors tension. L’appareil
s’éteint.
6. Continuation des mesures
Si vous désirez mesurer la tension d’autres personnes, appuyez d’abord sur la
touche (POWER) pour éteindre l’appareil, puis allumez-le de nouveau. Une fois
que le“0”apparaît, l’appareil est prêt à mesurer.
Note:
Si vous remesurez la tension d’une même personne à des fins de confirmation, attendez
au moins dix minutes.
7. Fonction de mise hors tension automatique
Si vous laissez l’appareil allumé après la mesure, il s’éteindra automatiquement
environ une minute après. Pour le rallumer, il suffit d’appuyer sur le bouton de
départ (START).
Tension maxima
Commutateur de pression
(PRESSURE)
Tension minima
Bouton de départ
(START)
Pouls
La pagina sta caricando ...
La pagina sta caricando ...
La pagina sta caricando ...
La pagina sta caricando ...
La pagina sta caricando ...
La pagina sta caricando ...
La pagina sta caricando ...
La pagina sta caricando ...
La pagina sta caricando ...
La pagina sta caricando ...
La pagina sta caricando ...
La pagina sta caricando ...
La pagina sta caricando ...
La pagina sta caricando ...
La pagina sta caricando ...
La pagina sta caricando ...
La pagina sta caricando ...
La pagina sta caricando ...
La pagina sta caricando ...
La pagina sta caricando ...
La pagina sta caricando ...
La pagina sta caricando ...
La pagina sta caricando ...
La pagina sta caricando ...
La pagina sta caricando ...
La pagina sta caricando ...
La pagina sta caricando ...
La pagina sta caricando ...
La pagina sta caricando ...
La pagina sta caricando ...
-
 1
1
-
 2
2
-
 3
3
-
 4
4
-
 5
5
-
 6
6
-
 7
7
-
 8
8
-
 9
9
-
 10
10
-
 11
11
-
 12
12
-
 13
13
-
 14
14
-
 15
15
-
 16
16
-
 17
17
-
 18
18
-
 19
19
-
 20
20
-
 21
21
-
 22
22
-
 23
23
-
 24
24
-
 25
25
-
 26
26
-
 27
27
-
 28
28
-
 29
29
-
 30
30
-
 31
31
-
 32
32
-
 33
33
-
 34
34
-
 35
35
-
 36
36
-
 37
37
-
 38
38
-
 39
39
-
 40
40
-
 41
41
-
 42
42
-
 43
43
-
 44
44
-
 45
45
-
 46
46
-
 47
47
-
 48
48
-
 49
49
-
 50
50


A&D Blood Pressure Monitor UA-767 Manuale utente
- Categoria
- Unità di pressione sanguigna
- Tipo
- Manuale utente
- Questo manuale è adatto anche per
in altre lingue
Documenti correlati


Altri documenti
-
 AND UA-767 Manuale utente
-
uebe Visomat comfort XXL Instructions For Use Manual
-
Beurer BM49 VOICE Manuale del proprietario
-
-
visomat comfort eco Manuale del proprietario
-
visomat comfort 20/40 Istruzioni per l'uso
-
-
Gima 32771 Manuale del proprietario
