Furuno GP1971F Manuale utente
- Categoria
- Navigatori
- Tipo
- Manuale utente
Questo manuale è adatto anche per

FURUNO Authorized Distributor/Dealer
9-52 Ashihara-cho,
Nishinomiya, 662-8580, JAPAN
OPERATOR'S MANUAL
: FEB. 2018
All rights reserved. Printed in Japan
( TEHI ) GP-1871F/1971F
Pub. No. OME-44980-D
(Elemental Chlorine Free)
The paper used in this manual
is
elemental chlorine free.
A
D
www.furuno.com
GPS/WAAS COLOR
CHART PLOTTER
with FISH FINDER
Model
GP-1871F
GP-1971F
: APR. 13, 2020
00019433513

i
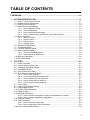
TABLE OF CONTENTS
FOREWORD.................................................................................................................. vii
1. SYSTEM INTRODUCTION ....................................................................................1-1
1.1 How to Turn the Power On/Off ...................................................................................1-1
1.2 Brilliance/Color Adjustments.......................................................................................1-1
1.3 How to Lock the Screen .............................................................................................1-2
1.4 Home Screen and Displays........................................................................................1-2
1.4.1 How to select a display...................................................................................1-2
1.4.2 How to add pages ..........................................................................................1-2
1.4.3 How to edit and delete pages.........................................................................1-3
1.4.4 How to switch screen operation in multi-section layouts ................................1-4
1.5 Menu Overview...........................................................................................................1-4
1.5.1 Slide-out menu ...............................................................................................1-5
1.5.2 Layered menu ................................................................................................1-5
1.5.3 Pop up menu ..................................................................................................1-5
1.5.4 Settings menu ................................................................................................1-5
1.6 Data Area (Data Boxes) .............................................................................................1-7
1.7 Countdown Beeps ......................................................................................................1-8
1.8 Function Gestures Setup............................................................................................1-8
1.9 Man Overboard (MOB)...............................................................................................1-8
1.9.1 How to mark MOB position.............................................................................1-8
1.9.2 How to erase an MOB mark ...........................................................................1-9
1.10 Wireless LAN Setup ...................................................................................................1-9
1.11 Simulation Mode.........................................................................................................1-9
2. PLOTTER...............................................................................................................2-1
2.1 Plotter Overview .........................................................................................................2-1
2.2 How to Select a Chart Type........................................................................................2-1
2.3 Changing the Display Range......................................................................................2-2
2.4 Orientation Modes ......................................................................................................2-2
2.5 How to Move the Charts.............................................................................................2-2
2.6 Own Ship Icon Display Settings .................................................................................2-2
2.6.1 COG vector settings .......................................................................................2-3
2.6.2 How to show/hide the heading line.................................................................2-3
2.6.3 How to change the own ship icon...................................................................2-3
2.6.4 How to offset the own ship icon......................................................................2-4
2.6.5 How to restore factory defaults ......................................................................2-4
2.7 Cursor Data ................................................................................................................2-4
2.8 Point to Point Measurements .....................................................................................2-4
2.9 Chart Display Angle....................................................................................................2-5
2.10 C-MAP Chart Information ...........................................................................................2-5
2.11 Radar Overlay ............................................................................................................2-6
2.12 NAVpilot Operations...................................................................................................2-6
2.12.1 How to show the autopilot’s course and destination on-screen .....................2-6
2.12.2 How to use the autopilot for navigation ..........................................................2-7
2.13 Weather Overlay.........................................................................................................2-7
2.14 Tide Information..........................................................................................................2-8
2.14.1 How to show the tide graph............................................................................2-8
2.14.2 How to view tidal current information .............................................................2-9
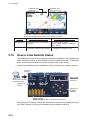
2.15 How to View Satellite Status.....................................................................................2-10

TABLE OF CONTENTS
ii
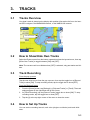
3. TRACKS.................................................................................................................3-1
3.1 Tracks Overview ........................................................................................................ 3-1
3.2 How to Show/Hide Own Tracks ................................................................................. 3-1
3.3 Track Recording......................................................................................................... 3-1
3.4 How to Set Up Tracks ................................................................................................ 3-1
3.5 How to Delete Tracks................................................................................................. 3-2
3.5.1 How to delete an individual track ................................................................... 3-3
3.5.2 How to delete a section of track..................................................................... 3-3
3.5.3 How to delete tracks automatically................................................................. 3-3
3.5.4 How to delete all tracks.................................................................................. 3-3
4. POINTS AND POLYLINES ....................................................................................4-1
4.1 Points and Event Marks ............................................................................................. 4-1
4.2 Points/Event Marks Setup.......................................................................................... 4-1
4.3 Point/Event Mark Creation ......................................................................................... 4-2
4.3.1 How to create a point ..................................................................................... 4-2
4.3.2 How to create an event mark ......................................................................... 4-2
4.4 Points List Overview................................................................................................... 4-3
4.4.1 How to view the points list.............................................................................. 4-3
4.4.2 How to search the points list .......................................................................... 4-3
4.4.3 How to sort the points list............................................................................... 4-3
4.4.4 How to filter the points list .............................................................................. 4-3
4.5 How to Move a Point .................................................................................................. 4-3
4.6 How to Delete Points.................................................................................................. 4-4
4.6.1 How to delete a point from the screen ........................................................... 4-4
4.6.2 How to delete points from the Points List....................................................... 4-4
4.6.3 How to delete all points or specified points.................................................... 4-4
4.7 How to Edit Points...................................................................................................... 4-4
4.7.1 How to edit a point on-screen ........................................................................ 4-4
4.7.2 How to edit a point from the [Points] list......................................................... 4-5
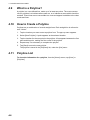
4.8 How to Show or Hide All Points ................................................................................. 4-5
4.9 What is a Polyline?..................................................................................................... 4-6
4.10 How to Create a Polyline............................................................................................ 4-6
4.11 Polyline List ................................................................................................................ 4-6
4.12 Polyline Color Setup................................................................................................... 4-7
4.13 Finding Polylines on the Map..................................................................................... 4-7
4.14 How to Delete Polylines ............................................................................................. 4-8
4.15 How to Delete a Vertex .............................................................................................. 4-8
5. ROUTES.................................................................................................................5-1
5.1 What is a Route?........................................................................................................ 5-1
5.2 How to Create Routes................................................................................................ 5-1
5.2.1 Quick routes...................................................................................................5-1
5.2.2 Planned routes with waypoints....................................................................... 5-1
5.3 How to Use Easy Routing .......................................................................................... 5-2
5.4 Routes List .................................................................................................................5-3
5.4.1 How to display the Routes List....................................................................... 5-3
5.4.2 How to search the routes list.......................................................................... 5-4
5.4.3 How to sort the routes list............................................................................... 5-4
5.4.4 How to edit route details................................................................................. 5-4
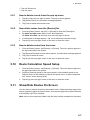
5.5 Extending Routes On-screen..................................................................................... 5-5
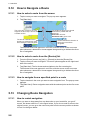
5.6 Creating Route Points On-screen .............................................................................. 5-5
5.7 Moving Route Points On-screen ................................................................................ 5-6
5.8 How to Delete a Route Point...................................................................................... 5-6
5.8.1 How to delete a route point from the screen .................................................. 5-6
5.8.2 How to delete a route point from the menu.................................................... 5-6

TABLE OF CONTENTS
iii
5.9 How to Delete Routes.................................................................................................5-6
5.9.1 How to delete a route from the pop up menu .................................................5-7
5.9.2 How delete routes from the [Routes] list ........................................................5-7
5.9.3 How to delete routes from the menu ..............................................................5-7
5.10 Route Calculation Speed Setup .................................................................................5-7
5.11 Show/Hide Routes On-Screen ...................................................................................5-7
5.12 How to Navigate a Route............................................................................................5-8
5.12.1 How to select a route from the screen............................................................5-8
5.12.2 How to select a route from the [Routes] list....................................................5-8
5.12.3 How to navigate from a specified point in a route ..........................................5-8
5.13 Changing Route Navigation........................................................................................5-8
5.13.1 How to restart navigation................................................................................5-8
5.13.2 How to follow a route in reverse order............................................................5-9
5.13.3 How to stop following a route .........................................................................5-9
5.13.4 How to set the XTE (off-course) width............................................................5-9
5.13.5 How to adjust the size of the arrival notification area ...................................5-10
5.13.6 How to enable/disable the arrival notification ...............................................5-10
5.13.7 How to keep or discard a route destination once you arrive ........................5-10
6. FISH FINDER.........................................................................................................6-1
6.1 Fish Finder Display.....................................................................................................6-1
6.2 How to Set Up the Transducer ...................................................................................6-1
6.3 Start/Stop Transmission .............................................................................................6-2
6.4 How to Select a Display..............................................................................................6-2
6.4.1 Single/dual frequency displays and zoom displays ........................................6-2
6.4.2 A-scope display ..............................................................................................6-3
6.4.3 Bottom discrimination display.........................................................................6-3
6.5 Automatic Fish Finder.................................................................................................6-4
6.5.1 How to select the automatic mode .................................................................6-5
6.5.2 How to adjust the gain in the auto mode ........................................................6-5
6.5.3 How to offset the bottom echo........................................................................6-5
6.6 Manual Fish Finder Operation ....................................................................................6-5
6.6.1 How to select the manual mode .....................................................................6-6
6.6.2 How to select a display range ........................................................................6-6
6.6.3 How to shift the range ....................................................................................6-6
6.6.4 How to adjust the gain....................................................................................6-6
6.7 How to Reduce Clutter ...............................................................................................6-6
6.8 How to Reduce Interference.......................................................................................6-6
6.9 How to Erase Weak Echoes.......................................................................................6-7
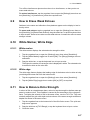
6.10 White Marker, White Edge..........................................................................................6-7
6.10.1 White marker ..................................................................................................6-7
6.10.2 White edge .....................................................................................................6-7
6.11 How to Balance Echo Strength...................................................................................6-7
6.12 Zero Line ....................................................................................................................6-8
6.13 Picture Advance Speed..............................................................................................6-8
6.14 Depth/Time Measurements ........................................................................................6-8
6.15 How to Show Past Echoes .........................................................................................6-9
6.16 Fish Finder Display Settings.......................................................................................6-9
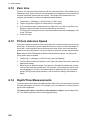
6.17 ACCU-FISH™ ............................................................................................................6-9
6.17.1 Considerations for ACCU-FISH™ ..................................................................6-9
6.17.2 How to activate ACCU-FISH™, select display information ..........................6-10
6.17.3 Fish size correction ......................................................................................6-10
6.17.4 How to filter the ACCU-FISH display............................................................6-11
6.18 RezBoost[trade]........................................................................................................6-11
6.19 Fish Finder Notifications...........................................................................................6-11
6.19.1 How to set the detection level ......................................................................6-12

TABLE OF CONTENTS
iv
6.19.2 How to set the notification for fish near the seabed ..................................... 6-12
6.19.3 How to set the fish size notification.............................................................. 6-12
6.19.4 How to set the seabed type notification ....................................................... 6-12
6.20 Restoring Factory Defaults....................................................................................... 6-13
7. RADAR...................................................................................................................7-1
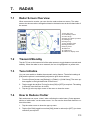
7.1 Radar Screen Overview ............................................................................................. 7-1
7.2 Transmit/Standby ....................................................................................................... 7-1
7.3 Tune Initialize .............................................................................................................7-1
7.4 How to Reduce Clutter ............................................................................................... 7-1
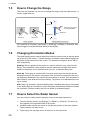
7.5 How to Change the Range......................................................................................... 7-2
7.6 Changing Orientation Modes ..................................................................................... 7-2
7.7 How to Select the Radar Sensor................................................................................ 7-2
7.8 Show/Hide the Own Ship Icon ................................................................................... 7-3
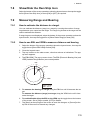
7.9 Measuring Range and Bearing .................................................................................. 7-3
7.9.1 How to estimate the distance to a target........................................................ 7-3
7.9.2 How to use EBL and VRM to measure distance and bearing........................ 7-3
7.9.3 How to change the bearing reference............................................................ 7-4
7.10 How to Shift the Screen ............................................................................................. 7-4
7.11 How to Use Echo Stretch ........................................................................................... 7-4
7.12 How to Use the Sentry Zones .................................................................................... 7-4
7.13 How to Change Echo Colors...................................................................................... 7-5
7.14 Changing Background Color ...................................................................................... 7-5
7.15 Bearing Scale Reference Setup................................................................................. 7-6
7.16 Radar [Initial Setup] Menu.......................................................................................... 7-6
7.17 Restoring Factory Defaults......................................................................................... 7-7
8. AIS/DSC OPERATIONS ........................................................................................8-1
8.1 AIS Overview ............................................................................................................. 8-1
8.2 AIS Target Information............................................................................................... 8-1
8.3 AIS Target Symbols ................................................................................................... 8-1
8.4 AIS Activation Range ................................................................................................. 8-1
8.5 How to Ignore Slow Targets....................................................................................... 8-2
8.6 How to Show AIS Target Data ................................................................................... 8-2
8.7 Show/Hide the AIS Target ID ..................................................................................... 8-2
8.8 AIS List Overview....................................................................................................... 8-2
8.8.1 How to show the AIS target list ...................................................................... 8-2
8.8.2 How to sort the AIS target list......................................................................... 8-2
8.8.3 AIS list sub menu operations ......................................................................... 8-3
8.9 CPA and TCPA Notifications...................................................................................... 8-3
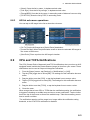
8.10 AIS SART Operations ................................................................................................ 8-4
8.11 ICOM Data ................................................................................................................. 8-4
8.12 DSC Message Information ......................................................................................... 8-4
8.13 Show/Hide the DSC Symbols .................................................................................... 8-4
8.14 DSC Device Selection................................................................................................ 8-5
8.15 DSC Message Information ......................................................................................... 8-5
8.16 Show/Hide the DSC Target ID ................................................................................... 8-5
8.17 DSC List Overview ..................................................................................................... 8-6
8.17.1 How to show the DSC target list .................................................................... 8-6
8.17.2 How to sort the DSC target list....................................................................... 8-6
8.17.3 DSC list sub menu operations........................................................................ 8-6
8.17.4 How to delete DSC messages ....................................................................... 8-7
9. INSTRUMENT DISPLAY........................................................................................9-1
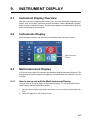
9.1 Instrument Display Overview ..................................................................................... 9-1
9.2 Instruments Display.................................................................................................... 9-1

TABLE OF CONTENTS
v
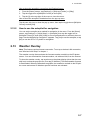
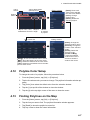
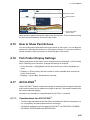
9.3 Multi-Instrument Display .............................................................................................9-1
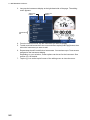
9.3.1 How to set up and edit the Multi-Instrument Display ......................................9-1
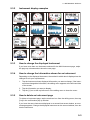
9.3.2 Instrument display examples..........................................................................9-3
9.3.3 How to change the displayed instrument .......................................................9-3
9.3.4 How to change the information shown for an instrument ...............................9-3
9.3.5 How to delete an instrument page..................................................................9-3
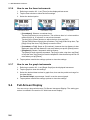
9.3.6 How to use the timer instruments...................................................................9-4
9.3.7 How to use the graph instruments..................................................................9-4
9.4 Full-Screen Display ....................................................................................................9-4
10. NOTIFICATIONS .................................................................................................10-1
10.1 What Are Notifications?............................................................................................10-1
10.2 How to Access the Notifications Menu .....................................................................10-1
10.3 Notification Buzzer Setup .........................................................................................10-1
10.4 Navigation Notifications............................................................................................10-2
10.4.1 Grounding notification ..................................................................................10-2
10.4.2 Depth notification..........................................................................................10-2
10.4.3 Anchor notification........................................................................................10-2
10.4.4 XTD (Cross-track distance) notification........................................................10-2
10.4.5 Arrival notification .........................................................................................10-3
10.4.6 Speed notification.........................................................................................10-3
10.4.7 Trip notification .............................................................................................10-4
10.4.8 Temperature notification...............................................................................10-4
10.4.9 Shear notification..........................................................................................10-4
10.5 Tank Notifications.....................................................................................................10-4
10.6 Wind Notifications.....................................................................................................10-5
10.7 Restoring Notification Defaults .................................................................................10-5
10.8 Notifications List .......................................................................................................10-5
10.8.1 How to view the notifications list...................................................................10-6
10.8.2 How to filter the notifications list ...................................................................10-6
10.8.3 How to save the notifications list to a microSD card ....................................10-6
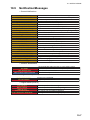
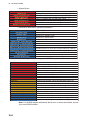
10.9 Notification/Messages ..............................................................................................10-7
11. OTHER SETTINGS/FUNCTIONS........................................................................11-1
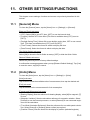
11.1 [General] Menu.........................................................................................................11-1
11.2 [Units] Menu .............................................................................................................11-1
11.3 File Management......................................................................................................11-2
11.3.1 How to save points, routes and tracks to the microSD card.........................11-2
11.3.2 How to load points, routes and tracks from a microSD card ........................11-2
11.3.3 How to save menu settings to the microSD card .........................................11-2
11.3.4 How to load menu settings from a microSD card .........................................11-3
11.3.5 How to save the notification log to the microSD card...................................11-3
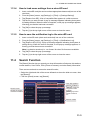
11.4 Search Function .......................................................................................................11-3
11.5 How to Take a Screenshot .......................................................................................11-4
11.5.1 How to save screenshots to the microSD card ............................................11-4
11.5.2 How to delete screenshots ...........................................................................11-4
11.6 How to Use the Mirroring Function...........................................................................11-4
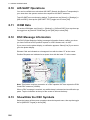
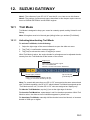
12. SUZUKI GATEWAY.............................................................................................12-1
12.1 Troll Mode.................................................................................................................12-1
12.1.1 Activating/deactivating Troll Mode................................................................12-1
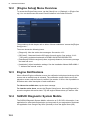
12.2 [Engine Setup] Menu Overview................................................................................12-2
12.3 Engine Notifications..................................................................................................12-2
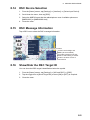
12.4 SUZUKI Diagnostic System Mobile..........................................................................12-2
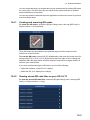
12.4.1 Creating and scanning QR codes ................................................................12-3
12.4.2 Viewing stored QR code files on your GP-1x71F.........................................12-3


vii
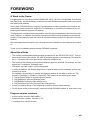
FOREWORD
A Word to the Owner
Congratulations on your choice of the FURUNO GP-1871F, GP-1971F GPS/WAAS Chart Plotter
with Fish Finder. We are confident you will see why the FURUNO name has become synonymous
with quality and reliability.
Since 1948, FURUNO Electric Company has enjoyed an enviable reputation for innovative and
dependable marine electronics equipment. This dedication to excellence is furthered by our ex-
tensive global network of agents and dealers.
This equipment is designed and constructed to meet the rigorous demands of the marine environ-
ment. However, no machine can perform its intended function unless operated and maintained
properly. Please carefully read and follow the recommended procedures for operation and main-
tenance.
We would appreciate hearing from you, the end user, about whether we are achieving our purpos-
es.
Thank you for considering and purchasing FURUNO equipment.
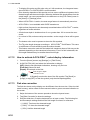
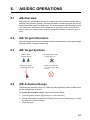
About the eGuide
• The eGuide provides abbreviated operating procedures for the GP1871F/GP-1971F. Text ap-
pears at the center of the screen. The table of contents appears on the left panel. The back but-
ton (“<“) at the top left corner goes to the previously viewed screen.
• The names of menu items and on-screen indications appear in brackets. For example, the “Set-
tings menu” is shown as “[Settings] menu”.
• The words “tap” and “select” are interchangeable.
• In some procedures, the step-by-step format is replaced with only the necessary actions, sep-
arated by an arrow.
For example, the procedure to access the [General] settings of the radar is written as “Tap
[Home] => [Settings] => [Radar] => [General]”. This means, do the following four steps:
1. Tap the [Home] button to show the [Home] screen.
2. Tap [Settings] to open the [Settings] menu.
3. Tap [Radar] to open the radar settings menu.
4. Tap [General] to open the [General] radar settings menu.
• Colors and settings shown in this manual are based on factory default settings.
• For the latest version of this manual, access the official FURUNO website at: www.furuno.com
Program version numbers
• eGuide version number: OME-44980-**
• Software version number: 1950193-3.*.*R
“**” indicates minor version number.

FOREWORD
viii
This page is intentionally left blank.

1-1
1. SYSTEM INTRODUCTION
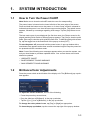
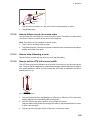
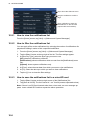
1.1 How to Turn the Power On/Off
Note: Make sure to close the microSD card slot cover for waterproofing.
The power button is located on the lower-left side of the outer edge of the screen.
Press and hold the button to turn the power on. A short “beep” sound is released to
indicate that the power is on, then the start-up procedure begins. The splash screen
appears, followed by a message regarding chart usage. Tap the [OK] button to con-
tinue.
The last used screen is now displayed (for first time users, the Plotter screen is dis-
played) and the [Quick Guide on Startup] pop up appears. Tap [Yes] to view the quick
guide, [Not now] to view the quick guide at a later time. To hide the quick guide at start-
up, tap the toggle box at the bottom-left of the pop up to show [OFF].
To turn the power off, press and hold the power button. A pop up window with a
countdown timer appears and a three second countdown begins. Keep the power but-
ton pressed until the countdown ends.
Note: If one of the following error messages appears when you start the system, con-
sult your local dealer to purchase updated charts. Your current charts are old and
should be updated.
• "OBSOLETE CHART"
• "BASE SEGMENT FOUND WARNING"
• "MAX SEGMENT FOUND WARNING"
1.2 Brilliance/Color Adjustments
Press the power switch at the left-side of the display unit. The [Brilliance] pop up win-
dow appears.
To adjust the screen brilliance, do one of the following:
• Press the power key several times;
• Drag the slide-bar at [Brilliance], in the pop up window;
• Tap the [+] or [-] icon at [Brilliance], in the pop up window
To change the color palette in use, tap [Day] or [Night] as appropriate.
To close the pop up window, tap the cross at the top-right of the pop up window.

1. SYSTEM INTRODUCTION
1-2
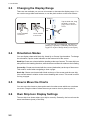
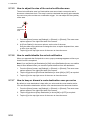
1.3 How to Lock the Screen
You can lock the on-screen icons/buttons to prevent accidental operation.
To lock the icons/buttons, press the power switch to show the [Brilliance] pop up win-
dow, then tap the toggle box at [Touch Screen] to show [OFF]. The touch screen is
now locked and all screen-based operations are disabled. Further, the “locked” icon
appears on the [Home] icon, as shown in the figure below.
To unlock the screen, press the power switch again.
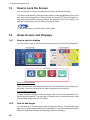
1.4 Home Screen and Displays
1.4.1 How to select a display
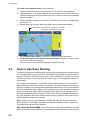
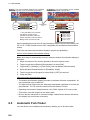
You can select a page to view from the [Home] screen or from the [Quick Page] list.
From the [Home] screen
Tap the [Home] icon to show the [Home] screen, then tap the icon for the page you
want view. If the icon you want is not visible, drag the screen to the left.
From the [Quick Page] list
To show the [Quick Page] list, swipe the upper-edge of the screen downwards. The
[Quick Page] list appears. Tap the page you want to view, or drag the list left or right
to show listed pages which are not visible.
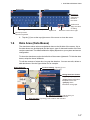
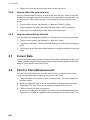
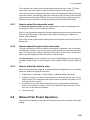
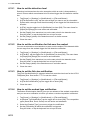
1.4.2 How to add pages
You can store up to 10 customized pages in the [Home] screen. You can divide each
page in up to three separate segments. Depending on connected equipment and the
number of segments selected, the following layouts are available:
Home screen Quick page list
Page icons
Plotter Radar Fish Finder Instruments

1. SYSTEM INTRODUCTION
1-3
[bull] Full screen (Single section, undivided): Plotter, Fish Finder, Plotter + Fish
Finder (right-side quarter of the screen), Radar;
[bull] Two sections: Plotter, Fish Finder, Radar;
[bull] Three sections: Left-side of the screen (Plotter, Fish Finder, Radar), Right-side
top or bottom quarter screen (Plotter, Fish Finder, Radar, Instruments).
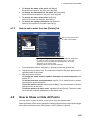
Follow the procedure below to customize a home screen.
1. Tap the [Home] icon to show the [Home] screen.
2. Tap the [+] icon to show the [Edit Page] screen.
If the [+] icon is not visible, drag the page list to show the icon.
Note: If there are 10 pages already registered, the [+] icon is grayed out and can-
not be selected. In this case, see section 1.4.3 for how to remove pages.
3. Referring to the figure below, set up the page.
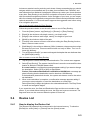
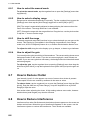
1.4.3 How to edit and delete pages
You can edit and delete pages from the [Home] screen. Long-tap the icon for the page
you wish to edit or delete, then tap the appropriate icon (see figure below).
Pin tool icon: Tap to save the selected page in the [Quick Page] list.
Edit contents icon: Tap to customize the page contents. (See section 1.4.2.)
Trash icon: Tap to delete the selected page.
Note: The full-screen plotter page (single-section) is not editable.
Select the page layout
you want to use.
Select the page layout
you want to use.
Page
layout
options.
Options available
to display on the
selected layout.
Drag an option to add
it to the current layout.
Drag an option to add
it to the current layout.
Tap
[
OK
]
to save
the new layout.
Long
tap
Pin tool
icon
Trash
icon
Edit
contents
icon

1. SYSTEM INTRODUCTION
1-4
1.4.4 How to switch screen operation in multi-section layouts
When the screen is divided into two or more sections, you can operate most screens
individually by switching the active screen. To switch active screens, tap the screen
you wish to operate. The active screen is indicated with a orange-colored highlight
around the screen edges.
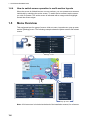
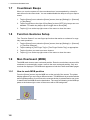
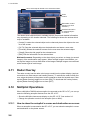
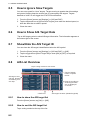
1.5 Menu Overview
This equipment has four types of menus: slide-out menu, layered menu, pop up menu
and the [Settings] menu. The following example shows the plotter screen and related
menus.
Note: A full menu tree is included at the back of the installation manual, for reference.
[
Settings
]
menu
Slide-out menu
Layered menu
Tap
Tap
SwipeSwipe
SwipeSwipe
[
Back
]
icon
Tap
[
Close
]
icon
Pop up menu

1. SYSTEM INTRODUCTION
1-5
1.5.1 Slide-out menu
Swipe the right edge of the screen leftwards to show the slide-out menu. The slide-out
menu contains operations and functions for the currently displayed screen are shown
in the slide-out menu. Simply tap the required item in the slide-out menu to use that
function or operation. Items which are not available for selection from the slide-out
menu appear in gray color.
If there is no operation detected within seven seconds, the menu automatically closes.
1.5.2 Layered menu
Swipe the bottom edge of the screen upwards to show the layered menu. The layered
menu contains display settings for icons and indications; for example, you can show,
or hide, AIS/DSC targets from the layered menu.
Items which appear with the [ON]/[OFF] toggle can be adjusted with a tap.
Items which appear with a [>] have further options available; tap the [>] to show the
sub-menu. Items which are not available appear in gray color.
Note: Layered menus are available for all pages. For pages with more than one sec-
tion, tap the page you want the layered menu for, then show the layered menu.
To close the layered menu, tap anywhere on the display other than the layered menu,
or swipe the layered menu downwards.
If there is no operation detected within seven seconds, the menu automatically closes.
1.5.3 Pop up menu
Pop up menus are context-based menus and contain settings or functions for a tapped
item. You can tap the screen, or a displayed item (such as a point) to show the pop up
menu. Tap the desired setting or function in the pop up menu. Pop up menu items
which are not available appear in gray color.
If there is no operation detected within seven seconds, the menu automatically closes.
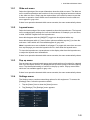
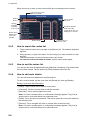
1.5.4 Settings menu
The Settings menu contains customizing options for this equipment. To access the
[Settings] menu, follow the procedure below.
1. Tap the [Home] icon to show the [Home] screen.
2. Tap [Settings]. The [Settings] menu appears.

1. SYSTEM INTRODUCTION
1-6
3. Tap the menu you want to access. Drag the menu to show menu items which do
not appear on-screen.
4. Tap the menu item you want to set; the available settings and options appear in
the right-side of the screen. Tap the [>] icon to show sub-menu items.
5. Depending on the menu item selected, do one of the following:
• [ON]/[OFF] toggle boxes: Select [ON] to activate the function or feature, select
[OFF] to deactivate the function or feature.
• Settings and options: Tap the desired setting or option. The current selection
is indicated by a filled circle to the left of the setting or option.
• Slide-bar or keyboard icon: Drag the slider (solid circle) on the slider-bar to
set a value. For the software keyboard (appears after you tap the keyboard
icon), tap the keyboard to input a value or character, then tap [OK].
Numeric keyboard
Alphanumeric keyboard
Tap
Top layer of
the menu
Menu items for the selected
top layer menu appear here.
Menu options for sub-menu items
appear in an overlaid window.
Selected menu item
appears in the title bar
Cancel input and
close the keyboard.
Move the cursor left or right.
Keyboard icon
Tap
Backspace
Deletes the
character to the
left of the cursor.
Confirm and
apply the value
or setting.
Back button

1. SYSTEM INTRODUCTION
1-7
6. Tap the [×] icon at the top-right corner of the menu to close the menu.
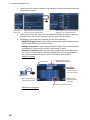
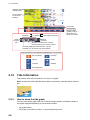
1.6 Data Area (Data Boxes)
The data boxes show various navigational data on the left side of the screen. Up to
five data boxes can be displayed and the layout, type of data and location of the box
can be customized. The data available for display depends on your system and sensor
configuration.
To show the data boxes, swipe the left side of the screen rightwards. To hide the data
boxes, swipe the boxes leftwards.
To edit the contents of a data box, long-tap the data box. You can now edit, delete or
add data boxes. See the figure below for an example.
Cancel input and
close the keyboard.
Tap to toggle between numeric and alphabet.
Move the cursor left or right.
Backspace
Deletes the
character to
the left of
the cursor.
Confirm and
apply the value
or setting.
Space bar
Back button
Cursor
Delete data box:
Tap the trash icon.
Finished editing: Tap the [<] icon.
(Closes and exits edit mode.)
Change data box format:
Tap [Text] or [Graph].
• [Text]: Show information
as alphanumeric text.
• [Graph]: Show
information as a graph.
Edit box contents:
Tap the item you
want to show in the data box.
Add data box: Tap the [+] icon to add a new data box.

1. SYSTEM INTRODUCTION
1-8
1.7 Countdown Beeps
When you turn the system off, the count-down timer is accompanied by a beep for
each second in the count-down. You can enable/disable the beep to suit your require-
ments.
1. Tap the [Home] icon to show the [Home] screen, then tap [Settings] => [General]
=> [Key Beep].
2. Tap the toggle box to the right of [Key Beep] to show [OFF]. Key beeps are now
disabled. To enable key beeps, tap the toggle box to show [ON].
3. Tap the [×] icon at the top-right corner of the menu to close the menu.
1.8 Function Gestures Setup
The “Function Gesture” is a two-finger tap function that works as a shortcut for regu-
larly used operations.
1. Tap the [Home] icon to show the [Home] screen, then tap [Settings] => [General]
=> [Function Gestures].
2. Tap the setting at [Two Finger Tap] or [Two Finger Double Tap], as appropriate.
3. Tap the function you want to set as a shortcut.
4. Tap the [×] icon at the top-right corner of the menu to close the menu.
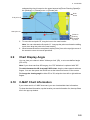
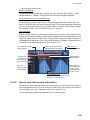
1.9 Man Overboard (MOB)
The MOB mark denotes man overboard position. Enter the mark when someone falls
overboard, to automatically create a route to the man overboard position. Only one
mark can be displayed. The MOB mark appears on both the Plotter and Radar pages.
1.9.1 How to mark MOB position
From the [Home] screen, tap the MOB icon at the top-left of the screen. The plotter
display appears if you are using a different screen. The MOB mark is put at the latitude
and longitude position of your boat at the moment the key is pressed and a new route
is started with the MOB set as the destination. The range and bearing to the MOB ap-
pears at the bottom-right corner of the screen with a red background.
MOB indication on the screen

1. SYSTEM INTRODUCTION
1-9
1.9.2 How to erase an MOB mark
Tap the range/bearing indication at the bottom-right of the screen to show the pop up
window. Tap [Cancel MOB]. A confirmation message appears. Tap [Yes] or [No] as
appropriate.
1.10 Wireless LAN Setup
You can use the wireless LAN to update weather information and software.
Notice regarding use of wireless LAN
• The wireless LAN function is available only in the countries which have acquired ra-
dio wave certification. Turn this function off in countries which do not have radio
wave certification. Ocean-going vessels that have radio wave certification can use
the wireless LAN function in any country that has acquired radio wave certification.
Vessels with radio wave certification that enter a country that does not have radio
wave certification may use the wireless LAN function only onboard the vessel.
Available countries (as of March, 2018): USA, Canada, New Zealand, Australia, Ja-
pan, and all countries of the EU.
• The communication rate and effective range for the wireless LAN can be affected
by electromagnetic waves, interfering objects, or access point location.
• We strongly recommend using a wireless LAN with encrypted connection. Other-
wise unauthorized access by a third party can occur, which can cause loss of data
or system crash.
• We recommend changing the initial password when using a local wireless network.
1. Tap the [Home] icon to show the [Home] screen, then tap [Settings] => [General]
=> [Wireless LAN].
2. Tap the toggle box inside the [Wireless LAN Connection] section to show [ON].
The system checks for available wireless networks and shows them in the [Net-
works] list.
3. Tap the network you wish to connect to. The password input screen appears.
4. Input the network password, then tap [OK]. If the password is correct, the system
connects to the selected network.
5. Tap the [×] icon at the top-right corner of the menu to close the menu.
1.11 Simulation Mode
You can use the simulation mode to familiarize yourself with the system and opera-
tions. For safety, simulation mode should only be used when the boat is moored.
1. Tap the [Home] icon to show the [Home] screen, then tap [Settings] => [General]
=> [Simulation]. The simulation settings appear on the right-hand side of the
screen.
2. Tap the toggle box at [Simulation] to show [ON]; simulation mode is now active.
3. Tap [Mode], then select the required simulation mode. For the purpose of this pro-
cedure, select [Simulation].
• [Internal Slide Show]: Used for promotional purposes.

1. SYSTEM INTRODUCTION
1-10
• [Slide Show From SD]: Displays images (photos) stored on the inserted SD
card as a slide show.
• [Simulation]: Activates the simulation mode and allows you set parameters for
the simulation.
4. Tap the [<] icon at the top-left of the selection window to go back to the [Simula-
tion] menu.
5. If you selected [Internal Slide Show] or [Slide Show From SD], the slide show
starts. To stop the slide show, tap anywhere on the screen, then tap [Yes] in the
pop up window, then proceed to step 9.
If you selected [Simulation], proceed to step 6.
6. In the [Parameters] section, set the [Course] and [Speed] for the simulation.
To set these items, either drag the slider bar or tap the keyboard icon to manually
enter a value.
7. To set [Date] and [Time], tap the item in the menu to show the software keyboard.
Enter the desired date/time for the simulation, then tap the [<] icon to go back to
the simulation settings.
8. At [Fish Finder], tap the desired setting for the simulation, then tap the [<] icon to
go back to the simulation settings.
• [Off]: no fish finder data is simulated.
• [Chirp Demo]: Show the CHIRP simulation.
• [RezBoost Demo]: Show the RezBoost simulation.
Note: The fish finder simulation operates separately from other settings in the
[Simulation] menu. To disable the fish finder simulation, change the above setting
to [Off].
9. Tap the [×] icon at the top-right corner of the menu to close the menu.

2-1
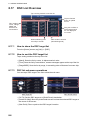
2. PLOTTER
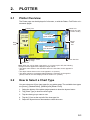
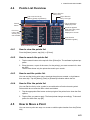
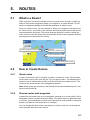
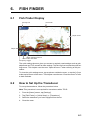
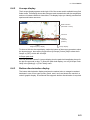
2.1 Plotter Overview
The Plotter page can be displayed in full-screen, or with the Radar, Fish Finder or In-
struments pages.
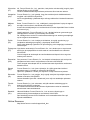
2.2 How to Select a Chart Type
You can select one of four chart types for your plotter page. The available chart types
are [Vector], [Shaded Relief], [Satellite] and [Raster Chart].
1. Swipe the bottom of the plotter page upwards to show the layered menu.
2. Tap [Chart Type] to show the chart types.
3. Tap the chart type you want to use.
4. Tap the [<] icon at the top-left of the chart type list.
5. Swipe the layered menu downwards to close the menu.
[
Home
]
icon
COG Vector
(red dashed line)
Heading line
(green solid line)
Cursor data boxOrientation mode
Data
area
Display range
2D/3D icon
Note:
When the unit for Depth (see section 11.2) is set to pb or HR, the following
changes are also applied to the displayed depth values.
• The depth value shown in the data area and on the fish finder screen appears in
pb/HR.
• The depth values shown on the chart appears in m (meters).
• The depth values for Underwater Objects/Display Limit filters are changed to
pb/HR, however the chart-displayed values remain in m (meters).
Center icon
(returns own ship
to screen center)
Range
slide
bar
Own ship track
Own ship icon
La pagina si sta caricando...
La pagina si sta caricando...
La pagina si sta caricando...
La pagina si sta caricando...
La pagina si sta caricando...
La pagina si sta caricando...
La pagina si sta caricando...
La pagina si sta caricando...
La pagina si sta caricando...
La pagina si sta caricando...
La pagina si sta caricando...
La pagina si sta caricando...
La pagina si sta caricando...
La pagina si sta caricando...
La pagina si sta caricando...
La pagina si sta caricando...
La pagina si sta caricando...
La pagina si sta caricando...
La pagina si sta caricando...
La pagina si sta caricando...
La pagina si sta caricando...
La pagina si sta caricando...
La pagina si sta caricando...
La pagina si sta caricando...
La pagina si sta caricando...
La pagina si sta caricando...
La pagina si sta caricando...
La pagina si sta caricando...
La pagina si sta caricando...
La pagina si sta caricando...
La pagina si sta caricando...
La pagina si sta caricando...
La pagina si sta caricando...
La pagina si sta caricando...
La pagina si sta caricando...
La pagina si sta caricando...
La pagina si sta caricando...
La pagina si sta caricando...
La pagina si sta caricando...
La pagina si sta caricando...
La pagina si sta caricando...
La pagina si sta caricando...
La pagina si sta caricando...
La pagina si sta caricando...
La pagina si sta caricando...
La pagina si sta caricando...
La pagina si sta caricando...
La pagina si sta caricando...
La pagina si sta caricando...
La pagina si sta caricando...
La pagina si sta caricando...
La pagina si sta caricando...
La pagina si sta caricando...
La pagina si sta caricando...
La pagina si sta caricando...
La pagina si sta caricando...
La pagina si sta caricando...
La pagina si sta caricando...
La pagina si sta caricando...
La pagina si sta caricando...
La pagina si sta caricando...
La pagina si sta caricando...
La pagina si sta caricando...
La pagina si sta caricando...
La pagina si sta caricando...
La pagina si sta caricando...
La pagina si sta caricando...
La pagina si sta caricando...
La pagina si sta caricando...
La pagina si sta caricando...
La pagina si sta caricando...
La pagina si sta caricando...
La pagina si sta caricando...
La pagina si sta caricando...
La pagina si sta caricando...
La pagina si sta caricando...
La pagina si sta caricando...
La pagina si sta caricando...
La pagina si sta caricando...
La pagina si sta caricando...
La pagina si sta caricando...
La pagina si sta caricando...
La pagina si sta caricando...
La pagina si sta caricando...
La pagina si sta caricando...
-
 1
1
-
 2
2
-
 3
3
-
 4
4
-
 5
5
-
 6
6
-
 7
7
-
 8
8
-
 9
9
-
 10
10
-
 11
11
-
 12
12
-
 13
13
-
 14
14
-
 15
15
-
 16
16
-
 17
17
-
 18
18
-
 19
19
-
 20
20
-
 21
21
-
 22
22
-
 23
23
-
 24
24
-
 25
25
-
 26
26
-
 27
27
-
 28
28
-
 29
29
-
 30
30
-
 31
31
-
 32
32
-
 33
33
-
 34
34
-
 35
35
-
 36
36
-
 37
37
-
 38
38
-
 39
39
-
 40
40
-
 41
41
-
 42
42
-
 43
43
-
 44
44
-
 45
45
-
 46
46
-
 47
47
-
 48
48
-
 49
49
-
 50
50
-
 51
51
-
 52
52
-
 53
53
-
 54
54
-
 55
55
-
 56
56
-
 57
57
-
 58
58
-
 59
59
-
 60
60
-
 61
61
-
 62
62
-
 63
63
-
 64
64
-
 65
65
-
 66
66
-
 67
67
-
 68
68
-
 69
69
-
 70
70
-
 71
71
-
 72
72
-
 73
73
-
 74
74
-
 75
75
-
 76
76
-
 77
77
-
 78
78
-
 79
79
-
 80
80
-
 81
81
-
 82
82
-
 83
83
-
 84
84
-
 85
85
-
 86
86
-
 87
87
-
 88
88
-
 89
89
-
 90
90
-
 91
91
-
 92
92
-
 93
93
-
 94
94
-
 95
95
-
 96
96
-
 97
97
-
 98
98
-
 99
99
-
 100
100
-
 101
101
-
 102
102
-
 103
103
-
 104
104
-
 105
105


Furuno GP1971F Manuale utente
- Categoria
- Navigatori
- Tipo
- Manuale utente
- Questo manuale è adatto anche per
in altre lingue
- English: Furuno GP1971F User manual
Documenti correlati
-
Furuno DRS4W Manuale utente
-
-
-
-
-
-
-
-
-
Altri documenti
-
Boston Whaler 190 Outrage Manuale del proprietario
-
-
Boston Whaler 190 Montauk Manuale del proprietario
-
Si-tex Nautilus NT & Neptune NT Manuale utente
-
Garmin 618 Manuale utente
-
Snap-On TECHANGLE Manuale utente
-
TomTom RIDER 500 Manuale utente
-
TomTom GO BASIC Manuale utente
-
TomTom GO ESSENTIAL Manuale utente
-
TomTom GPS Camping Car GO Camper Manuale utente