
OWNER’S MANUAL
MODE D’EMPLOI
BEDIENUNGSANLEITUNG
BRUKSANVISNING
MANUALE DI ISTRUZIONI
MANUAL DE INSTRUCCIONES
GEBRUIKSAANWIJZING
ИНСТРУКЦИЯ ПО ЭКСПЛУАТАЦИИ
==
==
=
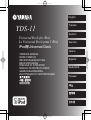
YDS-11
Universal Dock for iPod
Le Universal Dock pour l’iPod
English
Français
Deutsch
Svenska
Italiano
Español
Nederlands
Русский

FCC INFORMATION (for US customers only)
1. IMPORTANT NOTICE : DO NOT
MODIFY THIS UNIT!
This product, when installed as indicated in
the instructions contained in this manual,
meets FCC requirements. Modifications not
expressly approved by Yamaha may void your
authority, granted by the FCC, to use the
product.
2. IMPORTANT : When connecting this
product to accessories and/or another product
use only high quality shielded cables. Cable/
s supplied with this product MUST be used.
Follow all installation instructions. Failure to
follow instructions could void your FCC
authorization to use this product in the USA.
3. NOTE :
This product has been tested and
found to comply with the requirements listed
in FCC Regulations, Part 15 for Class “B”
digital devices. Compliance with these
requirements provides a reasonable level of
assurance that your use of this product in a
residential environment will not result in
harmful interference with other electronic
devices.
This equipment generates/uses radio
frequencies and, if not installed and used
according to the instructions found in the
users manual, may cause interference harmful
to the operation of other electronic devices.
COMPLIANCE INFORMATION STATEMENT
This device complies with Part 15 of the FCC Rules. Operation is subject to the following conditions:
1) This device may not cause harmful interface, and
2) This device must accept any interference received including interference that may cause undesired
operation of this device.
See user manual instructions if interference to radio reception is suspected.
Compliance with FCC regulations does not
guarantee that interference will not occur in all
installations. If this product is found to be the
source of interference, which can be
determined by turning the unit “OFF” and
“ON”, please try to eliminate the problem by
using one of the following measures:
Relocate either this product or the device
that is being affected by the interference.
Utilize power outlets that are on different
branch (circuit breaker or fuse) circuits or
install AC line filter/s.
In the case of radio or TV interference,
relocate/reorient the antenna. If the antenna
lead-in is 300 ohm ribbon lead, change the
lead-in to coaxial type cable.
If these corrective measures do not produce
satisfactory results, please contact the local
retailer authorized to distribute this type of
product. If you can not locate the appropriate
retailer, please contact Yamaha Electronics
Corp., U.S.A. 6660 Orangethorpe Ave, Buena
Park, CA 90620.
The above statements apply ONLY to those
products distributed by Yamaha Corporation of
America or its subsidiaries.
En

1AVIS IMPORTANT: NE PAS
APPORTER DE MOFIDICATIONS A
CET APPAREIL !
Ce produit est conforme aux exigences de
la FCC s’fil est installe selon les
instructions du mode d’femploi. Toute
modification non approuvee expressement
par Yamaha peut invalider l’fautorisation,
accordee par la FCC, d’futiliser ce produit.
2IMPORTANT: N’futiliser que des cables
blindes de haute qualite pour le
raccordement de ce produit a des
accessoires et/ou a un autre produit. Seuls
le ou les cables fournis avec le produit
DOIVENT etre utilises. Suivre les
instructions concernant l’finstallation. Le
non respect des instructions peut invalider
l’fautorisation, accordee par la FCC,
d’futiliser ce produit aux Etats-Unis.
3 REMARQUE: Ce produit a ete teste et
declare conforme aux normes relatives aux
appareils numeriques de Classe “B”, telles
que fixees dans l’fArticle 15 de la
Reglementation FCC. Ces normes sont
destinees a assurer une protection
suffisante contre les interferences nuisibles
avec d’fautres appareils electroniques dans
une installation residentielle.
Cet equipement genere et utilise des
frequences radio qui, en cas d’finstallation et
d’futilisation non conformes aux instructions
du mode d’femploi, peuvent etre a l’forigine
d’finterferences empechant d’fautres
appareils de fonctionner.
Cependant, la conformite a la Reglementation
FCC ne garantit pas l’fabsence
d’finterferences dans une installation
particuliere. Si ce produit devait produire des
interferences, ce qui peut etre determine en
“ETEIGNANT” et en “RALLUMANT” le
produit, l’futilisateur est invite a essayer de
corriger le probleme d’fune des manieres
suivantes:
Reorienter ce produit ou le dispositif
affecte par les interferences.
Utiliser des prises d’falimentation
branchees sur differents circuits (avec
interrupteur de circuit ou fusible) ou
installer un ou des filtres pour ligne secteur.
Dans le cas d’finterferences radio ou TV,
changer de place l’fantenne et la reorienter.
Si l’fantenne est un conducteur plat de 300
ohms, remplacer ce cable par un cable de
type coaxial.
Si ces mesures ne donnent pas les resultats
escomptes, priere de contacter le detaillant
local autorise a commercialiser ce type de
produit. Si ce n’fest pas possible, priere de
contacter Yamaha Electronics Corp., Etats-
Unis, 6660 Orangethorpe Ave, Buena Park,
CA 90620.
Les declarations precedentes NE concernent
QUE les produits commercialises par Yamaha
Corporation of America ou ses filiales.
Informations de la FCC (Pour les clients residents aux Etats-Unis)
INFORMATIONS CONCERNANT LA CONFORMITE
Cet appareil est conforme a l’farticle 15 de la Reglementation FCC.
Son fonctionnement est soumis aux deux conditions suivantes:
1) cet appareil ne doit pas causer d’finterferences pernicieuses, et
2) cet appareil doit accepter toutes les interferences, y compris les interferences pouvant lui causer
un fonctionnement indesirable.
Se reporter au mode d’femploi si des interferences semblent perturber la reception radio.
Fr

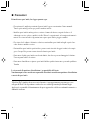
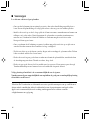
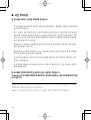
Read this before using this unit.
•To assure the finest performance, please read this manual carefully. Keep it in a safe place for future
reference.
• Install this unit in a cool, dry, clean place away from windows, heat sources, and sources of excessive
vibration, dust, moisture and cold. Avoid sources of humming (transformers, motors, etc.). To
prevent fire or electrical shock, do not expose this unit to rain or water.
•To prevent the enclosure from warping or discoloring, do not place this unit where it will be exposed
to direct sunlight or excessive humidity.
• Do not place this unit where foreign objects such as water drips may fall. It may cause a fire, or
damage to this unit.
• Do not attempt to clean this unit with chemical solvents as this may damage the finish. Use a clean,
dry cloth.
• Do not attempt to modify or fix this unit. Contact qualified Yamaha service personnel when any
service is needed. The cabinet should never be opened for any reasons.
Secure placement or installation is the owner’s responsibility.
Yamaha shall not be liable for any accident caused by improper placement or installation of this
unit.
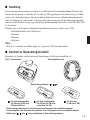
■ Precautions
En
“Made for iPod” means that an electronic accessory has been designed to connect specifically to iPod
and has been certified by the developer to meet Apple performance standards.
Apple is not responsible for the operation of this device or its compliance with safety and regulatory
standards.

1
En
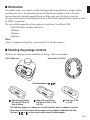
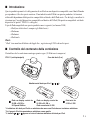
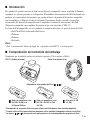
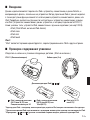
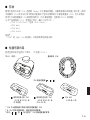
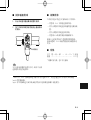
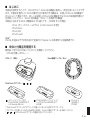
■ Checking the package contents
Check that the following items are included in the package. (iPod is not included.)
YDS-11 (Main unit) Dock cable (2 m (6.5 ft))
iPod dock adapters ( , , )
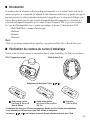
■ Introduction
This product enables you to connect an iPod with Yamaha dock-compatible device and play the files
recorded on the device. The method of operating the iPod using this product as well as the usable
functions depends on the dock-compatible device or iPod you are using. For details, refer to the
operating instructions of the dock-compatible device or iPod. (Dock-compatible device: Device to which
the YDS-11 is connected.)
The types of iPods compatible with this product are listed below. (As of March 2008)
•iPod (Click Wheel, including iPod classic)
• iPod nano
• iPod mini
• iPod touch
iPod
™
“iPod” is a trademark of Apple Inc., registered in the U.S. and other countries.
* The iPod Dock adapter is an adapter for use with iPods with which no adapter is included.
*When using an iPod that comes with an adapter, use the adapter included with the iPod.
* The mark ( , , or ) is shown on the back of each iPod dock adapter.
iPod with color display
(20 GB or 30 GB) or U2
Special Edition
iPod with color display
(40 GB or 60 GB) or iPod
(40 GB)
iPod mini (4 GB
or 6 GB)

2
En
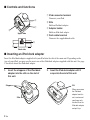
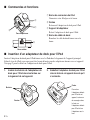
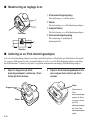
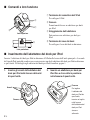
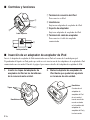
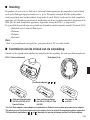
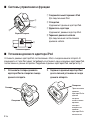
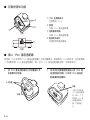
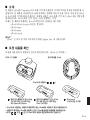
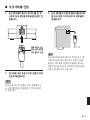
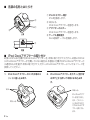
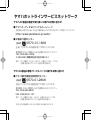
■ Controls and functions
1. Insert the stoppers of the iPod dock
adapter into the slits on the slot of
this unit.
2. Insert the iPod dock adapter until it
snaps into the slot of this unit.
1 iPod connector terminal
Connects your iPod.
2 Slits
Hold an iPod dock adapter.
3 Adapter holder
Holds an iPod dock adapter.
4 Dock cable terminal
Connects the supplied dock cable.
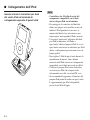
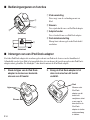
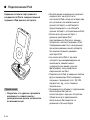
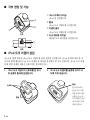
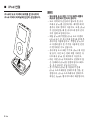
■ Inserting an iPod dock adapter
Insert the iPod dock adapter supplied with your iPod into the slot of the main unit. Depending on the
type of your iPod, you may need to insert one of the iPod dock adapters supplied with this unit. See page
1 for details about the iPod dock adapter.
3
1
2
Upper side
Back side
Slit
When you remove
the iPod dock
adapter from this
unit, insert one of
your finger nails
into the slit on the
iPod dock adapter
and pull it up.
Slits
Stoppers
4

3
En
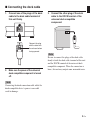
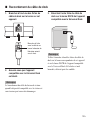
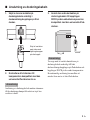
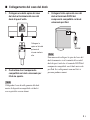
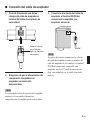
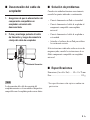
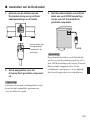
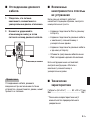
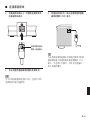
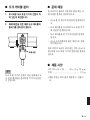
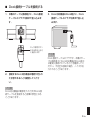
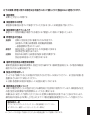
■ Connecting the dock cable
Connect the plug
with the side with
the release button
facing upward.
DOCK
1. Connect one of the plugs of the dock
cable to the dock cable terminal of
this unit firmly.
2.
Make sure the power of the universal
dock compatible component is turned
off.
Note
Connecting the dock connection cable while the
dock-compatible device’s power is on could
result in damage.
3. Connect the other plug of the dock
cable to the DOCK terminal of the
universal dock compatible
component.
Note
Be sure to connect the plugs of the dock cable
firmly to both the dock cable terminal of this unit
and the DOCK terminal of the universal dock
compatible component. When the connection is
loose, this unit may output some unwanted noise.

4
En
Notes
• Make sure that the output level of the
universal dock compatible component is
set to minimum.
•To protect the dock connector from damage,
do not twist or sway back and forth your iPod
when inserting or taking it off from this unit,
and be careful not to knock over this unit
when your iPod is inserted.
• Use this unit with the iPod dock adapter
(supplied with your iPod or with this unit)
appropriate for your iPod. If you use this unit
without using an appropriate iPod dock
adapter, loose connection may result.
• Do not take off your iPod from this unit when
you play back the music, photo, or movie
stored on your iPod with the universal dock
compatible component.
• Connect your iPod without any other iPod
accessories (such as headphones, a wired
remote control, an FM transmitter etc.)
connected.
• It is recommended that you update your iPod
software before using it with this unit. The
updater for the iPod software is available at
the Apple website.
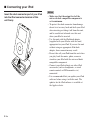
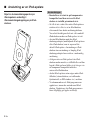
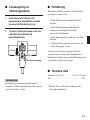
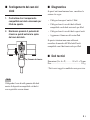
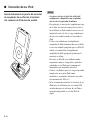
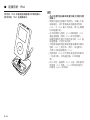
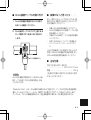
■ Connecting your iPod
Insert the dock connector port of your iPod
into the iPod connector terminal of this
unit firmly.

5
En
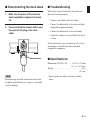
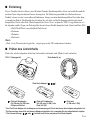
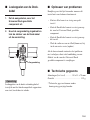
■ Troubleshooting
Refer to the items listed below when this unit
does not function properly.
• Connect your iPod to this unit firmly.
• Connect the dock cable to the universal dock
compatible component firmly.
• Connect the dock cable to this unit firmly.
• Update the software of your iPod to the latest
version.
If the instructions above do not help, refer to the
instructions of your iPod or universal dock
compatible component.
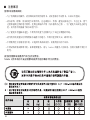
■ Specifications
Dimensions (W x H x D) ........ 80 x 33 x 70 mm
(3.1 x 1.3 x 2.8 in)
Weight ....................................................... 135 g
(4.8 oz)
*
Specifications are subject to change without
notice.
Release button
■
Disconnecting the dock cable
1.
Make sure the power of the universal
dock compatible component is turned
off.
2. Press and hold the release button and
then pull off the plug of the dock
cable.
Note
Disconnecting the dock connection cable while
the dock-compatible device’s power is on could
result in damage.

Lisez ces précautions attentivement avant d’utiliser cet appareil.
•Pour garantir les meilleures performances possibles, lire ce manuel avec attention. Le garder dans un
endroit sûr pour une utilisation ultérieure.
• Installer cet appareil dans un endroit frais, sec et propre, loin de fenêtres, sources de chaleur et
d’endroits où les vibrations, la poussière, l’humidité ou le froid sont importants. Eviter les sources de
bourdonnements (transformateurs, moteurs). Pour éviter les incendies ou électrocution, ne pas
exposer cet appareil à la pluie ni à l’humidité.
•Pour éviter que le coffret se gondole ou se décolore, ne pas placer cet appareil à un endroit ou il sera
exposée aux rayons directs du soleil ou à une trop forte humidité.
• Ne pas placer cet appareil à un endroit où des corps étrangers comme des gouttes d’eau peuvent
tomber. Ceci peut causer un feu, endommager cet appareil.
• Ne pas essayer de nettoyer cet appareil avec des diluants chimiques, ceci endommagerait le fini.
Utiliser un chiffon propre et sec.
• Ne pas essayer de modifier ni de réparer cet appareil. Contacter un dépanneur Yamaha qualifié en cas
de nécessité de réparation.
Le propriétaire de cet appareil est entièrement responsable du bon positionnement et de la bonne
installation de l’appareil.
Yamaha décline toute responsabilité en cas d’accident causé par un positionnement ou une
installation inadéquats de cet appareil.
■ Precautions
Fr
“Made for iPod” signifie qu’un accessoire électronique a été spécialement conçu pour être raccordé à un
iPod et qu’il a été certifié par le développeur comme répondant aux normes de performances d’Apple.
Apple n’est pas responsable du bon fonctionnement de cet appareil ou de sa conformité aux normes de
sécurité et à la réglementation en vigueur.

1
Fr
■ Vérification du contenu du carton d’emballage
Vérifiez si tous les articles suivants se trouvent bien dans le carton d’emballage. (Le iPod n’est pas fourni.)
YDS-11 (Appareil principal) Câble de dock (2 m)
Adaptateurs de dock pour l’iPod ( , , )
■ Introduction
Ce produit permet de raccorder un iPod à un dispositif compatible avec la station Yamaha et de lire les
fichiers enregistrés sur ce dispositif. La méthode de fonctionnement du iPod avec ce produit ainsi que les
fonctions pouvant être utilisées dépendent du dispositif compatible avec la station ou du iPod que vous
utilisez. Pour le détail, reportez-vous au mode d’emploi du dispositif compatible avec la station ou à
celui du iPod (Dispositif compatible avec la station: Dispositif auquel le YDS-11 peut être raccordé.)
Les types de iPod compatibles avec ce produit sont indiqués ci-dessous. (À dater de mars 2008)
•iPod (Click Wheel, y compris iPod classique)
• iPod nano
• iPod mini
• iPod touch
iPod
™
“iPod” est une marque commerciale de Apple Inc., enregistrée aux États-Unis et dans d’autres pays.
* L’adaptateur de dock pour l’iPod est un adaptateur destiné aux iPod vendus sans adaptateur.
* Si un adaptateur a été fourni avec votre iPod, utilisez cet adaptateur.
* La marque ( , , ou ) est indiquée au dos de chaque adaptateur de dock pour l’iPod.
iPod à écran couleur
(20 Go ou 30 Go) ou U2
Special Edition
iPod à écran couleur
(40 Go ou 60 Go) ou iPod
(40 Go)
iPod mini
(4 Go ou 6 Go)

2
Fr
■ Commandes et fonctions
1. Insérez les butoirs de l’adaptateur de
dock pour l’iPod dans les fentes sur
le logement de cet appareil.
2.
Emboîtez l’adaptateur de dock pour l’iPod
dans la fente de cet appareil de sorte qu’il
s’enclenche.
1 Borne de connexion de iPod
Connectez votre iPod par cette borne.
2 Fentes
Retiennent l’adaptateur de dock pour l’iPod.
3 Support d’adaptateur
Retient l’adaptateur de dock pour l’iPod.
4 Borne de câble de dock
Branchez le cable de dock fourni sur cette
borne.
■ Insertion d’un adaptateur de dock pour l’iPod
Insérez l’adaptateur de dock pour l’iPod fourni avec le iPod dans le logement de l’appareil principal.
Selon le type de iPod, vous aurez peut-être besoin d’insérer un des adaptateurs fournis avec cet appareil.
Voir page 1 pour le détail sur l’adaptateur de dock pour l’iPod.
3
1
2
Face supérieure
Face arrière
Fente
Pour retirer
l’adaptateur de dock
pour l’iPod de cet
appareil, insérez un
de vos ongles dans
la fente sur
l’adaptateur de dock
pour l’iPod et tirez
l’adaptateur vers le
haut.
Fentes
Butoirs
4

3
Fr
■ Raccordement du câble de dock
Branchez la fiche
avec le côté où se
trouve le bouton de
libération orienté
vers le haut.
DOCK
1. Branchez à fond une des fiches du
câble de dock sur la borne sur cet
appareil.
2. Assurez-vous que l’appareil
compatible avec le Universal Dock
est éteint.
Remarque
Le branchement du câble de liaison de station
quand le dispositif compatible avec la station est
sous tension peut causer des dommages.
3. Branchez l’autre fiche du câble de
dock sur la borne DOCK de l’appareil
compatible avec le Universal Dock.
Remarque
Veillez à brancher à fond les fiches du câble de
dock sur la borne correspondante de cet appareil
et sur la borne DOCK de l’appareil compatible
avec le Universal Dock. Si la fiche est mal
branchée, du bruit peut être audible.

4
Fr
Remarques
• Assurez-vous que le niveau de sortie de
l’appareil compatible avec le Universal
Dock est réglé au minimum.
• Pour éviter d’endommager le connecteur du
dock, ne tordez pas ou ne bougez pas vers
l’avant ou l’arrière votre iPod lorsque vous
l’insérez ou le sortez de cet appareil, et faites
attention de ne pas renverser cet appareil
lorsque le iPod est inséré.
• Utilisez cet appareil avec l’adaptateur de
dock pour l’iPod (fourni avec votre iPod ou
avec cet appareil) adapté à votre iPod. Si vous
utilisez un autre adaptateur, la connexion ne
sera pas bonne.
• Ne retirez pas le iPod de cet appareil pendant
que vous écoutez de la musique ou regardez
des photos ou un film enregistrés sur votre
iPod avec un appareil compatible avec le
Universal Dock.
• Raccordez votre iPod sans aucun autre
accessoire iPod (par exemple sans écouteurs,
télécommande à fil, émetteur FM, etc.).
• Il est conseillé de mettre à jour votre logiciel
iPod avant d’utiliser cet appareil. La mise à
jour du logiciel iPod est disponible sur le site
de Apple.
■ Raccordement du iPod
Insérez à fond le port de connexion du
iPod dans la borne de connexion de iPod
de cet appareil.

5
Fr
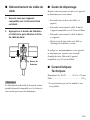
■ Guide de dépannage
Reportez-vous aux points suivants si cet appareil
ne fonctionne pas correctement.
•
Raccordez correctement votre iPod à cet
appareil.
• Raccordez correctement le câble de dock à
l’appareil compatible avec le Universal Dock.
• Raccordez correctement le câble de dock à
cet appareil.
•Mettez à jour le logiciel de votre iPod en
téléchargeant la dernière version.
Si, malgré ces recommandations, votre appareil
ne fonctionne pas, reportez-vous au mode
d’emploi de votre iPod ou de l’appareil
compatible avec le Universal Dock.
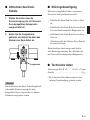
■ Caractéristiques
Techniques
Dimensions (L x H x P) .......... 80 x 33 x 70 mm
Poids .......................................................... 135 g
*
Les spécifications peuvent être modifiées sans
avis préalable.
Bouton de
libération
■ Débranchement du câble de
dock
1.
Assurez-vous que l’appareil
compatible avec le Universal Dock
est éteint.
2.
Appuyez sur le bouton de libération
et relâchez-le, puis détachez la fiche
du câble de dock.
Remarque
Le débranchement du câble de liaison de station
quand le dispositif compatible avec la station est
sous tension peut causer des dommages.

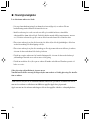
Lesen Sie diese Informationen, bevor Sie dieses Gerät verwenden.
• Bitte lesen Sie diese Bedienungsanleitung sorgfältig durch, damit die beste Geräteleistung
gewährleistet werden kann. Heben Sie die Bedienungsanleitung auf, um auch später noch
nachschlagen zu können.
• Stellen Sie dieses Gerät an einem kühlen, trockenen und sauberen Platz, entfernt von Fenstern,
Wärmequellen, Erschütterungen, Staub Feuchtigkeit und Kälte auf. Vermeiden Sie elektrische
Störquellen (Transformatoren, Motoren usw.). Um die Gefahr von Bränden oder elektrischen
Schlägen zu vermeiden, dieses Gerät nicht Regen oder Wasser aussetzen.
• Um ein Verziehen oder Verfärben des Gehäuses zu verhindern, sollten Sie das Gerät nicht in direktem
Sonnenlicht oder an Orten aufstellen, an denen eine hohe Luftfeuchtigkeit herrscht.
• Stellen Sie das Gerät nicht dort auf, wo Wassertropfen usw. eindringen können. Dadurch können ein
Brand oder Geräteschaden verursacht werden.
•Versuchen Sie nicht, dieses Gerät mit chemischen Lösungsmittel zu reinigen, da dabei das Gehäuse
beschädigt werden kann. Verwenden Sie einen sauberen, trockenen Lappen.
•Versuchen Sie nicht dieses Gerät zu modifizieren oder selber zu reparieren. Wenden Sie sich an
qualifiziertes Yamaha-Kundendienstpersonal, wenn Service erforderlich ist.
Eine sichere Aufstellung oder Installation liegt in der Verantwortung des Besitzers.
Yamaha kann keine Verantwortung für Unfälle oder Schäden übernehmen, die durch
unsachgemäße Aufstellung oder Installation dieses Geräts verursacht werden.
■ Zur Beachtung
De
“Made for iPod” (Hergestellt für iPod) bedeutet, dass ein auf den iPod ausgelegtes elektronisches
Anschlusszubehör entwickelt und vom Entwickler zertifiziert wurde, um den Apple-Standards zu
entsprechen.
Apple haftet nicht für den Betrieb dieses Geräts bzw. für die Einhaltung von Sicherheitsstandards und
gesetzlichen Vorschriften.

1
De
■ Prüfen des Lieferinhalts
Prüfen Sie, ob die folgenden Artikel im Lieferinhalt vorhanden sind. (iPod ist nicht enthalten.)
YDS-11 (Hauptgerät)
Dock-Kabel (2 m)
iPod Dock-Adapter ( , , )
■ Einleitung
Dieses Produkt erlaubt es Ihnen, einen iPod mit Yamaha-Dock kompatibles Gerät anzuschließen und die
auf dem Gerät aufgezeichneten Dateien abzuspielen. Die Bedienungsmethode des iPod mit diesem
Produkt, ebenso wie die verwendbaren Funktionen, hängen von dem dock-kompatiblen Gerät oder dem
verwendeten iPod ab. Für Einzelheiten beziehen Sie sich bitte auf die Bedienungsanleitung des dock-
kompatiblen Geräts oder iPod. (Dock-kompatibles Gerät: Gerät, an dem der YDS-11 angeschlossen ist.)
Im folgenden sind die Typen von iPod aufgeführt, die mit diesem Produkt kompatibel sind. (Stand vom März 2008)
•iPod (Click Wheel, einschließlich iPod classic)
• iPod nano
• iPod mini
• iPod touch
iPod
™
„iPod“ ist ein Warenzeichen Apple Inc., eingetragen in den USA und anderen Ländern.
* Der iPod Dock-Adapter ist ein Adapter zur Verwendung mit iPods, bei denen kein Adapter mitgeliefert ist.
*
Bei Verwendung eines iPod, bei dem ein Adapter mitgeliefert ist, verwenden Sie den mitgelieferten Adapter.
* Die Kennzeichnung ( , , oder ) befindet sich hinten an jedem iPod Dock-Adapter.
iPod mit Farbdisplay
(20 GB oder 30 GB) oder
U2 Special Edition
iPod mit Farbdisplay
(40 GB oder 60 GB) oder
iPod (40 GB)
iPod mini
(4 GB oder 6 GB)

2
De
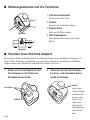
■ Bedienungselemente und ihre Functionen
1. Setzen Sie die Anschläge Ihres iPod
Dock-Adapters in die Schlitze am
Steckplatz dieses Geräts.
2.
Setzen Sie den iPod Dock-Adapter
ein, bis er in den Steckplatz dieses
Geräts einschnappt.
1 iPod Anschlussklemme
Zum Anschluss Ihres iPod.
2 Schlitze
Halten Sie einen iPod Dock-Adapter.
3 Adapter-Halter
Hält einen iPod Dock-Adapter.
4 Dock-Kabelklemme
Zum Anschließen des mitgelieferten Dock-
Kabels.
■ Einsetzen eines iPod Dock-Adapters
Setzen Sie den mit Ihrem iPod mitgelieferten iPod Dock-Adapter in den Steckplatz am Hauptgerät. Je
nach Typ Ihres iPod kann es erforderlich sein, einen der mit diesem Gerät mitgelieferten iPod Dock-
Adapter einzustecken. Einzelheiten zum iPod Dock-Adapter siehe Seite 1.
3
1
2
Oberseite
Rückseite
Schlitz
Wenn Sie den
iPod Dock-Adapter
von diesem Gerät
abziehen, setzen
Sie einen Ihrer
Finger in den
Schlitz am iPod
Dock-Adapter und
ziehen ihn nach
oben.
Schlitze
Anschläge
4

3
De
■
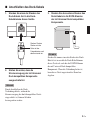
Anschließen des Dock-Kabels
Stecken Sie den
Stecker mit der
Seite mit der
Freigabetaste nach
oben weisend ein.
DOCK
1. Stecken Sie einen der Stecker des
Dock-Kabels fest in die Dock-
Kabelklemme dieses Geräts.
2. Stellen Sie sicher, dass die
Stromversorgung der mit Universal
Dock kompatiblen Komponente
ausgeschaltet ist.
Hinweis
Durch Anschließen des Dock-
Verbindungskabels, während die
Stromversorgung des dock-kompatiblen Geräts
eingeschaltet ist, können Schäden
hervorgerufen werden.
3. Stecken Sie den anderen Stecker des
Dock-Kabels in die DOCK-Klemme
der mit Universal Dock kompatiblen
Komponente.
Hinweis
Stecken Sie immer einen der Stecker des Dock-
Kabels fest in sowohl die Dock-Kabelklemme
dieses Geräts als auch die die DOCK-Klemme
der mit Universal Dock kompatiblen
Komponente. Wenn die Verbindung locker ist,
kann dieses Gerät ungewünschtes Rauschen
abgeben.

4
De
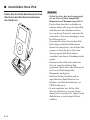
Hinweise
• Stellen Sie sicher, dass der Ausgangspegel
der mit Universal Dock kompatiblen
Komponente auf Minimum eingestellt ist.
• Um den Dock-Anschluss vor Schäden zu
schützen, drehen oder biegen Sie Ihren iPod
beim Einsetzen oder Abnehmen in dieses
bzw. von diesem Gerät nicht, und achten Sie
darauf, dieses Gerät nicht umzukippen, wenn
Ihr iPod eingesetzt ist.
•Verwenden Sie dieses Gerät mit dem iPod
Dock-Adapter (mit Ihrem iPod oder mit
diesem Gerät mitgeliefert), der für Ihren iPod
geeignet ist. Wenn Sie dieses Gerät ohne
einen geeigneten iPod Dock-Adapter
verwenden, kann lockere Verbindung bewirkt
werden.
• Nehmen Sie Ihren iPod nicht von diesem
Gerät ab, wenn Sie auf Ihrem iPod
gespeicherte Musik, Fotos oder Filme mit der
mit Universal Dock kompatiblen
Komponente wiedergeben.
• Schließen Sie Ihren iPod ohne anderes
angeschlossenes iPod-Zubehör an (wie
Kopfhörer, eine Kabelfernbedienung, ein
UKW-Sendeteil usw.).
• Es wird empfohlen, dass Sie Ihre iPod-
Software aktualisieren, bevor Sie ihn mit
diesem Gerät verwenden. Der Updater für die
iPod-Software ist auf der Apple-Website
erhältlich.
■ Anschließen Ihres iPod
Setzen Sie den Dock-Anschlussport Ihres
iPod fest in die iPod Anschlussklemme
des Geräts ein.
La pagina si sta caricando...
La pagina si sta caricando...
La pagina si sta caricando...
La pagina si sta caricando...
La pagina si sta caricando...
La pagina si sta caricando...
La pagina si sta caricando...
La pagina si sta caricando...
La pagina si sta caricando...
La pagina si sta caricando...
La pagina si sta caricando...
La pagina si sta caricando...
La pagina si sta caricando...
La pagina si sta caricando...
La pagina si sta caricando...
La pagina si sta caricando...
La pagina si sta caricando...
La pagina si sta caricando...
La pagina si sta caricando...
La pagina si sta caricando...
La pagina si sta caricando...
La pagina si sta caricando...
La pagina si sta caricando...
La pagina si sta caricando...
La pagina si sta caricando...
La pagina si sta caricando...
La pagina si sta caricando...
La pagina si sta caricando...
La pagina si sta caricando...
La pagina si sta caricando...
La pagina si sta caricando...
La pagina si sta caricando...
La pagina si sta caricando...
La pagina si sta caricando...
La pagina si sta caricando...
La pagina si sta caricando...
La pagina si sta caricando...
La pagina si sta caricando...
La pagina si sta caricando...
La pagina si sta caricando...
La pagina si sta caricando...
La pagina si sta caricando...
La pagina si sta caricando...
La pagina si sta caricando...
La pagina si sta caricando...
La pagina si sta caricando...
La pagina si sta caricando...
La pagina si sta caricando...
La pagina si sta caricando...
La pagina si sta caricando...
La pagina si sta caricando...
La pagina si sta caricando...
-
 1
1
-
 2
2
-
 3
3
-
 4
4
-
 5
5
-
 6
6
-
 7
7
-
 8
8
-
 9
9
-
 10
10
-
 11
11
-
 12
12
-
 13
13
-
 14
14
-
 15
15
-
 16
16
-
 17
17
-
 18
18
-
 19
19
-
 20
20
-
 21
21
-
 22
22
-
 23
23
-
 24
24
-
 25
25
-
 26
26
-
 27
27
-
 28
28
-
 29
29
-
 30
30
-
 31
31
-
 32
32
-
 33
33
-
 34
34
-
 35
35
-
 36
36
-
 37
37
-
 38
38
-
 39
39
-
 40
40
-
 41
41
-
 42
42
-
 43
43
-
 44
44
-
 45
45
-
 46
46
-
 47
47
-
 48
48
-
 49
49
-
 50
50
-
 51
51
-
 52
52
-
 53
53
-
 54
54
-
 55
55
-
 56
56
-
 57
57
-
 58
58
-
 59
59
-
 60
60
-
 61
61
-
 62
62
-
 63
63
-
 64
64
-
 65
65
-
 66
66
-
 67
67
-
 68
68
-
 69
69
-
 70
70
-
 71
71
-
 72
72


in altre lingue
- English: Yamaha YDS-11 Owner's manual
- français: Yamaha YDS-11 Le manuel du propriétaire
- español: Yamaha YDS-11 El manual del propietario
- Deutsch: Yamaha YDS-11 Bedienungsanleitung
- русский: Yamaha YDS-11 Инструкция по применению
- Nederlands: Yamaha YDS-11 de handleiding
- português: Yamaha YDS-11 Manual do proprietário
- dansk: Yamaha YDS-11 Brugervejledning
- svenska: Yamaha YDS-11 Bruksanvisning
- 日本語: Yamaha YDS-11 取扱説明書
- Türkçe: Yamaha YDS-11 El kitabı
- suomi: Yamaha YDS-11 Omistajan opas
- română: Yamaha YDS-11 Manualul proprietarului