ProLights MOSAICOJR Manuale utente
- Categoria
- Proiettori
- Tipo
- Manuale utente

USER MANUAL
MANUALE UTENTE
MOSAICOJR
EN - IT
OUTDOOR LED PROJECTOR

All rights reserved by Music & Lights S.r.l. No part of this instruction manual may be
reproduced in any form or by any means for any commercial use.
In order to improve the quality of products, Music&Lights S.r.l. reserves the right to modify the
characteristics stated in this instruction manual at any time and without prior notice.
All revisions and updates are available in the ‘manuals’ section on site www.musiclights.it
REV.01-07/19

1
MOSAICOJR
Packing content
• MOSAICOJR
• Power adapter cable
• Signal adapter cable (2 pcs)
• User manual
TABLE OF CONTENTS
Safety
General instructions
Warnings and installation precautions
1 Introduction
1. 1 Description
1. 2 Technical specifications
1. 3 Operating elements and connections
2 Installation
2. 1 Mounting
2. 2 Mounting with optional bracket
3 Functions and settings
3. 1 Operation
3. 2 Basic
3. 3 Menu structure
3. 4 DMX Addressing
3. 5 DMX Mode
3. 6 Wireless
3. 7 Screen
3. 8 Fixture settings
3. 9 Auto test
3. 10 Manual test
3. 11 Advanced
3. 12 Information on the device
3. 13 Operations in automatic mode
3. 14 Color wheel and Rotating gobos
3. 15 DMX control
3. 16 Connection of the DMX line
3. 17 Construction of the DMX termination
4 Maintenance
4. 1 Maintenance and cleaning the unit
4. 2 Trouble shooting
4. 3 Gobos replacement
2
2
3
3
5
6
7
8
8
9
11
11
12
13
13
13
13
14
14
14
14
19
22
22
23
23
24

MOSAICOJR
2
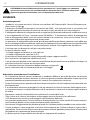
SAFETY
General instruction
• The products referred to in this manual conform to the European Community Directives and are there-
fore marked with .
• The unit is supplied with hazardous network voltage (230V~). Leave servicing to skilled personnel only.
Never make any modifications on the unit not described in this instruction manual, otherwise you will
risk an electric shock.
• Connection must be made to a power supply system fitted with efficient earthing (Class I appliance ac-
cording to standard EN 60598-1). It is, moreover, recommended to protect the supply lines of the units
from indirect contact and/or shorting to earth by using appropriately sized residual current devices.
• The connection to the main network of electric distribution must be carried out by a qualified electrical
installer. Check that the main frequency and voltage correspond to those for which the unit is designed
as given on the electrical data label.
• This unit is not for home use, only professional applications.
• Never use the fixture under the following conditions:
- in places subject to vibrations or bumps;
- in places with a temperature of over 45 °C.
• Make certain that no inflammable liquids, water or metal objects enter the fixture.
• Do not dismantle or modify the fixture.
• All work must always be carried out by qualified technical personnel. Contact the nearest sales point for
an inspection or contact the manufacturer directly.
• If the unit is to be put out of operation definitively, take it to a local recycling
plant for a disposal which is not harmful to the environment.
Warnings and installation precautions
• If this device will be operated in any way different to the one described in this manual, it may suffer
damage and the guarantee becomes void. Furthermore, any other operation may lead to dangers like
short circuit, burns, electric shock, etc.
• Before starting any maintenance work or cleaning the projector, cut off power from the main supply.
• Always additionally secure the projector with the safety rope. When carrying out any work, always com-
ply scrupulously with all the regulations (particularly regarding safety) currently in force in the country
in which the fixture’s being used.
• Keep any inflammable material at a safe distance from the fixture.
• Shields, lenses or ultraviolet screens shall be changed if they have become damaged to such an extent
that their effectiveness is impaired.
• The lamp (LED) shall be changed if it has become damaged or thermally deformed.
• Never look directly at the light beam. Please note that fast changes in lighting, e. g. flashing light, may
trigger epileptic seizures in photosensitive persons or persons with epilepsy.
• Do not touch the product’s housing when operating because it may be very hot.
• This product was designed and built strictly for the use indicated in this documentation. Any other use,
not expressly indicated here, could compromise the good condition/operation of the product and/or
be a source of danger.
• We decline any liability deriving from improper use of the product.
WARNING! Before carrying out any operations with the unit, carefully read this instruction
manual and keep it with cure for future reference. It contains important information about
the installation, usage and maintenance of the unit.

3
MOSAICOJR
- 1 - INTRODUCTION
1.1 DESCRIPTION
MOSAICOJR is a compact IP rated LED gobo projector designed for the projection of logos, images and
textures onto commercial buildings, hotels and city facades. The small size allows for mounting anywhere
without any impact on the surrounding environment or architecture. The onboard zoom ranges from
14° to 44° allowing for an extensive user-flexibility, from projecting crisp and accurate logos to textured
projections.
1.2 TECHNICAL SPECIFICATIONS
LIGHT SOURCE
• Source: 70W white LED
• CT: 7.900K
• Luminous flux: (14°) 2’861 lm - (44°) 2’681lm
• Lux: (14°) 6’070 lux - (44°) 848lx @3 m
• Lux: (14°) 2’250 lux - (44°) 315lx @5 m
• Source life expectancy: > 50.000 h
OPTICS
• Zoom: 14° - 44° motorised linear zoom
• Lens diameter: 63mm
• Lens type: high-quality glass lens optics
• Focus: motorised
COLOUR SYSTEM
• Colour wheel: 7 dichroic filters + open
DYNAMIC EFFECTS
• Rotating gobos: 7 rotating gobos + open, indexing
• Gobo size: gobo Ø 15,8 mm - img Ø 12,7 mm - 1,10 mm
• Auto mode: built-in programs with execution speed adjustment
• Special features: record scenes and create chases and shows throughout these scenes
BODY
• Hardware on-board: on board mechanics for rigging to the ceiling
• Body: aluminium die-casting
• Body colour: cool gray 6C
CONTROL
• Protocols: DMX512, RDM, W-DMX
• DMX channels: 8 / 14channel
• W-DMX: included, wireless solution receiver
• RDM: RDM ready for fixture remote monitor and settings
• Display: black OLED high resolution display
• Firmware upgrade: yes, via USB - DMX interface (UPBOX1) not included
• Master/Slave: for synchronized operation of more units linked in a chain

MOSAICOJR
4
ELECTRONICS
• Dimmer: linear 0 ~ 100% electronic dimmer
• Dimmer curves: 4 different dimming curves available
• Strobe / shutter: 1 - 21 Hz, electronic
• Battery backup: battery backup for user operation without connecting to the main power
• Operating temperature: -20° ~ +45°
• Flicker: flicker free frequency with adjustable PWM
E
LECTRICAL
• Power supply: 100-240 V – 50/60 Hz
• Power consumption (at 230 V): (static) 86,5 W - (dinamic) 91,3W
• Power consumption (at 120 V): (static) 85 W - (dinamic) 84,4W
• Output (at 230 V): 23 units on a single power line
• Output (at 120 V): 13 units on a single power line
• Power factor: pF 0,98 @230 V - pF 0,99 @120 V
PHYSICAL
• Cooling: forced air with IP low noise fan
• Sospension and fixing: hanging bracket suitable for safe hanging and positioning
• Adaptors: XLR and Shuko 16A adaptors included
• Signal connection: moulded IP signal IN/OUT connectors
• Data connection: W-DMX receiver
• Power connection: moulded IP power IN/OUT connectors
• IP rating: 66 for outdoor installations
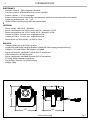
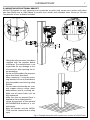
• Dimensions (WxHxD): 247x258x244mm
• Weight: 10kg
247
258
244
Fig.1Technical drawing

5
MOSAICOJR
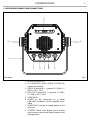
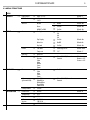
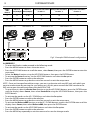
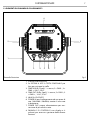
1.3 OPERATING ELEMENTS AND CONNECTIONS
1. MOUNTING BRACKET
2. 2x HEXAGONAL HEAD SCREW SYSTEMS for
tighten the bracket.
3. DMX IN (5-pole XLR): 1 = ground, 2 = DMX-, 3 =
DMX+, 4 N/C, 5 N/C.
4. DMX OUT (5-pole XLR): 1 = ground, 2 = DMX-,
3 = DMX+, 4 N/C, 5 N/C.
5. GORE VALVE
6. POWER IN: for connection to a socket
(100-240V~/50-60Hz) via the supplied mains
cable.
7. POWER OUT: connect to supply power to the
next unit
8. CONTROL PANEL with display and 4 button
used to access the control panel functions and
manage them.
Fig.2
Rear panel
3
1
2
4
8
5
6
7
2

MOSAICOJR
6
- 2 - INSTALLATION
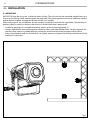
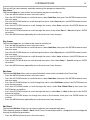
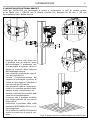
2.1 MOUNTING
MOSAICOJR may be set up on a solid and even surface. The unit can also be mounted upside down to a
cross arm. For fixing, stable mounting clips are required. The mounting place must be of sufficient stability
and be able to support a weight of 10 times of the unit’s weight.
When carrying out any installation, always comply scrupulously with all the regulations (particularly re-
garding safety) currently in force in the country in which the fixture’s being used.
• Install the projector at a suitable location by means of the mounting bracket (1).
• Always additionally secure the projector with the safety rope from falling down. For this purpose, fas-
ten the safety rope at a suitable position so that the maximum fall of the projector will be 20 cm.
• Adjust the projector and use the knob (2) to slightly release or tighten the locking mechanism of the
bracket if is necessary.
1
2
Fig.3

7
MOSAICOJR
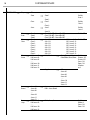
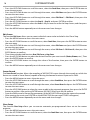
Fig.4 - Example with poles with square cross-section of 150x150 mm
2.2 MOUNTING WITH OPTIONAL BRACKET
MOSAICOJR bracket for wall mounting and suspension on poles with square cross-section with diam-
eter from 50x50 mm to 150x150mm or circular cross-section with diameter from 50 mm to 150 mm.
Complete kit of nuts and bolts included.
• Check that all accessories have been
supplied with the product before
installation. The manufacturer is not
responsible for any damage or loss
of accessories after opening the in-
ner packaging.
• Do not use the product for purposes
other than those described.
• When mounting / using the moun-
ting bracket, be sure to avoid dama-
ging the product and causing safety
hazards.
• Do not mount the bracket on a ver-
tical support whose surface shows
deformations, injuries, crushing, etc.
• Make sure all screws, bolts, nuts are
fully tightened.
• Make sure that no external force is
applied to the installed product.
• Locate the position of the optional
MOSUNIBRACKJR bracket at a suit-
able height..
• Both the bracket and the MOSAI-
COJR must be secured with a safety
rope.

MOSAICOJR
8
- 3 - FUNCTIONS AND SETTINGS
3.1 OPERATION
Connect the supplied main cable to a socket (100-240V~/50-60Hz). Then the unit is ready for operation
and can be operated via a DMX controller or it independently performs its show program in succession.
To switch off, disconnect the mains plug from the socket. For a more convenient operation it is recom-
mended to connect the unit to a socket which can be switched on and off via a light switch.
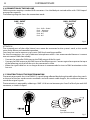
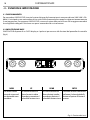
3.2 BASIC
Access control panel functions using the four panel buttons located directly underneath the LED Display
(fig.4).
MENU
UP DOWN ENTER
Used to access the menu or
to return a previous menu
option
Navigates downwards through
the menu list and increases
the numeric value when in a
function
Navigates upwards through
the menu list and decreases
the numeric value when in
a function
Used to select and store the
current menu or confirm the
current function value or
option within a menu
Fig.4 - Functions of the buttons

9
MOSAICOJR
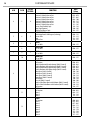
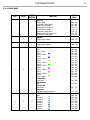
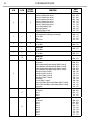
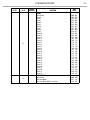
3.3 MENU STRUCTURE
MENU
1
CONNECT
ð
DMX Address
ð
Value (1-512) Default: 1
DMX Mode
ð
8 CH
14 CH
Default: 8CH
Wireless On/Off
ð
On/Off Default :Off
Reset
ð
Yes/No Default :No
WDMX To DMX
ð
Yes/No Default :No
2 SET UP
ð
Screen
ð
Backlight
ð
On
10s
20s
30s
Default: 10s
Flip Display
ð
Yes/No Default :No
Warn Cue
ð
On/Off Default:On
Key Lock
ð
Yes/No Default :No
Fixture
ð
Fan mode
ð
Auto/High/Silent Default: Auto
Temp unit
ð
C°/F° Default: °C
Auto Test
ð
Auto Test
Manual Test
ð
Shutter
Dimmer
Color
Gobo
RGobo
Focus
Zoom
ð
Value (000-255) for each
function
Default:
Dimmer=255
Shutter = 255
3 ADVANCED
ð
Reset
ð
All
Color
Gobo
Focus
Zoom
ð
Yes/No
Adjust
(password: 050)
ð
Color Offset
Gobo Offset
RGobo Offset
Focus Offset
Zoom Offset
ð
Value (000-255) for each
function
Factory Reload
ð
Yes/No
4
INFORMATION
ð
Fixture Time
ð
0-9999 Default: 0
Temperature
ð
58 °C
Fans Speed
ð
**%
Software
Version
ð
DISP: V1.0
CTR1:V1.0
UID
ð
15D00231****

MOSAICOJR
10
5 STAND ALONE
ð
Play
ð
Off
Show
ð
Show 1
...
Show 3
Default:
Show 1
Chase
ð
Chase 1
...
Chase 8
Default:
Chase 1
Scene
ð
Scene 1
…
Scene 32
Default:
Scene 1
Edit
Show
ð
Show 1
Show 2
Show 3
ð
Chase 1(On-Off) - Chase 8(On-Off)
Chase 1(On-Off) - Chase 8(On-Off)
Chase 1(On-Off) - Chase 8(On-Off)
Default: Off
Edit
Chase
ð
Chase 1
Chase 2
Chase 3
Chase 4
Chase 5
Chase 6
Chase 7
Chase 8
ð
Step 1-16
Step 1-16
Step 1-16
Step 1-16
Step 1-16
Step 1-16
Step 1-16
Step 1-16
Off - Scenes1-32
Off - Scenes1-32
Off - Scenes1-32
Off - Scenes1-32
Off - Scenes1-32
Off - Scenes1-32
Off - Scenes1-32
Off - Scenes1-32
Default: Off
Edit
Scenes
ð
Edit Scenes 01
Edit Scenes 02
Edit Scenes 03
......
Edit Scenes 30
Edit Scenes 31
Edit Scenes 32
ð
New/Edit Scene
ð
Shutte/Dimmer/Color/
Gobo/RGobo/Focus/Zoom
Default:
Dimmer: 255
Shutter: 255
Focus: 128
Zoom: 128
All others
at 0
Copy Scene
ð
Off
Scenes 01
Scenes 02
Scenes 03
......
Scenes 30
Scenes 31
Scenes 32
Scenes
Record
ð
Scenes 01
Scenes 02
Scenes 03
......
Scenes 30
Scenes 31
Scenes 32
ð
*
DMX - Scenes Record
Slave
setup
ð
Edit Scenes 01
Edit Scenes 02
......
Edit Scenes 30
Edit Scenes 32
ð
RGobo, Focus, Zoom Default:
RGobo: 0
Focus: 128
Zoom: 128

11
MOSAICOJR
Scenes Time
ð
Scenes 01 Time
Scenes 02 Time
Scenes 03 Time
......
Scenes 30 Time
Scenes 31 Time
Scenes 32 Time
ð
Fade in Time
Hold Time
Fade out Time
ð
0-3600 s Default: 1S
Chase Time
ð
Chase 1 Time
Chase 2 Time
Chase 3 Time
Chase 4 Time
Chase 5 Time
Chase 6 Time
Chase 7 Time
Chase 8 Time
ð
0-3600 s Default: 1S
Move blackout
ð
Scene 01
Scene 02
Scene 03
......
Scene 30
Scene 31
Scene 32
ð
Off-On
3.4 DMX ADDRESSING
To enter the DMX mode, follow these steps:
• Press the MENU button to access the main menu.
• Press the UP/DOWN button to scroll the menu, select Connect, then press the ENTER button to enter the
next menu.
• Press the UP/DOWN button to scroll through the menu, select DMX Address and press the ENTER key.
• Press the arrow keys to select the desired value (001-512).
• Press the ENTER key to confirm the setting.
• Press the MENU button repeatedly to exit the menu and save changes.
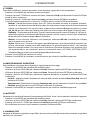
To able to operate the MOSAICOJR with a light controller, adjust the DMX start address for the first a DMX
channel. If the address 33 on the controller is provided for controlling the function of the first DMX chan-
nel, adjust the start address 33 on the MOSAICOJR. The other functions of the light effect panel are then
automatically assigned to the following addresses.
An example with the start address 33 is shown in fig.5.
3.5 DMX MODE
The MOSAICOJR has 2 DMX channel configurations which can be accessed from the control panel.
• Press the MENU button to access the main menu.
• Press the UP/DOWN button to scroll the menu, select Connect, then press the ENTER button to enter the
next menu.
• Press the UP/DOWN button to scroll through the menu, select DMX Mode and press the ENTER button to
enter the next menu.
• Use the UP/DOWN button to select the desired DMX channel configuration (8 CH,14CH), then press the
ENTER button to confirm your choice.
• Press the MENU button repeatedly to exit the menu and save changes.
NOTE: through the 14CH mode it is possible to edit or store scenes inside the projector.

MOSAICOJR
12
Number
DMX
channels
Address of
start (example)
Address of
start (example)
Next possible start address
for unit n ° 1
Next possible start address
for unit n ° 2
Next possible start address
for unit n ° 3
8 33 33-40 41 49 57
14 33 33-46 47 61 75
DMX512 Controller
. . . . . . . . . . . .
Fig.5 - Example 8 DMX channels configuration
DMX Address: 33 DMX Address: 57DMX Address: 41 DMX Address: 49
3.6 WIRELESS
• To enter the Wireless mode proceed in the following mode:
• Press the MENU button to access the main menu.
• Press the UP/DOWN button to scroll the menu, select Connect, then press the ENTER button to enter the
next menu.
• Select the Wireless function using the UP/DOWN buttons, then press the ENTER button.
• To activate the Receive function, use the UP/DOWN buttons and select the On option.
• Press the ENTER button to confirm the selection.
• Press the MENU button to go back or wait a few seconds to exit the setup menu.
NOTE - Once you have performed these steps, you must synchronize with any WiFi unit with which you
want to communicate by pressing the sync button on it. At this point connect the DMX console to the
WiFi unit to open the communication with the MOSAICOJR.
• To reset the unit, select the Receive Reset function using the UP/DOWN buttons, press the ENTER button
until the display shows Connect, then select Receive Reset using the UP/DOWN buttons, then press the
ENTER button.
• To activate the mode use the UP / DOWN keys and select the Yes option.
• Press the ENTER button to confirm the selection.
• Press the MENU button to go back or wait a few seconds to exit the setup menu.
• To activate the Wireless to DMX function, use the UP / DOWN buttons to press the ENTER button until the
display shows Connect, then select Wireless to DMX, then press the ENTER button.
• To activate the mode use the UP/DOWN buttons and select the Yes option.
• Press the ENTER button to confirm the selection.
• Press the MENU key repeatedly to exit the menu and to save the changes made.

13
MOSAICOJR
3.7 SCREEN
It is possible to modify the following parameters, related to the display, following the same procedure:
• Press the MENU button to access the main menu.
• Press the UP/DOWN button to scroll through the menu, select Set Up, then press the ENTER button ac-
cess the next menu.
• Press the UP/DOWN button to select Screen and press the ENTER button to proceed.
• Select the proposed option with the UP/DOWN button and press the ENTER button to confirm.
- Backlight - Auto Off display backlight. This function allows you to switch off automatically the back-
lighting of the display after a certain time which can be set using the directional keys. To have the
display always on select On or set a value between those shown (10s, 20s, 30s) to turn off the display
once the chosen time has elapsed, after exiting the menu.
- Flip Display - Display orientation. This feature allows you to rotate the display by 180 ° to get a better
view of the display when the unit is hanging upside down. Select Yes to activate the function, No to
deactivate it or AUTO.
- Warn Cue - Warning of error. Use the arrow keys to select Off or On depending on whether or not the
display shows error warnings.
- Key lock - With this function, you can lock the keys on the control panel to prevent, for example, tam-
pering with the settings. If this function is activated, the keys are locked automatically. To disable or
temporarily disable or disable the key lock function, press the keys in the following order to regain
access to the menu commands: UP, DOWN, UP, DOWN, ENTER. Select Yes to activate the function or
No to deactivate it.
• Press the ENTER button to confirm the selection.
• Press the MENU key repeatedly to exit the menu and to save the changes made.
3.8 FIXTURE SETTINGS
You can change the parameters for the device by following these steps:
• Press the button MENU to enter the menu mode.
• Use the buttons UP/DOWN to select Set Up. Press the button ENTER to confirm.
• Use the buttons UP/DOWN to select Fixture. Press the button ENTER to confirm.
• Press the buttons UP/DOWN to select the desired option and press the button ENTER to confirm:
- Fan Mode - Fan speed. Select the desired fan speed Auto, Silent, High through the button UP/ DOWN.
- Temperature unit. Select Temperature unit function and then choose Celsius / Fahrenheit measurement unit
then press the ENTER button to confirm the selection.
• Press the MENU key repeatedly to exit the menu and to save the changes made.
3.9 AUTO TEST
Allow checking the proper functioning of the unit. Start the automatic test in the following way:
• Press the button MENU to enter the menu mode.
• Use the buttons UP/DOWN to select the Set Up. Press the button ENTER to confirm.
• Press the buttons UP/DOWN to select the Auto Test and press ENTER to confirm.
• To confirm and start the automatic test press the ENTER button.
3.10 MANUAL TEST
It allows to do adjustments on the effects through commands panel to obtain a perfect balance between
the projectors.
• Press the button MENU to enter the menu mode.
• Press the buttons UP/DOWN to select the item Set Up. Then press the button ENTER.

MOSAICOJR
14
• Press the buttons UP/DOWN to select the Manual Test. Then press the button ENTER.
• Select the effect you want change (Shutter, Dimmer, Color, Gobo, RGobo, Focus, Zoom). Then press the button
ENTER to confirm.
• Use the directional buttons to calibrate the effect setting a value between 0 ~ 255. Then press the button
ENTER to confirm.
• Press the MENU key repeatedly to exit the menu and to save the changes made.
3.11 ADVANCED
It is possible to modify the following parameters following the same procedure:
• Press the MENU button to access the main menu.
• Press the UP/DOWN button to scroll through the menu, select Advanced, then press the ENTER button
to enter the next menu.
• Press the UP/DOWN button to select one off the following parametres:
- Reset - To start a preset program to restore the selected function (All, Color, Gobo, Focus, Zoom).
- Adjust - To allows you to change all parameters. Insert the password "050" to enter. Select the desired
function (Color Offset, Gobo Offset, RGobo Offset, Focus Offset, Zoom Offset) and the choose the value (0 ~ 255).
- Factory Reload - To reset the unit. Select Yes or No and select ENTER to confirm.
• Press the ENTER button to confirm the selection and wait for the selected function to be restored.
• Press the MENU key repeatedly to exit the menu and to save the changes made.
3.12 INFORMATION ON THE DEVICE
To view all the information on the device, proceed as follows:
• Press the MENU button to access the main menu. Press the UP/DOWN button to select Information, then
press the ENTER button to access the next menu.
• Press the UP/DOWN button to scroll through the menu, then select one of the following information
and press the ENTER button to display it.
- Fixture Time - To view the operating time of the projector.
- Temperature - To view the temperature of the device in °C/°F on the display.
- Fans Speed - To view on the display the fan speed present near the lamp.
- Software Version - To view the firmware version will show on the display.
- UID - To view the identification ID for the RDM control.
• Press the MENU button repeatedly to exit the menu and to save the changes made.
3.13 OPERATIONS IN AUTOMATIC MODE
Play Show
The unit independently runs through its show. Before you send an automatic program you need to set the
drive as Master/Alone:
• Press the MENU button to access the main menu.
• Press the UP/DOWN button to scroll the menu, select Stand Alone, then press the ENTER button to enter
the next menu.
• Press the UP/DOWN button to scroll through the menu, select Play and press the ENTER button to enter
the next menu.
• Press the UP/DOWN button to scroll through the menu, select Show and press ENTER to confirm your
choice.
• Press the UP/DOWN button to select the mode of operation: Show 1, Show 2, Show 3.
• Press the ENTER button to confirm your choice.
• Press the MENU button repeatedly to exit the menu and save changes.

15
MOSAICOJR
The unit will go into automatic mode by executing the program automatically.
Play Chase
The function Chase lets you choose the automatic program to actually run.
• Press the MENU button to access the main menu.
• Press the UP/DOWN button to scroll the menu, select Stand Alone, then press the ENTER button to enter
the next menu.
• Press the UP/DOWN button to scroll through the menu, select Play and press the ENTER button to enter
the next menu.
• Press the UP/DOWN button to scroll through the menu, select Chase and press the ENTER button to
enter the next menu.
• Press the UP/DOWN button to scroll through the menu, then select Chase 1 ~ Chase 8 and press ENTER
to confirm.
• Press the MENU button repeatedly to exit the menu and save changes.
Play Scenes
The function Scenes lets you choose the scene to actually run.
• Press the MENU button to access the main menu.
• Press the UP/DOWN button to scroll the menu, select Stand Alone, then press the ENTER button to enter
the next menu.
• Press the UP/DOWN button to scroll through the menu, select Play and press the ENTER button to enter
the next menu.
• Press the UP/DOWN button to scroll through the menu, select Scenes and press the ENTER button to
enter the next menu.
• Press the UP/DOWN button to scroll through the menu, then select Scene 1 ~ Scene 32 and press ENTER
to confirm.
• Press the MENU button repeatedly to exit the menu and save changes.
Edit Show
The function Edit Show allows you to create individual scenes to be included in the Chase Step.
• Press the MENU button to access the main menu.
• Press the UP/DOWN button to scroll the menu, select Stand Alone, then press the ENTER button to enter
the next menu.
• Press the UP/DOWN button to scroll through the menu, select Edit Show and press the ENTER button to
enter the next menu.
• Press the UP/DOWN button to scroll through the menu, select Show 1/Show 2/Show 3, then press the
ENTER button to confirm.
• Press the UP/DOWN button to scroll through the menu, select Chase 1 ~ Chase 8, then press the ENTER
button to confirm.
• Press the UP/DOWN button to change the value of the function, then press the ENTER button to
confirm.
• Press the MENU button repeatedly to exit the menu and save changes.
Edit Chase
The function Edit Chase allows you to create automatic pre-programmed show.
The automatic programs Chase1 ~ Chase8. Each Chase can be composed of 1 ~ 16 step that can be configured
through the following procedure:
• Press the MENU button to access the main menu.

MOSAICOJR
16
• Press the UP/DOWN button to scroll the menu, select the Stand Alone, then press the ENTER button to
enter the next menu.
• Press the UP/DOWN button to scroll through the menu, select Edit Chases and press the ENTER button
to enter the next menu.
• Press the UP/DOWN button to scroll through the menu, select Edit Chase 1 ~ Edit Chase 8, then press the
ENTER button to confirm.
• Press the UP/DOWN button to select the Step 01 ~ Step 16, and press ENTER to confirm.
• Press the UP/DOWN button to select the Scene 1 ~ 32 you want to set for the Step chosen, and then press
ENTER to confirm.
• Press the MENU button repeatedly to exit the menu and save changes.
Edit Scenes
The function Edit Scenes allows you to create individual scenes to be included in the Chase Step.
• Press the MENU button to access the main menu.
• Press the UP/DOWN button to scroll the menu, select Stand Alone, then press the ENTER button to enter
the next menu.
• Press the UP/DOWN button to scroll through the menu, select Edit Scenes and press the ENTER button
to enter the next menu.
• Press the UP/DOWN button to scroll through the menu, select Edit Scene 1 ~ Edit Scene 32, then press the
ENTER button to confirm.
• Then choose the desired function: New / Edit Scene or Copy Scene.
• Press the UP/DOWN button to select the desired function you want to edit (Shutter, Dimmer, etc.), Then
press the ENTER button to confirm.
• Press the UP/DOWN button to change the value of the function, then press the ENTER button to
confirm.
• Press the MENU button repeatedly to exit the menu and save changes.
Scenes Record
The Scenes Record function allows the recording of MOSAICOJR scenes through the console on which the
fixture was stored in Scene Record, capable of driving the beacon functions expressed in DMX.
• Press the MENU button to access the main menu.
• Press the UP/DOWN button to scroll through the menu, select Stand Alone, then press the ENTER button
to enter the next menu.
• Press the UP/DOWN button to scroll through the menu, select Scenes Record and press the ENTER button
to enter the next menu.
• Press the UP/DOWN button to select the scene to edit in the automatic program, then press the ENTER
button to confirm. After pushing ENTER button, MOSAICOJR will wait for the confirm.
• From the DMX console, change the parameters of the MOSAICOJR based on the scene to be created.
• After creating the scene, press ENTER on the MOSAICOJR (the message STORED will appear).
• Press the MENU button repeatedly to exit the menu and save changes.
Slave Setup
The function Slave Setup allows you to execute automatic pre-programmed show set on the master
projector.
• Press the MENU button to access the main menu.
• Press the UP/DOWN button to scroll the menu, select the Stand Alone icon, then press the ENTER button
to enter the next menu.

17
MOSAICOJR
• Press the UP/DOWN button to scroll through the menu, select Slave Setup and press the ENTER button
to enter the next menu.
• Press the UP/DOWN button to scroll through the menu, select Edit Scene 1 ~ Edit Scene 32, then press the
ENTER button to confirm.
• Press the UP/DOWN button to select the desired function you want to edit (RGobo, Focus, Zoom), Then
press the ENTER button to confirm.
• Press the UP/DOWN button to change the value of the function, then press the ENTER button to
confirm.
• Press the MENU button repeatedly to exit the menu and save changes.
NOTE: if the Slave units have to do the same operation as the MASTER, during a recording, the values of
Focus, Zoom and RGobo will not be stored. These values must be adjusted manually on the Slave units, via this
section.
Scenes Time
The Scenes Time function allows you to set the input, duration and output times of each single scene.
• Press the ENTER key to access the main menu.
• Press the UP / DOWN button to scroll through the menu, select Stand Alone, then press the ENTER button
to access the next menu.
• Press the UP / DOWN button to select Scenes Time and press the ENTER button to access the next menu.
• Press the UP / DOWN button to select Scene 01 Time ~ Scene 32 Time, then press the ENTER button.
• Press the UP / DOWN button to change the following times, then press the ENTER button to confirm:
- Fade in Time - Scene entry time.
- Hold Time - Time duration of the scene.
- Fade Out Time - Time out of the scene.
• Press the MENU key several times to exit the menu and to save the changes made.
Move blackout
The Move Blackout function allows you not to display the scroll between one scene and another; any kind of
change between a scene and the next occurs “in the dark”.
• Press the ENTER key to access the main menu.
• Press the UP / DOWN button to scroll through the menu, select Stand Alone, then press the ENTER button
to access the next menu.
• Press the UP / DOWN button to select Move Blackout and press the ENTER button to access the next menu.
• Press the UP / DOWN button to select On or Off then press the ENTER button.
• Press the MENU key several times to exit the menu and to save the changes made.
When the projector is in Stand Alone it turns out to be MASTER, as well as if you enter or connect the projec-
tor to the DMX. When you exit the menu or disconnect the DMX connection, the projector restarts the
show execution from the last scene interrupted by these two actions.

MOSAICOJR
18
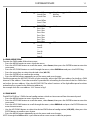
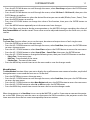
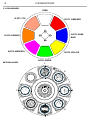
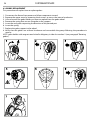
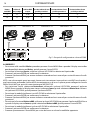
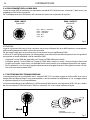
3.14 COLOR WHEEL
ROTATING GOBOS
SLOT6: ORANGE
OPEN
SLOT1: DARK RED
SLOT2: DARK
BLUE
SLOT7: CTO
SLOT3: YELLOW
SLOT4: GREEN
SLOT5: MAGENTA
1
2
3
4
5
6
7
La pagina sta caricando ...
La pagina sta caricando ...
La pagina sta caricando ...
La pagina sta caricando ...
La pagina sta caricando ...
La pagina sta caricando ...
La pagina sta caricando ...
La pagina sta caricando ...
La pagina sta caricando ...
La pagina sta caricando ...
La pagina sta caricando ...
La pagina sta caricando ...
La pagina sta caricando ...
La pagina sta caricando ...
La pagina sta caricando ...
La pagina sta caricando ...
La pagina sta caricando ...
La pagina sta caricando ...
La pagina sta caricando ...
La pagina sta caricando ...
La pagina sta caricando ...
La pagina sta caricando ...
La pagina sta caricando ...
La pagina sta caricando ...
La pagina sta caricando ...
La pagina sta caricando ...
La pagina sta caricando ...
La pagina sta caricando ...
La pagina sta caricando ...
La pagina sta caricando ...
La pagina sta caricando ...
La pagina sta caricando ...
La pagina sta caricando ...
La pagina sta caricando ...
La pagina sta caricando ...
La pagina sta caricando ...
-
 1
1
-
 2
2
-
 3
3
-
 4
4
-
 5
5
-
 6
6
-
 7
7
-
 8
8
-
 9
9
-
 10
10
-
 11
11
-
 12
12
-
 13
13
-
 14
14
-
 15
15
-
 16
16
-
 17
17
-
 18
18
-
 19
19
-
 20
20
-
 21
21
-
 22
22
-
 23
23
-
 24
24
-
 25
25
-
 26
26
-
 27
27
-
 28
28
-
 29
29
-
 30
30
-
 31
31
-
 32
32
-
 33
33
-
 34
34
-
 35
35
-
 36
36
-
 37
37
-
 38
38
-
 39
39
-
 40
40
-
 41
41
-
 42
42
-
 43
43
-
 44
44
-
 45
45
-
 46
46
-
 47
47
-
 48
48
-
 49
49
-
 50
50
-
 51
51
-
 52
52
-
 53
53
-
 54
54
-
 55
55
-
 56
56


ProLights MOSAICOJR Manuale utente
- Categoria
- Proiettori
- Tipo
- Manuale utente
in altre lingue
- English: ProLights MOSAICOJR User manual