Trendnet RB-TEW-731BR Guida utente
- Categoria
- Router
- Tipo
- Guida utente
Questo manuale è adatto anche per

TRENDnet User’s Guide
Cover Page

© Copyright 2014 TRENDnet. All Rights Reserved.
TRENDnet User’s Guide
Table of Contents
i
Contents
Product Overview ........................................................................... 1
Package Contents .......................................................................................................... 1
Features ......................................................................................................................... 1
Product Hardware Features........................................................................................... 2
Application Diagram ...................................................................................................... 4
Basic Router Setup .......................................................................... 5
Creating a Home Network ............................................................................................. 5
Router Installation ......................................................................................................... 6
Connect additional wired devices to your network ....................................................... 9
Wireless Networking and Security ................................................. 10
How to choose the type of security for your wireless network .................................. 10
Secure your wireless network ..................................................................................... 11
Connect wireless devices to your router ..................................................................... 12
Connect wireless devices using WPS ........................................................................... 13
Basic wireless settings ................................................................................................. 14
Steps to improve wireless connectivity ....................................................................... 16
Advanced wireless settings .......................................................................................... 18
Wireless Repeater........................................................................................................ 18
Access Control Filters .................................................................... 20
Access control basics ................................................................................................... 20
MAC address filters ................................................................................................. 20
Domain/URL Filters ................................................................................................. 21
Advanced Router Setup ................................................................. 22
Access your router management page ........................................................................ 22
Set your router date and time ..................................................................................... 22
Manually configure your Internet connection ............................................................ 23
IPv6 Internet Connection Settings ............................................................................... 23
Clone a MAC address ................................................................................................... 24
Change your router IP address .................................................................................... 25
Set up the DHCP server on your router ....................................................................... 25
Set up DHCP reservation ............................................................................................. 26
Enable/disable UPnP on your router ........................................................................... 27
Identify your network on the Internet ........................................................................ 27
Allow remote access to your router management page ............................................. 28
Open a device on your network to the Internet .......................................................... 29
DMZ ......................................................................................................................... 29
Virtual Server .......................................................................................................... 29
Special Applications ................................................................................................ 32
Router Maintenance & Monitoring ............................................... 34
Reset your router to factory defaults .......................................................................... 34
Router Default Settings ............................................................................................... 34
Backup and restore your router configuration settings .............................................. 35
Restart your router ...................................................................................................... 37
Check the router system information ......................................................................... 38
View your router packet statistics ............................................................................... 39
View wireless devices connected to your router ........................................................ 39
Router Management Page Structure ............................................. 40
Technical Specifications ................................................................ 41
Troubleshooting ........................................................................... 43
Appendix ...................................................................................... 44

© Copyright 2016 TRENDnet. All Rights Reserved.
TRENDnet User’s Guide
TEW-731BR
1
Product Overview
TEW-731BR
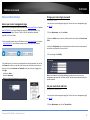
Package Contents
In addition to your router, the package includes:
Multi-Language Quick Installation Guide
Network cable (1 m / 3.28 ft.)
Power adapter (5V DC, 1A)
If any package contents are missing or damaged, please contact the retail store, online
retailer, or reseller/distributor from which the product was purchased.
Features
TRENDnet’s N300 WiFi Router, model TEW-731BR, offers up to 300 Mbps wireless N
networking to share files, play games, and surf the internet. Control access to the
internet and manage bandwidth for devices connected to router. For your convenience,
the wireless network is setup and pre-encrypted out of the box.
Ease of Use
Easy Setup
Get up and running in minutes with the intuitive guided setup
One Touch Connection
Securely connect to the router at the touch of the Wi-Fi Protected Setup (WPS) button
Access Control
Pre-Encrypted
For your convenience the wireless network is pre-encrypted with its own unique
password
Access Controls
Control access to specific websites and manage which devices can access the router
Performance
N300 Wireless
Proven 300 Mbps Wireless N
Fast Ethernet Ports
10/100 Mbps Ethernet ports connect up to four devices
Wireless Coverage
Dual 5 dBi antennas provide extended wireless coverage
IPv6
IPv6 network support
*Maximum wireless signal rates are referenced from IEEE 802.11 theoretical specifications. Actual data
throughput and coverage will vary depending on interference, network traffic, building materials and other
conditions.

© Copyright 2016 TRENDnet. All Rights Reserved.
TRENDnet User’s Guide
TEW-731BR
2
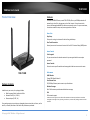
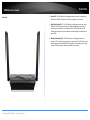
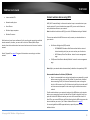
Product Hardware Features
Rear View
Reset Button –Push and hold this button for 10 seconds and release to reset
your router to its factory defaults.
LAN Ports – Connect Ethernet cables (also called network cables) from your
router LAN ports to your wired network devices.
WAN Port– Connect an Ethernet cable from your router WAN port to your
modem.
Power Port – Connect the included power adapter from your router power
port and to an available power outlet.
Antennas – The antennas broadcast wireless network signals.

© Copyright 2016 TRENDnet. All Rights Reserved.
TRENDnet User’s Guide
TEW-731BR
3
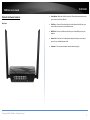
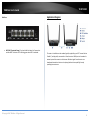
Front View
Power LED -This LED indicator is solid green when your router is powered on.
Otherwise if this LED indicator is off, there is no power to your router.
WAN (Link/Activity) LED – This LED indicator is solid green when your router
WAN port is physically connected to the modem Network port (also called
network port) successfully with a Network cable. The LED indicator will be
blinking green while data is transmitted or received through the WAN port of
your router.
WLAN (Link/Activity) LED – This LED indicator is blinking green when the
wireless is “On” and functioning properly on your router. This LED indicator will
be blinking green rapidly while data is transmitted or received by your wireless
clients or wireless network devices connected to your router.

© Copyright 2016 TRENDnet. All Rights Reserved.
TRENDnet User’s Guide
TEW-731BR
4
Side View
WPS (Wi-Fi Protected Setup) – Push and hold this button for 3 seconds to
activate WPS. The button LED is blinking green when WPS is activated.
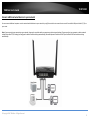
Application Diagram
The router is installed near the modem (typically supplied by your ISP “Internet Service
Provider”) and physically connected to it from the router’s WAN port to the modem’s
network port which connects to the Internet. Wireless signals from the router are
broadcasted to wireless clients such as laptops (with wireless capability) thereby
providing Internet access.

© Copyright 2016 TRENDnet. All Rights Reserved.
TRENDnet User’s Guide
TEW-731BR
5
Basic Router Setup
Creating a Home Network
What is a network?
A network is a group of computers or devices that can communicate with each other. A
home network of more than one computer or device also typically includes Internet
access, which requires a router.
A typical home network may include multiple computers, a media player/server, a
printer, a modem, and a router. A large home network may also have a switch,
additional routers, access points, and many Internet-capable media devices such as TVs,
game consoles, and Internet cameras.
Modem – Connects a computer or router to the Internet or ISP (Internet
Service Provider).
Router – Connects multiple devices to the Internet.
Switch –Connect several wired network devices to your home network. Your
router has a built-in network switch (the LAN port 1-4). If you have more wired
network devices than available Ethernet ports on your router, you will need an
additional switch to add more wired connections.
How to set up a home network
1. For a network that includes Internet access, you’ll need:
Computers/devices with an Ethernet port (also called network port) or wireless
networking capabilities.
A modem and Internet service to your home, provided by your ISP (modem
typically supplied by your ISP).
A router to connect multiple devices to the Internet.
2. Make sure that your modem is working properly. Your modem is often provided by
your Internet Service Provider (ISP) when you sign up for Internet service. If your
modem is not working contact your ISP to verify functionality.
3. Set up your router. See “How to setup your router” below.
4. To connect additional wired computers or wired network devices to your network,
see “Connect additional wired devices to your network” on page 9.
5. To set up wireless networking on your router, see “Wireless Networking and Security”
on page 10.
How to setup your router
Refer to the Quick Installation Guide or continue to the next section “Router
Installation” on page 6 for more detailed installation instructions.
Where to find more help
In addition to this User’s Guide, you can find help below:
http://www.trendnet.com/support
(documents, downloads, and FAQs are available from this Web page)

© Copyright 2016 TRENDnet. All Rights Reserved.
TRENDnet User’s Guide
TEW-731BR
6
Router Installation
Before you Install
Many Internet Service Providers (ISPs) allow your router to connect to the Internet
without verifying the information fields listed below. Skip this section for now and if
your router cannot connect to the Internet using the standard installation process, come
back to this page and contact your ISP to verify required ISP specification fields listed
below.
1. Obtain IP Address Automatically (DHCP)
Host Name (Optional)
Clone Mac Address (Optional)
2. Fixed IP address
WAN IP Address: _____. _____._____._____
(e.g. 215.24.24.129)
WAN Subnet Mask: _____. _____._____._____
WAN Gateway IP Address: _____. _____._____._____
DNS Server Address 1: _____. _____._____._____
DNS Server Address 2: _____. _____._____._____
3. PPPoE to obtain IP automatically
User Name: _________
Password: ________________
Verify Password: ________________
4. PPPoE with a fixed IP address
User Name: _________
Password: ________________
Verify Password: ________________
IP Address: ____. _____._____._____ (e.g. 215.24.24.129)
5. PPTP or Russian PPTP
Type (Dynamic IP or Static IP)
My IP Address: _____. _____._____._____
(e.g. 215.24.24.129)
Subnet Mask:_____. _____._____._____
Gateway:_____. _____._____._____
Server IP: _____. _____._____._____
PPTP Account: ________________
PPTP Password: ________________
Retype Password: ________________
6. L2TP or Russia L2TP
Type (Dynamic IP or Static IP)
My IP Address: _____. _____._____._____
(e.g. 215.24.24.129)
Subnet Mask:_____. _____._____._____
Gateway:_____. _____._____._____
Server IP: _____. _____._____._____
L2TP Account: ________________
L2TP Password: ________________
Retype Password: ________________
7. Russia PPPoE
Type (Dynamic IP or Static IP)
User Name: _________
Password: ________________
Verify Password: ________________
IP Address: ____. _____._____._____ (e.g. 215.24.24.129)

© Copyright 2016 TRENDnet. All Rights Reserved.
TRENDnet User’s Guide
TEW-731BR
7

© Copyright 2016 TRENDnet. All Rights Reserved.
TRENDnet User’s Guide
TEW-731BR
8
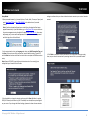
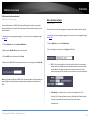
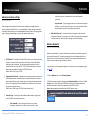
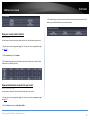
Setup Wizard
1. Open your web browser (e.g. Internet Explorer, Firefox, Safari, Chrome, or Opera) and
enter http://tew-731br or http://192.168.10.1 in the address bar of your web
browser.
Note: If you have already configured your router before, the wizard will no longer
appear automatically. In your web browser, go to http://tew-731br or you can access
the router management using the default IP address http://192.168.10.1. Your router
will prompt you for a user name and password. Enter your user name and password
and click Login, then click on Wizard.
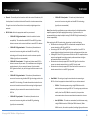
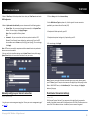
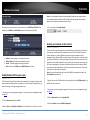
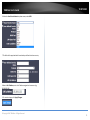
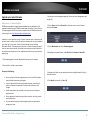
2. In the setup wizard, select your Language and select your WAN Connection Type and
click Next. If you are unsure of the connection, keep the default setting “Dynamic IP”
and click Next and continue to follow the instructions to complete the WAN connection
setup.
Note: Dynamic IP (DHCP) is typical for most Internet services. You can verify your
settings with your Internet Service Provider.
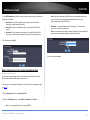
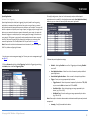
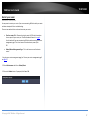
3. Use the default or change the wireless settings and click Next. By default, a unique
SSID (Wi-Fi Name) and wireless key (Wi-Fi Password) have already been preconfigured
on your router. If you change the default settings, please write down the new wireless
settings to reference for your other wireless devices to connect to your router’s wireless
network.
4. Click Finish to complete the setup and wait for the configuration settings to apply,
then, test your internet connection by accessing Internet sites in your web browser.

© Copyright 2016 TRENDnet. All Rights Reserved.
TRENDnet User’s Guide
TEW-731BR
9
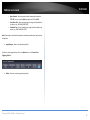
Connect additional wired devices to your network
You can connect additional computers or other network enabled devices to your network by using Ethernet cables to connect them to one of the available LAN ports labeled 1,2,3,4 on
your router.
Note: If you encounter issues connecting to your network, there may be a problem with your computer or device network settings. Please ensure that your computer or device network
settings (also called TCP/IP settings) are configured to obtain IP address settings automatically (also called dynamic IP address or DHCP) and to Obtain DNS Server address settings
automatically.

© Copyright 2016 TRENDnet. All Rights Reserved.
10
TRENDnet User’s Guide
TEW-731BR
Wireless Networking and Security
How to choose the type of security for your wireless network
Setting up wireless security is very important. Leaving your wireless network open and
unsecure could expose your entire network and personal files to outsiders. TRENDnet
recommends reading through this entire section and setting up wireless security on your
new router.
There are a few different wireless security types supported in wireless networking each
having its own characteristics which may be more suitable for your wireless network
taking into consideration compatibility, performance, as well as the security strength
along with using older wireless networking hardware (also called legacy hardware).
It is strongly recommended to enable wireless security to prevent unwanted users from
accessing your network and network resources (personal documents, media, etc.).
In general, it is recommended that you choose the security type with the highest
strength and performance supported by the wireless computers and devices in your
network. Please review the security types to determine which one you should use for
your network.
Wireless Encryption Types
WEP: Legacy encryption method supported by older 802.11b/g hardware. This
is the oldest and least secure type of wireless encryption. It is generally not
recommended to use this encryption standard, however if you have old 802.11
b or 802.11g wireless adapters or computers with old embedded wireless
cards(wireless clients), you may have to set your router to WEP to allow the old
adapters to connect to the router. Note: This encryption standard will limit
connection speeds to 54Mbps.
WPA: This encryption is significantly more robust than the WEP technology.
Much of the older 802.11g hardware was been upgraded (with firmware/driver
upgrades) to support this encryption standard. Total wireless speeds under
this encryption type however are limited to 54Mbps.
WPA-Auto: This setting provides the router with the ability to detect wireless
devices using either WPA or WPA2 encryption. Your wireless network will
automatically change the encryption setting based on the first wireless device
connected. For example, if the first wireless client that connects to your
wireless network uses WPA encryption your wireless network will use WPA
encryption. Only when all wireless clients disconnect to the network and a
wireless client with WPA2 encryption connects your wireless network will then
change to WPA2 encryption. NOTE: WPA2 encryption supports 802.11n speeds
and WPA encryption will limit your connection speeds to 54Mbps
WPA2: This is the most secure wireless encryption available today, similar to
WPA encryption but more robust. This encryption standard also supports the
highest connection speeds. TRENDnet recommends setting your router to this
encryption standard. If you find that one of your wireless network devices does
not support WPA2 encryption, then set your router to either WPA or WPA-Auto
encryption.
Note: Check the specifications of your wireless network adapters and wireless appliances
to verify the highest level of encryption supported.

© Copyright 2016 TRENDnet. All Rights Reserved.
11
TRENDnet User’s Guide
TEW-731BR
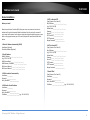
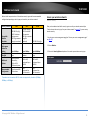
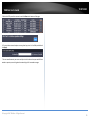
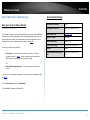
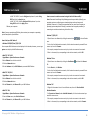
Below is brief comparison chart of the wireless security types and the recommended
configuration depending on which type you choose for your wireless network.
Security Standard
WEP
WPA
WPA2
Compatible
Wireless
Standards
IEEE 802.11a/b/g
(802.11n devices
will operate at
802.11g to connect
using this standard)
IEEE 802.11a/b/g
(802.11n devices
will operate at
802.11g to connect
using this
standard)
IEEE 802.11a/b/g/n
Highest
Performance
Under This
Setting
Up to 54Mbps
Up to 54Mbps
Up to 300Mbps*
Encryption
Strength
Low
Medium
High
Additional
Options
Open System or
Shared Key,
HEX or ASCII,
Different key sizes
TKIP or AES,
Preshared Key or
RADIUS
TKIP or AES,
Preshared Key or
RADIUS
Recommended
Configuration
Open System ASCII
13 characters
TKIP
Preshared Key
8-63 characters
AES
Preshared Key
8-63 characters
*Dependent on the maximum 802.11n data rate supported by the device (150Mbps,
300Mbps, or 450Mbps)
Secure your wireless network
Wireless > Security
After you have determined which security type to use for your wireless network (see
“How to choose the security type for your wireless network” on page 10), you can set up
wireless security.
1. Log into your router management page (see “Access your router management page”
on page 22).
2. Click on Wireless.
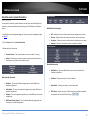
3. Click on the Security Options drop-down list to select your wireless security type.

© Copyright 2016 TRENDnet. All Rights Reserved.
12
TRENDnet User’s Guide
TEW-731BR
Selecting WEP:
If selecting WEP (Wired Equivalent Privacy), please review the WEP settings to configure
and click Apply to save the changes.
Authentication Type– Choose Automatic or Shared Keys.
Note: It is recommended to use Automatic because it is known to be more secure
than Shared Key.
WEP Key – Choose the key length 64-bits or 128-bits.
Note: It is recommended to use 128-bit because it is more secure to use a key that
consists of more characters.
Key 1-4
o This is where you enter the password or key needed for a computer to
connect to the router wirelessly
o You can define up to 4 passwords or 4 keys. Only one key can be active
at a given time. Most users simply define one key.
o Choose a key index 1, 2, 3, or 4 and enter the key.
o When connecting to the router, the client must match both the
password and the Key number. (e.g. if you have activated Key 2 with a
password of 12345, then the client must select: Key 2 (entering Key 1,
3, or 4 will block the ability to connect) and enter password 12345)
Selecting WPA-PSK, WPA2-PSK, or WPA-PSK/WPA2-PSK (WPA2 recommended):
First, from the Authentication Type row, select WPA-PSK, WPA2-PSK, or WPA-
PSK/WPA2-PSK.
The following section outlines options when selecting PSK (Preshared Key Protocol),
Create your Wireless security Passphrase (password or key):
Passphrase – Enter the passphrase.
o This is the password or key that is used to connect your computer to
this router wirelessly
Confirmed Passphrase – Re-enter the passphrase.
Note: 8-63 alphanumeric characters (a,b,C,?,*, /,1,2, etc.)
Connect wireless devices to your router
A variety of wireless network devices can connect to your wireless network such as:
Gaming Consoles
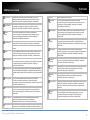
WEP Key Format
HEX
ASCII
Character set
0-9 & A-F, a-f only
Alphanumeric (a,b,C,?,*, /,1,2, etc.)
64-bit key length
10 characters
5 characters
128-bit key length
26 characters
13 characters

© Copyright 2016 TRENDnet. All Rights Reserved.
13
TRENDnet User’s Guide
TEW-731BR
Internet enabled TVs
Network media players
Smart Phones
Wireless Laptop computers
Wireless IP cameras
Each device may have its own software utility for searching and connecting to available
wireless networks, therefore, you must refer to the User’s Manual/Guide of your
wireless client device to determine how to search and connect to this router’s wireless
network.
See the “Appendix” on page 44 for general information on connecting to a wireless
network.
Connect wireless devices using WPS
WPS (Wi-Fi Protected Setup) is a feature that makes it easy to connect devices to your
wireless network. If your wireless devices support WPS, you can use this feature to
easily add wireless devices to your network.
Note: You will not be able to use WPS if you set the SSID Broadcast setting to Disabled.
There are two methods the WPS feature can easily connect your wireless devices to
your network.
Push Button Configuration (PBC) method
o RECOMMENDED Hardware Push Button method–with an external
button located physically on your router and on your client device
o WPS Software/Virtual Push Button - located in router management
page
PIN (Personal Identification Number) Method - located in router management
page
Note: Refer to your wireless device documentation for details on the operation of WPS.
Recommended Hardware Push Button (PBC) Method
Note it is recommended that a wireless key (passphrase or password) is created
before connecting clients using the PBC method. If no wireless key is defined
when connecting via PBC, the router will automatically create an encryption
key that is 64 characters long. This 64 character key will then have to be used if
one has to connect computers to the router using the traditional connection
method.
To add a wireless device to your network, simply push the WPS button on the wireless
device you are connecting (consult client device User’s Guide for length of time), then
push and hold the WPS button located on your router for 3 seconds and release it. A
blue LED on your router WPS button will flash indicating that the WPS setup process has
been activated on your router. (See “Product Hardware Features” on page 2)
For connecting additional WPS supported devices, repeat this process for each
additional device.

© Copyright 2016 TRENDnet. All Rights Reserved.
14
TRENDnet User’s Guide
TEW-731BR
PIN (Personal Identification Number)
Wireless >WiFi Protected Setup
If your wireless device has WPS PIN (typically an 8-digit code printed on the wireless
device product label or located in the wireless device wireless software utility), you can
use this method.
1. Log into your router management page (see “Access your router management page”
on page 22).
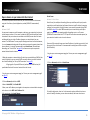
2. Click on Wireless, and click on Advanced Wireless.
3. Make sure the Disable PIN selection is not checked.
4. Click on WPS on the left menu and click Next.
5. Next enter the WPS PIN of the wireless device you are connecting and click Start PIN.
Note: You may need to initiate the WPS PIN on your wireless device first when using this
method. Refer to your wireless device documentation for details on the operation of
WPS.
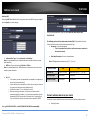
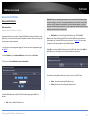
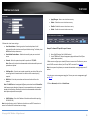
Basic wireless settings
Wireless > Basic
This section outlines available management options under the Basic Wireless sub tab.
1. Log into your router management page (see “Access your router management page”
on page 22).
2. Click on Wireless, and click on Wireless Basic.
3. To save changes to this section, click Apply when finished.
SSID – This acronym stands for Service Set Identifier and is the name of your
wireless network. It differentiates your wireless network from others around
you. By default, the router’s wireless name is unique to the device. If you
choose to change the SSID, change it to a name that you can easily remember.
Auto Channel – In North America, this router can broadcast on 1 of 11
Channels (13 in Europe and other countries). Selecting Auto Channel enables
the router to automatically select the best Channel for wireless
communication.

© Copyright 2016 TRENDnet. All Rights Reserved.
15
TRENDnet User’s Guide
TEW-731BR
Channel – To manually set the channel on which the router will broadcast, click
the drop-down list and select the desired Channel for wireless communication.
The goal is to select the Channel that is least used by neighboring wireless
networks.
802.11 Mode - Select the appropriate mode for your network.
o 2.4GHz 802.11b/g/n mixed mode – Select this mode for the best
compatibility. This mode allows older 802.11b and 802.11g wireless
devices to connect to the router in addition to newer 802.11n devices.
o 2.4GHz 802.11b/g mixed mode – This mode only allows devices to
connect to the router using older and slow 802.11b or 802.11g
technology and it thereby reduces the router’s maximum speed to
54Mbps (typically not recommended).
o 2.4GHz 802.11n only mode – This mode only allows newer 802.11n
devices to connect to your router. This mode does ensure the highest
speed and security for your network, however if you have older
802.11g wireless clients, they will no longer be able to connect to this
router.
o 2.4GHz 802.11n/g mixed mode – This mode only allows devices to
connect to the router using the older 802.11g technology and also the
newer 802.11n technology. This mode allows older wireless clients to
connect to the wireless router while also ensuring the highest speed
and security for your network for newer wireless clients that are
802.11n.
o 2.4GHz 802.11g only mode – This mode only allows devices to
connect to the router using older and slow 802.11g technology
(typically not recommended).
o 2.4GHz 802.11b only mode – This mode only allows devices to
connect to the router using older and slow 802.11b technology
(typically not recommended).
Note: Please check the specifications on your wireless devices for the highest wireless
capability supported first before applying these settings. If you are unsure, it is
recommended that you keep the default setting (2.4GHz 802.11b/g/n mixed mode) for
the best compatibility.
When applying the 802.11 mode setting, please keep in mind the following:
Wireless devices that support 802.11n are backwards compatible and can
connect wirelessly at 802.11g or 802.11b.
Connecting at 802.11b or 802.11g will limit the capability of your 802.11n
supported wireless devices from obtaining higher performance and data rates.
Allowing 802.11b or 802.11g devices to connect to an 802.11n capable wireless
network may degrade the wireless network performance below the higher
performance and data rates of 802.11n.
Wireless devices that only support 802.11b or 802.11g will not be able to
connect to a wireless network that is set to 802.11n only mode.
Wireless devices that only support 802.11b will not be able to connect to a
wireless network that is set to 802.11g only mode.
Band Width – This setting only applies to wireless devices connecting at
802.11n. Select the appropriate channel width for your wireless network.
o 20 MHz – This mode operates using a single 20MHz channel for
wireless devices connecting at 802.11n. This setting may provide more
stability than Auto 20/40 MHz for connectivity in busy wireless
environments where there are several wireless networks in the area.
o Auto 20/40 MHz – This mode can automatically switch between using
a single 20MHz channel or 40MHz (two 20MHz channels). When
40MHz is active, this mode is capable of providing higher performance

© Copyright 2016 TRENDnet. All Rights Reserved.
16
TRENDnet User’s Guide
TEW-731BR
only if the wireless devices support the 40MHz channel width.
Enabling 20/40MHz typically results in substantial performance
increases when connecting to an 802.11n client.
SSID Broadcast
o Enabled allows wireless devices to search and discover your wireless
network name (also called SSID) broadcasted by your router.
o Disabled turns off the ability for wireless devices to find your network.
It is still possible for wireless devices to be configured to connect to
your wireless network.
Note: Setting this option to Disabled, will disable WPS functionality.
WMM – Wi-Fi Multimedia is a Quality of Service (QoS) feature which prioritizes
audio and video data packets. This feature requires the wireless device to also
support WMM. Click Enabled (recommended) or Disabled to turn this feature
on or off on your router.
Steps to improve wireless connectivity
There are a number of factors that can impact the range of wireless devices. Follow
these tips to help improve your wireless connectivity:
1. Keep the number of obstructions to a minimum. Each obstruction can reduce
the range of a wireless device. Position the wireless devices in a manner that
will minimize the amount of obstructions between them.
a. For the widest coverage area, install your router near the center of
your home, and near the ceiling, if possible.
b. Avoid placing the router on or near metal objects (such as file cabinets
and metal furniture), reflective surfaces (such as glass or mirrors), and
masonry walls.
c. Any obstruction can weaken the wireless signal (even non-metallic
objects), so the fewer obstructions between the router and the
wireless device, the better.
d. Place the router in a location away from other electronics, motors,
and fluorescent lighting.
e. Many environmental variables can affect the router’s performance, so
if your wireless signal is weak, place the router in several locations and
test the signal strength to determine the ideal position.
2. Building materials can have a large impact on your wireless signal. In an indoor
environment, try to position the wireless devices so that the signal passes
through less dense material such as dry wall. Dense materials like metal, solid
wood, glass or even furniture may block or degrade the signal.

© Copyright 2016 TRENDnet. All Rights Reserved.
17
TRENDnet User’s Guide
TEW-731BR
3. Antenna orientation can also have a large impact on your wireless signal. Use
the wireless adapter’s site survey tool to determine the best antenna
orientation for your wireless devices.
4. Interference from devices that produce RF (radio frequency) noise can also
impact your signal. Position your wireless devices away from anything that
generates RF noise, such as microwaves, radios and baby monitors.
If possible, upgrade wireless network interfaces (such as wireless cards in computers)
from older wireless standards to 802.11n. If a wirelessly networked device uses an older
standard, the performance of the entire wireless network may be slower. If you are still
experiencing low or no signal, consider repositioning the wireless devices or installing
additional access points.

© Copyright 2016 TRENDnet. All Rights Reserved.
18
TRENDnet User’s Guide
TEW-731BR
Advanced wireless settings
Wireless > Advanced
These settings are advanced options that can be configured to change advanced
wireless broadcast specifications. It is recommended that these settings remain set to
their default values unless you are knowledgeable about the effects of changing these
values. Changing these settings incorrectly can degrade performance.
RTS Threshold – The Request To Send (RTS) function is part of the networking
protocol. A wireless device that needs to send data will send a RTS before
sending the data in question. The destination wireless device will send a
response called Clear to Send (CTS). The RTS Threshold defines the smallest
data packet size allowed to initiate the RTS/CTS function.
Default Value: 2347 (range: 1-2347)
Fragmentation Threshold – Fragmentation in wireless networks is the process
of breaking down data communications into smaller data packets in order to
improve data efficiency when transferring or receiving data between wireless
devices. The fragmentation threshold defines the maximum size of the data
packets that are broken down.
Default Value: 2346 (range: 256~2346, even numbers only)
Preamble Type – A setting that adds additional data header strings to help
check the Wi-Fi data transmission errors.
o Short Preamble - Using a short guard interval can increase
throughput. However, it can also increase error rate in some
installations, due to increased sensitivity to radio-frequency
reflections.
o Long Preamble – Using a long guard interval can decrease throughput.
However, it can also decrease the error rate in some installations due
to decreased sensitivity to radio-frequency reflections.
Radio Power (Percent) – A setting that allows the power of the radio to be
customized. By default, the setting is set to 100%. Decreasing the percentage of
the radio power will reduce the Wi-Fi coverage area and throughput
Wireless Repeater
Wireless > Wireless Repeater
Wireless range extender or repeater mode allows the device to extend the range of an
existing wireless network. The existing wireless signal can be broadcasted from your
wireless router or other access point. In addition, other network enabled devices can
connect to your network using the Ethernet LAN port.
1. Log into your router management page (see “Access your router management page”
on page 22).
2. Click on Wireless, and click on Wireless Repeater.
3. Enable the repeater mode by clicking on the Repeater Enabled, and click on the Site
Survey button. This will allow the TEW-731BR to scan for the wireless network you
would like to repeat or extend. If prompted to disable DHCP, click OK.
Note: Enabling repeater mode will set the the DHCP mode to none.
La pagina si sta caricando...
La pagina si sta caricando...
La pagina si sta caricando...
La pagina si sta caricando...
La pagina si sta caricando...
La pagina si sta caricando...
La pagina si sta caricando...
La pagina si sta caricando...
La pagina si sta caricando...
La pagina si sta caricando...
La pagina si sta caricando...
La pagina si sta caricando...
La pagina si sta caricando...
La pagina si sta caricando...
La pagina si sta caricando...
La pagina si sta caricando...
La pagina si sta caricando...
La pagina si sta caricando...
La pagina si sta caricando...
La pagina si sta caricando...
La pagina si sta caricando...
La pagina si sta caricando...
La pagina si sta caricando...
La pagina si sta caricando...
La pagina si sta caricando...
La pagina si sta caricando...
La pagina si sta caricando...
La pagina si sta caricando...
La pagina si sta caricando...
La pagina si sta caricando...
La pagina si sta caricando...
La pagina si sta caricando...
La pagina si sta caricando...
-
 1
1
-
 2
2
-
 3
3
-
 4
4
-
 5
5
-
 6
6
-
 7
7
-
 8
8
-
 9
9
-
 10
10
-
 11
11
-
 12
12
-
 13
13
-
 14
14
-
 15
15
-
 16
16
-
 17
17
-
 18
18
-
 19
19
-
 20
20
-
 21
21
-
 22
22
-
 23
23
-
 24
24
-
 25
25
-
 26
26
-
 27
27
-
 28
28
-
 29
29
-
 30
30
-
 31
31
-
 32
32
-
 33
33
-
 34
34
-
 35
35
-
 36
36
-
 37
37
-
 38
38
-
 39
39
-
 40
40
-
 41
41
-
 42
42
-
 43
43
-
 44
44
-
 45
45
-
 46
46
-
 47
47
-
 48
48
-
 49
49
-
 50
50
-
 51
51
-
 52
52
-
 53
53


Trendnet RB-TEW-731BR Guida utente
- Categoria
- Router
- Tipo
- Guida utente
- Questo manuale è adatto anche per
in altre lingue
- English: Trendnet RB-TEW-731BR User guide
Documenti correlati
-
Trendnet RB-TEW-809UB Manuale utente
-
Trendnet TV-IP562WI Manuale utente
-
Trendnet TEW-652BRP Manuale del proprietario
-
-
Trendnet TV-IP862IC Manuale utente
-
-
-
-
-
Altri documenti
-
 Corega 613-00041-01 Manuale utente
-
Edimax BR-6228NS V2 Manuale utente
-
Zoom 1098 Manuale utente
-
König CMP-WNROUT55 Manuale del proprietario
-
-
Edimax EW-7811UN Manuale utente
-
Silex SX-ND-4350WAN Plus Guida d'installazione
-
NGS Domo Repeater Manuale utente
-
D-Link KA2IR883A1 Manuale utente
-
 Atlantis Land Wireless N Broadband Router RB-W300 Manuale utente

