Philips 109P40/15 Manuale utente
- Categoria
- Monitora CRT
- Tipo
- Manuale utente
Questo manuale è adatto anche per


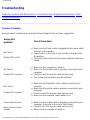
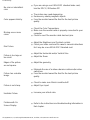
Safety & Troubleshooting
Safety and Troubleshooting Information
Safety Precautions and Maintenance • Troubleshooting • Regulatory Information • Other
Related Information
Safety precautions and maintenance
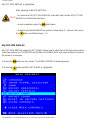
WARNING: Use of controls, adjustments, or procedures other than those
specified in this documentation may result in exposure to shock, electrical
hazards, and/or mechanical hazards.
Read and follow these instructions when connecting and using your computer monitor:
● Disconnect the monitor from the power supply if the monitor is not to be used for an
extended period of time.
● Do not attempt to remove the back cover, as you will be exposed to a shock hazard. The
back cover should only be removed by qualified service personnel.
● Do not place objects on top of the monitor cabinet, objects could fall into vents or cover them
and prevent proper cooling of the monitor's electronic devices.
● To avoid the risk of shock or permanent damage to the set, do not expose the monitor to rain
or excessive moisture.
● Do not use alcohol or ammonia-based liquid to clean the monitor. If necessary, clean with a
slightly damp cloth. Disconnect the monitor from the power supply before cleaning.
● When positioning the monitor, make sure the power plug and outlet are easily accessible.
Consult a service technician if the monitor does not operate normally when operating instructions of
this manual are followed.
RETURN TO TOP OF THE PAGE
file:///D|/EDFU/crt_19_5/edoc/english/109P/SAFETY/SAFETY.HTM2005-04-21 ¤W¤È 09:37:42

About This Electronic User's Manual
About This Electronic User's Manual
About This Guide • Other Documents You May Need • Notational Descriptions
About This Guide
This electronic user's guide is intended for anyone who uses the Philips Color Monitor. It describes
the monitor's features, setup, operation and all other information, which is the same exact
information described in our printed version.
The sections are as follows:
● Safety and Troubleshooting Information provides tips and solutions for common problems,
and other related information you may need.
● About This Electronic User's Manual gives overview of what information are included as well
as notation icon descriptions and other documentation you can refer to.
● Product Information gives an overview of the monitor's features and as well as the technical
specifications for this monitor.
● Installing Your Monitor describes the initial setup process and gives an overview of how to
use the monitor.
● On Screen Display provides information on adjusting the settings on your monitor.
● Customer Care and Warranty is a list of worldwide Philips consumer information centers
along with the help desk phone numbers and information on the applicable warranty of your
product..
● Glossary provides more information for technical terms.
● Download allows users to install the entire manual on their hard drive.
● Frequently Asked Questions provides answers to commonly asked questions.
RETURN TO TOP OF THE PAGE
Other Documents You May Need
In addition to this Electronic User's Guide, you may need to refer to the following documentation:
file:///D|/EDFU/crt_19_5/edoc/english/109P/ABOUT/ABOUT.HTM (1 of 3)2005-04-21 ¤W¤È 09:37:42

About This Electronic User's Manual
● Philips Color Monitor Quick Start Guide which summarizes the steps for setting up the
monitor. This is included with this product.
RETURN TO TOP OF THE PAGE
Notational Descriptions
The following subsections describe notational conventions used in this document.
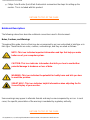
Notes, Cautions, and Warnings
Throughout this guide, blocks of text may be accompanied by an icon and printed in bold type or in
italic type. These blocks are notes, cautions, and warnings, and they are used as follows:
NOTE: This icon indicates important information and tips that help you make
better use of your computer system.
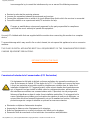
CAUTION: This icon indicates information that tells you how to avoid either
potential damage to hardware or loss of data.
WARNING: This icon indicates the potential for bodily harm and tells you how
to avoid the problem.
SMART HELP: This icon indicates helpful information when adjusting the On
Screen Display of your monitor.
Some warnings may appear in alternate formats and may be unaccompanied by an icon. In such
cases, the specific presentation of the warning is mandated by regulatory authority.
RETURN TO TOP OF THE PAGE
file:///D|/EDFU/crt_19_5/edoc/english/109P/ABOUT/ABOUT.HTM (2 of 3)2005-04-21 ¤W¤È 09:37:42

About This Electronic User's Manual
©2005 Koninklijke Philips Electronics N.V.
All rights reserved. Reproduction, copying, usage, modifying, hiring, renting, public performance, transmission and/or
broadcasting in whole or in part is prohibited without written consent of Philips Electronics N.V.
file:///D|/EDFU/crt_19_5/edoc/english/109P/ABOUT/ABOUT.HTM (3 of 3)2005-04-21 ¤W¤È 09:37:42

109P Product Information
Product Information
Product Features • Technical Specifications • Automatic Power Saving • Physical
Specification • Pin Assignment • Product Views
Product Features
Model Regulation Color
109P40 TCO'03 Gray
109P4:
● 19-inch (18.0" VIS) Real Flat color monitor featuring ICE technology for excellent front of
screen performance for use with MACs, PCs or Workstations
● Autoscan covers horizontal frequencies up to 111 kHz offering a maximum resolution of
1920 x 1440 with flicker free display of 1600 x 1200 at up to 87 Hz
● Real Flat aperture grille CRT with high-resolution 0.24 mm uniform grille pitch.
● Auto Calibrate extends the useful life of the monitor by automatically adjusting color and
luminance to original values
● XSD-Xtra Space Design for large screen display in a small footprint: World's shortest 19-inch
Real Flat monitor with maximum depth of only 438mm/17.2"
● sRGB for true on screen color representation.
● FCC, CE (in selected countries only) and ISO9241, ISO14001 certified
RETURN TO TOP OF THE PAGE
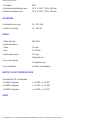
Technical Specifications*
CRT
• Size and deflection 19 inch / 46 cm ; 90° deflection angle
• Dot pitch / Grille pitch 0.24 mm
• Horizontal pitch
• Tube type
Aperture grille, flat, high contrast, anti-glare, anti-static, anti
reflection
file:///D|/EDFU/crt_19_5/edoc/english/109P/PRODUCT/PRODUCT.HTM (1 of 6)2005-04-21 ¤W¤È 09:37:43

109P Product Information
• Phosphor B22
• Recommended display area 14.0" x 10.4" / 355 x 265 mm
• Maximum display area 14.4" x 10.8" / 365 x 274 mm
SCANNING
• Horizontal scanning 30 - 111 KHz
• Vertical scanning 50 - 160 Hz
VIDEO
• Video dot rate 290 MHz
• Input impedance
- Video 75 ohm
- Sync 4.7 kOhm
• Input signal levels 0.7 Vpp
• Sync input signal
Separate sync
Composite sync
• Sync polarities Positive and negative
WHITE COLOR TEMPERATURE
Chromaticity CIE coordinates:
• at 9300 K degrees x = 0.283 / y = 0.297
• at 6500 K degrees x = 0.313 / y = 0.329
• at 5500 K degrees x = 0.332 / y = 0.347
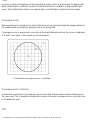
sRGB
file:///D|/EDFU/crt_19_5/edoc/english/109P/PRODUCT/PRODUCT.HTM (2 of 6)2005-04-21 ¤W¤È 09:37:43

109P Product Information
sRGB is a standard for ensuring correct exchange of colors between different devices (e.g.
digital cameras, monitors, printers, scanners, etc.)
Using a standard unified color space, sRGB will help represent pictures taken by an sRGB
compatible device correctly on your sRGB enabled Philips monitors. In that way, the colors are
calibrated and you can rely on the correctness of the colors shown on your screen.
Important with the use of sRGB is that the brightness and contrast of your monitor is fixed to a
predefined setting as well as the color gamut. Therefore it is important to select the sRGB
setting in the monitor's OSD.
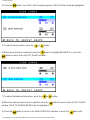
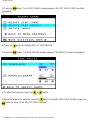
To do so, open the OSD by pressing the OK button on the front of your monitor. Use the down
button to go to Color temperature and press OK again. Then move the down button to go to
sRGB and press OK again.
Exit this OSD.
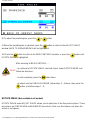
After this, please don't change the brightness or contrast setting of your monitor. If you change
either of these, the monitor will exit the sRGB mode and go to a color temperature setting of
9300K.
For more information on sRGB, please visit:
www.srgb.com
* These information are subject to change without notice.
RETURN TO TOP OF THE PAGE
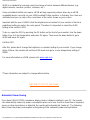
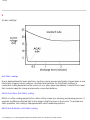
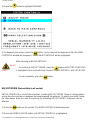
Automatic Power Saving
If you have VESA's DPMS compliance display card or software installed in your PC, the monitor
can automatically reduce its power consumption when not in use. And if an input from a keyboard,
mouse or other input device is detected, the monitor will automatically "wake up". The following
table shows the power consumption and signaling of this automatic power saving features:
file:///D|/EDFU/crt_19_5/edoc/english/109P/PRODUCT/PRODUCT.HTM (3 of 6)2005-04-21 ¤W¤È 09:37:43

109P Product Information
Power Management Definition
VESA's Mode Video H-sync V-sync Power Used
Power
Saving (%)
LED color
ON Active Yes Yes
Typical
120 W
0 % Verde
OFF Blanked No No < 1W 99% Chihlimbar
This monitor is ENERGY STAR
®
compliant. As an ENERGY STAR
®
Partner, PHILIPS has
determined that this product meets the
ENERGY STAR
®
guidelines for energy efficiency.
RETURN TO TOP OF THE PAGE
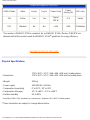
Physical Specifications
• Dimensions
17.9"x 18.5" x 17.2" / 456 x 469 x 438 mm (including base)
17.9"x 16.5" x 17.2" / 456 x 419 x 438 mm (excluding base)
• Weight 23.8 kg
• Power supply 100-240VAC, 60-50Hz
• Temperature (operating) 0° to 35°C / 32° to 95°F
• Temperature (storage) -25° to +65°C / -13° to +149°F
• Relative humidity 5% to 95%
* Resolution 1280 x 1024, standard size, contrast max., brightness 50%, 9300°, full white pattern.
* These information are subject to change without notice.
file:///D|/EDFU/crt_19_5/edoc/english/109P/PRODUCT/PRODUCT.HTM (4 of 6)2005-04-21 ¤W¤È 09:37:43

109P Product Information
RETURN TO TOP OF THE PAGE
Pin Assignment
The 15-pin D-sub connector (male) of the signal cable (IBM systems):
Pin
No.
Assignment
Pin
No.
Assignment
1 Red video input 9 No pin
2 Green video input 10 Logic ground
3 Blue video input 11
Identical output - connected
to pin 10
4
Identical output - connected
to pin 10
12 Serial data line (SDA)
5 Ground 13 H. Sync / H+V
6 Red video ground 14 V. Sync (VCLK for DDC)
7 Green video ground 15 Data clock line (SCL)
8 Blue video ground
RETURN TO TOP OF THE PAGE
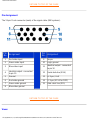
Views
file:///D|/EDFU/crt_19_5/edoc/english/109P/PRODUCT/PRODUCT.HTM (5 of 6)2005-04-21 ¤W¤È 09:37:43


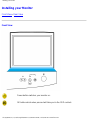
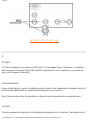
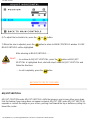
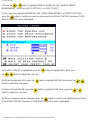
Installing your Monitor
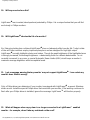
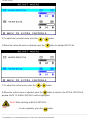
Contrast hotkey. When the UP arrow is pressed, the adjustment
controls for the CONTRAST will show up.
UP and DOWN buttons are used when adjusting the OSD of your
monitor
Brightness hotkey. When the RIGHT arrow is pressed ,the
adjustment controls for BRIGHTNESS will show up.
LEFT and RIGHT buttons, like the UP and DOWN buttons, are also
used in adjusting the OSD of your monitor.
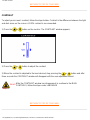
By pressing both the UP and OK buttons, you can easily access the
Input Signals A and/or B.
RETURN TO TOP OF THE PAGE
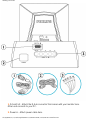
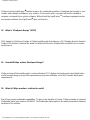
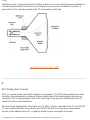
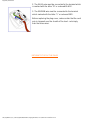
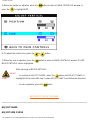
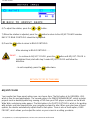
Rear View
file:///D|/EDFU/crt_19_5/edoc/english/INSTALL_4/INSTALL.HTM (2 of 4)2005-04-21 ¤W¤È 09:37:44

Installing your Monitor
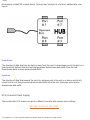
1. D-Sub Port - Attach the D-Sub connector that comes with your monitor here.
Other end connects to your PC.
2. Power in - Attach power cable here.
file:///D|/EDFU/crt_19_5/edoc/english/INSTALL_4/INSTALL.HTM (3 of 4)2005-04-21 ¤W¤È 09:37:44


On-Screen Display
On-Screen Display
Description of the On-Screen Display • The OSD Tree • The OSD Controls
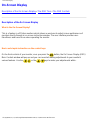
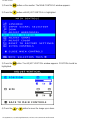
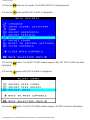
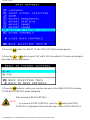
Description of the On Screen Display
What is the On-Screen Display?
This is a feature in all Philips monitors which allows an end-user to adjust screen performance of
monitors directly though an on-screen instruction window. The user interface provides user-
friendliness and ease-of-use when operating the monitor.
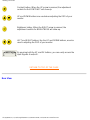
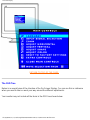
Basic and simple instruction on the control keys.
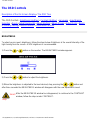
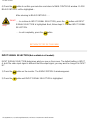
On the front controls of your monitor, once you press the
button, the On Screen Display (OSD)
Main Controls window will pop up and you can now start making adjustments to your monitor's
various features. Use the
or the keys to make your adjustments within.
file:///D|/EDFU/crt_19_5/edoc/english/OSD/OSDDESC.HTM (1 of 4)2005-04-21 ¤W¤È 09:37:45

On-Screen Display
RETURN TO TOP OF THE PAGE
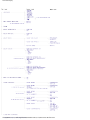
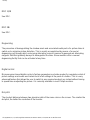
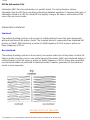
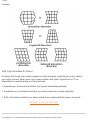
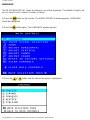
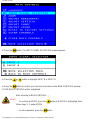
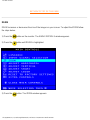
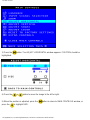
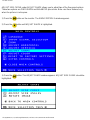
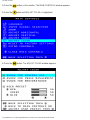
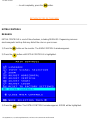
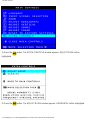
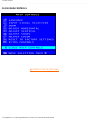
The OSD Tree
Below is an overall view of the structure of the On-Screen Display. You can use this as reference
when you want to later on work your way around the different adjustments.
Your monitor may not include all the items in the OSD tree shown below.
file:///D|/EDFU/crt_19_5/edoc/english/OSD/OSDDESC.HTM (2 of 4)2005-04-21 ¤W¤È 09:37:45

On-Screen Display
file:///D|/EDFU/crt_19_5/edoc/english/OSD/OSDDESC.HTM (3 of 4)2005-04-21 ¤W¤È 09:37:45


Customer Care and Warranty
Customer Care & Warranty
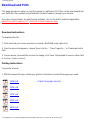
PLEASE SELECT YOUR COUNTRY/AREA TO READ THE WARRANTY COVERED:
WESTERN EUROPE:
Austria • Belgium • Cyprus • Denmark • France • Germany • Greece •
Finland • Ireland • Italy • Luxembourg • the Netherlands • Norway • Portugal • Sweden •
Switzerland • Spain • United Kingdom
EASTERN EUROPE: Czech Republic • Hungary • Poland • Russia • Turkey • Bulgaria •
Slovakia • Slovenia
LATIN AMERICA: Antilles • Argentina • Brazil • Chile • Colombia • Mexico • Paraguay •
Peru • Uruguay • Venezuela
NORTH AMERICA: USA & Canada
PACIFIC: Australia • New Zealand
ASIA: Bangladesh • China • Hong Kong • India • Indonesia • Japan • Korea • Malaysia •
Pakistan • Philippines • Singapore • Taiwan • Thailand
AFRICA: Morocco • South Africa
MIDDLE EAST: Dubai • Egypt
file:///D|/EDFU/crt_19_5/edoc/english/WARRANTY/WARRANTY.HTM2005-04-21 ¤W¤È 09:37:45
La pagina si sta caricando...
La pagina si sta caricando...
La pagina si sta caricando...
La pagina si sta caricando...
La pagina si sta caricando...
La pagina si sta caricando...
La pagina si sta caricando...
La pagina si sta caricando...
La pagina si sta caricando...
La pagina si sta caricando...
La pagina si sta caricando...
La pagina si sta caricando...
La pagina si sta caricando...
La pagina si sta caricando...
La pagina si sta caricando...
La pagina si sta caricando...
La pagina si sta caricando...
La pagina si sta caricando...
La pagina si sta caricando...
La pagina si sta caricando...
La pagina si sta caricando...
La pagina si sta caricando...
La pagina si sta caricando...
La pagina si sta caricando...
La pagina si sta caricando...
La pagina si sta caricando...
La pagina si sta caricando...
La pagina si sta caricando...
La pagina si sta caricando...
La pagina si sta caricando...
La pagina si sta caricando...
La pagina si sta caricando...
La pagina si sta caricando...
La pagina si sta caricando...
La pagina si sta caricando...
La pagina si sta caricando...
La pagina si sta caricando...
La pagina si sta caricando...
La pagina si sta caricando...
La pagina si sta caricando...
La pagina si sta caricando...
La pagina si sta caricando...
La pagina si sta caricando...
La pagina si sta caricando...
La pagina si sta caricando...
La pagina si sta caricando...
La pagina si sta caricando...
La pagina si sta caricando...
La pagina si sta caricando...
La pagina si sta caricando...
La pagina si sta caricando...
La pagina si sta caricando...
La pagina si sta caricando...
La pagina si sta caricando...
La pagina si sta caricando...
La pagina si sta caricando...
La pagina si sta caricando...
La pagina si sta caricando...
La pagina si sta caricando...
La pagina si sta caricando...
La pagina si sta caricando...
La pagina si sta caricando...
La pagina si sta caricando...
La pagina si sta caricando...
La pagina si sta caricando...
La pagina si sta caricando...
La pagina si sta caricando...
La pagina si sta caricando...
La pagina si sta caricando...
La pagina si sta caricando...
La pagina si sta caricando...
La pagina si sta caricando...
La pagina si sta caricando...
La pagina si sta caricando...
La pagina si sta caricando...
La pagina si sta caricando...
La pagina si sta caricando...
La pagina si sta caricando...
La pagina si sta caricando...
La pagina si sta caricando...
La pagina si sta caricando...
La pagina si sta caricando...
La pagina si sta caricando...
La pagina si sta caricando...
La pagina si sta caricando...
La pagina si sta caricando...
La pagina si sta caricando...
La pagina si sta caricando...
La pagina si sta caricando...
La pagina si sta caricando...
La pagina si sta caricando...
La pagina si sta caricando...
La pagina si sta caricando...
La pagina si sta caricando...
La pagina si sta caricando...
La pagina si sta caricando...
La pagina si sta caricando...
La pagina si sta caricando...
La pagina si sta caricando...
La pagina si sta caricando...
La pagina si sta caricando...
La pagina si sta caricando...
La pagina si sta caricando...
La pagina si sta caricando...
La pagina si sta caricando...
La pagina si sta caricando...
La pagina si sta caricando...
La pagina si sta caricando...
La pagina si sta caricando...
La pagina si sta caricando...
-
 1
1
-
 2
2
-
 3
3
-
 4
4
-
 5
5
-
 6
6
-
 7
7
-
 8
8
-
 9
9
-
 10
10
-
 11
11
-
 12
12
-
 13
13
-
 14
14
-
 15
15
-
 16
16
-
 17
17
-
 18
18
-
 19
19
-
 20
20
-
 21
21
-
 22
22
-
 23
23
-
 24
24
-
 25
25
-
 26
26
-
 27
27
-
 28
28
-
 29
29
-
 30
30
-
 31
31
-
 32
32
-
 33
33
-
 34
34
-
 35
35
-
 36
36
-
 37
37
-
 38
38
-
 39
39
-
 40
40
-
 41
41
-
 42
42
-
 43
43
-
 44
44
-
 45
45
-
 46
46
-
 47
47
-
 48
48
-
 49
49
-
 50
50
-
 51
51
-
 52
52
-
 53
53
-
 54
54
-
 55
55
-
 56
56
-
 57
57
-
 58
58
-
 59
59
-
 60
60
-
 61
61
-
 62
62
-
 63
63
-
 64
64
-
 65
65
-
 66
66
-
 67
67
-
 68
68
-
 69
69
-
 70
70
-
 71
71
-
 72
72
-
 73
73
-
 74
74
-
 75
75
-
 76
76
-
 77
77
-
 78
78
-
 79
79
-
 80
80
-
 81
81
-
 82
82
-
 83
83
-
 84
84
-
 85
85
-
 86
86
-
 87
87
-
 88
88
-
 89
89
-
 90
90
-
 91
91
-
 92
92
-
 93
93
-
 94
94
-
 95
95
-
 96
96
-
 97
97
-
 98
98
-
 99
99
-
 100
100
-
 101
101
-
 102
102
-
 103
103
-
 104
104
-
 105
105
-
 106
106
-
 107
107
-
 108
108
-
 109
109
-
 110
110
-
 111
111
-
 112
112
-
 113
113
-
 114
114
-
 115
115
-
 116
116
-
 117
117
-
 118
118
-
 119
119
-
 120
120
-
 121
121
-
 122
122
-
 123
123
-
 124
124
-
 125
125
-
 126
126
-
 127
127
-
 128
128
-
 129
129
-
 130
130


Philips 109P40/15 Manuale utente
- Categoria
- Monitora CRT
- Tipo
- Manuale utente
- Questo manuale è adatto anche per
in altre lingue
- English: Philips 109P40/15 User manual
Documenti correlati
-
Philips 201B40/00H Manuale utente
-
-
-
-
-
-
-
-
-
