Suntec Wellness BATHROOM HEATER HEAT SUPREME 2000 GLASS PANEL Manuale del proprietario
- Categoria
- Riscaldatori di spazio
- Tipo
- Manuale del proprietario

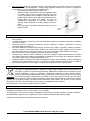
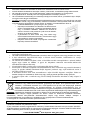
WARNING! ACHTUNG!
DE Dieses Produkt eignet sich nicht als Hauptheizgerät. Dieses Produkt ist nur für gut isolierte
Räume oder für den gelegentlichen Gebrauch geeignet.
GB This product is not suitable as the main heater. This product is only suitable for well-insulated
rooms or for occasional use.
ES Este producto no resulta adecuado como dispositivo principal de calefacción. Este producto
resulta adecuado únicamente para utilizarlo en espacios debidamente aislados o de forma
ocasional.
FR Ce produit ne doit pas être utilisé comme appareil de chauffage principal. Ce produit est
uniquement approprié pour des locaux correctement isolés ou pour une utilisation occasionnelle.
IT Il presente prodotto non è adatto a funzioni di riscaldamento primario. Questo prodotto è
destinato solo ad ambienti ben isolati o all’utilizzo occasionale.
NL Dit product is niet geschikt als hoofdverwarming. Dit product is alleen geschikt voor goed
geïsoleerde ruimten of voor incidenteel gebruik.
PT Este produto não é indicado para ser utilizado como aquecedor principal. Este produto só é
indicado para espaços bem isolados ou para a utilização ocasional.
HR Ovaj proizvod nije podoban da bude glavni uređaj za grijanje. Ovaj proizvod je prikladan samo
za dobro izolirane prostorije ili za povremenu uporabu.
BA Ovaj proizvod nije prikladan kao glavna grijalica. Ovaj proizvod namijenjen je samo za dobro
izolovane prostorije ili za povremenu upotrebu.
SI Ta izdelek ni primeren za uporabo kot glavna naprava za ogrevanje. Ta izdelek je namenjen
samo za dobro izolirane prostore ali za občasno uporabo.
SK Tento výrobok nie je vhodný na používanie ako hlavný ohrievač. Tento výrobok je vhodný iba pre
dobre izolované miestnosti alebo pre príležitostné použitie.
CZ Tento produkt není vhodný jako hlavní topidlo. Tento produkt je určen jen pro dobře izolované
místnosti nebo pro příležitostné použití.
HU Ez a termék nem alkalmas fő fűtőeszköznek. Ez a termék kizárólag jól szigetelt helyiségekbe
vagy alkalmi használatra alkalmas.
PL Niniejszy produkt nie nadaje się jako główne urządzenie grzewcze. Ten produkt nadaje się tylko
do dobrze izolowanych pomieszczeń lub do użytku okazjonalnego.

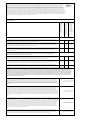
Verordnung (EU) 2015/1188 vom 28. April 2015. Angaben zu elektrischen Einzelraumheizgeräten gemäß Tabelle 2 Anh. II/ Regulation (EU) 2015/1188 of 28 April 2015. Information
requirements for electric local space heaters according to table 2 annex II/ Reglamento (UE) 2015/1188 de la Comisión de 28 de abril de 2015. Requisitos de información que deben
cumplir los aparatos de calefacción local eléctricos de acuerdo con el cuadro 2 anexo II/Règlement (UE) 2015/1188 de la Commi ssion du 28 avril 2015. Exigences d'informations
applicables aux dispositifs de chauffage décentralisés électriques selon le tableau 2 annexe II/Regolamento (UE) 2015/1188 della Commissione del 28 aprile 2015. Informazioni
obbligatorie per gli apparecchi per il riscaldamento d'ambiente locale elettrici secondo la tabella 2 dell'allegato II/ Verordening (EU) 2015/1188 van de commissie van 28 april 2015.
Informatie-eisen voor elektrische toestellen voor lokale ruimteverwarming volgens tabel 2, bijlage II / Regulamento (UE) 2015/1188 da Comissᾶo de 28 de abril de 2015. Requisitos de
informação para aquecedores de ambiente local elétricos conforme quadro 2 anexo II / Uredba KomisijeE (EU) 2015/1188 оd 28. travnja 2015. Zahtjevi za informacije za električne
grijalice za lokalno grijanje prostora prema tablici 2 priloga II / Uredba (EU) 2015/1188 od 28. aprila 2015. Podaci o električnim grijalicama za lokalno grijanje pro stora u skladu s tabelom
2, prilog II /Uredba Komisije (EU) 2015/1188 z dne 28. aprila 2015. Zahteve glede informacij za lokalne el ektrične grelnike prostorov v skladu s tabelo 2, Priloga II / Nariadenie Komisie
(EÚ) 2015/1188 z 28. apríla 2015. Požiadavky na informácie pre elektrické lokálne ohrievače priestoru podľa tabuľky 2 prílohy II / Nařízení Komise (EU) 2015/1188 ze dne 28. dubna 2015.
Požadavky na informace týkající se elektrických lokálních topidel podle tabulky 2 přílohy II / A Bizottság (EU) 2015/1188 Rendelete (2015. április 28.). Az elektromos egyedi helyiségfűtő
berendezések termékinformációs követelményei a 2. táblázat II. melléklete szerint / Rozporządzenie Komisiji (UE) 2015/1188 z dnia 28 kwietnia 2015 r. Wymogi w zakresie informacji
dotyczące elektrycznych miejscowych ogrzewaczy pomieszczeń zgodnie z tabelą 2 załącznik II.
Modell / Model identifier(s) / Identificador(es) del modelo / Référence(s) du modèle / Identificativo del modello / Typeaanduiding(en) / Identificador(es) de modelo / Identifikacijska(-e) / Model /
oznaka(-e) modela / Identifikacijska oznaka modela(-ov) / Identifikačný (-é) kód (-y) modelu / Identifikační značka (značky) modelu / Modellazonosító(k) / Identyfikator( -y) modelu: 15083 Heat
Supreme 2000 glass panel
Angabe / Item / Partida / Caractéristique / Dato / Item / Elemento / Značajka /Karakteristika / Postavka / Položka / Údaj / Jellemző / Parametr
Symbol /
symbol /
Símbolo /
Symbole /
Simbolo /
Symbool /
Símbolo /
Symbol /
Simbol /
Značka / Jel /
Oznaczenie
Wert /
value
/ Valor
/ Valeur/
Valore /
Waarde /
Valor /
Vrjednost/
Vrijednost /
Vrednost /
Hodnota /
Hodnota /
Érték /
Wartość
Einheit /
unit / Unidad /
Unité / Unità/
Eenheid /
Unidade /
Enota /
Jedinica /
Enota /
Jednotka /
Jednotka /
Mértékegység
/
Jednostka
Wärmeleistung / Heat output / Potencia calorífica /Puissance thermique / Potenza termica / Warmteafgifte / Potência calorífica / Toplinska snaga /
Toplinska snaga / Izhodna toplotna moč / Tepelný výkon / Tepelný výkon / Névleges hőteljesítmény / Moc cieplna
Nennwärmeleistung / Nominal heat output / Potencia calorífica nominal / Puissance thermique nominale / Potenza termica nominale / Potenza termica
nominale / Nominale warmteafgifte / Potência calorífica nominal / nazivna toplinska snaga / Nazivna toplinska snaga / Nazivna izhodna toplotna moč /
Menovitý tepelný výkon / Jmenovitý tepelný výkon / Névleges hőteljesítmény / Nominalna moc cieplna
Pnom
2,0
kW
Mindestwärmeleistung (Richtwert) / Minimum heat output (indicative) / Potencia calorífica mínima (indicativa) / Puissance the rmique minimale (indicative)
/ Potenza termica minima (indicativa) / Minimale warmteafgifte (indicatief) / Potência calorífica mínima (indicativa) / minimalna toplinskasnaga (referentna) /
Minimalna toplinska snaga (referentna vrijednost) / Minimalna izhodna toplotna moč (okvirno) / Minimálny tepelný výkon (orientačne) / Minimální tepelný
výkon (orientační) / Minimális hőteljesítmény (indikatív) / Minimalna moc cieplna (orientacyjna)
Pmin
0,2000
kW
Maximale kontinuierliche Wärmeleistung / Maximum continuous heat output / Potencia calorífica máxima continuada / Massima potenza termica continua /
Maximale continue warmteafgifte / Potência calorífica contínua máxima / maksimalna kontinuirana toplinska snaga / Maksimalna kontinuirana toplinska snaga /
Največja trajna izhodna toplotna moč / Maximálny priebežný tepelný výkon / Maximální trvalý tepelný výkon / Maximális folyamatos hőteljesítmény /
Maksymalna stała moc cieplna
Pmax,c
2,0
kW
Hilfsstromverbrauch / Auxiliary electricity consumption / Consumo auxiliar de electricidad / Consommation d'électricité auxiliaire / Consumo ausi liario
di energia elettrica / Aanvullend elektriciteitsverbruik / Consumo de eletricidade auxiliar / Potrošnja pomoćne električne energije / Potrošnja pomoćne
električne energije / Dodatna potreba po električni moči / Vlastná spotreba elektrickej energie / Spotřeba pomocné elektrické energie / Kiegészítő
villamosenergia-fogyasztás / Zużycie energii elektrycznej na potrzeby własne
Bei Nennwärmeleistung / at nominal heat output / A potencia calorífica nominal / À la puissance thermique nominale / Alla potenza termica nominale / Bij
nominale warmteafgifte / À potência calorífica nominal / kod nazivne toplinske snage / Kod nazivne toplinske snage / Pri nazivni izhodni toplotni moči / Pri
menovitom tepelnom výkone / Při jmenovitém tepelném výkonu / A névleges hőteljesítményen / Przy nominalnej mocy cieplnej
el
max
N/A
kW
Bei Mindestwärmeleistung / at minimum heat output / A potencia calorífica mínima / À la puissance thermique minimale / Alla potenza termica minima / Bij
minimale warmteafgifte / À potência calorífica mínima / kod minimalne toplinske snage / Kod minimalne toplinske snage / Pri minimalni izhodni toplotni moči
/ Pri minimálnom tepelnom výkone / Při minimálním tepelném výkonu / A minimális hőteljesítményen / Przy minimalnej mocy cieplnej
el
min
N/A
kW
Im Bereitschaftszustand / in standby mode / En modo de espera / En mode veille / In modo stand-by / In standbymodus / Em estado de vigília / u stanju
pripravnosti / U stanju pripravnosti / V stanju pripravljenosti / V pohotovostnom režime / V pohotovostním režimu / Készenlét i üzemmódban / W trybie
czuwania
el
SB
0,0004
kW
Nur bei elektrischen Speicher-Einzelraumheizgeräten: Art der Regelung der Wärmezufuhr (bitte eine Möglichkeit auswählen) / Type of heat input, for electric storage local space heaters only
(select one) / Tipo de aportación de calor, únicamente para los aparatos de calefacción local eléctricos de acumulación (seleccione uno) / Type d'apport de chaleur, pour les dispositifs de chauffage
décentralisés électriques à accumulation uniquement (sélectionner un seul type) / Tipo di potenza termica, solo per gli apparecchi per il riscaldamento d'ambiente locale elettrici ad accumulo (indicare
una sola opzione) / Type warmte-input, uitsluitend voor elektrische warmteopslagtoestellen (selecteer één) / Tipo de potência calorífica, apenas para os aquecedores de ambiente local elétricos de
acumulação (selecionar uma opção) / Vrsta ulazne topline, samo za električne akumulacijske grijalice za lokalno grijanje prostora (odabrati jednu) / Samo za električne akumulacijske grijalice za lokalno
grijanje prostora: Vrsta regulacije napajanja toplinom (odabrati jednu mogućnost) / Način dovajanja toplotne moči, samo za lokalne električne akumulacijske greln ike (izberite eno možnost) / Spôsob
prívodu tepla, iba pre elektrické akumulačné lokálne ohrievače priestoru (vyberte jeden) / Pouze u akumulačních elektrických lokálních topidel: typ příjmu tepla (vyberte jeden) / A hőbevitel típusa
(csak a hőtárolós elektromos egyedi helyiségfűtő berendezések esetében – egyet jelöljön meg) / Sposób doprowadzania ciepła wyłącznie w przypadku elektrycznych akumulacyjnych miejscowych
ogrzewaczy pomieszczeń (należy wybrać jedną opcję)
Manuelle Regelung der Wärmezufuhr mit integriertem Thermostat / manual heat charge control, with integrated thermostat / control manual de la carga de
calor, con termostato integrado / contrôle thermique manuel de la charge avec thermostat intégré / controllo manuale del cari co termico, con termostato
integrato / Handmatige sturing van de warmteopslag, met geïntegreerde thermostaat / Comando manual da carga térmica, com termóstato integrado / ručna
regulacija napajanja toplinom, s ugrađenim termostatom / Ručna regulacija napajanja toplinom s ugrađenim termostatom / Ručna regulacija napajanja toplinom s
ugrađenim termostatom / Ročno uravnavanje dovajanja toplote z vgrajenim termostatom / manuálne ovládanie množstva tepla so za budovaným termostatom /
ruční řízení akumulace tepla s integrovaným termostatem / Kézi töltésszabályozás beépített termosztáttal / ręczny regulator doprowadzania ciepła z wbudowanym
termostatem
nein/no/no/non/no/neen/n
ão/ne/ne/ ne/nie/ne/nem/nie
Manuelle Regelung der Wärmezufuhr mit Rückmeldung der Raum- und/oder Außentemperatur / manual heat charge control with room and/or outdoor
temperature feedback / control manual de la carga de calor con respuesta a la temperatura interior o exterior / contrôle ther mique manuel de la charge avec
réception d'informations sur la température de la pièce et/ou extérieure / controllo manuale del carico termico con riscontro della temperatura ambiente e/o
esterna / Handmatige sturing van de warmteopslag, met kamer- en/of buitentemperatuurfeedback / Comando manual da carga térmica, com retroação da
temperatura interior e/ou exterior / ručna regulacija napajanja toplinom putem informacija o sobnoj i/ili vanjskoj temperatur i / Ručna regulacija napajanja
toplinom putem povratnih informacija o sobnoj i/ili vanjskoj temperaturi / Ručna regulacija napajanja toplinom putem povratnih informacija o sobnoj i/ili vanjskoj
temperaturi /Ročno uravnavanje dovajanja toplote s povratno / informacijo o temperaturi v prostoru in/ali na prostem / manuálne ovládanie množstva tepla so
spätnou väzbou izbovej a/alebo vonkajšej teploty / ruční řízení akumulace tepla se zpětnou vazbou informující o teplotě v místnosti a/nebo venkovní teplotě / Kézi
töltésszabályozás beltéri és/vagy kültéri hőmérséklet-visszacsatolással / ręczny regulator doprowadzania ciepła z pomiarem temperatury w pomieszczeniu lub na
zewnątrz
nein/no/no/non/no/neen/n
ão/ne/ne/ ne/nie/ne/nem/nie
Elektronische Regelung der Wärmezufuhr mit Rückmeldung der Raum- und/oder Außentemperatur / electronic heat charge control with room and/or outdoor
temperature feedback / control electrónico de la carga de calor con respuesta a la temperatura interior o exterior / contrôle thermique électronique de la charge
avec réception d'informations sur la température de la pièce et/ou extérieure / controllo elettronico del carico termico con riscontro della temperatura ambient e
e/o esterna /Elektronische sturing van de warmteopslag, met kamer- en/of buitentemperatuurfeedback / Comando eletrónico da carga térmica, com retroação da
temperatura interior e/ou exterior / elektronička regulacija napajanja toplinom putem informacija o sobnoj i/ili vanjskoj temperaturi / Elektronička regulacija
napajanja toplinom putem povratnih informacija o sobnoj i/ili vanjskoj temperaturi / Elektronička regulacija napajanja toplinom putem povratnih informacija o
sobnoj i/ili vanjskoj temperaturi / Elektronsko uravnavanje dovajanja toplote s povratno informacijo o temperaturi v prostoru in/ali na prostem /elektronické
ovládanie množstva tepla so spätnou väzbou izbovej a/alebo vonkajšej teploty / elektronické řízení akumulace tepla se zpětnou vazbou informující o teplotě v
místnosti a/nebo venkovní teplotě / Elektronikus töltésszabályozás beltéri és/vagy külső hőmérséklet-visszacsatolással / elektroniczny regulator doprowadzania
ciepła z pomiarem temperatury w pomieszczeniu lub na zewnątrz
nein/no/no/non/no/neen/n
ão/ne/ne/ ne/nie/ne/nem/nie
Wärmeabgabe mit Gebläseunterstützung / fan assisted heat output / potencia calorífica asistida por ventiladores / puissance thermique régulable par
ventilateur / potenza termica assistita da ventilatore / Door een ventilator bijgestane warmteafgifte / Potência calorífica com ventilador / predaja topline uz
pomoć ventilatora / Predaja topline pomoću ventilatora / Predaja topline pomoću ventilatora / Uravnavanje izhodne toplotne moči s pomočjo ventilatorja /
tepelný výkon s pomocou ventilátora / výdej tepla s ventilátorem / Ventilátorral segített hőleadás / moc cieplna regulowana wentylatorem
nein/no/no/non/no/neen/n
ão/ne/ne/ ne/nie/ne/nem/nie

Art der Wärmeleistung/Raumtemperaturkontrolle (bitte eine Möglichkeit auswählen) / Type of heat output/room temperature control (select one) / Tipo de control de potencia calorífica/de
temperatura interior (seleccione uno) / Type de contrôle de la puissance thermique/de la température de la pièce (sélectionner un seul type) / Tipo di potenza termica/controllo della
temperatura ambiente (indicare una sola opzione) / Type warmteafgifte/sturing kamertemperatuur (selecteer één) / Tipo de potência calorífica/comando da temperatura interior (selecionar uma
opção) / Vrsta izlazne topline/regulacija sobne temperature (odabrati jednu) / Vrsta toplinske snage/regulacija sobne temperature (odabrati jednu mogu ćnost) / Način uravnavanja izhodne toplotne
moči/temperature v prostoru (izberite eno možnost) / Druh ovládania tepelného výkonu/izbovej teploty (vyberte jeden) / Typ výdeje tepla/regulace teploty v místnosti (vyberte jeden) / A
teljesítmény, illetve a beltéri hőmérséklet szabályozásá-nak típusa (egyet jelöljön meg) / Rodzaj mocy cieplnej/regulacja temperatury w pomieszczeniu (należy wybrać jedną opcję)
Einstufige Wärmeleistung, keine Raumtemperaturkontrolle / single stage heat output and no room temperature control / potencia calorífica de un solo nivel,
sin control de temperatura interior / contrôle de la puissance thermique à un palier, pas de contrôle de la température de la pièce / potenza termica a fase unica
senza controllo della temperatura ambiente / Eentrapswarmteafgifte, geen sturing van de kamertemperatuur / Potência calorífica numa fase única, sem comando
da temperatura interior / jednostupanjska predaja topline i bez regulacije sobne temperature / Jednostepena toplinska snaga, bez regulacije sobne temperature / Z
enostopenjskim uravnavanjem izhodne toplotne moči, brez uravnavanja temperature v prostoru / jednoúrovňový tepelný výkon bez ovládania izbovej teploty /
jeden stupeň tepelného výkonu, bez regulace teploty v místnosti / Egyetlen állás, beltéri hőmérséket-szabályozás nélkül / jednostopniowa moc cieplna bez regulacji
temperatury w pomieszczeniu
nein/no/no/non/no/neen/n
ão/ne/ne/ ne/nie/ne/nem/nie
Zwei oder mehr manuell einstellbare Stufen, keine Raumtemperaturkontrolle / two or more manual stages, no room temperature control / Dos o más
niveles manuales, sin control de temperatura interior / contrôle à deux ou plusieurs paliers manuels, pas de contrôle de la température de la pièce / due o più fasi
manuali senza controllo della temperatura ambiente / Twee of meer handmatig in te stellen trappen, geen sturing van de kamertemperatuur / Em duas ou mais
fases manuais, sem comando da temperatura interior / dva ili više ručna stupnja, bez regulacije sobne temperature / Dva ruč no podesiva stepena ili više ručno
podesivih stepeni, bez regulacije sobne temperature / Z dvema ali več ročnimi stopnjami, brez uravnavanja temperature v prostoru / dve alebo viac manuálnych
úrovní bez ovládania izbovej teploty / dva nebo více ručních stupňů, bez regulace teploty
v místnosti / Két vagy több kézi szabályozású állás, beltéri hőmérséklet-szabályozás nélkül / co najmniej dwa ręczne stopnie bez regulacji temperatury w
pomieszczeniu
nein/no/no/non/no/neen/n
ão/ne/ne/ ne/nie/ne/nem/nie
Raumtemperaturkontrolle mit mechanischem Thermostat / with mechanic thermostat room temperature control / con control de temperatura interior
mediante termostato mecánico / contrôle de la température de la pièce avec thermostat mécanique / con controllo della temperatura ambiente tramite
termostato meccanico / Met mechanische sturing van de kamertemperatuur door thermostaat / Com comando da temperatura interior por termóstato
mecânico / s regulacijom sobne temperature mehaničkim termostatom / Regulacija sobne temperature mehaničkim termostatom / Z uravnavanjem temperature
v prostoru z mehanskim termostatom / s ovládaním izbovej teploty mechanickým termostatom / s mechanickým termostatem pro regu laci teploty v místnosti /
Mechanikus termosztátos beltéri hőmérsékletszabályozás / mechaniczna regulacja temperatury w pomieszczeniu za pomocą termostatu
nein/no/no/non/no/neen/n
ão/ne/ne/ ne/nie/ne/nem/nie
Mit elektronischer Raumtemperaturkontrolle / with electronic room temperature control / con control electrónico de temperatura interior / contrôle
électronique de la température de la pièce / con controllo elettronico della temperatura ambiente / Met elektronische sturing van de kamertemperatuur / Com
comando eletrónico da temperatura interior / s elektroničkom regulacijom sobne temperature / S elektroničkom regulacijom sobne temperature / Z
uravnavanjem temperature v prostoru z mehanskim termostatom / Z elektronskim uravnavanjem temperature v pros toru / s elektronickým ovládaním izbovej
teploty / s elektronickou regulací teploty v místnosti / Elektronikus beltéri hőmérséklet-szabályozás / elektroniczna regulacja temperatury w pomieszczeniu
nein/no/no/non/no/neen/n
ão/ne/ne/ ne/nie/ne/nem/nie
Elektronische Raumtemperaturkontrolle und Tageszeitregelung / electronic room temperature control plus day timer / control electrónico de temperatura
interior y temporizador diario / contrôle électronique de la température de la pièce et programmateur jour nalier / con controllo elettronico della temperatura
ambiente e temporizzatore giornaliero / Elektronische sturing van de kamertemperatuur plus dag-tijdschakelaa / Com comando eletrónico da temperatura interior
e temporizador diário / elektronička regulacija sobne temperature i dnevni uklopni sat / Elektronička regulacija sobne temperature i dnevni vremenski
programator / Z elektronskim uravnavanjem temperature v prostoru z dnevnim časovnikom / elektronické ovládanie izbovej teploty a denný časovač / s
elektronickou regulací teploty v místnosti a denním programem / Elektronikus beltéri hőmérséklet-szabályozás és napszak szerinti szabályozás /elektroniczna
regulacja temperatury w pomieszczeniu ze sterownikiem dobowym
nein/no/no/non/no/neen/n
ão/ne/ne/ ne/nie/ne/nem/nie
Elektronische Raumtemperaturkontrolle und Wochentagsregelung / electronic room temperature control plus week timer / control electrónico de
temperatura interior y temporizador semanal / contrôle électronique de la température de la pièce et programmateur hebdomadaire / con controllo elettronico
della temperatura ambiente e temporizzatore settimanale / Elektronische sturing van de kamertemperatuur plus week-tijdschakelaar / Com comando eletrónico da
temperatura interior e temporizador semanal / elektronička regulacija sobne temperature i tjedni uklopni sat / Elektronička regulacija sobne temperature i sedmični
vremenski programator / Z elektronskim uravnavanjem temperature v prostoru s tedenskim časovnikom / elektronické ovládanie izbovej teploty a týždenný časovač
/ s elektronickou regulací teploty v místnosti a týdenním programem / Elektronikus beltéri hőmérséklet-szabályozás és heti szabályozás / elektroniczna regulacja
temperatury w pomieszczeniu ze sterownikiem tygodniowym
ja/yes/sí/oui/sì/ja/sim/da/da/da/á
no/
ano/igen/tak
Sonstige Regelungsoptionen (Mehrfachnennungen möglich) / Other control options (multiple selections possible) / Otras opcione s de control (pueden seleccionarse varias) / Autres options de
contrôle (sélectionner une ou plusieurs options) / Altre opzioni di controllo (è possibile selezionare più opzioni) / Andere sturingsopties (meerdere selecties mogelijk) / Outras opções de comando (seleção
múltipla possível) / Druge mogućnosti regulacije (moguć odabir više opcija) / Druge mogućnosti regulacije (moguć odabir više opcija) / Druge možnosti uravnavanja (izberete lahko več možnosti) / Ďalšie
možnosti ovládania (možnosť viacnásobného výberu) / Další možnosti regulace (lze vybrat více možností) / Más szabályozási lehetőségek (többet is megjelölhet) / Inne opcje regulacji (można wybrać kilka)
Raumtemperaturkontrolle mit Präsenzerkennung / room temperature control, with presence detection / control de temperatura interior con detección de
presencia / contrôle de la température de la pièce, avec détecteur de présence / controllo della temperatura ambiente con rilevamento di presenza / Sturing van
de amertemperatuur, met aanwezigheidsdetectie / Comando da temperatura interior, com deteção de presença / regulacija sobne t emperature s
prepoznavanjem prisutnosti / Regulacija sobne temperature s detektorom prisutnosti / Z uravnavanjem temperature v prostoru z zaznavanjem prisotnosti /
ovládanie izbovej teploty s detekciou prítomnosti / regulace teploty v místnosti s detekcí přítomnosti osob / Beltéri hőmérsé klet-szabályozás jelenlét-
érzékeléssel / regulacja temperatury w pomieszczeniu z wykrywaniem obecności
ja/yes/sí/oui/sì/ja/sim/da/da/da/á
no/
ano/igen/tak
Raumtemperaturkontrolle mit Erkennung offener Fenster / room temperature control, with open window detection / control de temperatura interior con
detección de ventanas abiertas / contrôle de la température de la pièce, avec détecteur de fenêtre ouvert / controllo della t emperatura ambiente con rilevamento
di finestre aperte / Sturing van de kamertemperatuur, met openraamdetectie / Comando da temperatura interior, com deteção de janelas abertas
/ regulacija sobne temperature s prepoznavanjem otvorenog prozora / Regulacija sobne temperature s detektorom otvorenih prozora / Z
uravnavanjem temperature v prostoru z zaznavanjem odprtega okna / ovládanie izbovej teploty s detekciou otvoreného okna / regulace teploty v místnosti s
detekcí otevřeného okna / Beltéri hőmérséklet-szabályozás nyitottablak-érzékeléssel / regulacja temperatury w pomieszczeniu z wykrywaniem otwartego
okna
ja/yes/sí/oui/sì/ja/sim/da/da/da/á
no/
ano/igen/tak
Mit Fernbedienungsoption / with distance control option / con opción de control a distancia / option contrôle à distance / con opzione di controllo a distanza
/ Met de optie van afstandsbediening / Com opção de comando à distância / s mogućnošću regulacije na daljinu / S opcijom daljinskog upravljanja / Z možnostjo
uravnavanja na daljavo / s možnosťou diaľkového ovládania / s dálkovým ovládáním / Távszabályozási lehetőség / z regulacją na odległość
nein/no/no/non/no/neen/n
ão/ne/ne/ ne/nie/ne/nem/nie
Mit adaptiver Regelung des Heizbeginns / with adaptive start control / con control de puesta en marcha adaptable / contrôle adaptatif de l'activation / con
controllo di avviamento adattabile / Met adaptieve sturing van de start / Com comando de arranque adaptativo / s prilagodljivim pokretanjem regulacije / S
prilagodivom regulacijom početka grijanja / S prilagodljivim uravnavanjem začetka delovanja / s prispôsobivým ovládaním spustenia / s adaptivně řízeným
spouštěním / Adaptív bekapcsolásszabályozás / z adaptacyjną regulacją startu
nein/no/no/non/no/neen/n
ão/ne/ne/ ne/nie/ne/nem/nie
Mit Betriebszeitbegrenzung / with working time limitation / con limitación de tiempo de funcionamiento / limitation de la dur ée d'activation / con
limitazione del tempo di funzionamento / Met beperking van de werkingstijd / Com limitação do tempo de funcionamento / s ograničenjem vremena rada / S
ograničenjem vremena rada / Z omejitvijo časa delovanja / s obmedzením času prevádzky / s omezením doby činnosti / Működési i dő korlátozása / z
ograniczeniem czasu pracy
ja/yes/sí/oui/sì/ja/sim/da/da/da/á
no/
ano/igen/tak
Mit Schwarzkugelsensor / with black bulb sensor / con sensor de lámpara negra / capteur à globe noir / con termometro a globo nero / Met black-bulbsensor /
Com sensor de corpo negro / s osjetnikom s crnom žaruljom / Sa senzorom sa crnom sijalicom / Z globus senzorjem / so snímačom čiernej žiarovky / s černým
kulovým čidlem / Feketegömb-érzékelővel ellátva / z czujnikiem ciepła promieniowania
nein/no/no/non/no/neen/n
ão/ne/ne/ ne/nie/ne/nem/nie
Kontaktangaben / Contact details / Información de contacto / Coordonnées de contact / Contatti / Contactgegevens / Elementos de contacto / Podaci za
kontakt / Podaci za kontakt / Kontaktni podatki / Kontaktné údaje / Kontaktní údaje / Kapcsolatfelvételi adatok / Dane teleadresowe
Suntec Wellness
GmbH Holzstrasse 2
40221 Düsseldorf
Deutschland

DE
Heat Supreme 2000 glass panel
Badschnellheizer
Bedienungsanleitung

1
2a
2b
3

4
5

6
7
8

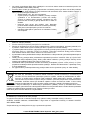
Wir danken Ihnen für den Kauf dieses Gerätes der Marke Suntec Wellness. Bitte lesen Sie die
Bedienungsanleitung aufmerksam, bevor Sie das Gerät in Betrieb nehmen. Bitte bewahren Sie diese
Bedienungsanleitung zum späteren Nachschlagen auf.
Sicherheitshinweise
Dieses Gerät kann von Kindern ab 8 Jahren und
darüber und von Personen mit reduzierten
physischen, sensorischen oder mentalen
Fähigkeiten oder Mangel an Erfahrung und/oder
Wissen benutzt werden, wenn sie beaufsichtigt oder
bezüglich des sicheren Gebrauchs des Gerätes
unterwiesen wurden und die daraus resultierenden
Gefahren verstanden haben. Kinder dürfen nicht mit
dem Gerät spielen. Reinigung und Benutzer-
Wartung dürfen nicht durch Kinder ohne
Beaufsichtigung durchgeführt werden.
Kinder unter 3 Jahren ohne permanente Aufsicht
müssen daran gehindert werden, auf das Gerät
zugreifen zu können.
Kinder ab 3 Jahren und unter 8 Jahren dürfen das
Gerät nur unter der Voraussetzung ein- und
ausschalten, dass das Gerät in seiner
vorgesehenen Gebrauchslage positioniert oder
installiert, sie bezüglich des sicheren Gebrauchs
des Gerätes unterwiesen und beaufsichtigt werden
und die möglichen Gefahren verstanden haben.
Kinder ab 3 Jahren und unter 8 Jahren dürfen das
Gerät nicht an die Steckdose anschliessen, es
regulieren, reinigen oder die Wartung durchführen.
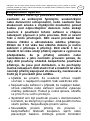
• Bitte stellen Sie sicher, dass die angegebene
Netzspannung mit der Ihres Stromnetzes
übereinstimmt.
• Bitte betreiben Sie das Gerät nicht, wenn das
Stromkabel, der Netzstecker oder das Gerät
Schäden aufweisen. Ist eine Reparatur notwendig,
wenden Sie sich bitte an Ihre Verkaufsstelle.

• Das Gerät darf nur im Haushalt und für den
Verwendungszweck, für den es hergestellt wurde,
genutzt werden. Andere Anwendungen können zu
Brand führen. Bitte nicht im Freien nutzen.
• Bitte nehmen Sie das Gerät nicht in unmittelbarer
Nähe von Bädern, Duschen oder Swimming-Pools in
Betrieb. Bitte halten Sie einen Mindestabstand von
0,6m ein. Dies gilt auch für das Stromkabel.
• Bitte verwenden Sie keine Mehrfachstecker und
Verlängerungskabel.
• Bitte lassen Sie das Gerät nicht unbeaufsichtigt.
• Bitte versuchen Sie nicht das Gerät selbstständig zu
reparieren, auseinanderzubauen oder in sonst einer
Weise zu verändern.
• Bitte nehmen Sie sich vor heißen Oberflächen in
Acht und berühren Sie diese bitte nicht, da sie zu
Verbrennungen führen können. Besondere Vorsicht
gilt bei Kindern und verwundbaren Personen.
• Der Gebrauch von fremden, nicht vom Hersteller
empfohlenen Zubehörteilen, wie z.B.
Zeitschaltuhren, kann zu Verletzungen führen.
• Bitte verwenden Sie das Gerät nur auf ebenen,
stabilen und hitzeresistenten Flächen.
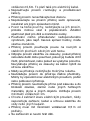
• Bitte entfernen Sie den Netzstecker von der
Steckdose, wenn Sie das Gerät für längere Zeit nicht
nutzen, es reinigen, bewegen oder eine Störung
auftritt. Bitte ziehen Sie dabei nicht am Kabel,
sondern am Netzstecker.
• Bitte verwenden Sie das Gerät nie mit nassen
Händen.
• Bitte führen Sie keine Objekte in das Gerät ein.
Diese können zu Stromschlägen, Feuer oder
Schäden am Gerät führen.

• Bitte platzieren Sie das Gerät nicht direkt unter einer
Steckdose sowie nicht in der Nähe von Gardinen,
Vorhängen oder anderen entflammbaren
Materialien, Gasen und anderen Objekten. Bitte
halten Sie einen Mindestabstand von 1m ein.
• Zur Vermeidung von Stromschlägen tauchen Sie
bitte das Gerät, Kabel und Netzstecker niemals in
Wasser oder andere Flüssigkeiten ein.
• Das Gerät muss einen Mindestabstand von 0,5m
zum Boden haben.
• Kinder dürfen nicht mit dem Gerät spielen.
• Das Gerät ist über einen Fehlerstromschutzschalter
von höchstens 30mA zu versorgen.
• Bevor Sie das Netzkabel ein-/ausstecken,
vergewissern Sie sich bitte, dass der Ein-/Aus-
Schalter auf der linken Seite des Gerätes
ausgeschaltet ist.
• In feuchten Räumen muss sich das Netzkabel
mindestens 25 cm über dem Boden befinden. Bitte
achten Sie darauf, dass das Kabel weder den Boden
noch heiße Stellen am Gerät berührt.
• Für den Betrieb muss eine Steckdose gewählt
werden, die für den Anwender sichtbar und leicht
zugänglich ist.
• Das Gerät darf nicht in geschlossenen Räumen
verwendet werden, an denen die Luft nicht frei
zirkulieren kann.
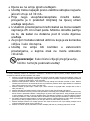
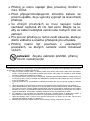
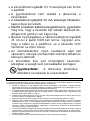
Warnung: Um Überhitzung zu vermeiden,
decken Sie das Gerät bitte nicht ab!

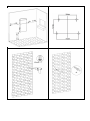
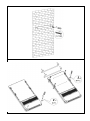
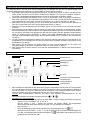
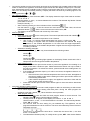
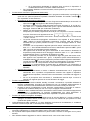
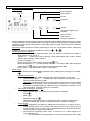
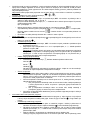
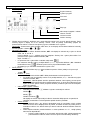
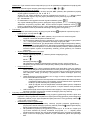
Montage
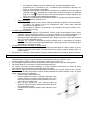
Bitte entfernen Sie die Verpackungsmaterialien und prüfen Sie alle Bestandteile auf sichtbare Schäden. Im Falle
von Schäden fahren Sie bitte nicht mit der Montage fort und wenden Sie sich an Ihre Verkaufsstelle. Die
folgenden Montageschritte beziehen sich auf die Bilder zu Anfang dieser Anleitung.
1. Bitte wählen Sie zunächst eine geeignete Wand aus, um das Gerät dort zu montieren. Die Wand muss
stabil, gerade und darf nicht aus einem entflammbaren Material, z.B. Holz oder Kunststoff, bestehen.
Die in Bild 1 abgebildeten Mindestabstände müssen für die Montage eingehalten werden.
2. Sie können die beigefügte Schablone nutzen, um die zu bohrenden Löcher an der Wand zu markieren.
Bitte achten Sie darauf, dass die Markierungen gerade sind (s. Bild 2a). Bitte bohren Sie anschließend
an den Markierungen vier Löcher mit einem Durchmesser von je 6mm in die Wand (s. Bild 2b).
3. Bitte stecken Sie je einen Dübel pro Loch in die Wand und schieben Sie diese mit einem Hammer so
weit rein, bis die Dübel nicht mehr aus der Wand herausragen (s. Bild 3).
4. Bitte fixieren Sie die Wandhalterung an den beiden oberen Löchern mithilfe von zwei ST4x35 Schrauben
(s. Bild 4).
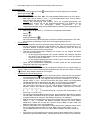
5. Bitte befestigen Sie die beiden Z-Winkel mithilfe von zwei M4x8 Schrauben am Geräterücken. Setzen
Sie bitte den kleineren Handtuchhalter in die vorgesehenen Halterungen ein und schrauben Sie diesen
mit vier M4x16 Schrauben fest. Wiederholen Sie bitte den Vorgang mit dem größeren Handtuchhalter
sowie vier weiteren M4x16 Schrauben (s. Bild 5). Die beiden Handtuchhalter sind auch nach der
Montage höhenverstellbar. Bitte bringen Sie die Handtuchhalter durch Schieben in die gewünschten
Positionen.
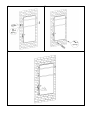
6. Für den folgenden Montageschritt werden zwei Personen benötigt: Bitte legen Sie das Gerät an die
Wandhalterung und befestigen Sie es links und rechts außen mit jeweils zwei M4x10 Schrauben an die
Wandhalterung (s. Bild 6).
7. Bitte fixieren Sie die Z-Winkel am Gerät mithilfe von zwei ST4x35 Schrauben an die Wand. Die
Schrauben sollten in die beiden vorgebohrten unteren Löcher passen (s. Bild 7).
8. Bitte wischen Sie mit einem weichen Tuch über die Geräteoberfläche (s. Bild 8). Das Gerät ist bereit
zum Betrieb.
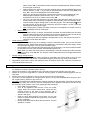
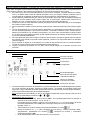
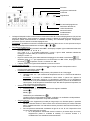
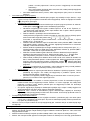
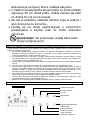
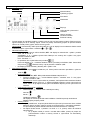
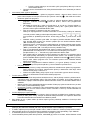
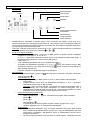
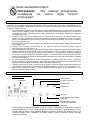
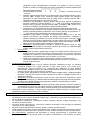
Inbetriebnahme
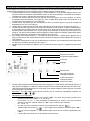
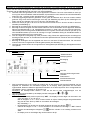
• Stromversorgung: 230-240V~, 50Hz, 2000W
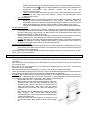
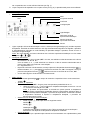
• Bedienfeld: Wertzunahme
Display Wochenprogramm
Bestätigung
Einstellung
Ein-/Aus
Auswahl Heizstufe/Ventilation
Fenstersensor/
Handtuchwärmer
Wertabnahme
• Bitte schließen Sie das Gerät an die Stromversorgung an und betätigen Sie dann den Ein-/Aus-Schalter
(O/I) auf der linken Seite des Gerätes. Es ertönt ein akustisches Signal und das Display schaltet sich
für drei Sekunden ein. Danach schaltet das Gerät automatisch in den Standby-Modus. Wenn Sie das
Gerät ausschalten möchten, betätigen Sie bitte den Ein-/Aus-Schalter erneut.
Hinweis: Den Standby-Modus erkennen Sie daran, dass keinerlei Indikationsleuchten für die
Heizstufen/Ventilation am Display angezeigt werden ( / / ).
• Einstellung von Tag und Uhrzeit:
o Bitte drücken Sie im Standby-Modus die Taste „SET“. Auf dem Display erscheinen die Tage der
Woche in Form von Zahlen: 1 2 3 4 5 6 7
Mit den Tasten „+“ und „-“ können Sie zwischen den Zahlen wählen. Der ausgewählte
Wochentag blinkt dabei. Bitte drücken Sie „OK“, um Ihre Auswahl zu bestätigen.
Bsp.: Montag -> 1
o Nach der Bestätigung des Wochentags blinkt die Stundenangabe der Uhr:
Bitte nutzen Sie die Tasten „+“ und „-“, um die aktuelle Stunde einzustellen und bestätigen Sie
mit „OK“. Anschließend blinkt die Minutenangabe . Bitte stellen Sie die Minuten ein und
bestätigen Sie ebenfalls mit „OK“.

o Das Display zeigt nun den aktuellen Wochentag und die Uhrzeit an.
• Manueller Betrieb:
o Bitte drücken Sie die Ein-/Aus-Taste am Bedienfeld. Das Gerät beginnt den manuellen
Betrieb bei 1800W ( ).
o Temperatureinstellung:
▪ Bitte drücken Sie die Taste „SET“. Die voreingestellte Zieltemperatur von 20°C blinkt.
▪ Bitte nutzen Sie die Tasten „+“ und „-“, um Ihre Zieltemperatur auf 5-40°C zu ändern.
Bitte bestätigen Sie Ihre Auswahl mit „OK“.
Hinweis: Der Heizvorgang wird pausiert, wenn die Umgebungstemperatur die
Zieltemperatur erreicht hat. Ist die Umgebungstemperatur 2°C niedriger als die
Zieltemperatur, wird der Heizvorgang wieder aufgenommen. Ist die
Umgebungstemperatur höher als die Zieltemperatur, wird kein Heizvorgang begonnen.
o Auswahl Heizstufe/Ventilation:
▪ Bitte drücken Sie die Taste . Sie können aus folgenden Modi wählen:
1800W ( )
900W ( )
Kühlende Ventilation ( )
Die entsprechende Indikationsleuchte erscheint am Display. Bitte beachten Sie, dass
die Ventilation unabhängig von der Ziel- und Umgebungstemperatur ist.
o Fenstersensor:
▪ Um zu vermeiden, dass das Gerät über längere Zeit bei offenem Fenster heizt, können
Sie den Fenstersensor aktivieren. Bitte beachten Sie, dass der Fenstersensor nur im
manuellen Betrieb verwendet werden kann. Zur Aktivierung halten Sie bitte die
Fenstersensor-Taste drei Sek. lang gedrückt.
▪ Sinkt die Umgebungstemperatur innerhalb von 10 Min. um 5°C, beginnt das Gerät
einen 30-Min.-Countdown:
• Ist die Umgebungstemperatur nach 30 Min. dieselbe oder niedriger, wechselt
das Gerät in den Standby-Modus und der Fenstersensor sowie das Heizen
werden automatisch deaktiviert.
• Ist die Umgebungstemperatur nach 30 Min. höher, heizt das Gerät weiterhin
und der Fenstersensor bleibt aktiv.
▪ Wenn Sie den Fenstersensor deaktivieren möchten, halten Sie die entsprechende
Taste erneut drei Sek. lang gedrückt.
• Automatischer Betrieb (Wochenprogramm):
o Im automatischen Betrieb können Sie ein Wochenprogramm bestimmen, an welchen Tagen, zu
welchen Zeiten und auf welche Zieltemperatur geheizt werden soll. Es wird hierbei mit 1800W
() geheizt. Eine andere Auswahl ist nicht möglich.
o Einstellung des Wochenprogramms:
▪ Bitte halten Sie im Standby-Modus die Wochenprogramm-Taste drei Sek. lang gedrückt.
Die Indikationsleuchte blinkt solange bis die Programmierung abgeschlossen ist.
▪ Auf dem Display erscheinen die Tage der Woche in Form von Zahlen: 1 2 3 4 5 6 7.
Mit den Tasten „+“ und „-“ können Sie zwischen den Tagen wählen. Der ausgewählte
Wochentag blinkt dabei. Bitte drücken Sie „OK“, um Ihre Auswahl zu bestätigen.
▪ Sie befinden sich nun in der Stundeneinstellung für Ihren ausgewählten Tag.
Das Gerät kann zwischen 0-24 Uhr für volle Stunden programmiert werden. Die
Stunden werden über Balken angezeigt. Jeder Balken entspricht einer Stunde:
Der erste Balken „0“ repräsentiert die Zeit 00:00 – 00:59 Uhr, der zweite Balken „1“ die
Zeit 01:00 – 01:59 Uhr usw.
▪ Der aktuell ausgewählte Balken blinkt schnell. Zum Bearbeiten des Balkens drücken
Sie bitte „SET“. Der Balken blinkt nun langsam. Bitte drücken Sie „OK“, um das Heizen
für diesen Zeitraum zu aktivieren. Der Balken leuchtet nun durchgehend.
▪ Bitte fahren Sie die Einstellungen für die anderen Zeiträume fort, indem Sie mithilfe der
Tasten „+“ und „-“ zwischen den Balken wechseln. Möchten Sie einen Balken
deaktivieren, wählen Sie ihn bitte aus, drücken Sie auf „SET“ und dann „OK“. Der
Balken leuchtet nicht mehr und ist deaktiviert.
▪ Sobald Sie alle Balken des ausgewählten Tages aktiviert bzw. deaktiviert haben, blinkt
die voreingestellte Zieltemperatur von 20°C. Bitte nutzen Sie die Tasten „+“ und „-“,
um Ihre Zieltemperatur auf 5-40°C zu ändern. Bitte bestätigen Sie Ihre Auswahl mit
„OK“.
▪ Sie können nun die Einstellungen für weitere Tage auf dem selben Wege vornehmen.
Sobald alle Tage bearbeitet wurden, wechselt das Gerät automatisch in den Standby-

Modus. Bitte drücken Sie die Wochenprogramm-Taste, um das Programm zu starten.
Die Indikationsleuchte sowie die aktiven Balken des Tages leuchten während des
Programms durchgehend. Zum Beenden drücken Sie bitte erneut die
Wochenprogramm-Taste.
▪ Hinweis: Die Programmierung wird auch nach dem Ausschalten gespeichert. Ist das
Gerät jedoch fünf Tage lang außer Betrieb, müssen die Einstellungen erneut
vorgenommen werden.
o Bewegungssensor:
▪ Der Bewegungssensor wird stets automatisch mit dem Wochenprogramm aktiviert und
deaktiviert. Eine manuelle Einstellung ist nicht möglich. Sobald das Gerät zur
eingestellten Zeit heizt, beginnt der Sensor Bewegungen im Radius von 3m zu scannen.
▪ Wenn keine Bewegungen wahrgenommen werden, wird das Heizen nach 15 Min.
beendet und wieder aufgenommen, sobald sich jemand innerhalb des Radius bewegt.
• Handtuchwärmfunktion:
o Unabhängig davon, ob Sie sich im Standby, manuellen oder automatischen Betrieb befinden,
können Sie die Handtuchwärmfunktion nutzen. Bitte stellen Sie dazu sicher, dass das Gerät an
die Stromversorgung angeschlossen ist. Bitte drücken Sie die Handtuchwärmer-Taste. Zum
Beenden drücken Sie die Taste bitte erneut.
o Während des Wärmens leuchtet die zugehörige Indikationsleuchte durchgehend. Das Gerät
heizt mit 200W für max. zwei Stunden und schaltet sich danach automatisch ab.
o Hinweis: Wenn Sie im manuellen oder automatischen Betrieb die Ein-/Aus-Taste zum Beenden
des Heizens betätigen, wird die Handtuchwärmfunktion nicht beeinflusst. Die Funktion ist
ebenfalls unabhängig von der Ziel- und Umgebungstemperatur.
• Display-Energiesparfunktion:
o Unabhängig von der Betriebsart erlöschen alle Leuchten am Display und Bedienfeld, wenn nach
einer Minute keine Tasten berührt wurden. Zum reaktivieren der Leuchten drücken Sie bitte eine
beliebige Taste am Bedienfeld.
• Unabhängig davon, in welchem Modus die Heizfunktion ausgeschaltet wird, arbeitet der Lüfter 15 Sek.
weiter, bevor er sich ausschaltet.
Reinigung
• Bitte entfernen Sie das Gerät vor jeder Reinigung von der Stromzufuhr und lassen Sie es abkühlen.
Tauchen Sie das Gerät und seine elektrischen Bestandteile bitte nie unter Wasser, um Stromschläge zu
vermeiden.
• Bitte verwenden Sie zur Reinigung der Außenflächen ein feuchtes, weiches Tuch und zum Abtrocknen
ein trockenes Tuch.
• Bitte nutzen Sie keine aggressiven und chemischen Reinigungsmittel sowie keine scheuernden
Putzmittel, wie z.B. Stahlwolle.
• Bitte verwenden Sie einen Staubsauger, um Luftein- und auslass von Staub zu befreien.
• Wenn Sie das Gerät für längere Zeit nicht nutzen, lagern Sie es bitte staubgeschützt an einem trockenen,
gut belüfteten Ort. Bitte legen Sie keine schweren Gegenstände auf das Gerät.
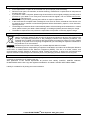
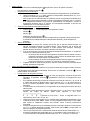
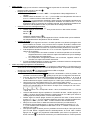
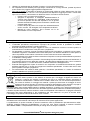
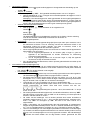
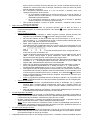
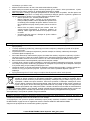
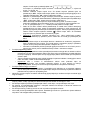
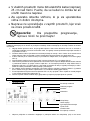
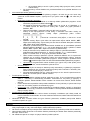
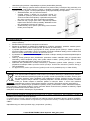
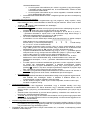
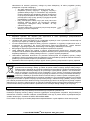
• Staubfilter: Das Gerät ist mit einer Reinigungserinnerung für die Staubfilter ausgestattet. Sind die Filter
über 150 Std. in Benutzung oder erreicht die Temperatur im Gerät aufgrund der Verschmutzung das
Limit, ertönt ein Signalton-Alarm. Bitte gehen Sie in diesem Fall wiefolgt vor:
o Bitte drücken Sie „OK“, um den Alarm zu beenden.
o Bitte schalten Sie das Gerät aus und entfernen Sie es von
der Stromzufuhr. Wenn das Gerät abgekühlt ist, lösen Sie
bitte die beiden ST3x10 Schrauben am Geräterücken mit
einem Schraubenzieher. Bitte ziehen Sie die beiden
Staubfilter links und rechts raus, wie in der Abbildung zu
sehen.
o Bitte waschen Sie die Staubfilter unter Wasser. Es dürfen
keine ätzenden oder scheuernden Reinigungsmittel
verwendet werden. Lassen Sie die Filter anschließend bitte
vollkommen lufttrocknen.
o Setzen Sie beide Filter bitte wieder ein und fixieren Sie sie
mit den Schrauben. Bitte schalten Sie das Gerät wieder
ein.

Für den Reklamationsfall
• Möchten Sie das Gerät reklamieren, so können Sie das binnen 24 Monate ab Kaufdatum (Quittung) tun.
• Ein kostenloser Ersatz oder eine kostenlose Reparatur ist bei vorheriger unsachgemäßer
Produktmanipulation ausgeschlossen.
• Defekte an Verschleißteilen, Verbrauchsmaterialien, ebenso wie Reinigung, Wartung oder Austausch
besagter Teile sind folglich kostenpflichtig.
• Falls Sie eine Reklamation durchführen wollen, so bringen Sie bitte das gesamte Gerät in der
Originalverpackung und mit Kaufbeleg zu Ihrem Händler. Für eine zeitnahe und bequeme
Serviceanmeldung besuchen Sie ferner unsere Internetseite www.suntec-wellness.de und erfahren Sie
mehr.
• Ohne Kaufbeleg erfolgt grundsätzlich keine kostenlose Reparatur oder ein Austausch.
• Für den Fall, dass der Reklamationsfall analog unserer Service Bestimmungen erfolgt, so werden alle
Defekte des Gerätes oder des Zubehörs aufgrund von Material- oder Herstellungsfehlern durch
kostenlose Reparatur oder, nach unserem Ermessen, durch Austausch des Gerätes beseitigt.
• Die Beschädigung von Zubehörteilen führt nicht automatisch zu einem kostenlosen Austausch des
gesamten Gerätes. Kontaktieren Sie in diesen Fällen bitte Ihren Fachhändler. Glasbruch oder Bruch von
Plastikteilen ist immer kostenpflichtig.
• Der Fachhändler oder Reparaturservice kann nach Ablauf der Garantie Reparaturen kostenpflichtig
durchführen.
Hinweise zum Umweltschutz
Dieses Produkt darf am Ende seiner Lebensdauer nicht über den normalen Haushaltsabfall
entsorgt werden, sondern muss an einem Sammelpunkt für das Recycling von elektrischen und
elektronischen Geräten abgegeben werden. Das Symbol auf dem Produkt, der Gebrauchsanleitung
oder der Verpackung weist darauf hin. Die Werkstoffe sind gemäß ihrer Kennzeichnung wieder
verwertbar. Mit der Wiederverwendung, der stofflichen Verwertung oder anderen Formen der
Verwertung von Altgeräten leisten Sie einen wichtigen Beitrag zum Schutze unserer Umwelt. Bitte
erfragen Sie bei der Gemeindeverwaltung die zuständige Entsorgungsstelle.
Im Rahmen unserer erweiterten Herstellerverantwortung ist dieses Gerät gemäß der Europäischen Richtlinie
2012/19/EU für Elektro- und Elektronik-Altgeräte (WEEE) gekennzeichnet. Ziel ist das Vermeiden, Verringern
sowie umweltverträgliche Entsorgen an Elektronikschrott. Bitte helfen Sie aktiv mit, die Umwelt zu schonen und
entsorgen Sie Elektroschrott über die örtlichen Sammelstellen.
Die Verpackung sowie diese Bedienungsanleitung sind recycelbar.
EG-Konformitätserklärung
Das Gerät entspricht den wesentlichen Gesundheits- und Sicherheitsanforderungen der Europäischen Union.
Die EG-Konformitätserklärung ist Basis für die CE-Kennzeichnung dieses Gerätes.
Mit Erscheinen dieser Bedienungsanleitung verlieren alle bisherigen ihre Gültigkeit. SUNTEC, SUNTEC
Wellness, KLIMATRONIC und das Sonnenlogo sind eingetragene Marken. © 2020/01 SUNTEC WELLNESS
GMBH.
Für Druckfehler und Irrtümer wird keine Haftung übernommen.
© 2020 KLIMATRONIC® Heat Supreme 2000 glass panel
SUNTEC WELLNESS GMBH / HOLZSTRASSE 2 / 40 221 DÜSSELDORF / DEUTSCHLAND

Thank you for purchasing this product of the brand Suntec Wellness. Before the first use, please read
the manual carefully. Keep it for later reference and hand it over to its new owner, if you give the appliance
to another person.
Safety Precautions
This appliance can be used by children aged from 8
years and above and persons with reduced
physical, sensory and mental capabilities or lack of
experience and knowledge if they have been given
supervision or instruction concerning use of the
appliance in a safe way and understand the hazards
involved. Cleaning and user maintenance shall not
be made by children without supervision.
Children of less than 3 years should be kept away
unless continuously supervised.
Children aged from 3 years and less than 8 years
shall only switch on/off the appliance provided that
it has been placed or installed in its intended normal
operating position and they have been given
supervision or instruction concerning use of the
appliance in a safe way and understand the hazards
involved. Children aged from 3 years and less than
8 years shall not plug in, regulate and clean the
appliance or perform user maintenance.
• Before connecting the appliance to the power
supply, check that the voltage indicated on the
appliance corresponds with your home’s voltage.
• Please refrain from further usage if the power cord,
power plug or the appliance are damaged and
contact your seller.
• Do not use the appliance for other than its intended
use. Other applications may cause fire. For
domestic indoor use only.
• Do not operate the appliance in the immediate
surroundings of baths, showers or swimming pools.
Keep a distance of at least 0,6m. This also includes
GB

the power cord.
• Do not use multiple sockets or extension cords.
• Please do not leave the appliance unattended.
• Do not attempt to repair, disassemble or change the
appliance by yourself.
• Be careful of hot surfaces and do not touch them as
they might cause burns. Special care must be taken
when children and vulnerable persons are present.
• The use of accessory not recommended by the
manufacturer, e.g. time switches, may cause harm.
• Only operate the appliance on a flat, stable and
heat-resistant surface.
• Remove the appliance from the wall socket when it
is not in use, before cleaning, when moving and in
case of malfunctions. Pull on the power plug, not on
the power cord.
• Never use the appliance with wet hands.
• Do not insert any objects into the appliance as this
may cause electric shocks, fire or damages to the
appliance.
• Do not place the heater directly under a power
socket, near curtains, drapes or other flammable
materials, gases and other objects. Keep a
minimum distance of 1m.
• To avoid electric shocks, never immerse the unit, it’s
cord and plug into water or other liquids.
• The appliance needs to be at least 0,5m apart from
the floor.
• Children should not play with the appliance.
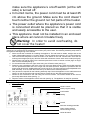
• The appliance is to be supplied through a residual
current device (RCD) having a rated residual
operating current not exceeding 30 mA.
• Before unplugging/plugging in the power cable,

make sure the appliance’s on/off switch (at the left
side) is turned off.
• In humid rooms, the power cord must be at least 25
cm above the ground. Make sure the cord doesn’t
touch neither the ground nor hot parts of the heater.
• The power outlet where the appliance’s power cord
is connected should be placed so that it is visible
and easily accessible to the user.
• This appliance must not be installed in an enclosed
place where air cannot circulate freely
Warning: In order to avoid overheating, do
not cover the heater!
Assembly
Please remove all packaging materials and check all components for visible damage. In the event of damage,
please do not proceed with the assembly and contact your point of sale. The following assembly steps refer to
the figures at the beginning of this manual.
1. Select a wall that is suitable for installing the appliance. The wall must be stable, straight and not be
made of flammable material, e.g. wood or plastic. The min. distances as shown in fig.1 must be followed.
2. Use the enclosed template to mark the holes to be drilled on the wall. Please make sure that the
markings are straight (see fig.2a). Drill four holes with a diameter of 6mm each into the wall (see fig.2b).
3. Please insert one peg per hole into the wall and push them in with a hammer until the pegs no longer
stick out from the wall (see fig.3).
4. Fix the wall bracket to the two upper holes using two ST4x35 screws (see fig.4).
5. Fasten the two z-brackets to the back of the unit using two M4x8 screws. Insert the smaller towel rail
into the provided brackets and screw it tight with four M4x16 screws. Repeat the procedure with the
larger towel rail and four additional M4x16 screws (see fig.5). The towel rails are height adjustable even
after assembly. To do so, slide the towel rails up or down into the desired positions.
6. Two persons are required for the following assembly step: Place the appliance on the wall bracket and
fasten it on the left and right side with two M4x10 screws each to the wall bracket (see fig.6).
7. Please fix the z-brackets to the wall using two ST4x35 screws. The screws should fit into the two
previously drilled lower holes (see fig. 7).
8. Wipe the surface of the appliance with a soft cloth (see fig. 8). The appliance is ready for operation.
Operation
• Operating voltage: 230-240V~, 50Hz, 2000W
• Control panel: Value increase
Display Week program setting
Confirmation
Setting
On/Off
Selection heating power/fan
Open window sensor/
towel warming function
Value decrease

• Connect the appliance to the power supply and push the on/off switch (O/I) located at the left side of the
heater to switch on the appliance. An acoustic signal sounds and the display will light up for 3 seconds,
then automatically switch to standby mode. Push the on/off switch again when you want to switch it off.
Note: You can identify the standby mode by a display that does not show any indicating lights for the
heating power/fan ( / / ).
• Day and time setting:
o In standby mode, press the button „SET“. The display shows the days of the week as numbers:
1 2 3 4 5 6 7
Use the buttons „+“ and „-“ to choose between the numbers. The selected day flashes. Please
press „OK“ to confirm.
Example: Monday -> 1
o After confirming the day, the hour indication of the clock flashes:
Use the buttons „+“ and „-“ to set the current hour and confirm with „OK“. Next, the minute
indication flashes: . Set the current minutes and confirm with „OK“.
o The display now shows the time and current day of the week.
• Manual operation:
o Press the on/off button on the control panel. The manual operation starts with 1800W ( ).
o Temperature setting:
▪ Press „SET“. The default temperature of 20°C flashes.
▪ Use „+“ and „-“ to choose a target temperature from 5-40°C. Confirm with „OK“.
Note: Heating is stopped when the ambient temperature has reached the target
temperature. If the ambient temperature is 2°C lower than the target temperature,
heating will resume. If the ambient temperature is higher than the target temperature,
no heating is started.
o Selection of heating power/fan:
▪ Press the button . You may choose between the following modes:
1800W ( )
900W ( )
Cooling fan ( )
The corresponding indicating light appears on the display. Please note that the fan is
independent from the target and ambient temperature.
o Open window sensor:
▪ You can activate the open window sensor to prevent the appliance from heating for a
longer period when a window is open. Please note that the sensor can only be used in
the manual operation. To activate the sensor, press and hold the according button for
three seconds.
▪ If the ambient temperature drops by 5°C within 10 minutes, the appliance starts a 30-
min.-countdown:
• After 30 minutes, if the ambient temperature is the same or lower, the appliance
switches to standby mode and the heating as well as open window sensor are
automatically deactivated.
• If the ambient temperature is higher, the appliance continues to heat and the
open window sensor remains active.
▪ Press and hold the open window sensor button again for three seconds to deactivate
the sensor.
• Automatic operation (week program):
o In the automatic operation you can set a week program to define on which days, at which times
and to which target temperature heating shall take place. During the week program the
appliance works with 1800W ( ). Other selections are not possible.
o Week program setting:
▪ In standby mode press and hold the week program button for three seconds. The
indicating light flashes until the setting is finished.
▪ The days of the week appear on the display as numbers.: 1 2 3 4 5 6 7.
Use the buttons „+“ and „-“ to choose between the numbers. The selected day flashes.
Press „OK“ to confirm.
▪ You will now enter the hour setting for your selected day. The appliance can be
programmed between 0-24h for full hours. The hours are indicated by boxes. Each box
represents one hour:
The first box „0“ represents the time 00:00 – 00:59 AM, the second box „1“ the time
01:00 – 01:59 AM etc.
▪ The selected box flashes quickly. To modify the box, press „SET“. Now the box flashes

slowly. Press „OK“ to activate the heater during the represented time. When activated,
the box lights continously.
▪ Please continue the settings for the other time periods by switching between the boxes
with the buttons „+“ and „-“. If you want to deactivate a box, select it, press „SET“ and
then „OK“. The box will dissappear and is deactivated.
▪ When you have finished activating or deactivating all boxes of the selected day, the
default target temperature starts to blink. Use „+“ and „-“ to choose the target
temperature from 5-40°C. Please confirm with „OK“.
▪ You may now make the settings for the other days using the same steps. As soon as
all days have been processed, the appliance automatically enters the standby mode.
Press the week program setting button to start the program. The indicating light and
the active boxes of the day are lit continously duing the program. To stop, press the
week program setting button again.
▪ Note: The program is saved even after turning off. If the appliance is turned of for five
days, all settings must be made again.
o Motion sensor:
▪ The motion sensor is always automatically activated and deactivated with the week
program. Manual setting is not possible. As soon as the appliance starts to heat at the
set time, the sensor starts to scan movements within a radius of 3m.
▪ If no movement is detected, heating is stopped after 15 min. and resumed as soon as
someone moves within the radius.
• Towel warming function:
o Regardless of whether you are in standby, manual or automatic mode, you can use the towel
warming function. Please make sure that the appliance is connected to the power supply. Press
the towel warming button. To exit, press the button again.
o During heating, the corresponding indication light is lit continuously. The function heats at 200W
for a maximum of two hours and then automatically switches off.
o Note: When you press the on/off button to stop heating in manual or automatic mode, the towel
warming function is not affected. The function is also independent from the target and ambient
temperature.
• Display energy saving function:
o Regardless of the operating mode, all lights on the display and control panel go out if no keys
are touched after one minute. To reactivate the lights, press any key on the control panel.
• Regardless of the mode in which the heating function is switched off, the fan continues to operate for
15 seconds before it turns off.
Cleaning
• Always disconnect the appliance from the power outlet and let it cool before cleaning. Never immerse
the appliance in water to prevent electric shocks.
• Wipe over the exterior of the appliance with a soft wet cloth and then wipe dry with a dry cloth.
• Please do not use any aggressive or chemical cleaning agents or abrasive cleaning agents such as
steel wool.
• Please use a vacuum cleaner to remove any dust from the air inlet and outlet.
• If you don’t use the appliance for a longer period, store it in a dry, well-ventilated place away from fust.
Do not place heavy objects on top of the unit.
• Dust filter: The appliance is equipped with a cleaning reminder for the dust filters. If the filters have been
in use for more than 150 hours or if the inner temperature of the appliance reaches its limit due to the
dirt, an alarm signal sounds. In this case, please proceed as follows:
o Press „OK“ to stop the alarm.
o Turn off the appliance and remove it from the power
supply. When the unit has cooled down, loosen the two
ST3x10 screws on the back of the appliance with a
screwdriver. Pull out the two dust filters left and right as
shown in the figure.
o Clean the dust filters directly under water. Do not use
caustic or abrasive material during cleaning. Let the filters
air-dry completely.
o Reinsert both filters and fix them with the screws. Turn the
appliance on again.

In case of complaint
• You can claim the device within 24 months from date of purchase (receipt).
• A free replacement or repair will be excluded from prior improper product handling.
• Defects in wear parts, consumables, as well as cleaning, maintenance or replacement of said parts are
therefore with costs.
• If you want to make a complaint, please bring the entire device in its original packaging and with proof of
purchase to your dealer. For a timely and convenient service register, visit our website www.suntec-
wellness.de and learn more.
• Without a proof of purchase, generally there will be no repair or replacement.
• In the event that the complaint case is analogous to our terms of service, all defects of the device or its
accessories due to material or manufacturing defects will be eliminated by repair or, at our discretion,
replacing the unit.
• The damage of accessories does not automatically lead to a free exchange of the whole device. In these
cases, please contact your dealer. Glass breakage, or breakage of plastic parts are always to charge.
• The dealer or repair service can perform the repair after the expiration of warranty against charge.
Note concerning protection of environment
This product must not be disposed of via normal household waste after its service life, but must be
taken to a collection station for the recycling of electrical and electronic devices. The symbol on the
product, the operating instructions or the packaging indicates such disposal procedures. The
materials are recyclable in accordance with their respective symbols. By means of re-use, material
recycling or any other form of recycling old appliances you are making an important contribution to
the protection of our environment.
Please ask your local council where your nearest disposal station is located.
As part of our extended producer responsibility, this product is indicated in accordance to the European Directive
2012/19/EU on Waste Electrical and Electronic Equipment (WEEE). The aim is to avoid, reduce, and
environmentally friendly disposal of electronic waste. Please help actively to protect the environment and
dispose electronic waste through local collection points. The packaging and this manual can be recycled.
EC declaration of conformity
The device meets the essential health and safety requirements of the European Union. The EC declaration of
conformity is the basis for CE marking this unit.
With publication of this manual supersedes all previous their validity. SUNTEC, SUNTEC Wellness,
KLIMATRONIC and the Sun-Logo are registered trademarks. © 2020/01 SUNTEC WELLNESS GMBH
Liability is excluded for all printing errors and omissions.
© 2020 KLIMATRONIC® Heat Supreme 2000 glass panel
SUNTEC WELLNESS GMBH / HOLZSTRASSE 2 / 40 221 DÜSSELDORF / GERMANY
La pagina si sta caricando...
La pagina si sta caricando...
La pagina si sta caricando...
La pagina si sta caricando...
La pagina si sta caricando...
La pagina si sta caricando...
La pagina si sta caricando...
La pagina si sta caricando...
La pagina si sta caricando...
La pagina si sta caricando...
La pagina si sta caricando...
La pagina si sta caricando...
La pagina si sta caricando...
La pagina si sta caricando...
La pagina si sta caricando...
La pagina si sta caricando...
La pagina si sta caricando...
La pagina si sta caricando...
La pagina si sta caricando...
La pagina si sta caricando...
La pagina si sta caricando...
La pagina si sta caricando...
La pagina si sta caricando...
La pagina si sta caricando...
La pagina si sta caricando...
La pagina si sta caricando...
La pagina si sta caricando...
La pagina si sta caricando...
La pagina si sta caricando...
La pagina si sta caricando...
La pagina si sta caricando...
La pagina si sta caricando...
La pagina si sta caricando...
La pagina si sta caricando...
La pagina si sta caricando...
La pagina si sta caricando...
La pagina si sta caricando...
La pagina si sta caricando...
La pagina si sta caricando...
La pagina si sta caricando...
La pagina si sta caricando...
La pagina si sta caricando...
La pagina si sta caricando...
La pagina si sta caricando...
La pagina si sta caricando...
La pagina si sta caricando...
La pagina si sta caricando...
La pagina si sta caricando...
La pagina si sta caricando...
La pagina si sta caricando...
La pagina si sta caricando...
La pagina si sta caricando...
La pagina si sta caricando...
La pagina si sta caricando...
La pagina si sta caricando...
La pagina si sta caricando...
La pagina si sta caricando...
La pagina si sta caricando...
La pagina si sta caricando...
La pagina si sta caricando...
La pagina si sta caricando...
La pagina si sta caricando...
La pagina si sta caricando...
La pagina si sta caricando...
La pagina si sta caricando...
La pagina si sta caricando...
La pagina si sta caricando...
La pagina si sta caricando...
La pagina si sta caricando...
La pagina si sta caricando...
La pagina si sta caricando...
La pagina si sta caricando...
La pagina si sta caricando...
La pagina si sta caricando...
La pagina si sta caricando...
La pagina si sta caricando...
La pagina si sta caricando...
La pagina si sta caricando...
La pagina si sta caricando...
La pagina si sta caricando...
La pagina si sta caricando...
La pagina si sta caricando...
La pagina si sta caricando...
La pagina si sta caricando...
La pagina si sta caricando...
La pagina si sta caricando...
La pagina si sta caricando...
La pagina si sta caricando...
La pagina si sta caricando...
La pagina si sta caricando...
La pagina si sta caricando...
La pagina si sta caricando...
La pagina si sta caricando...
-
 1
1
-
 2
2
-
 3
3
-
 4
4
-
 5
5
-
 6
6
-
 7
7
-
 8
8
-
 9
9
-
 10
10
-
 11
11
-
 12
12
-
 13
13
-
 14
14
-
 15
15
-
 16
16
-
 17
17
-
 18
18
-
 19
19
-
 20
20
-
 21
21
-
 22
22
-
 23
23
-
 24
24
-
 25
25
-
 26
26
-
 27
27
-
 28
28
-
 29
29
-
 30
30
-
 31
31
-
 32
32
-
 33
33
-
 34
34
-
 35
35
-
 36
36
-
 37
37
-
 38
38
-
 39
39
-
 40
40
-
 41
41
-
 42
42
-
 43
43
-
 44
44
-
 45
45
-
 46
46
-
 47
47
-
 48
48
-
 49
49
-
 50
50
-
 51
51
-
 52
52
-
 53
53
-
 54
54
-
 55
55
-
 56
56
-
 57
57
-
 58
58
-
 59
59
-
 60
60
-
 61
61
-
 62
62
-
 63
63
-
 64
64
-
 65
65
-
 66
66
-
 67
67
-
 68
68
-
 69
69
-
 70
70
-
 71
71
-
 72
72
-
 73
73
-
 74
74
-
 75
75
-
 76
76
-
 77
77
-
 78
78
-
 79
79
-
 80
80
-
 81
81
-
 82
82
-
 83
83
-
 84
84
-
 85
85
-
 86
86
-
 87
87
-
 88
88
-
 89
89
-
 90
90
-
 91
91
-
 92
92
-
 93
93
-
 94
94
-
 95
95
-
 96
96
-
 97
97
-
 98
98
-
 99
99
-
 100
100
-
 101
101
-
 102
102
-
 103
103
-
 104
104
-
 105
105
-
 106
106
-
 107
107
-
 108
108
-
 109
109
-
 110
110
-
 111
111
-
 112
112
-
 113
113


Suntec Wellness BATHROOM HEATER HEAT SUPREME 2000 GLASS PANEL Manuale del proprietario
- Categoria
- Riscaldatori di spazio
- Tipo
- Manuale del proprietario
in altre lingue
- français: Suntec Wellness BATHROOM HEATER HEAT SUPREME 2000 GLASS PANEL Le manuel du propriétaire
- español: Suntec Wellness BATHROOM HEATER HEAT SUPREME 2000 GLASS PANEL El manual del propietario
- Deutsch: Suntec Wellness BATHROOM HEATER HEAT SUPREME 2000 GLASS PANEL Bedienungsanleitung
- Nederlands: Suntec Wellness BATHROOM HEATER HEAT SUPREME 2000 GLASS PANEL de handleiding
- português: Suntec Wellness BATHROOM HEATER HEAT SUPREME 2000 GLASS PANEL Manual do proprietário
- slovenčina: Suntec Wellness BATHROOM HEATER HEAT SUPREME 2000 GLASS PANEL Návod na obsluhu
- polski: Suntec Wellness BATHROOM HEATER HEAT SUPREME 2000 GLASS PANEL Instrukcja obsługi
Documenti correlati
-
Suntec Wellness BATHROOM HEATER HEAT STREAM 2000 SLIM Manuale del proprietario
-
-
-
-
-
 Klimatronic Air Booster 2000 Manuale del proprietario
-
-
-
-

Altri documenti
-
 Glamox heating H60 Manuale utente
-
Equation CH505FT Manuale utente
-
 NEO TOOLS 90-101 Manuale del proprietario
-
 NEO TOOLS 90-093 Manuale del proprietario
-
BOMANN HL 6040 CB Manuale del proprietario
-
-
BOMANN HL 6064 CB Istruzioni per l'uso
-
Clatronic HL 3763 Manuale del proprietario
-
Koenic KFH 3161 B Manuale del proprietario
-
ProfiCare PC-EHW 3115 Istruzioni per l'uso


