
Tomit
GB
I
Passapomodoro e tritacarne elettrico
ISTRUZIONID USO
Electric Meat Grinder and Tomato Strainer
INSTRUCTIONS FOR USE

2
Mod. Tomit (MGB-150)
220 - 240V 50/60 Hz
600 W
B

3

4
Questo apparecchio può essere utilizzato da
bambini dagli 8 anni in su e da persone con
ridotte capacità fisiche, sensoriali o mentali o
con mancanza di esperienza o conoscenza se
a loro è stata assicurata un’adeguata sor- ve
glianza oppure se hanno ricevuto istruzioni cir
ca l’uso in sicurezza dell’apparecchio e hanno
compreso i pericoli correlati. I bambini non de
vono giocare con l’apparecchio. Le operazioni
di pulizia e di manutenzione non devono essere
effettuate da bambini a meno che non abbiano
più di 8 anni e siano sorvegliati. Mantenere l’ap
parecchio e il suo cavo fuori dalla portata dei
bambini con meno di 8 anni.

5

6

7

8
60

9
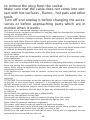
Componenti
A. Corpo apparecchio con motore
B. Vite di rotazione
D. Tasto selettore velocità I - II
E. Tasto Selettore ON-OFF-R
F. Tasto di sblocco condotto a T
G. Condotto a T
H. Bacinella introduzione alimenti
L. Pressa alimenti
M. Elica in metallo
N. Lama a stella
P. Dischi per tritare (tre tipi differenti)
Q. Ghiera di bloccaggio
R. Dischi in plastica per insaccati e pol-
pette
S. Accessorio per polpette
(da alimenti gia tritati)
T. Accessorio per salsicce
(da alimenti gia tritati)
U. Cono filtrante per salsa
V. Foro espulsione bucce
Z. Elica in plastica
Y. Convogliatore della salsa
K. Fascetta del convogliatore
W. Fermo della fascetta
Operazioni preliminari al primo utilizzo
Con spina disinserita dalla presa elet-
trica, disporre il corpo dell’apparecchio
(A) su di un piano stabile e asciutto non
in prossimità di vasche o contenitori di
liquidi, indi procedere all’assemblaggio
dell’apparecchio.
Attenzione nel maneggiare la lama in
quanto è molto tagliente.
Tenendo premuto il tasto (F) inserire in
posizione ore 2 il condotto (G) nel foro
anteriore del corpo (A), ruotarlo in senso
antiorario, poi rilasciare il tasto F.
Collocare la bacinella (H) inserendola
nella parte superiore del condotto (G)
Introdurre l’elica metallica (M) nel foro
anteriore del condotto (G) (la parte den-
tellata in plastica verso l’apparecchio),
aggiungere la lama (N) (montata con le
parti incavate rivolte all’esterno), uno dei
dischi (P) (facendo corrispondere i den-
telli del disco con le tacche del condotto
G) e bloccare il tutto avvitandoci, senza
forzare, la ghiera (Q).
La scelta dei dischi (P) è in funzione della
dimensione del trito desiderata.
Disporre un contenitore in corrispon-
denza dell’uscita del tritato. Controllare
che il tasto (E) sia in posizione OFF e In-
serire la spina in una presa di corrente
idonea a riceverla. Premere sul tasto (E)
in posizione ON attivando l’apparecchio.
Successivamente premere il tasto (D) in
posizione I e Lasciare funzionare a vuo-
to per circa 2 minuti (Non selezionate il
tasto su posizione II in quanto funziona
unicamente in combinazone con il tasto
R per la funzione revers in caso di incep-
pamento).
Per rimuovere la lama, dischi ed elica,
eventuale polvere metallica residuo di
fabbricazione, introdurre nella bacinel-
la (H) della carne che al suo passaggio
ovvierà all’inconveniente. Naturalmen-
te questo piccolo quantita tivo di carne
dovrà essere eliminato. Spegnere l’appa-
recchio portando il selettore (E) in posi-
zione 0. Estrarre la spina dalla presa di
corrente. Procedere allo smontaggio.
Tutte le componenti dell’apparecchio (B-
G-H- L-M-N-P-R-S-T-U-Z-Y) ad eccezione
del corpo A, devono essere lavate con ac-
qua e detersivo, sciacquate ed asciugate.
Montaggio dell’apparecchio nelle diverse
configurazioni:
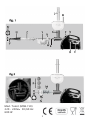
Passapomodoro (fig.1)
Tritacarne (fig. 2)
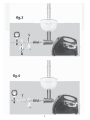
Realizzare polpette da alimenti già tritati
(fig. 3) Insaccare salsicce da alimenti già
tritati ( fig. 4)
Per fare la salsa di pomodoro
(assemblare l’apparecchio come in fig.
1). Controllare che il tasto (E) sia in po-
sizione OFF e la spina scollegata dal-
la presa di corrente. Tenendo premuto
il tasto (F) inserire in posizione ore 2 il
condotto (G) nel foro anteriore del cor-
po (A), ruotarlo in senso antiorario, poi
rilasciare il tasto F. Collocare la bacinella
(H) inserendola nella parte superiore del
condotto (G).
Introdurre Introdurre la vite di rotazione
(B) all’interno del foto anteriore del con-
dotto a T con la molla rivolta verso l’e-
sterno, successivamente inserite l’elica
in plastica (Z) (la parte dentellata verso
l’apparecchio), aggiungere il cono fil-
trante (U) (facendo corrispondere i den-
telli con le tacche del condotto G) e bloc-
care il tutto avvitandoci, senza forzare,

10
la ghiera (Q).
Posizionare lo scivolo convogliatore in
modo che la parte terminale del cono fil-
trante sia nel suo foro e la parte destra
attorno al condotto. Disporre un conte-
nitore in corrispondenza dello scivolo
convogliatore (Y) ed un altro sotto il foro
(V) da dove verranno espulse le bucce.
Tagliare a pezzi i pomodori e collocarli
nella bacinella H. Introdurli nel condotto
(G), per agevolare quest’ultima opera-
zione utilizzare, senza forzare, il pressa
alimenti (L).
Attivare l’apparecchio con il tasto selet-
tore (E) in posizione ON e il tasto (D) per
selezionare la velocità I.
Al termine della lavorazione spegnere e
disinserire la spina. Scomporre l’appa-
recchio e provvedere alla sua pulizia.
Per tritare la carne
Attenzione nel maneggiare la lama in
quanto è molto tagliente.
Tenendo premuto il tasto (F) inserire in
posizione ore 2 il condotto (G) nel foro
anteriore del corpo (A), ruotarlo in senso
antiorario, poi rilasciare il tasto F.
Collocare la bacinella (H) inserendola
nella parte superiore del condotto (G)
Introdurre l’elica metallica (M) nel foro
anteriore del condotto (G) (la parte den-
tellata in plastica verso l’apparecchio),
aggiungere la lama (N) (montata con le
parti incavate rivolte all’esterno e la par-
te liscia verso l’interno), uno dei dischi
(P) (facendo corrispondere i dentelli del
disco con le tacche del condotto G) e
bloccare il tutto avvitandoci, senza for-
zare, la ghiera (Q). La scelta dei dischi
(P) è in funzione della dimensione del tri-
tato desiderato. Disporre un contenitore
in corrispondenza dell’uscita del tritato.
Controllare che il tasto (E) sia in posi-
zione 0 e inserire la spina in una presa
di corrente idonea a riceverla. Attivare
l’apparecchio con il tasto selettore (E) in
posizione ON.
Inserire lentamente e senza forzare in
successione nel condotto (G) la carne
precedentemente tagliata in pezzi di
2x2x6 cm. Fate attenzione che la carne
sia magra e priva di grassi per evitare
che si incastri tra le lame rischiando cosi
di danneggiare il tritacarne. Al termine
della lavorazione spegnere e disinseri-
re la spina. Scomporre l’apparecchio e
provvedere alla sua pulizia.
L’apparecchio è adatto per il trattamento
in continuo fino a 5 Kg di carne (cruda o
cotta). Il tempo previsto è di circa 5 mi-
nuti dopodichè è necessaria una pausa
di raffreddamento di 30 minuti.
Per fare polpette
(assemblare l’apparecchio come in fig.
3). (assemblare l’apparecchio come in
fig. 3). Controllare che il tasto (E) sia in
posizione 0 e la spina scollegata dal-
la presa di corrente. Tenendo premuto
il tasto (F) inserire in posizione ore 2 il
condotto (G) nel foro anteriore del corpo
(A), ruotarlo in senso antiorario, poi rila-
sciare il tasto F.
Collocare la bacinella (H) inserendola nel-
la parte superiore del condotto (G). Intro-
durre l’elica metallica (M) nel foro anteri-
ore del condotto (G) (la parte dentellata
in plastica verso l’apparecchio), aggiun-
gere il disco (R) (facendo corrispondere i
dentelli del disco con le tacche del con-
dotto G), aggiun- gere l’accessorio per
polpette (S) e bloccare il tutto avvitando-
ci, senza forzare, la ghiera (Q). Disporre
un contenitore in corrispondenza dell’u-
scita del lavorato. Attivare l’apparecchio
con il tasto selettore (E) in posizione ON.
Introdurre lentamente l’alimento, in pre-
cedenza tritato e mescolato, dalla baci-
nella al condotto (G).
Al termine della lavorazione spegnere e
disin- serire la spina.
Scomporre l’apparecchio e provvedere
alla sua pulizia.
Per fare salsicce
Controllare che il tasto (E) sia in posizio-
ne 0 e la spina scollegata dalla presa di
corrente. Tenendo premuto il tasto (F)
inserire in posizione ore 2 il condotto (G)
nel foro anteriore del corpo (A), ruotarlo
in senso antiorario, poi rilasciare il tasto
F. Collocare la bacinella (H) inserendola
nella parte superiore del condotto (G)
Introdurre l’elica metallica (M) nel foro
anteri- ore del condotto (G) (la parte
dentellata in plastica verso l’apparec-
chio), aggiungere il disco (R) (facendo
corrispondere i dentelli del disco con

11
le tacche del condotto G), aggiun- gere
l’accessorio per insaccati (T) e bloccare il
tutto avvitandoci, senza forzare, la ghie-
ra (Q). Calzare l’involucro da riempire
sulla parte terminale dell’accessorio (T).
Attivare l’apparecchio con il tasto selet-
tore (E) in posizione ON.
Introdurre lentamente l’alimento, in pre-
cedenza tritato e mescolato, dalla ba-
cinella al condotto (G). Al termine della
lavorazione spegnere e disin- serire la
spina.
Scomporre l’apparecchio e provvedere
alla sua pulizia.
L’eventuale inceppamento o arresto del
motore.
Può essere causato da parti dure dell’a-
limento introdotto. In tal caso occorre
spegnere immediatamente l’apparecchio
posizionare il selettore (E) su OFF, posi-
zionarlo poi su R e premere il tasto (D)
posizionandolo su II.
Dopo 2 secondi ripremere il tasto (
E). Ri-
accendere l’apparecchio per continuare
la lavorazione.
Se l’inconveniente persiste spegnere
l’apparecchio, estrarre la spina dalla
presa e scomporre l’apparecchio provve-
dendo alla rimozione dell’ostruzione.
Pulizia
Operazioni da effettuare sempre con ap-
parec chio spento e con spina disinseri-
ta. Tutte le componenti dell’apparecchio
(B-G-H- L-M-N-P-R-S-T-U-Z-Y) ad eccezio-
ne del corpo A, devono essere lavate con
acqua e detersivo non aggressivo, sciac-
quate ed asciu- gate. Per la migliore con-
servazione delle lame e dei dischi è bene
passarle con un panno imbe- vuto di olio
alimentare.
Il corpo(A) deve essre pulito solo con un
panno umido e non abrasivo.
IMPORTANTE
Non utilizzare alcool, benzina o altre so-
stanze similari. Non immergere il corpo
(A) dell’apparecchio in acqua o altri liqui-
di. Non lavare nessuna parte dell’appa-
recchio in lavastoviglie.

12
GENERAL WARNINGS
Carefully keep his manual and read the
warnings carefully; it provides important
instructions on safety and immediate and fu-
ture use of the appliance. ATTENTION:
Always remove the plug from the electrical
power before cleaning, maintenance or any
change of accessories and if the appliance is
not in use.
Noncompliance with these instructions or
improper use of the product can cause injury.
Precautions must be taken when handling the
sharp blades, in particular when you remove
the blade from the bowl (where present), when
the bowl is emptied and during cleaning.
Avoid touching SHARP blades especially when
the appliance is connected.
If the blades jam, DISCONNECT THE
GB
This appliance can be used by children over 8
years of age, people with reduced physical, sen
sory or mental abilities or with no experience or
know-how if they are ensured adequate super
vision or have received instructions on safe use
of the appliance and have under- stood the re
lated dangers. Children cannot play with the ap
pliance. Cleaning and maintenance operations
must not be carried out by children unless they
are over 8 years of age and supervised.
Always keep the appliance and its cable out of
reach of children under 8 years of age.

13
APPLIANCE before removing the ingredients
that are causing the blockage using a spatula.
Never place your fingers or other objects in
the container when the appliance is on.
In the event of a fault or the appliance is not
working properly, switch it off and do not tam-
per with it. For any repairs contact an au- tho-
rised technical support centre only.
Always disconnect the unit from the power if left
unattended and before assembling, dismantle
and clean it .
It’s necessary to take precautions when handling
sharp blades , especially when removing the bla-
de from the cup , when the cup is emptied and
during cleaning .
Failure to comply with these instructions or misu-
se of the product may cause injury.
If the power cable is damaged, it must be re- pla-
ced by an authorised technical support centre, to
prevent any risks.
The appliance is only intended for use in hou-
sehold environments.
This appliance, which is only suitable for non-pro-
fessional use, should only be used for its inten-
ded use, or rather as an immersion blender for
domestic use.
Never remove the cover glass of the product
( if any ) during operation .
Do not use the unit on an unstable surface .
Do not pull the power cord or the appliance itself

14
to remove the plug from the socket .
Make sure that the cable does not come into con-
tact with hot surfaces , flames , hot pots and other
tools.
Turn off and unplug it before changing the acces-
sories or before approaching parts which are in
motion when it works .
Any other use is considered improper and dangerous.
The manufacturer cannot be considered in any way liable for damage due to improper,
wrong and unreasonable use.
Installation should be carried out according to the manufacturer’s instructions. Wrong
installation can cause damage to people, animals and property and the manufacturer
cannot be held liable. Electrical safety is only guaranteed when the appliances are con-
nected to an electrical system with suitable earthing according to the standards in force
on electrical safety.
Packaging (plastic bags, nails, expanded polystyrene, etc.) must not be left within reach
of children or incapable people since they are a potential source of danger.
Before connecting the appliance, ensure the plate data corresponds to those of the
electrical mains.
If the plug and socket are incompatible, contact qualified staff for the necessary adap-
tation operations.
Do not use adapters, multiple sockets and/or extensions.
When their use is indispensable only use material complying with safety standards in
force and having the compatibility requirements with the appliance and the electricity
mains. When using the appliance for the first time, ensure you have removed the labels
and protective sheet.
If the appliance is equipped with air sockets, ensure they are never blocked, not even
partially.
Use of any electrical appliance involves complying with certain fundamental rules, in
particular:
ATTENTION: Do not immerge or wet the appliance; do not use it near water, in the bath,
in the sink or near other liquid containers. If the appliance accidentally falls in water
do NOT attempt to take it out. Instead, immediately remove the plug from the socket.
Then bring it to a qualified support centre for the necessary controls.
During use, the appliance must be kept far from any inflammable or explosive object
or substance.
Do not touch the appliance with wet or damp hands.
Do not use the appliance in bare feet.
Do not pull the appliance or cable to remove the plug from the socket.
Do not leave the appliance exposed to atmospheric agents (rain, sun).
Never leave the powered appliance unguarded.
The power cable must be entirely unrolled to avoid overheating.
The power cable must not be placed near heat sources and/or sharp surfaces, open
flames, saucepans and other tools. Do NOT use near a hob.
Do NOT use the appliance near a sink full of water. During use, the appliance must be
positioned so it cannot fall into the sink.

15
Any tampering or intervention carried out by unqualified staff will cause the warranty to
expire.
To clean the appliance only use a soft and non-abrasive cloth.
When the appliance can no longer be used and you want to dispose of it, remove the
cables and dispose of them via a qualified body to avoid contaminating the environ-
ment.
Periodically check the appliance and its parts are working properly; if in doubt contact
an authorised support centre.
- Do not pull the power cable to move the appliance.
- It is strictly forbidden to dismantle or repair the appliance due to danger of electric
shock; if necessary, contact your retailer or support centre.
- The appliance must not be used with external timers or other, separate devices with
remote control.
- The power cable plug, since it is used as a disconnection device, must always be wi-
thin easy reach.
The appliance must not be left unguarded when connected to power.
The appliance must be used and positioned on a stable surface that can resist heat.
The appliance must not be used after falling, if damaged.
- Use the appliance only with its supplied accessories, to avoid compromising safe use.
- The appliance is equipped with a safety closure to avoid functioning with accessories
that are assembled incorrectly or which were not properly assembled.
- Never use accessories to switch off or on the appliance.
- When the container unit or other accessories are assembled correctly on the motor
unit you can hear a ‘click’.
- Do not remove the accessories from the motor unit when the appliance is on.
- Do not exceed the quantities and preparation times indicated in the various sections.
- Leave hot ingredients to cool before chopping or placing them in the container (ma-
ximum temperature 80°C/175°F).
- Never emerge the motor unit in water or any other liquid, do not rinse under the
tap,use a damp cloth.
Do not use the appliance with solid ingredients.
Never immerge the appliance in boiling liquids.
- Disconnect the appliance immediately after use, for example before unscrewing the
container.
Attention: It should not be operated for more than 60 sec at a time.
• If the product contains glass parts, they are not covered by the warranty.
ATTENTION:
The plastic parts of the product are not covered by warranty.
ATTENTION:
Damage to the power cable due to wear is not covered by the warranty; any repairs are
therefore the responsibility of the owner.
ATTENTION:
If you need to bring or send the appliance to the authorised support centre, you are
advised to clean all its parts.
If the appliance is also minimally dirty or encrusted or has limescale, dust deposits or
otherwise, externally or internally, for hygiene-sanitary reasons the support centre will
reject the appliance without inspecting it.
The symbol
on the product or on the packaging indicates the products must not be
considered normal household waste, but must be brought to an appropriate col- lection
point for the recycling of electrical and electronic appliances. By disposing of this pro-

16
duct appropriately, you contribute to avoiding negative consequences for the envi-
ronment and health, which could be caused by inadequate disposal of the product. For
more detailed information on recycling of this product, contact the municipality office,
the local waste disposal service or the shop where you bought the product.
After use, proceed to clean the appliance. Remove the plug from the socket.
• Clean the motor unit and the leg with a damp and well wrung sponge.
• Dry with a dry cloth.
ATTENTION!
• NEVER clean the motor unit and the leg under running water.
Components
A. Appliance casing with motor
B. Rolling screw
D. Speed I - II selector key
E. ON-OFF-R selector key
F. T tube release key
G. T tube
H. Food insertion basin
L. Food press
M. Metal rotor
N. Star blade
P. Chopping discs (three different types)
Q. Ring nut
R. Plastic discs for sausages/salami and
dumplings
S. Accessory for dumplings
(for already minced food)
T. Accessory for sausages
(for already minced food)
U. Filtering cone for sauce
V. Peel ejector hole
Z. Plastic rotor
Y. Sauce conveyor
K. Conveyor strap
W. Strap stoppage
Preliminary operations on first use With
the plug disconnected from the electri-
cal socket, place the casing of the ap-
pliance (A) on a stable and dry surface
not near tanks or containers of liquids,
then proceed to assemble the appliance.
Caution when handling the blade as it is
very sharp.
Keep the key pressed (F) and insert the
tube (G) in hour 2 position in the front
hole on the casing (A), turning it anti-
clockwise, then release key F.
Position the basin (H) by inserting it in
the upper part of the tube (G)
Insert the metal rotor in the front hole
of the tube (G) (the plastic toothed part
should be facing the appliance), add the
blade (N) (assembled with the hollowed
parts facing outwards and the smooth
side inward), one of the discs (P) (ensu-
ring the teeth on the disc correspond
to the notches on the tube G) and lock
everything in
place by screwing them in,
without forcing the ring nut (Q).
The choice of discs (P) is based on the
dimension of the desired chopping.
Place a container under the outlet of the
chopped food. Check the key (E) is in the
OFF position and place the plug in a sui-
table socket. Press the key (E) on the ON
position to activate the appliance. Leave
to work empty for approximately 2 mi-
nutes.
To remove any residual metal dust due
to manufacturing from the blade, discs
and rotor, insert some meat in the ba-
sin (H) which on passing will remove the
problem. Naturally this small quantity of
meat should be binned. Switch off the
appliance and bring the selector (E) to
position 0. Disconnect the plug from the
socket. Proceed with dismantling.
All the parts of the appliance (B-G-H-L-
M-N-P-R-S-T-U-Z-Y), with the exception of
casing A, should be washed with deter-
gent, rinsed and dried.
Assembly of the appliance in different
configurations:
Tomato squeezer (fig.1) Meat mincing
(fig. 2)
Create dumplings using already minced
food (fig. 3) Stuff sausages using alrea-
dy minced food ( fig. 4)

17
To make tomato sauce
(assemble the appliance as in Fig. 1).
Check the key (E) is in the OFF position
and the plug is disconnected from the
socket. Keep the key pressed (F) and in-
sert the tube (G) in the hour 2 position
in the front hole of the casing (A), tur-
ning it anti-clockwise, then release key
F. Position the basin (H) inserting it in
the upper part of the tube (G).
Insert the plastic rotor (Z) in the front
hole on the tube (G) (the toothed part
facing the appliance), add
the filtering cone (U) (ensuring the te-
eth correspond to the notches on the
tube G) and block everything in place by
screwing them in, without forcing the
ring nut (Q).
Position the conveyor slide so the end
part of the filtering cone is in its hole
and the right part is around the tube. Fa-
sten the strap (K) around the tube with
the stop (W).
Place a container under the conveyor
slide (Y) and another under the hole (V)
where the peel is ejected. Cut the toma-
toes in pieces and place them in a bowl
H. Insert them in the tube (G). To make
this last operation easier use the food
press (L), without force.
Activate the appliance with the selector
key (E) in the ON position.
At the end of processing, switch off and
disconnect the plug. Dismantle the ap-
pliance and clean it.
To mince meat
Pay attention when holding the blade as
it is very sharp.
Keep the key (F) pressed and insert the
tube (G) in the hour 2 position in the
front hole of the casing (A), turning it
anti-clockwise, then release key F.
Position the basin (H) inserting it in the
upper part of the tube (G)
Insert the metal rotor (M) in the front
hole of the tube (G) (the toothed, plastic
part facing the appliance), add the bla-
de (N) (assembled with the hollow parts
turned outwards), one of the discs (P)
(ensuring the disc teeth correspond with
the notches on the tube G) and block
everything in place by screwing in, wi-
thout forcing the ring nut (Q). The choi-
ce of discs (P) is based on
the dimension
of the mince you want. Place a container
under the mince output. Check the key
(E) is in position 0 and place the plug
in a suitable power socket. Activate the
appliance with the selector key (D) in the
ON position.
Slowly insert the meat which was pre-
viously cut into 2x2x6 cm pieces and
without forcing the tube (G).
When finished the work, switch off the
appliance and disconnect the plug. Di-
smantle the appliance and clean it.
The appliance is suitable for continuous
processing of up to 5 Kg of meat (raw or
cooked). The time planned is approx. 5
minutes after which a cooling phase of
30 minutes is necessary.
To make dumplings
(assemble the appliance as in fig. 3). (as-
semble the appliance as in fig. fig. 3).
Check the key (E) is on position 0 and
the plug is disconnected from the mains
socket. Keep the key (F) pressed and
keep the tube (G) in the hour 2 position
in the front hole of the casing (A), tur-
ning it anti-clockwise, then release key
F.
Position the basin (H) by inserting it in
the upper part of the tube (G). Insert the
metal rotor (M) in the front hole of the
tube (G) (the toothed plastic part should
be facing the appliance), add the disc
(R) (ensuring the disc teeth correspond
to
the notches on the tube G), adding
the accessories for dumplings (S) and lo-
cking everything in place by screwing in,
without forcing the ring nut (Q). Place a
container under the outlet for the pro-
cessed product. Start the appliance with
the selector key (E) in the ON position.
Slowing insert the food, which was pre-
viously minced and mixed, from the
basin to the tube (G). When the work
is complete, switch off and remove the
plug.Dismantle the appliance and clean
it.

18
To make sausages
Check the key (E) is in position 0 and
the plug is disconnected from the power
socket. Keeping the key (F) pressed, in-
sert the tube (G) in the hour 2 position in
the front hole of the casing (A), turning
it anti-clockwise, then release key F. Po-
sition the basin (H) inserting it over the
tube (G)
Insert the metal rotor (M) in the front hole
of the tube (G) (the plastic, toothed part
facing the appliance), add the disc (R)
(ensuring the disc teeth correspond to
the notches on the tube G), add the stuf-
fing accessory (T) and fasten everything
in place by screwing in, without forcing
the ring nut (Q). Lift the shell to fill on
the end part of the accessory (T).
Screw in the appliance with the selector
key (E) in the ON position.
Slowly insert the food, which was pre-
viously minced and mixed, from the
basin to the tube (G). At the end of pro-
cessing, switch off the appliance and re-
move the plug.
Dismantle the appliance and clean it.
Any clogging or motor stoppage.
It can be caused by solid food inserted.
In this case you need to immediately
switch off the appliance and position the
selector (E) on OFF, then positioning it
on R and press the key (E) for rotation
inversion.
After 2 seconds press the key (E) again.
Switch the appliance back on to conti-
nue processing.
If the problem persists, switch off the
appliance, remove the plug from the so-
cket and dismantle the appliance, remo-
ving the obstruction.
Cleaning
Operations to always carry out with the
appliance off and the plug disconnected.
All the parts of the appliance (B-G-H-L-
M-N-P-R-S-T-U-Z-Y), except the casing
A, must be washed with water and non-
abrasive detergent, rinsed and dried. To
improve conservation of the blades and
the discs, you need to wipe them with a
cloth soaked in oil for alimentary use.
The casing (A) must only be cleaned with
a damp and non-abrasive cloth.
IMPORTANT
Do not use alcohol or other similar sub-
stances. Do not immerge the casing (A)
of the appliance in water or other liquids.
Do not wash any part of the appliance in
the dishwasher.

19

20
TOM-2017-03-I
Mod. Ola
Mod. Tomit Mod. Tomit
-
 1
1
-
 2
2
-
 3
3
-
 4
4
-
 5
5
-
 6
6
-
 7
7
-
 8
8
-
 9
9
-
 10
10
-
 11
11
-
 12
12
-
 13
13
-
 14
14
-
 15
15
-
 16
16
-
 17
17
-
 18
18
-
 19
19
-
 20
20


in altre lingue
- English: Johnson TOMIT User manual
Documenti correlati
Altri documenti
-
Ducati monster S4 fogarty 2002 Workshop Manual
-
Tefal FP413DAE Manuale utente
-
Moulinex FP 7321 Manuale del proprietario
-
Unold 78131 Manuale del proprietario
-
Westfalia 87 83 03 Manuale utente
-
-
-
-
Palson Zeus 1400 Istruzioni per l'uso
-