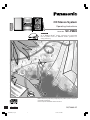
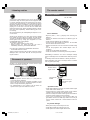
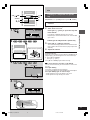
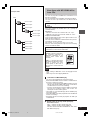
Panasonic SCPM28P Istruzioni per l'uso
- Categoria
- Lettore CD
- Tipo
- Istruzioni per l'uso
Questo manuale è adatto anche per

RQT6885-2P
Model No. SC-PM28
CD Stereo System
Operating Instructions
P PC
Before connecting, operating or adjusting this product, please read these
instructions completely.
Please keep this manual for future reference.
For U.S.A.
As an ENERGY STAR
®
Partner, Panasonic has determined
that this product meets the
ENERGY STAR
®
guidelines for
energy efficiency.
RQT6885(Cov).p65 3/24/03, 9:29 AM1

RQT6885
2
Before use
Dear customer
Thank you for purchasing this product.
For optimum performance and safety, please read these
instructions carefully.
These operating instructions are applicable to the following
system.
System SC-PM28
Main unit SA-PM28
Speakers SB-PM28
CAUTION!
THIS PRODUCT UTILIZES A LASER.
USE OF CONTROLS OR ADJUSTMENTS OR
PERFORMANCE OF PROCEDURES OTHER THAN
THOSE SPECIFIED HEREIN MAY RESULT IN
HAZARDOUS RADIATION EXPOSURE.
DO NOT OPEN COVERS AND DO NOT REPAIR
YOURSELF. REFER SERVICING TO QUALIFIED
PERSONNEL.
CAUTION!
DO NOT INSTALL OR PLACE THIS UNIT IN A BOOK-
CASE, BUILT-IN CABINET OR IN ANOTHER
CONFINED SPACE. ENSURE THE UNIT IS WELL
VENTILATED. TO PREVENT RISK OF ELECTRIC
SHOCK OR FIRE HAZARD DUE TO OVERHEATING,
ENSURE THAT CURTAINS AND ANY OTHER MATE-
RIALS DO NOT OBSTRUCT THE VENTILATION
VENTS.
User memo:
DATE OF PURCHASE
DEALER NAME
DEALER ADDRESS
TELEPHONE NUMBER
CAUTION:
TO PREVENT ELECTRIC SHOCK MATCH
WIDE BLADE OF PLUG TO WIDE SLOT,
FULLY INSERT.
WARNING:
TO REDUCE THE RISK OF FIRE, ELECTRIC
SHOCK OR PRODUCT DAMAGE, DO NOT
EXPOSE THIS APPARATUS TO RAIN,
MOISTURE, DRIPPING OR SPLASHING AND
THAT NO OBJECTS FILLED WITH LIQUIDS,
SUCH AS VASES, SHALL BE PLACED ON
THE APPARATUS.
The model number and serial number of this product can
be found on either the back or the bottom of the unit.
Please note them in the space provided below and keep
for future reference.
MODEL NUMBER
SERIAL NUMBER
Table of contents
Before use
Supplied accessories .................................................... 3
IMPORTANT SAFETY INSTRUCTIONS ........................ 4
Product Service .............................................................. 4
Listening caution ........................................................... 5
Placement of speakers .................................................. 5
The remote control ........................................................ 5
Connections ................................................................... 6
Front panel controls ...................................................... 8
Setting the time .............................................................. 9
Listening operations
The radio: manual tuning ............................................ 10
The radio: preset tuning .............................................. 11
CDs ................................................................................ 12
How discs with MP3/WMA differ from CDs ............... 17
Cassette tapes .............................................................. 23
Recording operations
Before recording .......................................................... 24
Recording from the radio ............................................ 25
Recording CDs ............................................................. 25
Timers and others
Using the sound quality settings ............................... 26
Enhancing the sound quality ...................................... 26
Using an external unit ................................................. 26
Auto-off function .......................................................... 27
Turning the demo function off .................................... 27
Convenient functions .................................................. 27
Using the timers ........................................................... 28
Reference
Troubleshooting guide ................................................ 30
Warranty (ONLY FOR U.S.A.) ...................................... 31
Specifications ................................................. Back cover
Maintenance ................................................... Back cover
When moving the unit ................................... Back cover
RQT6885(2-10)new4.P65 1/28/03, 5:07 PM2

RQT6885
3
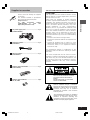
Before use
Please check and identify the supplied
accessories.
Use numbers indicated in parentheses
when asking for replacement parts.
(Only for U.S.A.)
To order accessories contact
1-800-332-5368 or web site
(http://www.panasonic.com).
Supplied accessories
AC power supply cord ...................................... 1 pc.
(K2CB2CB00006)
FM indoor antenna ............................................ 1 pc.
(RSA0006-L)
AM loop antenna ............................................... 1 pc.
(RSA0033A-1)
Remote control transmitter .............................. 1 pc.
(EUR7711030)
Remote control batteries................................ 2 pcs.
R6, AA, UM-3
The lightning flash with arrowhead symbol,
within an equilateral triangle, is intended to
alert the user to the presence of uninsulated
dangerous voltage within the product s
enclosure that may be of sufficient
magnitude to constitute a risk of electric
shock to persons.
CAUTION: TO REDUCE THE RISK OF ELECTRIC
SHOCK, DO NOT REMOVE SCREWS.
NO USER-SERVICEABLE PARTS
INSIDE.
REFER SERVICING TO QUALIFIED
SERVICE PERSONNEL.
The exclamation point within an equilateral
triangle is intended to alert the user to the
presence of important operating and
maintenance (servicing) instructions in the
literature accompanying the appliance.
CAUTION:
This equipment has been tested and found to comply
with the limits for a Class B digital device, pursuant to
Part 15 of the FCC Rules.
These limits are designed to provide reasonable
protection against harmful interference in a residential
installation. This equipment generates, uses and can
radiate radio frequency energy and, if not installed and
used in accordance with the instructions, may cause
harmful interference to radio communications.
However, there is no guarantee that interference will
not occur in a particular installation. If this equipment
does cause harmful interference to radio or television
reception, which can be determined by turning the
equipment off and on, the user is encouraged to try to
correct the interference by one or more of the following
measures:
• Reorient or relocate the receiving antenna.
• Increase the separation between the equipment and
receiver.
• Connect the equipment into an outlet on a circuit
different from that to which the receiver is connected.
• Consult the dealer or an experienced radio/TV
technician for help.
Any unauthorized changes or modifications to this
equipment would void the user’s authority to operate
this device.
This device complies with Part 15 of the FCC Rules.
Operation is subject to the following two conditions: (1)
This device may not cause harmful interference, and
(2) this device must accept any interference received,
including interference that may cause undesired
operation.
THE FOLLOWING APPLIES ONLY IN THE U.S.A.
RQT6885(2-10)new2.P65 3/24/05, 2:28 PM3

RQT6885
4
Before use
IMPORTANT SAFETY INSTRUCTIONS
Read these operating instructions carefully before using the unit. Follow the safety instructions on the unit and the applicable
safety instructions listed below. Keep these operating instructions handy for future reference.
1) Read these instructions.
2) Keep these instructions.
3) Heed all warnings.
4) Follow all instructions.
5) Do not use this apparatus near water.
6) Clean only with dry cloth.
7) Do not block any ventilation openings. Install in
accordance with the manufacturer’s instructions.
8) Do not install near any heat sources such as radiators,
heat registers, stoves, or other apparatus (including
amplifiers) that produce heat.
9) Do not defeat the safety purpose of the polarized or
grounding-type plug. A polarized plug has two blades
with one wider than the other. A grounding-type plug
has two blades and a third grounding prong. The wide
blade or the third prong are provided for your safety. If
the provided plug does not fit into your outlet, consult
an electrician for replacement of the obsolete outlet.
10) Protect the power cord from being walked on or pinched
particularly at plugs, convenience receptacles, and the
point where they exit from the apparatus.
11) Only use attachments/accessories specified by the
manufacturer.
12) Use only with the cart, stand, tripod,
bracket, or table specified by the
manufacturer, or sold with the apparatus.
When a cart is used, use caution when
moving the cart/apparatus combination to
avoid injury from tip-over.
13) Unplug this apparatus during lightning storms or when
unused for long periods of time.
14) Refer all servicing to qualified service personnel.
Servicing is required when the apparatus has been
damaged in any way, such as power-supply cord or
plug is damaged, liquid has been spilled or objects have
fallen into the apparatus, the apparatus has been
exposed to rain or moisture, does not operate normally,
or has been dropped.
Inside of product
Except for U.S.A.
Product Service
1. Damage requiring service —The unit should be serviced
by qualified service personnel if:
(a) The AC power supply cord or AC adaptor has been
damaged; or
(b) Objects or liquids have gotten into the unit; or
(c) The unit has been exposed to rain; or
(d) The unit does not operate normally or exhibits a
marked change in performance; or
(e) The unit has been dropped or the cabinet damaged.
2. Servicing—Do not attempt to service the unit beyond
that described in these operating instructions. Refer all
other servicing to authorized servicing personnel.
3. Replacement parts—When parts need replacing ensure
the servicer uses parts specified by the manufacturer or
parts that have the same characteristics as the original
parts. Unauthorized substitutes may result in fire, electric
shock, or other hazards.
4. Safety check—After repairs or service, ask the servicer
to perform safety checks to confirm that the unit is in
proper working condition.
Product information
For product information or assistance with product
operation:
In the U.S.A., contact the Panasonic Customer Call
Center at 1-800-211-7262, or e-mail
[email protected], or web site
(http://www.panasonic.com).
In Canada, contact Panasonic Canada Inc. Customer
Care Centre at 905-624-5505, web site
(www.panasonic.ca), or an authorized Servicentre
closest to you.
RQT6885(2-10)new4.P65 3/24/03, 9:36 PM4

RQT6885
5
Before use
The remote control
Battery installation
Use of batteries
• Align the poles (+ and –) properly when inserting the
batteries.
• Do not mix old and new batteries or different types of
batteries.
• Do not recharge ordinary dry cell batteries.
• Do not heat or disassemble the batteries. Do not allow
them to contact with flame or water.
• Remove the batteries if the unit is not to be used for a long
time.
• Do not keep together with metallic objects such as
necklaces.
• Do not use rechargeable type batteries.
• Do not use batteries if the covering has been peeled off.
Mishandling of batteries can cause electrolyte leakage
which can damage items the fluid contacts and may cause a
fire.
If electrolyte leaks from the batteries, consult your dealer.
Wash thoroughly with water if electrolyte comes in contact
with any part of your body.
Correct method of use
Operation notes
• Do not place obstacles between the remote control signal
sensor and remote control unit.
• Do not expose the remote control signal sensor to direct
sunlight or to the bright light of a fluorescent light.
• Take care to keep the remote control signal sensor and the
end of the remote control unit free from dust.
• If this system is installed in a rack with glass doors, the
glass doors’ thickness or color might make it necessary to
use the remote control unit a shorter distance from the
system.
To prevent damage
• Never place heavy items on top of the unit.
• Do not disassemble or reconstruct the unit.
• Do not spill water or other liquids into the unit.
Placement of speakers
Speakers are designed identically so that no left or right
channel orientation is necessary.
Notes
• Keep your speakers at least 10mm (
13
/32˝) away from the
system for proper ventilation.
• These speakers do not have magnetic shielding. Do not
place them near televisions, personal computers or other
devices easily influenced by magnetism.
• To avoid damage to the speakers, do not touch the
speaker cones if you have taken the nets off.
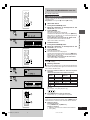
Selecting fine audio equipment such as the unit you’ve just
purchased is only the start of your musical enjoyment. Now
it’s time to consider how you can maximize the fun and ex-
citement your equipment offers. This manufacturer and the
Electronic Industries Association’s Consumer Electronics
Group want you to get the most out of your equipment by
playing it at a safe level. One that lets the sound come
through loud and clear without annoying blaring or distor-
tion—and, most importantly, without affecting your sensi-
tive hearing.
We recommend that you avoid prolonged exposure to ex-
cessive noise.
Sound can be deceiving. Over time your hearing “comfort
level” adapts to higher volumes of sound. So what sounds
“normal” can actually be loud and harmful to your hearing.
Guard against this by setting your equipment at a safe
level BEFORE your hearing adapts.
To establish a safe level:
• Start your volume control at a low setting.
• Slowly increase the sound until you can hear it
comfortably and clearly, and without distortion.
Once you have established a comfortable sound level:
• Set the dial and leave it there.
Taking a minute to do this now will help to prevent hearing
damage or loss in the future. After all, we want you listen-
ing for a lifetime.
EST. 1924
About 7 meters in
front of the signal
sensor.
Transmission
window
R6, AA, UM-3
Remote control
signal sensor
Listening caution
RQT6885(2-10)new3.P65 1/17/03, 5:04 PM5

RQT6885
6
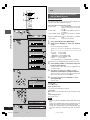
Before use
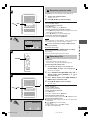
Connections
• Plug the AC power supply cord into a household AC outlet
only after all other connections have been made.
• To prepare the AM loop antenna wire and speaker cords,
twist the vinyl cover tip and pull off.
1 Connect the FM indoor antenna.
Tape the antenna to a wall or column, in a position
where radio signals are received with the least amount
of interference.
Note
For the best reception:
An FM outdoor antenna is recommended. (\ page 7)
2 Connect the AM loop antenna.
Stand the antenna up on its base. Keep loose antenna
cord away from other wires and cords.
3 Connect the speaker cords.
A Confirm the colors of the tags on the ends of the
cords.
B For White tags:
Connect cords to gray terminals.
For Blue, Black and Red tags:
Connect cords so tag colors match the terminal
colors.
Cords with white and blue tags are for high frequency.
Cords with red and black tags are for low frequency.
Incorrect connection can damage the unit.
Caution
Use only the supplied speakers.
The combination of the main unit and speakers provide
the best sound. Using other speakers can damage the
unit and sound quality will be negatively affected.
4 Connect the AC power supply cord.
Note
The included AC power supply cord is for use with this
unit only. Do not use it with other equipment.
Red (
ªª
ªª
ª)
Black (
··
··
·) Black (
··
··
·)
Red (
ªª
ªª
ª)
1
2
3
AM loop antenna
Adhesive
tape
FM indoor
antenna
1
2
R
L
LOW (6
)
HIGH (6
)
Blue (–)
Black (–)
Red (+)
Gray (+)
White
Blue
Black
Red
A
B
1
3
2
(R)
(L)
2
3
1
4
1
2
Caution
• Use the speakers only with the
recommended system. Failure to do
so may lead to damage to the
amplifier and/or the speakers, and
may result in the risk of fire.
Consult a qualified service person if
damage has occurred or if you
experience a sudden change in
performance.
• Do not attach these speakers to walls
or ceilings.
RQT6885(2-10)new1.P65 3/24/05, 4:05 PM6

RQT6885
7
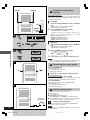
Before use
Connections
Optional antenna connections
You may need an outdoor antenna if you use this system in
a mountainous region or inside a reinforced-concrete
building, etc.
FM outdoor antenna
Disconnect the FM indoor antenna if an FM outdoor
antenna is installed.
Note
An outdoor antenna should be installed by a qualified
technician only.
AM outdoor antenna
Connect the outdoor antenna without removing the AM loop
antenna. Run 5 to 12 m of vinyl-covered wire horizontally
along a window or other convenient location.
Note
When the unit is not in use, disconnect the outdoor antenna
to prevent possible damage that may be caused by
lightning. Never use an outdoor antenna during an electrical
storm.
External unit connections
• Make sure that the power supply for all components has
been turned off before making any connections.
• For details, refer to the operating instructions of the unit
which is to be connected.
• All peripheral components and cables sold separately.
Connecting analog equipment
This example shows how to connect an analog player with a
PHONO OUT/LINE OUT switch.
When units other than those described are to be connected,
please consult your audio dealer.
Note
• Only an analog player with a built-in phono equalizer can
be connected.
• Set the switch to the “LINE OUT” position at the back of
the analog player.
A
B
C
A
B
C
AUX
(L)
(R)
AM outdoor antenna
(not included)
AM loop antenna
(included)
Shield braid
Core wire
FM outdoor antenna
(not included)
5-12 m
(16-40 ft)
Analog player (not included)
"LINE OUT"
position
Rear panel of this unit
L
R
1
2
(1
3
/
16
"
)
(
19
/
32
"
)
1
2
RQT6885(2-10)new3.P65 1/27/03, 5:05 PM7

RQT6885
8
Before use
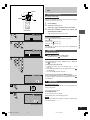
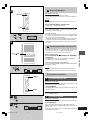
Front panel controls
Main unit
Cassette lid
Cassette open button (c OPEN) ............................ 23
AC supply indicator (AC IN)
This indicator lights when the unit is connected to the AC
mains supply.
Standby/on switch (
POWER)
Press to switch the unit from on to standby mode or vice
versa. In standby mode, the unit is still consuming a
small amount of power.
Aux button (AUX) ..................................................... 26
Album jog control ( , , ALBUM SKIP) ...... 18
Re-master button (RE-MASTER) ............................. 26
CD skip/search, tape fast-forward/rewind/TPS, tune/
preset channel select, time adjust buttons
(f
33
33
3 /FF , g
44
44
4/ REW ) ...... 9, 10, 11, 12, 16, 18, 23
CD check button (CD CHECK) ................................ 13
CD trays
Display
Recording start/pause button ([/ J REC) ..... 24, 25, 26
Track jog control ( , , TRACK SKIP) ........ 18
Super sound EQ button (S.SOUND EQ) ................. 26
Volume control
(VOLUME DOWN, UP) ............................ 10, 12, 23, 26
CD tray open/close button (c OPEN/CLOSE) ....... 12
CD change button (c CD CHANGE) ....................... 13
Headphone jack (PHONES) ..................................... 26
Stop/program clear and demonstration button
(STOP L, –DEMO) ............................ 12, 16, 20, 23, 27
Tuner/band select button (TUNER/BAND) ............. 10
Cassette play button (TAPE 2 ) ............................... 23
CD play/pause button (CD 2/ J ) ............................. 12
Disc direct play buttons (CD 1~CD 5) .................... 12
DEMO
CD 1 CD 2 CD 3 CD 4 CD 5
STOP
TUNER BAND
CD
TAPE
DOWN
VOLUME
UP
S.SOUND EQRE MASTER
PHONES
OPEN/CLOSE
CD CHANGE
REC
TRACK SKIP
ALBUM SKIP
CD CHECKCD CHECK
FF
AUX
REW
AC IN
3
4
5
8
7
9
~
)
(
%
#
"
&
$
DEMO
CD 1 CD 2 CD 3 CD 4 CD 5
STOP
TUNER BAND
CD
TAPE
+,-.
/
1
!
POWER
6
OPEN
2
RQT6885(2-10)new3.P65 1/27/03, 7:57 PM8

RQT6885
9
Before use
A
1
2
3
4
REW FF
CD
CD
RE W
FF
CLEAR
ALBUM
ALBUM
12 3
45
6
78 9
TAPE
TUNER
BAND
0
10
VOL
VOL
VOL
VOL
AUX
AUX
ABC DEF
GHI
GHI
JKL
MNO
TUV
WXYZ
WXYZ
PQRS
ENTER
ENTER
DISC
DISC
SEARCH
SEARCH
MARKER
MARKER
INTRO
INTRO
REPEA
REPEA
T
DIMMER
DIMMER
DISPLA
DISPLA
Y
RE-MASTER
MU
MU
TING
ING
SOUND
S.SOUND EQ
S.SOUND EQ
PLAY
REC
REC
SLEEP
SLEEP
AUTO OFF
AUTO OFF
SHIFT
SHIFT
TITLE
TITLE
CL
CL
OCK
CK
TIMER
TIMER
PROGRAM
PROGRAM
DEL
DEL
SPACE
PLA
PLA
Y MODE
Y MODE
1
2 4
3
SHIFT
CLOCK/
TIMER
DISPLAY
SHIFT
CLOCK/
TIMER
DISPLAY
2 4
CD
REW
FF
CLEAR
ALBUM
12 3
45
6
78 9
TAPE
TUNER
BAND
0
10
VOL VOL
AUX
ABC
ABC
DEF
DEF
GHI
GHI
JKL
JKL
MNO
MNO
TUV
TUV
WXYZ
WXYZ
PQRS
PQRS
ENTER
DISC
SEARCH
MARKER
INTRO
INTRO
REPEA
REPEA
T
DIMMERDISPLAY
RE-MASTER
RE-MASTER
MU
MU
TING
ING
SOUND
SOUND
S.SOUND EQ
S.SOUND EQ
PLAY
REC
SLEEP
AUTO OFF
SHIFT
TITLE
CLOCK
TIMER
PROGRAM
PROGRAM
DEL
DEL
SP
SP
ACE
ACE
PLAY MODE
Y MODE
4
,
5
6
:
;
^
_
|
{
0
1
.
-
8
&
?
]
<
=
>
@
[
\
}
Front panel controls
Remote Control
Buttons such as function in exactly same way as the
buttons on the main unit.
Auto off + Sleep timer button
(AUTO OFF, SLEEP) .......................................... 27, 29
Disc button (DISC) ................................................... 14
CD Program, tuner preset button
(PROGRAM) .................................................. 11, 16, 20
Play mode select button
(PLAY MODE) .... 10, 14, 19, 25
Use this for selecting CD play mode, tune mode, FM
mode and AM beat proof function.
Repeat button (REPEAT) ......................................... 15
Delete button (DEL) ........................................... 20, 21
Intro button (INTRO) ................................................ 19
Marker memory/recall button (MARKER) .............. 22
Shift button (SHIFT)
To use functions labelled in orange
:
While pressing [SHIFT], press the corresponding button.
For buttons [AUTO OFF], [CLOCK/TIMER],
[˚PLAY/REC] and [RE-MASTER].
Re-master + Super sound EQ button
(RE-MASTER, S.SOUND EQ) ................................... 26
Play timer/record timer + Dimmer button
(
˚˚
˚˚
˚PLAY/REC, DIMMER) ..................................... 27, 28
Clock/timer + display button
(CLOCK/ TIMER, DISPLAY) ..................... 9, 15, 22, 28
Numbered, character buttons
(
10, 1-9, 0, A-Z, SPACE!”#) ............... 11, 14-16, 18, 21
Stop/program clear button (L CLEAR) ...... 14, 16, 19
Enter button (ENTER) ....................................... 20, 21
Title search mode select button
(TITLE SEARCH) ..................................................... 21
Muting button (MUTING) ........................................ 27
Preset EQ + Manual EQ button (SOUND) ............. 26
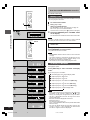
A Setting the time
By remote control only
This is a 12-hour clock.
The example shows how to set the clock for 6:30 p.m..
1 Press [
yy
yy
y] to turn the unit on.
2 Press [SHIFT] + [CLOCK / TIMER] to select
“CLOCK”.
Every time you press the button:
CLOCK
PLAY REC
Original display
3 Within 7 seconds
Press [g
44
44
4/REW] or [f
33
33
3 /FF] to set the
time.
Press and hold to change the time faster.
4 Press [SHIFT] + [CLOCK / TIMER].
The time is set and the original display is restored.
Displaying the clock:
Press [SHIFT] + [CLOCK/ TIMER].
The clock is shown for about 5 seconds.
Note
The clock may lose or gain some time over a period.
Readjust if necessary.
RQT6885(2-10)new3.P65 1/27/03, 5:05 PM9

RQT6885
10
Before use
The radio: manual tuning
1 Press [TUNER/BAND] to select “FM” or “AM”.
The unit comes on automatically.
Every time you press the button:
FM ↔ AM
2 Press [PLAY MODE] on the remote control to
select “MANUAL”.
Every time you press the button:
MANUAL ↔ PRESET
3 Press [f
33
33
3 /FF] or [g
44
44
4/REW] to select
the frequency of the required station.
“ST” is displayed when a stereo FM broadcast is being
received.
4 Adjust the volume.
Auto tuning
Press and hold [f
33
33
3 /FF] or [g
44
44
4/REW] for a moment
until the frequency starts changing rapidly. The unit begins
auto tuning, stopping when it finds a station.
• Auto tuning may not function when there is excessive
interference.
• To cancel auto tuning, press [f
33
33
3 /FF] or [g
44
44
4/REW]
once again.
If noise is excessive in FM
By remote control only
Press and hold [PLAY MODE] to display
“MONO”.
This mode improves sound quality if reception is weak, but
broadcasts will be heard in monaural.
Press and hold [PLAY MODE] again to cancel the mode.
“MONO” goes out. MONO is also cancelled if the frequency
is changed.
Turn off “MONO” for normal listening. Stereo and monaural
broadcasts are automatically played as they are received.
FM allocation setting
By main unit only
By adjusting the allocation, you can enable this tuner to
receive FM broadcasts allocated in 0.1 MHz steps.
Press and hold [TUNER/BAND]. After a few seconds, the
display will change to a flashing display of the current mini-
mum FM frequency. If you continue to hold the button down,
the minimum frequency will change. Release the button at
this time.
To return to the original frequency indication, repeat above.
Note
•After changing the “allocation” setting, the frequencies you
previously preset in the memory will be cleared.
•Sound is momentarily interrupted if you load/unload a
cassette while listening to an AM broadcast.
A
2
3
4
1
DOWN
VOLUME
UP
PLAY MODEPLAY MODE
4
1
3
CD
REW
FFFF
CLEARCLEAR
ALBUMALBUM
12 3
45
6
78 9
TAPE
TUNER
BAND
0
10
VOLVOL VOLVOL
AUX
ABCABC DEFDEF
GHIGHI
JKLJKL
MNOMNO
TUVTUV
WXYZWXYZ
PQRSPQRS
ENTERENTER
DISCDISC
SEARCHSEARCH
MARKERMARKER
INTRO
REPEAT
DIMMERDIMMERDISPLADISPLAY
RE-MASTERRE-MASTER
MUTING
SOUNDSOUND
S.SOUND EQS.SOUND EQ
PLAY
RECREC
SLEEPSLEEP
AUTO OFFAUTO OFF
SHIFT
TITLETITLE
CLCLOCKCK
TIMER TIMER
PROGRAM
DEL
SPSPACEACE
PLAY MODE
2
FF
REW
CD
RE W
FFFF
CLEAR
ALBUM
12 3
45
6
78 9
TAPE
TUNER
BAND
0
10
VOL VOL
AUX
ABC DEF
GHI
JKL
MNO
TUV
WXYZ
PQRS
ENTER
DISC
SEARCH
MARKER
INTROINTRO
REPEAREPEAT
DIMMERDISPLAY
RE-MASTER
MUMUTINGING
SOUND
S.SOUND EQS.SOUND EQ
PLAY
REC
SLEEP
AUTO OFFAUTO OFF
SHIFTSHIFT
TITLE
CLOCK
TIMER
PROGRAMPROGRAM
DELDEL
SPACE
PLAPLAY MODEY MODE
PLAY MODE
TUNER BAND
Listening operations
A
RQT6885(2-10)new1.P65 3/24/05, 4:05 PM10

RQT6885
11
Listening operations
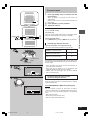
The radio: preset tuning
By remote control only
There are two methods of pre-setting stations.
Automatic presetting: All the stations the tuner can
receive are preset.
Manual presetting: You can select the stations to pre-
set and the order they are preset
in.
Up to 15 stations each can be set in the FM and AM bands.
Preparation:
Press [TUNER/BAND] to select “FM” or “AM”.
A Automatic pre-setting
Do the following once each for FM and AM.
Preparation:
Tune to the frequency where pre-setting is to begin (\ page
10).
Press and hold [PROGRAM].
The tuner presets all the stations it can receive into the
channels in ascending order. When finished, the last station
memorized is tuned in.
Manual pre-setting
Pre-set the stations one at a time.
Press [PROGRAM] then press [g
44
44
4/REW]
or [f
33
33
3/FF] to tune to the required station.
Press [PROGRAM] then press [g
44
44
4/REW]
or [f
33
33
3/FF] to select a channel.
Press [PROGRAM].
The station occupying a channel is erased if another station
is preset in that channel.
B Selecting channels
1 Press the numeric buttons to select the
channel.
For channels 1 to 9, press the corresponding number.
For channels 10 to 15, press [
10], then the two digits.
OR
Press [PLAY MODE] to select “PRESET”.
Press [g
44
44
4/REW] or [f
33
33
3 /FF] to
select the channel.
2 Adjust the volume.
A
B
1
2
/REW /FF
,
TUNER/BAND
CD
RE W
FFFF
CLEARCLEAR
ALBUM
12 3
45
6
78 9
TAPE
TUNER
BAND
0
10
VOL VOL
AUX
ABC DEF
GHI
JKL
MNO
TUV
WXYZ
PQRS
ENTER
DISC
SEARCH
MARKER
INTROINTRO
REPEAREPEAT
DIMMERDISPLAY
RE-MASTER
MUMUTINGING
SOUND
S.SOUND EQS.SOUND EQ
PLAY
REC
SLEEP
AUTO OFF
SHIFTSHIFT
TITLE
CLOCK
TIMER
PROGRAMPROGRAM
DELDEL
SPACE
PLAPLAY MODEY MODE
PROGRAM
/REW /FF
,
CD
RE W
FFFF
CLEARCLEAR
ALBUM
12 3
45
6
78 9
TAPE
TUNER
BAND
0
10
VOL VOL
AUX
ABC DEF
GHI
JKL
MNO
TUV
WXYZ
PQRS
ENTER
DISC
SEARCH
MARKER
INTROINTRO
REPEAREPEAT
DIMMERDISPLAY
RE-MASTER
MUMUTINGING
SOUND
S.SOUND EQS.SOUND EQ
PLAY
REC
SLEEP
AUTO OFF
SHIFTSHIFT
TITLE
CLOCK
TIMER
PROGRAMPROGRAM
DELDEL
SPACE
PLAPLAY MODEY MODE
PLAY MODE
1
2
12 3
45
6
78 9
0
10
ABC DEF
GHI
JKL
MNO
TUV
WXYZ
PQRS
SPACE
PROGRAM
VOL VOL
RQT6885(11-15)new2.P65 3/24/05, 3:19 PM11

RQT6885
12
Listening operations
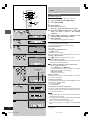
CDs
This unit can play WMA, MP3 and CD-DA (digital audio)
format audio CD-R and CD-RW that have been finalized
(a process that enables CD-R/CD-RW players to play
audio CD-R and CD-RW) upon completion of recording.
It may not be able to play some CD-R or CD-RW due to the
condition of the recording.
The unit contains five CD trays.
You can simply listen to the CD on a single tray, or you
can select and listen to the CD in a particular tray. See
the section on All-Disc play (\ page 14) for information
on how to listen to all the CDs one after the next.
Listening to the CD on a single tray
1 Press [c OPEN/CLOSE] to open the disc tray
and insert the CD.
The unit comes on automatically and tray 1 opens.
Press [c
OPEN/CLOSE] again to close the tray.
2 Press [CD 2/
J] to start play.
The selected CD is played from the first track to the last
track in order. After the last track, the player stops
automatically.
3 Adjust the volume.
To stop the disc
Press [STOP L, –DEMO].
To pause play
Press [CD 2/J]. Press [CD 2/J] again to resume play.
Skipping tracks
Press [g
44
44
4/REW] (backward) or [f
33
33
3/FF ] (forward).
Searching through tracks
During play or pause
Press and hold [g
44
44
4/REW] (backward) or [f
33
33
3/FF]
(forward).
CD indicator
The CD indicator on the display lights whenever the tray is
in the playing position whether it is loaded or not.
One touch play
If the unit is in standby mode and a CD is loaded, press
[CD 2/J] or [CD 1] ~ [CD 5].
The unit will come on automatically and play will start.
A CD selection and care
With this system, you can only play CDs having this mark. ( )
Do not;
• use irregularly shaped CDs. ( )
• attach extra labels and stickers.
• use CDs with labels and stickers that are coming off or
with adhesive exuding from under labels and stickers. ( )
• attach scratch-proof covers or any other kind of accessory.
• write anything on the CD.
• clean CDs with liquids. (Wipe with a soft, dry cloth.)
• use CDs printed with label printers available on the
market.
To prevent damage
Always observe the following points.
• Set the system on a flat, level surface.
Do not set it on top of magazines, inclined surfaces, etc.
• Do not move the system while tray is opening/closing, or
when loaded. Always unload all CDs before moving the
system.
• Do not put anything except a CD in the tray.
• Do not use cleaning CDs or CDs which are badly warped
or cracked.
• Do not disconnect the power cord from the household AC
outlet during CD changing operation.
A
1
2
3
DOWN
DOWN
VOLUME
VOLUME
UP
UP
a
b
c
OPEN/CLOSE
OPEN/CLOSE
2
1
3
(CD 1)
~
(CD 5)
/
REW
/
FF,
DEMOSTOP
,
CD
CD
CD indicator
Elapsed play time
Disc tray
Label must face upward.
Track number
RQT6885(11-15)new2.P65 12/30/02, 5:28 PM12

RQT6885
13
Listening operations
1
2
3
4
A
DOWN
VOLUME
VOLUME
UP
CD CHECK
CD CHANGE
CHANGE
CD CHECK
CD 1 CD 2 CD 3 CD 4 CD 5
CD 1 CD 2 CD 3 CD 4 CD 5
1
DEMOSTOP
,
CD CHECK
2 3
CD
/
1
4
CD indicator
CDs
Listening to a CD placed in a specific
tray
Preparation: Press [CD 2/J] and then [STOP L, –DEMO].
Selecting the desired tray number and placing
a CD in it
1 Press [c CD CHANGE].
2 Within about 10 seconds
Press [CD 1] – [CD 5] to open the tray and
insert the CD.
Press [c CD CHANGE] again to close the tray.
Repeat steps 1 and 2 to insert other CDs. You can load
up to 5 CDs.
Listening to the CD placed in a specific tray
3 Press [CD 1] – [CD 5] to start play.
The selected CD is played from the first track to the last
track in order. After the last track, the player stops auto-
matically.
4 Adjust the volume.
To remove the CD
While one CD is playing (except in All-Disc Random play or
program play), you can change the CDs in the other trays.
1 Press [c CD CHANGE].
2 Press [CD 1] – [CD 5].
Press [c CD CHANGE] again to close the tray.
A To check which tray the CD is in (CD CHECK)
The CD check feature lets you check whether a 12cm CD is
in a tray.
Press [CD CHECK].
If the player is stopped, all trays will open.
If a CD is being played, the corresponding tray will not open.
Press [CD CHECK] again to close the trays.
• Do not remove or insert CDs during a CD check.
• Do not pull out the trays during a CD check.
Elapsed play time
Track number
Disc tray
Label must face upward.
Tray
number
RQT6885(11-15)new2.P65 1/14/03, 11:55 AM13
CD
DO
WN

RQT6885
14
Listening operations
CDs
Listening to specific CDs and tracks
(CD Play Mode function)
By remote control only
This function makes it easier for you to select specific CDs
and tracks from those loaded in the player.
There are 5 disc/track selection modes.
All-Disc mode : Plays all loaded discs in succession
from the selected disc to the final
disc
.
1-Track mode : Plays one selected track on the se-
lected disc.
1-Disc Random mode : Plays one selected disc in random
order.
All-Disc Random mode : Plays all loaded discs in random
order.
1-Disc mode : Plays one selected disc.
1 Press [CD 2/J] and then [L CLEAR].
2 Press [PLAY MODE] to select the desired
mode.
Every time you press the button:
ALL-DISC 1-RANDOM1-TRACK A-RANDOM
1-DISC
ALL-DISC : All-Disc mode
1-TRACK : 1-Track mode
1-RANDOM : 1-Disc Random mode
A-RANDOM : All-Disc Random mode
1-DISC : 1-Disc mode
(The original display is restored in about 2 seconds.)
Proceed to step 5 if A-RANDOM was selected in this step.
3 Press [DISC] (Within 10 seconds) and press
[1]-[5] to select the disc.
The CD starts if 1-DISC, ALL-DISC or 1-RANDOM was
selected in step 2.
4 Only when you selected “1-TRACK” in step 2
Select the track with the numbered buttons.
To select a track 10 or over, press [ 10] then the two
digits. Play starts from the selected track.
5 Only when you selected “A-RANDOM” in step 2
Press [CD 2/J].
The CD starts.
To stop play
Press [L CLEAR].
When playback ends
The current play mode will be retained.
Final disc
For example, if play starts from disc 4, disc 3 will be the “final
disc”.
Order of progression:
Disc 4z5z1z2z3
Note
• You can use the CD Play Mode function together with repeat
play.
• During 1-Disc Random play or All-Disc Random play, you
cannot skip to tracks which have already been played.
• During 1-Disc Random play or All-Disc Random play, you
can search forward or backward only within the current
track.
1
2
5
3
4
12 3
45
6
78 9
0
10
ABC DEF
GHI
JKL
MNO
TUV
WXYZ
PQRS
SPACE
CD
CD
CLEAR
CLEAR
DISC
DISC
CD
CD
RE W
FF
CLEAR
ALBUM
ALBUM
12 3
45
6
78 9
TAPE
TUNER
BAND
0
10
VOL
VOL
VOL
VOL
AUX
ABC DEF
GHI
JKL
MNO
TUV
WXYZ
PQRS
ENTER
ENTER
DISC
DISC
SEARCH
SEARCH
MARKER
MARKER
INTRO
INTRO
REPEA
REPEA
T
DIMMER
DIMMER
DISPLA
DISPLA
Y
RE-MASTER
MU
MU
TING
ING
SOUND
S.SOUND EQ
S.SOUND EQ
PLAY
REC
REC
SLEEP
SLEEP
AUTO OFF
AUTO OFF
SHIFT
SHIFT
TITLE
TITLE
CL
CL
OCK
CK
TIMER
TIMER
PROGRAM
PROGRAM
DEL
DEL
SPACE
PLA
PLA
Y MODE
Y MODE
4
15
1
2
3
PLAY MODE
PLAY MODE
12 3
45
ABC DEF
GHI
JKL
CD
CD
Specified disc indicator
RQT6885(11-15)new2.P65 1/14/03, 11:55 AM14

RQT6885
15
Listening operations
CDs
Direct access play
By remote control only
Direct access allows you to start normal play from a specific
track to the last track of the CD.
1 Press [DISC].
2 (within 10 seconds or so)
Press [1] – [5] to select the disc you want.
3 Press the numeric button(s) to select the
desired track number.
Play will start with the track you select.
To select a two-digit track
Press [
10] and then the two numbers you want.
For example
Track no. 20: [
10]→[2]→[0]
Track no. 35: [
10]→[3]→[5]
Note
You cannot use direct access play with 1-RANDOM or
A-RANDOM mode.
Repeat play
By remote control only
A Press [REPEAT] before or during play.
“REPEAT ON” and “ ” are displayed.
To cancel repeat play
Press [REPEAT] once again. “REPEAT OFF” is displayed
and “
” is cleared.
To repeat your favorite tracks
1. Program the tracks you want (perform steps 1 ~ 6 on
page 16.)
2. Press [REPEAT] and make sure “REPEAT ON” and “
”
are displayed.
3. Press [CD 2/J]. Playback will start.
To use repeat play with CD Play Mode function
Set the desired mode (A page 14), press [REPEAT] before
or during playback, and make sure “REPEAT ON” and “
”
are displayed.
B CD display
By remote control only
This function allows you to display the remaining play time
of the current track.
During play or pause mode
Press [DISPLAY].
Every time you press the button:
Elapsed play time ↔ Remaining play time
Note
When track number 25 or greater is playing, remaining play
time display shows “– –:– – ”.
A
B
1
2
3
12 3
45
ABC
ABC
DEF
DEF
GHI
GHI
JKL
JKL
CLOCK/
CLOCK/
TIMER
TIMER
DISPLAY
DISPLAY
CD
CD
RE W
FF
CLEAR
CLEAR
ALBUM
ALBUM
12 3
45
6
78 9
TAPE
APE
TUNER
TUNER
BAND
BAND
0
10
VOL
VOL
VOL
VOL
AUX
AUX
ABC
ABC
DEF
DEF
GHI
GHI
JKL
JKL
MNO
MNO
TUV
TUV
WXYZ
WXYZ
PQRS
PQRS
ENTER
ENTER
DISC
DISC
SEARCH
SEARCH
MARKER
MARKER
INTRO
INTRO
REPEAT
DIMMER
DIMMER
DISPLA
DISPLA
Y
RE-MASTER
RE-MASTER
MU
MU
TING
SOUND
SOUND
S.SOUND EQ
PLAY
REC
REC
SLEEP
SLEEP
AUTO OFF
AUTO OFF
SHIFT
SHIFT
TITLE
CL
CL
OCK
CK
TIMER
TIMER
PROGRAM
DEL
SP
SP
ACE
ACE
PLAY MODE
REPEAT
3
2
1
CD
DISPLAY
/
DISC
DISC
12 3
45
6
78 9
0
10
ABC
ABC
DEF
DEF
GHI
GHI
JKL
JKL
MNO
MNO
TUV
TUV
WXYZ
WXYZ
PQRS
PQRS
SP
SP
ACE
ACE
REPEAT
REPEAT
Remaining play time
RQT6885(11-15)new2.P65 1/27/03, 5:05 PM15

RQT6885
16
Listening operations
A
B
1
2
5
CD
CD
7
3
4
CD
CD
CLEAR
CLEAR
PROGRAM
PROGRAM
DISC
12 3
45
ABC DEF
GHI
JKL
12 3
45
6
78 9
0
10
ABC DEF
GHI
JKL
MNO
TUV
WXYZ
PQRS
SPACE
CD
CD
RE W
FF
CLEAR
ALBUM
ALBUM
12 3
45
6
78 9
TAPE
TUNER
BAND
0
10
VOL
VOL
VOL
VOL
AUX
ABC DEF
GHI
JKL
MNO
TUV
WXYZ
PQRS
ENTER
ENTER
DISC
DISC
SEARCH
SEARCH
MARKER
MARKER
INTRO
INTRO
REPEA
REPEA
T
DIMMER
DIMMER
DISPLA
DISPLA
Y
RE-MASTER
MU
MU
TING
ING
SOUND
S.SOUND EQ
S.SOUND EQ
PLAY
REC
REC
SLEEP
SLEEP
AUTO OFF
AUTO OFF
SHIFT
SHIFT
TITLE
TITLE
CL
CL
OCK
CK
TIMER
TIMER
PROGRAM
PROGRAM
DEL
DEL
SPACE
PLA
PLA
Y MODE
Y MODE
5
4
1 7
1
3
2
/
REW
,
/
FF
DEL
CDs
Program play
By remote control only
This function allows you to program up to 24 tracks.
1 Press [CD 2/ J ] and then [L CLEAR].
2 Press [PROGRAM].
3 Press [DISC].
4 (within 10 seconds or so)
Press [1] – [5] to select the disc you want.
5 Press the numeric button(s) to select the
track you want to play in the desired
sequence.
6 Repeat steps 3 through 5 until you have
programmed all the tracks you want.
7 Press [CD 2/ J ].
Play will start in the programmed sequence.
To cancel program play mode
Press [PROGRAM] in the stop mode.
Programmed contents will be saved in memory.
To clear the last track
Press [DEL].
To clear all programmed tracks
Press [L CLEAR].
“CLEAR ALL ?” is displayed.
Within 5 seconds, press the button again to clear all tracks.
To select a two-digit track
Press [
10] and then the two numbers you want.
A When “CD FULL” appears
The number of programmed tracks is limited to 24. No
further tracks can be programmed.
B You can do the following during program mode:
• Check program contents.
Press [g
44
44
4/REW ] or [f
33
33
3/FF].
Every time you press one of the buttons, the track and
program No. are shown on the display.
• Add to the program.
Repeat steps 3 through 5.
Memory retention
Your program is retained in memory for about 1 week while
the system is unplugged.
To replay your program
If you turned OFF your program with [PROGRAM], you can
play it again as explained below.
1. Press [PROGRAM].
2. Press [CD 2/ J].
If you program a track not on your CDs
The track is initially programmed, but during program play,
the player will skip that track and will continue playing from
the next programmed item.
Note
• During program play, you can search forward or backward
only within the current track.
• During program play, skipping is always in the programmed
order, whether forward or backward.
• You can use repeat mode with program play.
• You cannot program CD-DA together with MP3/WMA
tracks.
To mark a track
See page 22.
Indicates program mode
Specified track
number
Program
order
RQT6885(16-21)new2.P65 1/27/03, 5:06 PM16

RQT6885
17
Listening operations
This unit can play MP3 and WMA files recorded on CD-R/
RW with a computer.
Files are treated as tracks and folders are treated as albums.
This unit can access up to 999 tracks, 255 albums and 20
sessions.
When making MP3/WMA files to play on this
unit
Disc format
Discs must conform to ISO9660 level 1 or 2 (except for
extended formats).
File format
• MP3 files must have the extension “.MP3” or “.mp3”.
• WMA files must have the extension “.WMA” or “.wma”.
To play in a certain order
Prefix the folder and file names with 3-digits numbers in the
order you want to play them.
Files may not be recorded in numbered order if the prefixes
have different numbers of digits.
For example: 1????.mp3, 2????.mp3, 10????.mp3.
However, some writing software may also cause recording
to occur in a different order.
MPEG Layer-3 audio decoding technology licensed from
Fraunhofer IIS and Thomson multimedia.
Windows Media, and the
Windows logo are trademarks,
or registered trademarks of
Microsoft Corporation in the
United States and/or other
countries.
WMA is a compression format
developed by Microsoft Corpo-
ration. It achieves the same
sound quality as MP3 with a
file size that is smaller than that
of MP3.
Note
• When creating a WMA disc, ensure the copyright feature
is off.
• Noise may occur when playing WMA files.
Limitations on MP3/WMA play
•
This unit is not compatible with packet-write format.
•
When both MP3/WMA and CD-DA data is recorded on the
disc over a number of sessions:
•
If the first session contains MP3/WMA recordings, the unit
will play from the MP3/WMA made in that session till the
session before the first CD-DA recordings.
•
If the first session contains CD-DA recordings, the unit will
play only the recordings made in that session. The
subsequent sessions will be ignored.
•
You cannot use 1-Disc Random play, All-Disc Random play
and search function.
•
Some MP3/WMA may not be played due to the condition of
the disc or recording.
•
Recordings will not necessarily be played in the order you
recorded them.
L Display when in the stop mode (example)
File format indicator
“MP3”: Indicates the disc contains MP3 files
“WMA”: Indicates the disc contains WMA files
If the disc contains both MP3 and WMA files, both “MP3”
and “WMA” will light up.
How discs with MP3/WMA differ
from CDs
001
002
003
001????.mp3
002????.mp3
003????.mp3
001????.mp3
002????.mp3
003????.mp3
004????.mp3
001????.mp3
002????.mp3
003????.mp3
Example: MP3
root
RQT6885(16-21)new2.P65 1/27/03, 5:06 PM17

RQT6885
18
Listening operations
CD
REW
FF
CLEAR
CLEAR
ALBUM
ALBUM
12 3
45
6
78 9
TAPE
APE
TUNER
TUNER
BAND
BAND
0
10
VOL
VOL
VOL
VOL
AUX
ABC
ABC
DEF
DEF
GHI
GHI
JKL
JKL
MNO
MNO
TUV
TUV
WXYZ
WXYZ
PQRS
PQRS
ENTER
ENTER
DISC
DISC
SEARCH
SEARCH
MARKER
MARKER
INTRO
REPEA
REPEA
T
DIMMER
DIMMER
DISPLA
DISPLA
Y
RE-MASTER
RE-MASTER
MU
MU
TING
ING
SOUND
SOUND
S.SOUND EQ
S.SOUND EQ
PLAY
REC
REC
SLEEP
SLEEP
AUTO OFF
AUTO OFF
SHIFT
SHIFT
TITLE
TITLE
CL
CL
OCK
CK
TIMER
TIMER
PROGRAM
PROGRAM
DEL
DEL
SP
SP
ACE
ACE
PLA
PLA
Y MODE
Y MODE
/REW
/FF
,
ALBUM
( or )
TRACK SKIPALBUM SKIP
ALBUM SKIP
ALBUM SKIP
TRACK SKIP
TRACK SKIP
1
2
CD
CD
RE W
FF
CLEAR
CLEAR
ALBUM
ALBUM
12 3
4 5
6
78 9
TAPE
TUNER
BAND
0
10
VOL
VOL
VOL
VOL
AUX
AUX
ABC DEF
GHI
JKL
MNO
TUV
WXYZ
PQRS
ENTER
ENTER
DISC
DISC
SEARCH
SEARCH
MARKER
MARKER
INTRO
INTRO
REPEA
REPEA
T
DIMMER
DIMMER
DISPLA
DISPLA
Y
RE-MASTER
MU
MU
TING
ING
SOUND
S.SOUND EQ
S.SOUND EQ
PLAY
REC
REC
SLEEP
SLEEP
AUTO OFF
AUTO OFF
SHIFT
SHIFT
TITLE
TITLE
CL
CL
OCK
CK
TIMER
TIMER
PROGRAM
PROGRAM
DEL
DEL
SPACE
PLA
PLA
Y MODE
Y MODE
1
12 3
45
6
78 9
0
10
ABC
ABC
DEF
DEF
GHI
GHI
JKL
JKL
MNO
MNO
TUV
TUV
WXYZ
WXYZ
PQRS
PQRS
SP
SP
ACE
ACE
1 2
ALBUM
ALBUM
Current
album
Number of tracks
in current album
Current
album
Current track
How discs with MP3/WMA differ from CDs
Album skip play
During play or stop
Push the jog control up/down [ , ,
ALBUM SKIP] to select the desired album.
Remote control: Press [ALBUM ( or )].
When selecting in the stop mode:
Press [CD 2/ J ] to start play.
Play starts from the first track of the selected album.
To play from another track, refer to “Track skip play” below.
Track skip play
During play or stop
Push the jog control up/down [ , ,
TRACK SKIP] to select a desired track.
(You can
also press [g
44
44
4/REW] or [f
33
33
3/FF].)
Remote control: Press [g
44
44
4/REW] or [f
33
33
3/FF].
When selecting in the stop mode:
Press [CD 2/ J ] to start play.
Play starts from the selected track.
To play from another album, refer to “Album skip play”
above.
Note
During 1-ALBUM mode, track skipping can only be done
within the current album.
Starting play from a desired track in a
desired album
By remote control only
Preparation: Press [CD 2/ J ] and then [L CLEAR].
1 Press [ALBUM ( or )] and then the numbered
buttons to select the album.
To select album 10 or over, press [ 10] once then the
two digits.
To select album 100 or over, press [
10] twice then the
three digits.
Play starts from the first track of the selected album.
2 Press the numbered buttons to select the track
in the current album.
To select track 10 or over, press [ 10] once then the two
digits.
To select track 100 or over, press [
10] twice then the
three digits.
Play starts from the selected track.
RQT6885(16-21)new2.P65 12/30/02, 5:36 PM18

RQT6885
19
Listening operations
A
1
2
1
2
B
3
4
CD
CD
RE W
FF
CLEAR
CLEAR
ALBUM
ALBUM
12 3
45
6
78 9
TAPE
APE
TUNER
TUNER
BAND
BAND
0
10
VOL
VOL
VOL
VOL
AUX
AUX
ABC
ABC
DEF
DEF
GHI
GHI
JKL
JKL
MNO
MNO
TUV
TUV
WXYZ
WXYZ
PQRS
PQRS
ENTER
ENTER
DISC
DISC
SEARCH
SEARCH
MARKER
MARKER
INTRO
INTRO
REPEAT
DIMMER
DIMMER
DISPLA
DISPLA
Y
RE-MASTER
RE-MASTER
MUTING
SOUND
SOUND
S.SOUND EQ
PLAY
REC
REC
SLEEP
SLEEP
AUTO OFF
AUTO OFF
SHIFT
SHIFT
TITLE
CL
CL
OCK
CK
TIMER
TIMER
PROGRAM
DEL
SP
SP
ACE
ACE
PLAY MODE
2
1
CD
CD
RE W
FF
CLEAR
CLEAR
ALBUM
ALBUM
12 3
45
6
78 9
TAPE
APE
TUNER
TUNER
BAND
BAND
0
10
VOL
VOL
VOL
VOL
AUX
AUX
ABC
ABC
DEF
DEF
GHI
GHI
JKL
JKL
MNO
MNO
TUV
TUV
WXYZ
WXYZ
PQRS
PQRS
ENTER
ENTER
DISC
DISC
SEARCH
SEARCH
MARKER
MARKER
INTRO
INTRO
REPEAT
DIMMER
DIMMER
DISPLA
DISPLA
Y
RE-MASTER
RE-MASTER
MUTING
SOUND
SOUND
S.SOUND EQ
PLAY
REC
REC
SLEEP
SLEEP
AUTO OFF
AUTO OFF
SHIFT
SHIFT
TITLE
CL
CL
OCK
CK
TIMER
TIMER
PROGRAM
DEL
SP
SP
ACE
ACE
PLAY MODE
4
2
3
2
1
CD
INTRO
12 3
45
ABC
ABC
DEF
DEF
GHI
GHI
JKL
JKL
12 3
45
6
78 9
0
10
ABC
ABC
DEF
DEF
GHI
GHI
JKL
JKL
MNO
MNO
TUV
TUV
WXYZ
WXYZ
PQRS
PQRS
SP
SP
ACE
ACE
PLAY MODE
DISC
ALBUM
A INTRO function (Album scan)
You can find an album by listening to the first track of all albums
in the current disc for 10 seconds each.
1 Press [INTRO].
INTRO function starts.
(INTRO function is cancelled after playing the first track
in the last album on the current disc.)
2 While your desired album is playing, press
[CD 2/ J ].
Play continues from the first track of the album.
To stop during the process, press [INTRO].
B CD Play Mode function for MP3/WMA
1 Press [PLAY MODE] to select the desired mode.
Every time you press the button:
ALL-DISC → 1-TRACK → 1-ALBUM
1-DISC
←
ALL-DISC: Plays all loaded discs in succession from
the selected disc to the final disc
.
1-TRACK: Plays one selected track on the selected disc.
1-ALBUM: Plays one selected album on the selected disc.
1-DISC: Plays one selected disc.
(The original display is restored in about 2 seconds.)
2 Press [DISC] and (within 10 seconds) [1]–[5] to
select the disc.
The CD starts.
3 When you selected “1-ALBUM” or “1-TRACK” in step 1
Press [ALBUM ( or )] to select the album.
Play starts from the first track of the selected album.
4 When you selected “1-TRACK” in step 1
Press the numbered buttons to select the track
in the current album.
To select track 10 or over, press [ 10] once then the two
digits.
To select track 100 or over, press [
10] twice then the
three digits.
Play starts from the selected track.
To stop play
Press [L CLEAR].
When playback ends
The current play mode will be retained in memory until it is
changed even if the unit is turned off.
Final disc
For example, if play starts from disc 4, disc 3 will be the “final disc”.
Order of progression: Disc 4z5z1z2z3
L When “NOT MP3/ERROR1” appears on the display
An unsupported MP3 format is being played. The unit will
skip that track and play the next one.
L When “TRACK/PROTECTED” appears on the display
A copyright protected WMA format is being played. The unit
will skip that track and play the next one.
Note
•
You can use repeat mode (\ page 15) with CD Play Mode
function.
•
You cannot use program mode together with CD Play Mode
function.
→
By remote control only
Preparation: Press [CD 2/ J ] and then [L CLEAR].
How discs with MP3/WMA differ from CDs
RQT6885(16-21)new2.P65 1/14/03, 11:56 AM19

RQT6885
20
Listening operations
1
2
A
CLEAR
REW
REW
FF
FF
3
4
5
CD
RE W
FF
CLEAR
ALBUM
ALBUM
12 3
45
6
78 9
TAPE
TUNER
BAND
0
10
VOL
VOL
VOL
VOL
AUX
ABC DEF
GHI
JKL
MNO
TUV
WXYZ
PQRS
ENTER
ENTER
DISC
DISC
SEARCH
SEARCH
MARKER
MARKER
INTRO
INTRO
REPEA
REPEA
T
DIMMER
DIMMER
DISPLA
DISPLA
Y
RE-MASTER
MU
MU
TING
ING
SOUND
S.SOUND EQ
S.SOUND EQ
PLAY
REC
REC
SLEEP
SLEEP
AUTO OFF
AUTO OFF
SHIFT
SHIFT
TITLE
TITLE
CL
CL
OCK
CK
TIMER
TIMER
PROGRAM
PROGRAM
DEL
DEL
SPACE
PLA
PLA
Y MODE
Y MODE
5
4
3
2
DEL
1
PROGRAM
PROGRAM
ENTER
ENTER
2 3
ALBUM
ALBUM
CD
CD
Program play for MP3/WMA
You can program up to 24 tracks.
By remote control only
Preparation:
1. Press [DISC] and (within 10 seconds) [1]–[5] to select the disc.
2. Press [L CLEAR].
1 Press [PROGRAM].
“PGM” appears.
2 Press [ALBUM ( or )] to select the album.
To select an album directly, press the numbered
buttons after pressing [ALBUM (
or )].
To select album 10 or over, press [
10] once then the
two digits.
To select album 100 or over, press [
10] twice then the
three digits.
3 Press [
g
44
44
4/REW] or [f
33
33
3/FF] to select the
track.
To select a track directly, press the numbered buttons
after pressing [
g
44
44
4/REW] or [f
33
33
3/FF].
To select track 10 or over, press [
10] once then the two
digits.
To select track 100 or over, press [
10] twice then the
three digits.
4 Press [ENTER].
Repeat steps 2~4 to program other tracks.
5 Press [CD
22
22
2/
JJ
JJ
J] to start play.
To exit program mode
Press [PROGRAM] in the stop mode. (You can replay your
program by pressing [PROGRAM] then [CD 2/J].)
A You can do the following while “PGM” is displayed
• To check program contents
Press [g
44
44
4/REW] or [f
33
33
3/FF].
Every time you press the button, the album number, track
number and program order are displayed.
• To add to the program
Do steps 2~4.
• To clear the last track
Press [DEL].
• To clear all tracks
Press [L CLEAR].
“CLEAR ALL?” is displayed.
Within 5 seconds, press the button again to clear all tracks.
Note
• You can use repeat mode (\ page 15) with program play.
• You cannot program more than one CD for MP3/WMA.
• You cannot program CD-DA together with MP3/WMA
tracks.
• The program memory is cleared when you change a disc
or open the CD tray.
How discs with MP3/WMA differ from CDs
RQT6885(16-21)new2.P65 1/14/03, 11:56 AM20
La pagina si sta caricando...
La pagina si sta caricando...
La pagina si sta caricando...
La pagina si sta caricando...
La pagina si sta caricando...
La pagina si sta caricando...
La pagina si sta caricando...
La pagina si sta caricando...
La pagina si sta caricando...
La pagina si sta caricando...
La pagina si sta caricando...
La pagina si sta caricando...
-
 1
1
-
 2
2
-
 3
3
-
 4
4
-
 5
5
-
 6
6
-
 7
7
-
 8
8
-
 9
9
-
 10
10
-
 11
11
-
 12
12
-
 13
13
-
 14
14
-
 15
15
-
 16
16
-
 17
17
-
 18
18
-
 19
19
-
 20
20
-
 21
21
-
 22
22
-
 23
23
-
 24
24
-
 25
25
-
 26
26
-
 27
27
-
 28
28
-
 29
29
-
 30
30
-
 31
31
-
 32
32


Panasonic SCPM28P Istruzioni per l'uso
- Categoria
- Lettore CD
- Tipo
- Istruzioni per l'uso
- Questo manuale è adatto anche per
in altre lingue
Documenti correlati
-
Panasonic SLSX430 Manuale del proprietario
-
Panasonic SLPH660 Istruzioni per l'uso
-
-
-
-
-
-
-
-
Panasonic SCPM29 Istruzioni per l'uso
Altri documenti
-
Aiwa NSX-SZ17 Operating Instructions Manual
-
MPMan XRM 34 Manuale del proprietario
-
 Ego Technology 4000 Plus Manuale utente
-
-
JVC RC-EX25S Manuale del proprietario
-
-
jWIN JX-M85 Instructions Manual
-
THB UNI Take&Talk BT Manuale del proprietario
