Elite SUPER CHRONO HYDROMAG DIGITAL Manuale del proprietario

Tipo
Manuale del proprietario

Questo manuale è adatto anche per

I
GB
D
F
E
NL
ISTRUZIONI
INSTRUCTIONS
BEDIENUNGSANLEITUNG
MODE D’EMPLOI
INSTRUCCIONES
INSTRUCTIES
1 Supercrono HydroMag Dgt.indd 1 05/11/09 12:21
IMPORTANTE 3
INTRODUZIONE 3
INSTALLAZIONE DEL COMPUTER 4
UTILIZZO COMPUTER 4
Impostazioni 4
Utilizzo 5
Avvio 5
SCHERMATE 5
Informazioni disponibili durante la corsa 5
Fine della corsa 6
Cancellazione dei dati della corsa 6
Batterie 6
Risoluzione dei problemi 6
ATTENZIONE 7
SI CONSIGLIA 7
GARANZIA 34
I - ITALIANO
IMPORTANT 8
INTRODUCTION 8
CONSOLE AND GEAR SHIFT INSTALLATION 9
USING THE COMPUTER 9
Set up instructions 9
How to use 10
Starting a run 10
SCREENS 10
Information available during the run 10
Finish a run 11
Delete data of a run 11
Batteries 11
Troubleshooting 11
ATTENTION 12
ADVICE 12
WARRANTY 34
GB - ENGLISH
WICHTIGER HINWEIS 13
EINLEITUNG 13
MONTAGE DER KONSOLE 14
VERWENDUNG DES COMPUTERS/EINSTELLUNGEN 14
Einstellungen 14
Gebrauch 15
Start 15
Bildschirme 15
Während des Trainings verfugbare Informationen
15
Trainingsende 16
Löschen der Trainingswerte 16
Batterien 16
Problemlösungen 16
ACHTUNG! 17
RATSCHLÄGE 17
GARANTIE 34
D - DEUTSCH
IMPORTANT 18
INTRODUCTION 18
INSTALLATION ORDINATEUR 19
UTILISATION DE L’ORDINATEUR 19
Réglage des données 19
Utilisation 20
Démarrage 20
ECRANS 20
Informations disponibles durant la course 20
Fin de la course 21
Elimination des données de la course 21
Piles 21
Résolution des problèmes 21
ATTENTION 22
NOUS CONSEILLONS 22
GARANTIE 34
F -
FRANÇAIS
IMPORTANTE 23
INTRODUCCIÓN 23
USO DEL ORDENADOR 24
Programación 24
Utilización 25
Puesta en marcha 25
PANTALLAS DE CONFIGURACIÓN 25
Informaciones disponibles durante la carrera 25
Final de la carrera 26
Anulación de los datos de la carrera 26
Baterias 26
Solución de problemas 26
IMPORTANTE 27
ACONSEJAMOS 27
GARANTIA 34
E -
ESPAÑOL
BELANGRIJK 28
INLEIDING 28
INSTALLATIE VAN DE CONSOLE 29
DE COMPUTER GEBRUIKEN 29
Set up instructies 29
Tijdens een rit 30
Een rit starten 30
SCHERMEN 30
Beschikbare informatie tijdens de rit 30
Een rit beëindigen 31
Ritgegevens verwijderen 31
Batterijen 31
Probleemoplossingen 31
OPGELET 32
ADVIEZEN 32
GARANTIE 34
NL -
DUTCH
1 Supercrono HydroMag Dgt.indd 2 05/11/09 12:21
3
IMPORTANTE
INTRODUZIONE
Verificare la presenza di tutti i componenti seguenti.
N°1 unità Hydromag (Rif. A)
N°1 cavalletto (Rif.B)
- N°1 perno bussola sinista (Rif.C)
- N°1 ghiera (Rif.D)
- N°1 perno bussola destra (Rif.E)
- N°1 leva comando (Rif.F)
- N°1 base superiore supporto unità (Rif.G)
- N°1 base inferiore supporto unità (Rif.H)
- N°1 vite M6 x45 mm (Rif.I)
- N°1 rondella Ø6 mm (Rif.L)
- N°1 dado M6 (Rif.M)
N°1 sacchetto accessori unità:
- N°1 chiave esagonale
- N°2 viti M6 x 55 mm (Rif.N)
- N°2 rondelle Ø6 mm (Rif.O)
N°1 Sgancio Rapido (Rif.P)
N°1 console (Rif.Q)
ITALIANO
Molte grazie per aver acquistato Super Crono Hydromag Digital.
Non frenare durante l’utilizzo del
trainer, ciò danneggia irreparabil-
mente il rullino e il pneumatico.
I
1 Supercrono HydroMag Dgt.indd 3 05/11/09 12:21
4
INSTALLAZIONE DEL COMPUTER
•Installare il computer sulla leva comando, come
mostrato in figura 1.
• Connettere il cavo uscente dal retro del compu-
ter alla corrispondente presa della leva.
• Qualora non fosse già collegato, infilare la spina
del sensore di velocità (cavo che esce del guscio
dell’unità di resistenza) alla leva.
Assicurarsi che la leva comando e la console
siano fissati bene e che i cavi non intralcino i mo-
vimenti del ciclista e quelli della bicicletta (pedali,
catena, ecc.).
Ora è possibile iniziare l’allenamento. E’ possi-
bile variare la resistenza del rullo, agendo sulla
manopola di regolazione presente sul manubrio
e visualizzare tutti i dati dell’allenamento sullo
schermo del computer.
UTILIZZO DEL COMPUTER
Impostazioni
Per utilizzare correttamente il Super Crono Hydro-
mag Digital è inizialmente necessario impostare i
propri parametri. Per far ciò si deve entrare nella
schermata SET UP.
Per entrare nella schermata SET UP si deve premere
il tasto di destra (MODE) per almeno tre secondi.
A questo punto apparirà la scritta SET UP. Quando
si rilascia il tasto, il computer mo-
stra la prima schermata della fase
di SET UP.
Attenzione: è possibile entrare nel-
la fase di SET UP solo a velocità
nulla.
Innanzitutto si devono scegliere le
unità di misura tra decimali o an-
glosassoni. Per far ciò è sufficiente
premere il tasto sinistro (SET). Sul-
lo schermo appariranno alternati-
vamente le unità di misura METER
(metri), KM/H e KILO (chilogrammi) o FOOT (piedi),
M/H (miglia) e LB (once). Premendo il tasto MODE si
confermano le unità scelte e si passa alla scherma-
ta successiva. In questa schermata, in alto abbiamo
un numero a tre cifre che indica il nostro peso più
quello della bici, espresso nell’unità di misura pre-
cedentemente scelta. Apparirà il peso impostato dal
costruttore o l’ultimo valore inserito. Per modificare
questo valore, premere il tasto SET per modificare
la cifra che lampeggia e il tasto MODE per confer-
mare la valore scelto e passare
alla cifra successiva che inco-
mincerà a lampeggiare. Ripetere
l’operazione per impostare tutte
e tre le cifre del peso. Premere
il tasto MODE per confermare il
peso e passare alla schermata
successiva. Questa schermata
serve per scegliere il tipo di uni-
di resistenza. Per impostare
correttamente il computer per
il Super Crono Hydromag Digi-
tal impostare il valore “2”. Questo valore dovrebbe
essere già impostato, se così non fosse, premere il
tasto SET finché la cifra non diventa “2”. Premere il
tasto MODE per uscire dalla schermata di SET UP.
Attenzione: un valore non corretto comporta una
visualizzazione errata dei dati. Esempio: se si vuole
impostare come unità di misura chilogrammi, metri,
chilometri e come peso 78 chilogrammi si dovrà ese-
guire la seguente operazione.
3
I
1
2
SET
Schermata per la scelta delle uni di misura
1 Supercrono HydroMag Dgt.indd 4 05/11/09 12:21
5
I
KM/H-M/H
Velocità corrente. Velocità a cui si sta pedalando nel momento in cui si legge il valore.
1
1
DST
Tempo della corsa. Misura del tempo dall’inizio della corsa.
TIME
1-2
Posizione della leva comando. Indica in che posizione si trova la leva di variazione della resistenza dell’unità.
1-2-3
1-2-3
AVG WATT
2
% AVG
2
Pendenza media. Pendenza media della corsa.
3
MAX KM/H
3
ELV.G
SIMBOLO
SCHER-
MATA
INFORMAZIONE
Potenza corrente. Potenza che si sta sviluppando nel momento in cui si legge il valore.
WATT 1
Pendenza. La pendenza visualizzata è una funzione del peso del ciclista e della posizione della leva. comando.
%
Distanza percorsa. Distanza che si è percorsa dall’inizio della corsa.
1-2
1
2
3
4
5
Indicatore Indica se la velocità corrente è maggiore ( ) o minore ( ) della velocità media.
Potenza media. Potenza media sviluppata dall’inizio della corsa.
AVG KM/H-M/H
2
Velocità media. Velocità media dall’inizio della corsa.
MAX WATT
Potenza massima. Massima potenza sviluppata durante la corsa.
Velocità massima. Massima velocità raggiunta durante la corsa.
3
Guadagno in elevazione. Indica il dislivello ottenuto durante la corsa.
ODO
3
Distanza totale percorsa. Distanza totale che è stata percorsa con il Digital Mag.
TOTAL TIME
3
Tempo totale. Tempo totale che è stato utilizzato il Digital Mag.
Indicatore di batteria scarica.
1-2-3
Per entrare nella schermata SET UP premere il tasto
MODE per 3 secondi. Premere il tasto SET finché
non appare sullo schermo METER, KILO e KM/H.
Premere il tasto MODE. Premere il tasto SET finché
la cifra che lampeggia (quella più a destra) diventa
“8”. Premere il tasto MODE. Premere il tasto SET
finché la cifra che lampeggia (quella centrale) di-
venta “7”. Premere il tasto MODE.
Premere il tasto SET finché la cifra che lampeggia
(quella più a sinistra) diventa “0”. Premere il tasto
MODE.
Premere il tasto SET finché la cifra che lampeggia diventa
“2”. Premere il tasto MODE. Fine dell’impostazione.
Utilizzo
Durante la corsa sono disponibili tre diverse scher-
mate. Ogni schermata è suddivisa in sette aree con
informazioni che variano a seconda della scherma-
ta in cui ci si trova.
Durante la corsa si può passare indifferentemen-
te da una schermata all’altra per visualizzare i dati
che interessano maggiormente. Per far ciò preme-
re il tasto MODE.
Durante la corsa è possibile variare la resistenza
dell’unità, cambiando la posizione della leva co-
mando. Sulla console verrà aggiornato il numero
della posizione e alcuni dei valori rappresentati sul-
lo schermo (ad esempio la pendenza, ecc.).
Avvio
Per l’accensione dello schermo è sufficiente
premere uno dei due pulsanti SET o MODE oppure
iniziare a pedalare.
Informazioni disponibili durante la corsa
SCHERMATE
Ia schermata:
A Potenza corrente
B Velocità corrente
C Pendenza
D Distanza
E Tempo della corsa
F
Posizione della Leva
G Indicatore
IIa schermata:
A Potenza media
B Velocità media
C Pendenza media
D Distanza
E Tempo della corsa
F Posizione della Leva
G Indicatore
IIIa schermata:
A Potenza massima
B Velocità massima
C Guadagno in elevazione
D Distanza totale
E Tempo totale
F Posizione della Leva
G Indicatore
valori correnti valori medi valori max
1 Supercrono HydroMag Dgt.indd 5 05/11/09 12:21
6
I
Fine della corsa
Alla fine della corsa è possibile visualizzare i dati
massimi e medi di velocità e potenza, il guadagno
in elevazione, la distanza percorsa e il tempo della
corsa appena eseguita.
Se si rincomincia a pedalare i dati della corsa (va-
lori medi, massimi, tempo e distanze) vengono ag-
giornati come se fossero parte della stessa corsa.
Cancellazione dei dati della corsa
Dopo due minuti di inattività, cioè senza pedalare
o senza premere i tasti della console, il program-
ma va in stand-by (modalità riposo). Quando il
computer va in stand-by, tutti le informazioni del-
la corsa appena fatta vengono memorizzate.
In caso si volesse iniziare una nuova corsa e can-
cellare i dati è sufficiente effettuare l’operazione
di CLEAR.
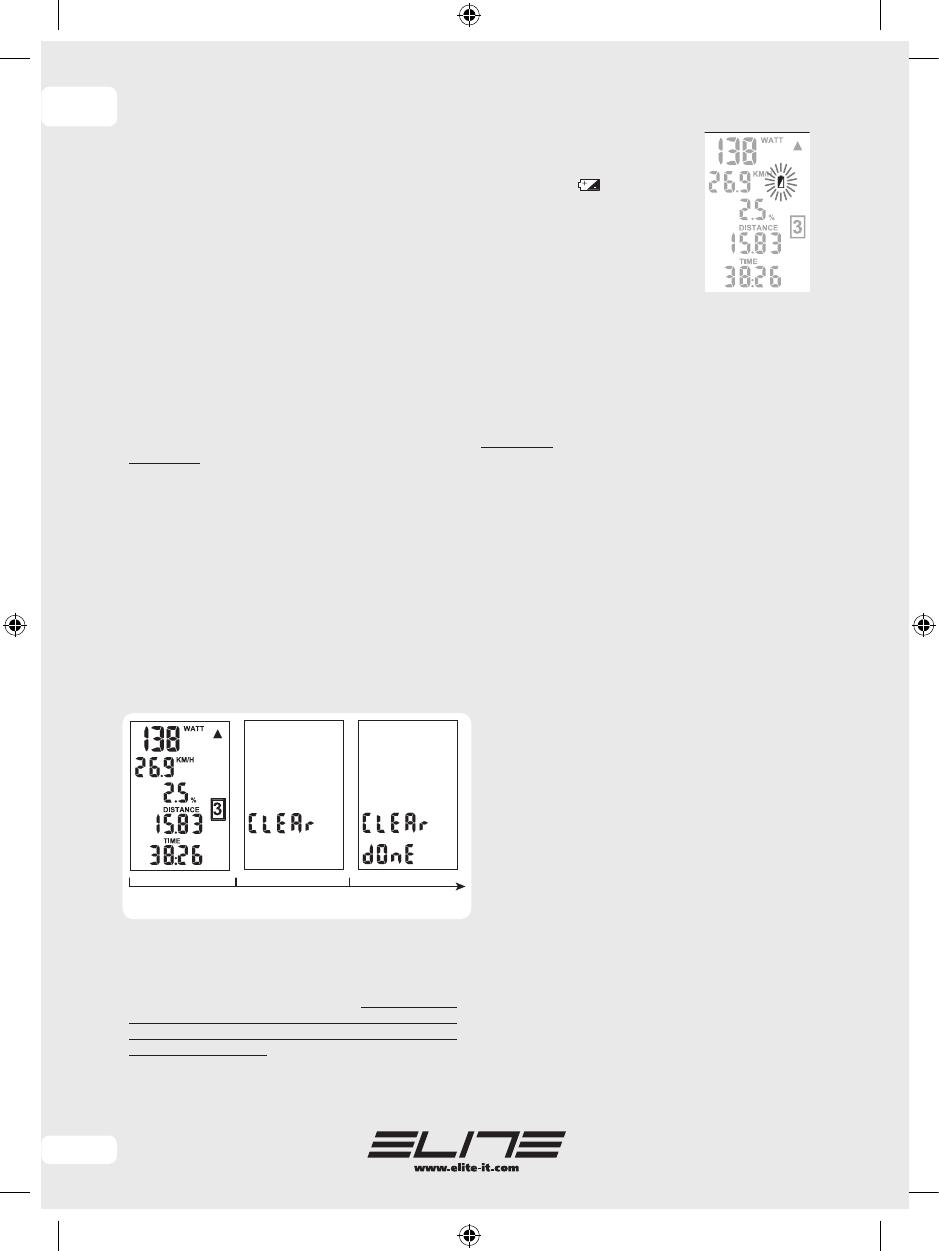
Per eseguire la procedura CLEAR è necessario
premere il tasto SET per almeno 6 secondi.
Attenzione: è possibile effettuare la procedura di
cancellazione solo a velocità nulla.
Per i primi tre secondi la schermata non cambia.
Tenendo il tasto SET, dopo i primi tre secondi, ap-
parirà la scritta CLEAR. Questa è una scritta che
avverte che si sta per eseguire la cancellazione dei
dati. È comunque possibile interrompere la proce-
dura di cancellazione, semplicemente smettendo
di premere il tasto.
Dopo aver premuto il tasto SET per sei secon-
di apparirà la schermata con la scritta CLEAR e
DONE. Questa scritta significa che la cancellazio-
ne dei dati è stata eseguita. Ora si può smettere di
premere il tasto.
Qui di seguito sono raffigurate le schermate che
appariranno durante la procedura.
Batterie
Il
Super Crono Hydromag Digital
utilizza due batterie
di tipo AA. L’autonomia del sistema dipende dalla
qualità di batteria che si utilizza. Per ottimizza-
re il consumo delle batterie in fase di stand-by è
necessario staccare il cavo del sensore di velocità
dalla leva comando. In condizioni ottimali le nor-
mali batterie alcaline hanno una durata di circa
300 ore. Non è possibile utilizzare batterie ricari-
cabili a meno che non siano da 1,5 Volt.
Quando le batterie si stanno per
scaricare incomincerà a lampeg-
giare sullo schermo il simbolo
della batteria ( ).
Da quando incomincia a lampeg-
giare il simbolo passano alcune
ore prima che le batterie si sca-
richino del tutto.
Quando le batterie sono com-
pletamente scariche lo schermo
si spegnerà, il programma però
provvederà a salvare tutti i dati in memoria. Così
anche quando si sostituiranno le batterie tutti i
dati che erano memorizzati non andranno persi.
Proprio grazie a questa memorizzazione dei dati,
il
Super Crono Hydromag Digital
può stare lunghis-
simo tempo senza alimentazione e senza perdere
nessuna informazione.
Attenzione: gettare le batterie esauste negli ap-
positi contenitori. Non disperderle nell’ambiente.
Risoluzione problemi
1.
Mentre si sta pedalando, sullo schermo della
console i valori di velocità, potenza, tempo e di-
stanze non cambiano come dovrebbero (nella
schermata dei valori correnti velocità, potenza
sono nulle mentre gli altri valori non cambiano).
È probabile che non arrivino le informazioni dal
sensore di velocità. Provare a verificare se il cavo
del sensore velocità è ben inserito nel guscio del-
l’unità di resistenza e se la spina è ben inserita
nella leva comando.
2.
Sulla console tutti i valori sono regolari, ma il
logo del ciclista, che mostra la posizione della
leva comando, è fisso su una posizione indipen-
dentemente dalla effettiva posizione della leva.
Probabilmente non arriva il segnale dal sensore
della leva di comando. Controllare il cavo che va
dal computer alla leva sia connesso.
3.
Al variare della posizione della leva di coman-
do, la pendenza che si legge è cambiata rispetto
a ieri.
La pendenza è una funzione del peso e quindi ogni
volta che si variano le impostazioni del peso del
ciclista, cambia anche la pendenza per ogni posi-
zione della leva.
4.
Il valore della pendenza è troppo elevato.
Controllare il peso impostato (vedi paragrafo Im-
postazioni). Infatti il valore della pendenza equi-
valente è inversamente proporzionale al peso del
ciclista e se il peso impostato è troppo basso, tale
valore risulta errato.
5.
La velocità è molto più alta di quella corretta e
anche gli altri valori sono errati.
È possibile che il computer sia stato impostato per
una unità di resistenza diversa da quella del
Super
Crono Hydromag Digital
. Controllare se nella fase
di SET UP il valore TYPE è uguale a 2.
3 6
secondi
1 Supercrono HydroMag Dgt.indd 6 05/11/09 12:21
7
I
ATTENZIONE
L’unità di resistenza si riscalda sensibilmente
quando in uso. È necessario aspettare che si raf-
freddi prima di toccare i gusci di alluminio.
Non frenare durante l’utilizzo del trainer, ciò
danneggia irreparabilmente il rullino e il pneu-
matico.
Il cavalletto é studiato per l’uso da parte di un
solo ciclista.
Verificare la sicurezza e la stabilità della bici-
cletta prima di ogni allenamento.
Qualora lo sgancio rapido non fosse compatibile
con le bussole del cavalletto, sostituirlo con quello
fornito in dotazione (P).
Il computer che si applica sul manubrio non è
impermeabile. Attenzione a non sudare sopra il
display, perché potrebbe danneggiare il circuito
elettronico.
Non conservate il Super Crono Hydromag Digital
in luoghi bagnati o umidi. Questo potrebbe dan-
neggiare i componenti elettronici.
Se non si utilizza il trainer per lungo tempo, si
consiglia di togliere le batterie dal computer e dal
trasmettitore.
• Non ci sono componenti utilizzabili singolar-
mente all’interno. La garanzia è nulla se l’unità
viene aperta o manomessa.
• Poiché i piedini sono costruiti in materiale mor-
bido antiscivolo, potrebbe verificarsi che durante
l’uso lascino tracce di gomma sul pavimento.
Durante l’uso del Super Crono Hydromag Digital
con rullino Elastogel, una leggera usura del-
lo stesso rientra nella normalità. I test eseguiti
in Elite dimostrano che dopo un uso continuo di
20.000 Km il consumo del rullino si aggira sui 0,1
mm, ed essendo 17.5 mm lo spessore totale, un
consumo ben superiore non impedisce il corretto
funzionamento del trainer.
Contestazioni dovute ad utilizzo improprio o negli-
gente, non verranno riconosciute. Si potrebbe ve-
rificare una leggera usura della parte in gomma
che rientra nella normalità.
L’utilizzo con pneumatici stretti o con pressione
del pneumatico non ottimale, può danneggiare ir-
reparabilmente il rullino Elastogel.
Qualora si avvertisse uno slittamento della ruo-
ta sul rullino Elastogel, rendere più progressivo lo
sforzo sul pedale. L’allenamento con il pneumati-
co che slitta può danneggiare irreparabilmente il
rullino Elastogel.
SI CONSIGLIA
Per un minor consumo del pneumatico e una
migliore aderenza al rullino, consigliamo di utiliz-
zare pneumatici larghi 23 mm.
Pressione consigliata della ruota posteriore: 7
-8 atmosfere per pneumatico da corsa; 3,5 - 4 at-
mosfere per pneumatico MTB. Per casi particolari
attenersi alla pressione consigliata dal costrutto-
re dei pneumatici.
Per una minor rumorosità, una maggiore ade-
renza del pneumatico sul rullino e una riduzione
delle vibrazioni, utilizzare pneumatici slick (anche
per Mountain bike).
Prima dell’uso, pulire il pneumatico con alcool
o acqua.
Se il perno dello sgancio rapido fornito sporge
più di 3 mm dal dado di fissaggio tagliare la parte
sporgente (fig. 4).
4
1 Supercrono HydroMag Dgt.indd 7 05/11/09 12:21
8
IMPORTANT
INTRODUCTION
Check the presence of all the following components.
1 Hydromag Unit (Ref. A)
1 stand (Ref.B)
- 1 left bushing pin (Ref.C)
- 1 ring (Ref.D)
- 1 right bushing pin (Ref.E)
- 1 control lever (Ref.F)
- 1 unit support upper base (Ref.G)
- 1 unit support lower base (Ref.H)
- 1 screw M6 x45 mm (Ref.I)
- 1 washer Ø6 mm (Ref.L)
- 1 nut M6 (Ref.M)
1 bag of unit accessories:
- 1 hex wrench
- 2 screws M6 x 55 mm (Ref.N)
- 2 washers Ø6 mm (Ref.O)
1 Quick release (Ref.P)
1 console (Rif.Q)
ENGLISH
Thank you for choosing the Super Crono Hydromag Digital.
Do not stop the rotation of the
bicycle wheel by using caliper or
disk brake. This seriously dama-
ges the roller and the tire.
GB
1 Supercrono HydroMag Dgt.indd 8 05/11/09 12:21
9
GB
CONSOLE AND GEAR SHIFT
INSTALLATION:
• Install the LCD console to the shifting lever (see
the following illustration).
• Connect the wire from the back of the LCD
console to the shifting lever as shown in the
following illustration.
• In case it isn’t firmly connected, insert the plug
of the speed sensor (the cable that comes from
the flywheel housing) in the shifting lever, as
shown in the following illustration.
• Make sure the shifter is securely mounted and
that the cable does not interfere with you or the
bicycle while pedal-ling (pedals, chain, etc).
• It is now possible to start the training session.
It is possible to change the resistance level using
the remote regulation shifter installed on the han-
dlebar and view all the data of your training ses-
sion on the LCD display.
USING THE COMPUTER
Set up instructions
The first operation with Super Crono Hydromag Digital
is to set your personal parameters.
This is possible from the SET UP screen that you may
have access by keeping pressed the right (MODE)
key for at least 3 seconds. SET UP will appear at the
bottom of the screen. By stop pressing the key, the
SET UP screen will appear on the
LCD display.
Attention: the trainer must not be
running to be able to enter the SET
UP screen.
The next step is to select the units
of measurement, which can be me-
tric or Anglo-Saxon.
By pressing the left button (SET),
METER, KM/H, KILO and FOOT, M/H
e LB will alternate on the screen. Press the MODE
key to select the desired units and to pass to the next
screen where you can input your personal weight.
In this screen, a three digit number will appear at the
top right corner of the screen which indicates your
weight including your bicycle, in the unit of measu-
rement previously selected. Using the trainer for the
first time, the number that ap-
pears is the figure preinserted at
the factory; from the second time
onwards, it’s the figure introdu-
ced the previous run. To amend
the number, press the SET key
to modify the first flashing digit
and the MODE key to confirm the
value selected and pass to the se-
cond digit which will start to flash.
Repeat the same operation for all
three digits. Press MODE to con-
firm the weight value and to pass to the next screen.
In this screen the model of resistance unit is selec-
ted. Select value ”2” for Super Crono Hydromag Di-
gital. This value should already be preinserted at the
factory; if this is not the case, press the SET key until
the number becomes “2”. Press the MODE key to exit
the SET UP screen.
3
1
2
SET
Screen to select the units of measurement.
1 Supercrono HydroMag Dgt.indd 9 05/11/09 12:21
10
GB
Current speed. The speed you are proceeding the moment you read the value on the screen.
1
1
Race duration. Indicates the time passed since training commenced.
1-2
Resistance level/Gear shift position. Indicates the gear shift position of the resistance unit.
1-2-3
1-2-3
2
2
Average slope. Average slope of the run.
3
3
SCREEN INFO
Current power. Power developed the moment you read the value on the screen.
1
Slope. The slope value is in function of the cyclist’s weight and the resistance level/gear shift position.
Distance covered since training commenced. Indicates the distance covered from the starting point.
1-2
1
2
3
4
5
Average power. Indicates the average power developed since training commenced.
2
Average speed. Indicates the average speed since training commenced.
Maximum power. Indicates the peak on power during the run.
Maximum speed. Indicates the peak on speed during the run.
3
Elevation gain. Indicates the elevation gained during the run.
3
Total distance covered. Indicates the total distance covered by your Digital Mag.
3
Total time. Indicates the total time your Digital Mag has been used.
Indicator . Indicates if the current speed is higher ( ) or lower ( ) than the average speed.
3
Flat battery indicator.
KM/H- M/H
DST
TIME
AVG WATT
% AVG
MAX KM/H
ELV.G
SYMBOL
WATT
%
AVG KM/H-M/H
MAX WATT
ODO
TOTAL TIME
Attention: Inputting an incorrect value will process
incorrect data during your training sessions.
Example: You want to set the following units of
measurement: kilometres, metres, kilograms and
input your personal weight which is 78 kg.
To access the SET UP screens keep pressed the
MODE key for at least 3 seconds. Press SET un-
til METER, KILO and KM/H appear on the screen.
Then press the MODE key. Press the SET key until
the flashing digit (first from the right) becomes
“8”. Then press MODE. Press the SET key until
the flashing number (middle) becomes “7”. Then
press MODE. Press the SET key until the flashing
number (first from the left) becomes “0”. Then
press MODE. Press the SET key until the flashing
number becomes “2”. Then press MODE. Now you
are ready to go!
How to use
During the run, you can select from four different
screens. Each screen is divided in seven parts
with different information displayed in each one.
During the run, you can toggle through the screens
at will with the MODE key.
During the run, you can adjust the resistance level
with the remote shifting lever. The console will au-
tomatically indicate the gear shift position on the
screen and up-date some values (i.e. slope).
Starting a run
To start a run simply press ADJUST or MODE or
simply start pedalling.
SCREENS
1
st
screen:
A Current power
B Current speed
C
Slope/current incline
D Distance
E Course time
F
Resistance level/gear
shift position
G Indicator
2
nd
screen:
A Average power
B Average speed
C Average slope/incline
D Distance
E Course time
F Resistance level/gear
shift position
G Indicator
3
rd
screen:
A Maximum power
B Maximum speed
C Elevation gain
D Total distance
E Total time
F Resistance level/gear
shift position
G Indicator
Information available during the run.
1 Supercrono HydroMag Dgt.indd 10 05/11/09 12:21
11
GB
Finish a run
Once completed the run, it is possible to view
the maximum and average values for speed and
power, the elevation gain, the distance covered
and the duration of the run.
If you restart pedalling, the values of the run (ave-
rage and maximum values, time and distance) are
up-dated.
Delete data of a run
After two minutes of inactivity, which means there
is no pedalling motion nor pressing of the con-
sole keys, the program goes in “stand-by”. Once
in “stand-by”, all the information of the run just
completed are memorized.
To commence a new run and delete the previous
data, just proceed with the CLEAR procedure.
To start the CLEAR procedure, press the left (SET)
key for at least six seconds.
Attention: the trainer must not be running to be
able to delete data of a run.
For the first three seconds nothing changes.
Maintaining pressed the SET key, after the first
three seconds, CLEAR will appear on the screen.
This confirms that you are deleting the data of the
run just completed. To stop the delete procedure,
simply stop pressing the key.
After six seconds you kept the key pressed, CLEAR
and DONE will appear on the screen.
This confirms that you have deleted the data of the
run just completed, and you can now stop pres-
sing the key.
Shown below are the screens that appear during
this procedure.
Batteries
Two AA batteries are necessary to power
Super
Crono Hydromag Digital
. The life duration depends
on the quality of batteries used.
Battery life will last longer if you disconnect the
speed sensor plug from the shifting lever when
the trainer is not running. In normal conditions,
standard alkaline batteries should last for about
300 hours. Rechargeable batteries can be used
only if they are 1.5 V.
When the batteries are running
down a battery symbol will start
flashing on the screen. From
when the symbol starts
flashing the batteries still have
several hours of life.
When the batteries completely
run down the screen will turn
off, while the program will save
all the data in it’s memory. With the replacement
of the batteries all the data stored will be saved.
With the possibility of storing information,
Super
Crono Hydromag Digital
can remain without power
for long periods without losing any data.
Attention: Throw away run out batteries in ap-
propriate containers.
Troubleshooting
1.
While pedalling, the values on the LCD screen
representing speed, power, time and distan-
ce don’t up-date as they should (in the current
screen, speed and power values are zero while
the others don’t change).
Probably the information from the sensor placed
on the resistance unit doesn’t arrive to the console.
Check that the speed sensor and the plug are pro-
perly fixed.
2.
All the values on the LCD screen are correct but
the resistance level indicator, which indicates the
resistance level/gear shift position, remains
blocked on the first level even if I change gear.
Probably no information arrives from the sensor
of the gear shift. Check the cable from the console
to the lever.
3.
The slope values are different from yesterday.
The slope value is in function of the weight, thus
every time you introduce a new weight value, the
slope figure for each resistance level will automa-
tically change.
4.
The slope value is too high.
Check the weight value (see paragraph Set up
settings Instructions). In fact the slope value is
inversely proportional to the rider’s weight and
if the weight value is too low, the slope value is
wrong.
5.
The speed value is too high and the other values
are incorrect.
Probably the model of resistance unit selected is
not
Super Crono Hydromag Digital
. Check the SET
UP fase that the TYPE value is “2”.
3 6
seconds
1 Supercrono HydroMag Dgt.indd 11 05/11/09 12:21
12
GB
ATTENTION
• The resistance unit becomes warm when in use.
Wait until it has cooled before touching the alumi-
nium shells.
Do not brake when using the trainer, as this can
permanently damage the roller and the tyre.
The stand is designed for use by just one
cyclist.
Check the safety and stability of the bicycle before
every training session.
If the quick release is not compatible with the
bushings of the stand, replace it with the one
supplied (P).
The computer that is applied on the handlebar
is not waterproof. Take care not to sweat over the
display, because it could damage the electronic
circuit.
Do not store the Super Crono Hydromag Digital
in damp or wet places. This could damage the
electronic components.
If the trainer is not going to be used for a long
time, it is advisable to remove the batteries from
the computer and the transmitter.
• There are no individually usable components on
the inside. The warranty is invalidated if the unit
is opened or tampered with.
Since the feet are made from soft non-slip ma-
terial, during use they may leave rubber marks on
the floor.
During use of the Super Crono Hydromag Digital
with Elastogel roller, slight wear of the roller is
to be considered normal. Tests carried out at Eli-
te show that after continuous use for 20,000 km,
roller wear is around 0.1 mm, and as the total
thickness is 17.5 mm, far greater wear does not
prevent correct operation of the trainer.
Claims due to improper or careless use will not be
acknowledged. Possible slight wear of the rubber
part comes within the norm.
Use with narrow tyres or with non-optimum tyre
pressures can permanently damage the Elastogel
roller.
If slipping of the wheel on the Elastogel roller is
noticed, apply a more gradual force on the pedal.
Training with the tyre slipping can permanently
damage the Elastogel roller.
ADVICE
For less tyre wear and better grip on the roller, it
is advisable to use tyres of 23 mm width.
Recommended rear wheel pressure: 7 -8
atmospheres for racing tyres; 3.5 - 4 atmospheres
for MTB tyres. For particular cases, comply with
the pressure recommended by the tyre manufac-
turer.
For quieter use, better grip of the tyre on the
roller and reduced vibration, use slick tyres (also
for Mountain bikes).
• Before use, clean the tyre with alcohol or water.
If the pin of the quick release supplied protrudes
more than 3 mm from the fixing nut, cut off the
protruding part (fig. 4).
4
1 Supercrono HydroMag Dgt.indd 12 05/11/09 12:21
13
4
EINLEITUNG
Überprüfen Sie, dass alle nachstehenden
Komponenten vorhanden sind:
1 Bauteile des Hydromag (Bez. A)
1 St. Gestell (Bez.B)
- 1 St. Stift linke Buchse (Bez.C)
- 1 St. Zwinge (Bez.D)
- 1 St. Stift rechte Buchse (Bez.E)
- 1 St. Steuerhebel (Bez.F)
- 1 St. obere Stützbasis Einheit (Bez.G)
- 1 St. untere Stützbasis Einheit (Bez.H)
- 1 St. Schraube M6 x45 mm (Bez.I)
- 1 St. Unterlegscheibe Ø6 mm (Bez.L)
- 1 St. Mutter M6 (Bez.M)
1 St. Tüte mit Zubehör für die Einheit:
- 1 St. Sechskantschlüssel
- 2 St. Schrauben M6 x 55 mm (Bez.N)
- 2 St. Unterlegscheiben Ø6 mm (Bez.O)
1 St. Schnellspanner (Bez.P)
N°1 Konsole (Rif.Q)
DEUTSCH
Wir danken Ihnen für den Kauf des Super Crono Hydromag Digital.
WICHTIGER HINWEIS
Bei Gebrauch vom Radsimulator
auf keinen Fall bremsen, da sonst
die Rolle und die Reifen stark
beschädigt werden können!
D
1 Supercrono HydroMag Dgt.indd 13 05/11/09 12:21
14
D
MONTAGE DER KONSOLE
Befestigen Sie die LCD-Konsole am Verstellhebel
gemäß folgender Illustration.
• Gegebenenfalls können Sie auch das Kabel von der
Widerstandseinheit (Geschwindigkeitssensor) wie in
folgender Zeichnung gezeigt, verwenden.
• Verbinden Sie das Kabel von der Rückseite der
Konsole am Verstellhebel, wie gezeigt:
• Prüfen, ob der Hebel korrekt fixiert ist. Das Kabel
darf die Bewegungen des Fahrers nicht behindern,
auch nicht Pedalen, Kette usw. im Wege stehen.
Nun können Sie mit dem Training beginnen.
• Um unterschiedliche Widerstandsstufen zu errei-
chen, verwenden Sie einfach wie gewohnt die
Gangschaltung Ihres Fahrrades und/oder verwenden
den Lenkerschalte. (betrachten Sie die Daten von
Ihrer Trainings-session auf dem LCD-Display).
VERWENDUNG DES COMPUTERS/EINSTELLUNGEN
Einstellungen
Zur korrekten Anzeige der Trainingsdaten sind
zunächst die eigenen Parameter einzugeben. Dies
geschieht über den Bildschirm SET UP: dazu auf die
rechte Taste (MODE) für mindestens 3 Sekunden
drücken. Im Feld unten wird nun SET UP angezeigt.
Achtung: Der Trainer muss stillstehen, während Sie
das Set-Up durchlaufen.
Hier ist die Meinheit auszuwählen, die in
Dezimalklassification oder
Angelsächsischklassification ange-
geben werden kann. Dazu auf die
linke Taste (SET) drücken. Auf dem
Bildschirm werden abwechselnd die
misura METER, KM/H und KILO
(Kilogramm) oder FOOT (Versfuß),
M/H (Meile) und LB (Pfund) ange-
zeigt. Über die Taste MODE wird die
gewählte Maßeinheiten bestätigt
und der nächste Bildschirm aufge-
rufen.
Auf diesem Bildschirm oben erscheint für das Gewicht
inklusive des Fahrradgewichts eine Zahl mit drei
Ziffern und die vorher ausgewählte Maßeinheit. Es
wird das vom Hersteller eingegebene Gewicht oder
der zuletzt eingegebene Wert angezeigt.
Um diesen Wert zu modifizieren, auf die Taste SET
drücken. Jetzt kann die erste blinkende Ziffer geän-
dert werden. Über MODE wird die neue Ziffer bestätigt
und es beginnt die nächste Ziffer
zu blinken.
Den Vorgang wiederholen, bis alle
drei Ziffern neu eingegeben sind.
Auf die Taste MODE drücken um
das Gewicht zu bestätigen und der
nächste Bildschirm aufgerufen.
In diesem Bildschirm wird das
Modell der Widerstandsrolle
ausgewählt. ”2” für Super Crono
Hydromag Digital. Dies sollte wer-
ksseitig schon so voreingestellt
sein; andernfalls drücken Sie SET, bis die “2
erscheint. Drücken Sie MODE, um das Set-Up zu
verlassen.
Wichting: Unrichtige Eingaben werden Ihnen in der
Folge falsche Trainingsdaten hervorrufen. Beispiel:
Sollen die Maßeinheiten km, m, kg und als Gewicht 78
kg eingegeben werden, folgendermaßen vorgehen.
3
1
2
SET
Bildschirmr die Eingabe der Maßeinheiten.
1 Supercrono HydroMag Dgt.indd 14 05/11/09 12:21
15
D
Momentane Geschwindigkeit. Die Geschwindigkeit, mit der man in dem Moment fährt, in dem man den Wert liest.
1
1
DST
Trainingszeit. Die Zeit von Trainingsbeginn an.
TIME
1-2
Position des Einstellhebels. Zeigt an, in welcher Position der Hebel ist, der den Widerstand reguliert.
1-2-3
1-2-3
AVG WATT
2
% AVG
2
Durchschnittliche Steigung (dieser Trainingseinheit).
3
3
ELV.G
SYMBOL
BILD-
SCHIRM
INFORMATION
Momentane Leistung. Die Leistung, die in dem Moment aufgebracht wird, in dem man den Wert liest.
WATT 1
Steigung. Der angezeigte Wert ergibt sich aus dem Verhältnis zwischen dem Gewicht des Athleten und der
Position des Einstellhebels. comando.
%
Zurückgelegte Distanz. Die Distanz, die von Trainingsbeginn an zurückgelegt wurde.
1-2
1
2
3
4
5
Anzeige . : Zeigt an, ob die momentane Geschwindigkeit die Durchschnittsgeschwindigkeit über ( )- oder
unterschreitet ( ).
Durchschnittsleistung. Die von Trainingsbeginn an durchschnittlich aufgebrachte Leistung.
2
Durchschnittsgeschwindigkeit. Die Durchschnittsgeschwindigkeit von Trainingsbeginn an.
MAX WATT
Höchstleistung. Die während des Trainings aufgebrachte maximale Leistung.
Höchstgeschwindigkeit. Die während des Trainings erreichte maximale Geschwindigkeit.
3
Höhengewinn. Gibt den Höhenunterschied an, den man während des Trainings erreicht hat.
ODO
3
Gesamtdistanz. Die totale Distanz, die mit dem Volare Mag zurückgelegt wurde.
TOTAL TIME
3
Gesamtzeit. Gibt Information über die gesamte Benutzungszeit Ihres Trainers.
1-2-3
Beim Aufleuchten der Batterieanzeige ist die Batterie auszuwechseln.
KM/H-M/H
MAX KM/H
AVG KM/H-M/H
Auf die Tasten MODE und ADJUST gleichzeitig drücken,
um den Bildschirm SET UP aufzurufen.
Auf SET drücken, bis METER, KILO e KM/H angezeigt
wird. Auf MODE drücken. Auf ADJUST drücken, bis
die blinkende Ziffer (auf der rechten Stelle) “8” wird.
Auf MODE drücken. Auf ADJUST drücken, bis die
blinkende Ziffer (die Stelle in der Mitte) “7” wird. Auf
MODE drücken. Auf ADJUST drücken, bis die blinkende
Ziffer (auf der linken Stelle) “0” wird. Auf MODE
drücken. Auf ADJUST drücken, bis die blinkende
Ziffer “2” wird. Auf MODE drücken. Ende der Eingabe.
Gebrauch
Während des Trainings stehen drei verschiedene
Bildschirme zur Verfügung. Jeder dieser Bildschirme
weist sieben Bereiche mit Funktionen, die je nach
Bildschirm variieren, auf.
Während des Trainingsnnen die Bildschirme beliebig
aufgerufen werden, um die gewünschten Werte ein-
zusehen. Dazu auf die Taste MODE drücken.
Während des Trainings kann auch durch Verstellung
des Einstellhebels der Widerstand variiert werden. Auf
der Konsole werden dann sowohl die Position des
entsprechenden Symbols als auch die auf dem
Bildschirm angezeigten entsprechenden Werte
aktualisiert (z. B. die Steigung usw.).
Start
Um den Bildschirm einzuschalten, auf ADJUST oder
MODE drücken oder einfach auf die Pedale treten.
Während des Trainings verfügbare Informationen
Bildschirme
Erster Bildschirm:
A Momentane Leistung
B Momentane
Geschwindigkeit
C Steigung
D Distanz
E Zeit
F Position des Hebels
G Anzeige
Zweiter Bildschirm:
A Durchschnittsleistung
B
Durchschnittsgeschwindigkeit
C Durchschnittsteigung
D Distanz
E Zeit
F Position des Hebels
G Anzeige
Dritter Bildschirm:
A Maximale Leistung
B Höchstgeschwindigkeit
C Höhengewinn
D Gesamtdistanz
E Gesamtzeit
F Position des Hebels
G Anzeige
1 Supercrono HydroMag Dgt.indd 15 05/11/09 12:21
16
D
Trainingsende
Hat man das Training beendet, kann man die
maximalen und durchschnittlichen Werte der Ge-
schwindigkeit, Leistung, des Höhengewinns, der
Distanz und der Zeit des gerade abgeschlossenen
Trainings einsehen. Wird das Training weiter-
geführt, werden die Werte (Durchschnitts- und
Höchstwerte, Zeit und Distanz) aktualisiert.
Löschen der Trainingswerte
Nach zwei Minuten Stillstand (d. h. ohne auf die
Pedale zu treten bzw. ohne auf die Tasten zu dcken)
schaltet das Programm auf Stand-by. Jetzt wer-
den alle Daten des Trainings gespeichert.
Will man das Training wieder aufnehmen und die
Daten löschen, ist der CLEAR - Vorgang einzulei-
ten. Dazu auf die Taste SET gleichzeitig drücken
(mindestens 6 Sekunden lang).
ACHTUNG: Zur Löschung der Daten muss der
Trainer still stehen (keine Bewegung an der
Rolle!).
In den ersten 3 Sekunden verändert sich nichts.
Drückt man nach den ersten drei Sekunden weiter
auf die Taste SET erscheint die Schrift CLEAR. Mit
CLEAR wird signalisiert, daß man im Begriffe ist,
die Daten zu löschen. Man kann den Vorgang un-
terbrechen, indem man die Taste losläßt.
Drückt man sechs Sekunden lang auf die Taste,
erscheint der Bildschirm mit den Schriften CLEAR
und DONE. Dies bedeutet, daß die Daten gelöscht
wurden. Nun kann man die Taste loslassen.
Im folgenden sind die Bildschirme dargestellt, die
während dieses Vorganges erscheinen.
Batterien
Für den
Super Crono Hydromag Digital
sind zwei
Batterien des Typs AA notwendig. Die Dauer hängt
von der Qualität der Batterien ab.
Die Batterie-Lebensdauer kann durch das He-
rausziehen des Geschwindigkeits-Sensor-Kabels
aus dem Display verlängert werden. In normalen
Bedingungen, normale alkalische Batterien ha-
ben eine Dauer von ca. 300 Stunden. Nachladbare
Batterien können nicht verwendet werden (ausge-
nommen 1,5V-Batterien).
Blinkt das Symbol der Batterie
auf dem Bildschirm, bedeutet
dies, daß bald ein Batterie
wechsel vorgenommen werden
muß.
Sind die Batterien komplett
entladen, schaltet sich der Bild-
schirm ab, aber das Programm
schützt die gespeicherten Daten.
So gehen auch beim Batteriewechsel
die gespeicherten Daten nicht verloren.
Bevor die neuen Batterien eingesetzt werden, ca.
20 Sekunden lang warten. Diese Zeit benötigt der
Kondensator, um sich ganz zu entladen (er liefert
dem Programm die notwendige Energie, um die
Daten zu schützen).
Achtung: Der Umwelt zuliebe sind die Batterien in
eigens dafür vorgesehene Behälter zu entsorgen.
Problemlösungen
1.
Die Werte der Geschwindigkeit, Leistung, Zeit
und Distanz bleiben unverändert.
Möglicherweise erreichen die Informationen des
Geschwindigkeitssensores nicht die Konsole.
Überprüfen Sie den Sitz des Steckers vom Ge-
schwindigkeitssensor in dem Lenkerdisplay.
2.
Das Symbol des Radfahrers bleibt auf der eine
Position stehen, obwohl der Hebel weiter verstellt
wurde.
Das Signal des Sensors, der die Position des He-
bels erfaßt, erreicht nicht die Konsole. Überprüfen
Sie das Kabel von der Konsole zum Verstellhebel.
3.
Verstellt man den Einstellhebel, wird für die
Steigung ein Wert angezeigt, der mit dem eines
vorherigen Trainings nicht übereinstimmt.
Die Steigung ist eine Funktion des Gewichtes.
Wird demnach für das Gewicht des Athleten ein
neuer Wert eingegeben, ändert sich auch die Stei-
gung für jede Position des Hebels.
4.
Der Wert für die Steigung ist zu hoch.
Überprüfen Sie den eingegebenen Wert für das
Gewicht (siehe Abschnitt Einstellungen). Der für
die Steigung äquivalente Wert ist nämlich um-
gekehrt proportional zum Gewicht des Fahrers
- deshalb ist, wenn das eingegebene Gewicht zu
niedrig ist, dieser Wert nicht korrekt.
5.
Die Geschwindigkeit ist zu hoch und andere An-
gaben nicht korrekt.
Eventuell haben Sie die falsche Widerstandseinheit
im SET-UP-MENU ausgewählt. Überprüfen Sie im
SET-UP, dass Sie als Typ „2“ eingegeben haben.
3 6
Sekunden
1 Supercrono HydroMag Dgt.indd 16 05/11/09 12:21
17
D
ACHTUNG!
Die Widerstandseinheit wird bei Gebrauch sehr
heiss! Vor dem Anfassen des Aluminiumgehäuses
die Einheit gut abküDhlen lassen!
Bei Gebrauch vom Radsimulator auf keinen Fall
bremsen, da sonst die Rolle und die Reifen stark
beschädigt werden können!
Das Gestell wurde zur Benutzung durch einen
einzigen Radsportler entwickelt.
Vor jedem Training die Sicherheit und Stabilität
des Fahrrads überprüfen.
• Sollte der Schnellspanner mit den Buchsen des
Gestells nicht kompatibel sein, muss er gegen
den in der Lieferung enthaltenen ausgetauscht
werden (P).
Der Computer, der am Lenker befestigt wird,
ist nicht wasserdicht! Es muss deshalb darauf
geachtet werden, dass kein Schweiss auf das Di-
splay tropft, da sonst die Elektronik beschädigt
werden kann!
Den Trainer Super Crono Hydromag Digital
nicht an nassen oder feuchten Orten aufbewah-
ren, da sonst die elektronischen Komponenten
beschädigt werden können.
Wenn der Trainer längere Zeit nicht mehr
benützt wird, sollten die Batterien aus dem Com-
puter und dem Sender genommen werden.
Es befinden sich keine einzeln benutzbaren Kom-
ponenten im Innern. Die Garantie verfällt, wenn
die Einheit geöffnet oder manipuliert wurde.
• Da die Stützfüße aus weichem, rutschfesten
Gummi sind, können Sie während des Gebrauchs
Gummispuren auf dem Fußboden hinterlassen.
Beim Gebrauch des Super Crono Hydromag
Digital Trainer, ist ein leichter Verschleiß der
ElastoGel Rolle normal. Die im Werk Elite ausge-
führten Tests haben ergeben, dass der Verschleiß
der Rolle nach einem kontinuierlichen Gebrauch
über 20.000 km circa 0,1 mm beträgt. Da die Ge-
samtstärke 17.5 mm beträgt, behindert selbst ein
viel höherer Verschleiß die korrekte Funktion des
Rollentrainers nicht.
Beanstandungen durch unsachgemäßen oder
fahrlässigen Gebrauch werden nicht anerkannt.
Der Gebrauch mit schmalen Reifen oder nicht
optimalen Reifendruck kann die Elastogel-Rolle
auf irreparable Weise beschädigen.
Sollte ein Abrutschen des Rads auf der Elasto-
gel-Rolle auftreten, muss die Kraftausübung auf
die Pedale auf progressivere Weise erfolgen. Das
Training mit einem abrutschenden Reifen kann
die Elastogel-Rolle auf irreparable Weise be-
schädigen.
RATSCHLÄGE:
• Für einen geringeren Verschleiß des Reifens
und eine bessere Haftung an der Rolle empfehlen
wir die Verwendung von 23 mm breiten Reifen.
Empfohlener Reifendruck des Hinterrads: 7 - 8
atü für Rennreifen; 3,5 - 4 atü für MTB-Reifen. In
speziellen Fällen den vom Hersteller empfohle-
nen Druck einhalten.
• Für einen leiseren Betrieb, bessere Haftung des
Reifens an der Rolle und Verminderung der Vibra-
tionen Slick-Reifen benutzen (auch für Mountain-
bike).
• Den Reifen vor Gebrauch mit Alkohol oder Was-
ser reinigen.
Wenn der Stift des mitgelieferten Schnellspan-
ners mehr als 3 mm aus der Befestigungsmutter
herausragt, den hervorstehenden Teil abschnei-
den (Abb. 4).
4
1 Supercrono HydroMag Dgt.indd 17 05/11/09 12:21
18
4
INTRODUCTION
Vérifiez la présence de toutes les pièces suivantes.
N°1 Unité Hydromag (Réf. A)
N°1 support (Réf.B)
- N°1 axe douille gauche (Réf.C)
- N°1 bague (Réf.D)
- N°1 axe douille droite (Réf.E)
- N°1 levier de commande (Réf.F)
- N°1 base supérieure support unité (Réf.G)
- N°1 base inférieure support unité (Réf.H)
- N°1 vis M6 x45 mm (Réf.I)
- N°1 rondelle Ø6 mm (Réf.L)
- N°1 écrou M6 (Réf.M)
N°1 sachet accessoires unité:
- N°1 clé hexagonale
- N°2 vis M6 x 55 mm (Réf.N)
- N°2 rondelles Ø6 mm (Réf.O)
N°1 déclenchement instantané (Réf.P)
1 console (Rif.Q)
FRANÇAIS
Merci d’avoir acheté Super Crono Hydromag Digital.
IMPORTANT
Ne jamais freiner pendant l’utili-
sation du trainer, ceci endomma-
gerait irréparablement e rouleau
et le pneu.
F
1 Supercrono HydroMag Dgt.indd 18 05/11/09 12:21
19
F
INSTALLATION ORDINATEUR
• Installer l’ordinateur sur le levier de commande
(voir figure suivante).
• Connecter le câble de la partie arrière de l’ordi-
nateur sur le levier de commande.
• Dans le cas ou il n’est pas déjà connecté, insérer
la prise du capteur de vitesse ( il s’agit du câble
provenant de l’unité de résistance) sur le levier de
contrôle.
• S’assurer que le groupe levier de commande
soit parfaitement fixé et que le câble ne gêne pas
les mouvements du cycliste et ceux du vélo (péda-
les, chaîne, etc.).
• A ce stade, on peut effectuer l’entraînement. Il
est possible de modifier la résistance du galet de
roulement en agissant sur le bouton de réglage
situé sur le guidon et voir toutes les données de
votre cession d'entraînement sur l'écran LCD.
UTILISATION DE L'ORDINATEUR
Réglage des données
Pour utiliser correctement le Super Crono Hydromag
Digital, il est préalablement nécessaire d’insérer
toutes les données de ses propres paramètres.
Ceci est possible en partant de SET UP, pour faire
apparaître l’inscription appuyer sur le bouton de
droite (MODE) pendant trois secondes. A ce stade,
l’inscription SET UP apparaît en bas. En cessant
d’appuyer sur SET UP apparaît sur l’écran.
Attention: Le home trainer ne
doit pas tourner ou être utilisé
pour entrer dans l’écran SET UP.
Avant toute chose on doit choisir
l’unité de mesure qui peut être
décimale ou anglo-saxonne. Pour
cela, il suffit d’appuyer sur la
touche gauche (SET). Sur l’écran
apparaissent alternativement
les inscriptions METER (mètres),
KM/H et KILO (kilogramme) ou
FOOT (pieds), K/H (mille) et LB
(livre). Poussant la touche MODE
on confirme l’unité choisie et on passe à l’écran
successif.
Sur le haut de cet écran, on trouvera un numéro à
trois chiffres qui indique notre poids ainsi que ce-
lui du vélo, exprimé dans l’unité de mesure choisie
précédemment. Le poids réglé par le construc-
teur ou la dernière valeur enregistrée apparaîtra.
Pour modifier cette valeur, appuyer sur la touche
SET, pour modifier le numéro qui clignote et la
touche MODE pour confirmer la
valeur choisie et passer au nu-
méro suivant qui commencera
à clignoter. Répéter l’opération
pour insérer tous les numéros
du poids. Appuyer sur la touche
MODE pour confirmer le poids
et passer à l’écran suivant. Sur
cet écran le modèle d'unité de
résistance est spécifié. Sélec-
tionner la valeur ''2'' pour le
Super Crono Hydromag Digital.
Cette valeur devrait également
avoir été pré-initialisée à la production, si ce n'est
pas le cas, appuyer sur le bouton'SET' jusqu'à vi-
sualiser ''2''. Appuyer sur le bouton MODE pour
sortir de l'écran SET UP. Attention: Une valeur
incorrecte comporte une visualisation erronée
des données. Exemple: si on veut insérer comme
unités de mesures Kilomètres, mètres, Kilogram-
mes et comme poids 78 kilogrammes, on devra
effectuer les opérations suivantes.
3
1
2
SET
Ecran pour le choix de lunité de mesure.
1 Supercrono HydroMag Dgt.indd 19 05/11/09 12:21
20
ECRANS
1er écran:
A
Puissance instatanée
B Vitesse instantanée
C Pente
D Distance parcourue
E Durée de la course
F Position du levier
de commande
G Indicateur
2ème écran:
A Puissance moyenne
B Vitesse moyenne
C Pente moyenne
D Distance parcourue
E Durée de la course
F Position du levier de
commande
G Indicateur
3e écran:
A Puissance maximum
B Vitesse maximum
C Gain en élévation
D Distance totale
E Durée totale
F Position du levier de
commande
G Indicateur
F
1
1
Durée de la course. Durée de la course depuis le départ.
1-2
Position du levier de commande. Indique en quelle position se trouve le levier de variation de la résistance de l’unité.
1-2-3
1-2-3
2
% AVG
2
Pente moyenne. Pente moyenne de la course
3
MAX KM/H
3
ELV.G
SYMBOLE ECRAN INFORMATION
Puissance actuelle. Puissance qui se développe au moment où on visualise la valeur
1
Indicateur +/-. indique si la vitesse actuelle est majeure (+)ou mineure
(-) par rapport à la vitesse moyenne.
Distance parcourue. Distance parcourue depuis le début de la course
1-2
1
2
3
4
5
Indicateur . indique si la vitesse actuelle est majeure ( ) ou mineure ( ) par rapport à la vitesse
moyenne.
Puissance moyenne. Puissance moyenne développée depuis le début de la course.
2
Vitesse moyenne. Vitesse moyenne depuis le début de la course.
Puissance maximum. Puissance maximum développée depuis le début de la course
Vitesse maximum. Vitesse maximum obtenue depuis le début de la course.
3
Pente. Indique le dénivelé obtenu durant la course.
3
Distance totale parcourue. Distance totale parcourue avec Digital Mag.
3
Durée totale. Indique le temps total d’utilisation du home trainer
Indicateur de charge de la batterie
1-2-3
DST
TIME
WATT
%
AVG KM/H
MAX WATT
ODO
TOTAL TIME
KM/H-M/H
AVG KM/H-M/H
Vitesse actuelle. Vitesse à laquelle on pédale au moment de la visualisation de la valeur.
Informations disponibles durant la course.
Pour aller sur l’écran SET UP appuyer sur la touche
MODE pendant au moins 3 secondes. Appuyer sur
la touche SET jusqu’à ce qu’apparaisse sur l’écran
METER, KILO et KM/H. Appuyer sur la touche
MODE. Appuyer sur la touche SET jusqu’à ce que
le numéro clignotant (celui plus à droite) devienne
“8”. Appuyer sur la touche MODE. Appuyer sur la
touche SET jusqu’à ce que le numéro qui clignote
(celui au centre) devienne “7”. Appuyer sur la tou-
che MODE. Appuyer sur la touche SET jusqu’à ce
que le numéro qui clignote (celui plus à gauche)
devienne “0”. Appuyer sur la touche MODE.
Appuyer sur la touche SET jusqu’à ce que le nu-
méro qui clignote devienne “2”.
Appuyer sur la touche MODE. Fin des réglages.
Utilisation
Trois différents types d’écrans sont disponibles
durant la course. Chaque écran est divisé en 7 zo-
nes avec des informations qui varient selon l’écran
sur lequel on se trouve.
Durant la course on peut passer d’un écran à l’autre
pour visualiser les données qui nous intéressent le
plus. Pour cela Appuyer sur la touche MODE.
Pendant la course il est possible de varier la
résistance de l’unité, en changeant la position du
levier de commande. Sur l’ordinateur, le numéro
de la position sera mis à jour ainsi que certaines
valeurs représentées sur l’écran. (par exemple: la
pente, etc.).
Démarrage
Pour allumer l’écran, il suffit d’appuyer sur une
des deux touches ADJUST ou MODE ou bien com-
mencer à pédaler.
valeur courante valeur moyenne valeur maximum
1 Supercrono HydroMag Dgt.indd 20 05/11/09 12:21
  • Page 1 1
  • Page 2 2
  • Page 3 3
  • Page 4 4
  • Page 5 5
  • Page 6 6
  • Page 7 7
  • Page 8 8
  • Page 9 9
  • Page 10 10
  • Page 11 11
  • Page 12 12
  • Page 13 13
  • Page 14 14
  • Page 15 15
  • Page 16 16
  • Page 17 17
  • Page 18 18
  • Page 19 19
  • Page 20 20
  • Page 21 21
  • Page 22 22
  • Page 23 23
  • Page 24 24
  • Page 25 25
  • Page 26 26
  • Page 27 27
  • Page 28 28
  • Page 29 29
  • Page 30 30
  • Page 31 31
  • Page 32 32
  • Page 33 33
  • Page 34 34
  • Page 35 35
  • Page 36 36

Elite SUPER CHRONO HYDROMAG DIGITAL Manuale del proprietario

Tipo
Manuale del proprietario
Questo manuale è adatto anche per