
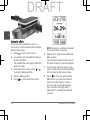
EDGE® EXPLORE 2
Quick Start Manual ............................................. 2
Manuel de démarrage rapide ...................................10
Manuale di avvio rapido........................................19
Schnellstartanleitung ..........................................28
Guía de inicio rápido...........................................37
Manual de início rápido ........................................ 46
DRAFT

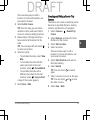
Edge® Explore 2
Quick Start Manual
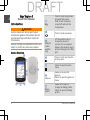
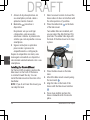
Introduction
WARNING
See the Important Safety and Product
Information guide in the product box for
product warnings and other important
information.
Always consult your physician before you
begin or modify any exercise program.
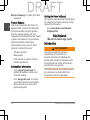
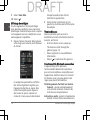
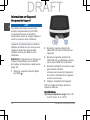
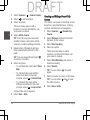
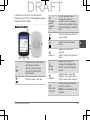
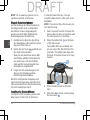
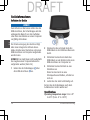
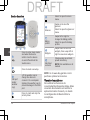
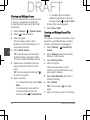
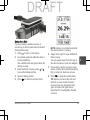
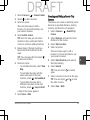
Device Overview
Press to enter sleep mode
and wake the device.
Hold to turn the device
on and off and lock the
touchscreen.
Press to mark a new lap.
USB port
(under
weather
cap)
Lift the weather cap to
charge the device or
connect it to a computer.
Replace the weather cap to
prevent damage to the USB
port.
Press to start and stop the
activity timer.
Select to open the main
menu.
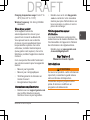
Glances
Swipe up to view the
glances.
Select to open the glance or
menu.
Biking
profile
Swipe left or right to
change the biking profile.
Select to open the biking
profile.
2 Quick Start Manual
EN
DRAFT

Widgets
Swipe down to view the
widgets, then swipe left or
right to view more widgets.
Electrical
contacts
Charge using an external
power accessory.
NOTE: Not available on all
models.
NOTE: Go to www.buy.garmin.com to
purchase optional accessories.
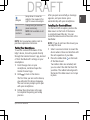
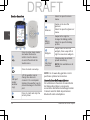
Pairing Your Smartphone
To use the connected features of the
Edge® device, it must be paired directly
through the Garmin Connect™ app, instead
of from the Bluetooth® settings on your
smartphone.
1From the app store on your
smartphone, install and open the
Garmin Connect app.
2Hold to turn on the device.
The first time you turn on the device,
you will select the device language.
The next screen prompts you to pair
with your smartphone.
3Follow the instructions in the app
to complete the pairing and setup
process.
After you pair successfully, a message
appears, and your device syncs
automatically with your smartphone.
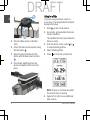
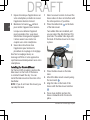
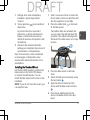
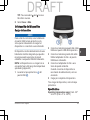
Installing the Standard Mount
For the best GPS reception, position the
bike mount so the front of the device
is oriented toward the sky. You can
install the bike mount on the stem or the
handlebar.
NOTE: If you do not have this mount, you
can skip this task.
1Select a secure location to mount the
device where it does not interfere with
the safe operation of your bike.
2Place the rubber disk on the back
of the bike mount.
Two rubber disks are included, and
you can select the disk that best fits
your bike. The rubber tabs align with
the back of the bike mount so it stays
in place.
Quick Start Manual 3
EN
DRAFT

3Place the bike mount on the bike
stem.
4Attach the bike mount securely using
the two bands .
5Align the tabs on the back of the
device with the bike mount notches
.
6Press down slightly and turn the
device clockwise until it locks into
place.
Going for a Ride
If you are using a wireless sensor or
accessory, it can be paired and activated
during initial setup.
1Hold to turn on the device.
2Go outside, and wait while the device
locates satellites.
The satellite bars turn green when the
device is ready.
3From the home screen, select or
to view the biking profiles.
4Select a biking profile.
5Press to start the activity timer.
NOTE: History is recorded only while
the activity timer is running.
6Swipe left or right to view additional
data screens.
4 Quick Start Manual
EN
DRAFT

You can swipe down from the top of
the data screens to view the widgets.
7If necessary, tap the screen to view
status overlay data (including battery
life) or return to the home screen.
8Press to stop the activity timer.
TIP: Before you save this ride and
share it on your Garmin Connect
account, you can change the ride
type. Accurate ride type data is
important for creating bike friendly
courses.
9Select Save Ride.
10 Select .
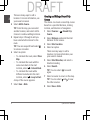
Viewing Widgets
Your device is preloaded with several
widgets, and more are available when you
pair your device with a phone or other
compatible device.
1From the home screen, swipe down
from the top of the screen.
The settings widget appears. A
flashing icon means the device is
searching for a signal. A solid icon
means the signal was found or the
sensor is connected. You can select
any icon to change the settings.
2Swipe left or right to view more
widgets.
Viewing Glances
Glances provide quick access to
health data, activity information, built-in
sensors, and more.
•From the home screen, swipe up.
The device scrolls through the
glances (page2).
• Select a glance to view additional
information.
Quick Start Manual 5
EN
DRAFT

• Select to customize the glances.
Bluetooth Connected Features
The Edge device has several Bluetooth
connected features for your compatible
phone using the Garmin Connect and
Connect IQ™ apps. Go to www.garmin
.com/apps for more information.
Activity uploads to Garmin Connect:
Automatically sends your activity to
Garmin Connect as soon as you finish
recording the activity.
Audio prompts: Allows the Garmin
Connect app to play status
announcements on your phone during
a ride.
Bike alarm: Allows you to enable an
alarm that sounds on the device and
sends an alert to your phone when the
device detects motion.
Connect IQ downloadable features:
Allows you to download Connect IQ
features from the Connect IQ app.
Course downloads from Garmin Connect:
Allows you to search for courses on
Garmin Connect using your phone and
send them to your device.
Find my Edge: Locates your lost Edge
device that is paired with your phone
and currently within range.
Messages: Allows you to reply to an
incoming call or text message with
a preset text message. This feature
is available with compatible Android™
phones.
Notifications: Displays phone
notifications and messages on your
device.
Safety and tracking features: (page6)
Social media interactions: Allows you to
post an update to your favorite social
media website when you upload an
activity to Garmin Connect.
Weather updates: Sends real-time
weather conditions and alerts to your
device.
Safety and Tracking Features
CAUTION
The safety and tracking features are
supplemental features and should not
be relied on as a primary method
to obtain emergency assistance. The
Garmin Connect app does not contact
emergency services on your behalf.
The Edge Explore 2 device has safety and
tracking features that must be set up with
the Garmin Connect app.
6 Quick Start Manual
EN
DRAFT

NOTICE
To use these features, the Edge Explore
2 device must have GPS enabled and
be connected to the Garmin Connect
app using Bluetooth technology. You can
enter emergency contacts in your Garmin
Connect account.
For more information, see your owner's
manual.
Assistance: Allows you to send a
message with your name, LiveTrack
link, and GPS location (if available) to
your emergency contacts.
Incident detection: When the Edge
Explore 2 device detects an incident
during certain outdoor activities, the
device sends an automated message,
LiveTrack link, and GPS location
(if available) to your emergency
contacts.
LiveTrack: Allows friends and family
to follow your races and training
activities in real time. You can invite
followers using email or social media,
allowing them to view your live data
on a web page.
Live Event Sharing: Allows you to send
messages to friends and family
during an event, providing real-time
updates.
NOTE: This feature is available only
if your device is connected to a
compatible Android phone.
GroupTrack: Allows you to keep track
of your connections using LiveTrack
directly on screen and in real time.
Courses
You can send a course from your Garmin
Connect account to your device. After it
is saved to your device, you can navigate
the course on your device. You can also
create and save a custom course directly
on your device.
You can follow a saved course simply
because it is a good route. For example,
you can save and follow a bike-friendly
commute to work.
Planning and Riding a Course
You can create and ride a custom course.
A course is a sequence of waypoints
or locations that leads you to your final
destination.
1Select Courses > > Course Creator.
2Select to add a location.
3Select an option.
Quick Start Manual 7
EN
DRAFT

There are many ways to add a
location. For more information, see
your owner's manual.
4Select Add to Course.
TIP: From the map, you can select
another location, and select Add to
Course to continue adding locations.
5Repeat steps 2 through 4 until you
have selected all locations for the
route.
TIP: You can swipe left and select
to remove a location.
6Select an option:
•To calculate the route, select View
Map.
• To calculate the route with the
same route back to the start
location, select > Out and Back.
•To calculate the route with a
different route back to the start
location, select > Loop to Start.
A map of the course appears.
7Select Save > Ride.
Creating and Riding a Round-Trip
Course
The device can create a round-trip course
based on a specified distance, starting
location, and direction of navigation.
1Select Courses > > Round-Trip
Course.
2Select Distance, and enter the total
distance for the course.
3Select Start Location.
4Select an option.
There are many ways to add a
location. For more information, see
your owner's manual.
5Select Start Direction, and select a
direction heading.
6Select Search.
TIP: You can select to search
again.
7Select a course to view it on the map.
TIP: You can select and to view
the other courses.
8Select Save > Ride.
8 Quick Start Manual
EN
DRAFT

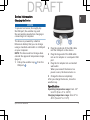
Device Information
Charging the Device
NOTICE
To prevent corrosion, thoroughly dry
the USB port, the weather cap, and
the surrounding area before charging or
connecting to a computer.
The device is powered by a built-in
lithium-ion battery that you can charge
using a standard wall outlet or a USB port
on your computer.
NOTE: The device will not charge when
outside the approved temperature range
(page9).
1Pull up the weather cap from the
USB port .
2Plug the small end of the USB cable
into the USB port on the device.
3Plug the large end of the USB cable
into an AC adapter or a computer USB
port.
4Plug the AC adapter into a standard
wall outlet.
When you connect the device to a
power source, the device turns on.
5Charge the device completely.
After you charge the device, close the
weather cap.
Specifications
Operating temperature range: From -20º
to 60ºC (from -4º to 140ºF)
Charging temperature range: From 0º to
45ºC (from 32º to 113ºF)
Quick Start Manual 9
EN
DRAFT

Wireless frequency: 2.4 GHz @ 20 dBm
maximum
Product Updates
Your device automatically checks for
updates when connected to Bluetooth.
You can manually check for updates
from the system settings. On your
computer, install Garmin Express™ (www
.garmin.com/express). On your phone,
install the Garmin Connect app.
This provides easy access to these
services for Garmin® devices:
• Software updates
• Map updates
• Data uploads to Garmin Connect
• Product registration
Getting More Information
• Go to support.garmin.com for
additional manuals, articles, and
software updates.
• Go to buy.garmin.com, or contact
your Garmin dealer for information
about optional accessories and
replacement parts.
Getting the Owner's Manual
The owner's manual includes instructions
for using device features and accessing
regulatory information.
Go to www.garmin.com/manuals
/EdgeExplore2.
Edge® Explore 2
Manuel de démarrage rapide
Introduction
AVERTISSEMENT
Consultez le guide Informations
importantes sur le produit et la
sécurité inclus dans l'emballage du
produit pour prendre connaissance des
avertissements et autres informations
importantes sur le produit.
Consultez toujours votre médecin avant
de commencer ou de modifier tout
programme d'exercice physique.
10 Manuel de démarrage rapide
FR
DRAFT

Device Overview
Press to enter sleep mode
and wake the device.
Hold to turn the device
on and off and lock the
touchscreen.
Press to mark a new lap.
USB port
(under
weather
cap)
Lift the weather cap to
charge the device or
connect it to a computer.
Replace the weather cap to
prevent damage to the USB
port.
Press to start and stop the
activity timer.
Select to open the main
menu.
Glances
Swipe up to view the
glances.
Select to open the glance or
menu.
Biking
profile
Swipe left or right to
change the biking profile.
Select to open the biking
profile.
Widgets
Swipe down to view the
widgets, then swipe left or
right to view more widgets.
Electrical
contacts
Charge using an external
power accessory.
NOTE: Not available on all
models.
NOTE: Go to www.buy.garmin.com to
purchase optional accessories.
Couplage de votre smartphone
Pour que vous puissiez utiliser les
fonctions connectées de l'appareil Edge,
celui-ci doit être couplé directement via
l'application Garmin Connect et non pas
via les paramètres Bluetooth de votre
smartphone.
Manuel de démarrage rapide 11
FR
DRAFT

1Depuis la boutique d'applications sur
votre smartphone, installez et ouvrez
l'application Garmin Connect.
2Maintenez le bouton enfoncé
pour mettre l'appareil sous tension.
Lorsque vous allumez l'appareil
pour la première fois, vous devez
sélectionner la langue de l'appareil.
L'écran suivant vous invite à le
coupler avec votre smartphone.
3Suivez les instructions dans
l'application pour terminer la
procédure de couplage et de réglage.
Une fois le couplage réussi, un
message s'affiche et votre appareil se
synchronise automatiquement avec votre
smartphone.
Installing the Standard Mount
For the best GPS reception, position the
bike mount so the front of the device
is oriented toward the sky. You can
install the bike mount on the stem or the
handlebar.
NOTE: If you do not have this mount, you
can skip this task.
1Select a secure location to mount the
device where it does not interfere with
the safe operation of your bike.
2Place the rubber disk on the back
of the bike mount.
Two rubber disks are included, and
you can select the disk that best fits
your bike. The rubber tabs align with
the back of the bike mount so it stays
in place.
3Place the bike mount on the bike
stem.
4Attach the bike mount securely using
the two bands .
5Align the tabs on the back of the
device with the bike mount notches
.
6Press down slightly and turn the
device clockwise until it locks into
place.
12 Manuel de démarrage rapide
FR
DRAFT

Going for a Ride
If you are using a wireless sensor or
accessory, it can be paired and activated
during initial setup.
1Hold to turn on the device.
2Go outside, and wait while the device
locates satellites.
The satellite bars turn green when the
device is ready.
3From the home screen, select or
to view the biking profiles.
4Select a biking profile.
5Press to start the activity timer.
NOTE: History is recorded only while
the activity timer is running.
6Swipe left or right to view additional
data screens.
You can swipe down from the top of
the data screens to view the widgets.
7If necessary, tap the screen to view
status overlay data (including battery
life) or return to the home screen.
8Press to stop the activity timer.
TIP: Before you save this ride and
share it on your Garmin Connect
account, you can change the ride
type. Accurate ride type data is
important for creating bike friendly
courses.
Manuel de démarrage rapide 13
FR
DRAFT

9Select Save Ride.
10 Select .
Affichage des widgets
Si votre appareil est fourni préchargé
avec plusieurs widgets, vous pouvez en
télécharger d'autres lorsque vous couplez
votre appareil avec un smartphone ou un
autre appareil compatible.
1Depuis l'écran d'accueil, faites glisser
votre doigt vers le bas à partir du haut
de l'écran.
Le widget des paramètres s'affiche.
Une icône clignotante signifie que
l'appareil recherche un signal. Une
icône fixe signifie que le signal a
été trouvé ou que le capteur est
connecté. Vous pouvez sélectionner
n'importe quelle icône afin de
modifier les paramètres.
2Faites glisser votre doigt vers la
gauche ou la droite pour afficher plus
de widgets.
Viewing Glances
Glances provide quick access to
health data, activity information, built-in
sensors, and more.
•From the home screen, swipe up.
The device scrolls through the
glances (page11).
• Select a glance to view additional
information.
• Select to customize the glances.
Fonctionnalités Bluetooth connectées
L'appareil Edge offre plusieurs
fonctionnalités Bluetooth connectées
pour votre smartphone compatible avec
l'application Garmin Connect et Connect
IQ. Rendez-vous sur www.garmin.com
/apps pour plus d'informations.
Téléchargements d'activité sur Garmin
Connect: envoie automatiquement
votre activité à Garmin Connect dès
la fin de son enregistrement.
Instructions audio: permet à l'application
Garmin Connect de lire des annonces
14 Manuel de démarrage rapide
FR
DRAFT

d'état sur votre smartphone pendant
votre activité.
Alarme de vélo: permet de définir
une alarme qui sonne sur l'appareil
et envoie une alerte à votre
smartphone quand l'appareil détecte
un mouvement.
Fonctions Connect IQ téléchargeables:
permet de télécharger des fonctions
Connect IQ à partir de l'application
Connect IQ.
Téléchargements de parcours depuis
Garmin Connect: permet de
rechercher des parcours sur Garmin
Connect à l'aide de votre smartphone
et de les envoyer vers votre appareil.
Détecter mon Edge: localise votre
appareil Edge égaré qui est
couplé avec votre smartphone et
actuellement à sa portée.
Messages: permet de répondre à un
appel entrant ou à un SMS à l'aide de
messages prérédigés. Cette fonction
est disponible avec les smartphones
Android compatibles.
Notifications: affiche des notifications et
des messages liés à votre téléphone
sur votre appareil.
Fonctions de suivi et de sécurité:
(page15)
Interactions avec les réseaux sociaux:
vous permet de poster une mise à
jour sur votre réseau social préféré
lorsque vous téléchargez une activité
sur Garmin Connect.
Bulletins météo: envoie les conditions
météo en temps réel et des alertes à
votre appareil.
Fonctions de suivi et de sécurité
ATTENTION
Les fonctions de sécurité et de suivi
sont des fonctions complémentaires qui
ne doivent pas être utilisées en premier
pour solliciter une aide d'urgence.
L'application Garmin Connect ne contacte
aucun service d'urgence à votre place.
L'appareil Edge Explore 2 intègre des
fonctions de suivi et de sécurité que
vous devez configurer dans l'application
Garmin Connect.
AVIS
Pour utiliser ces fonctions, vous devez
activer le GPS de l'appareil Edge Explore
2 et le connecter à l'application Garmin
Connect via la technologie Bluetooth.
Manuel de démarrage rapide 15
FR
DRAFT

Vous pouvez indiquer des contacts
d'urgence sur votre compte Garmin
Connect.
Pour plus d'informations, reportez-vous
au manuel d'utilisation.
Assistance: permet d'envoyer un
message contenant votre nom, un lien
LiveTrack et votre position GPS à vos
contacts d'urgence (si disponibles).
Détection d'incident: quand l'appareil
Edge Explore 2 détecte un incident
pendant certaines activités de plein
air, il envoie un message automatisé,
un lien LiveTrack ainsi que votre
position GPS (si disponible) à vos
contacts d'urgence.
LiveTrack: permet à vos amis et à
votre famille de suivre vos courses
et vos entraînements en temps réel.
Vous pouvez inviter des abonnés par
e-mail ou sur les réseaux sociaux. Ils
pourront ainsi consulter vos données
en temps réel sur une page web.
Live Event Sharing: permet d'envoyer
des messages à vos amis et à
votre famille pendant un événement
pour leur fournir des informations en
temps réel.
REMARQUE: cette fonction n'est
disponible que si votre appareil
est connecté à un smartphone
compatible doté de la technologie
Android.
GroupTrack: vous permet de suivre vos
contacts en temps réel sur votre
écran à l'aide de LiveTrack.
Parcours
Vous pouvez envoyer un parcours depuis
votre compte Garmin Connect vers votre
appareil. Une fois le parcours enregistré
sur votre appareil, vous pouvez vous
laisser guider par votre appareil. Vous
pouvez également créer et enregistrer
directement un parcours personnalisé sur
votre appareil.
Vous pouvez suivre un parcours
enregistré simplement parce qu'il s'agit
d'un bon itinéraire. Par exemple, vous
pouvez enregistrer et suivre un trajet
adapté aux vélos pour aller à votre
travail.
Planning and Riding a Course
You can create and ride a custom course.
A course is a sequence of waypoints
or locations that leads you to your final
destination.
16 Manuel de démarrage rapide
FR
DRAFT

1Select Courses > > Course Creator.
2Select to add a location.
3Select an option.
There are many ways to add a
location. For more information, see
your owner's manual.
4Select Add to Course.
TIP: From the map, you can select
another location, and select Add to
Course to continue adding locations.
5Repeat steps 2 through 4 until you
have selected all locations for the
route.
TIP: You can swipe left and select
to remove a location.
6Select an option:
•To calculate the route, select View
Map.
• To calculate the route with the
same route back to the start
location, select > Out and Back.
•To calculate the route with a
different route back to the start
location, select > Loop to Start.
A map of the course appears.
7Select Save > Ride.
Creating and Riding a Round-Trip
Course
The device can create a round-trip course
based on a specified distance, starting
location, and direction of navigation.
1Select Courses > > Round-Trip
Course.
2Select Distance, and enter the total
distance for the course.
3Select Start Location.
4Select an option.
There are many ways to add a
location. For more information, see
your owner's manual.
5Select Start Direction, and select a
direction heading.
6Select Search.
TIP: You can select to search
again.
7Select a course to view it on the map.
TIP: You can select and to view
the other courses.
8Select Save > Ride.
Manuel de démarrage rapide 17
FR
DRAFT

Informations sur l'appareil
Chargement de l'appareil
AVIS
Pour éviter tout risque de corrosion,
essuyez soigneusement le port USB,
le capuchon étanche et la surface
environnante avant de charger l'appareil
ou de le connecter à un ordinateur.
L'appareil est alimenté par une batterie
intégrée au lithium-ion que vous pouvez
charger à l'aide d'une prise murale
standard ou d'un port USB de votre
ordinateur.
REMARQUE: l'appareil ne se charge pas
lorsque la température est en dehors
de la plage de températures approuvées
(page18).
1Retirez le capuchon étanche du
port USB .
2Branchez la petite extrémité du
câbleUSB sur le port USB situé sur
l'appareil.
3Branchez la grande extrémité du
câbleUSB sur un adaptateur secteur
ou sur le port USB d'un ordinateur.
4Branchez l'adaptateur secteur sur une
prise murale standard.
Lorsque vous connectez l'appareil à
une source d'alimentation, l'appareil
se met sous tension.
5Chargez complètement l'appareil.
Une fois l'appareil chargé, fermez le
capuchon étanche.
Specifications
Operating temperature range: From -20º
to 60ºC (from -4º to 140ºF)
18 Manuel de démarrage rapide
FR
DRAFT

Charging temperature range: From 0º to
45ºC (from 32º to 113ºF)
Wireless frequency: 2.4 GHz @ 20 dBm
maximum
Mises à jour produit
Votre appareil recherche
automatiquement les mises à jour
quand il est connecté au Bluetooth.
Vous pouvez lancer une recherche
de mises à jour manuellement dans
les paramètres système. Sur votre
ordinateur, installez Garmin Express
(www.garmin.com/express). Sur votre
téléphone, installez l'application Garmin
Connect.
Ceci vous permet d'accéder facilement
aux services suivants pour les appareils
Garmin :
• Mises à jour logicielles
• Mises à jour cartographiques
• Téléchargements de données sur
Garmin Connect
• Enregistrement du produit
Informations complémentaires
• Rendez-vous sur support.garmin.com
pour profiter d'autres manuels,
articles et mises à jour logicielles.
• Rendez-vous sur le site buy.garmin
.com ou contactez votre revendeur
Garmin pour plus d'informations sur
les accessoires en option et sur les
pièces de rechange.
Téléchargement du manuel
d'utilisation
Le manuel d'utilisation comprend des
instructions sur la manière d'utiliser des
fonctionnalités de l'appareil et d'obtenir
des informations de réglementation.
Rendez-vous sur www.garmin.com
/manuals/EdgeExplore2.
Edge® Explore 2
Manuale di avvio rapido
Introduzione
AVVERTENZA
Per avvisi sul prodotto e altre informazioni
importanti, consultare la guida inclusa
nella confezione del dispositivo.
Consultare sempre il proprio medico
prima di iniziare o modificare un
programma di allenamento.
Manuale di avvio rapido 19
IT
DRAFT

Device Overview
Press to enter sleep mode
and wake the device.
Hold to turn the device
on and off and lock the
touchscreen.
Press to mark a new lap.
USB port
(under
weather
cap)
Lift the weather cap to
charge the device or
connect it to a computer.
Replace the weather cap to
prevent damage to the USB
port.
Press to start and stop the
activity timer.
Select to open the main
menu.
Glances
Swipe up to view the
glances.
Select to open the glance or
menu.
Biking
profile
Swipe left or right to
change the biking profile.
Select to open the biking
profile.
Widgets
Swipe down to view the
widgets, then swipe left or
right to view more widgets.
Electrical
contacts
Charge using an external
power accessory.
NOTE: Not available on all
models.
NOTE: Go to www.buy.garmin.com to
purchase optional accessories.
Associazione dello smartphone
Per utilizzare le funzioni di connettività
del dispositivo Edge è necessario
associarlo direttamente dall'app Garmin
Connect anziché dalle impostazioni
Bluetooth sullo smartphone.
20 Manuale di avvio rapido
IT
DRAFT
La pagina si sta caricando...
La pagina si sta caricando...
La pagina si sta caricando...
La pagina si sta caricando...
La pagina si sta caricando...
La pagina si sta caricando...
La pagina si sta caricando...
La pagina si sta caricando...
La pagina si sta caricando...
La pagina si sta caricando...
La pagina si sta caricando...
La pagina si sta caricando...
La pagina si sta caricando...
La pagina si sta caricando...
La pagina si sta caricando...
La pagina si sta caricando...
La pagina si sta caricando...
La pagina si sta caricando...
La pagina si sta caricando...
La pagina si sta caricando...
La pagina si sta caricando...
La pagina si sta caricando...
La pagina si sta caricando...
La pagina si sta caricando...
La pagina si sta caricando...
La pagina si sta caricando...
La pagina si sta caricando...
La pagina si sta caricando...
La pagina si sta caricando...
La pagina si sta caricando...
La pagina si sta caricando...
La pagina si sta caricando...
La pagina si sta caricando...
La pagina si sta caricando...
La pagina si sta caricando...
La pagina si sta caricando...
-
 1
1
-
 2
2
-
 3
3
-
 4
4
-
 5
5
-
 6
6
-
 7
7
-
 8
8
-
 9
9
-
 10
10
-
 11
11
-
 12
12
-
 13
13
-
 14
14
-
 15
15
-
 16
16
-
 17
17
-
 18
18
-
 19
19
-
 20
20
-
 21
21
-
 22
22
-
 23
23
-
 24
24
-
 25
25
-
 26
26
-
 27
27
-
 28
28
-
 29
29
-
 30
30
-
 31
31
-
 32
32
-
 33
33
-
 34
34
-
 35
35
-
 36
36
-
 37
37
-
 38
38
-
 39
39
-
 40
40
-
 41
41
-
 42
42
-
 43
43
-
 44
44
-
 45
45
-
 46
46
-
 47
47
-
 48
48
-
 49
49
-
 50
50
-
 51
51
-
 52
52
-
 53
53
-
 54
54
-
 55
55
-
 56
56


in altre lingue
- English: Garmin Edge Explore 2 User guide
- français: Garmin Edge Explore 2 Mode d'emploi
- español: Garmin Edge Explore 2 Guía del usuario
- português: Garmin Edge Explore 2 Guia de usuario
Documenti correlati
-
Garmin Enduro 2 Manuale utente
-
Garmin inReach Mini 2 Manuale del proprietario
-
Garmin Instinct Crossover Series Rugged Hybrid Smartwatch Manuale utente
-
Garmin dēzlCam™ 785 LMT-S Manuale utente
-
Garmin fleet™ 790 Manuale del proprietario
-
Garmin Vivomove Luxe Guida Rapida
-
-
Garmin Alpha® 50 Manuale del proprietario
-
Garmin Drive 52 Manuale utente