La pagina si sta caricando...

GB
F
D
2
I
GENERALITA’
1.1 INFORMAZIONI
GENERALI
1.2 SIMBOLOGIA
1.2.1 Pittogrammi redazionali
1.2.2 Pittogrammi relativi alla
sicurezza
1.3 USO PREVISTO
1.4 ZONE DI RISCHIO
1.5 LISTA DEGLI
ACCESSORI FORNITI
1.5.1 Immagazzinamento
1.5.2 Ricevimento e disimballo
INSTALLAZIONE
2.1 MODALITÀ
D’INSTALLAZIONE
2.2 SCELTA DELLA
POSIZIONE DELL’UNITÀ
INTERNA
2.3 MONTAGGIO
DELL’UNITÀ INTERNA
2.3.1 Montaggio della piastra di
¿VVDJJLR
2.3.2 Staffa
2.3.3 Esecuzione foro passaggio
tubi
2.3.4 Tubo di connessione
2.3.5 Installazione unità interna
2.4 MONTAGGIO
DELL’UNITÁ ESTERNA
2.4.1 Scelta della posizione
dell’unità esterna
2.4.2 Avvertenze di montaggio
2.4.3 Apparecchi a pompa di
calore
2.4.4 Montaggio unità esterna
2.4.5 Esecuzione, posa ed
allacciamenti delle linee
frigorifere
3URYHHYHUL¿FKH
2.4.7 Vuoto impianto
2.4.8 Riempimento impianto
2.4.9 Allacciamento della linea di
scarico condensa
2.4.10 Allacciamenti elettrici
2.4.11 Connessione del cavo
all’unità esterna
2.4.12 Alimentazione elettrica
2.4.13 Consegna dell’impianto
USO E MANUTENZIONE (parte
utente)
3.1 USO DEL
TELECOMANDO
3.1.1 Inserimento delle batterie
3.1.2 Sostituzione delle batterie
3.1.3 Posizione del telecomando
3.2 COMPONENTI DEL
SISTEMA
6
16
16
16
18
18
20
22
22
26
28
32
32
32
32
34
36
38
38
42
44
44
46
52
54
54
58
60
62
64
66
68
70
70
74
76
GENERALITES
1.1 INFORMATIONS
GÉNÉRALES
1.2 SYMBOLOGIE
1.2.1
Pictogrammes rédactionnels
1.2.2 Pictogrammes concernant
la sécurité
1.3 UTILISATION PRÉVUE
1.4 ZONES À RISQUE
1.5 LISTE DES
ACCESSOIRES FOURNIS
1.5.1 Stockage
1.5.2 Réception et déballage
INSTALLATION
2.1 MODE D’INSTALLATION
2.2 CHOIX DE LA POSITION
DE L’UNITE INTERIEURE
2.3 MONTAGE DE L’UNITE
INTERIEURE
2.3.1 Montage de la plaque de
¿[DWLRQ
2.3.2 Etrier
([pFXWLRQGXWURXSRXUOH
SDVVDJHGHVWX\DX[
2.3.4 Tube de raccordement
2.3.5 Installation unité interne
2.4 MONTAGE DE L’UNITE
EXTERIEURE
&KRL[GHODSRVLWLRQGH
O¶XQLWpH[WpULHXUH
2.4.2 Précautions pour le
montage
2.4.3 Appareils à pompe à
chaleur
0RQWDJHXQLWpH[WpULHXUH
([pFXWLRQSRVHHW
branchements des
FRQGXLWVIULJRUL¿TXHV
(VVDLVHWYpUL¿FDWLRQV
2.4.7 Mise sous vide de
l’installation
2.4.8 Remplissage de
l’installation
2.4.9 Branchement de la
conduite d’évacuation du
condensat
2.4.10 Branchements électriques
2.4.11 Raccordement du câble à
O¶XQLWpH[WHUQH
2.4.12 Alimentation électrique
2.4.13 Livraison de l’installation à
l’utilisateur
MODE D’EMPLOI ET ENTRETIEN
(partie utilisateur)
3.1 MODE D’EMPLOI DE LA
TELECOMMANDE
3.1.1 Mise en place des piles
3.1.2 Remplacement des piles
3.1.3 Position de la
télécommande
3.2 COMPOSANTS DU
SYSTEME
ALLGEMEINES
1.1 ALLGEMEINE HINWEISE
1.2 BILDSYMBOLE
1.2.1 Bildsymbole
1.2.2 Bildsymbole zur Sicherheit
1.3 BEST
IMMUNGS-GEMÄSSE
VERWENDUNG
1.4 GEFAHRENBEREICHE
1.5
LISTE DER GELIEFERTEN
ZUBEHÖRS
1.5.1 Lagerung
1.5.2 Erhalt und Auspacken des
Gerätes
INSTALLATION
2.1 HINWEISE ZUR
INSTALLATION
2.2 POSITIONIERUNG DER
INNENEINHEIT
2.3 MONTAGE DER
INNENEINHEIT
2.3.1 Montage der Befestigungs-
platte
2.3.2 Haltebügel
2.3.3 Bohrung für das
Durchführen der Rohre
2.3.4 Anschlussschlauch
2.3.5
Installation der Inneneinheit
2.4 MONTAGE DER
AUSSENEINHEIT
2.4.1 Positionierung der
Außeneinheit
2.4.2 Hinweise zur Montage
2.4.3 Geräte mit Wärmepumpe
2.4.4 Montage der Außeneinheit
2.4.5 Verlegung und Anschluss
der Kühlleitungen
2.4.6 Überprüfungen
2.4.7 Vakuumerzeugung in der
Anlage
2.4.8 Füllung der Anlage
2.4.9 Anschluss der
Kondenswas-serableitung
2.4.10 Elektrische Anschlüsse
2.4.11 Anschluss des Kabels an
die Außeneinheit
2.4.12 Stromversorgung
2.4.13 Übergabe der Anlage
BEDIENUNG UND WARTUNG
(Benutzer)
3.1 BENUTZUNG DER
FERNBEDIENUNG
3.1.1 Einlegen der Batterien
3.1.2 Austausch der Batterien
3.1.3 Position der
Fernbedienung
3.2 SYSTEMKOMPONENTEN
GENERAL INFORMATION
1.1 GENERAL INFORMATION
1.2 SYMBOLS
1.2.1 Editorial pictograms
1.2.2 Safety pictograms
1.3 PROPER USE
1.4 HAZARDOUS ZONES
1.5 LIST OF ACCESSORIES
SUPPLIED
1.5.1 Storage
1.5.2 Receipt and unpacking
INSTALLATION
2.1 INSTRUCTIONS FOR
INSTALLATION
2.2 SELECTION OF
POSITION OF THE
INSIDE UNIT
2.3 INSTALLATION OF THE
INSIDE UNIT
2.3.1 Installation of fastening
plate
2.3.2 Brace
2.3.3 Drilling pipe passage holes
2.3.4 Connective pipe
2.3.5 Indoor unit installation
2.4 INSTALLATION OF
OUTSIDE UNIT
2.4.1 Selection of position for
outside unit
2.4.2 Instructions for installation
2.4.3 Air-conditioner with heat
pump
2.4.4 Installation of outside unit
2.4.5 Installation and connection
of cooling lines
2.4.6 Tests and inspection
2.4.7 System vacuum
2.4.8 Filling the system
2.4.9 Connection of
condensation discharge
line
2.4.10 Electric connections
2.4.11 Connect the cable to the
outdoor unit
2.4.12 Power supply
2.4.13 Delivery of the system
USE AND MAINTENANCE (for
the user)
3.1 USE OF THE REMOTE
CONTROL
3.1.1 Insertion of batteries
3.1.2 Replacement of batteries
3.1.3 Location of the remote
controller
3.2 COMPONENTS OF THE
SYSTEM
La pagina si sta caricando...

GB
F
D
4
I
3.3 INDICATORI DI
FUNZIONE SUL DISPLAY
DELL’UNITA’ INTERNA
(solo per modelli
INVERTER)
3.4 DESCRIZIONE DEL
TELECOMANDO
3.4.1 Indicatori sul telecomando
3.4.2 Descrizione dei pulsanti
3.5 PROGRAMMAZIONE
3.5.1 Funzionamento automatico
3.5.2 Funzionamento in
Raffreddamento/
Riscaldamento/Solo
ventilazione
3.6 REGOLAZIONE DELLA
DIREZIONE DELL’ARIA
3.6.1 Regolazione della
direzione verticale dell’aria
(alto - basso)
3.7 DEUMIDIFICAZIONE
3.8 FUNZIONAMENTO CON
TIMER
3.8.1 Esempio di settaggio del
TIMER
3.8.2 Esempio di impostazione
del TIMER
3.9 REGOLAZIONE
DELL’OROLOGIO
3.10 FUNZIONAMENTO
MANUALE
3.11 MANUTENZIONE
E PULIZIA DEL
CLIMATIZZATORE
3.11.1 Pulizia dell’unità interna e
del telecomando
3XOL]LDGHO¿OWURGHOO¶DULD
3.12 MANUTENZIONE
3.13
CONSIGLI PER IL
RISPARMIO ENERGETICO
3.14 ASPETTI FUNZIONALI
DA NON INTERPRETARE
COME INCONVENIENTI
4.1 SCHEMA ELETTRICO
DELL’UNITÀ INTERNA
MODELLO 9 E 12
4.2 SCHEMA ELETTRICO
DELL’UNITÀ ESTERNA
MODELLO 9
4.3 SCHEMA ELETTRICO
DELL’UNITÀ ESTERNA
MODELLO 12
4.4 SCHEMA ELETTRICO
DELL’UNITÀ INTERNA
MODELLO 18 E 24
4.5 SCHEMA ELETTRICO
DELL’UNITÀ ESTERNA
MODELLO 18
4.6 SCHEMA ELETTRICO
DELL’UNITÀ ESTERNA
MODELLO 24
CARATTERISTICHE TECNICHE
SUGGERIMENTI PER
L’ELIMINAZIONE GUASTI
78
80
80
84
94
94
96
98
98
102
104
106
110
112
116
118
118
120
122
124
124
132
132
134
136
136
138
140
144
3.3
INDICATEURS DE
FONCTION SUR
L’AFFICHEUR DE L’UNITE
INTERNE (uniquement pour
modèles à INVERSEUR)
3.4 DESCRIPTION DE LA
TELECOMMANDE
,QGLFDWHXUV¿JXUDQWVXUOD
télécommande
3.4.2 Description des boutons
3.5 PROGRAMMATION
3.5.1
Fonctionnement automatique
3.5.2 Fonctionnement en
mode Refroidissement/
Chauffage/Ventilation
seule
3.6 REGLAGE DE LA
DIRECTION DE L’AIR
3.6.1 Réglage de la direction
verticale de l’air (haut -
bas)
3.7 DESHUMIDIFICATION
3.8 FONCTIONNEMENT
AVEC TEMPORISATEUR
([HPSOHGHUpJODJHGX
TEMPORISATEUR
([HPSOHGHUpJODJHGX
TEMPORISATEUR
3.9 REGLAGE DE
L’HORLOGE
3.10 FONCTIONNEMENT
MANUEL
3.11 ENTRETIEN ET
NETTOYAGE DU
CLIMATISEUR
3.11.1
Nettoyage de l’unité interne
et de la télécommande
1HWWR\DJHGX¿OWUHjDLU
3.12 ENTRETIEN
3.13 CONSEILS POUR
L’ECONOMIE D’ENERGIE
3.14
ASPECTS
FONCTIONNELS A NE PAS
INTERPRETER COMME
INCONVENIENTS
4.1
SCHEMA ELECTRIQUE
DE L’UNITE INTERNE
MODELE 9 ET 12
4.2
SCHEMA ELECTRIQUE
DE L’UNITE EXTERNE
MODELE 9
4.3
SCHEMA ELECTRIQUE
DE L’UNITE EXTERNE
MODELE 12
4.4
SCHEMA ELECTRIQUE
DE L’UNITE INTERNE
MODELE 18 ET 24
4.5
SCHEMA ELECTRIQUE
DE L’UNITE EXTERNE
MODELE 18
4.6
SCHEMA ELECTRIQUE
DE L’UNITE EXTERNE
MODELE 24
CARACTERISTIQUES
SUGGESTIONS POUR
L’ELIMINATION DES PANNES
3.3 FUNKTIONSANZEIGEN
AUF DEM DISPLAY DER
INNENEINHEIT (nur für
INVERTER-Modelle)
3.4 BESCHREIBUNG DER
FERNBEDIENUNG
3.4.1 Anzeigen auf der
Fernbedienung
3.4.2 Beschreibung der Taster
3.5 PROGRAMMIERUNG
3.5.1 Automatikbetrieb
3.5.2 Betrieb im Modus Kühlung/
Heizung/Nur Belüftung
3.6 REGELUNGDER
LUFTSTRÖMUNGSRICHTUNG
3.6.1 Regelung der vertikalen
Luftströmungsrichtung
(oben - unten)
3.7 ENTFEUCHTEN
3.8 BETRIEB MIT TIMER
3.8.1 Beispiele für TIMER-
einstellungen
3.8.2 Beispiele für TIMER-
einstellungen
3.9 EINSTELLUNG DER UHR
3.10 HANDBETRIEB
3.11 WARTUNG UND
REINIGUNG DES
KLIMAGERÄTES
3.11.1 Reinigung der Inneneinheit
und der Fernbedienung
5HLQLJXQJGHV/XIW¿OWHUV
3.12 WARTUNG
3.13 TIPPS ZUM
ENERGIESPAREN
3.14 FUNKTIONALE
ASPEKTE, DIE NICHT
ALS STÖRUNGEN ZU
VERSTEHEN SIND
4.1
ELEKTRISCHER
SCHALTPLAN DER
INNENEINHEIT MODELL 9
UND 12
4.2
ELEKTRISCHER
SCHALTPLAN DER
AUSSENEINHEIT
MODELL 9
4.3
ELEKTRISCHER
SCHALTPLAN DER
AUSSENEINHEIT MODELL
12
4.4
ELEKTRISCHER
SCHALTPLAN DER
INNENEINHEIT MODELL 18
UND 24
4.5
ELEKTRISCHER
SCHALTPLAN DER
AUSSENEINHEIT MODELL
18
4.6
ELEKTRISCHER
SCHALTPLAN DER
AUSSENEINHEIT MODELL
24
TECHNISCHE MERKMALE
HINWEISE ZU
FEHLERBEHEBUNG
3.3 FUNCTION INDICATORS
ON INDOOR UNIT
DISPLAY PANEL (only
for INVERTER models)
3.4 ESCRIPTION OF
REMOTE CONTROL
3.4.1 Indicators on remote
controller
3.4.2 Description of buttons
3.5 PROGRAMMING
3.5.1 Automatic operation
3.5.2 Cooling/Heating/Fan only
operation
3.6 ADJUSTING AIR FLOW
DIRECTION
3.6.1 Adjusting the Vertical Air
Flow Direction (up - down)
3.7 DRYING OPERATION
3.8 TIMER OPERATION
([DPSOHRIWLPHUVHWWLQJ
([DPSOHRIWLPHUVHWWLQJ
3.9 SETTING THE CLOCK
3.10 MANUAL OPERATION
3.11 MAINTENANCE AND
CLEANING OF THE AIR-
CONDITIONER
3.11.1 Cleaning the indoor unit
and remote controller
&OHDQLQJWKHDLU¿OWHU
3.12 MAINTENANCE
3.13 RECOMMENDATIONS
FOR ENERGY SAVINGS
3.14 FUNCTIONAL ASPECTS
NOT TO BE MISTAKEN
FOR ANOMALIES
4.1 9 AND 12 MODEL
INTERNAL UNIT WIRING
DIAGRAM
4.2 9 MODEL EXTERNAL
UNIT WIRING DIAGRAM
4.3 12 MODEL EXTERNAL
UNIT WIRING DIAGRAM
4.4 18 AND 24 MODEL
INTERNAL UNIT WIRING
DIAGRAM
4.5 18 MODEL EXTERNAL
UNIT WIRING DIAGRAM
4.6 24 MODEL EXTERNAL
UNIT WIRING DIAGRAM
TECHNICAL FEATURES
TROUBLESHOOTING TIPS
La pagina si sta caricando...

GB
F
D
6
I
1
GENERALITA’
INFORMAZIONI GENERALI
Documento riservato ai termini di
legge con divieto di riproduzione o di
trasmissione a terzi senza esplicita
autorizzazione della ditta OLIMPIA
SPLENDID.
Le macchine possono subire
aggiornamenti e quindi presentare
SDUWLFRODULGLYHUVLGDTXHOOLUDI¿JXUDWL
senza per questo costituire
pregiudizio per i testi contenuti in
questo manuale.
Leggere attentamente il
presente manuale prima
di procedere con qualsiasi
operazione (installazione,
manutenzione, uso) ed attenersi
scrupolosamente a quanto
descritto nei singoli capitoli.
LA DITTA COSTRUTTRICE NON
SI ASSUME RESPONSABILITÀ
PER DANNI A PERSONE O COSE
DERIVANTI DALLA MANCATA
OSSERVANZA DELLE NORME
CONTENUTE NEL PRESENTE
LIBRETTO.
La ditta costruttrice si riserva
LOGLULWWRGLDSSRUWDUHPRGL¿FKH
in qualsiasi momento ai propri
modelli, fermo restando le
FDUDWWHULVWLFKH HVVHQ]LDOL
descritte nel presente manuale.
L’installazione e la manutenzione
GL DSSDUHFFKLDWXUH SHU OD
climatizzazione come la presente
potrebbero risultare pericolose
in quanto all’interno di questi
DSSDUHFFKLqSUHVHQWHXQJDV
refrigerante sotto pressione
e componenti elettrici sotto
tensione.
Pertanto l’installazione, il primo
avviamento e le successive
fasi di manutenzione devono
essere eseguite esclusivamente
da personale autorizzato e
TXDOL¿FDWR
Questa unità è conforme alle
direttive Europee ECC/73/23,
ECC/89/336, ECC 2002/96, ECC
HVXFFHVVLYHPRGL¿FD]LRQL
GENERAL INFORMATION
GENERAL INFORMATION
This document is restricted in use to
the terms of the law and may not be
copied or transferred to third parties
ZLWKRXWWKH H[SUHVV DXWKRUL]DWLRQ
RI WKH PDQXIDFWXUHU OLIMPIA
SPLENDID.
Our machines are subject to
change and some parts may appear
GLIIHUHQWIURPWKHRQHVVKRZQKHUH
ZLWKRXWWKLVDIIHFWLQJWKHWH[WRIWKH
manual in any way.
Read this manual carefully
before performing any operation
(installation, maintenance, use)
and follow the instructions
contained in each chapter.
THE MANUFACTURER IS NOT
RESPONSIBLE FOR DAMAGES
TO PERSONS OR PROPERTY
CAUSED BY FAILURE TO
FOLLOW THE INSTRUCTIONS
IN THIS MANUAL.
The manufacturer reserves the
right to make any changes it
deems advisable to its models,
although the essential features
described in this manual remain
the same.
The installation and maintenance
of air-conditioners like this one
may be hazardous as they contain
a cooling gas under pressure as
well as powered parts.
Therefore, the installation,
first startup and subsequent
maintenance should be carried
out exclusively by authorized,
TXDOL¿HGSHUVRQQHO
This unit complies with European
'LUHFWLYHV(&&(&&
(&& (&& DQG
subsequent amendments.
GENERALITES
INFORMATIONS GÉNÉRALES
'RFXPHQWUpVHUYpDX[WHUPHVGHOD
loi avec interdiction de reproduction
ou de transmission à tiers sans
O¶DXWRULVDWLRQH[SUHVVHGHODVRFLpWp
OLIMPIA SPLENDID.
Les machines peuvent subir des
mises à jour et par conséquent
présenter des éléments différents
GHFHX[TXLVRQWUHSUpVHQWpVVDQV
que cela constitue pour autant un
SUpMXGLFHSRXUOHVWH[WHVFRQWHQXV
dans ce manuel.
Lire attentivement le présent
manuel avant de procéder à
toute opération (installation,
entretien, utilisation) et suivre
scrupuleusement ce qui est
GpFULWGDQVFKDFXQGHVFKDSLWUHV
LE FABRICANT DECLINE TOUTE
RESPONSABILITE EN CAS DE
DOMMAGES AUX PERSONNES
OU AUX BIENS DERIVANT DU
NON-RESPECT DES NORMES
CONTENUES DANS LE PRESENT
LIVRET.
Le fabricant se réserve le droit
d’apporter à tout moment des
modifications à ces modèles,
tout en conservant les
caractéristiques essentielles
décrites dans le présent manuel.
L’installation et l’entretien
d’appareils pour la
climatisation comme celui
qui est décrit dans ce manuel
pourraient être dangereux
étant donné qu’il se trouve à
l’intérieur de ces appareils un gaz
frigorigène sous pression ainsi
que des composants électriques
sous tension.
Par conséquent l’installation, la
première mise en route et les
SKDVHVVXFFHVVLYHVG¶HQWUHWLHQ
doivent être effectuées
exclusivement par un personnel
DJUppHWTXDOL¿p
&HWWH XQLWp HVW FRQIRUPH DX[
directives Européennes ECC/73/23,
ECC/89/336, ECC 2002/96,
ECC 2001/95 et modifications
successives.
ALLGEMEINES
ALLGEMEINE HINWEISE
Laut Gesetz ist dies ein vertrauliches
'RNXPHQWGDKHUJLOWGDV9HUERWGHU
Vervielfältigung oder Übermittlung
an Dritte ohne ausdrückliche
Genehmigung der Firma OLIMPIA
SPLENDID.
An den Geräten können technische
Neuerungen vorgenommen
ZHUGHQ GK (LQ]HOWHLOH N|QQHQ
u.U. anders aussehen als auf
GHQ $EELOGXQJHQZDVMHGRFKGLH
Gültigkeit der Anweisungen in diesem
Benutzerhandbuch in keiner Weise
beeinträchtigt.
Bevor Sie mit einer Tätigkeit
beginnen (Installation,
Instandhaltung, Gebrauch), lesen
Sie aufmerksam das vorliegende
Benutzerhandbuch und halten
Sie sich strengstens an die in den
einzelnen Kapiteln dargelegten
Anweisungen.
DIE HERSTELLERFIRMA
ÜBERNIMMT KEINERLEI
VERANTWORTUNG FÜR SCHÄDEN
AN PERSONEN ODER SACHEN,
DIE DURCH NICHTBEACHTUNG
DER IM VORLIEGENDEN
BENUTZERHANDBUCH
ENTHALTENEN
SICHERHEITSVORSCHRIFTEN
ENTSTEHEN.
Die Herstellerfirma behält
sich das Recht vor, an
ihren Modellen jederzeit
Veränderungen vorzunehmen,
wobei die wesentlichen im
vorliegenden Benutzerhandbuch
beschriebenen
Geräteeigenschaften unverändert
bleiben.
Die Installation und
Instandhaltung von Klimaanlagen
wie der hier beschriebenen
können gefährlich sein, da
sich im Inneren der Anlagen
ein unter Druck stehendes
.KOJDVEH¿QGHWXQGVLH]XGHP
elektrische Bauteile enthalten,
die unter Spannung stehen.
Daher dürfen die Installation,
die erste Inbetriebsetzung
und die nachfolgenden
Instandhaltungsarbeiten
ausschließlich von autorisiertem
und qualifiziertem Personal
durchgeführt werden.
Dieses Gert entspricht den
europäischen Richtlinien
(&& (&& (&&
(&&XQGGHQ
darauffolgenden Änderungen.
1.1
La pagina si sta caricando...

GB
F
D
8
I
1
Failing to comply with the
instructions contained in this
PDQXDODQGXVLQJWKHXQLWZLWK
WHPSHUDWXUHV H[FHHGLQJ WKH
permissible temperature range will
invalidate the warranty.
5RXWLQHPDLQWHQDQFH RI WKH¿OWHUV
DQG JHQHUDOH[WHUQDOFOHDQLQJ
can be done by the user as these
operations are not difficult or
dangerous.
'XULQJLQVWDOODWLRQDQGPDLQWHQDQFH
respect the precautions indicated
LQWKHPDQXDODQGRQWKHODEHOV
DSSOLHGLQVLGHWKHXQLWVDVZHOO
as all the precautions suggested
by good sense and by the safety
regulations in effect in your country.
Always wear gloves and
protective goggles when
performing any operations on
the refrigerating side of the units.
Air conditioners MUST NOT be
installed in places containing
LQÀDPPDEOH JDVVHVH[SORVLYH
gasses, or in very humid
environments (laundries,
greenhouses, etc.), or in places
where there are machines that
generate very great heat.
In case of replacement of parts,
use only original OLIMPIA
SPLENDID parts.
IMPORTANT!
To prevent any risk of
electrocution, always disconnect
the main circuit breaker before
making electric connections or
performing any maintenance on
the units.
Les installations effectuées en
dehors des instructions fournies par
le présent manuel et l’utilisation en
dehors des limites de température
prescrites annulent la garantie.
/¶HQWUHWLHQ FRXUDQW GHV ¿OWUHV OH
QHWWR\DJHJpQpUDOH[WpULHXUSHXYHQW
être effectués même par l’utilisateur,
étant donné que ces opérations ne
FRPSRUWHQWSDVGHGLI¿FXOWpRXGH
danger.
Lors du montage, et à chaque
opération d’entretien, il faut
observer les précautions citées
dans le présent manuel et sur les
étiquettes mises à l’intérieur des
appareils, ainsi qu’adopter toute les
précautions suggérées par le bon
sens commun et par les Normes
de Sécurité en vigueur sur le lieu
de l’installation.
Il faut toujours mettre des
JDQWVHWFKDXVVHUGHVOXQHWWHV
de protection pour effectuer
les interventions sur le côté
réfrigérant des appareils.
Les climatiseurs NE DOIVENT
PAS être installés dans des
pièces où il y a présence de gaz
inflammables, gaz explosifs,
GDQVGHVHQGURLWVWUqVKXPLGHV
(buanderies, serres, etc.), ou
dans des locaux où se trouvent
G¶DXWUHVPDFKLQHVSURGXLVDQW
une importante source de
FKDOHXU
En cas de remplacement
de composants, utiliser
exclusivement des pièces de
UHFKDQJHRULJLQDOHV2/,03,$
SPLENDID.
IMPORTANT!
Afin de prévenir tout risque
d’électrocution, il est
indispensable de couper
le courant au disjoncteur
principal avant d’effectuer des
EUDQFKHPHQWVpOHFWULTXHVHW
toute opération d’entretien sur
les appareils.
Installationen die nicht entsprechend
den im vorliegenden Handbuch
enthaltenen Anweisungen sowie
der Einsatz unter Nichtbeachtung
der vorgeschriebenen
7HPSHUDWXUJUHQ]HQJHEHQNHLQHUOHL
Anspruch auf Garantie.
Die gewöhnliche Instandhaltung der
Filter und die allgemeine äußerliche
Reinigung können auch durch den
%HQXW]HUGXUFKJHIKUWZHUGHQ
da sie keine schwierigen oder
gefährlichen Tätigkeiten erfordern.
Während der Montage
und bei sämtlichen
Instandhaltungstätigkeiten
müssen die Vorsichtsmaßnahmen
HLQJHKDOWHQZHUGHQGLHLQGLHVHP
Benutzerhandbuch und auf den
Schildern im Innern der Geräte
angeführt sind; außerdem müssen
sämtliche Vorsichtsmaßnahmen
HUJULIIHQZHUGHQGLHGHUJHVXQGH
Menschenverstand gebietet und
die durch die am Installationsort
geltenden Sicherheitsbestimmungen
vorgeschrieben sind.
Bei Eingriffen an der
Kühlseite der Geräte sind
stets Schutzhandschuhe und
Schutzbrille zu tragen.
Die Klimaanlagen DÜRFEN NICHT
in Räumen installiert werden, in
GHQHQ VLFK HQWÀDPPEDUH RGHU
H[SORVLYH*DVHEH¿QGHQRGHULQ
denen hohe Feuchtigkeit herrscht
(Wäschereien, Gewächshäuser
usw.) oder in Räumen, in denen
VLFKDQGHUH*HUlWHEH¿QGHQGLH
viel Wärme freisetzen.
Bei der Auswechslung von
Einzelteilen bitte ausschließlich
original OLIMPIA SPLENDID-
Ersatzteile verwenden.
WICHTIG!
Um dem Risiko eines Stromschlags
vorzubeugen, muss unbedingt
der Hauptschalter ausgeschaltet
werden, bevor elektrische
Anschlüsse hergestellt oder
Instandhaltungsarbeiten an den
Geräten vorgenommen werden.
Installazioni eseguite al di fuori delle
avvertenze fornite dal presente
manuale e l’utilizzo al di fuori dei
limiti di temperatura prescritti fanno
decadere la garanzia.
L’ordinaria manutenzione dei filtri,
la pulizia generale esterna possono
essere eseguite anche dall’utente, in
quanto non comportano operazioni
GLI¿FROWRVHRSHULFRORVH
Durante il montaggio, e ad ogni
operazione di manutenzione, è
necessario osservare le precauzioni
citate nel presente manuale, e sulle
etichette apposte all’interno degli
apparecchi, nonché adottare ogni
precauzione suggerita dal comune
buonsenso e dalle Normative
di Sicurezza vigenti nel luogo
d’installazione.
E’ necessario indossare sempre
JXDQWLHGRFFKLDOLSURWHWWLYL
pereseguire interventi sul lato
UHIULJHUDQWHGHJOLDSSDUHFFKL
I climatizzatori NON DEVONO
essere installati in ambienti con
presenza di gas infiammabili,
gas esplosivi, in ambienti
molto umidi (lavanderie, serre,
ecc.), o in locali dove sono
SUHVHQWLDOWULPDFFKLQDULFKH
generano una forte fonte di
calore.
In caso di sostituzione
di componenti utilizzare
esclusivamente ricambi
originali OLIMPIA SPLENDID.
IMPORTANTE!
3HUSUHYHQLUHRJQLULVFKLRGL
folgorazione è indispensabile
staccare l’interruttore generale
prima di effettuare collegamenti
elettrici ed ogni operazione di
PDQXWHQ]LRQHVXJOLDSSDUHFFKL
La pagina si sta caricando...

GB
F
D
10
I
1
The following instructions must
be made known to all personnel
involved in the machine’s tran-
sport and installation.
/LJKWQLQJ QHLJKERULQJ FDU DQG
mobile telephone may cause mal-
function. Now unplug your unit for
VHYHUDOVHFRQGVWKHQUHVWDUW\RXU
air conditioner.
In rainy day please cut off power
supply to avoid damage caused
by lightning.
If the unit is left unused for long time
RUQRERG\LHLQWKHFRQGLWLRQHGURRP
please turn off the main power supply
to avoid accident.
Please turn off the main power sup-
ply to avoid accident before cleaning
or maintaining the unit.
'RQRWXVHFOHDQLQJDJHQWOLTXHID-
cient or corrosive cleanser to clean
the unit or spray water or other
OLTXLGDWXQLWDOOWKHVHPD\GDPDJH
SODVWLF FRPSRQHQWV HYHQ FDXVH
electric shock.
Do not wet indoor unit and remote
FRQWUROOHU2WKHUZLVHLWPD\FDXVH
VKRUWFLUFXLWRU¿UH
If any abnormal symptom (such
DVH[FHSWLRQDOQRLVHRGRU VPRJ
abnormal temperature rise or elec-
WULFOHDNDJHHWFRFFXUWXUQRIIWKH
power supply immediately. Please
contact local dealer.
Do not let the air conditioner run
for a long time when the humidity
is very high and a door or a win-
dows is left open.
Moisture may condense and wet or
damage furniture.
Do not plug or unplug the power
supply plug during operation.
7KHUHLVULVNRI¿UHRUHOHFWULFVKRFN
Do not touch (operation) the
product with wet hands.
7KHUHLVULVNRI¿UHRUHOHFWULFVKRFN
Do not place a heater or other
appliance near the power cable.
7KHUHLVULVNRI¿UHDQGHOHFWULFVKRFN
Communiquer ces instructions
à tout le personnel concerné par
le transport et l’installation de la
PDFKLQH
La foudre, les voitures voisines et
les téléphones cellulaires peuvent
provoquer des dysfonctionnements.
Débranchez l’unité pendant
quelques secondes puis remettez
le climatiseur en marche.
Les jours de pluie, il est recommandé
de débrancher l’alimentation
électrique pour éviter des dégâts
causés par la foudre.
Si l’unité reste inutilisée pendant
longtemps ou qu’il n’y a personne
dans la pièce climatisée, il est
recommandé de débrancher
l’alimentation électrique pour éviter
des accidents.
Pour éviter des accidents, éteignez
l’interrupteur général avant de
nettoyer ou d’effectuer des
interventions d’entretien sur l’unité.
N’utilisez pas de détergents
liquides ou corrosifs pour nettoyer
l’unité, ne projetez pas d’eau ou
d’autres liquides sur l’unité car cela
pourrait abîmer les éléments en
plastique, voire provoquer des chocs
électriques.
Ne mouillez pas l’unité intérieure ni
la télécommande, car cela pourrait
entraîner des courts-circuits ou des
incendies.
Si quelque chose vous semble bizarre
EUXLWH[FHSWLRQQHOPDXYDLVHRGHXU
fumée, augmentation anormale
de la température ou dispersions
électriques, etc.), débranchez
immédiatement l’alimentation
électrique. Contactez le revendeur
local.
Ne pas laisser le climatiseur en
fonction pendant de longues
périodes en présence d’une
KXPLGLWppOHYpHRXGHSRUWHVRX
fenêtres ouvertes.
L’humidité pourrait se condenser
et mouiller ou endommager les
meubles.
1HSDVEUDQFKHURXGpEUDQFKHUOD
¿FKH G¶DOLPHQWDWLRQ SHQGDQW OH
fonctionnement.
Il y a risque d’incendie ou
d’électrocution.
1H SDV WRXFKHU V¶LO HVW HQ
fonction) le produit avec les mains
mouillées.
Il y a risque d’incendie ou
d’électrocution.
1HSDVSODFHUOHUpFKDXIIHXURX
d’autres appareils à proximité du
cordon d’alimentation
Il y a risque d’incendie ou
d’électrocution.
Das für den Transport und
für die Maschineninstallation
zuständige Personal ist von
diesen Anweisungen in Kenntnis
zu setzen.
Blitze, Autos in der Nähe
und Mobiltelefone können
Betriebsstörungen verursachen.
Trennen Sie die Einheit für einige
Sekunden ab und starten Sie
anschließend die Klimaanlage neu.
$Q5HJHQWDJHQHPS¿HKOWHVVLFK
die elektrische Stromversorgung
abzutrennen, um durch Blitze
verursachte Schäden zu vermeiden.
Wenn die Einheit für eine längere
Zeit unbenutzt bleibt oder niemand
sich im klimatisierten Raum aufhält,
HPS¿HKOW HV VLFK ]XU 9HUPHLGXQJ
von Unfällen, den elektrischen Strom
zu trennen.
Schalten Sie zur Vermeidung von
Unfällen vor Reinigungs- oder
Wartungsarbeiten an der Einheit
den Hauptschalter aus.
Verwenden Sie keine flüssigen
oder korrosiven Reinigungsmittel
zum Säubern der Einheit. Spritzen
Sie kein Wasser oder sonstige
Flüssigkeiten auf die Einheit, da die
Kunststoffkomponenten beschädigt
oder sogar elektrische Stromschläge
herbeigeführt werden könnten.
Nässen Sie die Inneneinheit und die
Fernbedienung nicht. Andernfalls
könnte es zu Kurzschlüssen oder
Bränden kommen.
Wenn Sie ungewöhnliche
Erscheinungen bemerken (starke
Geräusche, unangenehme Gerüche,
Rauch, anomale Temperaturanstiege,
Verlustströme usw.), trennen Sie
die elektrische Stromversorgung
unverzüglich ab. Nehmen Sie Kontakt
mit Ihrem örtlichen Wiederverkäufer auf.
/DVVHQ6LHGDV.OLPDJHUlWQLFKW
IUOlQJHUH=HLWLQ%HWULHEZHQQ
GLH)HXFKWLJNHLWVHKUKRFKLVWRGHU
die Fenster geöffnet sind.
Die Feuchtigkeit könnte
kondensieren und
Einrichtungsgegenstände nässen
oder beschädigen.
6WHFNHQ RGHU ]LHKHQ 6LH GHQ
1HW]VWHFNHU QLFKW ZlKUHQG GHV
Betriebs.
Es besteht die Gefahr von
Stromschlägen.
%HUKUHQ 6LH IDOOV LQ %HWULHE
GDV 3URGXNW QLFKW PLW IHXFKWHQ
Händen.
Es besteht die Gefahr von Brand
oder Stromschlägen.
Positionieren Sie die Heizung
RGHUDQGHUH*HUlWHQLFKWLQGHU
1lKHGHV9HUVRUJXQJVNDEHOV
Es besteht die Gefahr von Brand
oder Stromschlägen.
Rendere note a tutto il personale
interessato al trasporto ed
DOO¶LQVWDOOD]LRQH GHOOD PDFFKLQD
le presenti istruzioni.
I fulmini, le auto nelle vicinanze ed
i telefoni cellulari possono causare
dei malfunzionamenti. Scollegare
l’unità per diversi secondi, quindi
riavviare il condizionatore.
Nelle giornate di pioggia
è consigliabile scollegare
l’alimentazione elettrica per evitare
danni provocati da fulmini.
Se l’unità rimane inutilizzata per
un lungo periodo, oppure nessuno
soggiorna nella stanza climatizzata,
per evitare incidenti, è consigliabile
scollegare l’alimentazione elettrica.
Per evitare incidenti, spegnere
l’interruttore generale prima di
pulire o effettuare interventi di
manutenzione sull’unità.
Non utilizzare detergenti liquidi
o corrosivi per pulire l’unità, non
spruzzare acqua o altri liquidi
sull’unità in quanto potrebbero
danneggiare i componenti in plastica
o, addirittura, provocare scosse
elettriche.
Non bagnare l’unità interna ed il
WHOHFRPDQGR3RWUHEEHURYHUL¿FDUVL
corto-circuiti o incendi.
Se notate qualcosa di strano (quale
rumore eccezionale, cattivo odore,
fumo, innalzamento anomalo della
temperatura, o dispersioni elettriche,
ecc.) scollegare immediatamente
l’alimentazione elettrica. Contattare
il rivenditore locale.
Non lasciare il condizionatore in
IXQ]LRQH SHU OXQJKL SHULRGL VH
l’umidità è elevata e vi sono porte
R¿QHVWUHDSHUWH
L’umidità potrebbe condensarsi e
bagnare o danneggiare gli arredi.
Non collegare o scollegare la spina
di alimentazione durante il
funzionamento.
Vi è il rischio di incendio o scosse
elettriche
Non toccare (se in funzione) il
prodotto con le mani bagnate.
Vi è il rischio di incendio o scosse
elettriche.
Non posizionare il riscaldatore
RDOWUHDSSDUHFFKLDWXUHYLFLQHDO
cavo di alimentazione
Vi è il rischio di incendio o scosse
elettriche.
La pagina si sta caricando...

GB
F
D
12
I
1
Do not allow water to run into
electric parts.
,W PD\ FDXVH ¿UH IDLOXUH RI WKH
SURGXFWRUHOHFWULFVKRFN
Do not open the inlet grill of the
product during operation.
7KHUH LV ULVN RI SK\VLFDO LQMXU\
HOHFWULFVKRFNRUSURGXFWIDLOXUH
Do not block the inlet or outlet
RIDLUÀRZ
It may cause product failure.
Do not insert hands or other object
through air inlet or outlet while the
product is operated.
There are sharp and moving parts
that could cause personal injury.
Do not drink the water drained
from the product.
It is not sanitary could cause serious
health issues.
Ventilate room before operating
air conditioner if there is a gas
leakage from another appliance.
Do not disassemble or modify
unit.
Ventilate the room well when used
together with a stove, etc.
Do not use for special purposes.
Do not vent R-410A into
atmosphere: R-410A is a
fluorinated greenhouse gas,
covered by Kyoto Protocol, with
a Global Warming Potential (GWP)
= 1975
Veiller à ce qu’il n’entre pas d’eau
dans les parties électriques
Cela pourrait provoquer des
incendies, une détérioration ou du
produit ou une électrocution.
Ne pas ouvrir la grille d’entrée
pendant le fonctionnement.
Il y a risque de blessure, d’électrocution
ou de détérioration du produit.
Ne pas bloquer l’entrée ou la sortie
GXÀX[G¶DLU
Cela pourrait endommager le produit
Ne pas introduire les doigts ou
d’autres objets dans l’entrée ou
dans la sortie de l’air pendant que
l’appareil est en fonction.
Sont présentes des parties
tranchantes et en mouvement qui
pourraient vous blesser.
Ne pas boire l’eau qui sort de
l’appareil.
Cela n’est pas hygiénique et
provoquer de graves problèmes
pour la santé.
Aérer la pièce avant d’actionner
le climatiseur en cas de fuites de
gaz d’autres appareils.
Ne pas démonter, ni apporter de
PRGL¿FDWLRQVjO¶DSSDUHLO
Bien aérer la pièce si l’appareil
est utilisé en même temps qu’un
poêle etc.
Ne pas utiliser l’appareil pour
des usages autres que celui pour
lequel il a été conçu.
Ne pas émettre de R-410A dans
O¶DWPRVSKqUHOH5$HVWXQJD]
jHIIHWGHVHUUHÀXRUpFLWpGDQV
le Protocole de Kyoto, avec un
3RXYRLUGH5pFKDXIIHPHQW*OREDO
(GWP) égal à 1975
Achten Sie darauf, dass kein
Wasser in elektrische Teile
gelangt.
'LHV N|QQWH ]X %UlQGHQ
Produktschäden oder
Stromschlägen führen.
Öffnen Sie den Eingangsrost nicht
während des Betriebs.
Es besteht die Gefahr von
9HUOHW]XQJHQ6WURPVFKOlJHQRGHU
Produktschäden
Blockieren Sie nicht den Einlass
oder Auslass des Luftstroms.
Das Produkt könnte beschädigt
werden.
Führen Sie nicht die Hände oder
Gegenstände in den Lufteinlass
oder -auslass, während das Gerät
in Betrieb ist.
Scharfe Teile in Bewegung können
Verletzungen herbeiführen.
Trinken Sie das aus dem Gerät
tretende Wasser nicht.
Dies ist unhygienisch und kann zu
schweren Gesundheitsschäden
führen.
Lüften Sie beim Austreten von
Gas aus anderen Geräten den
Raum, bevor Sie die Klimaanlage
betätigen.
Nehmen Sie das Klimagerät nicht
auseinander und nehmen Sie
keine Änderungen daran vor.
Lüften Sie den Raum gut, wenn Sie
das Gerät zusammen mit einem
Ofen usw. benutzen.
Setzen Sie das Klimagerät nicht für
andere als für die vorgesehenen
Verwendungszwecke ein.
R-410A nicht in die Atmosphäre
auslassen: R-410A ist ein im
Kyoto-Protokoll verzeichnetes
Fluorgasmit mit einem globalem
Treibhauspotential (GWP) = 1975
)DWHDWWHQ]LRQHFKHO¶DFTXDQRQ
HQWULQHOOHSDUWLHOHWWULFKH
Potrebbe provocare incendi, guasti
al prodotto o scosse elettriche.
Non aprire la griglia di ingresso
durante il funzionamento.
Vi è il rischio di farsi male, di
prendere la scossa o di danneggiare
il prodotto.
Non bloccare l’ingresso o l’uscita
GHOÀXVVRGLDULD
Potrebbe danneggiare il prodotto
Non inserire dita o altri oggetti
nell’ingresso o nell’uscita
GHOO¶DULDPHQWUH O¶DSSDUHFFKLR q
in funzione.
9LVRQRSDUWLDI¿ODWHHGLQPRYLPHQWR
che potrebbero ferirvi.
1RQ EHUH O¶DFTXD FKH IXRULHVFH
GDOO¶DSSDUHFFKLR
Non è igienico e potrebbe provocare
dei seri problemi per la salute.
Arieggiare l’ambiente prima di
azionare il condizionatore d’aria se
vi sono perdite di gas da altre
DSSDUHFFKLDWXUH
Non smontare, né apportare
PRGL¿FKHDOO¶DSSDUHFFKLDWXUD
Arieggiare bene l’ambiente se
utilizzato insieme ad una stufa,
ecc.
1RQLPSLHJDUHO¶DSSDUHFFKLDWXUD
per usi diversi da quello per cui è
stata concepita.
Non immettere R-410A
QHOO¶DWPRVIHUD O¶5$ q XQ
JDVVHUUDÀXRUXUDWRULFKLDPDWR
nel Protocollo di Kyoto, con un
Potenziale di Riscaldamento
Globale (GWP)= 1975
La pagina si sta caricando...

GB
F
D
14
I
1
DISPOSAL
This symbol on the product or
its packaging indicates that the
appliance cannot be treated as
QRUPDO GRPHVWLFWUDVKEXWPXVW
be handed in at a collection point
for recycling electric and electronic
appliances.
Your contribution to the correct
disposal of this product protects
the environment and the health of
your fellow men. Health and the
environment are endangered by
incorrect disposal.
Further information about the
recycling of this product can be
REWDLQHGIURP\RXUORFDOWRZQKDOO
\RXU UHIXVH FROOHFWLRQ VHUYLFHRU
in the store at which you bought
the product.
This regulation is valid only in EU
member states.
ELIMINATION
Ce symbole apposé sur le produit
ou son emballage indique que
ce produit ne doit pas être jeté
au titre des ordures ménagères
normales, mais doit être remis
à un centre de collecte pour le
recyclage des appareils électriques
et électroniques.
En contribuant à une élimination
correcte de ce produit, vous
protégez l’environnement et la
santé d’autrui. L’environnement et
la santé sont mis en danger par une
élimination incorrecte du produit.
Pour toutes informations
complémentaires concernant le
recyclage de ce produit, adressez-
vous à votre municipalité, votre
service des ordures ou au magasin
où vous avez acheté le produit.
Cette consigne n’est valable que
pour les états membres de l’UE.
ENTSORGUNG
Dieses Symbol auf dem Produkt
oder seiner Verpackung weist
GDUDXIKLQGDVVGLHVHV3URGXNW
nicht als normaler Haushaltsabfall
]XEHKDQGHOQLVWVRQGHUQDQHLQHP
Sammelpunkt für das Recycling von
elektrischen und elektronischen
Geräten abgegeben werden muss.
Durch Ihren Beitrag zum korrekten
Entsorgen dieses Produktes
schützen Sie die Umwelt und die
Gesundheit Ihrer Mitmenschen.
Umwelt und Gesundheit werden
durch falsches Entsorgen gefährdet.
Weitere Informationen über das
Recycling dieses Produktes
HUKDOWHQ6LHYRQ,KUHP5DWKDXV
,KUHU0OODEIXKURGHUGHP*HVFKlIW
in dem Sie das Produkt gekauft
haben.
Diese Vorschrift ist nur gültig für
Mitgliedstaaten der EU.
SMALTIMENTO
Il simbolo sul prodotto o sulla
confezione indica che il prodotto
non deve essere considerato come
XQQRUPDOHUL¿XWRGRPHVWLFRPD
deve essere portato nel punto di
raccolta appropriato per il riciclaggio
di apparecchiature elettriche ed
elettroniche.
Provvedendo a smaltire questo
prodotto in modo appropriato, si
contribuisce a evitare potenziali
conseguenze negative per
l’ambiente e per la salute, che
potrebbero derivare da uno
smaltimento inadeguato del
prodotto.
Per informazioni più dettagliate
sul riciclaggio di questo prodotto,
contattare l’ufficio comunale, il
VHUYL]LRORFDOHGLVPDOWLPHQWRUL¿XWL
o il negozio in cui è stato acquistato
il prodotto.
Questa disposizione è valida
solamente negli Stati membri
dell’UE.
La pagina si sta caricando...

GB
F
D
16
I
1
1.2
1.2.1
1.2.2
SYMBOLS
7KHSLFWRJUDPVLQWKHQH[WFKDSWHU
provide the necessary information
IRUFRUUHFWVDIHXVHRIWKHPDFKLQH
LQDUDSLGXQPLVWDNDEOHZD\
Editorial pictograms
Service
- Refers to situations in which
you should inform the SERVICE
department in the company:
CUSTOMER TECHNICAL
SERVICE.
Index
- Paragraphs marked with
this symbol contain very
important information and
UHFRPPHQGDWLRQV SDUWLFXODUO\
as regards safety.
Failure to comply with them may
result in:
- danger of injury to the operators
- loss of the warranty
- refusal of liability by the
manufacturer.
Raised hand
- Refers to actions that absolutely
must not be performed.
S
afety pictograms
Danger of high voltage
- Signals to the personnel that the
operation described could cause
electrocution if not performed
according to the safety rules.
Generic danger
- Signals to the personnel that the
operation described could cause
physical injury if not performed
according to the safety rules.
Danger due to heat
- Signals to the personnel that the
operation described could cause
burns if not performed according
to the safety rules.
SYMBOLOGIE
Les pictogrammes reportés au chapitre
suivant permettent de fournir rapidement
et de manière univoque les informations
nécessaires pour une utilisation correcte
de la machine dans des conditions de
sécurité.
Pictogrammes rédactionnels
Service
- Indique des situations où il faut
informer le SERVICE interne de la
société:
SERVICE APRES-VENTE CLIENTS.
Index
- Les paragraphes précédés par
ce symbole contiennent des
informations et des prescriptions
très importantes, notamment pour
ce qui concerne la sécurité.
Le non-respect peut comporter:
- danger pour la sécurité des
opérateurs.
- perte de la garantie du contrat.
- dégagement de la responsabilité du
fabricant.
Main levée
- Indique les actions qu’il ne faut
absolument pas accomplir.
Pictogrammes concernant la
sécurité
Tension électrique dangereuse
- Signale au personnel concerné que
l’opération décrite présente, si elle
n’est pas effectuée conformément
DX[QRUPHVGHVpFXULWpOHULVTXHGH
provoquer une décharge électrique.
Danger général
- Signale au personnel concerné que
l’opération décrite présente, si elle
n’est pas effectuée conformément
DX[QRUPHVGHVpFXULWpOHULVTXHGH
provoquer des dommages physiques.
Danger de température élevée
- Signale au personnel concerné que
l’opération décrite présente, si elle
n’est pas effectuée conformément
DX[QRUPHVGHVpFXULWpOHULVTXHGH
provoquer des brûlures par contact
avec des composants à température
élevée.
BILDSYMBOLE
Die im folgenden Kapitel aufgeführten
Bildsymbole liefern schnell und
eindeutig Informationen zum
korrekten und sicheren Gebrauch
des Gerätes.
Bildsymbole
Kundendienst
.HQQ]HLFKQHW 6LWXDWLRQHQ
in denen der interne
KUNDENDIENST der Firma
zu benachrichtigen ist:
KUNDENDIENST
Inhaltsverzeichnis
'LH 3DUDJUDIHQ GHQHQ GLHVHV
6\PERO YRUDXVJHKW HQWKDOWHQ
sehr wichtige Informationen
XQG9RUVFKULIWHQ LQVEHVRQGHUH
bezüglich der Sicherheit.
Die Nichtbeachtung dieser
Informationen und Vorschriften
NDQQGD]XIKUHQGDVV
- die Unversehrtheit des Personals
an den Geräten gefährdet ist
- die vertragliche Garantie verfällt
- die Herstellerfirma jede
Verantwortung ablehnt.
Erhobene Hand
.HQQ]HLFKQHW +DQGOXQJHQ GLH
absolut verboten sind.
Bildsymbole zur Sicherheit
Gefährliche elektrische Spannung
- Zeigt dem betreffenden Personal
DQGDVVEHLGHUEHVFKULHEHQHQ
Tätigkeit die Gefahr eines
HOHNWULVFKHQ 6FKODJV EHVWHKW
wenn diese nicht unter Beachtung
der Sicherheitsvorschriften
durchgeführt wird.
Allgemeine Gefahr
- Zeigt dem betreffenden
3HUVRQDO DQ GDVV EHL GHU
beschriebenen Tätigkeit
9HUOHW]XQJVJHIDKUEHVWHKWZHQQ
diese nicht unter Beachtung
der Sicherheitsvorschriften
durchgeführt wird.
Gefahr durch starke Hitze
- Zeigt dem betreffenden Personal
DQGDVVEHLGHUEHVFKULHEHQHQ
Tätigkeit Verbrennungsgefahr
durch Berührung heißer
*HUlWHWHLOH EHVWHKW ZHQQ
diese nicht unter Beachtung
der Sicherheitsvorschriften
durchgeführt wird.
SIMBOLOGIA
I pittogrammi riportati nel seguente
capitoloconsentono di fornire
rapidamente ed in modo univoco
informazioni necessarie alla corretta
utilizzazione della macchina in
condizioni di sicurezza.
Pittogrammi redazionali
Service
- Contrassegna situazioni nelle
quali si deve informare il
SERVICE aziendale interno:
SERVIZIOASSISTENZA
TECNICA CLIENTI.
Indice
,SDUDJUD¿SUHFHGXWLGDTXHVWR
simbolo contengono informazioni
e prescrizioni molto importanti,
particolarmente per quanto
riguarda la sicurezza.
Il mancato rispetto può comportare:
- pericolo per l’incolumità degli
operatori
- perdita della garanzia contrattuale
- declinazione di responsabilità da
parte della ditta costruttrice.
Mano alzata
- Contrassegna azioni che non si
devono assolutamente fare.
Pittogrammi relativi alla
sicurezza
Tensione elettrica pericolosa
- Segnala al personale interessato
che l’operazione descritta
presenta, se non effettuata
nel rispetto delle normative di
sicurezza, il rischio di subire uno
shock elettrico.
Pericolo generico
- che l’operazione descritta
presenta, se non effettuata
nel rispetto delle normative di
sicurezza, il rischio di subire
GDQQL¿VLFL
Pericolo di forte calore
- delle normative di sicurezza,
il rischio di subire bruciature per
contatto con componenti con
elevata temperatura.
La pagina si sta caricando...

GB
F
D
18
I
1.3
1.4
1
USO PREVISTO
Il climatizzatore deve essere utilizzato
esclusivamente per produrre aria
calda o fredda (a scelta) con il solo
scopo di rendere confortevole la
temperatura nell’ambiente.
Un uso improprio delle
apparecchiature (esterna ed interna)
con eventuali danni causati a
persone, cose o animali esulano
la OLIMPIA SPLENDID da ogni
responsabilità.
ZONE DI RISCHIO
I climatizzatori NON DEVONO
essere installati in ambienti con
presenza di gas infiammabili,
gas esplosivi, in ambienti molto
umidi (lavanderie, serre, ecc.), o
in locali dove sono presenti altri
PDFFKLQDULFKHJHQHUDQRXQD
forte fonte di calore, in prossimità
di una fonte di acqua salata o
acqua sulfurea.
NON usare gas, benzine o altri
liquidi infiammabili vicino al
climatizzatore.
,O FOLPDWL]]DWRUH QRQ KD XQ
ventilatore per l’immissione
all’interno del locale di aria fresca
esterna, ricambiare aria aprendo
SRUWHH¿QHVWUH
- Il condizionatore dell’aria
non deve essere utilizzato
da bambini piccoli o persone
LQYDOLGHVHQ]DFKHYLVLDXQ
controllo.
- I bambini devono essere
controllati da un adulto
DIILQFKpQRQJLRFKLQRFRQLO
condizionatore.
)DWHDWWHQ]LRQHFKHO¶DFTXDQRQ
HQWULQHOOHSDUWLHOHWWULFKH
- Installare sempre un interruttore
automatico e prevedere un
circuito di alimentazione
dedicato.
Rendere note a tutto il personale
interessato al trasporto ed
all’installazione della macchina le
presenti istruzioni.
PROPER USE
The air-conditioner should be
XVHGIRUWKHH[FOXVLYHSXUSRVHRI
producing hot or cool air (on demand)
for the sole purpose of obtaining a
comfortable temperature in the room.
Improper use of the machine (outside
and inside units) causing damage to
persons, property or animals relieve
OLIMPIA SPLENDID of any liability.
HAZARDOUS ZONES
7KHDLUFRQGLWLRQHUMUST NOT
be installed in environments
ZKHUHLQÀDPPDEOH RUH[SORVLYH
JDVDUHSUHVHQWLQYHU\KXPLG
environments (laundries,
KRWKRXVHV HWF LQ SODFHV
ZKHUHRWKHUPDFKLQHU\ZKLFK
JHQHUDWHVWURQJVRXUFHVRIKHDW
DUHSUHVHQWRULQWKHYLFLQLW\RI
DVRXUFHRIVDOW\RUVXOSKXURXV
ZDWHU
DO NOT use gas, benzene or
RWKHUÀDPPDEOHOLTXLGVQHDUWKH
air-conditioner.
7KHDLUFRQGLWLRQHUGRHVQRWKDYH
DIDQIRUWKHLQWDNHLQVLGHWKH
HVWDEOLVKPHQWRIH[WHUQDOIUHVK
DLU&KDQJHDLUE\RSHQLQJGRRUV
DQGZLQGRZV
7KH DLU FRQGLWLRQHU LV QRW
intended for use by young
FKLOGUHQRULQYDOLGVZLWKRXW
supervision.
<RXQJ FKLOGUHQ VKRXOG EH
VXSHUYLVHG WR HQVXUH WKDW
WKH\GRQRWSOD\ZLWKWKHDLU
conditioner.
'RQRWDOORZZDWHUWRUXQLQWR
electric parts.
$OZD\VLQVWDOOFLUFXLWEUHDNHU
DQGDGHGLFDWHGSRZHUFLUFXLW
Make sure that all personnel involved
in the transportation and installation
of the machine are familiar with the
following instructions.
UTILISATION PRÉVUE
Le climatiseur doit être utilisé
H[FOXVLYHPHQWSRXUSURGXLUHGH
O¶DLUFKDXGRXIURLGDXFKRL[GDQV
le seul but de rendre agréable la
température ambiante.
Un usage impropre des appareils
H[WpULHXU HW LQWpULHXU DYHF
d’éventuels dommages causés
DX[SHUVRQQHVDX[ELHQVRXDX[
DQLPDX[GpJDJHODVRFLpWp2/,03,$
SPLENDID de toute responsabilité.
ZONES À RISQUE
Les climatiseurs NE DOIVENT
PAS être installés en présence
GHJD]LQÀDPPDEOHVRXGHJD]
explosifs, dans des locaux très
KXPLGHVEXDQGHULHVVHUUHV
etc.) ou dans des locaux où
VHWURXYHQWG¶DXWUHVPDFKLQHV
SURGXLVDQWEHDXFRXSGHFKDOHXU
à proximité d’une source d’eau
salée ou d’eau sulfureuse.
NE PAS UTILISER de gaz,
d’essence ou autres liquides
LQÀDPPDEOHVSUqVGXFOLPDWLVHXU
Le climatiseur ne possède pas de
ventilateur pour l’amenée dans
la pièce d’air frais de l’extérieur;
pour aérer, ouvrir portes et
fenêtres.
- Le climatiseur ne doit pas être
utilisé par des enfants ou par
des personnes invalides en
l’absence de contrôle.
- Les enfants doivent être
contrôlés par un adulte pour
qu’ils ne jouent pas avec le
climatiseur.
- Veiller à ce qu’il n’entre
pas d’eau dans les parties
électriques
- Installer toujours un
interrupteur automatique et
prévoir un circuit d’alimentation
dédié.
Communiquer les présentes
instructions à toutes les personnes
intéressées au transport et à
l’installation de la machine
BESTIMMUNGS-GEMÄSSE
VERWENDUNG
Das Klimagerät darf ausschließlich
zur Erzeugung von Warm- oder
Kaltluft (nach Wahl) verwendet
ZHUGHQGDPLWLQGHQ5lXPOLFKNHLWHQ
eine angenehme Temperatur
geschaffen wird.
Jeder Gebrauch des Klimagerätes
$XHQ XQG ,QQHQHLQKHLW GHU
über die beschriebene Verwendung
KLQDXVJHKWJLOWDOVQLFKW]XOlVVLJXQG
enthebt die Fa. OLIMPIA SPLENDID
von jeder Verantwortung.
GEFAHRENBEREICHE
Das Einheiten des Klimagerätes
DÜRFEN AUF KEINEN FALL in
Räumen, in denen Flaschen mit
HQWÀDPPEDUHQ RGHU H[SORVLYHQ
Gasen aufbewahrt werden, in sehr
feuchten Räumen (Wäschereien,
Gewächshäusern, usw.), in
Räumen, in denen Maschinen
aufgestellt sind, die eine hohe
Wärmequelle erzeugen, oder
in der Nähe von Salzwasser-
oder Schwefelwasserquellen
installiert werden.
In der Nähe des Klimagerätes
dürfen weder Gas, Benzin
noch andere entflammbare
Flüssigkeiten verwendet werden.
Das Klimagerät ist mit keinem
Gebläse für die Zufuhr von
Frischluft ausgestattet.
Demzufolge sind zur Lüftung
des Raums Türen und Fenster
zu öffnen.
- Das Klimagerät darf ohne
Kontrolle nicht von kleinen
Kindern oder in der Bedienung
beeinträchtigten Personen
verwendet werden
- Kinder sind durch
einen Erwachsenen zu
beaufsichtigen, damit sie nicht
mit der Klimaanlage spielen.
- Achten Sie darauf, dass kein
Wasser in elektrische Teile
gelangt.
- Installieren Sie stets einen
Automatikschutzschalter und
sehen Sie einen gesonderten
Stromkreis vor.
Das mit der Beförderung und der
Installation des Gerätes beauftragte
Personal muss mit diesen
Anweisungen vertraut gemacht
werden.
La pagina si sta caricando...

GB
F
D
20
I
1
1.5
LIST OF ACCESSORIES
SUPPLIED
Items packed with the unit
1 - Installation Plate (q.ty 1)
2 - Clip Anchor (q.ty 8)
3 - Self-tapping Screw A ST3.9X25
(q.ty 8)
4 - Seal (q.ty 1)
5 - Drain Joint (q.ty 1)
6 - Remote controller (q.ty 1)
Note: ([FHSW WKH DERYH SDUWV
SURYLGHGWKHRWKHUSDUWVQHHGHG
during installation you must
purchase.
LISTE DES ACCESSOIRES
FOURNIS
Contenu de l’emballage
1 - Plaque d’installation(1)
2 - Crochet (8)
3 - Vis autotaraudeuse A
ST3.9X25 (8)
4 - Joint (1)
5 - Joint drainage (1)
6 - Télécomande (1)
1RWHV Les pièces indiquées
ci-dessus sont comprises dans
la fourniture, les autres pièces
nécessaires pour l’installation
devront être achetées.
LISTA DEGLI ACCESSORI
FORNITI
Contenuto della confezione
1 - Piastra di installazione (q.tà 1)
2 - Gancio (q.tà 8)
9LWHDXWR¿OHWWDQWH$67;
(q.tà 8)
4 - Guarnizione (q.tà 1)
5 - Giunto drenaggio (q.tà 1)
6 - Telecomando (q.tà 1)
1RWH Le parti sopra indicate
sono comprese nella fornitura,
gli altri particolari necessari per
l’installazione dovranno essere
acquistati.
LISTE DER GELIEFERTEN
ZUBEHÖRS
Packungsinhalt
1 - Installationsplatte (Menge 1)
2 - Haken (Menge 8)
3 - Selbstschneidende Schraube A
ST3.9X25 (Menge 8)
4 - Dichtung (Menge 1)
5 -Entwässerungs-
Kupplungsstück (Menge 1)
6 - Fernbedienung (Menge 1)
Hinweise: Die oben genannten
7HLOHZHUGHQJHOLHIHUWGLHVRQVWLJHQ
für die Installation erforderlichen
Teile müssen zugekauft werden.
15 cm
2
1
3
12 cm
6
2,3 m
60 cm
60 cm
30 cm
4
5
30 cm
200 cm
La pagina si sta caricando...

GB
F
D
22
I
1
Immagazzinamento
Immagazzinare le confezioni in
ambiente chiuso e protetto dagli
agenti atmosferici, isolate dal
suolo tramite traversine o pallet.
NON CAPOVOLGERE
L’IMBALLO.
Ricevimento e disimballo
L’imballo è costituito da materiale
adeguato ed eseguito da personale
esperto.
Le unità vengono consegnate
complete ed in perfette condizioni,
tuttavia per il controllo della qualità
dei servizi di trasporto attenersi alle
seguenti avvertenze:
- al ricevimento degli imballi
YHUL¿FDUHVHODFRQIH]LRQHULVXOWD
danneggiata, in caso positivo
ritirare la merce con riserva,
SURGXFHQGRSURYHIRWRJUD¿FKHHG
eventuali danni apparenti.
1.5.1
1.5.2
Storage
Store the cartons in a closed
environment protected against
atmospheric agents and raised off
WKHÀRRUE\SODQNVRUDSDOOHW
TO NOT TURN THE CARTON
UPSIDE DOWN.
Receipt and unpacking
The packing is made of suitable
PDWHULDO DQG LV GRQHE\H[SHUW
personnel.
The units are delivered complete
DQG LQ SHUIHFW FRQGLWLRQ KRZHYHU
we suggest that you perform the
following controls of the quality of
the shipping service:
- on receipt of the cartons check
WKHP IRU DQ\ GDPDJHDQGLI
DQ\ LV IRXQG DFFHSWWKHJRRGV
ZLWK UHVHUYDWLRQ DQG NHHS
photographic evidence of any
damage found.
6WRFNDJH
Stocker les caisses dans un local
fermé et protégé des agents
atmosphériques, isolées du sol par
des traverses ou des palettes.
NE PAS RENVERSER
L’EMBALLAGE.
Réception et déballage
L’emballage est constitué de
matériau adéquat et effectué par
XQSHUVRQQHOH[SHUW
Les unités sont livrées complètes
et en parfaites conditions; suivre
cependant les instructions suivantes
pour le contrôle de la qualité des
services de transport:
- à la réception des emballages
vérifier si le carton est
endommagé, si c’est le cas retirer
la marchandise sous réserve,
en produisant des preuves
photographiques des éventuels
dégâts apparents.
Lagerung
Die verpackten Klimageräte
sind in einem geschlossenen
und gegen Witterungseinflüsse
geschützten Raum auf Paletten
oder entsprechenden Untersätzen
aufzubewahren.
DIE KARTONS DÜRFEN NICHT
AUF DEN KOPF GESTELLT
WERDEN.
Erhalt und Auspacken des
Gerätes
Das Klimagerät wird werkseitig
fachmännisch verpackt. Die
Verpackung setzt sich aus
zweckentsprechendem Material
zusammen.
Die Einheiten werden komplett
und in einwandfreiem Zustand
geliefert. Dennoch ist bei Erhalt des
.OLPDJHUlWHV]XEHUSUIHQRE
- die Verpackung beschädigt
LVW ,VWGLHVGHU)DOOLVWGDV
Klimagerät dennoch in Empfang
zu nehmen und auf dem
Lieferschein ein entsprechender
Vermerk anzubringen. Es sind
)RWRJUD¿HQYRQ GHU9HUSDFNXQJ
und eventuellen sichtbaren
6FKlGHQ]XPDFKHQGLHDOV
Beweismaterial dienen;
La pagina si sta caricando...

GB
F
D
24
I
1
- unpack and check the contents
against the packing list.
- make sure none of the parts have
been damaged during shipment; in
case of damage you must report it
to the shipping company within 3
GD\VRIUHFHLSWE\UHJLVWHUHGOHWWHU
ZLWKUHWXUQUHFHLSWSUHVHQWLQJ
photographic documentation.
- Be caution when unpacking and
installing the product.
6KDUS HGJHV FRXOG FDXVHLQMXU\
be especially careful of the
FDVHHGJHVDQGWKH¿QVRQWKH
condenser and evaporator.
Copy of notice should also be sent
E\ID[WR2/,03,$63/(1','
No notice of damage will be
accepted after 3 days from
delivery.
)RUDQ\FRQWURYHUVLHVWKHFRXUWRI
REGGIO EMILIA has jurisdiction.
Important note:
Keep the packing at least through
WKHZDUUDQW\SHULRGLQFDVH\RX
need to ship the air-conditioner to
the service centre for repair.
Dispose of the packing materials in
compliance with the rules in effect
for waste disposal.
- disimballare verificando la
presenza dei singoli componenti
con gli elenchi d’imballo
- controllare che tutti i componenti
non abbiano subito danni durante
il trasporto; nel caso notificare
entro 3 giorni dal ricevimento gli
eventuali danni allo spedizioniere
a mezzo raccomandata r.r.
presentando documentazione
IRWRJUD¿FD
- Fare attenzione durante il
disimballo e l’installazione
dell’apparecchiatura.
3DUWL DI¿ODWH SRVVRQR SURYRFDUH
ferimenti, fare particolare
attenzione agli spigoli della
struttura ed alle alette del
condensatore ed evaporatore.
Analoga informazione inviarla
WUDPLWHID[DQFKHD2/,03,$
SPLENDID.
Nessuna informazione
concernente danni subiti potrà
essere presa in esame dopo 3
giorni dalla consegna.
Per qualunque controversia sarà
competente il foro di REGGIO
nell’EMILIA.
1RWDLPSRUWDQWH
Conservare l’imballo almeno
per tutta la durata del periodo di
garanzia, per eventuali spedizioni
al centro di assistenza in caso di
riparazione. Smaltire i componenti
dell’imballo secondo le normative
YLJHQWLVXOORVPDOWLPHQWRGHLUL¿XWL
GpEDOOHUHQYpUL¿DQWODSUpVHQFH
de chacun des composants avec
les listes d’emballage.
- contrôler qu’aucun composant n’a
subi de dommages pendant le
transport; dans le cas contraire,
QRWL¿HUOHVpYHQWXHOVGRPPDJHV
au transporteur dans le délai de 3
jours à partir de la réception par
lettre recommandée avec accusé
de réception en présentant la
documentation photographique.
- Faire attention pendant le
déballage et l’installation de
l’appareil.
Les parties tranchantes peuvent
provoquer des blessures, faire
SDUWLFXOLqUHPHQWDWWHQWLRQDX[
DUrWHVGHODVWUXFWXUHHWDX[
ailettes du condensateur et de
l’évaporateur.
(QYR\HU DXVVL SDUID[ FHWWH
même information à OLIMPIA
SPLENDID.
Aucune information concernant
les dommages subis ne pourra
être prise en considération au-
delà de 3 jours après la livraison.
Le tribunal compétent pour
tout litige est celui de REGGIO
EMILIA.
1RWHLPSRUWDQWH
Conserver l’emballage au moins
pendant toute la durée de la période
de garantie, pour d’éventuelles
H[SpGLWLRQVDXFHQWUHGXVHUYLFH
après-vente en cas de réparation.
Pour la mise au rebut des
composants de l’emballage, suivre
les normes locales relatives à
l’élimination des déchets en vigueur.
- die Anzahl der angelieferten
Komponenten mit der Anzahl der
auf der Verpackung angeführten
Komponenten übereinstimmt;
- die Komponenten während des
Transports beschädigt wurden. Ist
GLHV GHU )DOO LVW GHU 6FKDGHQ
innerhalb von 3 Tagen ab Erhalt
der Ware per Einschreiben mit
Rückantwort dem Spediteur zu
melden. Als Beweismaterial sind
)RWRJUD¿HQEHL]XOHJHQ
- Handeln Sie vorsichtig beim
Auspacken und bei der Installation
des Geräts.
Scharfe Teile können Verletzungen
herbeiführen. Achten Sie auf die
Kanten der Struktur und auf die
Rippen des Kondensators und
des Verdampfers.
Eine Kopie dieser Unterlagen ist
ebenfalls der Fa. OLIMPIA
63/(1',']X]XID[HQ
Der Anspruch auf
Schadensersatz verfällt nach
Ablauf der zuvor genannten Frist
von 3 Tagen.
Für eventuelle Streitigkeiten ist
das Gericht REGGIO EMILIA
(Italien) zuständig.
Wichtiger Hinweis:
Die Verpackung ist für die
ganze Dauer der Garantiezeit
aufzubewahren. Im Falle
von Reparaturen ist sie für die
Rücksendung des Gerätes an die
Kundendienststelle zu verwenden.
Die Verpackung ist laut
Gesetzesvorschriften
umweltfreundlich zu entsorgen.
La pagina si sta caricando...

GB
F
D
26
I
2
2.1
INSTALLAZIONE
MODALITÀ
D’INSTALLAZIONE
Per ottenere una buona riuscita
dell’installazione e prestazioni di
funzionamento ottimali, seguire
attentamente quanto indicato nel
presente manuale. La mancata
applicazione delle norme indicate,
che può causare mal funzionamento
delle apparecchiature, sollevano la
ditta OLIMPIA SPLENDID da ogni
forma di garanzia e da eventuali
danni causati a persone, animali
o cose.
(¶ LPSRUWDQWH FKH O¶LPSLDQWR
elettrico sia a norma, rispetti i
GDWLULSRUWDWLQHOODVFKHGDWHFQLFD
e sia costituito di una buona
messa a terra.
Non installare, rimuovere, o
UHLQVWDOODUHO¶DSSDUHFFKLDWXUDGD
soli (cliente)
Vi è il rischio di incendio o scosse
elettriche, esplosione o ferimento.
Per l’installazione contattare
sempre il rivenditore o un centro
assistenza autorizzato.
Vi è il rischio di incendio o scosse
elettriche, esplosione o ferimento.
&RQWUROODUH FKH O¶DUHD GL
installazione non si rovini nel
tempo.
Se la base crolla, anche il
condizionatore potrebbe cadere,
provocando danni agli arredi, guasti
al prodotto e ferimenti alle persone.
Installare in un punto robusto e
VROLGRFKHVLDLQJUDGRGLUHJJHUH
il peso.
1RQLQVWDOODUHO¶DSSDUHFFKLDWXUDLQ
un luogo dove ci possono essere
SHUGLWHGLJDVLQ¿DPPDELOH
INSTALLATION
INSTRUCTIONS FOR
INSTALLATION
To obtain the best results and
RSWLPXPSHUIRUPDQFHIROORZWKH
instructions for correct installation
provided in this manual. Failure to
follow the instructions and apply
the rules indicated may cause
malfunction of the appliance and
UHOLHYHVWKHPDQXIDFWXUHU2/,03,$
SPLENDID of any form of guarantee
DQGOLDELOLW\IRUGDPDJHVWRSHUVRQV
animals or property.
The electrical system must
comply with the regulations and
rating data in the technical sheet,
with good grounding.
Do not install, remove, or reinstall
the unit by yourself (customer).
7KHUHLVULVNRI¿UHHOHFWULFVKRFN
H[SORVLRQRULQMXU\
For installation, always contact
the dealer or an Authorized
service center.
7KHUHLVULVNRI¿UHHOHFWULFVKRFN
H[SORVLRQRULQMXU\
Be sure the installation area does
not deteriorate with age.
,I WKH EDVH FROODSVHVWKH DLU
FRQGLWLRQHUFRXOGIDOOZLWKLWFDXVLQJ
SURSHUW\GDPDJHSURGXFWIDLOXUH
and personal injury.
Install the unit securely in a
place which can bear the weight
of the unit.
Do not install the unit in a place
where
DÀDPPDEOHJDVOHDNV
INSTALLATION
MODE D’INSTALLATION
Pour une bonne réussite de
l’installation et pour que les
prestations de fonctionnement
soient optimales, suivre
attentivement les instructions
dans le présent manuel. Le non-
respect de l‘application des normes
indiquées, qui peut entraîner un
mauvais fonctionnement des
appareillages, dégage la société
OLIMPIA SPLENDID de toute
forme de garantie et des éventuels
dommages causés à des personnes,
DQLPDX[RXELHQV
S’assurer que l’installation
électrique correspond aux
normes, respecte les données
UHSRUWpHVVXUOD¿FKHWHFKQLTXH
et qu’elle dispose d’une mise à la
terre adéquate.
Le client ne doit pas installer,
enlever ou réinstaller l’appareil
par lui-même.
Il y a risque d’incendie,
G¶pOHFWURFXWLRQG¶H[SORVLRQRXGH
blessure.
Pour l’installation, contacter
toujours le revendeur ou un
centre d’assistance agréé.
Il y a risque d’incendie,
G¶pOHFWURFXWLRQG¶H[SORVLRQRXGH
blessure.
S’assurer que la zone
d’installation ne s’abîme pas
avec le temps.
Si la base s’écroule, le climatiseur
lui-même pourrait tomber, ce qui
pourrait provoquer une détérioration
des meubles et de l’appareil et
blesser des personnes.
Installer dans un point robuste et
solide, en mesure de supporter
le poids.
Ne pas installer l’appareil dans
un lieu où il pourrait y avoir des
IXLWHVGHJD]LQÀDPPDEOH
INSTALLATION
HINWEISE ZUR
INSTALLATION
Zur Gewährleistung einer korrekten
Installation und einer einwandfreien
Funktionsweise des Klimagerätes
sind die in dieser Betriebsanleitung
enthaltenen Anweisungen
strikt zu befolgen. Für eventuelle
3HUVRQHQRGHU6DFKVFKlGHQGLH
auf ein Nichtbeachten derselben
]XUFN]XIKUHQVLQGNDQQGLH)D
OLIMPIA SPLENDID auf keinen
Fall zur Verantwortung gez
ogen werden. Zudem erlischt der
Garantieanspruch.
Die elektrische Anlage
muss geerdet sein und den
einschlägigen Richtlinien sowie
den im Technischen Datenblatt
angeführten Daten entsprechen.
Das Gerät darf nicht selbst
(Kunde) installiert, entfernt oder
neu installiert werden.
Es besteht die Gefahr von
6WURPVFKOlJHQ ([SORVLRQHQ XQG
Verletzungen.
Nehmen Sie für die korrekte
Installation stets Kontakt mit dem
Händler oder einem autorisierten
Kundendienstzentrum auf.
Es besteht die Gefahr von
6WURPVFKOlJHQ ([SORVLRQHQ XQG
Verletzungen.
Stellen Sie sicher, dass der
Installationsbereich langfristig
unbeschädigt bleibt.
6ROOWH GHU 6RFNHO QDFKJHEHQ
könnte das Klimagerät stürzen
und Verletzungen von Personen
sowie Schäden an
Einrichtungsgegenständen und
Produktmängel herbeiführen.
Installieren Sie an einem
belastbaren und standfesten Ort,
der zur Aufnahme des Gewichts
geeignet ist.
Installieren Sie das Gerät nicht an
HLQHP2UWDQGHPHQWÀDPPEDUHV
Gas austreten kann.
La pagina si sta caricando...

GB
F
D
28
I
2
SCELTA DELLA POSIZIONE
DELL’UNITÀ INTERNA
La posizione di installazione
dell’unità interna, per ottenere il
miglior rendimento di funzionamento
ed evitare guasti o condizioni di
pericolo, deve avere i seguenti
requisiti:
- Non esporre l’unità interna a fonti
di calore o vapore.
- Assicurarsi che lo spazio a destra
e a sinistra dell’apparecchiatura
sia superiore a 12 cm.
- L’unità interna dovrebbe essere
installata a muro ad un’altezza di
2.3 metri o più dal suolo.
- L’unità interna dovrebbe essere
installata lasciando uno spazio
minimo di 15 cm dal soffitto
¿J
/DSDUHWHVXFXLVLLQWHQGH¿VVDUH
l’unità interna deve essere robusta
e adatta a sostenerne il peso.
- Deve essere possibile lasciare
attorno all’unità uno spazio
necessario per eventuali
operazioni di manutenzione.
- Non devono essere presenti
ostacoli per la libera circolazione
dell’aria sia dal lato aspirazione
che, in maggior luogo, su quello
di uscita aria; in questo particolare
caso non deve essere presente
nessun ostacolo ad una distanza
inferiore i 2 m. Ciò potrebbe
causare turbolenze tali da
inibire il corretto funzionamento
dell’apparecchio.
SELECTION OF POSITION OF
THE INSIDE UNIT
The position for installation of
WKH LQVLGH XQLW WR REWDLQ WKH
best performance and prevent
EUHDNGRZQVRUKD]DUGVPXVWKDYH
the following requisites:
'RQRWH[SRVHWKHLQGRRUXQLWWR
heat or steam.
- Ensure that the space on the left
and right of the unit is more than
12 cm.
- The indoor unit should be installed
on the wall at a height of 2.3
PHWUHVRUPRUHIURPWKHÀRRU
- The indoor unit should be installed
allowing a minimum clearance of
FPIURPWKHFHLOLQJ¿J
- The wall on which the inside unit is
installed must be sturdy and able
to withstand its weight.
- It must be possible to leave
room around the unit for any
maintenance operations that may
be necessary.
- There should be no obstacles to
the free circulation of air on the
LQWDNH VLGH DQG HVSHFLDOO\ RQ
WKH DLU RXWOHW VLGHRQWKLVVLGH
LQSDUWLFXODU WKHUH VKRXOGEHQR
obstacles closer than 2 m. This
could cause turbulence that would
interfere with correct operation of
the unit.
2.2
CHOIX DE LA POSITION DE
L’UNITE INTERIEURE
Pour obtenir le meilleur rendement
de fonctionnement et éviter les
pannes ou les situations de
danger, la position d’installation
de l’unité intérieure doit avoir les
caractéristiques suivantes:
1H SDV H[SRVHU O¶XQLWp LQWHUQH
à des sources de chaleur ou de
vapeur.
- S’assurer que l’espace à droite
et à gauche de l’appareil est
supérieur à 12 cm.
- L’unité interne doit être installée
au mur à une hauteur de 2,3
mètres ou plus du sol.
- L’unité interne doit être installée
en laissant un espace minimum
de 15 cm par rapport au plafond
¿J
/HPXUVXUOHTXHORQVRXKDLWH¿[HU
l’unité intérieure doit être solide et
apte à en supporter le poids.
- Il faut prévoir de laisser l’espace
nécessaire autour de l’unité
pour d’éventuelles opérations
d’entretien.
- Il ne doit y avoir aucun obstacle
pour la libre circulation de l’air
tant du côté de l’aspiration que,
à plus forte raison, sur celui de la
sortie de l’air; pour ce dernier cas
il ne doit y avoir aucun obstacle
à une distance inférieure à 2
m. Cela pourrait causer des
turbulences qui pourraient
empêcher le fonctionnement
correct de l’appareil.
POSITIONIERUNG DER
INNENEINHEIT
Zur Gewährleistung einer
einwandfreien Funktionsweise
und zur Vorbeugung von
Betriebsstörungen und Gefahren
LVWEHLGHU:DKOGHU6WHOOHDQGHUGLH
,QQHQHLQKHLWLQVWDOOLHUWZHUGHQVROO
auf Folgendes zu achten:
- Setzen Sie die Inneneinheit keinen
Wärme- oder Dampfquellen aus.
6WHOOHQ6LHVLFKHUGDVVUHFKWVXQG
links vom Gerät mehr als 12 cm
Abstand eingehalten werden.
- Die Inneneinheit ist an der Wand
auf einer Höhe von mindestens
2.3 Metern über dem Boden zu
installieren.
- Die Inneneinheit ist so zu
LQVWDOOLHUHQ GDVV PLQGHVWHQV
15 cm Abstand von der Decke
eingehalten werden (Abb. 1).
'LH:DQGDQGHUGLH,QQHQHLQKHLW
EHIHVWLJWZLUGPXVVGHP*HZLFKW
derselben standhalten.
'LH(LQKHLWLVWVRDQ]XEULQJHQ
dass an dieser jederzeit
und problemlos eventuelle
Wartungseingriffe vorgenommen
werden können.
- An der Luftansaug- und
Luftauslassseite dürfen sich
in einem Abstand von mind. 2
PNHLQH+LQGHUQLVVHEHILQGHQ
da dies zu Turbulenzen führen
N|QQWHGLHGLHHLQZDQGIUHLH
Funktionsweise des Gerätes
beeinträchtigen könnten.
1
15 cm
2,3 m
12 cm
12 cm
La pagina si sta caricando...

GB
F
D
30
I
2
- Deve possibilmente essere una
parete esterna in modo da poter
convogliare verso l’esterno il
drenaggio della condensa.
- Non deve essere in una posizione
tale che il flusso dell’aria sia
rivolto direttamente alle persone
VRWWRVWDQWL¿J
- Non sia direttamente sopra ad
un apparecchio elettrodomestico
(televisore, radio, frigorifero, ecc.),
RVRSUDDGXQDIRQWHGLFDORUH¿J
3).
- Non siano presenti ostacoli per il
ricevimento dei segnali emessi dal
WHOHFRPDQGR¿J
MONTAGGIO DELL’UNITÀ
INTERNA
Montaggio della piastra di
¿VVDJJLR
Dopo aver verificato quanto
descritto nel cap. 2.2 si procede al
PRQWDJJLRGHOODSLDVWUDGL¿VVDJJLR
tenendo conto delle dimensioni
ULSRUWDWHLQ¿JXUD
- Posizionare correttamente la
piastra mediante una bolla di
OLYHOOR¿J
- Se la parete è in mattoni, cemento
o similari, realizzare otto fori da
5 mm sulla parete. Inserire i fermi
per le apposite viti di montaggio.
- Fissare la piastra di installazione
alla parete con otto viti del tipo A.
,ISRVVLEOHLWVKRXOGEHLQVWDOOHG
RQDQH[WHUQDOZDOOVRDVWR
convey the condensation drain
outside.
- It should not be installed in a
SRVLWLRQ ZKHUH WKH DLUÀRZFDQ
strike the people underneath
GLUHFWO\¿J
- It should not be directly over
DQRWKHUDSSOLDQFHWHOHYLVLRQVHW
UDGLRUHIULJHUDWRUHWFRURYHUD
VRXUFHRIKHDW¿J
- There should be no obstacles for
reception of signals emitted by the
UHPRWHFRQWURO¿J
INSTALLATION OF THE
INSIDE UNIT
Installation of fastening plate
After ascertaining the conditions
GHVFULEHG LQSDU SURFHHG WR
LQVWDOO WKH IDVWHQLQJ SODWHWDNLQJ
into consideration the dimensions
VKRZQLQ¿JXUH
- Position the plate accurately with
DEXEEOHOHYHO¿J
,I WKH ZDOO LV PDGH RI EULFN
FRQFUHWHRUWKHOLNHGULOOHLJKW
5 mm diameter holes in the wall.
Insert Clip anchor for appropriate
mounting screws.
- Fit the installation plate on the wall
with eight type “A” screws.
- il est préférable, autant que
possible, que ce soit un mur
GRQQDQWVXUO¶H[WpULHXUGHVRUWH
que l’on puisse diriger le drainage
de la condensation au dehors.
- L’installation ne doit pas être dans
XQHSRVLWLRQWHOOHTXHOHVRXIÀDJH
de l’air soit dirigé directement
sur les personnes placées au-
GHVVRXV¿J
- Elle ne doit pas être directement
audessus d’un appareil
électroménager (téléviseur, radio,
réfrigérateur, etc.), ou au-dessus
G¶XQHVRXUFHGHFKDOHXU¿J
- Il ne doit pas y avoir d’obstacles
SRXUODUpFHSWLRQGHVVLJQDX[
pPLVSDUODWpOpFRPPDQGH¿J
MONTAGE DE L’UNITE
INTERIEURE
Montage de la plaque de
¿[DWLRQ
$SUqVDYRLUYpUL¿pFHTXLHVWGpFULW
au parag. 2.2, on procède au
PRQWDJHGHODSODTXHGH¿[DWLRQ
en tenant compte des dimensions
UHSRUWpHVjOD¿JXUH
- Positionner correctement la plaque
en utilisant un niveau à bulle
¿J
- Si le mur est en briques, béton
ou similaires, percer huit trous de
5 mm dans le mur. Insérer les
chevilles pour les vis de montage
spéciales.
)L[HU OD SODTXH G¶LQVWDOODWLRQ DX
mur au moyen de huit vis de type
A.
- Nach Möglichkeit sollte eine
$XHQZDQGYRUKDQGHQVHLQ
damit das Kondenswasser ins
Freie abgeleitet werden kann.
- Bei der Installation der Einheit
LVWGDUDXI]XDFKWHQGDVVGHU
Luftstrom nicht direkt auf sich
darunter befindliche Personen
gerichtet ist (Abb. 2).
- Die Einheit darf nicht über
HLQHP(OHNWURJHUlW79 5DGLR
.KOVFKUDQN XVZ RGHU EHU
einer Wärmequelle installiert
werden (Abb. 3).
(VLVWGDUDXI]XDFKWHQGDVVGDV
von der Fernbedienung gesendete
Signal auf keine Hindernisse trifft
(Abb. 4).
MONTAGE DER
INNENEINHEIT
Montage der Befestigungs-
platte
1DFKGHP EHUSUIW ZXUGH RE
die in Kap. 2.2 beschriebenen
%HGLQJXQJHQ JHJHEHQ VLQG
ist die Befestigungsplatte unter
Berücksichtigung der in Abb. 6
angegebenen Maße zu befestigen.
- Die Platte unter Zuhilfenahme
einer Wasserwaage nivellieren
¿J
%HL :lQGHQ DXV 0DXHU]LHJHOQ
Beton o. Ä. führen Sie acht 5-mm-
Bohrungen an der Wand aus.
Setzen Sie die
Befestigungselemente für die
vorgesehenen Montageschrauben
ein.
- Befestigen Sie die
Installationsplatte mit acht
Schrauben vom Typ A.
2
3
2.3
2.3.1
La pagina si sta caricando...

GB
F
D
32
I
(WULHU¿J
A - sortie unité interne
B - plaque d’installation
& RUL¿FHWXEHUpIULJpUDQWJDXFKH¡
65
' RUL¿FH WXEH UpIULJpUDQWGURLWH¡
65
Exécution du trou pour le
passage des tuyaux
Si les conduites de branchement
arrivent derrière l’unité intérieure côté
droit, il est nécessaire d’effectuer le
trou dans le mur pour le passage des
WX\DX[
- Faire le trou au centre de la position
avec un foret de 8-10 mm et une
LQFOLQDLVRQYHUVO¶H[WpULHXUGH
(pour faciliter l’écoulement du liquide
de condensation). Procéder ensuite
DXSHUoDJHGp¿QLWLIDYHFXQIRUHWSRXU
carottage guidé de 65 mm.
- Introduire dans le trou le tuyau de
GUDLQDJHHWFHX[GXIULJRULJqQH
ainsi que le câblage pour le
branchement électrique.
Si les conduites de branchement
arrivent derrière l’unité intérieure
côté gauche, il est nécessaire
d’effectuer dans le mur, en
FRUUHVSRQGDQFHDX[WX\DX[GH
l’installation réfrigérante un trou de
¡¿J
Haltebügel (Abb. 6)
A - Ausgang Inneneinheit
B - Installationsplatte
C - Bohrung Kühlschlauch links ø
65
D - Bohrung Kühlschlauch rechts
ø 65
Bohrung für das Durchführen
der Rohre
Werden die Verbindungsleitungen zur
rechten Rückseite der Inneneinheit
JHIKUWLVWLQGHU:DQGHLQH%RKUXQJ
für das Durchführen der Rohre
einzuarbeiten.
,QGHU0LWWHGHU6WHOOHDQGHUGLH(LQKHLW
PRQWLHUWZLUGPLWHLQHU%RKUHUVSLW]H
(8-10 mm) eine Bohrung mit einer
Neigung von 5% (zur ungehinderten
Ableitung des Kondenswassers)
durchführen. Danach das vorgebohrte
Loch mit einer geführten Breitkopf-
Bohrerspitze (65mm) aufbohren.
- Die Ableitung für das Kondenswasser
und das Kühlmittel sowie die Kabel
für den elektrischen Anschluss in die
Bohrung einführen.
Werden die Verbindungsleitungen
zur linken Rückseite der Inneneinheit
JHIKUWLVWLQGHU:DQGXQG]ZDUDXI
GHU+|KHGHU.KOURKUHHLQH%RKUXQJ
(Æ 65 mm) einzuarbeiten (Abb. 6).
6
2
6WDIID¿J
A - uscita unità interna
B - piastra di installazione
& IRURWXERUHIULJHUDQWHVLQLVWUR¡
' IRURWXERUHIULJHUDQWHGHVWUR¡
Esecuzione foro passaggio
tubi
Nel caso in cui le linee di
collegamento arrivino dalla parte
posteriore destra dell’unità interna
si rende necessario eseguire nella
parete il foro per il passaggio dei
tubi.
- Eseguire nel centro della
posizione il foro con una punta di
8-10 mm e un’inclinazione verso
O¶HVWHUQRGHOSHUFRQVHQWLUH
XQ¶DJHYROHGHÀXLUHGHOOLTXLGRGL
condensa). Procedere poi alla
IRUDWXUDGH¿QLWLYDFRQXQDSXQWD
a tazza guidata di 65 mm.
- Inserire nel foro la linea di
drenaggio e quelle del refrigerante
e il cablaggio per il collegamento
elettrico.
Nel caso in cui le linee di collegamento
arrivino dalla parte posteriore
sinistra dell’unità interna si rende
necessario eseguire nella parete, in
corrispondenza dei tubi dell’impianto
UHIULJHUDQWHXQIRURGL¡¿J
2.3.2
2.3.3
%UDFH¿J
A - indoor unit outline
B - installation plate
C - left rear side refrigerant pipe
hole ø 65
D - right rear side refrigerant pipe
hole ø 65
Drilling pipe passage holes
If the service lines for connection
come from the right rear side of the
inside unit it will be necessary to
drill a hole in the wall for passage
of the pipes.
- Drill the hole at the centre of the
site of installation using an 8-10
mm bit and tilting it downward
towards the outside by 5% (to
IDFLOLWDWHWKHÀRZRIFRQGHQVDWLRQ
Finish the hole with a 65 mm
auger.
- Insert the drain line and the
FRROLQJ IOXLG OLQHLQWKHKROH
as well as the cable for electric
connection.
If the service lines for connection
come from the left rear side of the
inside unit it will be necessary to drill
a hole ø 65 in the wall for the cooling
SLSHV¿J
L
R
H
ø ø
5PP /PP +PP ¡PP
88 85 45 65
95 100 45 65
100 110 45 65
NEXYA S2 9
NEXYA S2 12
NEXYA S2 24
La pagina si sta caricando...

GB
F
D
34
I
7a
E
D
F
C
A
G
B
H
I
43
&RQQHFWLYHSLSH¿JD
1 For the left-hand and right-hand
SLSLQJ UHPRYH WKH SLSHFRYHU
from the side panel.
([SODLQ WR FOLHQWV WKDW WKHSLSH
cover must be kept as it may
be used when relocate the air
conditioner to any other place.
2 For the rear-right-hand and rear-
OHIWKDQGSLSLQJLQVWDOOWKHSLSLQJ
as shown. Bend the connective
pipe to be laid at 43mm height
or less from the wall.
3 )L[ WKH HQG RI WKH FRQQHFWLYH
pipe. (Refer to Tightening
Connection in REFRIGERANT
PIPING CONNECTION).
A - pipe holder
B - pipe cover (left)
C - left piping
D - left back piping
E - right back piping
F - right piping
G - pipe cover (right)
H - indoor unit outline
I - connective pipe
L - upper hook
M - lower hook
N - cushioning material
2
2.3.4
7XEHGHUDFFRUGHPHQW¿JD
1 Pour les tubes gauche et droit,
enlever la couverture des tubes
du panneau latéral.
([SOLTXHU DX[ FOLHQWV TXH OD
couverture des tubes doit être
conservée, car elle pourrait
être réutilisée si l’on place le
climatiseur dans une autre
position.
2 Pour les tubes arrière droit et
arrière gauche, installer les tubes
de la façon indiquée. Plier le tube
GHFRQQH[LRQTXLVHUDPLVHQ
place à une hauteur de 43mm,
ou inférieure, du mur.
3 )L[HU O¶H[WUpPLWp GX WXEH
de raccordement. (Voir
Serrage raccordement dans
RACCORDEMENT DU TUBE
REFRIGERANT).
A - porte-tube
B - protection tube (gauche)
C - tube gauche
D - tube arrière gauche
E - tube arrière droit
F - tube droite
G - protection tube (droite)
H - sortie unité interne
I - tube de raccordement
L - crochet supérieur
M - crochet inférieur
N - matériau de rembourrage
7XERGLFRQQHVVLRQH¿JD
1 Per le tubazioni sinistra e destra,
togliere la copertura dei tubi dal
pannello laterale.
Spiegare ai clienti che la
copertura dei tubi deve essere
conservata, perché potrebbe
essere riutilizzata se si colloca
il condizionatore in un’altra
posizione.
2 Per le tubazioni posteriore destra
e posteriore sinistra, installare
i tubi come mostrato. Piegare il
tubo di connessione che sarà
steso ad un’altezza di 43mm, o
inferiore, dal muro.
3 Fissare l’estremità del tubo di
connessione. (Vedere Serraggio
Connessione in CONNESSIONE
TUBO REFRIGERANTE).
A - porta-tubo
B - protezione tubo (sinistra)
C - tubazione sinistra
D - tubazione sinistra posteriore
E - tubazione destra posteriore
F - tubazione destra
G - protezione tubo (destra)
H - uscita unità interna
I - tubo di connessione
L - gancio superiore
M - gancio inferiore
N - materiale di imbottitura
Anschlussschlauch (Abb. 7a)
1 Entfernen Sie für die
Schlauchleitungen links und
rechts die Abdeckung der
Schläuche von der Seitenblende.
Bitte weisen Sie Ihre Kunden
GDUDXIKLQGDVVGLH$EGHFNXQJ
der Schläuche aufzubewahren
LVWGDVLHEHLGHU$XIVWHOOXQJGHU
Klimaanlage an einem anderen
Ort wiederverwendet werden
könnte.
2 Installieren Sie für die
Schlauchleitungen hinten rechts
und hinten links die Schläuche
wie gezeigt. Biegen Sie den
$QVFKOXVVVFKODXFKGHUDXIHLQHU
Höhe von 43 mm oder darunter
von der Wand ausgestreckt wird.
3 Befestigen Sie das andere
Ende des Anschlussschlauchs
(Siehe Befestigter
Anschluss in ANSCHLUSS
KÜHLSCHLAUCH).
A - Schlauchhalter
B - Schutz für Schlauch (links)
C - Schlauchleitung links
D - Schlauchleitung links hinten
E - Schlauchleitung rechts hinten
F - Schlauchleitung rechts
G - Schutz für Schlauch (rechts)
H - Ausgang Inneneinheit
I - Anschlussschlauch
L - Oberer Haken
M - Unterer Haken
N - Futtermaterial
La pagina si sta caricando...

GB
F
D
36
I
,QGRRUXQLWLQVWDOODWLRQ¿J
7b)
1 Pass the piping through the hole
in the wall.
2 Put the upper claw at the back of
the indoor unit on the upper hook
RIWKHLQVWDOODWLRQSODWHPRYHWKH
indoor unit from side to side to
see that it is securely hooked.
3 Piping can easily be made by
lifting the indoor unit with a
cushioning material between the
indoor unit and the wall. Get it out
DIWHU¿QLVKSLSLQJ
4 Push the lower part of the indoor
XQLWXSRQWKHZDOO7KHQPRYH
WKHLQGRRUXQLWIURPVLGHWRVLGH
up and down to check if it is
hooked securely.
2
2.3.5
,QVWDOODWLRQXQLWpLQWHUQH¿J
7b)
1 Passer les tubes à travers le trou
percé dans le mur.
2 Mettre l’étrier supérieur du
côté arrière de l’unité interne
sur le crochet supérieur de la
plaque d’installation. Déplacer
l’unité interne latéralement pour
s’assurer qu’elle est accrochée
de façon sûre.
3 Le raccordement des tubes
peut facilement être effectué en
soulevant l’unité interne avec un
matériau de rembourrage entre
l’unité interne et le mur. L’enlever
une fois les raccordements
terminés.
4 Pousser la partie inférieure
de l’unité interne sur le mur.
Déplacer ensuite l’unité interne
latéralement et verticalement
pour s’assurer qu’elle est
accrochée de façon sûre.
Installazione unità interna
¿JE
1 Passare i tubi attraverso il foro
nella parete.
2 Mettere la staffa superiore
della parte posteriore dell’unità
interna sul gancio superiore della
piastra di installazione. Muovere
l’unità interna lateralmente per
YHUL¿FDUHFKH VLDDJJDQFLDWDLQ
modo sicuro.
3 La connessione dei tubi
può facilmente essere fatta
sollevando l’unità interna con del
materiale di imbottitura tra l’unità
interna e la parete. Toglierla, una
volta terminati gli allacciamenti.
4 Spingere la parte inferiore
dell’unità interna sulla parete.
Muovere quindi l’unità interna
lateralmente e verticalmente per
YHUL¿FDUHFKH VLDDJJDQFLDWDLQ
modo sicuro.
Installation der Inneneinheit
(Abb. 7b)
1 Führen Sie die Schläuche durch
die Öffnung in der Wand
2. Fügen Sie den oberen Bügel des
hinteren Teils der Inneneinheit
auf den oberen Haken der
Installationsplatte. Bewegen
Sie die Inneneinheit seitlich um
VLFKHU]XVWHOOHQ GDVV GLHVH DXI
sichere Art eingehängt ist.
3 Der Anschluss der Schläuche
NDQQHLQIDFKHUIROJHQLQGHPGLH
Inneneinheit mit Futtermaterial
zwischen Inneneinheit und Wand
angehoben wird. Entfernen Sie
diese nach Herstellung der
Anschlüsse.
4 Schieben Sie den unteren Teil
der Inneneinheit an die Wand
Bewegen Sie die Inneneinheit
seitlich und vertikal um
VLFKHU]XVWHOOHQ GDVV GLHVH DXI
sichere Art eingehängt ist.
7b
L
M
N
La pagina si sta caricando...

GB
F
D
38
I
INSTALLATION OF OUTSIDE
UNIT
Selection of position for
outside unit
The position for installation of
WKH RXWVLGH XQLW WRREWDLQWKH
best performance and prevent
EUHDNGRZQVRUKD]DUGVPXVWKDYH
the following requisites:
- It should be protected from direct
VXQOLJKW¿J
- It should be protected from
DWPRVSKHULFDJHQWVUDLQ VQRZ
and from direct gusts of strong
ZLQG¿J
- It should also be protected from
DQ\ FRSLRXV GRZQÀRZ RIZDWHU
(gutter drains or watering cans)
¿J
- It should stand on a solid surface
able to withstand its weight
¿J
- The outside unit must be installed
perfectly level (check with a
bubble level).
,ILWKDVWREHLQVWDOOHGRQDZDOOXVH
the special kit with WALL MOUNT
BRACKETS (optional).
Follow the instructions included in
the kit for correct installation.
MONTAGE DER
AUSSENEINHEIT
Positionierung der
Außeneinheit
Zur Gewährleistung einer
einwandfreien Funktionsweise
und zur Vorbeugung von
Betriebsstörungen und Gefahren
LVWEHLGHU:DKOGHU6WHOOHDQGHU
die Außeneinheit installiert werden
VROODXI)ROJHQGHV]XDFKWHQ
- Die Einheit ist gegen
Sonneneinstrahlung geschützt
zu montieren (Abb. 8).
- Die Einheit ist gegen
:LWWHUXQJVHLQIOVVH5HJHQ
Schnee) und gegen starke
Windböen geschützt zu montieren
(Abb. 9).
- Die Einheit ist gegen Tropfwasser
DXV%OXPHQYDVHQ5HJHQULQQHQ
geschützt zu montieren (Abb. 10).
- Die Tragplatte muss dem Gewicht
der Außeneinheit standhalten
(Abb. 11).
- Die Außeneinheit muss
einwandfrei nivelliert sein;
zur Überprüfung ist eine
Wasserwaage zu verwenden.
Soll die Außeneinheit an einer
:DQGLQVWDOOLHUW ZHUGHQ VLQG GLH
hierfür vorgesehenen (auf Wunsch
lieferbaren) MONTAGEBÜGEL zu
verwenden.
Für deren Montage sind die in der
Packung beiliegenden Anweisungen
strikt zu befolgen.
2.4
2
MONTAGGIO DELL’UNITÁ
ESTERNA
Scelta della posizione
dell’unità esterna
La posizione di installazione
dell’unità esterna, per ottenere il
miglior rendimento di funzionamento
ed evitare guasti o condizioni di
pericolo, deve avere i seguenti
requisiti:
- Deve essere al riparo dai raggi
VRODULGLUHWWL¿J
- Deve essere riparata dagli agenti
atmosferici (pioggia, neve) e dalle
correnti dirette dei forti venti
¿J
- Deve essere in posizione riparata
da eventuali rovesci copiosi di
acqua (innaffiatoi, scarichi di
JURQGDLH¿J
- La base d’appoggio deve poter
reggere il peso dell’unità esterna
¿J
- L’unità esterna deve essere
posizionata perfettamente in piano
YHUL¿FDUHFRQEROODGLOLYHOOR
Nel caso l’unità esterna debba
essere installata a parete è
necessario utilizzare il kit STAFFA
DI MONTAGGIO A PARETE
(a richiesta).
Per il suo montaggio seguire
scrupolosamente le relative
istruzioni allegate alla confezione
del kit.
MONTAGE DE L’UNITE
EXTERIEURE
&KRL[GHODSRVLWLRQGHO¶XQLWp
extérieure
Pour obtenir le meilleur rendement
de fonctionnement et éviter les
pannes ou les situations de danger,
la position d’installation de l’unité
H[WpULHXUH GRLW SRVVpGHU OHV
caractéristiques suivantes:
- Elle doit être protégée des rayons
GLUHFWVGXVROHLO¿J
- Elle doit être à l’abri des agents
atmosphériques (pluie, neige) et
des courants directs des vents
YLROHQWV¿J
- Elle doit être située à l’abri
d’éventuelles aspersions
abondantes d’eau (arrosages,
écoulements de gouttières)
¿J
- La base d’appui doit pouvoir
supporter le poids de l’unité
H[WpULHXUH¿J
/¶XQLWp H[WpULHXUH GRLW rWUH
positionnée parfaitement à
l’horizontale (vérifier avec un
niveau à bulle).
6L O¶XQLWp H[WpULHXUH GRLW rWUH
installée au mur il faut utiliser le kit
PATTE DE MONTAGE MURAL (sur
demande).
Pour son montage suivre
scrupuleusement les instructions
relatives jointes à l’emballage du kit.
2.4.1
8 9
La pagina si sta caricando...

GB
F
D
40
I
- The unit should not be installed
downwind of chimneys
discharging burnt gas or subject
WR HPLVVLRQV RI IXPHVRLO\RU
corrosive gasses.
- It should be possible to discharge
the condensation produced.
- Ensure that the clearance around
the back of the unit is more than
30 cm and left side is more than
30 cm. The front of the unit
should have more than 70 cm of
clearance and the connection side
(right side) should have more than
FPRIFOHDUDQFH¿J
- Take the air conditioner weight into
account and select a place where
noise and vibration will not be an
issue.
- Select a place so that the warm air
and noise from the air conditioner
do not disturb neighbors.
- Die Einheit darf nicht unterhalb von
Rauchgasableitungen montiert
und keinen Emissionen von
'DPSI|OLJHPRGHUNRUURVLYHP
Gas ausgesetzt werden.
(VPXVVGLH0|JOLFKNHLWEHVWHKHQ
eine Kondenswasserableitung zu
installieren.
6WHOOHQ6LHVLFKHUGDVVGHU3ODW]
im hinteren Teil des Geräts mehr
als 30 cm und auf der linken
Seite mehr als 30 cm beträgt.
Die Stirnseite des Geräts sollte
mehr als 70 cm und die Seite der
Anschlüsse (rechte Seite) mehr
als 60 cm Platz haben (Abb. 12).
- Berücksichtigen Sie das Gewicht
der Klimaanlage und wählen Sie
HLQHQ2UWDQGHP*HUlXVFK
und Vibrationen kein Problem
darstellen.
:lKOHQ6LHHLQHQ2UWDQGHPGLH
Warmluft und der Lärm durch die
Klimaanlage keine Störung der
Nachbarn bedeuten.
2
- L’unità non deve essere sottovento
rispetto a camini di scarico gas
combusti, ne sottoposto ad
emissioni di vapori, gas oleosi o
corrosivi.
- Deve essere possibile lo scarico
della condensa emessa.
- Assicurarsi che lo spazio nella parte
posteriore dell’apparecchiatura
sia superiore a 30 cm e sul lato
sinistro sia superiore a 30 cm. La
parte frontale dell’apparecchiatura
dovrebbe avere più di 70 cm di
spazio ed il lato delle connessioni
(lato destro) dovrebbe avere più
GLFPGLVSD]LR¿J
- Considerare il peso del
condizionatore e scegliere un
posto in cui rumore e vibrazioni
non rappresentino un problema.
- Scegliere un posto in cui l’aria
calda ed il rumore generato dal
condizionatore non siano di
disturbo per i vicini.
- L’unité ne doit pas être sous-
ventée par rapport à des
cheminées d’évacuation de gaz
brûlés, ni soumis à des émissions
GH YDSHXUV JD] KXLOHX[ RX
corrosifs.
- L’évacuation du condensat produit
doit être possible.
- S’assurer que l’espace à l’arrière
de l’appareil est supérieur à 30
cm et que sur le côté gauche il
est supérieur à 30 cm. La partie
frontale de l’appareil doit avoir
plus de 70 cm d’espace et le côté
des raccordements (côté droit)
doit avoir plus de 60 cm d’espace
¿J
- Prendre en compte le poids
du climatiseur et choisir un
emplacement où le bruit et les
vibrations ne créent pas de
problème.
- Choisir un emplacement où l’air
chaud et le bruit généré par le
climatiseur ne causent pas de
GpUDQJHPHQWDX[YRLVLQV
12
60 cm
30 cm
70 cm
30 cm
60 cm
La pagina si sta caricando...
La pagina si sta caricando...
La pagina si sta caricando...
La pagina si sta caricando...
La pagina si sta caricando...
La pagina si sta caricando...
La pagina si sta caricando...
La pagina si sta caricando...
La pagina si sta caricando...
La pagina si sta caricando...
La pagina si sta caricando...
La pagina si sta caricando...
La pagina si sta caricando...
La pagina si sta caricando...
La pagina si sta caricando...
La pagina si sta caricando...
La pagina si sta caricando...
La pagina si sta caricando...
La pagina si sta caricando...
La pagina si sta caricando...
La pagina si sta caricando...
La pagina si sta caricando...
La pagina si sta caricando...
La pagina si sta caricando...
La pagina si sta caricando...
La pagina si sta caricando...
La pagina si sta caricando...
La pagina si sta caricando...
La pagina si sta caricando...
La pagina si sta caricando...
La pagina si sta caricando...
La pagina si sta caricando...
La pagina si sta caricando...
La pagina si sta caricando...
La pagina si sta caricando...
La pagina si sta caricando...
La pagina si sta caricando...
La pagina si sta caricando...
La pagina si sta caricando...
La pagina si sta caricando...
La pagina si sta caricando...
La pagina si sta caricando...
La pagina si sta caricando...
La pagina si sta caricando...
La pagina si sta caricando...
La pagina si sta caricando...
La pagina si sta caricando...
La pagina si sta caricando...
La pagina si sta caricando...
La pagina si sta caricando...
La pagina si sta caricando...
La pagina si sta caricando...
La pagina si sta caricando...
La pagina si sta caricando...
La pagina si sta caricando...
La pagina si sta caricando...
La pagina si sta caricando...
La pagina si sta caricando...
La pagina si sta caricando...
La pagina si sta caricando...
La pagina si sta caricando...
La pagina si sta caricando...
La pagina si sta caricando...
La pagina si sta caricando...
La pagina si sta caricando...
La pagina si sta caricando...
La pagina si sta caricando...
La pagina si sta caricando...
La pagina si sta caricando...
La pagina si sta caricando...
La pagina si sta caricando...
La pagina si sta caricando...
La pagina si sta caricando...
La pagina si sta caricando...
La pagina si sta caricando...
La pagina si sta caricando...
La pagina si sta caricando...
La pagina si sta caricando...
La pagina si sta caricando...
La pagina si sta caricando...
La pagina si sta caricando...
La pagina si sta caricando...
La pagina si sta caricando...
La pagina si sta caricando...
La pagina si sta caricando...
La pagina si sta caricando...
La pagina si sta caricando...
La pagina si sta caricando...
La pagina si sta caricando...
La pagina si sta caricando...
La pagina si sta caricando...
La pagina si sta caricando...
La pagina si sta caricando...
La pagina si sta caricando...
La pagina si sta caricando...
La pagina si sta caricando...
La pagina si sta caricando...
La pagina si sta caricando...
La pagina si sta caricando...
La pagina si sta caricando...
La pagina si sta caricando...
La pagina si sta caricando...
La pagina si sta caricando...
La pagina si sta caricando...
La pagina si sta caricando...
La pagina si sta caricando...
La pagina si sta caricando...
La pagina si sta caricando...
-
 1
1
-
 2
2
-
 3
3
-
 4
4
-
 5
5
-
 6
6
-
 7
7
-
 8
8
-
 9
9
-
 10
10
-
 11
11
-
 12
12
-
 13
13
-
 14
14
-
 15
15
-
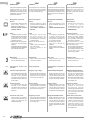 16
16
-
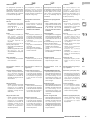 17
17
-
 18
18
-
 19
19
-
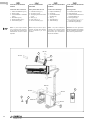 20
20
-
 21
21
-
 22
22
-
 23
23
-
 24
24
-
 25
25
-
 26
26
-
 27
27
-
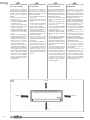 28
28
-
 29
29
-
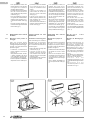 30
30
-
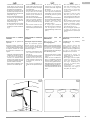 31
31
-
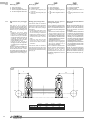 32
32
-
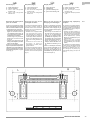 33
33
-
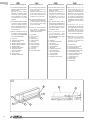 34
34
-
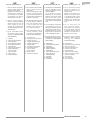 35
35
-
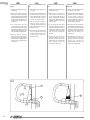 36
36
-
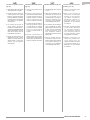 37
37
-
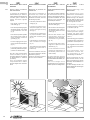 38
38
-
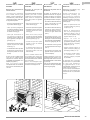 39
39
-
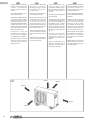 40
40
-
 41
41
-
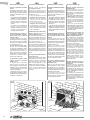 42
42
-
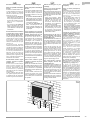 43
43
-
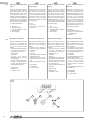 44
44
-
 45
45
-
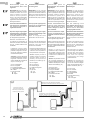 46
46
-
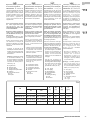 47
47
-
 48
48
-
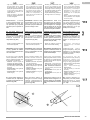 49
49
-
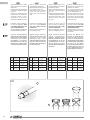 50
50
-
 51
51
-
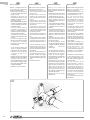 52
52
-
 53
53
-
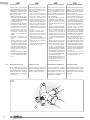 54
54
-
 55
55
-
 56
56
-
 57
57
-
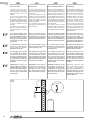 58
58
-
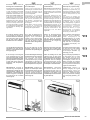 59
59
-
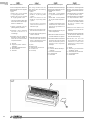 60
60
-
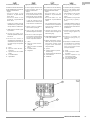 61
61
-
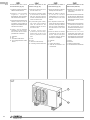 62
62
-
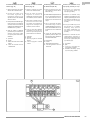 63
63
-
 64
64
-
 65
65
-
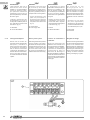 66
66
-
 67
67
-
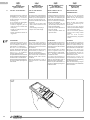 68
68
-
 69
69
-
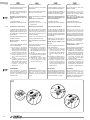 70
70
-
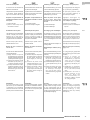 71
71
-
 72
72
-
 73
73
-
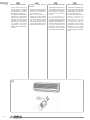 74
74
-
 75
75
-
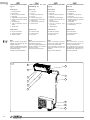 76
76
-
 77
77
-
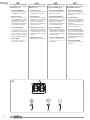 78
78
-
 79
79
-
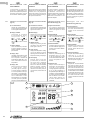 80
80
-
 81
81
-
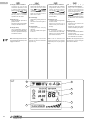 82
82
-
 83
83
-
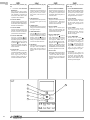 84
84
-
 85
85
-
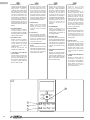 86
86
-
 87
87
-
 88
88
-
 89
89
-
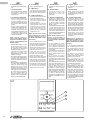 90
90
-
 91
91
-
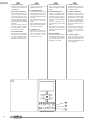 92
92
-
 93
93
-
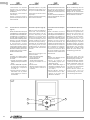 94
94
-
 95
95
-
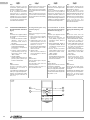 96
96
-
 97
97
-
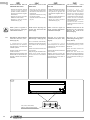 98
98
-
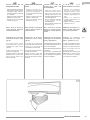 99
99
-
 100
100
-
 101
101
-
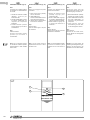 102
102
-
 103
103
-
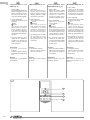 104
104
-
 105
105
-
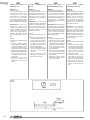 106
106
-
 107
107
-
 108
108
-
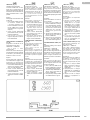 109
109
-
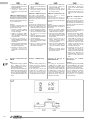 110
110
-
 111
111
-
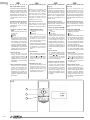 112
112
-
 113
113
-
 114
114
-
 115
115
-
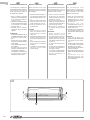 116
116
-
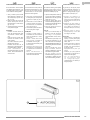 117
117
-
 118
118
-
 119
119
-
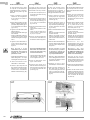 120
120
-
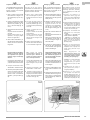 121
121
-
 122
122
-
 123
123
-
 124
124
-
 125
125
-
 126
126
-
 127
127
-
 128
128
-
 129
129
-
 130
130
-
 131
131
-
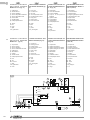 132
132
-
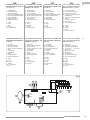 133
133
-
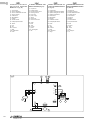 134
134
-
 135
135
-
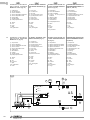 136
136
-
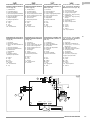 137
137
-
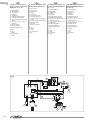 138
138
-
 139
139
-
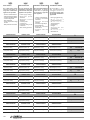 140
140
-
 141
141
-
 142
142
-
 143
143
-
 144
144
-
 145
145
-
 146
146
-
 147
147
-
 148
148


Olimpia Splendid Nexya S2 Inverter Manuale utente
- Tipo
- Manuale utente
- Questo manuale è adatto anche per
in altre lingue
- English: Olimpia Splendid Nexya S2 Inverter User manual
- français: Olimpia Splendid Nexya S2 Inverter Manuel utilisateur
- español: Olimpia Splendid Nexya S2 Inverter Manual de usuario
- Deutsch: Olimpia Splendid Nexya S2 Inverter Benutzerhandbuch
- Nederlands: Olimpia Splendid Nexya S2 Inverter Handleiding
- português: Olimpia Splendid Nexya S2 Inverter Manual do usuário
Documenti correlati
-
 Olimpia Splendid Qi Inverter Manuale utente
-
 Olimpia Splendid Nexya S4 E Inverter Manuale utente
-
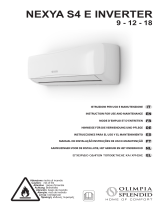 Olimpia Splendid NEXYA S4 E Manuale utente
-
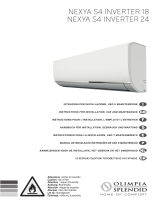 Olimpia Splendid Nexya S4 E Inverter Manuale utente
-
 Olimpia Splendid Nexya S4 E Duct Inverter Multi Guida d'installazione
-
 Olimpia Splendid Nexya S2 Multi inverter Manuale utente
-
 Olimpia Splendid Multiflexi inverter Manuale utente
-
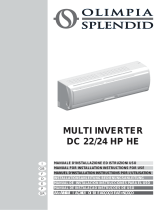 Olimpia Splendid Multiflexi inverter Manuale utente
-
 Olimpia Splendid NEXYA S4 COMMERCIAL CASSETTE Manuale del proprietario
-
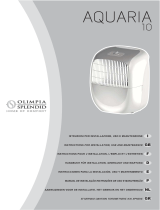 Olimpia Splendid MIA 2 7.5 Manuale utente


Altri documenti
-
Airwell 30K Installation Instructions Manual
-
Hitachi HSU-12RD03/R2(SDB) Manuale utente
-
Mitsubishi Heavy Industries FDFU Manuale utente
-
Haier 3HUM20HA03/R2(DB) Guida d'installazione
-
-
Stiga Park Pro 20 Manuale utente
-
Digicom Tintoretto Manuale utente
-
Crowcon XgardIQ Manuale utente
-
-
Wacker Neuson BS65-V EU Manuale utente