
EPNL
1
GR
I
GB
F
D
E
NL
P
GR
ISTRUZIONI PER INSTALLAZIONE, USO E MANUTENZIONE
INSTRUCTIONS FOR INSTALLATION, USE AND MAINTENANCE
INSTRUCTIONS POUR L'INSTALLATION, L'EMPLOI ET L'ENTRETIEN
HANDBUCH FÜR INSTALLATION, GEBRAUCH UND WARTUNG
INSTRUCCIONES PARA LA INSTALACIÓN, USO Y MANTENIMIENTO
MANUAL DE INSTALAÇÃO INSTRUÇÕES DE USO E MANUTENÇÃO
AANWIJZINGEN VOOR DE INSTALLATIE, HET GEBRUIK EN HET ONDERHOUD
ÅÃ×ÅÉÑÉÄÉÏ ÏÄÇÃÉÙÍ ÔÏÐÏÈÅÔÇÓÇÓ ÊÁÉ ×ÑÇÓÇÓ

GB
F
D
2
I
INDICE
1 GENERALITA’
1.1 INFORMAZIONI
GENERALI
1.2 SIMBOLOGIA
1.2.1 Pittogrammi redazionali
1.2.2 Pittogrammi relativi alla
sicurezza
1.3 IDENTIFICAZIONE DELLE
PARTI PRINCIPALI
1.4 COMPONENTI A
CORREDO
1.5 DESCRIZIONE DEL
FUNZIONAMENTO
1.5.1 AQUARIA
1.5.2 AQUARIA THERMO
1.6 AVVERTENZE
2 INSTALLAZIONE
2.1 ALLACCIAMENTO
ELETTRICO
2.2 INTERRUZIONE DI
CORRENTE
3 USO E MANUTENZIONE
3.1 PANNELLO COMANDI
3.2 SELEZIONE FUNZIONI
3.2.1 Stand-by
3.2.2 Selezione modo di
funzionamento
(AQUARIA)
3.2.3 Selezione modo di
funzionamento
(AQUARIA THERMO)
3.2.4 Visualizzazione temperatura
umidità ambiente
3.3 FUNZIONAMENTO CON
SCARICO CONTINUO
3.4 FUNZIONAMENTO A
BASSA TEMPERATURA
3.5 SVUOTAMENTO TANICA
3.6 MANUTENZIONE FILTRI
3.7 TRASPORTO DEL
DEUMIDIFICATORE
3.8 MANUTENZIONE PERIODICA
3.9 PULIZIA DEL
DEUMIDIFICATORE
3.10 RIPORRE IL
DEUMIDIFICATORE
SCHEMA ELETTRICO
DATI TECNICI
INDIVIDUAZIONE ANOMALIE DI
FUNZIONAMENTO
PAG.
4
4
6
6
6
8
8
10
10
10
10
14
14
16
18
18
18
18
20
20
24
26
30
30
32
34
34
34
34
36
38
40
INDEX
1 GENERAL INFORMATION
1.1 GENERAL INFORMATION
1.2 SYMBOLS
1.2.1 Editorial pictograms
1.2.2 Safety pictograms
1.3 IDENTIFICATION OF MAIN
COMPONENTS
1.4 COMPONENTS PROVIDED
1.5 OPERATING
DESCRIPTION
1.5.1 AQUARIA
1.5.2 AQUARIA THERMO
1.6 WARNINGS
2 INSTALLATION
2.1 ELECTRICAL POWER
SUPPLY
2.2 POWER FAILURE
3 USE AND MAINTENANCE
3.1 CONTROL PANEL
3.2 SELECTING FUNCTIONS
3.2.1 Stand-by
3.3.3 Selecting the operating
mode (AQUARIA)
3.2.3 Selecting the operating
mode (AQUARIA THERMO)
3.2.4 Indication of ambient
temperature and humidity on
the display
3.3 OPERATION WITH
CONTINUOUS DISCHARGE
3.4 LOW TEMPERATURE
OPERATION
3.5 EMPTYING THE TANK
3.6 FILTER MAINTENANCE
3.7 TRANSPORTING THE
DEHUMIDIFIER
3.8 ROUTINE MAINTENANCE
3.9 CLEANING THE
DEHUMIDIFIER
3.10 STORING THE
DEHUMIDIFIER
ELECTRICAL DIAGRAM
SPECIFICATIONS
TROUBLE SHOOTING
SOMMAIRE
1 GENERALITES
1.1 INFORMATIONS
GENERALES
1.2 SYMBOLOGIE
1.2.1 Pictogrammes rédactionnels
1.2.2 Pictogrammes concernant
la sécurité
1.3 IDENTIFICATION DES
COMPOSANTS PRINCIPAUX
1.4 COMPOSANTS FOURNIS
1.5 DESCRIPTION DU
FONCTIONNEMENT
1.5.1 AQUARIA
1.5.2 AQUARIA THERMO
1.6 MISES EN GARDE
2 INSTALLATION
2.1 RACCORDEMENT
ÉLECTRIQUE
2.2 PANNE DE COURANT
3 UTILISATION ET
ENTRETIEN
3.1 TABLEAU DE COMMANDE
3.2 SÉLECTION DES
FONCTIONS
3.2.1 Stand-by
3.2.2 Sélection mode de
fonctionnement
(AQUARIA)
3.2.3 Sélection mode de
fonctionnement
(AQUARIA THERMO)
3.2.4 Affichage de la température
et de l'humidité ambiante
3.3 FONCTIONNEMENT EN
VIDANGE CONTINUE
3.4 FONCTIONNEMENT À
BASSE TEMPÉRATURE
3.5 VIDAGE DU BIDON
3.6 ENTRETIEN DES
FILTRES
3.7 TRANSPORT DU
DÉSHUMIDIFICATEUR
3.8 ENTRETIEN PÉRIODIQUE
3.9 NETTOYAGE DU
DÉSHUMIDIFICATEUR
3.10 RANGEMENT DU
DÉSHUMIDIFICATEUR
SCHÉMA ÉLECTRIQUE
DONNEES TECHNIQUES
ANOMALIES POSSIBLES
INHALTSVERZEICHNIS
1 ALLGEMEINES
1.1 ALLGEMEINE
INFORMATIONEN
1.2 BILDSYMBOLE
1.2.1 Bildsymbole
1.2.2 Bildsymbole zur Sicherheit
1.3 BEZEICHNUNG DER
WICHTIGSTEN TEILE
1.4 MITGELIEFERTE
KOMPONENTEN
1.5 BESCHREIBUNG DER
FUNKTIONEN
1.5.1 AQUARIA
1.5.2 AQUARIA THERMO
1.6 WICHTIGE HINWEISE
2 INSTALLATION
2.1 STROMANSCHLUSS
2.2 STROMAUSFALL
3 GEBRAUCH UND
INSTANDHALTUNG
3.1 BEDIENTEIL
3.2 ANWAHL DER
FUNKTIONEN
3.2.1 Stand-by
3.2.2 Wahl der Funktionsweise
(AQUARIA)
3.2.3 Wahl der Funktionsweise
(AQUARIA THERMO)
3.2.4 Anzeige der
Raumtemperatur und -
feuchtigkeit
3.3 FUNKTIONSWEISE MIT
KONTINUIERLICHEM
KONDENSWASSERABLASS
3.4 BETRIEB BEI NIEDRIGER
TEMPERATUR
3.5 AUSLEEREN DES
BEHÄLTERS
3.6 WARTUNG DER FILTER
3.7 TRANSPORT DES
ENTFEUCHTERS
3.8 REGELMÄßIGE
WARTUNG
3.9 REINIGUNG DES
ENTFEUCHTERS
3.10 ABSTELLEN DES
ENTFEUCHTERS
ELEKTROSCHALTPLAN
TECHNISCHEN DATEN
KLEINE STÖRUNGEN SELBST
BEHEBEN
La pagina sta caricando ...

GB
F
D
4
I
GENERALITÁ
INFORMAZIONI GENERALI
Desideriamo innanzitutto ringraziarVi
per aver deciso di accordare la vostra
preferenza ad un apparecchio di
nostra produzione.
Questo documento è riservato ai
termini di legge con divieto di ripro-
duzione o di trasmissione a terzi
senza esplicita autorizzazione della
ditta costruttrice.
Leggere attentamente il presente ma-
nuale prima di procedere con qualsiasi
operazione (installazione, manutenzio-
ne, uso) ed attenersi scrupolosamen-
te a quanto descritto nei
singoli capitoli.
Conservare con cura questo libretto
per ogni ulteriore consultazione.
Dopo aver tolto l’imballaggio assicurar-
si dell’integrità dell’apparecchio; gli
elementi dell’imballaggio non devono
essere lasciati alla portata dei bambini
in quanto potenziali fonti di pericolo.
LA DITTA COSTRUTTRICE NON SI AS-
SUME RESPONSABILITÀ PER DANNI
A PERSONE O COSE DERIVANTI DAL-
LA MANCATA OSSERVANZA DELLE
NORME CONTENUTE NEL PRESENTE
LIBRETTO.
La ditta costruttrice si riserva il diritto
di apportare modifiche in qualsiasi
momento ai propri modelli, fermo
restando le caratteristiche essenziali
descritte nel presente manuale.
Durante il montaggio, e ad ogni ope-
razione di manutenzione, è
necessario osservare le precauzioni
citate nel presente manuale, e sulle
etichette apposte all’interno degli
apparecchi, nonché adottare ogni
precauzione suggerita dal
comune buonsenso e dalle Normative
di Sicurezza vigenti nel luogo d’in-
stallazione.
GENERAL INFORMATION
GENERAL INFORMATION
We wish to thank you, first of all, for
purchasing an air-conditioner produced
by our company.
This document is restricted in use to
the terms of the law and may not be
copied or transferred to third parties
without the express authorization of
the manufacturer.
Read this manual carefully before
performing any operation (installation,
maintenance, use) and follow the
instructions contained in each chapter.
Keep the manual carefully for future
reference.
After removing the packaging, check
that the appliance is in perfect
condition.
The packaging materials must not be
left within reach of children as they can
be dangerous.
THE MANUFACTURER IS NOT
RESPONSIBLE FOR DAMAGES TO
PERSONS OR PROPERTY CAUSED
BY FAILURE TO FOLLOW THE
INSTRUCTIONS IN THIS MANUAL.
The manufacturer reserves the right
to make any changes it deems
advisable to its models, although the
essential features described in this
manual remain the same.
During installation and maintenance,
respect the precautions indicated in
the manual, and on the labels applied
inside the units, as well as all the
precautions suggested by good
sense and by the safety regulations
in effect in your country.
GENERALITES
INFORMATIONS GENERALES
Nous désirons avant tout vous remercier
pour avoir accordé la préférence à un
climatiseur de notre production.
Document réservé aux termes de la
loi avec interdiction de reproduction
ou de transmission à tiers sans
l’autorisation expresse de le
fabricant.
Lire attentivement le présent manuel
avant de procéder à toute opération
(installation, entretien, utilisation) et
suivre scrupuleusement ce qui est
décrit dans chacun des chapitres.
Conserver soigneusement le présent
livret pour toute consultation
ultérieure. Après avoir retiré
l’emballage, s’assurer que l’appareil
est en parfait état.
Les éléments de l’emballage ne doivent
pas être laissés à portée des enfants
pour qui ils représentent des sources
potentielles de danger.
LE FABRICANT DECLINE TOUTE
RESPONSABILITE EN CAS DE
DOMMAGES AUX PERSONNES OU
AUX BIENS DERIVANT DU NON-
RESPECT DES NORMES
CONTENUES DANS LE PRESENT
LIVRET.
Le fabricant se réserve le droit
d’apporter à tout moment des
modifications à ces modèles, tout en
conservant les caractéristiques
essentielles décrites dans le présent
manuel.
Lors du montage, et à chaque
opération d’entretien, il faut observer
les précautions citées dans le présent
manuel et sur les étiquettes mises à
l’intérieur des appareils, ainsi
qu’adopter toute les précautions
suggérées par le bon sens commun
et par les Normes de Sécurité en
vigueur sur le lieu de l’installation.
ALLGEMEINES
ALLGEMEINE
INFORMATIONEN
Zunächst möchten wir Ihnen danken,
dass Sie sich für eine Klimaanlage aus
unserer Produktion entschieden haben.
Laut Gesetz ist dies ein vertrauliches
Dokument, daher gilt das Verbot der
Vervielfältigung oder Übermittlung an
Dritte ohne ausdrückliche
Genehmigung die Herstellerfirma.
Bevor Sie mit einer Tätigkeit beginnen
(Installation, Instandhaltung,
Gebrauch), lesen Sie aufmerksam das
vorliegende Benutzerhandbuch und
halten Sie sich strengstens an die in
den einzelnen Kapiteln dargelegten
Anweisungen.
Bewahren Sie das Handbuch sorgfältig
auf, damit Sie es bei Bedarf stets zur
Hand haben. Überprüfen Sie das Gerät
nach dem Auspacken auf
einwandfreien Zustand.
Die Verpackungsrückstände nie in
Reichweite von Kindern lassen, da sie
für diese eine Gefahrenquelle
darstellen.
DIE HERSTELLERFIRMA ÜBERNIMMT
KEINERLEI VERANTWORTUNG FÜR
SCHÄDEN AN PERSONEN ODER
SACHEN, DIE DURCH
NICHTBEACHTUNG DER IM
VORLIEGENDEN
BENUTZERHANDBUCH
ENTHALTENEN
SICHERHEITSVORSCHRIFTEN
ENTSTEHEN.
Die Herstellerfirma behält sich das
Recht vor, an ihren Modellen jederzeit
Veränderungen vorzunehmen, wobei
die wesentlichen im vorliegenden
Benutzerhandbuch beschriebenen
Geräteeigenschaften unverändert
bleiben.
Während der Montage
und bei sämtlichen
Instandhaltungstätigkeiten müssen
die Vorsichtsmaßnahmen
eingehalten werden, die in diesem
Benutzerhandbuch und auf den
Schildern im Innern der Geräte
angeführt sind; außerdem müssen
sämtliche Vorsichtsmaßnahmen
ergriffen werden, die der gesunde
Menschenverstand gebietet und die
durch die am Installationsort
geltenden Sicherheitsbestimmungen
vorgeschrieben sind.
1
1.1
La pagina sta caricando ...

GB
F
D
6
I
SIMBOLOGIA
I pittogrammi riportati nel presente
capitolo consentono di fornire
rapidamente ed in modo univoco in-
formazioni necessarie alla corretta
utilizzazione della macchina in condi-
zioni di sicurezza.
Pittogrammi redazionali
Service
• Contrassegna situazioni nelle
quali si deve informare il SERVICE
aziendale interno:
SERVIZIO ASSISTENZA
TECNICA CLIENTI.
Indice
• I paragrafi preceduti da questo
simbolo contengono informazioni
e prescrizioni molto importanti,
particolarmente per quanto riguar-
da la sicurezza.
Il mancato rispetto può comportare:
• pericolo per l'incolumità degli ope-
ratori
• perdita della garanzia contrattua-
le
• declinazione di responsabilità da
parte della ditta costruttrice.
Mano alzata
• Contrassegna azioni che non si
devono assolutamente fare.
Pittogrammi relativi alla
sicurezza
Tensione elettrica pericolosa
• Segnala al personale interessato
che l'operazione descritta
presenta, se non effettuata nel ri-
spetto delle normative di
sicurezza, il rischio di subire uno
shock elettrico.
Pericolo generico
• Segnala al personale interessato
che l'operazione descritta
presenta, se non effettuata nel ri-
spetto delle normative di
sicurezza, il rischio di subire
danni fisici.
Pericolo di forte calore
• Segnala al personale interessato
che l'operazione descritta presen-
ta, se non effettuata nel rispetto
delle normative di sicurezza, il ri-
schio di subire bruciature per con-
tatto con componenti con elevata
temperatura.
IMPORTANTE!
Per prevenire ogni rischio di
folgorazione è indispensabile
togliere l’alimentazione elettrica
prima di effettuare collegamenti elet-
trici ed ogni operazione di
manutenzione sugli apparecchi.
SYMBOLS
The pictograms in the next chapter
provide the necessary information
for correct, safe use of the machine
in a rapid, unmistakable way.
Editorial pictograms
Service
• Refers to situations in which you
should inform the SERVICE
department in the company:
CUSTOMER TECHNICAL
SERVICE.
Index
• Paragraphs marked with this
symbol contain very important
information and
recommendations, particularly as
regards safety.
Failure to comply with them may
result in:
• danger of injury to the operators
• loss of the warranty
• refusal of liability by the
manufacturer.
Raised hand
• Refers to actions that absolutely
must not be performed.
Safety pictograms
Danger of high voltage
• Signals to the personnel that the
operation described could
cause electrocution if not
performed according to the safety
rules.
Generic danger
• Signals to the personnel that the
operation described could
cause physical injury if not
performed according to the safety
rules.
Danger due to heat
• Signals to the personnel that the
operation described could
cause burns if not performed
according to the safety rules.
IMPORTANT!
To prevent any risk of electrocution,
always disconnect the electric power
supply before performing electrical
connections and any service
operation on the appliances.
1
1.2
1.2.1
SYMBOLOGIE
Les pictogrammes reportés au
chapitre suivant permettent de fournir
rapidement et de manière univoque
les informations nécessaires pour
une utilisation correcte de la machine
dans des conditions de sécurité.
Pictogrammes rédactionnels
Service
• Indique des situations où il faut
informer le SERVICE interne de
la société:
SERVICE APRES-VENTE
CLIENTS.
Index
• Les paragraphes précédés par ce
symbole contiennent des
informations et des prescriptions
très importantes, notamment pour
ce qui concerne la sécurité.
Le non-respect peut comporter:
• danger pour la sécurité des
opérateurs.
• perte de la garantie du contrat.
• dégagement de la responsabilité
du fabricant.
Main levée
• Indique les actions qu’il ne faut
absolument pas accomplir.
Pictogrammes concernant
la sécurité
Tension électrique dangereuse
• Signale au personnel concerné que
l’opération décrite présente, si elle
n’est pas effectuée conformément
aux normes de sécurité, le risque
de provoquer une décharge
électrique.
Danger général
• Signale au personnel concerné que
l’opération décrite présente, si elle
n’est pas effectuée conformément
aux normes de sécurité, le risque
de provoquer des dommages
physiques.
Danger de température élevée
• Signale au personnel concerné que
l’opération décrite présente, si elle
n’est pas effectuée conformément
aux normes de sécurité, le risque
de provoquer des brûlures par
contact avec des composants à
température élevée.
MPORTANT!
Afin d'éviter tout risque
d'électrocution, il est indispensable
de couper le courant électrique avant
d'effectuer des branchements
électriques et toute opération
d'entretien sur les appareils.
BILDSYMBOLE
Die im folgenden Kapitel aufgeführten
Bildsymbole liefern schnell und
eindeutig Informationen zum
korrekten und sicheren Gebrauch des
Gerätes.
Bildsymbole
Kundendienst
- Kennzeichnet Situationen, in
denen der interne
KUNDENDIENST der Firma zu
benachrichtigen ist:
KUNDENDIENST
Inhaltsverzeichnis
- Die Paragrafen, denen dieses
Symbol vorausgeht, enthalten
sehr wichtige Informationen und
Vorschriften, insbesondere
bezüglich der Sicherheit.
Die Nichtbeachtung dieser
Informationen und Vorschriften kann
dazu führen, dass:
• die Unversehrtheit des
Personals an den Geräten
gefährdet ist
• die vertragliche Garantie verfällt
• die Herstellerfirma jede
Verantwortung ablehnt.
Erhobene Hand
• Kennzeichnet Handlungen, die
absolut verboten sind.
Bildsymbole zur Sicherheit
Gefährliche elektrische Spannung
• Zeigt dem betreffenden
Personal an, dass bei der
beschriebenen Tätigkeit die
Gefahr eines elektrischen Schlags
besteht, wenn diese nicht unter
Beachtung der
Sicherheitsvorschriften
durchgeführt wird.
Allgemeine Gefahr
• Zeigt dem betreffenden
Personal an, dass bei
der beschriebenen Tätigkeit
Verletzungsgefahr besteht, wenn
diese nicht unter
Beachtung der
Sicherheitsvorschriften
durchgeführt wird.
Gefahr durch starke Hitze
• Zeigt dem betreffenden
Personal an, dass bei der
beschriebenen Tätigkeit
Verbrennungsgefahr durch
Berührung heißer Geräteteile
besteht, wenn diese nicht
unter Beachtunder
Sicherheitsvorschriften
durchgeführt wird.
WICHTIG!
Um das Risiko eines Stromschlags
zu vermeiden, muss die
Stromversorgung vor der
Durchführung elektrischer
Anschlüsse und vor jeder
Wartungsarbeit am Gerät abgetrennt
werden.
1.2.2
La pagina sta caricando ...

GB
F
D
8
I
1
1.3
1
Rendere note a tutto il personale in-
teressato al trasporto ed all’installa-
zione della macchina le presenti istru-
zioni.
SMALTIMENTO
Il simbolo sul prodotto o sulla
confezione indica che il prodotto non
deve essere considerato come un
normale rifiuto domestico, ma deve
essere portato nel punto di raccolta
appropriato per il riciclaggio di
apparecchiature elettriche ed
elettroniche.
Provvedendo a smaltire questo
prodotto in modo appropriato, si
contribuisce a evitare potenziali
conseguenze negative per l’ambien-
te e per la salute, che potrebbero
derivare da uno smaltimento
inadeguato del prodotto.
Per informazioni più dettagliate sul
riciclaggio di questo prodotto,
contattare l’ufficio comunale, il
servizio locale di smaltimento rifiuti
o il negozio in cui è stato acquistato
il prodotto.
Questa disposizione è valida
solamente negli Stati membri dell’UE.
IDENTIFICAZIONE DELLE
PARTI PRINCIPALI (fig. 1)
1) Pannello comandi
2) Filtro dell’aria
3) Tanica raccolta condensa
4) Maniglia di spostamento
5) Griglia uscita aria
6) Portello tanica raccogli
condensa
7) Avvolgicavo
8) Griglia aspirazione aria
COMPONENTI A CORREDO
(fig. 2)
1) Tubo scarico condensa
2) Fascetta fermatubo
3) N. 3 filtri addizionali
4) Manuale Uso Manutenzione +
garanzia
The following instructions must be
made known to all personnel involved
in the machine’s transport and
installation.
DISPOSAL
This symbol on the product or its
packaging indicates that the appliance
cannot be treated as normal domestic
trash, but must be handed in at a
collection point for recycling electric
and electronic appliances.
Your contribution to the correct
disposal of this product protects the
environment and the health of your
fellow men. Health and the
environment are endangered by
incorrect disposal.
Further information about the
recycling of this product can be
obtained from your local town hall,
your refuse collection service, or in
the store at which you bought the
product.
This regulation is valid only in EU
member states.
IDENTIFICATION OF MAIN
COMPONENTS (fig. 1)
1) Control panel
2) Air filter
3) Condensate collection tank
4) Handle for moving
5) Air outlet grill
6) Condensation collection tank
door
7) Cable winder
8) Air intake grill
COMPONENTS PROVIDED
(fig. 2)
1) Condensation discharge hose
2) Hose collar clamp
3) 3 x additional filters
4) Use & Maintenance Manual +
guarantee
Communiquer ces instructions à tout
le personnel concerné par le transport
et l’installation de la machine.
ELIMINATION
Ce symbole apposé sur le produit ou
son emballage indique que ce produit
ne doit pas être jeté au titre des
ordures ménagères normales, mais
doit être remis à un centre de collecte
pour le recyclage des appareils
électriques et électroniques.
En contribuant à une élimination
correcte de ce produit, vous protégez
l'environnement et la santé d'autrui.
L'environnement et la santé sont mis
en danger par une élimination
incorrecte du produit.
Pour toutes informations
complémentaires concernant le
recyclage de ce produit, adressez-
vous à votre municipalité, votre service
des ordures ou au magasin où vous
avez acheté le produit.
Cette consigne n'est valable que pour
les états membres de l'UE.
IDENTIFICATION DES
COMPOSANTS PRINCIPAUX
(fig. 1)
1) Tableau de commande
2) Filtre à air
3)
Bidon de recueil de condensation
4)
Poignée pour le déplacement
5) Grille de sortie air
6) Portillon bidon de récupération
des condensats
7) Enrouleur de câble
8) Grille d'aspiration d'air
COMPOSANTS FOURNIS
(fig. 2)
1) Tube d'évacuation des
condensats
2) Collier serre-tube
3) 3 filtres supplémentaires
4) Manuel d'utilisation et d'entretien
+ garantie
Das für den Transport und für die
Maschineninstallation zuständige
Personal ist von diesen Anweisungen
in Kenntnis zu setzen.
ENTSORGUNG
Dieses Symbol auf dem Produkt oder
seiner Verpackung weist darauf hin,
dass dieses Produkt nicht als normaler
Haushaltsabfall zu behandeln ist,
sondern an einem Sammelpunkt für
das Recycling von elektrischen und
elektronischen Geräten abgegeben
werden muss.
Durch Ihren Beitrag zum korrekten
Entsorgen dieses Produktes
schützen Sie die Umwelt und die
Gesundheit Ihrer Mitmenschen.
Umwelt und Gesundheit werden durch
falsches Entsorgen gefährdet.
Weitere Informationen über das
Recycling dieses Produktes erhalten
Sie von Ihrem Rathaus, Ihrer
Müllabfuhr oder dem Geschäft, in
dem Sie das Produkt gekauft haben.
Diese Vorschrift ist nur gültig für
Mitgliedstaaten der EU.
BEZEICHNUNG DER
WICHTIGSTEN TEILE (abb. 1)
1) Bedientafel
2) Luftfilter
3) Kondenswasserbehälter
4) Verschiebegriff
5) Luftauslassrost
6) Klappe
Kondenswassersammelbehälter
7) Kabelaufroller
8) Luftansaugrost
MITGELIEFERTE
KOMPONENTEN (Abb. 2)
1) Kondenswasserabflussrohr
2) Rohrbefestigungsschelle
3) Anz. 3 Zusatzfilter
4) Bedienungsanleitung + Garantie
1
8
3
4
2
7
6
5
1.4
La pagina sta caricando ...

GB
F
D
10
I
DESCRIZIONE DEL
FUNZIONAMENTO
L’aria umida aspirata dal ventilatore
attraversa una serpentina refrigerata
che provoca la condensazione
dell’umidità in gocce d’acqua
raccolte nella sottostante tanica. Il
suo utilizzo è consigliato in tutti gli
ambienti dove esistono problemi di
umidità eccessiva come ad esempio
cucine, bagni, lavanderie, taverne,
cantine, ecc.
AQUARIA
Tramite il tasto “MODE” potete
selezionare due diversi modi di
funzionamento in base alle vostre
necessità:
• PURIFICAZIONE
• DEUMIDIFICAZIONE
AQUARIA THERMO
Tramite il tasto “MODE” potete
selezionare quattro diversi modi di
funzionamento in base alle vostre
necessità:
• PURIFICAZIONE
• DEUMIDIFICAZIONE
• DEUMIDIFICAZIONE
AUTOMATICA
• DEUMIDIFICAZIONE +
RISCALDAMENTO
AVVERTENZE
• Per impedire danneggiamenti
al compressore, quest’ultimo viene
attivato con un ritardo, rispetto al suo
ultimo spegnimento, di 3 minuti.
• Questo apparecchio dovrà
essere destinato solo all’uso
per il quale è stato espressa-
mente concepito, e cioè per
deumidificare gli ambienti
dove viene installato e asciu-
gare il bucato. Ogni altro uso
è da considerarsi improprio e
quindi pericoloso.
Il costruttore non può essere
considerato responsabile per
eventuali danni derivanti da
usi impropri, erronei ed
irragionevoli.
1.5.1
1.5.2
1
OPERATING DESCRIPTION
Humid air sucked in by the fan
passes through a cooled coil. This
causes the humidity to condense into
water droplets, which are collected
in the tank below. The appliance is
suitable for use in any area which
has problems of excessive humidity,
e.g. kitchens, laundries, cellars, etc.
AQUARIA
Through the "MODE" key you can
select two different operating modes
according to your requirements:
• AIR CLEANING
• DEHUMIDIFICATION
AQUARIA THERMO
Through the "MODE" key you can
select four different operating modes
according to your own requirements:
• AIR CLEANING
• DEHUMIDIFICATION
• AUTOMATIC
DEHUMIDIFICATION
• DEHUMIDIFICATION +
HEATING
WARNINGS
• To prevent damages to the
compressor, the latter is activated
with a delay of 3 minutes after its last
switching off.
• This appliance must be used
solely for the specific purpose
for which it was designed, i.e.
for dehumidifying rooms in
which it is installed. All other
uses are to be considered
inappropriate and therefore
dangerous. The manufacturer
will not be held responsible for
personal injury or damage to
property caused by
inappropriate, incorrect or
unreasonable use.
1.6
DESCRIPTION DU
FONCTIONNEMENT
L’air humide aspiré par le ventilateur,
traverse un serpentin réfrigérant qui
provoque la condensation de l’humi-
dité en gouttes d’eau recueillies dans
un bidon situé au-dessous. Son utili-
sation est conseillée dans toutes les
pièces sujettes à des problèmes d’hu-
midité excessive telles que les
cuisines, les salles de bains, les buan-
deries, les tavernes, les caves, etc..
AQUARIA
Grâce à la touche "MODE" vous
pouvez sélectionner deux différents
modes de fonctionnement selon vos
besoins:
• PURIFICATION
• DÉSHUMIDIFICATION
AQUARIA THERMO
Grâce à la touche "MODE" vous
pouvez sélectionner quatre
différents modes de fonctionnement
selon vos besoins:
• PURIFICATION
• DÉSHUMIDIFICATION
• DÉSHUMIDIFICATION
AUTOMATIQUE
• DÉSHUMIDIFICATION +
CHAUFFAGE
MISES EN GARDE
• Pour éviter de l'endommager, le
compresseur est activé avec un
retard de 3 minutes, par rapport à
son dernier arrêt.
• Cet appareil ne doit être
destiné qu’au seul usage pour
lequel il a été conçu, à savoir
la déshumidification des
pièces dans lesquelles il est
installé. Tout autre usage est
considéré comme impropre et
donc dan-gereux. Le
constructeur ne peut être tenu
responsable des éventuels
dégâts provoqués par un
usage impropre, erroné ou
déraisonnable.
BESCHREIBUNG DER
FUNKTIONEN
Die zu entfeuchtende Luft wird vom
Ventilator angesaugt. Dabei wird sie
in einem Wärmeaustauscher soweit
abgekühlt, daß ein Teil der in ihr ent-
haltenen Feuchtigkeit kondensiert
(Taupunktunterschreitung).
Das Kondenswasser tropft dann in
den darunterstehenden Behälter ab.
Der Einsatz dieses Gerätes ist in all
jenen Räumen empfohlen, in
denen der Feuchtigkeitsgehalt über
den Normwerten liegt, wie zum Bei-
spiel Küchen, Badezimmern, Gast-
stätten, Waschräumen, Kellern etc..
AQUARIA
Über die Taste "MODE" können Sie
zwei unterschiedliche
Funktionsweisen je nach Bedarf
wählen:
• LUFTREINIGUNG
• ENTFEUCHTEN
AQUARIA THERMO
Über die Taste "MODE" können Sie
vier unterschiedliche
Funktionsweisen je nach Bedarf
wählen:
• LUFTREINIGUNG
• ENTFEUCHTEN
• AUTOMATISCH
ENTFEUCHTEN
• ENTFEUCHTEN + HEIZEN
WICHTIGE HINWEISE
• Um den Verdichter zu schonen bzw.
nicht zu beschädigen, wird dieser mit
einer Verzögerung von 3 Minuten
nach dem letzten Ausschalten in
Betrieb gesetzt.
• Dieses Gerät dient
ausschließlich zum Ent-
feuchten von Räumen. Jeder
andere Einsatz ist
bestimmungswidrig und
daher gefährlich. Der
Hersteller haftet nicht für
Folgeschäden, die durch
unsachgemäße, falsche und
unangemessene Ver-
wendung entstehen können.
1.5

EPNL
11
GR
1
1.6
DESCRIPCIÓN DEL
FUNCIONAMIENTO
El aire húmedo aspirado por el
ventilador atraviesa un serpentín
refrigerado que provoca la conden-
sación de la humedad en gotas de
agua recogidas en el recipiente
inferior. Se aconseja su utilización
en todos los ambientes donde
existan problemas de humedad
excesiva, como por ejemplo
cocinas, baños, lavanderías,
tabernas, bodegas, etc.
AQUARIA
Mediante la tecla "MODE" se pueden
seleccionar dos modos distintos de
funcionamiento en base a las
necesidades:
• PURIFICACIÓN
• DESHUMIDIFICACIÓN
AQUARIA THERMO
Mediante la tecla "MODE" se pueden
seleccionar cuatro modos distintos
de funcionamiento en base a las
necesidades:
• PURIFICACIÓN
• DESHUMIDIFICACIÓN
• DESHUMIDIFICACIÓN
AUTOMÁTICA
• DESHUMIDIFICACIÓN +
CALEFACCIÓN
ADVERTENCIAS
• Para evitar averías en el compresor,
el mismo tiene que ser activado por
lo menos después de 3 minutos de
su último apagado.
• Este aparato tiene que ser
destinado solamente al uso
para el cual ha sido
expresamente concebido, es
decir para deshumidificar los
ambientes donde se instala.
Otro empleo se considera
impropio y por tanto
peligroso. El fabricante no
podrá ser considerado
responsable por eventuales
daños derivados de usos
inadecuados, erróneos e
irrazonables.
BESCHRIJVING VAN DE
WERKING
De door de ventilator via een
gekoelde spiraal aangezogen
vochtige lucht veroorzaakt de
condensatie van het vocht in
waterdruppels die worden
opgevangen in de bak eronder. Het
gebruik ervan wordt aanbevolen voor
alle ruimten met
vochtigheidsproblemen, zoals
keukens, badkamers, washokken,
tavernes, kelders, enz.
AQUARIA
Met de "MODE" toets kunt u
afhankelijk van de behoefte uit twee
verschillende werkingsstanden
kiezen:
• ZUIVEREN
• ONTVOCHTIGEN
AQUARIA THERMO
Met de "MODE" toets kunt u
afhankelijk van de behoefte uit vier
verschillende werkingsstanden
kiezen:
• ZUIVEREN
• ONTVOCHTIGEN
• AUTOMATISCH
ONTVOCHTIGEN
• ONTVOCHTIGEN +
VERWARMEN
BELANGRIJKE AANWIJZINGEN
• Om beschadigingen van de
compressor te voorkomen wordt
deze laatste met een vertraging van
3 minuten ten opzichte van de
laatste uitschakeling ervan
geactiveerd.
• Dit apparaat mag uitsluitend
gebruikt worden voor het doel
waarvoor het apparaat
uitdrukkelijk bestemd is, d.w.z.
het ontvochtigen van de
ruimten waarin het apparaat
geïnstalleerd wordt. Elk ander
gebruik dient als ongeschikt en
dus als gevaarlijk beschouwd
te worden. De fabrikant kan op
geen enkele wijze
aansprakelijk gesteld worden
voor eventueel persoonlijk
letsel of materiële schade die
veroorzaakt is door
ongeschikt, onjuist of
onredelijk gebruik.
DESCRIÇÃO DO
FUNCIONAMENTO
O ar húmido aspirado pelo ventilador
atravessa uma serpentina refrigerada
que provoca a condensação da
humidade em gotas de água que se
recolhem no recipiente posto em
baixo. O seu uso é aconselhado para
todos os ambientes onde existem
problemas de humidade excessiva
como por exemplo cozinhas, casas
de banho, lavanderias, cantinas, etc.
AQUARIA
Mediante a tecla "MODE" é possível
seleccionar duas modalidades
diferentes de funcionamento segundo
as vossas necessidades:
• PURIFICAÇÃO
• DESUMIDIFICAÇÃO
AQUARIA THERMO
Mediante a tecla "MODE" é possível
seleccionar quatro modalidades
diferentes de funcionamento
segundo as vossas necessidades:
• PURIFICAÇÃO
• DESUMIDIFICAÇÃO
• DESUMIDIFICAÇÃO
AUTOMÁTICA
• DESUMIDIFICAÇÃO +
AQUECIMENTO
ADVERTÊNCIAS
• Para impedir a danificação do
compressor, este é activado com
um atraso de 3 minutos, após a
sua última desligação.
• Este aparelho deverá ser
destinado só para o uso para o
qual foi expressamente
concebido, isto é para
desumidificar os ambientes
onde é instalado e para secar
a roupa. Qualquer outro uso
deve ser considerado
impróprio e portanto perigoso.
O construtor não se
responsabiliza por eventuais
danos causados por uso
impróprio, incorrecto ou
irracional do aparelho.
1.5.2
1.5.1
1.5
ÐÅÑÉÃÑÁÖÇ ÔÇÓ
ËÅÉÔÏÕÑÃÉÁÓ
Ï áðïññïöçìÝíïò áðü ôïí
åîáåñéóôÞñá õãñüò áÝñáò
äéáó÷ßæåé ìßá øõ÷ñÞ óåñðáíôßíá ç
ïðïßá ðñïêáëåß óõìðýêíùóç ôçò
õãñáóßáò óå óôáãüíåò íåñïý ðïõ
óõëëÝãïíôáé óôçí êÜôù äåîáìåíÞ.
Ç ÷ñÞóç óõóôÞíåôáé óå üëïõò
ôïõò ÷þñïõò üðïõ õðÜñ÷ïõí
ðñïâëÞìáôá õðåñâïëéêÞò õãñáóßáò
üðùò ð.÷. êïõæßíåò, ìðÜíéá,
ðëõíôÞñéá, ôáâÝñíåò, êáíôßíåò,
êëð.
AQUARIA
Ðáôþíôáò ôï êïõìðß “MODE”,
ìðïñåßôå íá åðéëÝîåôå äýï
äéáöïñåôéêïýò ôñüðïõò
ëåéôïõñãßáò, áíÜëïãá ìå ôéò
áðáéôÞóåéò óáò:
•
ÊÁÈÁÑÉÓÌÏÓ
• ÁÖÕÃÑÁÍÓÇ
AQUARIA THERMO
Ìå ôï ðëÞêôñï “MODE” åßíáé
äõíáôÞ ç åðéëïãÞ ôåóóÜñùí
äéáöïñåôéêþí ôñüðùí
ëåéôïõñãßáò âÜóåé
áðáéôÞóåùí:
• ÊÁÈÁÑÉÓÌÏÓ
• ÁÖÕÃÑÁÍÓÇ
• ÁÕÔÏÌÁÔÇ ÁÖÕÃÑÁÍÓÇ
• ÁÖÕÃÑÁÍÓÇ +
ÈÅÑÌÁÍÓÇ
ÐPOEIÄOÐOIHÓEIÓ
• Ãéá íá áðïöåõ÷èïýí ïé âëÜâåò óôï
óõìðéåóôÞ, ìåôÜ áðü ôï óâÞóéìï
ôçò óõóêåõÞò êáé ðñéí ôçí
åðüìåíç åðáíåêêßíçóç, ðñÝðåé íá
ðåñÜóïõí 3 ëåðôÜ.
• Ç óõóêåõÞ áõôÞ ðñÝðåé íá
÷ñçóéìïðïéåßôáé ìüíï ãéá ôï óêïðü
ðïõ ñçôÜ ó÷åäéÜóôçêå: ãéá ôçí
áöýãñáíóç ôïõ ÷þñïõ üðïõ
ôïðïèåôåßôáé êáé ãéá ôï óôÝãíùìá
ôçò ìðïõãÜäáò. ÏðïéáäÞðïôå
Üëëç ÷ñÞóç èåùñåßôáé áíÜñìïóôç
êáé óõíåðþò åðéêßíäõíç.
Ï êáôáóêåõáóôÞò äå ìðïñåß íá
èùñçèåß õðåýèõíïò ãéá ôõ÷üí
âëÜâåò ðïõ ïöåßëïíôáé óå
áíÜñìïóôç, ëáíèáóìÝíç Þ
áëüãéóôç ÷ñÞóç ôïõ ìç÷áíÞìáôïò.

GB
F
D
12
I
• In caso di guasto e/o di
cattivo funzionamento dell’ap-
parecchio, spegnerlo e non
manometterlo. Per l’eventuale
riparazione rivolgersi esclusi-
vamente ai centri di assistenza
tecnica autorizzati dal
costruttore e richiedere l’uti-
lizzo di ricambi originali. Il
mancato rispetto di quanto
sopra può compromettere la
sicurezza dell’apparecchio.
• Non permettete che l’apparec-
chio sia usato da bambini o da
incapaci, senza sorveglianza.
• Non usare prolunghe, se non
con particolare cautela, in
locali adibiti a bagno o doccia.
• Non installare l’apparecchio in
ambienti dove l’aria può
contenere gas, olio, zolfo o in
prossimità di fonti di calore.
• Non appoggiare oggetti pesanti
o caldi sopra l’apparecchio.
• Nel caso in cui si decida di non
utilizzare più un apparecchio di
questo tipo, si raccomanda di
renderlo inoperante tagliando il
cavo di alimentazione, dopo
avere staccato la spina dalla
presa di corrente. Si raccoman-
da inoltre di rendere innocue
quelle parti dell’apparecchio
suscettibili di costituire un
pericolo, specialmente per i
bambini che potrebbero
servirsi dell’apparecchio fuori
uso per i propri giochi.
ATTENZIONE !
QUESTO PRODOTTO CONTIE-
NE GAS REFRIGERANTE
ECOLOGICO R 134A CON
CARATTERISTICA DI O.D.P.=0
(POTENZIALE IMPOVERIMEN-
TO OZONO); ALLA FINE DEL
SUO UTILIZZO DEVE ESSERE
CONSEGNATO AGLI APPOSI-
TI CENTRI DI RACCOLTA:
CHIEDERE INFORMAZIONI AI
SERVIZI DI GESTIONE DELLA
NETTEZZA URBANA DEL
VOSTRO COMUNE.
Non immettere R-134A
nell'atmosfera: l'R-134A è un
gas serra fluorurato, richia-
mato nel Protocollo di Kyoto,
con un Potenziale di Riscal-
damento Globale (GWP)=
1300.
• In the even of a breakage or
malfunction of the appliance,
turn it off and do not attempt
to repair it. For repair work
contact solely the technical
service centres authorised by
the manufacturer and ask for
original spare parts to be
used. Failure to do this can
affect the safety of the
appliance.
• Do not allow the appliance to
be used by children or
disabled people without
supervision.
• Do not use extension cables
in bathrooms or showers
without taking special
precautions.
• Do not install the appliance in
areas where the air may
contain gas, oil or sulphur, or
near heat sources.
• Do not place heavy or hot
objects on top of the
appliance.
• If you no longer wish to use
this appliance, it must be
made inoperative by cutting
the power supply cable after
removing the plug from the
power socket. Hazardous
parts of the appliance must be
rendered harmless, especially
as there is a risk of children
playing with it.
WARNING!
THIS PRODUCT CONTAINS
ECOLOGICAL
REFRIGERANT GAS R 134A
WITH O.D.P. = 0 (OZONE
DEPLETION POTENTIAL). AT
THE END OF ITS SERVICE
LIFE IT MUST BE DELIVERED
TO THE SPECIAL
COLLECTION CENTRES.
ASK FOR INFORMATION
FROM YOUR MUNICIPAL
WASTE DISPOSAL SERVICE.
Do not vent R-134A into
atmosphere: R-134A is a
fluorinated greenhouse
gas, covered by Kyoto
Protocol, with a Global
Warming Potential (GWP)
= 1300.
• En cas de panne et/ou de
mauvais fonctionnement de
l’appareil, l’éteindre et ne pas
tenter de le manipuler. Pour
toute réparation, s’adresser
exclusivement aux services
après-vente agréés par le
constructeur et exiger
l’utilisation de pièces de
rechange originales. Le non-
respect de ce qui précède peut
compromettre la sécurité de
l’appareil.
• Interdire l’utilisation sans
surveillance de l’appareil aux
enfants ainsi qu’aux
handicapés.
• Ne pas utiliser de rallonges,
sinon avec une prudence
particulière, dans les salles de
bains et les salles d’eau.
• Ne pas installer l’appareil dans
des pièces où l’air peut
contenir du gaz, de l’huile, du
souffre ni à proximité de
sources de chaleur.
• Ne pas appuyer d’objets lourds
ou chauds sur l’appareil.
• Si vous décidiez de ne plus
utiliser un appareil de ce type,
il est recommandé de le mettre
hors d’usage en coupant le
câble d’alimen-tation, après
avoir dé-branché la fiche de la
prise de courant. Il est en outre
recommander de rendre
inoffensives les éléments de
l’appareil susceptibles de
constituer un danger,
notamment pour les enfants,
qui pourraient se servir de
l’appareil hors d’usage pour
jouer.
ATTENTION!
CE PRODUIT CONTIENT DU GAZ
REFRIGERANT ECOLOGIQUE
R134A REPONDANT AUX
CARACTERISTIQUES DE
O.D.P.=0 (APPAUVRIS-SEMENT
POTENTIEL DE L’OZONE). AU
TERME DE SON UTILISATION,
IL DOIT ETRE REMIS AUX
CENTRES DE COLLECTE SPE-
CIALI-SES: SE RENSEIGNER AU
SERVICE DE GESTION DE LA
VOIRIE DE VOTRE COMMUNE.
Ne pas émettre de R-134A
dans l'atmosphère: le R-
134A est un gaz à effet de
serre fluoré, cité dans le
Protocole de Kyoto, avec un
Pouvoir de Réchauffement
Global (GWP) égal à 1300.
• Bei Betriebsstörungen keine
eigenmächtigen Eingriffe
vornehmen, sondern das
Gerät ausschalten. Etwaige
Reparaturen dürfen
ausschließlich von den
Vertrags-Servicezentren und
unter Verwendung von
Originalersatzteilen aus-
geführt werden. Bei
Zuwiderhandeln ist die
Betriebssicherheit des
Gerätes gefährdet.
• Das Gerät darf nicht von
Kindern oder von Personen,
die die Funktion nicht ken-
nen, ohne Beaufsichtigung
benutzt werden.
• Bei Verwendung von
Verlängerungen in Feuch-
träumen ist größte Acht-
samkeit ge- boten.
• Das Gerät nie in Räumen mit g
as-, öl- oder schwe-felhaltiger
Luft und auch nicht in der Nähe
von Wärmequellen installieren.
• Keine schweren oder heißen
Gegenstände auf das Gerät
legen.
• Bei der Entsorgung des
Gerätes das Netzkabel
durchschneiden und alle Teile
entfernen, mit denen Kinder
spielen und sich dabei
verletzen können.
ACHTUNG!
DIESES PRODUKT ENTHÄLT
UMWELTFREUNDLICHES
KÄLTEMITTEL R134A, MIT
EINEM O.D.P. = 0. ZUR
ENTSORGUNG IST ES AN DEN
GESETZLICH
VORGESEHENEN
SAMMELSTELLEN
ANZULIEFERN.
DIE DEMENTSPRECHENDEN
INFORMATIONEN KÖNNEN
BEI DER STRAßENREINIGUNG
IHRER GEMEINDE EINGEHOLT
WERDEN.
R-134A nicht in die
Atmosphäre auslassen: R-
134A ist ein im Kyoto-
Protokoll verzeichnetes
Fluorgasmit mit einem
globalem Treibhauspotential
(GWP) = 1300.
1
La pagina sta caricando ...

GB
F
D
14
I
2
INSTALLATION
Position the machine in a suitable
room. Be sure to maintain a free
space of at least 50 cm in front of
the air intake grid and make sure
that curtains or other objects do not
obstruct the airflow (fig. 3).
ELECTRICAL POWER
SUPPLY
The device is fitted with a power
supply cable and plug (Y-type
connection). Before connecting the
air conditioner ensure that:
• The voltage and frequency values
of the power supply respect those
specified on the device data plate.
• The power line is equipped with an
effective earth connection and is
correctly sized for maximum power
consumption of the air conditioner.
• The appliance is powered solely
through a socket compatible with
the plug provided.
INSTALLATION
Installer l’appareil dans une pièce
appropriée. Nous vous
recommandons de ménager un
espace libre d’au moins 50 cm sur le
devant de la grille d’aspiration de l’air
et de vous assurer en outre qu’aucun
rideau ni aucun autre objet n’obstrue
le flux d’air (fig. 3).
RACCORDEMENT
ÉLECTRIQUE
L'appareil est doté d'un cordon
d'alimentation à fiche (branchement
du type Y). Avant de brancher
l'appareil, s'assurer que :
• Les valeurs de tension et de
fréquence de l'alimentation
électrique sont conformes aux
indications figurant sur la plaque
signalétique de l'appareil.
• La ligne d'alimentation électrique
est dotée d'une mise à la terre ef-
ficace et est correctement
dimensionnée pour l'absorption
maximale de l'appareil.
• L'appareil est alimenté
exclusivement à travers une prise
compatible avec la fiche fournie.
INSTALLATION
Das Gerät in einem
zweckentsprechenden Raum
aufstellen. Frontseitig des
Luftsauggitters ist ein Freiraum von
mindestens 50 cm zu lassen, zudem
ist darauf zu achten, daß Vorhänge
oder andere Gegenstände die
Luftströmung nicht behindern (Bild 3).
STROMANSCHLUSS
Das Gerät ist mit einem Stromkabel
mit Strecker ausgestattet
(Anschluss vom Typ Y). Vor dem
Anschluss der Klimaanlage sind
folgende Bedingungen
sicherzustellen:
• Die Spannungs- und
Frequenzwerte der
Stromversorgung stehen in
Übereinstimmung mit den Angaben
auf dem Typenschild des Gerätes.
• Die Versorgungsleitung ist mit
einem wirksamen Erdschluss
ausgestattet und korrekt für die
maximale Stromaufnahme des
Klimagerätes bemessen.
• Das Gerät wird ausschließlich über
eine zum mitgelieferten Stecker
passenden Steckdose gespeist.
3
2.1
INSTALLAZIONE
Collocare l’apparecchio in un ambien-
te adeguato. Vi raccomandiamo di
mantenere uno spazio libero di alme-
no 50 cm sul fronte della griglia
aspirazione aria, assicurandovi
inoltre che tende o altri oggetti non
ostruiscano il flusso d’aria. (fig. 3).
ALLACCIAMENTO
ELETTRICO
L'apparecchio è dotato di un cavo di
alimentazione con spina (collegamen-
to di tipo Y). Prima di collegare il
climatizzatore assicurarsi che:
• I valori della tensione e frequenza
di alimentazione rispettino quanto
specificato sui dati di targa dell'ap-
parecchio.
• La linea di alimentazione sia dota-
ta di un efficace collegamento a
terra e sia correttamente
dimensionata per il massimo as-
sorbimento del climatizzatore.
• L'apparecchiatura venga alimenta-
ta esclusivamente attraverso una
presa compatibile con la spina for-
nita a corredo.

EPNL
15
GR
2
INSTALACIÓN
Colocar el aparato en el ambiente
que se desea deshumidificar. El
deshumidificador tendrá que tener
alrededor un espacio de por lo menos
50 cm. (fig. 3).
CONEXIÓN ELÉCTRICA
El aparato está dotado de un cable
de alimentación con clavija (conexión
tipo Y). Antes de conectar el
climatizador, verifique:
• Que los valores de tensión y
frecuencia de alimentación
respeten lo especificado en los
datos de placa del aparato;
• Que la línea de alimentación esté
dotada de una eficaz conexión al
suelo y esté correctamente
dimensionada para la máxima
absorción del climatizador;
• Que la maquinaria esté alimentada
exclusivamente a través de una
toma compatible, con la clavija
suministrada.
INSTALLATIE
Plaats het apparaat in een geschikte
ruimte. Wij raden aan om een vrije
ruimte van tenminste 50 cm
tegenover het luchtaanzuigrooster te
bewaren, en verzeker u er van dat
de luchtstroom niet wordt belemmerd
door gordijnen of andere zaken. (fig.
3).
ELEKTRISCHE AANSLUITING
Het apparaat is uitgerust met een
voedingskabel met stekker
(aansluiting van het type Y).
Controleer, alvorens de
klimaatregelaar aan te sluiten, of:
• De waarden van de
voedingsspanning en -frequentie
overeenstemmen met de
specificaties op het
gegevensplaatje van het apparaat.
• De voedingslijn uitgerust is met een
doeltreffende aardaansluiting en de
correcte afmetingen heeft voor de
maximumabsorptie van de
klimaatregelaar.
• Het apparaat uitsluitend gevoed
wordt via een stopcontact dat
compatibel is met de bijgeleverde
stekker.
INSTALAÇÃO
Coloque o aparelho em um ambiente
adequado. Recomendamos manter
um espaço livre de pelo menos 50
cm na frente da grelha de aspiração
do ar, controlando que cortinas e
outros objectos não obstruam o fluxo
de ar (fig. 3).
LIGAÇÃO ELÉCTRICA
O aparelho está equipado com um
cabo de alimentação com ficha
(ligação de tipo Y). Antes de ligar o
climatizador, certificar-se que:
• Os valores de tensão e de
frequência de alimentação
respeitam as especificações da
chapa de identificação do aparelho.
• A linha de alimentação tem uma
ligação eficiente à terra e está
correctamente dimensionada para
o consumo máximo do
climatizador.
• O aparelho está ligado
exclusivamente a uma tomada
compatível com a ficha fornecida
com o mesmo.
2.1
ÔÏÐÏÈÅÔÇÓÇ
ÔïðïèåôÞóáôå ôç óõóêåõÞ óôï
êáôÜëëçëï ðåñéâÜëëïí.
ÓõóôÞíïõìå íá äéáôçñçèåß Ýíáò
åëåýèåñïò ÷þñïò ôïõëÜ÷éóôïí 50
cm áðü ôçí áðïññïöçôéêÞ ó÷Üñá
ôïõ áÝñá, âåâáéùèåßôå åðßóçò üôé
ôåíôþíåôáé Þ Üëëá áíôéêåßìåíá äåí
åìðïäßæïõí ôç ñïÞ ôïõ áÝñá (åéê.
3).
ÇËÅÊÔÑÉÊÇ ÓÕÍÄÅÓÇ
Ç óõóêåõÞ åßíáé åöïäéáóìÝíç ìå
Ýíá êáëþäéï ôñïöïäüôçóçò ìå öéò
(óýíäåóç ôýðïõ Y). Ðñéí íá
óõíäÝóåôå ôï êëéìáôéóôéêü
âåâáéùèåßôå üôé:
• Ïé ôéìÝò ôçò ôÜóçò êáé
óõ÷íüôçôáò ôñïöïäïóßáò åßíáé
óýìöùíåò ìå áõôÝò ðïõ
áíáöÝñïíôáé óôá äåäïìÝíá ôçò
ðéíáêßäáò ôçò óõóêåõÞò.
• Ç ãñáììÞ ôñïöïäïóßáò äéáèÝôåé
éêáíÞ óýíäåóç ãåßùóçò êáé åßíáé
óùóôÜ äéáóôáóéïðïéçìÝíç ãéá ôç
ìÝãéóôç áðïññüöçóç ôïõ
êëéìáôéóôéêïý.
• Ç óõóêåõÞ ôñïöïäïôåßôáé
áðïêëåéóôéêÜ ìÝóù ìéáò ðñßæáò
óõìâáôÞò ìå ôï öéò ðïõ ðáñÝ÷åôáé
ìå ôïí åîïðëéóìü.

GB
F
D
16
I
AVVERTENZA
L'eventuale sostituzione del cavo di
alimentazione deve essere effettua-
ta esclusivamente dal servizio di
assistenza tecnica Olimpia Splendid
o da personale con qualifica simila-
re.
AVVERTENZA
Sulla rete di alimentazione dell'appa-
recchio deve essere previsto un ade-
guato dispositivo di disconnessione
onnipolare in conformità alle regole
di installazione nazionali. E' neces-
sario comunque verificare che l'ali-
mentazione elettrica sia provvista di
un efficace messa a terra e di ade-
guate protezioni contro sovraccari-
chi e/o cortocircuiti (si raccomanda
l'utilizzo di un fusibile ritardato di tipo
5 AT per il modello AQUARIA e 10
AT per il modello AQUARIA THERMO
o altri dispositivi con funzioni equiva-
lenti).
AVVERTENZA
L'allacciamento alla rete di alimenta-
zione deve essere effettuato a cura
dell'installatore (esclusi gli apparec-
chi mobili, per i quali non è richiesta
una installazione fissa da parte di
personale qualificato) in conformità
alle norme nazionali vigenti."
INTERRUZIONE DI CORRENTE
Se durante il funzionamento, doves-
se mancare la corrente elettrica, vie-
ne memorizzato l’ultimo modo di fun-
zionamento nel quale si trovava il
deumidificatore.
Al ritorno della corrente, l’apparec-
chio riprende a funzionare come
precedentemente impostato.
WARNING
Any replacement of the power cable
must be carried out solely by Olimpia
Splendid technical support or by
similarly qualified personnel.
WARNING
The mains power supply must be
fitted with an adequate omnipolar
disconnect switch compliant with
national installation regulations.
Check that the mains power supply
is correctly earthed and fitted with
adequate overload and short circuit
protection (it is recommended to use
a 5 AT type delayed fuse for the
AQUARIA model and 10 AT for the
AQUARIA THERMO model or
another device with equivalent
functions).
WARNING
The connection to the mains must
be made by the installer in compliance
with the national regulations in force
(excluding mobile appliances that do
not require a fixed installation by a
specialized installer).
POWER FAILURE
If there is an electrical power failure
during operation, the dehumidifier’s
last operating mode will be
memorised.
When the electric current is restored,
the device starts operating again,
following its settings.
AVERTISSEMENT
Le remplacement éventuel du
cordon d'alimentation doit être
effectué exclusivement par le
service technique Olimpia
Splendid ou par du personnel
ayant une qualification similaire.
AVERTISSEMENT
Il faut prévoir sur le réseau
d'alimentation de l'appareil un
dispositif de déconnexion
omnipolaire approprié conforme
à la réglementation d'installation
nationale. Il est nécessaire
néanmoins de s'assurer que
l'alimentation électrique est
dotée d'une mise à la terre effi-
cace et de protections
appropriées contre les
surcharges et/ou les courts-
circuits (nous conseillons
l'utilisation d'un fusible retardé
du type 5 AT pour le modèle
AQUARIA et 10 AT pour le
modèle AQUARIA THERMO ou
autres dispositifs à fonctions
équivalentes).
AVERTISSEMENT
Le branchement au réseau
d'alimentation électrique doit être
effectué par l'installateur (sauf
pour les appareils mobiles, qui
ne nécessitent pas d'installation
fixe par du personnel qualifié),
conformément à la
réglementation nationale en
vigueur.
PANNE DE COURANT
Si pendant le fonctionnement de
l’appareil, le courant vient à manquer,
le déshumi-dificateur mémorise le
dernier mode de fonctionnement
programmé.
Lorsque le courant revient, l'appareil
se remet à fonctionner comme il a
été précédemment programmé.
WARNHINWEIS
Die eventuelle Auswechselung
des Versorgungskabels ist
ausschließlich durch den
technischen Kundendienst von
Olimpia Splendid oder Perso-
nal mit entsprechender
Qualifikation auszuführen.
WARNHINWEIS
Am Stromnetz des Gerätes ist
eine geeignete allpolige
Trennvorrichtung in
Übereinstimmung mit den
nationalen Installationsregeln
vorzusehen. In jedem Fall ist
es notwendig sicherzustellen,
dass die elektrische
Stromversorgung mit einer
geeigneten Erdung und
angemessenen
Schutzvorrichtungen gegen
Überlasten und/oder
Kurzschlüsse ausgestattet ist
(es empfiehlt sich eine
verzögerte Schmelzsicherung
vom Typ 5 AT für das Modell
AQUARIA und 10 AT für das
Modell AQUARIA THERMO
oder andere Vorrichtung mit
gleichwertigen Funktionen).
WARNHINWEIS
Der Anschluss an das
Versorgungsnetz hat in
Übereinstimmung mit den
geltenden nationalen
Vorschriften durch den
Installateur zu erfolgen
(ausgenommen bewegliche
Geräte, für die keine feste
Installation durch qualifiziertes
Personal erforderlich ist).
STROMAUSFALL
Bei Stromausfall während des
Betriebes wird die Betriebsweise, auf
die der Ent- feuchter zuletzt
geschaltet war, gespeichert.
Nachdem die Stromversorgung
wieder hergestellt worden ist, setzt
sich das Gerät wie zuvor eingestellt,
wieder in Betrieb.
2.2
2.2
La pagina sta caricando ...

GB
F
D
18
I
USO E MANUTENZIONE
PANNELLO COMANDI
Il deumidificatore da Voi acquistato,
è dotato di una logica elettronica
che ne governa il funzionamento, in
modo da ottimizzare al
massimo i consumi e le prestazioni.
I tasti e le indicazioni presenti sul
pannello comandi hanno i seguenti
significati (Fig. 4 e 5):
A) Tasto Accensione / Stand - by
B) Tasto selezione modalità di
funzionamento
C) Tasto incremento umidità
D) Tasto diminuzione umidità
E) Tasto segnalazione umidità /
temperatura ambiente rilevate
F) Indicazione Temperatura
G) Indicazione Umidità
H) Deumidificazione
I) Indicazione tanica raccolta
condensa piena/assente
L) Modalità riscaldamento (solo
versione THERMO)
M) Modalità automatico (solo
versione THERMO)
N) Modalità purificazione
SELEZIONE FUNZIONI
Stand-by. Tasto (A)
Questo tasto attiva il deumidificatore
o lo pone in modalità Stand - by.
In questo ultimo caso il display
indica ' - - - - ' e il deumidificatore è
disattivato.
Per riattivare l'apparecchio è
sufficiente premere nuovamente il
tasto (A).
3.1
3.2
4
3.2.1
3
AQUARIA
H I
A B C D E
F G
USE AND
MANINTENANCE
CONTROL PANEL
The dehumidifier you have
purchased features an electronic
logic system which controls
operation and optimises
consumption and performance.
The keys and information on the
control panel have the following
meanings (Fig. 4 and 5):
A) Start / Stand-by key
B) Operating mode selection key
C) Desired humidity
D) Desired humidity
E) Detected ambient humidity /
temperature warning key
F) Temperature indication
G) Humidity indication
H) Dehumidification
I) Condensate collection tank full/
absent indication
L) Heating mode (THERMO
version only)
M) Automatic mode (THERMO
version only)
N) Purifying mode
SELECTING FUNCTIONS
Stand-by. Key (A)
This key activates the dehumidifier
or puts it in Stand-by mode.
In the latter case, the display shows
' - - - - ' and the dehumidifier is
deactivated.
To reactivate the appliance, press
the key (A).
MODE D’EMPLOI ET
ENTRETIEN
TABLEAU DE COMMANDE
Le déshumidificateur que vous avez
acheté est équipé d’une logique
électronique qui gère son
fonctionnement de manière à
optimiser au maximum sa
consommation et ses prestations.
Les touches et les indications
présentes sur le tableau de
commande ont les significations
suivantes (Fig. 4 et 5):
A) Touche de mise en marche /
Stand - by
B) Touche sélection de mode de
fonctionnement
C) Touche augmentation de
l'humidité
D) Touche diminution de l'humidité
E) Touche signalisation de l'humidité
/ température ambiante relevées
F) Indication Température
G) Indication Humidité
H) Dèshumidification
I) Indication bac de récupération de
condensat plein/absent
L) Mode chauffage (uniquement
version THERMO)
M) Mode automatique (uniquement
version THERMO)
N) Mode purification
SÉLECTION DES FONCTIONS
Stand-by. Touche (A)
Cette touche active le
déshumidificateur ou le met en mode
Stand - by.
Dans ce dernier cas, l'écran indique
' - - - - ' et le déshumidificateur est
désactivé.
Pour réactiver l'appareil, il suffit
d'appuyer de nouveau sur la touche
(A).
GEBRAUCH UND
INSTANDHALTUNG
BEDIENTEIL
Der von Ihnen erworbene
Entfeuchter ist mit einer
elektronischen Logik zur
Betriebssteuerung aus-gestattet.
Verbrauch und Leistung werden
hierdurch in höchstem Maß
optimiert.
Die Tasten und Angaben an der
Bedientafel haben folgende
Bedeutung (Abb. 4 und 5):
A) Taste Ein / Stand-by
B) Taste Anwahl der
Funktionsweise
C) Taste Zunahme Feuchtigkeit
D) Taste Abnahme Feuchtigkeit
E) Taste Feuchtigkeitsmeldung /
gemessene Raumtemperatur
F) Temperaturanzeige
G) Feuchtigkeitsanzeige
H) Entfeuchten
I) Anzeige Kondenswasserbehälter
voll/nicht vorhanden
L) Heizmodus (nur Version
THERMO)
M) Automatikmodus (nur Version
THERMO)
N) Betriebsart Reinigung
ANWAHL DER FUNKTIONEN
Stand-by. Taste (A)
Mit dieser Taste wird der
Entfeuchter entweder ein- oder auf
Stand-by geschaltet.
Im letzteren Fall wird am Display
' - - - - ' angezeigt und der
Entfeuchter deaktiviert.
Um das Gerät wieder zu aktivieren
genügt es die Taste (A) nochmals
zu drücken.
N
La pagina sta caricando ...

GB
F
D
20
I
Selezione modo di
funzionamento (AQUARIA)
Tramite il tasto (B) (figura 4), è
possibile selezionare due diversi
modi di funzionamento
dell'apparecchio:
• PURIFICAZIONE
L'attivazione di questa funzione è
indicata dal simbolo "ventilatore"
acceso sul display.
Sul display viene visualizzato
tramite l'indicatore (F) (figura 4)
la temperatura presente
nell'ambiente, mentre tramite
l'indicatore (G) (figura 4) viene
visualizzato il grado di umidità
presente nell'ambiente.
L'apparecchio funziona in modo
continuo purificando l'aria.
• DEUMIDIFICAZIONE
L'attivazione di questa funzione è
indicata dal simbolo "goccia"
acceso sul display.
E' possibile impostare il grado di
umidità desiderato nell'ambiente
in cui l'apparecchio è collocato
agendo sui tasti (C)
o (D) viene rispettivamente
incrementato o diminuito a passi
del 5% il valore di umidità
ambiente desiderato.
L'apparecchio funziona fino al
raggiungimento del valore
desiderato, quindi si spegne
automaticamente. Non appena
l'umidità relativa ambiente supera
il valore selezionato l’unità
rientra automaticamente in
funzione.
Si consiglia di impostare un valore
di umidità desiderata compreso tra
il 40% e il 60%.
Selezione modo di
funzionamento (AQUARIA
THERMO)
Tramite il tasto B (figura 5) è
possibile selezionare quattro diversi
modi di funzionamento
dell’apparecchio :
• PURIFICAZIONE
L'attivazione di questa funzione è
indicata dal simbolo "ventilatore"
acceso sul display.
Sul display viene visualizzato
tramite l'indicatore (F) (figura 4)
la temperatura presente
nell'ambiente, mentre tramite
l'indicatore (G) (figura 4) viene
visualizzato il grado di umidità
presente nell'ambiente.
L'apparecchio funziona in modo
continuo purificando l'aria.
3.2.3
3
Selecting the operating
mode (AQUARIA)
Key B (figure 4) offers you a choice
of two different appliance operating
modes:
• AIR CLEANING
The activation of this function is
indicated by the "fan" symbol lit
on the display.
Through the indicator (F) (figure
4) the current temperature is
visualised on the display, whereas
through the indicator (G) (figure
4) the current degree of humidity
is visualised. The appliance works
continuously cleaning the air.
• DEHUMIDIFICATION
The activation of this function is
indicated by the "drop" symbol lit
on the display.
It is possible to set the desired
level of humidity in the room in
which the device is positioned. By
pressing the (C) or (D) keys the
desired value of humidity in the
room is respectively increased or
decreased by 5% increments.
The unit operates until the desired
value is reached and then
switches off automatically. As
soon as the relative humidity of
the room exceeds the value
selected, the unit automatically
restarts.
It is advisable to set a desired
humidity value between 40% and
60%.
Selecting the operating
mode (AQUARIA THERMO)
Key B (figure 5) offers you a choice
of four different appliance operating
modes:
• AIR CLEANING
The activation of this function is
indicated by the "fan" symbol lit
on the display.
Through the indicator (F) (figure
4) the current temperature is
visualised on the display, whereas
through the indicator (G) (figure
4) the current degree of humidity
is visualised. The appliance works
continuously cleaning the air.
Sélection mode de
fonctionnement
(AQUARIA)
La touche B (figure 4) permet la
sélection entre deux modes de
fonctionnement de l'appareil :
• PURIFICATION
L'activation de cette fonction est
indiquée par le symbole
"ventilateur" allumé à l'écran.
La température présente dans la
pièce s'affiche à l'écran grâce à
l'indicateur (F) (figure 4), tandis
que le degré d'humidité présente
dans la pièce s'affiche grâce à
l'indicateur (G) (figure 4). L'appareil
fonctionne en mode continu en
purifiant l'air.
• DÉSHUMIDIFICATION
L'activation de cette fonction est
indiquée par le symbole "goutte"
allumé à l'écran.
Il est possible de régler le degré
d'humidité souhaité dans la pièce
dans laquelle l'appareil est installé
en agissant sur les touches (C)
ou (D), respectivement pour
augmenter ou diminuer par pas
de 5% la valeur d'humidité
ambiante souhaitée.
L'appareil fonctionne jusqu'à ce
que la valeur souhaitée soit
atteinte, puis il s'éteint
automatiquement. Dès que
l'humidité relative ambiante
dépasse la valeur sélectionnée,
l'unité se met automatiquement
en fonction.
Il est conseillé de programmer une
valeur d'humidité souhaitée
comprise entre 40% et 60%.
Sélection mode de
fonctionnement
(AQUARIA THERMO)
La touche B (figure 5) permet la
sélection entre quatre différents
modes de fonctionnement de
l’appareil :
• PURIFICATION
L'activation de cette fonction est
indiquée par le symbole
"ventilateur" allumé à l'écran.
La température présente dans la
pièce s'affiche à l'écran grâce
l'indicateur (F) (figure 4), tandis
que le degré d'humidité présente
dans la pièce s'affiche grâce
l'indicateur (G) (figure 4). L'appareil
fonctionne en mode continu en
purifiant l'air.
Wahl der Funktionsweise
(AQUARIA)
Über die Taste B (Abbildung 4)
können zwei unterschiedliche
Funktionsweisen gewählt werden:
• LUFTREINIGUNG
Die Aktivierung dieser Funktion
wird durch das Symbol "Ventilator"
gemeldet, das am Display
aufleuchtet.
Am Display wird über die Anzeige
(F) (Abbildung 4) die
Raumtemperatur und über die
Anzeige (G) (Abbildung 4) der
Feuchtigkeitsgrad im Raum
angezeigt. Das Gerät funktioniert
kontinuierlich und reinigt die Luft.
• ENTFEUCHTEN
Die Aktivierung dieser Funktion
wird durch das Symbo"Tropfen"
gemeldet, das am Display
aufleuchtet.
Es besteht die Möglichkeit, den im
Installationsraum des Geräts
gewünschten Feuchtigkeitsgrad
einzustellen. Mit Hilfe der Tasten
(C) und (D) wird der für den Raum
gewünschte Feuchtigkeitsgrad in
Schritten von 5 % erhöht
beziehungsweise erniedrigt.
Das Gerät funktioniert bis zum
Erreichen des gewünschten
Wertes und schaltet anschließend
automatisch ab. Sobald die
relative Raumfeuchtigkeit den
gewählten Wert überschreitet,
setzt sich die Einheit automatisch
wieder in Betrieb.
Wir empfehlen einen
Feuchtigkeitswert zwischen 40%
und 60% einzustellen.
Wahl der Funktionsweise
(AQUARIA THERMO)
Über die Taste B (Abbildung 5)
können vier unterschiedliche
Funktionsweisen gewählt werden:
• LUFTREINIGUNG
Die Aktivierung dieser Funktion
wird durch das Symbol "Ventilator"
gemeldet, das am Display
aufleuchtet.
Am Display wird über die Anzeige
(F) (Abbildung 4) die
Raumtemperatur und über die
Anzeige (G) (Abbildung 9) der
Feuchtigkeitsgrad im Raum
angezeigt. Das Gerät funktioniert
kontinuierlich und reinigt die Luft.
3.2.2
La pagina sta caricando ...

GB
F
D
22
I
• DEUMIDIFICAZIONE
L'attivazione di questa funzione è
indicata dal simbolo "goccia"
acceso sul display.
E' possibile impostare il grado di
umidità desiderato nell'ambiente
in cui l'apparecchio è collocato
agendo sui tasti (C)
o (D) viene rispettivamente
incrementato o diminuito a passi
del 5% il valore di umidità
ambiente desiderato.
L'apparecchio funziona fino al
raggiungimento del valore
desiderato, quindi si spegne
automaticamente. Non appena
l'umidità relativa ambiente supera
il valore selezionato l’unità
rientra automaticamente in
funzione.
Si consiglia di impostare un valore
di umidità desiderata compreso tra
il 40% e il 60%.
• DEUMIDIFICAZIONE
AUTOMATICA
L'attivazione di questa funzione è
indicata dai simboli "goccia"
e "smile" accesi
contemporaneamente sul display.
Sul display viene visualizzato
tramite l'indicatore (F) (figura 5)
la temperatura presente
nell'ambiente, mentre tramite
l'indicatore (G) (figura 5) viene
visualizzato il grado di umidità
presente nell'ambiente.
L'apparecchio funziona in modo
automatico scegliendo il valore di
umidità più confortevole in base
alla temperatura ambiente.
• DEUMIDIFICAZIONE+
RISCALDAMENTO
L'attivazione di questa funzione è
indicata dal simbolo "goccia" e
"sole" accesi
contemporaneamente sul
display.E' possibile impostare il
grado di umidità desiderato
nell'ambiente in cui l'apparecchio
è collocato. In particolare, agendo
sui tasti (C) o (D) viene
rispettivamente incrementato o
diminuito a passi del 5% il valore
di umidità ambiente desiderato; il
quale viene visualizzato sul
display tramite l'indicatore (G)
(figura 5). L'apparecchio funziona
fino al raggiungimento del valore
desiderato, quindi si spegne
automaticamente. Non appena
l'umidità relativa ambiente supera
il valore selezionato l’unità
rientra automaticamente in
funzione.
In questa modalità di
funzionamento, l’unità oltre a
deumidificare, immette aria calda
nell’ambiente.
Si consiglia di impostare un valore
di umidità desiderata compreso tra
il 40% e il 60%.
3
• DEHUMIDIFICATION
The activation of this function is
indicated by the "drop" symbol lit
on the display.
It is possible to set the desired
level of humidity in the room in
which the device is positioned. By
pressing the (C) or (D) keys the
desired value of humidity in the
room is respectively increased or
decreased by 5% increments.
The unit operates until the desired
value is reached and then
switches off automatically. As
soon as the relative humidity of
the room exceeds the value
selected, the unit automatically
restarts.
It is advisable to set a desired
humidity value between 40% and
60%.
• AUTOMATIC
DEHUMIDIFICATION
The activation of this function is
indicated by the "drop" and "smile"
symbols lit on the display at the
same time.
Through the indicator (F) (figure
5) the current temperature is
visualised on the display, whereas
through the indicator (G) (figure
5) the current degree of humidity
is visualised. The appliance works
automatically choosing the more
comfortable humidity value
according to the ambient
temperature.
• DEHUMIDIFICATION+
HEATING
The activation of this function is
indicated by the "drop" and "sun"
symbols lit on the display at the
same time. It is possible to set
the desired degree of humidity in
the environment where the
appliance is placed. In particular,
by pressing the keys (C) or (D)
the desired value of ambient
humidity is increased or decreased
respectively by steps of 5% each
time and is visualised on the
display through the indicator (G)
(figure 5). The appliance works
until it reaches the desired value,
then it switches off automatically.
As soon as the relative humidity
of the room exceeds the value
selected, the unit automatically
restarts.
In this operating mode, the unit
also releases hot air into the room
as well as dehumidifying.
It is advisable to set a desired
humidity value between 40% and
60%.
• DÉSHUMIDIFICATION
L'activation de cette fonction est
indiquée par le symbole "goutte"
allumé à l'écran.
Il est possible de régler le degré
d'humidité souhaité dans la pièce
dans laquelle l'appareil est installé
en agissant sur les touches (C)
ou (D), respectivement pour
augmenter ou diminuer par pas
de 5% la valeur d'humidité
ambiante souhaitée.
L'appareil fonctionne jusqu'à ce
que la valeur souhaitée soit
atteinte, puis il s'éteint
automatiquement. Dès que
l'humidité relative ambiante
dépasse la valeur sélectionnée,
l'unité se met automatiquement
en fonction.
Il est conseillé de programmer une
valeur d'humidité souhaitée
comprise entre 40% et 60%.
• DÉSHUMIDIFICATION
AUTOMATIQUE
L'activation de cette fonction est
indiquée par les symboles "goutte"
et "smile" allumés en même temps
à l'écran.
La température présente dans la
pièce s'affiche à l'écran grâce à
l'indicateur (F) (figure 5), tandis
que le degré d'humidité présente
dans la pièce s'affiche grâce à
l'indicateur (G) (figure 5). L'appareil
fonctionne en mode automatique
en choisissant la valeur d'humidité
la plus confortable en fonction de
la température ambiante.
• DÉSHUMIDIFICATION +
CHAUFFAGE
L'activation de cette fonction est
indiquée par le symbole "goutte"
et "soleil" allumés en même temps
à l'écran. Il est possible de
programmer le degré d'humidité
souhaité dans la pièce où
l'appareil est installé. Notamment,
en agissant sur les touches (C)
ou (D) la valeur d'humidité
ambiante souhaitée est
respectivement augmentée ou
diminuée par palier de 5%; celle-
ci s'affiche à l'écran grâce à
l'indicateur (G) (figure 5). L'appareil
fonctionne tant que la valeur
souhaitée n'est pas atteinte,
ensuite il s'éteint
automatiquement. Dès que
l'humidité relative ambiante
dépasse la valeur sélectionnée,
l'unité se met automatiquement
en fonction.
Dans ce mode de fonctionnement,
l'unité, en plus de déshumidifier,
introduit de l'air chaud dans la
pièce.
Il est conseillé de programmer une
valeur d'humidité souhaitée
comprise entre 40% et 60%.
• ENTFEUCHTEN
Die Aktivierung dieser Funktion
wird durch das Symbol "Tropfen"
gemeldet, das am Display
aufleuchtet.
Es besteht die Möglichkeit, den
im Installationsraum des Geräts
gewünschten Feuchtigkeitsgrad
einzustellen. Mit Hilfe der Tasten
(C) und (D) wird der für den Raum
gewünschte Feuchtigkeitsgrad in
Schritten von 5 % erhöht
beziehungsweise erniedrigt.
Das Gerät funktioniert bis zum
Erreichen des gewünschten
Wertes und schaltet anschließend
automatisch ab. Sobald die
relative Raumfeuchtigkeit den
gewählten Wert überschreitet,
setzt sich die Einheit automatisch
wieder in Betrieb.
Wir empfehlen einen
Feuchtigkeitswert zwischen 40%
und 60% einzustellen.
• AUTOMATISCH
ENTFEUCHTEN
Die Aktivierung dieser Funktion
wird durch die Symbole "Tropfen"
und "Smile" gemeldet, die
gleichzeitig am Display
aufleuchten.
Am Display wird über die Anzeige
(F) (Abbildung 5) die
Raumtemperatur und über die
Anzeige (G) (Abbildung 5) der
Feuchtigkeitsgrad im Raum
angezeigt. Das Gerät funktioniert
automatisch und wählt den für die
jeweilige Raumtemperatur
geeignetesten Feuchtigkeitswert.
• ENTFEUCHTEN+
HEIZEN
Die Aktivierung dieser Funktion
wird durch das Symbol "Tropfen"
gemeldet, das am Display
aufleuchtet. Der gewünschte
Feuchtigkeitsgrad kann in dem
Raum eingestellt werden in dem
das Gerät aufgestellt ist. Über die
Tasten (C) oder (D) kann der
gewünschte Feuchtigkeitsgrad im
Raum schrittweise um jeweils 5%
erhöht oder verringert werden; der
eingestellte Wert wird am Display
durch die Anzeige (G) (Abbildung
5) angezeigt. Das Gerät bleibt
solange in Betrieb bis der
gewünschte Wert erreicht worden
ist; danach schaltet es
automatisch aus. Sobald die
relative Raumfeuchtigkeit den
gewählten Wert überschreitet,
setzt sich die Einheit automatisch
wieder in Betrieb.
In dieser Betriebsart letzt die
Einheit zusätzlich zur
Entfeuchtung aus Warmluft in den
Raum.
Wir empfehlen einen
Feuchtigkeitswert zwischen 40%
und 60% einzustellen.
La pagina sta caricando ...

GB
F
D
24
I
Visualizzazione temperatu-
ra e umidità ambiente
Nelle modalità DEUMIDIFICAZIONE
e DEUMIDIFICAZIONE + RISCAL-
DAMENTO, premendo il tasto (E)
vengono visualizzati per 5 secondi e
in modo lampeggiante sul display i
valori di temperatura e umidità am-
biente rilevati dall'apparecchio.
AVVERTENZA:
Quando l’umidità relativa
scende sotto valori molto
bassi (20-25%) e comunque
tali da non giustificare il
funzionamento del deumi-
dificatore, l’apparecchio si
arresta e segnala sul
display "Hr".
Questo allarme rientra
automaticamente quando
l’umidità comincia a risalire.
Se l'allarme persiste anche
con livelli di umidità più alti,
chiamare un centro di assi-
stenza.
Anzeige der
Raumtemperatur und -
feuchtigkeit
Bei der Funktionsweise
ENTFEUCHTEN und
ENTFEUCHTEN + HEIZEN werden
die vom Gerät gemessenen Werte
der Raumtemperatur und der -
feuchtigkeit durch Drücken der Taste
(E) 5 Sekunden lang blinkend
angezeigt.
HINWEIS:
Wenn die Raumfeuchtigkeit
unter sehr niedrige Werte
(20-25%) und auf jeden Fall
auf solche Werte absinkt,
bei denen der
Entfeuchtung-sbetrieb
überflüssig ist, stoppt das
Gerät und am Display wird
"HR" ange-zeigt.
Diese Alarmmeldung wird
automatisch rückgestellt,
sobald der
Feuchtigkeisgrad wieder
ansteigt. Im Falle, daß diese
Alarm-meldung auch bei
einem höheren
Feuchtigkeitsgrad
eingeblendet bleibt, ist ein
Service-Zentrum zu Hilfe zu
ziehen.
Affichage de la
température et de
l'humidité ambiante
Dans les modes
DÉSHUMIDIFICATION et
DÉSHUMIDIFICATION +
CHAUFFAGE, en appuyant sur la
touche (E) les valeurs de température
et d'humidité ambiante relevées par
l'appareil s'affichent en clignotant
pendant 5 secondes sur l'écran.
MISE EN GARDE:
Lorsque le taux d’humidité
relative atteint des valeurs
très basses (20-25%) ou tel
de toute façon à ne pas
justifier le fonctionnement
du déshumidificateur,
l’appareil s’arrête et affiche
"Hr".
Cette alarme se rétablit
automatiquement lorsque
le taux d’humidité
commence à remonter. Si
cette alarme persiste
même avec un taux
d’humidité plus élevé,
faites intervenir le service
après vente.
3
Indication of ambient
temperature and humidity
on the display
In the DEHUMIDIFICATION and
DEHUMIDIFICATION + HEATING
modes, the ambient temperature and
humidity values detected by the
appliance are visualised flashing for
5 seconds on the display by pressing
key (E).
CAUTION:
When relative humidity
drops below very low values
(20-25%), or such that there
is no need for the
dehumidifier, the appliance
will stop and signals "Hr" on
the display.
This alarm resets itself
automatically when
humidity starts to rise. If the
alarm persists even at
higher humidity levels, call
an assistance centre.
3.2.4
La pagina sta caricando ...

GB
F
D
26
I
FUNKTIONSWEISE MIT
KONTINUIERLICHEM
KONDENSWASSERABLASS
Für den fortlaufenden Wasserablaß
aus dem Entfeuchter während des
Betriebes sind die folgenden
Arbeitsschritte auszuführen:
• Drücken Sie einmal die Klappe des
Kondenswassersammelbehälters,
um die Öffnung zu ermöglichen
(Abb. 6).
• Öffnen Sie die Klappe nach dem
Aushängen, indem Sie sie nach
außen drehen (Abb. 7).
• Ziehen Sie den Behälter vom
Gerät, indem Sie diesen
gleichzeitig vom unteren und
oberen Teil ergreifen, siehe
Abbildung (Abb. 8).
• Ziehen Sie den
Kondenswasserauslassstopfen
von der Tür (Abb. 9).
OPERATION WITH
CONTINUOUS DISCHARGE
To operate the dehumidifier with
continuous discharge, carry out the
following operations:
• Press the condensation collection
tank door once to open it (fig. 6).
• Once the door is unhooked, open
it by pulling outwards (fig. 7).
• Extract the tank of the device by
grasping it from the lower and
upper part simultaneously as
illustrated in the figure (fig. 8).
• Extract the condensation
discharge plug from the door
(fig.9).
FUNZIONAMENTO CON
SCARICO CONTINUO
Per fare funzionare il deumidificato-
re in scarico continuo eseguire le
seguenti operazioni:
• Premere una volta il portello
tanica raccolta condensa per con-
sentirne l’apertura (fig. 6).
• Una volta sganciato il
portello,aprirlo ruotandolo verso
l'esterno (fig. 7).
• Estrarre la tanica dall'apparecchio
afferrandola contemporaneamen-
te dalla parte inferiore e superio-
re come illustrato in figura (fig.
8).
• Estrarre il tappo scarico conden-
sa dal portello (fig. 9).
6
3
FONCTIONNEMENT EN
VIDANGE CONTINUE
Pour faire fonctionner le
déshumidificateur en vindange con-
tinue, effectuer les opérations
suivantes:
• Appuyer une fois sur le portillon
du bidon de récupération des
condensats pour en permettre l'ou-
verture (fig. 6).
• Une fois le portillon débloqué,
l'ouvrir en le tournant vers
l'extérieur (fig. 7).
• Enlever le bidon de l'appareil en le
saisissant simultanément par la
partie inférieure et supérieure de
la façon illustrée dans la figure
(fig. 8).
• Enlever le bouchon de purge des
condensats du portillon (fig. 9)
3.3
7
La pagina sta caricando ...

GB
F
D
28
I
• Schließen Sie den Gummischlauch
an das Fitting der
Kondenswassersammelwanne an
(im oberen Teil des
Behälterschachts Abb. 10).
• Blockieren Sie den Schlauch mit
der Metallschelle.
• Schließen Sie die Klappe und
achten Sie dabei darauf, den
Gummischlauch durch den
vorgesehenen Durchgang zu
führen (Abb. 11).
• Mit der Maschine in der Funktion
gleichzeitig 3 Sekunden lang die
Tasten (C) für Zunahme und (D)
für Abnahme drücken.
Die Aktivierung dieser Funktion
wird durch das blinkende Symbol
(I) "Behälter" gemeldet.
WARNHINWEIS: Die
Dauerauslassfunktion wird
durch das Wiedereinsetzen
des leeren Behälters
annulliert.
• Connect the rubber hose to the
connection of the condensation
collection tray (in the upper part
of the tank compartment fig. 10).
• Secure the hose to the connection
with the metal clamp.
• Close the door, ensuring to pass
the rubber hose through the
appropriate passage (fig.11).
• Simultaneously press the
increment (C) and decrement (D)
keys for three seconds, with the
machine in function
The activation of this function is
indicated by the flashing "tank"
symbol (I).
WARNING:
The continuous discharge
function is cancelled when
reinserting the empty tank.
• Collegare il tubo di gomma al
raccordo della vaschetta raccol-
ta condensa (nella parte superio-
re del vano tanica fig. 10).
• Bloccare il tubo al raccordo con
la fascetta metallica.
• Richiudere il portello,avendo cura
di far passare il tubo di gomma
attraverso il passaggio dedicato
(fig. 11).
• Con l’apparecchio in funzione
premere contemporaneamente
per tre secondi, i tasti di aumento
(C) e decremento (D).
L'attivazione di questa funzione
è indicata dal simbolo (I) "tanica"
lampeggiante.
AVVERTENZA:
La funzione di scarico con-
tinuo viene annullata
reinserendo la tanica vuo-
ta.
3
• Brancher le tube en caoutchouc
au raccord du bac de récupération
des condensats (dans la partie
supérieure du logement du bidon
fig. 10).
• Bloquer le tube au raccord au
moyen du collier en métal
• Refermer le portillon en veillant à
faire passer le tube en caoutchouc
à travers le passage prévu à cet
effet (fig. 11)
• Avec la machine dans la fonction
appuyer simultanément pendant
trois secondes sur les touches
d'augmentation (C) et de
diminution (D).
L'activation de cette fonction est
indiquée par le symbole (I) "bidon"
qui clignote.
AVERTISSEMENT:
La fonction de purge
continue se désactive
quand on remet en place le
bidon vide.
10
11
La pagina sta caricando ...

GB
F
D
30
I
3
BETRIEB BEI NIEDRIGER
TEMPERATUR
Der Entfeuchter ist auch bei sehr
niedrigen Temperaturen (bis zu
einem Mindestwert von 2 °C)
einsatzfähig. In diesem Fall sorgt
die elektronische Logik für
automatisches Abtauen.
AUSLEEREN DES
BEHÄLTERS
Wenn der Behälter voll ist, wird am
Display das Symbol (I) "Behälter"
angezeigt und das Gerät erzeugt
einige Sekunden lang ein
akustisches Signal. Der Entfeuchter
schaltet aus; um den Betrieb wieder
herzustellen, folgendermaßen
vorgehen:
• Drücken Sie die Klappe des
Kondenswassersammelbehälters
(Abb. 6)
• Öffnen Sie die Klappe nach dem
Aushängen, indem Sie sie nach
außen drehen (Abb. 7)
• Ziehen Sie das Behälter vom
Gerät, indem Sie diesen
gleichzeitig vom unteren und
oberen Teil ergreifen, siehe
Abbildung (Abb. 8).
• Leeren Sie das im Behälter
enthaltene Wasser aus.
• Stellen Sie den Behälter wieder in
seinen Schacht.
• Schließen Sie die Klappe.
WICHTIGER HINWEIS:
Kein Trinkwasser, nicht
zum Verzehr verwenden.
FONCTIONNEMENT À
BASSE TEMPÉRATURE
Le déshumidificateur peut
fonctionner également à une
température très basse (jusqu’à une
valeur minimale de 2°C). Dans un
tel cas, la logique électronique veille
à effectuer le cycle automatique de
dégivrage.
VIDAGE DU BIDON
Lorsque le bac atteint sa capacité
maximale, le symbole (I) "bidon"
apparaît à l'écran et la machine émet
un signal sonore pendant quelques
secondes. Le déshumidificateur
s'éteint et, pour rétablir le
fonctionnement, il faut effectuer les
opérations suivantes:
• Appuyer sur le portillon du bidon
de récupération des condensats
(fig. 6)
• Une fois le portillon débloqué,
l'ouvrir en le tournant vers
l'extérieur (fig. 7).
• Enlever le bidon de l'appareil en le
saisissant simultanément par la
partie inférieure et supérieure de
la façon illustrée dans la figure
(fig. 8).
• Vider l'eau présente dans le bidon
• Remettre le bidon en place dans
son logement
• Refermer le portillon
ATTENTION:
eau non potable, n’étant
pas indiquée à un usage
alimentaire
LOW TEMPERATURE
OPERATION
The dehumidifier is able to operate
at extremely low temperatures, in
which case the electronic logic
control performs an automatic
defrost cycle (up to a minimum of
2°C).
EMPTYING THE TANK
When the tank reaches its maximum
capacity, "tank" symbol (I) is shown
on the display and the machine
emits an acoustic signal for a few
seconds. The dehumidifier will then
switch off. To restore its operation,
the following operations must be
performed:
• Press the condensation collection
tank door (fig. 6).
• Once the door is unhooked, open
it by pulling outwards (fig. 7).
• Extract the tank of the device by
grasping it from the lower and
upper part simultaneously as
illustrated in the figure (fig. 8).
• Empty the water contained within
the tank.
• Reposition the tank into its
compartment.
• Close the door.
CAUTION:
non-drinkable water, do
not use with foodstuffs.
FUNZIONAMENTO A BASSA
TEMPERATURA
Il deumidificatore può funzionare
anche a temperature molto basse
(fino ad un valore minimo di 2°C).
In questi casi la logica elettronica
provvede ad eseguire il ciclo
automatico di sbrinamento.
SVUOTAMENTO TANICA
Quando la tanica raggiunge la sua
massima capacità, sul display
appare il simbolo (I) "tanica"e la
macchina emette per alcuni
secondi un segnale acustico. Il
deumidificatore si spegne e, per
ripristinarne il funzionamento, è
necessario eseguire le seguenti
operazioni:
• Premere il portello tanica raccolta
condensa (fig. 6).
• Una volta sganciato il portello,
aprirlo ruotandolo verso l'esterno
(fig. 7).
• Estrarre la tanica dall'apparecchio
afferrandola contemporaneamen-
te dalla parte inferiore e superiore
come illustrato in figura (fig. 8).
• Vuotare l'acqua contenuta nella
tanica.
• Ricollocare la tanica nel proprio
vano.
• Richiudere il portello.
ATTENZIONE:
acqua non potabile, non
utilizzare per uso alimen-
tare.
3.5
3.4

EPNL
31
GR
3
FUNCIONAMIENTO A BAJA
TEMPERATURA
El deshumidificador también puede
funcionar a temperaturas muy bajas
(hasta un valor mínimo de 2°C). En
estos casos la lógica electrónica
efectúa el ciclo automático de
descongelación.
VACIADO DEL TANQUE
Cuando el bidón alcanza su máxima
capacidad, en el display aparece el
símbolo (I) "bidón" y la máquina
emite por algunos segundos una
señal acústica. El deshumidificador
se apaga y, para restablecer el
funcionamiento, es necesario llevar
a cabo las siguientes operaciones:
• Presione la puerta del bidón
colector de condensación (Fig. 6).
• Una vez desenganchada la puerta,
ábrala girándola hacia fuera (Fig.
7).
• Extraiga el bidón del aparato
tomándolo simultáneamente por
las partes inferior y superior, tal
como se ilustra en la figura (Fig.
8).
• Vacíe el agua contenida en el
bidón.
• Vuelva a colocar el bidón en su
compartimiento.
• Cierre la puerta.
ATENCION:
agua no potable, no
utilizarla con los alimentos.
WERKING BIJ EEN LAGE
TEMPERATUUR
Het ontvochtigingsapparaat kan ook
bij zeer lage temperaturen werken
(tot een minimumwaarde van 2°C).
In deze gevallen zorgt de elektroni-
sche logica voor de uitvoering van
de automatische ontdooicyclus.
LEGEN TANK
Wanneer de opvangbak de maximale
capaciteit benadert, verschijnt op de
display het symbool (I) van "bak" en
zal de machine enkele minuten lang
een geluidssignaal laten horen. De
ontvochtiger gaat uit en om er de
werking van te herstellen moet u de
volgende handelingen uitvoeren:
• Druk één keer op het deurtje van
de jerrycan voor de
condensopvang (afb. 6).
• Is het deurtje eenmaal ontkoppeld,
open hem dan door hem naar
buiten te draaien (afb. 7).
• Trek de jerrycan uit het apparaat
door hem gelijktijdig aan onder-
en bovenkant vast te nemen, zoals
de afbeelding toont (afb. 8).
• Leeg de jerrycan door het water
weg te gieten.
• Plaats de jerrycan weer op zijn
plaats.
• Sluit het deurtje.
ATTENTIE:
Geen drinkwater, niet voor
levensmiddelen gebruiken.
3.5
FUNCIONAMENTO A
BAIXA TEMPERATURA
O desumidificador pode funcionar a
temperaturas muito baixas (até um
valor mínimo de 2°C). Nestes casos
a lógica electrónica efectua o ciclo
automático de descongelação.
ESVAZIAMENTO DO
TANQUE
Quando o tanque atinge a sua
capacidade máxima, no display
aparece o símbolo (I) "tanque"e a
máquina emite por alguns segundos
um sinal acústico. O desumidificador
desliga-se e, para restabelecer o
funcionamento, será necessário
efectuar as seguintes operações:
• Premir a portinhola da recolha de
condensação (fig. 6).
• Depois de desencaixada a
portinhola, abri-la rodando-a para
fora (fig. 7).
• Extrair o depósito do aparelho
segurando-o simultaneamente
pela parte inferior e superior, como
ilustrado na figura (fig. 8).
• Esvaziar a água do depósito
• Colocar o depósito no seu
alojamento.
• Fechar a portinhola.
ATENÇÃO:
água não potável, não
utilizar para uso alimentar.
ËÅÉÔÏÕÑÃÉÁ ÓÅ ×ÁÌÇËÇ
ÈÅÑÌÏÊÑÁÓÉÁ
Ï áöõãñáíôÞñáò ìðïñåß íá
ëåéôïõñãÞóåé êáé óå ðïëý ÷áìçëÝò
èåñìïêñáóßåò (Ýùò ôçí åëÜ÷éóôç
ôéìÞ ôùí 2°C). Ó’ áõôÝò ôéò
ðåñéðôþóåéò, ç çëåêôñïíéêÞ
ìïíÜäá åëÝã÷åé áõôüìáôá ôïí
êýêëï áðüøõîçò.
ÁÄÅÉÁÓÌÁ ÄÏ×ÅÉÏÕ
¼ôáí ôï íåñü óôï äï÷åßï öèÜóåé
óôç ìÝãéóôç óôÜèìç, óôçí ïèüíç
åìöáíßæåôáé ôï óýìâïëï “äï÷åßï”
(I) êáé ç óõóêåõÞ åêðÝìðåé, ãéá
ìåñéêÜ äåõôåñüëåðôá, Ýíáí
ðñïåéäïðïéçôéêü Þ÷ï. Ï
áöõãñáíôÞñáò óâÞíåé. Ãéá íá
áðïêáôáóôÞóåôå ôç ëåéôïõñãßá
ôïõ, ðñÝðåé íá êÜíåôå ôéò åîÞò
åíÝñãåéåò:
• ÐáôÞóôå ôç èõñßäá ôïõ äï÷åßïõ
óõëëïãÞò óõìðýêíùóçò (åéê. 6)
• Áöïý áðïóõíäåèåß ç èõñßäá,
áíïßîôå ôçí ãõñßæïíôÜò ôçí ðñïò
ôá Ýîù (åéê. 7)
• ÂãÜëôå ôï äï÷åßï áðü ôç
óõóêåõÞ ðéÜíïíôÜò ôï
ôáõôü÷ñïíá áðü ôï êÜôù êáé
åðÜíù ìÝñïò üðùò öáßíåôáé
óôçí åéêüíá (åéê. 8)
• ÁäåéÜóôå ôï íåñü ðïõ ðåñéÝ÷åôáé
ìÝóá óôï äï÷åßï.
• ÔïðïèåôÞóôå êáé ðÜëé ôï äï÷åßï
óôç èÝóç ôïõ.
• Îáíáêëåßóôå ôç èõñßäá.
ÐÑÏÓÏ×Ç:
Ìç ðüóéìï íåñü. Ìçí ôï
÷ñçóéìïðïéåßôå ãéá ëüãïõò
äéáôñïöÞò.
3.4

GB
F
D
32
I
FILTER MAINTENANCE
The filtering system is composed
of a mesh filter (fig. 13 ref. A) and a
removable frame (fig. 13 ref. B) onto
which the additional filters can be
positioned.
To dismount the filtering system:
• Press the condensation collection
tank door (fig. 6).
• Once the door is unhooked, open
it by pulling outwards (fig. 7).
• Extract the tank of the device by
grasping it from the lower and
upper part simultaneously as
illustrated in the figure (fig. 8).
• Flex the air filter by pressing the
lower tabs in order to release the
hooks.
• Keep the two tabs pressed and
withdraw the filtering system from
the machine pulling the tabs
downwards (fig. 12).
The filtering system withholds any
impurities present in the air, for this
reason it should be cleaned every
month.
Use running water to clean the mesh
filter (fig. 13 ref. A). Any additional
filters should be replaced after
approx. 500 hours of use. For
correct functioning of the filtering
system it is recommended to use
only original OLIMPIA SPLENDID
spare parts.
To remount the filtration system:
• Insert the filtering system into the
appropriate seat of the machine
and simultaneously press the
lower tabs in order to insert it into
the hooks of the air inlet grill.
• Reposition the tank in the
appropriate compartment .
• Close the door.
3
3.6
13
12
MANUTENZIONE FILTRI
Il sistema filtrante è composta da
un filtro a rete (fig. 13 rif. A) e da un
telaietto smontabile (fig. 13 rif. B)
su cui possono essere inseriti i filtri
addizionali.
Per smontare il sistema filtrante:
• Premere il portello tanica raccolta
condensa (fig. 6)
• Una volta sganciato il
portello,aprirlo ruotandolo verso
l'esterno (fig. 7)
• Estrarre la tanica dall'apparecchio
afferrandola contemporaneamen-
te dalla parte inferiore e superiore
come illustrato in figura (fig. 8)
• Flettere il filtro dell'aria premendo
le linguette inferiori in modo da
liberarlo dai ganci.
• Tenere premute le due linguette e
sfilare il sistema filtrante dalla
macchina tirando le linguette ver-
so il basso (fig. 12).
Il sistema filtrante trattiene le impu-
rità presenti nell’aria, per questo
motivo si consiglia di eseguire men-
silmente la pulizia.
Per pulire il filtro a rete (fig. 13 rif.
A) usare acqua corrente, per i filtri
addizionali è necessario procedere
alla sostituzione dopo circa 500 ore
di utilizzo. Per un corretto funziona-
mento del sistema filtrante si con-
siglia di utilizzare unicamente ricam-
bi originali OLIMPIA SPLENDID.
Per rimontare il sistema filtrante:
• Infilare il sistema filtrante nella
apposita sede nella macchina e
contemporaneamente premere le
linguette inferiori in modo da infi-
larlo nei ganci della griglia entrata
aria.
• Ricollocare la tanica nel proprio
vano
• Richiudere il portello.
B
A
ENTRETIEN DES FILTRES
Le système filtrant se compose d'un
filtre à treillis (fig. 13 rif. A) et d'un
petit châssis démontable (fig. 13 réf.
B) sur lequel il est possible d'installer
des filtres supplémentaires.
Pour démonter le système filtrant:
• Appuyer sur le portillon du bidon
de récupération des condensats
(fig. 6)
• Une fois le portillon débloqué,
l'ouvrir en le tournant vers
l'extérieur (fig. 7).
• Enlever le bidon de l'appareil en le
saisissant simultanément par la
partie inférieure et supérieure de
la façon illustrée dans la figure
(fig. 8).
• Infléchir le filtre à air en appuyant
sur les languettes inférieures de
façon à le libérer des crochets.
• Maintenir les deux languettes
enfoncées et ôter le système
filtrant de la machine en tirant les
languettes vers le bas (fig. 12).
Le système filtrant retient les
impuretés présentes dans l'air,
aussi est-il est conseillé de
procéder mensuellement au
nettoyage. Pour nettoyer le filtre à
treillis (fig. 13 réf. A) utiliser de l'eau
courante, pour les filtres
additionnels il est nécessaire de
procéder au remplacement au bout
d'environ 500 heures d'utilisation.
Pour assurer un bon fonctionnement
du système filtrant, il est conseillé
d'utiliser uniquement des pièces de
rechange originales OLIMPIA
SPLENDID.
Pour remonter le système filtrant :
• Insérer le système filtrant dans le
logement prévu à cet effet sur la
machine et, simultanément,
appuyer sur les languettes
inférieures de façon à l'insérer
dans les crochets de la grille
d'entrée de l'air.
• Remettre le bidon en place dans
son logement
• Refermer le portillon
WARTUNG DER FILTER
Das Filtriersystem besteht aus einem
Netzfilter (Abb. 13 Pos. A) und einem
abmontierbaren Rahmen (Abb. 13
Pos. B), auf dem die Zusatzfilter
eingesetzt werden können.
Zum Ausbau des Filtriersystems:
• Drücken Sie die Klappe des
Kondenswassersammelbehälters
(Abb. 6)
• Öffnen Sie die Klappe nach dem
Aushängen, indem Sie sie nach
außen drehen (Abb. 7)
• Ziehen Sie den Behälter vom
Gerät, indem Sie diesen
gleichzeitig vom unteren und
oberen Teil ergreifen, siehe
Abbildung (Abb. 8)
• Biegen Sie den Luftfilter, indem
Sie die unteren Laschen drücken,
sodass der Filter von den Haken
gelöst wird.
• Halten Sie die beiden Laschen
gedrückt und ziehen Sie das
Filtriersystem von der Maschine,
indem Sie die Laschen nach unten
ziehen (Abb. 12).
Das Filtriersystem hält die in der
Luft vorhandenen Verunreinigungen
zurück. Es empfiehlt sich daher
seine monatliche Reinigung.
Verwenden Sie zur Reinigung des
Netzfilters (Abb. 13 Pos. A)
fließendes Wasser. Für die
Zusatzfilter ist die Auswechselung
nach zirka 500 Betriebsstunden
erforderlich. Zur Gewährleistung des
Filtriersystems sollten nur
Originalersatzteile von OLIMPIA
SPLENDID verwendet werden.
Zum Wiedereinbau des
Filtriersystems:
• Führen Sie das Filtersystem in den
vorgesehenen Sitz in der Maschine
ein und drücken Sie gleichzeitig
derart die unteren Laschen, dass
es sich in die Haken des
Lufteingangsfilters fügt.
• Stellen Sie den Behälter wieder in
seinen Schacht.
• Schließen Sie die Klappe.
La pagina sta caricando ...
La pagina sta caricando ...
La pagina sta caricando ...
La pagina sta caricando ...
La pagina sta caricando ...
La pagina sta caricando ...
La pagina sta caricando ...
La pagina sta caricando ...
La pagina sta caricando ...
La pagina sta caricando ...
La pagina sta caricando ...
La pagina sta caricando ...
-
 1
1
-
 2
2
-
 3
3
-
 4
4
-
 5
5
-
 6
6
-
 7
7
-
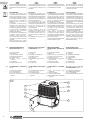 8
8
-
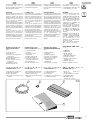 9
9
-
 10
10
-
 11
11
-
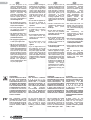 12
12
-
 13
13
-
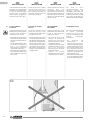 14
14
-
 15
15
-
 16
16
-
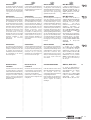 17
17
-
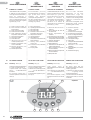 18
18
-
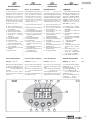 19
19
-
 20
20
-
 21
21
-
 22
22
-
 23
23
-
 24
24
-
 25
25
-
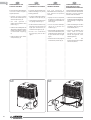 26
26
-
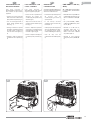 27
27
-
 28
28
-
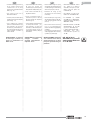 29
29
-
 30
30
-
 31
31
-
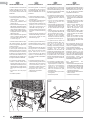 32
32
-
 33
33
-
 34
34
-
 35
35
-
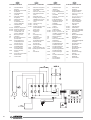 36
36
-
 37
37
-
 38
38
-
 39
39
-
 40
40
-
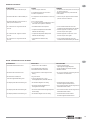 41
41
-
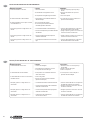 42
42
-
 43
43
-
 44
44


Olimpia Splendid AQUARIA / AQUARIA THERMO Manuale del proprietario
- Tipo
- Manuale del proprietario
- Questo manuale è adatto anche per
in altre lingue
- English: Olimpia Splendid AQUARIA / AQUARIA THERMO Owner's manual
- français: Olimpia Splendid AQUARIA / AQUARIA THERMO Le manuel du propriétaire
- español: Olimpia Splendid AQUARIA / AQUARIA THERMO El manual del propietario
- Deutsch: Olimpia Splendid AQUARIA / AQUARIA THERMO Bedienungsanleitung
- Nederlands: Olimpia Splendid AQUARIA / AQUARIA THERMO de handleiding
- português: Olimpia Splendid AQUARIA / AQUARIA THERMO Manual do proprietário
Documenti correlati
-
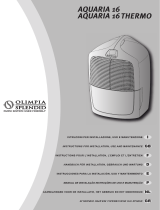 Olimpia Splendid Aquaria 16 Thermo Manuale utente
-
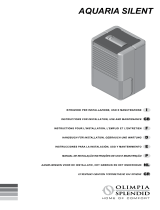 Olimpia Splendid Aquaria 16 Thermo Manuale utente
-
 Olimpia Splendid 01085 Scheda dati
-
Olimpia Splendid Aquaria Thermo 22 Manuale utente
-
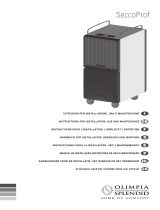 Olimpia Splendid SeccoProf 28-38 Manuale utente
-
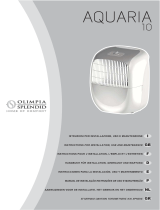 Olimpia Splendid MIA 2 7.5 Manuale utente
-
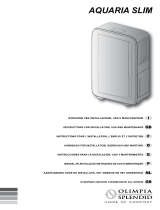 Olimpia Splendid Aquaria Slim Manuale utente
-
 Olimpia Splendid UNICO EASY Manuale utente
-
Olimpia Splendid Aquaria 18 P Manuale utente
-


Altri documenti
-
LANAFORM Dehumidifier Manuale utente
-
DeLonghi DEM8.5 Manuale del proprietario
-
Fagor DH-22 Manuale del proprietario
-
Argo DRY PURY EVO WF 17 Manuale utente
-
Metronic 480001 Manuale del proprietario
-
Master DH 26 44 62 92 Manuale del proprietario
-
-
-
-